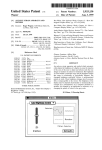
1
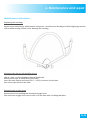
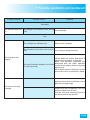
Mobi-Roll ‘N Stow
User’s Manual
187767/2
Usine du Bourisson - BP 20 - 16400 La Couronne
Tél. : +33 (0) 545 677 030 Fax : +33 (0) 545 678 160
[email protected]
www.Mobi-Mat®.com
Summary
Safety precautions
page
4
1. Assembly
page
5
a. Description
page
5
b. Assembly of Mobi-roll ‘N Stow
page
6
c. Installation of Mobi-Mat® on Mobi-roll ‘N Stow
page
9
2. Instructions for use
page 14
a. Preliminary information
page 14
b. Directions for use
page 18
3. Maintenance and cleaning
page 22
4. Transport
page 23
5. Storage
page 24
6. Maintenance and repair
page 25
Maintenance instructions
page 25
7. Possible problems encountered
page 26
2/28
Kit description 184370/2
REF.
DESIGNATION
QUANTITE
187763/2
Spool
1
187764
Flange
2
187765
Towbar
1
187766
Starting straps
2
187767/2
User manual
1
187768/2
US tools
1
187769
Roll belt
1
187770
I shape connection
2
Technical data
Net weight without Mobi-Mat® : 45 kg (99 lbs)
Dimensions : Total length : 1700 mm (5’6”)
Total width : 1700 mm (5’6”)
Total height : 550 mm (1’9”)
Maximum capacity : 50 m (164’) Mobi-Mat® A2X, width 1.53 m (5’)
Deployment or recovery : manual mode : approx. 2 minutes
vehicle mode : approx 30 seconds
People needed for deployment/recovery : manual mode : advisable 2 persons (minimum 1)
Vehicle mode : 1 person
100% of the parts are anti-corrosion treated
3/28
Safety precautions
Always observe the precautions listed in this manual.
On important slopes, only use the vehicle mode.
Always make sure that no one stands in the path of deployment and recovery.
Do not let a person aboard the vehicle pull the mat
Do not use Mobi-roll ‘N Stow to transport materiel other than Mobi-Mat®
Do not use Mobi-roll ‘N Stow to transport people
After a long period in the sunshine, metallic parts are hot and may cause burns when in contact with skin.
Do not roll more than 50m (164’) of Mobi-Mat® on Mobi-roll ‘N Stow
Do not roll Mobi-Mat® rolls wider than the width specified for Mobi-roll ‘N Stow
Mobi-roll ‘N Stow does not comply with road regulation. It is not to be used on public roads.
When tracting Mobi-roll ‘N Stow with a vehicle :
• only use the towing system
• avoid swift turns
• avoid sudden stops
• do not exceed 10 km/h (6Mph)
Do not use Mobi-roll ‘N Stow if there is a missing part (screw, pin...)
Avoid as much as possible to lay the mat on concrete or rocky surfaces.
LIMITS
Range of temperature : -20°C to + 60°C (-13°F to 140°F)
4/28
1. Assembly
a. General sketch
5/28
b. Assembling Mobi-roll ‘N Stow
1. Remove the parts from the box
2. Insert the flange A on the main shaft B (check the
assembly sketch below for assembling configuration).
B
C
A
3. Screw the top C with supplied M6 screws, using the
Allen key n° 4
4. Insert the second flange A on the opposite end of
the main shaft B (check above sketch for assembling
configuration)
5. Repeat step 3 for this end.
6/28
6. Place the handle E on the fittings of the flanges F
and fasten with the pins
F
F
7. The system is ready for use in the vehicle mode ( to
change into manual mode, see “changing mode of
use” page 14)
7/28
8. Installation of the starting straps with X connector
(Mobi-Mat® to Mobi-roll ‘N Stow main shaft)
Place the connection eyelet above the shaft thread
Insert the screw and the washer in the eyelet and
screw clockwise
Lock the screw with the Allen key supplied in the blue
storage bag
8/28
c. Installation of Mobi-Mat® on Mobi-roll ‘N
Stow
Unroll Mobi-Mat® on the ground
Position Mobi-roll ‘N Stow on the mat, approximately
5m (16’) from the end
Fold the mat back towards Mobi-roll ‘N Stow
If the mat is equipped with a “C” connection :
Connect the mat to the main shaft with the straps,
using the plastic “X” connection
9/28
Connect the “X” (strap) with the “C” (mat) and push
the X to face the screws.
The connection strap must remain flat.
Repeat with the other strap on the opposite side.
10/28
If he mat is equipped with a “X” connection :
Push the plastic connection on the strap towards the
shaft, to leave the strap end free.
Insert the strap end in the “X” connection on the mat.
11/28
Push the strap to face the screw
and repeat for the other strap
on the main shaft,
Start rolling the mat, making sure that the plastic
connection is correctly positioned on the shaft and
pull the Mobi-roll ‘N Stow until the mat is completely
rolled.
Place the roll belt B in front of the mat.
Place the Mobi-roll ‘N Stow above the belt, place the
belt around the roll and fasten the belt with the buckle.
12/28
Mobi-Mat® may be delivered in several sections. In
some cases, there may be 2 “X” connections between
2 sections.
In that case, 2 I-shaped connectors are supplied in
the storage bag.
Insert the I-shaped connector in the “X” connector on
the first mat.
Repeat on the other mat.
Push the connector to the center of the mat.
Repeat on the other side with the other I-shaped
connector.
13/28
2. Instructions for use of Mobi-roll ‘N Stow
a. Preliminary information
a-1.Changing the mode of use :
Be careful : when the handle is unlocked, it falls.
Manual mode >vehicle mode
1. Pull the trigger situated under the handle of the towing head and simultaneously lift the
handle. The handle for manual traction falls.
2. Move the manual handle backwards and lock it with the toggle levers
3. Couple the Mobi-roll ‘N Stow on the tracting vehicle.
14/28
4. Check the Mobi-roll ‘N Stow is correctly locked to the vehicle towing bar by lifting it. If it is locked, it
will stay on the coupling ball.
Vehicle mode>manual mode
1. If the Mobi-roll ‘N Stow is already coupled to a vehicle. Free the Mobi-roll ‘N Stow from
the vehicle : pull the trigger situated under the handle of the towing head and lift the handle
forward
2. Unlock the toggle levers to free the towing handle
3. Rotate the towing handle to clip the towing ball into the towing head.
4. Check that the handle is locked.
15/28
a-2.Changing Mobi-roll ‘N Stow direction
Mobi-roll ‘N Stow is a reversible system. It can either
be pushed or pulled.
To change the system direction :
Rotate the loop of the pin and remove it from its hole.
A
Repeat with the opposite pin
16/28
Pull the handle B free from the flanges C
B
C
Place the handle B of the opposite side of the Mobiroll ‘N Stow
Remove the yellow plastic caps.
Place the handle B on the fittings of the flanges F and
fasten with the pin. Fold back the pin’s loop.
Repeat on the other side
Place the yellow plastic caps on the fastening ends
on the other side of the handle
17/28
b. Preliminary information
b-1.Moving the Mobi-roll ‘N Stow to the deployment area
Reminder: Mobi-roll ‘N Stow does not comply with road regulation. It is not to be used on public roads.
Do not exceed 10 km/h (6Mph)
Moving the empty Mobi-roll ‘N Stow
Prepare the Mobi-roll ‘N Stow according to the chosen deployment mode (see change of deployment
mode p. 14)
Move the Mobi-roll ‘N Stow to the recovery site, making sure the safety rules are applied. (see safety
rules)
Moving the Mobi-roll ‘N Stow with mat
Prepare the Mobi-roll ‘N Stow according to the chosen deployment mode (see change of deployment
mode p. 14)
If the handle is on the wrong side, change the handle configuration (see changing the rolling direction
p. 16)
b-2. Ground preparation :
Before installing Mobi-Mat®, avoid disturbing the ground with vehicles. Also avoid laying Mobi-Mat® on
very uneven ground.
Determine where and in which direction the Mobi-Mat® will be laid.
Make sure the surface is long enough to deploy the mat completely, with a space for anchoring at
each end.
If possible, when there is a slope, unroll in downhill direction.
Make sure no one stand in the path of the deployment and remove obstacles which might hinder the
deployment or damage the mat.
18/28
b-3. Deployment/recovery
Manual deployment :
Place the mat in the chosen deployment direction.
Remove the belt fastened around the mat.
1 or 2 operators push the Mobi-roll ‘N Stow, walking on the Mobi-Mat® while deploying.
For safety reasons and convenience, the manual deployment is made by pushing.
However, it is also possible to deploy the mat by pulling the Mobi-roll ‘N Stow. To enable it, change the
handle direction (see changing the rolling direction p. 16)
Once the end of the mat is reached, disconnect each connector from the mat by pushing it to the end
of the plastic connector in order to free the mat.
Anchor the mat to the ground (see Mobi-Mat® Directions for use)
Secure the straps on the main shaft (see pictures below)
19/28
Deployment with a vehicle
Place the mat in the chosen deployment direction.
Remove the belt fastened around the mat and store it in the storage bag.
Since the system works in both directions, you can unroll the Mobi-Mat® either by pushing (the vehicle
moves on the deployed mat) or by pulling.
Once the end of the mat is reached, disconnect each connector from the mat by pushing it to the end
of the plastic connector in order to free the mat.
Anchor the mat to the ground (see Mobi-Mat® Directions for use)
20/28
Recovery : vehicle or manual mode
Before recovering Mobi Mat the Mobi-roll ‘N Stow, make sure that :
- The mat is not anchored to the ground
- The connectors between the Mobi-Mat® sections are aligned
- Sweep or blow sand and debris off of the Mobi-Mat
(see mounting the Mobi-Mat® on the Mobi-roll ‘N Stow p.9)
Start rolling by pulling (or pushing) the Mobi-roll ‘N Stow, making sure the plastic connector is correctly
placed on the shaft.
Continue until the mat is completely rolled.
Unroll the roll belt flat on the ground in front of the Mobi-Mat® roll.
Move the Mobi-roll ‘N Stow above the belt until the belt can be placed around the mat. Fasten it with
the buckle.
21/28
3. Maintenance and cleaning
After use, we advise to clean the Mobi-roll ‘N Stow with fresh water. Regular cleaning will enable the
stainless steel to keep its initial appearance.
With regular use, check to made sure the screws are locked at least once a month (step 3 of assembly).
22/28
4. Transport
Mobi-roll ‘N Stow does not comply with road regulation. It is not designed to be used on public roads
or over. It must be transported in an appropriate vehicle or trailer over public roads.
Make sure Mobi-roll ‘N Stow is well secured when transported over public roads by truck or trailer.
23/28
5. Storage
Before storing Mobi-roll ‘N Stow for a long period, make sure your have performed the basic regular
maintenance (see chapter maintenance and cleaning)
Mobi-roll ‘N Stow can be stored either mounted or dismantled.
Do not store Mobi-roll ‘N Stow under heavy loads.
24/28
6. Maintenance and repair
Maintenance instructions
Replacing the bushings
Remove the old bushings with hammer and punch. Insert the new bushings in their lodging by hand or
with a mallet, being careful not to damage the bushing.
Replacing the thermo retractable sleeve
With a cutter, cut the damaged sleeve lengthwise.
Remove the caps at each end of the tube.
Insert the new sleeve and heat (70°C – 158°F) to retract on the tube.
Place the caps back on the tube.
Replacing the toggle levers
Remove the rivets holding the damaged toggle lever.
Place the new toggle lever and secure it on the tube with a riveting machine.
25/28
7. Possible problems encountered
Possible problem
Possible cause
Solution
Assembly
The handles does not
fit
The flanges are mounted in the wrong
See assembly
way
Use
The roll belt are still fastened
Remove the roll belts
The handle is not in the correct posiSee change rolling direction
tion
The mat does not
deploy
Lift the Mobi-roll ‘N Stow and place it
about 2m backwards on the mat.
While one operator maintains the
deployed mat, the other operator
The mats is blocked (Mobi-roll ‘N Stow
unrolls what remains of the mat going
is under the mat)
backwards.
When deployment is finished, free the
mat and correct its position by hand.
Recover the mat and shift the end to
gain the missing lengh.
The mat is not long
enough
Deploy the mat completely, free the
mat from Mobi-roll ‘N Stow.
Pull the mat after checking that it is
not anchored to the ground.
26/28
A4 UTIL MANUEL MOBI ROLL UK déc. 11 /KB
Usine du Bourisson - BP 20 - 16400 La Couronne
Tél. : +33 (0) 545 677 030 Fax : +33 (0) 545 678 160
[email protected]
www.Mobi-Mat®.com