1
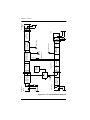
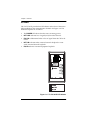
T1 CSU ACE
Part Number 1200022L2
Document Number 61200022L2-20A
October 2000
901 Explorer Boulevard
P.O. Box 140000
Huntsville, AL 35814-4000
(256) 963-8000
2000 ADTRAN, Inc.
All Rights Reserved
Printed in U.S.A.
FCC regulations require that the following information be provided in
this manual:
1.
2.
This equipment complies with Part 68 of the FCC rules. On the bottom of the equipment housing is a label that shows the FCC Registration Number and Ringer Equivalence Number (REN) for this
equipment. If requested, provide this information to the telephone
company. REN is not required for some types of analog or digital
facilities.
If this equipment causes harm to the telephone network, the telephone company may temporarily discontinue service. If possible,
advance notification is given; otherwise, notification is given as
soon as possible. The telephone company will advise the customer
of the right to file a complaint with the FCC.
3.
The telephone company may make changes in its facilities, equipment, operations or procedures that could affect the proper operation of this equipment; advance notification and the opportunity to
maintain uninterrupted service is given.
4.
If experiencing difficulty with this equipment, please contact
ADTRAN for repair and warranty information. The telephone
company may require this equipment to be disconnected from the
network until the problem is corrected, or it is certain the equipment is not malfunctioning.
5.
This unit contains no user-serviceable parts.
6.
An FCC compliant telephone cord with a modular plug is provided with this equipment. This equipment is designed to be connected to the telephone network or premises wiring using an
FCC-compatible modular jack, which is Part 68-compliant.
7.
The following information may be required when applying to the
local telephone company for leased line facilities.
Service Type
1.544 MB/S Digital Interface SF
1.544 MB/S Digital Interface ESF
1.544 MB/S Digital Interface ESF with B8ZS
8.
Digital Facility
Interface Code
04DU9-BN
04DU9-DN
04DU9-1KN
04DU9-1SN
Service
Order Code
6.0N
Network
Jacks
RJ48C
In case of equipment malfunction, all repairs must be performed
by ADTRAN or an authorized agent. It is the responsibility of
users requiring service to report the need for service to ADTRAN
or one of our authorized agents. Service can be facilitated through
our office. See the back page of this manual for address and phone
numbers.
iii
Federal Communications Commission
Radio Frequency Interference Statement
This equipment has been tested and found to comply with the limits
for a Class B digital device, pursuant to Part 15 of the FCC Rules. This
device complies with Part 15 of the FCC rules. Operation is subject to
the following two conditions:
1.
This device may not cause harmful interference,
2.
This device must accept any interference received, including
interference that may cause undesired operation.
.
No changes or modifications to this unit are allowed
unless expressly approved by the party responsible for
compliance. Modifications could void the user's authority
to operate the equipment within the FCC rules.
Canadian Emissions Requirements
This digital apparatus does not exceed the Class B limits for radio
noise emissions from digital apparatus, as set out in the interferencecausing equipment standard entitled “Digital Apparatus,” ICES-003
of the Department of Communications.
Cet appareil nuerique respecte les limites de bruits radioelectriques
applicables aux appareils numeriques de Class A prescrites dans la
norme sur le materiel brouilleur: “Appareils Numeriques,” NMB-003
edictee par le ministre des Communications.
iv
Canadian Equipment Limitations
Notice: The Canadian Industry and Science Canada label identifies certified equipment. This certification means that the equipment meets certain telecommunications network protective, operational, and safety
requirements. The Department does not guarantee the equipment will
operate to the user’s satisfaction.
Before installing this equipment, users should ensure that it is permissible to be connected to the facilities of the local telecommunications
company. The equipment must also be installed using an acceptable
method of connection. In some cases, the company’s inside wiring associated with a single line individual service may be extended by means
of a certified connector assembly (telephone extension cord). The customer should be aware that compliance with the above limitations may
not prevent degradation of service in some situations.
Repairs to certified equipment should be made by an authorized Canadian maintenance facility designated by the supplier. Any repairs or alterations made by the user to this equipment, or equipment
malfunctions, may give the telecommunications company cause to request the user to disconnect the equipment.
Users should ensure for their own protection that the
electrical ground connections of the power utility, telephone lines and internal metallic water pipe system, if
present, are connected together. This precaution may be
particularly important in rural areas.
Users should not attempt to make such connections
themselves, but should contact the appropriate electric
inspection authority, or an electrician, as needed.
The Load Number (LN) assigned to each terminal device denotes the
percentage of the total load to be connected to a telephone loop which
is used by the device, to prevent overloading. The termination on a loop
may consist of any combination of devices subject only to the requirement that the total of the Load Numbers of all devices does not exceed
100.
v
IMPORTANT SAFETY INSTRUCTIONS
When using telephone equipment, please follow these
basic safety precautions to reduce the risk of fire, electrical shock, or personal injury.
1.
Do not use this product near water, such as a bathtub, wash bowl,
kitchen sink, laundry tub, in a wet basement, or a swimming
pool.
2.
Avoid using a telephone (other than a cordless type) during an
electrical storm. There is a remote risk of shock from lightning.
3.
Do not use the telephone to report a gas leak in the vicinity of the
leak.
4.
Use only the power cord, power supply, and/or batteries indicated in the manual. Do not dispose of batteries in a fire. They
may explode. Check with local codes for special disposal instructions.
SAVE THESE INSTRUCTIONS
Warranty and Customer Service
ADTRAN will replace or repair this product within five years from
the date of shipment if it does not meet its published specifications or
fails while in service. For detailed warranty, repair, and return information refer to the ADTRAN Equipment Warranty and Repair and
Return Policy Procedure on the last page of this manual.
Return Material Authorization (RMA) is required prior to returning
equipment to ADTRAN.
For service, RMA requests, or further information, contact one of the
numbers listed on the last page of this manual.
vi
Affidavit for the Connection of Customer premises
Equipment to the 1.544 Mbps and /or Subrate Digital
Services.
For work to be performed in the certified territory of:
Telco’s Name:_______________________________________
State of: ____________________________________________
Country of: _________________________________________
I, ___________________________________, of _________________
(Name of Authorized Representative)
(Customer Name)
______________________________________, ____________________
(Customer’s Address)
(Telephone Number)
being duly sworn, state:
I have responsibility for the operation and maintenance of the terminal
equipment to be connected to__________1.544 Mbps and/or
________Subrate digital services. The terminal equipment to be connected complies with part 68 of the commissions rules except for the encoded analog content and billing protection specifications. With respect
to encoded analog content and billing protection:
•
I attest that all operations associated with the establishment, maintenance and adjustment of the digital CPE with respect to encoded
analog content and encoded billing information continuously complies with Part 68 of the FCC’s Rules and Regulations.
•
The digital CPE does not transmit digital signals containing encoded analog content or billing information which is intended to be decoded within the telecommunications network.
•
The encoded analog and billing protection is factory set and is not
under the control of the customer.
I attest that the operator(s) maintainer(s) of the digital CPE responsible
for the establishment, maintenance and adjustment of the encoded analog content and billing information has (have) been trained to perform
vii
these functions by successfully completing one of the following:
Check appropriate ones(s):
( ) A. A training course provided by the manufacturer/
grantee of the equipment used to encode analog signals; or
( ) B. A training course provided by the customer or authorized representative, using training materials and instructions provided by the manufacturer/grantee of the
equipment used to encode signals; or
( ) C. An independent training course (e.g., trade school or
technical institution) recognized by the manufacturer/
grantee of the equipment used to encode analog signals; or
( ) D. In lieu of the proceeding training requirements, the
operator(s) maintainer(s) is (are) under the control of a supervisor trained in accordance with _____________above.
I agree to provide ______________________ with proper
documentation__________________________________(Telco’s Name)
to demonstrate compliance with the information as provided in the
proceeding paragraph, if so requested.
_________________________ (Signature)
_________________________ (Title)
_________________________ (Date)
Subscribed and sworn to before me this day______, month______,
year__________.
___________________________ (Notary Public)
My commission expires: ____________________
viii
LIMITED PRODUCT WARRANTY
ADTRAN warrants that for five (5) years from the date of shipment to
Customer, all products manufactured by ADTRAN will be free from
defects in materials and workmanship. ADTRAN also warrants that
products will conform to the applicable specifications and drawings for
such products, as contained in the Product Manual or in ADTRAN's internal specifications and drawings for such products (which may or
may not be reflected in the Product Manual). This warranty only applies
if Customer gives ADTRAN written notice of defects during the warranty period. Upon such notice, ADTRAN will, at its option, either repair or replace the defective item. If ADTRAN is unable, in a reasonable
time, to repair or replace any equipment to a condition as warranted,
Customer is entitled to a full refund of the purchase price upon return
of the equipment to ADTRAN. This warranty applies only to the original purchaser and is not transferable without ADTRAN's express written permission. This warranty becomes null and void if Customer
modifies or alters the equipment in any way, other than as specifically
authorized by ADTRAN.
EXCEPT FOR THE LIMITED WARRANTY DESCRIBED ABOVE, THE
FOREGOING CONSTITUTES THE SOLE AND EXCLUSIVE REMEDY
OF THE CUSTOMER AND THE EXCLUSIVE LIABILITY OF ADTRAN
AND IS IN LIEU OF ANY AND ALL OTHER WARRANTIES (EXPRESSED OR IMPLIED). ADTRAN SPECIFICALLY DISCLAIMS ALL
OTHER WARRANTIES, INCLUDING (WITHOUT LIMITATION),
ALL WARRANTIES OF MERCHANTABILITY AND FITNESS FOR A
PARTICULAR PURPOSE. SOME STATES DO NOT ALLOW THE EXCLUSION OF IMPLIED WARRANTIES, SO THIS EXCLUSION MAY
NOT APPLY TO CUSTOMER.
In no event will ADTRAN or its suppliers be liable to Customer for any
incidental, special, punitive, exemplary or consequential damages experienced by either Customer or a third party (including, but not limited to, loss of data or information, loss of profits, or loss of use).
ADTRAN is not liable for damages for any cause whatsoever (whether
based in contract, tort, or otherwise) in excess of the amount paid for the
item. Some states do not allow the limitation or exclusion of liability for
incidental or consequential damages, so the above limitation or exclusion may not apply to Customer.
ix
x
Table of Contents
List of Figures . . . . . . . . . . . . . . . . . . . . . . . . . . . . . . . . . . . . . . . . . . xiii
List of Tables . . . . . . . . . . . . . . . . . . . . . . . . . . . . . . . . . . . . . . . . . . . . xv
Chapter 1 General . . . . . . . . . . . . . . . . . . . . . . . . . . . . . . . . . . . . .
Unit Overview . . . . . . . . . . . . . . . . . . . . . . . . . . . . . . . . . . . . . . . . . .
Power Options . . . . . . . . . . . . . . . . . . . . . . . . . . . . . . . . . . . . . . . . . .
Alarms . . . . . . . . . . . . . . . . . . . . . . . . . . . . . . . . . . . . . . . . . . . . . . . . .
Loopback . . . . . . . . . . . . . . . . . . . . . . . . . . . . . . . . . . . . . . . . . . . . . . .
Line Build Out . . . . . . . . . . . . . . . . . . . . . . . . . . . . . . . . . . . . . . . . . .
1-1
1-1
1-3
1-4
1-5
1-6
Chapter 2 Installation . . . . . . . . . . . . . . . . . . . . . . . . . . . . . . . . . . 2-1
Setting the LBO switch positions. . . . . . . . . . . . . . . . . . . . . . . . . . . 2-1
Powering the Unit . . . . . . . . . . . . . . . . . . . . . . . . . . . . . . . . . . . . . . . 2-2
Connecting to The Network and CPE. . . . . . . . . . . . . . . . . . . . . . . 2-3
Test and Monitor Access. . . . . . . . . . . . . . . . . . . . . . . . . . . . . . . . . . 2-3
Monitor Jacks . . . . . . . . . . . . . . . . . . . . . . . . . . . . . . . . . . . . . . . . . . 2-3
Break-and-Test Jacks . . . . . . . . . . . . . . . . . . . . . . . . . . . . . . . . . . . . 2-4
Wall Mounting . . . . . . . . . . . . . . . . . . . . . . . . . . . . . . . . . . . . . . . . . . 2-5
Chapter 3 Troubleshooting and Maintenance . . . . . . . . . . . . . 3-1
Troubleshooting . . . . . . . . . . . . . . . . . . . . . . . . . . . . . . . . . . . . . . . . . 3-1
Power . . . . . . . . . . . . . . . . . . . . . . . . . . . . . . . . . . . . . . . . . . . . . . . . 3-1
Network LOS . . . . . . . . . . . . . . . . . . . . . . . . . . . . . . . . . . . . . . . . . . 3-1
Equipment LOS . . . . . . . . . . . . . . . . . . . . . . . . . . . . . . . . . . . . . . . . 3-2
Maintenance . . . . . . . . . . . . . . . . . . . . . . . . . . . . . . . . . . . . . . . . . . . . 3-2
Chapter 4 Specifications . . . . . . . . . . . . . . . . . . . . . . . . . . . . . . . . 4-1
Network and Customer Interface . . . . . . . . . . . . . . . . . . . . . . . . . . 4-1
Line . . . . . . . . . . . . . . . . . . . . . . . . . . . . . . . . . . . . . . . . . . . . . . . . . . 4-1
Data Rate . . . . . . . . . . . . . . . . . . . . . . . . . . . . . . . . . . . . . . . . . . . . . . 4-1
Signal Format . . . . . . . . . . . . . . . . . . . . . . . . . . . . . . . . . . . . . . . . . . 4-1
Output Amplitude . . . . . . . . . . . . . . . . . . . . . . . . . . . . . . . . . . . . . 4-1
Connector Type . . . . . . . . . . . . . . . . . . . . . . . . . . . . . . . . . . . . . . . . 4-1
LED Indicators . . . . . . . . . . . . . . . . . . . . . . . . . . . . . . . . . . . . . . . . . . 4-1
Power . . . . . . . . . . . . . . . . . . . . . . . . . . . . . . . . . . . . . . . . . . . . . . . . 4-1
61202022L1-20A
T1 CSU ACE User Manual
xi
Table of Contents
Net LOS . . . . . . . . . . . . . . . . . . . . . . . . . . . . . . . . . . . . . . . . . . . . . . 4-1
Equip LOS . . . . . . . . . . . . . . . . . . . . . . . . . . . . . . . . . . . . . . . . . . . . 4-2
Loopback . . . . . . . . . . . . . . . . . . . . . . . . . . . . . . . . . . . . . . . . . . . . . 4-2
Power. . . . . . . . . . . . . . . . . . . . . . . . . . . . . . . . . . . . . . . . . . . . . . . . . . 4-2
Span Power . . . . . . . . . . . . . . . . . . . . . . . . . . . . . . . . . . . . . . . . . . . 4-2
Local Power . . . . . . . . . . . . . . . . . . . . . . . . . . . . . . . . . . . . . . . . . . . 4-2
Environmental . . . . . . . . . . . . . . . . . . . . . . . . . . . . . . . . . . . . . . . . . . 4-2
Temperature . . . . . . . . . . . . . . . . . . . . . . . . . . . . . . . . . . . . . . . . . . . 4-2
Relative Humidity . . . . . . . . . . . . . . . . . . . . . . . . . . . . . . . . . . . . . . 4-2
Index . . . . . . . . . . . . . . . . . . . . . . . . . . . . . . . . . . . . . . . . . . . . . . .Index-1
xii
T1 CSU ACE User Manual
61202022L1-20A
List of Figures
Figure 1-1.
Figure 1-2.
Figure 1-3.
Figure 1-4.
Figure 1-5.
Figure 1-6.
Figure 2-1.
Figure 2-2.
Figure 2-3.
T1 CSU ACE Applications. . . . . . . . . . . . . . . . . . . . . .
T1 CSU ACE Block Diagram . . . . . . . . . . . . . . . . . . . .
T1 CSU ACE Power Supply . . . . . . . . . . . . . . . . . . . .
T1 CSU ACE LED Alarms . . . . . . . . . . . . . . . . . . . . . .
T1 CSU ACE Loopback Switch and LED . . . . . . . . .
Line Build Out Switch . . . . . . . . . . . . . . . . . . . . . . . . .
Power Connection . . . . . . . . . . . . . . . . . . . . . . . . . . . .
T1 CSU ACE Bantam Jacks . . . . . . . . . . . . . . . . . . . . .
Wall Mounting . . . . . . . . . . . . . . . . . . . . . . . . . . . . . . .
61202022L1-20
T1 CSU ACE User Manual
1-1
1-2
1-3
1-4
1-5
1-6
2-2
2-4
2-5
xiii
List of Figures
xiv
T1 CSU ACE User Manual
61202022L1-20
List of Tables
Table 2-1.
Table 2-2.
Table 2-3.
Network LBO Switch Position Settings . . . . . . . . . . 2-1
Customer LBO Switch Position Settings. . . . . . . . . . 2-1
RJ48C Connector Pin Assignments . . . . . . . . . . . . . . 2-3
61202022L1-20
T1 CSU ACE User Manual
xv
List of Tables
xvi
T1 CSU ACE User Manual
61202022L1-20
Chapter 1
General
UNIT OVERVIEW
The ADTRAN T1 Channel Service Unit (CSU) Advanced Communications Equipment (ACE) provides the T1 interface between customer
premises equipment (CPE) such as channel banks, T1 multiplexers,
PBSs, etc., and the carrier network as shown in Figure 1-1. The unit
complies with Part 68 of FCC Rules and with applicable sections of
AT&T 62411, ANSI T1.102 and ANSI T1. 403.
The unit provides functions such as surge protection, signal regeneration, alarms, loopbacks necessary for circuit operation and fault isolation as illustrated in Figure 1-2 on page 1-2. The unit is transparent
to ESF or SF framing formats and AMI or B8ZS line coding.
Figure 1-1. T1 CSU ACE Applications
61200022L1-1
T1 CSU ACE User Manual
1-1
1-2
T1 CSU ACE User Manual
PWR
POWER
SUPPLY
SURGE
PROTECTION
SURGE
PROTECTION
NET OUT
NET IN
NETWORK
LBO
(0, 7.5,15, 22.5 dB)
Equipment LB
LOCAL
POWER
SENSOR
ALBO
LB
ALBO
Equipment LOS
Network LOS
LOS MONITOR &
AIS INSERTER
LOS Monitor &
AIS Inserter
MANUAL LB
LOOP CODE &
MANUAL LB
DETECTOR
LBO
EQ IN
(0-655 FEET)
EQUIPMENT
EQ OUT
Chapter 1. General
Figure 1-2. T1 CSU ACE Block Diagram
61200022L1-1
Chapter 1. General
POWER OPTIONS
The T1 CSU ACE may receive power from a local power supply located
on the customer’s premises. Local power can be supplied by the customer’s own 12 to 48-volt supply with the supplied power cable, or by the
wall-mount power supply shipped with the unit (see Figure 1-3). The
wall mount power supply is an NEC class 2 device.
See Powering the Unit on page 2-2 for details on
connecting the power to the unit.
Figure 1-3. T1 CSU ACE Power Supply
61200022L1-1
T1 CSU ACE User Manual
1-3
Chapter 1. General
ALARMS
The T1 CSU ACE provides five LED alarms on the front of the unit to
help troubleshoot the communication channel. See Figure 1-4. The
alarm descriptions are as follows:
•
The POWER LED shows that the unit is receiving power.
•
NET LOS indicates loss of signal (LOS) from the network.
•
EQ LOS is illuminated when a loss of signal from the CPE is detected.
•
NET LB indicates either a manual network loopback or a network-activated network loopback.
•
EQ LB indicates a manual equipment loopback.
Figure 1-4. T1 CSU ACE LED Alarms
1-4
T1 CSU ACE User Manual
61200022L1-1
Chapter 1. General
LOOPBACK
The T1 CSU ACE supports three types of loopbacks (LB), whereby the
unit loops the signal received from the network back to the network and
transmits an unframed all 1s pattern to the CPE. The signal received
from the CPE is ignored. The LOOPBACK LED (see Figure 1-5) will be
illuminated when either form of network loopback is in progress.
The first type of LB, manual loopback, is initiated by switching on the
MANUAL switch on the front of the unit , and will continue until it is
switched off. See Figure 1-5.
The second type of loopback, Network LB is activated by sending the
unit a 1-in-5 pattern (10000010000) from the network side for five seconds. It can be cleared by sending the 1-in-3 pattern (100100100) for five
seconds. The patterns may be Unframed or Framed (SF or ESF).
Figure 1-5. T1 CSU ACE Loopback Switch and LED
61200022L1-1
T1 CSU ACE User Manual
1-5
Chapter 1. General
LINE BUILD OUT
The five position switch on the front of T1 CSU ACE selects Line
Build Out (LBO). See Figure 1-6. Separate LBOs set the transmit levels
for the network and CPE sides of the CSU ACE. The receivers on both
sides of the CSU ACE contain Automatic Line Build Out (ALBO) circuitry to compensate for loss.
On the Network side, the amount of attenuation in decibels (dB) specified by the carrier can be selected as shown in Table 2-1 on page 2-1.
On the CPE side, the amount of attenuation is determined by the
maximum length of cable between the CSU ACE and the CPE, as
shown in Table 2-2 on page 2-1.
Figure 1-6. Line Build Out Switch
1-6
T1 CSU ACE User Manual
61200022L1-1
Installation
Chapter 2
SETTING THE LBO SWITCH POSITIONS
Network and customer LBO Switch position settings are defined in
Table 2-1 and Table 2-2.
Table 2-1. Network LBO Switch Position Settings
POSITION 1 POSITION 2
ATTENUATION
(dB)
On
On
0
On
Off
7.5
Off
On
15
Off
Off
22.5
Table 2-2. Customer LBO Switch Position Settings
POSITION 3
POSITION 4
POSITION 5
CABLE
LENGTH (feet)
Off
Off
On
0-133
On
On
Off
134-266
Off
On
Off
267-399
On
Off
Off
400-533
Off
Off
Off
534-655
61200022L1-1
T1 CSU ACE User Manual
2-1
Chapter 2. Installation
POWERING THE UNIT
The T1 CSU ACE can be line powered if line power from the carrier is
available. If the T1 CSU ACE relay detects that local power is present,
the unit will ignore the line power. If line power is used, the power cable should be disconnected from the unit. The power is received from
the transmit and receive pairs of the network side of the T1 CSU ACE.
Local power may be tapped using the power cable supplied and the
customer’s own NEC class 2 48 volt power supply. A 48 volt @ 100 mA
wall mount power supply is shipped with the unit. See Figure 2-1 for
an illustration of cable installation. Once power has been applied to
the unit, the power led will be illuminated.
10BT
10BT
To negative terminal
To positive terminal
This end plugs
into T1 CSU ACE
This end attaches
to ADTRAN or
customer’s own
48V supply
To AC ground (earth ground)
Figure 2-1. Power Connection
With the T1 CSU face up, plug the cable in with the plugoriented, as shown, above.
2-2
T1 CSU ACE User Manual
61200022L1-1
Chapter 2. Installation
CONNECTING TO THE NETWORK AND CPE
Two RJ-48C modular connectors are located on the bottom/end of the
T1 CSU ACE (see Figure 2-1 on page 2-2). Net connects the unit to the
network via the network cable. The connector marked CPE connects the
cable from the CPE to the T1 CSU ACE.
Notify the carrier before connecting the T1 CSU ACE to the carrier network. Connect the T1 CSU ACE to the network demarcation before connecting to the CPE. Connector pin assignments for the RJ-48C are listed
in Table 2-3.
Table 2-3. RJ48C Connector Pin Assignments
PIN
NET
CPE
1
R1 (Receive from Network) Transmit to DTE
2
T1
3
Not Used
Not Used
4
R (Transmit to Network)
Receive from DTE
5
T
6
Not Used
Not Used
7
Not Used
Not Used
8
Not Used
Not Used
TEST AND MONITOR ACCESS
The six Bantam jacks located on the back of the T1 CSU ACE provide test
and monitor access for the network and equipment side of the CSU
ACE. The diagram on the face of the unit shows each jack’s function, as
seen in Figure 2-2 on page 2-4.
Monitor Jacks
The first two jacks are monitor jacks which bridge the received signals,
so that the circuit can be monitored while in service. NET MON monitors
the signal received from the network. EQ MON monitors the signal received from the CPE.
61200022L1-1
T1 CSU ACE User Manual
2-3
Chapter 2. Installation
Break-and-Test Jacks
The other four jacks are break-and-test jacks and are used for out-ofservice testing. These jacks bypass the connections of the modular
jacks. NET IN and NET OUT are used to simulate the network input
and output of the T1 CSU ACE. To test the CPE, a T1 Bit Error Rate
Test (BERT) test set can be used to simulate the network. EQ IN and
EQ OUT can be used to simulate the CPE with a BERT test set, allowing the network to be tested. The T1 CSU ACE on the other end of the
circuit can be looped back to test only the network. Most BERT test
sets have the ability to send LB enable and LB clear codes.
Figure 2-2. T1 CSU ACE Bantam Jacks
2-4
T1 CSU ACE User Manual
61200022L1-1
Chapter 2. Installation
WALL MOUNTING
Two strips of Velcro are included with the unit for wall mounting. Without separating the Velcro surfaces, remove the protective paper covering from the adhesive surface on one side of each strip. On the back of
the unit, firmly place one Velcro strip on the area above the approvals
label, and one strip below the approvals label, as shown in Figure 2-3.
Remove the protective paper covering from the remaining adhesive surface. Firmly place the unit on the desired mounting surface.
VELCRO
APPROVALS
LABEL
VELCRO
Figure 2-3. Wall Mounting
61200022L1-1
T1 CSU ACE User Manual
2-5
Chapter 2. Installation
2-6
T1 CSU ACE User Manual
61200022L1-1
Chapter 3
Troubleshooting and
Maintenance
Troubleshooting guidelines and maintenance information are provided in this chapter.
TROUBLESHOOTING
Power
Condition: LED is not illuminated.
1.
If locally powered, verify the power cable installation.
2.
If line powered, verify the cable installation. Notify the carrier.
Network LOS
Condition: LED is illuminated.
1.
Verify that the cable from the network demarcation is in NET
modular jack on the bottom/end of the T1 CSU ACE.
2.
If all connections seem intact, the far end T1 CSU ACE can be
looped back (using a BERT test set to send the LB code, or using
MANUAL LB at the other end) to isolate the problem to the far
end customer premises or the network.
3.
If the problem persists after the LB has been activated, the problem appears to be within the network or the far end T1 CSU
ACE. In this case, notify the carrier.
4.
If the problem disappears after loop-up, then the cause must be
at the far end customer premises.
61202022L1-20
T1 CSU ACE User Manual
3-1
Chapter 3. Troubleshooting and Maintenance
Equipment LOS
Condition: LED is illuminated.
1.
Verify that the cable from the CPE is in the CPE modular jack on
the bottom/end of the T1 CSU ACE.
2.
If all connections seem intact, use a BERT test set in the NET IN
and NET OUT jacks to test the CPE.
MAINTENANCE
The ADTRAN T1 CSU ACE requires no routine maintenance to operate. No repairs should be performed by the customer. Repair services
can be obtained by returning the unit to the ADTRAN Customer and
Product Service (CAPS) department as instructed in the Product Support page on the back page of this manual.
3-2
T1 CSU ACE User Manual
61202022L1-20
Chapter 4
Specifications
NETWORK AND CUSTOMER INTERFACE
Line
4-Wire (T, R, T1, and R1).
Data Rate
1.544 Mbps +/-50 bps.
Signal Format
Bipolar with B8ZS transparency.
Output Amplitude
6 Volts, peak-to-peak nominal.
Connector Type
8-pin modular (RJ48C).
LED INDICATORS
Power
Power is On.
Net LOS
Loss of Signal from network.
61202022L1-20
T1 CSU ACE User Manual
4-1
Chapter 4. Specifications
Equip LOS
Loss of Signal from CPE.
Loopback
Network or manual loopback.
POWER
Span Power
60 to 140 mA at 30 volts (if line powered)
Local Power
20 to 50 mA at 48 volts
ENVIRONMENTAL
Temperature
Operating 0οC to 50οC.
Storage -20οC to 70οC.
Relative Humidity
Up to 95% (non-condensing).
4-2
T1 CSU ACE User Manual
61202022L1-20
Index
A
Alarms
LED 1-4
Automatic Line Build Out 1-6
B
M
Maintenance 3-2
Monitor Jacks 2-3
Break-and-Test Jacks 2-4
N
C
Canadian Emissions Requirements iv
Canadian Equipment Limitations v
Connecting to the network and CPE 2-3
Connector Type 4-1
Customer LBO Switch Positions 2-1
D
Data Rate 4-1
E
NET LB 1-4
NET LOS 1-4
Net LOS, LED indicator 4-1
NET MON 2-3
Network and Customer Interface, specifications 4-1
Network LBO Switch Positions 2-1
Network Loopback 1-5
Network LOS 1-4
Network LOS, problems 3-1
O
Environmental, specifications 4-2
EQ LB 1-4
EQ LOS 1-4
EQ MON 2-3
Equip LOS, LED indicator 4-2
Equipment LOS 1-4
Equipment LOS, problems 3-2
F
FCC Radio Frequency Interference Statement iv
FCC regulations iii
I
Output Amplitude 4-1
P
Power 1-4
POWER LED 1-4
power options 1-3
Power, LED indicator 4-1
Power, problems 3-1
Power, specifications 4-2
Powering the Unit 2-2
R
return material authorization (RMA) vi
installation 2-1
S
L
LBO Switch positions 2-1
LBO, line buildout 1-6
LED Indicators, specifications 4-1
limited product warranty ix
61202022L1-20
Line Build Out 1-6
Line, 4-wire 4-1
Loopback 1-5
safety instructions vi
Setting the LBO switch positions 2-1
Signal Format 4-1
Specifications 4-1
T1 CSU ACE User Manual
Index-1
Index
T
U
T1 Channel Service Unit Advanced Communications Equipment 1-1
T1 CSU ACE 1-1
Temperature, storage and operation 4-2
test and monitor access 2-3
Troubleshooting 3-1
Unit overview 1-1
61202022L1-20
W
Wall Mounting, how to 2-5
warranty and customer service vi
T1 CSU ACE User Manual
Index-2
Product Support Information
Presales Inquiries and Applications Support
Please contact your local distributor, ADTRAN Applications Engineering, or ADTRAN Sales:
Applications Engineering
(800) 615-1176
Sales
(800) 827-0807
Post-Sale Support
Please contact your local distributor first. If your local distributor cannot help, please contact ADTRAN Technical Support and have the
unit serial number available.
Technical Support
(888) 4ADTRAN
Repair and Return
If ADTRAN Technical Support determines that a repair is needed,
Technical Support will coordinate with the Customer and Product
Service (CAPS) department to issue an RMA number. For information regarding equipment currently in house or possible fees associated with repair, contact CaPS directly at the following number:
CAPS Department
(256) 963-8722
Identify the RMA number clearly on the package (below address), and
return to the following address:
ADTRAN, Inc.
CAPS Department
6767 Old Madison Pike
Progress Center
Building #6, Suite 690
Huntsville, AL 35807
RMA # _____________