1
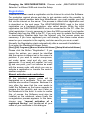
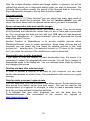
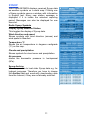
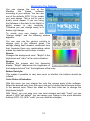
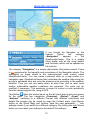
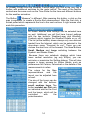
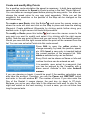
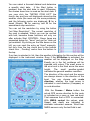
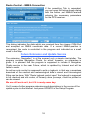
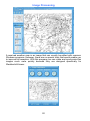
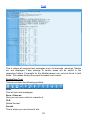
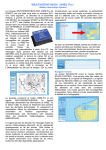
1
2
Inhalt
Program versions and dependencies ................................................................ 1
Installing WeatherInfoViewer ............................................................................. 3
Install ................................................................................................................. 4
Registration ....................................................................................................... 5
The WeatherInfoViewer ..................................................................................... 7
Weather ............................................................................................................. 7
Navigationsleiste ............................................................................................... 8
Data Layer ......................................................................................................... 8
Toolbar with TimeSlider ..................................................................................... 8
Switch from local time to UTC time .................................................................... 8
Print ................................................................................................................... 8
Speed controller and “PLAY” ............................................................................. 8
Time slider ......................................................................................................... 8
Internet Download Area ..................................................................................... 9
Time Management of the Download service...................................................... 9
Program-Update-Control ................................................................................... 9
Registry ............................................................................................................. 9
Selection for home based or mobile internet ..................................................... 9
Geographic map area for download ................................................................ 10
Deleting old data after selected days:.............................................................. 10
Data for static purposes, logbook data: ........................................................... 10
SYNOP ............................................................................................................ 11
Changing the Design ....................................................................................... 12
MeteoRouteControl ......................................................................................... 13
Images ............................................................................................................. 19
Directory and source selection ........................................................................ 19
Save and print FAX ......................................................................................... 21
Synchronize ..................................................................................................... 21
Skew correction ............................................................................................... 21
Crop image ...................................................................................................... 21
Rotate image ................................................................................................... 21
ICO RPM: ........................................................................................................ 21
Contours, Soften, Sharpen, Brightness ........................................................... 21
Undo / Redo .................................................................................................... 21
Text ................................................................................................................. 22
Symbol bar Text .............................................................................................. 22
3
Program versions and dependencies
The program "WeatherInfoViewer visualizes weather information which is
received by a WEATHERiNFOBOX from Mörer or downloaded from the
Internet. This is a special OEM development of Bonito. WeatherInfoViewer is a
viewer, a projector, which processed, sorted, classifies and visualizes the
received and loaded weather information, according to their properties in that
way, that the complexities of the Weather information’s are easily
understandable. However, it is noted that this program processes the weather
information according to modern meteorology, in highly scientifically Mesoscale
aspects. BUT! This software does not do any own statements/forecasts about
the weather situation!!! Therefore, we remind you once again to express terms
of all weather services around the world:
All weather informations are without any guarantee!!!
The WeatherInfoViewer is available in 2 Versions:
The Standard-Version, which supports the standard features of the
WEATHERINFIOBOX plus: converts the received Text messages to graphical
Animations, record and drawing Barograph diagrams and optional downloading
high resolution Weather data from MeteoServer via the Internet.
The Navigator-Version, which offers additional to the Standard Version, to
plan a Route on a map similar to a navigation map and colors the planned
route according to the weather situation
Both versions are delivered with a 14-day's trial access to the MeteoServer
Weather data via Internet. But additional both versions are offered directly with
1 year Weather data via Internet.
The Navigator- and the Internet weather data- Options can be unlocked at any
time via Internet. See the Prices for Options in the Price list or Online.
Functional dependencies:
This manual describes the full version with all options. This section also
describes things that you may not able to use because you have not purchased
these options or you do not operate the appropriate WEATHERiNFOBOX,
which receives the necessary data, which you expect to see in the
WeatherInfoViewer. For example, if you are using a WEATHERiNFOBOX with
NAVTEX receiver only, you cannot expect to see any forecasts by the German
Weather Service or receiving a series of pictures in the SYNOP and RTTY
platform. Or that Barometer Diagrams are presented, although the
WEATHERiNFOBOX has no air pressure sensor. Therefore, note the following
list of useful combinations.
1
Sensible combinations:
Not every WEATHERiNFOBOX receives NAVTEX, RTTY and SYNOP
messages. The WIBE for example is the only one which receives WeatherFax.
And not every WEATHERiNFOBOX has a built in air pressure sensor.
It may therefore seem nonsensical to operate the WeatherInfoViewer only with
a pure Navtex receiver without air pressure sensor. If you buy in such a case,
the option for Internet weather data, it is this very modern and useful. Because
the Internet can be used with any mobile phone reception and many marinas,
there is already W-LAN hotspot.
Therefore the Internet Weather data option makes sense with any combination.
With the option "Navigator", you have a simple chart plotter for your GPS. But
the MeteoRoute function is only useful if additional Internet data downloaded or
RTTY weather forecasts received by the DWD.
Which Weather Info viewer functions
are available for which WEATHERiNFOBOX?
WIBD can not read out with a computer. There is no sense in this context to
order a Weather Info Viewer.
WIB2, WIB2B, WIB2BX and WIB2D only receiving NAVTEX-Messages,
which will be displayed under TEXT
WIB1, WIB3, WIBE receiving RTTY- and SYNOP Messages,
Which will be displayed in Weather > RTTY/SYNOP and Text.
Only the WIBE can receive WeatherFax Images, which can be viewed and
improved under Images.
WIB2B, WIB2BX, WIB2D, WIB3 and WIBE, having an Air pressure sensor,
Whose values will be displayed as a Diagram under Weather.
WIB1 doesn’t receive any NAVTEX-Messages.
The Barograph option in all cases only makes sense if the has a
WEATHERiNFOBOX built in air pressure sensor. WIB1 and WIB2 have no
barograph, whose values will be displayed as a Diagram under Weather.
2
Installing WeatherInfoViewer
All prerequisite conditions are met if the WEATHERiNFOBOX (the Receiver) is
previously installed and operational on the PC. This installation guide does not
describe the installation of the software from the WEATHERiNFOBOX. It only
describes the extension of already installed software WEATHERiNFOBOX.
It is envisaged that after inserting the CD-ROM, the above setup program starts
automatically. However, it is not unusual if the setup does not start
automatically. Depending on the security level of your System the auto-start
feature on your CD ROM Drive could be turned off. In such a case you need to
start the WIV10AutoStart.exe. Start in no case the WIV10Install.exe! If you
want to start the Install Program manual please use WIV10SETUP.exe.
The problems are mostly the administration rights, which not everyone owns,
even though he is convinced that to possess. The Weather Info Viewer
requires all permissions for write, read, and the Internet. Otherwise, you must
change the user account to one which has enough rights.
3
Install
If you have your WEATHERiNFOBOX connected to the Computer und you
inserting the CD-ROM the Setup Window appear and your
WEATHERiNFOBOX model should be already selected in the
“WEATHERiNFOBOX Selection” menu. If not check the Cable connection and
choose your model manually. The Setup will show you the "CD-Key"
automatically. The "CD-Key" is pre-programmed on the CD and is absolutely
unique. This CD key unlocks the different versions of the program. The setup
will check the CD-KEY via the Internet and receives additional key codes back
from the Server. It is therefore necessary that you have your computer
connected to the Internet. Otherwise, you must register the Software manually
(see following page).
The
installation
will start when you press the Install
button. The complete contents of the CD will be copied and unpacked to your
Hard Disc Drive. After a successful installation you see the Message “copy
ready” and a icon will appear on your Windows Desktop and in the Start menu
at: [Start] [(all) Programs] [Moerer WeatherInfoViewer] You find the Entry
WeatherInfoViewer and Setup
If you should ever to reinstall or update the Software via the Internet, you don’t
have to insert the CD all the time. You can easily open the Setup.
You can easily update your WeatherInfoViewer via the Internet. If you press the
„Update“ Button, the setup will automatically download the necessary updates
and install them.
CD-Key:
Subsequently, a different CD-Key be entered manually, which was
acquired later, to extend the software version. Then must always be
reinstalled, and then a new update from the Internet.
A different CD-Key can be entered manually, which later was acquired to
extend the software version. After that you must always reinstalling the
Software by pressing the “Install” Button and you need a new update from the
Internet.
Preferences:
Here you can set or change the temperature unit from Fahrenheit to Celsius.
Delete Files: You can set whether already received data should be deleted or
if DEMO Data should be installed or not.
Language: You can choose your Language here.
4
Changing the WEATHERiNFOBOX: Choose under „WEATHERiNFOBOX
Selection“ a different WIB and close the Setup.
Registration
WeatherInfoViewer needs a registration via the Internet to unlock the Software.
For protection against abuse and also to get updates and/or the possibly to
download Internet weather data from MeteoServer, you must register your self
first via the internet on the server. This process is called initial registration and
is described on the next page. The WEATHERiNFOBOX used in the initial
registration as a hardware protection, also called dongle. While the initial
registration the WEATHERiNFOBOX must be connected on the PC. After the
initial registration it is only necessary to have the WIB connected if you transfer
Weather data from the WIB to the PC. If you only want to update the Software
or downloading Weather data from the Internet, only the access codes are
necessary. If you have registered your self already, then these codes where
saved on your computer in the registry, and also send to you as an e-mail.
Normally the Registration starts automatically after a successful Installation.
If not open the WeatherInfoViewer Setup:
[Start] [(All) Programs] [Moerer WeatherInfoViewer] [Setup WeatherInfoViewer]
Please click the Button “Registration”. If you
ignore the entries, you cannot be identified
and the service is always lost in the case of a
problem. If you want to remain anonymous,
set under name, road and city your own
passwords. If no email will register, but only
@ and one point, you’ll not receive an email
with the access code, with which you can reactivate a registration or transfer the code to
another computer.
Manual activation and reactivation:
All the individual access codes will be
designated as a certificate. Thus you could
activate also another Computer. Because it is
very often the case that the user wants to
install the Software on the home computer to
prepare his trip carefully and use it later on
the Notebook at the boat. In order to realize
this, of course, the Software must also be
installed on the notebook, where finally the
re-registration process appears. In this case,
choose now, “manual activation of a
registered Service” and transferred all your
codes of your certificate in this dialogue.
5
The suffix changes after each Internet update. This should be absolutely noticed, if you uninstall the program or operate it on several computers.
For such a change or the error message "SUFFIX_OPEN_ERR" the manual
activation must be open and the access code be entered by hand, because a
Registration by Internet is only possible one time. If the suffix should have been
lost, it is possible to use a wrong suffix, in order to eliminate this problem.
However this could happen only 8 times within 90 days.
So, if you change to a different computer you have to remind that and transfer
the last suffix from the other computer. If you are already on the boat and find
out that you have forgotten to do it, you must be forced to reactivate. In this
case any suffix (also FFFFFFFF) can be passed, that's no matter. However,
this could happen only 8 times in 90 days, otherwise your Software will be
blocked.
MeteoServer.net
Anything what has to do with this Software is on the international server
www.meteoserver.net. Although if some updates uses www.bonito.net, it is
ultimately the same server. It may also be that the extension named .de, .com,
etc. Nevertheless, it should not be tempted to use such addresses, since only
the link www.meteoserver.net provides a quick and liable service.
6
The WeatherInfoViewer
This is where weather data are displayed, irrespective of whether they are
received with the WEATHERiNFOBOX or downloaded via the internet. There
are four categories: “Navigation”, „Weather“, „Images“ and „Text“.
Navigation is only active if you bought the Navigator Version / Option.
Weather
This is where all weather data are
displayed
graphically,
which
was
received with the WEATHERiNFOBOX
as RTTY- or SYNOP or downloaded via
the internet.
The Layer Button’s: Internet, RTTY and
SYNOP switching to the desired Data
display. Barograph ON displays the
barometric diagram.
The Dialog button with the ‚+’ expands the dialog box. When the switch is a “-“
then the corresponding dialog box is hidden again.
The navigation of the WeatherInfoViewer can be done comfortable with the
mouse button and the mouse wheel. Zoom in or out using the mouse wheel
and move the whole map with holding down the right mouse button. A weatherinfo-window appears with a simple click on the left mouse button.
7
Navigation bar
You navigate the map using the up/down and left/right buttons. You can
also use the black arrows on the right. The button below the arrows
switches the map back to the overview. The image can be zoomed in or
out using the magnifying glass symbols. You can also select a portion of
the image with your mouse. Point your mouse pointer to the upper left
corner of the area you would like to select, click the mouse button and
then pull the mouse to the lower right until the desired area is inside the
marked area. Release the mouse button. MeteoViewer will zoom into the
selected area.
Below the navigation bar there is a slider which makes zooming even
easier. Point your mouse to your position and click on the right mouse
button. A context menu will open. Select “Set fix point”. If you now use the
zoom slider, you will always zoom back to the selected position. Even
when you are zooming into other areas you simply need to touch the
slider to get back to where you were before.
Data Layer
Depending on what you have downloaded, several or all data layers will
be active. Simply choose the layers you want to be displayed. For example,
wind, barometric pressure, waves, etc. You can also combine layers. Layers
that cannot be combined will automatically be displayed with the proper layer.
Toolbar with TimeSlider
Switch from local time to UTC time
The weather data are always in UTC. To have a better overview of the
prediction you can switch to local time or UTC.
Print
Here you can print your own weather maps. You choose when and which data
and areas should be printed. Maps are printed in high definition quality.
Speed controller and “PLAY”
This controller sets the speed at which animations are played. The speed is
also dependent upon the processing speed of your PC. The “<” and “>” buttons
are to „Play“ the Forecast forward or backwards.
Time slider
By moving this slider to the left or right you can move the data manually.
8
Internet Download Area
If you press the ‚Internet Download Area’ button
the download dialog appears. This controls and
arranges the Internet download and the data
production. The requirement is that you bought the
Internet Option and that your computer has
established an internet connection.
Time Management of the Download service
With ‚Start Download’ the Software connects via
the Internet the MeteoServer, download the desired
weather data and process it in such a way that you
can view and evaluate the data in the
WeatherInfoViewer.
If you activate the „Auto Download“ function,
WeatherInfoViewer automatically establish an
internet connection to MeteoServer. With the
submenus „Forecast every…“ you can set the
interval at which WeatherInfoViewer automatically
downloads weather data. The small clock indicates
the reference time.
Statusleisten
The status bars „Internet Download“, „Computing“
and „Work progress duration“ show the up-to-date
status of the respective process.
Program-Update-Control
If you activate “check for new updates”, each time
you download Weather data from MeteoServer, the
Software checks if program updates are available.
Registry
With this Button the reactivation can be made, as
described on Page 5.
Selection for home based or mobile internet
You can use WeatherInfoViewer at home as well as on the go, and want to
keep the data volume low when mobile, you have the option to toggle between
„Home Service“ and „Mobile Service“. You can select an entirely different
configuration for each service mode. For example, you can select to receive
satellite pictures and forecasts for up to six days with all available values,
whereas when mobile you can waive on the satellite pictures and just receive
forecasts for three days and even keep it down to some important values like
Wind, Waves and so on, only.
9
With the buttons Weather details and Image details, a selection list will be
offered that allows you to determine exactly what you want to download. The
following Menu buttons specify the period of the forecast data or how many
days retrospective Images or Synop data should be loaded.
Forecast period:
In „Download for ??? Days forecast“ you can select how many days worth of
forecasts you would like to receive. With the list “weather details” you can
check the check boxes with the desired values which you want to download.
Synop retrospective data and satellite images:
„Synop data“ are measurement values, not forecast values. They are the basis
of all forecasts and indicate the values that you are or have been surrounded
by. You can receive this data not only with your SSB radio but also download
them from MeteoServer. In „Synop download“ you can download the Synop
data of the past 72 hours.
Another function of MeteoServer is to provide satellite pictures which
WeatherInfoViewer uses to create animations. Since these pictures are not
forecasts you can select the time frame for satellite pictures in the “load
pictures for...” selection box. The maximum amount is 72 hours. In the „Image
List“ you select the pictures of the satellites you want to download.
Geographic map area for download
If you want to curb the amount of data downloaded from the server it is
necessary to adjust the geographical area covered. You will find a number of
preselected areas in the dialog box. You can reshape these areas by clicking
and dragging the arrows.
Deleting old data after selected days:
In order to prevent a build-up of old data on your computer you can have
certain data deleted at certain times. The preselected value serves as a good
average.
Data for static purposes, logbook data:
You can download, from the archives of the Meteo server, Synop data for any
time period from Meteo server (see next page). This can be used for the
documentation of a logbook for example. In order to keep a separate archive
for a trip you have activate the last two switches.
It is intended that also other programs can use the data from the
WeatherInfoViewer. We recommend at the moment the logbook of
http://www.tripcon.de.
10
SYNOP
WEATHERiNFOBOX displays received Synop data
as weather symbols on a world map. Clicking one
of these symbols opens a window with information
in English text. Every new station message is
displayed if it is inside the selected reporting
period. Messages can also be displayed for one
time slot.
Radio Synop Symbols
Display Synop measure Station
This toggles the display of Synop data.
Wind direction and speed
Shows symbols with wind direction (arrows) and
wind speed in Beaufort.
Temperature °C
Shows the air temperature in degrees centigrade
(°C) on the map.
Clouds and precipitation
Shows symbols for cloud cover and precipitation.
Air pressure
shows the barometric pressure in hectopascal
(hPa).
Synop-Archive
It is also possible to load older Synop data e.g. for
logbook purposes. Therefore you have to choose
the Archive list and eventually downloading data
from the Internet, if they are not already archived.
11
Changing the Design
You can change the look of the
Weather
Info
Viewer,
software
according to your wishes. You can use
one of the defaults (SCR 1-6) or create
your own design. This is not for just a
purely visual aspect. If you are using
the Software in the dark (in the Night) a
bright screen is very annoying.
Therefore you can change easily to a
darker night design.
To create your own design, click
"change design" and the following window
appears:
You can now use the various controls to
change color in the different areas. The
settings dialog itself remains unaffected from
that, because there are combinations which
makes the switches and buttons invisible.
Screen:
Changes the background color. "Bright" is the
brightness and "satur" is the color saturation.
Scopes:
Modifies the scopes and the frequency
display. "Bright" determines the brightness of
the background and "line" the brightness of the lines.
Button flat style:
This makes it possible to vary how much or whether the buttons should be
inflated.
Color Picker & Selection:
With this menu you can change the color the various parts of the software.
Select the desired entry from the menu and go by holding the left mouse button
in the desired color. Move the slider on the color tone bar to change the
brightness (bright).
With "Save", you can save your own color scheme and with "Load" you can
reload it. With "set default" you can assign your Design to the quick selection
buttons (SCR 1-6). With "undo" you can undo the changes.
12
MeteoRouteControl
If you bought the Navigator or the
Internet
Option
the
category
„Navigation“
appears
in
the
WeatherInfoViewer. This is a simple
Chart plotter with all the usual details
and functions, which can be updated via
the Internet.
The category “Navigation” is a simple chart plotter. But please remind: There
is no guarantee for the topicality and correctness of the Navigation charts. The
substantial on these charts is the meteorological route control called
MeteoRouteControl. You can create a planned route on a map similar to a
navigation map. WeatherInfoViewer then calculates the weather data using the
journey's estimated time and color the planned route according to the weather
situation. Thus you can see easily when, at what time, and on what route
section unfavorable weather conditions are expected. The route can be
modified if necessary. This extension is meant to control a route realistically
from the meteorological site, using a GPS.
This Button
hides the control panel on the left hand side to get more space
for the chart. The four categories „Overview“, „Global“, „Coast“ and
„Harbour“ switching to a different Pre-set with different resolutions and
details.The presets can be saved by open the Context menu (right Mouse
button on the World Map) and choose “save the view parameter…”. Your
settings remain if you switch to a different category. By clicking the right Mouse
button you can reset your settings to the default Pre-setting’s.
13
As already known from the Weather Control page, you find at the very top a
toolbar with additional switches for the route control. The most of the familiar
controls are the same such as the Time Slider for the time and different buttons
for the weather animation.
The Button
“Measure” is different. After pressing this button, a click on the
map is expected, to create a End-to-End measurement. After the first click, a
thread pulled which represents the line to the next vertices. A right mouse click
ends this procedure.
All known weather data settings can be selected here
as well. Additional you will find here Layout settings
with the two buttons: Weather-Layer and WeatherSymbols which toggles the Weather Details on or off.
The list (at the bottom) shows always only one data set
loaded from the Internet, which can be selected in the
drop-down menu "Forecast for xxx". There you can
choose the start hour of the forecast. The three Buttons
Small, Medium and Large switching between the
Symbol- and Raster-Sizes.
Because there are notebook displays which have
lower vertical resolution (eg only 800px), you can
minimize or maximize the Setting dialogs. This will also
appear in larger screens for further details, such as
preferences for Celsius, Fahrenheit or the details of the
measurements in miles.
The colors for the Map
representations
and
the
layout can be adjusted here
as well.
The size of the buoys can be
changed with the buttons:
small, medium, large. The
button variabel per Poti sets
an individual size for the Font
and the buoys, which will be
controlled
with
the
potentiometers.
14
If the Dialog RouteControl is visible, you
can load, save, modify or create a new
a route. Using the Context menu you
can also hide the Route. With the „OFF“
Button, you can hide the Route as well.
You can also reverse the direction of
the route. These functions are also
reflected as buttons in the button bar.
The buttons have the same icons.
The two Buttons
on the Top of
the Window intended for secondary
enlargement of buoys and their labeling.
Screen-Navigation
Resolution: With the slider, just right below the navigation buttons, the Map
can be zoomed in or out (see page 8). You also can use the mouse wheel for
zooming in and out.
Zoom: Point your mouse pointer to the upper left corner of the area you would
like to select, click the mouse button and then pull the mouse to the lower right
until the desired area is inside the marked area. Release the mouse button.
MeteoViewer will zoom into the selected area.
Map-Position: Scrolling the Map can be done with the Scrollbar on the bottom
or on the rights side of the Window. More precisely, it can be done directly on
the map: Hold the right mouse button down
and move the map with the mouse.
Context-Menu: Clicking the right mouse
button will open the context menu. This menu
is also used in other parts of the program and
allows you to make additional adjustments
like: showing a Nautical or meteorological
Information or “Set fix point” . If you now use
the zoom slider, you will always zoom back to
the selected position. Even when you are
zooming into other areas you simply need to
touch the slider to get back to where you were
before.
15
Create and modify Way Points
For a weather route calculation the speed is necessary. In both here explained
cases the edit window for Speed in Knots is active in the field “Route Options”.
You can define an average speed before placing the way points. You also can
change the speed value for any way point separately. While you set the
waypoints, the resolution or the position of the Map can be changed on the
well-known way.
To create a new Route click this Button
and move the mouse cursor on
where the route will start and click on the Map to place and draw the starting
Waypoint. Create additional Waypoints by clicking points further along your
desired route. A right mouse click ends this procedure.
To modify a Route press this button
and move the mouse cursor to the
way point you want to modify and select it by clicking with the right mouse
button. Now the way point is taken and you can move it to the desired position.
Would you now click the right mouse button the point will be removed from the
list. You can now set extra Points into this route as well.
Press Edit to open the editor window to
change manually, by hand, the position, speed,
etc. With Insert a new entry is inserted behind
the current position of the waypoint list. With
delete a selected entry can be deleted.
Every Point can be shown as Name or Info and
runtime functions can be entered as well.
It is possible, upon arrival to a waypoint, that
you can be warned by the Computer with a
alarm sound. Activate in this case Ankunft
warnen.
If you are planning a break, it would be good if the weather calculation may
also take into account. Therefore, you can the Pause and RESTART button
and enter in the edit window ST: The number of hours. If you also enter the
Day of the Restart it means always, the next day (or days) to ST-clock.
Because you arrive very often late in the afternoon and want to stay for the
night and restart on the next morning. In such a case, you do not know how
long the pause lasts.
16
You can select a forecast dataset and determine
a specific start date. If the Start button is
pressed, then the start date is used. Otherwise,
the chosen base time is used as the start date. If
you now click the "METEO ITEM LIST" the
month, day and hour will displayed colored as the
weather route (the more red, the more problems)
and the following marks are displayed: B for a
break (Break), W for warning and R for the
amendment map resolution.
You can set the resolution by using the button
"set Map Resolution". The current resolution of
the map is adopted. Which you can be verified
with test, because these functions will only run
after activate Start CONTROL. Green items are
presented below for, "done" and red for "data not
yet available'. By clicking on the little boxes on the
left, you can mark the entry as "done" manually,
but only from the top check box to the bottom
check box. , Pending’ works from the bottom to
the top.
If an item is selected in list, then the weather information for this section will be
displayed in the instrument window. Even if the KD-Button is activated, the
weather will be displayed on the Map.
Exactly as in the list, problems will be
signaled with colors. The small arrow is
the wind and is the thick arrow the wave
height. The small weather-symbol
indicates the general weather condition.
The direction of the wind and the waves
are always shown in the direction of the
boat. You can choose with route
direction, whether the boat arrow is
indicated in card direction (Compass) or
in route direction.
With the Course / Meteo button the
actual GPS course direction for the route
is indicated as a more or less red boat.
That assumes that a GPS is connected.
With NMEA control the values, wind,
Speed and depth are indicated to
available instrument sensors. Wind from
NMEA sensors only the text field is set.
17
Route-Control – NMEA Connection
If the presetting Tab is expanded,
you can open the below shown dialog
with the button ‚set NMEA-Para'and
entering the necessary parameters
for the GPS-receiver.
This dialog indicates the data which are received from the chosen COM-Port
and accepted as NMEA coordinate data. If a correct NMEA-position is
recognized, the route is controlled in the program and indicated as a small
cross in the Map.
Future Extension and Update Service
The extension „Navigation” is at the moment only a simple chart-plotter. The
program contains Navigation Charts, for which, however, no guarantee is
given. It is planned that the program is supposed to include a Navigation
Charts service in the near Future, which is updated by Internet and will be
liable to costs.
An active route control is supposed to write a logbook, in that way a seamless
download of the nautical and meteorological data’s correct and chronological
fitting can be done. With "Route logbook control open" the logbook is supposed
to be checked and old routes, of formerly done journeys, could be printed or
can be viewed.
We are still work on it, but if it is ready some day:
You'll receive further program extensions and descriptions in the course of the
update cycle via the Internet. Just press UPDATE in the Setup Program.
18
Images
Here all types of images are displayed, those downloaded from the internet and
those received from the WEATHERiNFOBOX. The navigation is the same as in
„Weather”“.
Directory and source selection
This is where the sources of the various images are:
Weather maps from the internet, weather maps received on the radio, satellite
images, saved and deleted images.
If you would like to archive images, simply drag and drop them to one of the
„banks“. Images saved there will not be deleted by the “automatic deleting
routine”.
Images that you move into the bin will be finally deleted after 8 days. If you did
a mistake, the images are not gone immediately. You can easily move them via
drag and drop out of the bin.
„Images selection“ contains images sorted by date. Double-clicking an image
will bring it up in the large window on the right where it can be viewed and
edited.
19
Image Processing
A received weather map is an image that can usually be edited with common
Windows programs. However, there are no special tools that would enable you
to improve fax reception. With this program you can rotate and synchronize fax
images much more quickly because they are designed specifically for
WeatherInfoViewer.
20
Save and print FAX
The image can be saved and printed. The regular processing windows appear
without any special attributes.
Synchronize
If you have received an image where the left edge is displayed in the center of
the image, you can use this function for subsequent synchronization. First
click on the button. Now select the exact spot where you want the edge to be.
Skew correction
Use this function when an image comes in skewed.
Click on the upper edge of the image and draw a line along the skewed edge
of the image. Clicking again will correct the image.
Crop image
Click on the button. Then click your left mouse button and draw a rectangle
around the area you want to crop. Release the mouse button. You can now
still manipulate the area by clicking on the edges and pulling them to a
different position. Clicking the right mouse button will finalize the crop.
Rotate image
If the image is arranged wrongly you can rotate it here.
ICO RPM:
If a fax has been recorded with a wrong module or at the wrong speed, it can
be turned into readable form here.
Contours, Soften, Sharpen, Brightness
„Contour“ displays lines such as isobars more clearly. If a line has been
drawn very softly you can enhance it with this effect. “Soften” and “Sharpen”
add a softening or sharpening effect to the image. “Brightness” controls the
contrast of the image.
Undo / Redo
Use the UNDO command to reverse the last editing action, if possible.
Use the REDO command to reverse the UNDO command.
21
Text
This is where all received text messages such as forecasts, warnings, Navtex
etc. are displayed. Texts belongs to certain areas will be stored in the
respective folders. Forecasts for the Mediterranean can only be found in that
folder. This makes finding the proper forecast much easier.
Symbol bar Text
This bar contains the following symbols:
Print
This will print text messages
Save + Save as
Here you can save a text or overwrite it.
CLR
Delete the text.
Format
This is where you can format a text.
22
23