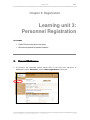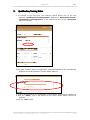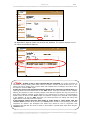
1
SDIMS – Home Community-Based
Care
User manual
Document no:
Revision:
Complied By :
SITA Eastern Cape – Application Training
Effective date:
2009-12-01
Electronic file:
HOME COMMUNITY-BASED CARE MANUAL
RESTRICTED
HCBC
RESTRICTED
1
RESTRICTED
HCBC
Approval page
Home Community-Based Care User manual
__________________________
___________________________
Date
Language editing
__________________________
___________________________
Date
Author
__________________________
___________________________
Date
Technical/functional manager
__________________________
___________________________
Date
Project manager
__________________________
Initials Surname of Organisation
Designation: Rank
___________________________
Date
__________________________
___________________________
Date
Configuration management
2
RESTRICTED
HOME COMMUNITY-BASED CARE MANUAL
RESTRICTED
HCBC
Amendment history
Doc. revision
Date effective
1.0
2009-12-01
Section changed
Change proposal no.
New document
HOME COMMUNITY-BASED CARE MANUAL
RESTRICTED
3
4
RESTRICTED
HCBC
RESTRICTED
HOME COMMUNITY-BASED CARE MANUAL
RESTRICTED
HCBC
Table of contents
Abbreviations ........................................................................................... 10
PREFACE 11
1.
Prerequisites for this module .............................................................. 11
2.
How this training manual is organised ................................................. 11
3.
Related publications .......................................................................... 13
CHAPTER 1: INTRODUCTION ........................................................................... 14
1.
System Description ........................................................................... 14
1.1
System description ................................................................... 14
1.2
HCBC Activity Diagram .............................................................. 16
2.
System Security ............................................................................... 17
3.
Getting started on SDIMS .................................................................. 18
3.1
Connecting to the Internet ......................................................... 18
3.2
Logging on to SDIMS ................................................................. 19
3.3
Changing a user password ......................................................... 19
CHAPTER 2: REGISTRATION ............................................................................ 23
Learning unit 1: Organisation Search ......................................................... 24
1.
Searching for Organisation ................................................................. 24
Learning unit 2: HCBC Information Capturing .............................................. 26
1.
Organisation Details .......................................................................... 26
2.
Address Details ................................................................................ 29
3.
Contact Details ................................................................................. 32
4.
NPO Operation Areas......................................................................... 35
Learning unit 3: Personnel Registration ...................................................... 39
1.
Personnel Maintenance ...................................................................... 39
2.
Qualification/Training Status .............................................................. 43
Learning unit 4: Reassign ......................................................................... 46
1.
Reassign Personnel ........................................................................... 46
CHAPTER 3: ORGANISATION REPORTS .............................................................. 50
Learning unit 1: Organisation Report .......................................................... 51
1.
Organisation Report .......................................................................... 51
2.
Monthly Stipend ............................................................................... 54
3.
Monthly Service ................................................................................ 59
4.
Training ........................................................................................... 63
5.
Procurement .................................................................................... 66
6.
Quarterly Report ............................................................................... 69
HOME COMMUNITY-BASED CARE MANUAL
RESTRICTED
5
RESTRICTED
HCBC
CHAPTER 4: MANAGEMENT ............................................................................. 73
Learning unit 1: Funding Information ......................................................... 74
1.
Funding Information ......................................................................... 74
Learning unit 2: M&E Meeting ................................................................... 77
1.
M&E Meetings .................................................................................. 77
1.1. Record Meeting ................................................................................ 77
1.2. Record Problem ................................................................................ 79
1.3. Record Meeting Attendance ................................................................ 82
Learning unit 3: Supervisory Visit .............................................................. 85
1.
Supervisory Visit .............................................................................. 85
2.
Problem Tracking .............................................................................. 87
Learning unit 4: Problem Tracking ............................................................. 90
1.
Problem Tracking .............................................................................. 90
Learning unit 5: Sign-off Report ................................................................ 93
1.
Sign-off Report ................................................................................. 93
1.1
1.2
6
Printing Sign-off report .............................................................. 97
1.1.1
Print with Appendix ....................................................... 97
1.1.2
Print without Appendix................................................... 98
View Reporting Status ............................................................... 99
RESTRICTED
HOME COMMUNITY-BASED CARE MANUAL
RESTRICTED
HCBC
Table of figures
Figure 1 - Home Community-Based Care Activity Diagram ........................ 16
HOME COMMUNITY-BASED CARE MANUAL
RESTRICTED
7
RESTRICTED
HCBC
Table of tables
8
Table 1 -
Training Manual layout .......................................................... 12
Table 2 -
Emergency Instructions ....................................................... 100
Table 3 -
Reference List .................................................................... 104
Table 4 -
Glossary ............................................................................ 105
RESTRICTED
HOME COMMUNITY-BASED CARE MANUAL
HOME COMMUNITY-BASED CARE MANUAL
RESTRICTED
HCBC
RESTRICTED
9
RESTRICTED
HCBC
Abbreviations
SITA
State Information Technology Agency
NDoSD
National Department of Social development
SDIMS
Social Development Information Management System
PERSAL
Personnel Salaries
IP
Internet Protocol
ID
Identity Document
VEP
10
WAN
Wide Area Network
SDLC
System Development Life Cycle
SRS
Software Requirements Specification
KPI
Key Performance Indicator
GUI
Graphic User Interface
ERD
Entity Relationship Diagram
CHC
Community Health Centre
CHW
Community Health Worker
DHP
District Health Plans
DHS
District Health System
DMT
District Management Team
DOT/S
Directly Observed Treatment/ Strategy
EPWP
Expanded Public Works Programme
HCBC
Home Community-Based Care
IDP
Integrated Development Plan
IMCI
Integrated Management of Childhood Illnesses
M&E
Monitoring and Evaluation
MLW
Mid-Level worker
NPO
Non-Profit Organisation
NQF
National Qualification Framework
PHC
Primary Health Care
RPL
Recognition of Prior Learning
SAQA
South African Qualifications Authority
SLA
Service Level Agreement
VCT
Voluntary Counselling and Testing
WHO
World Health Organization
RESTRICTED
HOME COMMUNITY-BASED CARE MANUAL
RESTRICTED
HCBC
Preface
Scope of t his prefac e
Prerequisites for attending a Home Community-Bases Care module
How Home Community-Bases Care training manual is organised.
Related publications
Welcome to the HOME COMMUNITY-BASED CARE training. In this preface you will find
the prerequisites for attending a HOME COMMUNITY-BASED CARE module,
information on the layout of this training manual as well as publications that relates to
the content presented in this training manual.
1.
Prerequisites for this module
a)
Before you begin this module, you should comply with the prerequisites as listed
below.
b)
Must be computer literate or have basic knowledge of using a computer.
c)
Be able to identify and interpret relevant policies and procedures related to the
Application of an HOME COMMUNITY-BASED CARE to registration with the
Department of Health and Social Development
d)
Read, Speak and write English as medium of instruction throughout the training
session.
2.
How this training manual is organised
The main objective of this training manual is to enable the SDIMS users to effectively
utilise the system regarding all the respective applicable processes within HOME
COMMUNITY-BASED CARE Module.
The purpose of this document is to outline the specific policies, procedures and
operational rules that govern the completion of various tasks on SDIMS, specifically
relating to the HOME COMMUNITY-BASED CARE. The policies and procedures manual
describes the user instructions for performing both manual and electronic functions that
are required to effectively use, operate and maintain the SDIMS module.
The reason for the compilation of this manual is to give all officials guidance as to the
procedure that will be used by Department of Health and Social Development Officials in
the capture, storage and retrieval of the HOME COMMUNITY-BASED CARE
information. Further more it will be used to obtain uniform procedures Nationally.
Note: all examples that might be used in this document and during the course
of the training are purely fictional.
The examples are presented without prejudice and are for illustrative purposes only.
HOME COMMUNITY-BASED CARE MANUAL
RESTRICTED
11
RESTRICTED
HCBC
The layout of this user manual is indicated in the table below.
Table 1 - Training Manual layout
Chapter
Topic
Chapter 1
Introduction
Chapter 2
Registration
Learning
Learning
Learning
Learning
Chapter 3
–
–
–
–
Organisation Search
HCBC Information Capturing
Personnel Registration
Reassign
unit
unit
unit
unit
unit
unit
unit
1
2
3
4
5
6
7
–
–
–
–
–
–
–
Organisation Reports
Monthly Stipend
Monthly Service
Training
Procurement
Quarterly Reports
Annual Reports
1
2
3
4
5
–
–
–
–
–
Funding Information
M&E Meeting
Supervisory visit
Problem Tracking
Sign-Off Reports
Management
Learning
Learning
Learning
Learning
Learning
12
1
2
3
4
Organisation Reports
Learning
Learning
Learning
Learning
Learning
Learning
Learning
Chapter 4
unit
unit
unit
unit
unit
unit
unit
unit
unit
RESTRICTED
HOME COMMUNITY-BASED CARE MANUAL
RESTRICTED
3.
HCBC
Related publications
List any applicable documentation under this heading.
HOME COMMUNITY-BASED CARE MANUAL
RESTRICTED
13
RESTRICTED
HCBC
Chapter 1:
Introduction
Outcomes
Summarise the HOME COMMUNITY-BASED CARE flow process.
Explain security issues on the system.
Identify different role players in the HOME COMMUNITY-BASED CARE module and explain
system access levels assigned to each role player on system.
Connect to the internet, Log on to the SDIMS and change a user password.
1.
System Description
HOME COMMUNITY-BASED CARE Module allows for the Registration, Management
and Maintenance of Home and Community-Based Care that provide a comprehensive and
quality health and social service within the home and community in order to promote,
restore and maintain a person’s maximal level of comfort, social functioning and health.
Many of these facilities share common information and thus the system was created
allowing for their uniqueness. If an organisation is already registered in the NPO System,
then the organisational details do not need to be entered again into the HOME
COMMUNITY-BASED CARE Module, in this case some of the organisation details can
not be amended. All HCBC’s are required to register with the department.
1.1
System description
The main function of the HCBC Module: is the registration and management of HCBC
organisation
The HCBC Module functions together with other modules of the SDIMS system. If an
organisation is already registered in the NPO Module, it is not necessary to re-enter these
details in the HCBC Module. Rather, the organisation needs only to be updated with the
missing information.
Selective Officials from Department of Social Development and Department of Health will
14
RESTRICTED
HOME COMMUNITY-BASED CARE MANUAL
RESTRICTED
HCBC
be responsible for inputting HCBC organisation information and for updating existing
Organisation details. This information is entered through the online (web-based) system
and stored in a central database. Supervisors and Managers, on the other hand, will
monitor the progress of the module by generating reports.
HOME COMMUNITY-BASED CARE MANUAL
RESTRICTED
15
RESTRICTED
1.2
HCBC
HCBC Activity Diagram
Figure 1 - Home Community-Based Care Activity
Diagram
HOME COMMUNITY BASED CARE
Search for HCBC
Organisation Exist
Amend Organisation Details
Organisation does
not Exist
Capture Organisational details
Capture Personnel details
Or Re-assign Personnel
Capture Organisational Reports
Print preloaded forms for field workers
Capture Funding Information
Capture M&E Meeting Attendance
Capture Supervisory Visit information
Capture Problem Tracking information
Capture Sign-off details
Download or Export data
Capture information pertaining to
Maintenance
16
RESTRICTED
HOME COMMUNITY-BASED CARE MANUAL
RESTRICTED
2.
HCBC
System Security
Given the nature of the information that is stored within the HOME COMMUNITYBASED CARE Module, secure access to information is a priority. Users are assigned
various security clearance levels based on their work functions or roles within the
department.
The users of the HCBC Module and their main roles have been identified as follows:
Data Capturer will capture organisation details on the system
Coordinators will capture Sign-off details on the system
Supervisors and Management will monitor performance and effectiveness by accessing
online reports on a monthly basis
These user groups correspond to the various security access levels that are available in
the HOME COMMUNITY-BASED CARE.
A systems administrator handles the management of user security levels and passwords
centrally.
A security access level is assigned by the systems administrator, and is associated with
the PERSAL number of a particular employee. PERSAL numbers are unique personnel
identification numbers that all salaried employees should hold.
HOME COMMUNITY-BASED CARE MANUAL
RESTRICTED
17
RESTRICTED
3.
HCBC
Getting started on SDIMS
The system requires users to log on using a unique user name and password
combination. This log in process ensures the integrity of the system and the information
that is stored within it. User names are the PERSAL numbers, and the systems
administrator assigns passwords. Passwords should at all times remain strictly
confidential. Users should never give out their passwords to other users or outside
individuals. SDIMS handles sensitive and confidential information, and as such the
integrity of this data should always be a priority.
3.1
Connecting to the Internet
SDIMS is an online, web-based system that requires users to be connected to the
Internet.
1. Simply double-click on the “Internet Explorer” icon on the desktop
interface.
The web browser will load on your computer.
2. Enter the IP address for SDIMS in the address bar directly under the tool
bar in Internet Explorer.
Note: Training Environment is different from the Live Environment; please make sure
you are using the correct one.
3. Press ENTER on the keyboard or click the “Go” icon on screen, adjacent to
the address bar.
The SDIMS Login screen loads. Input boxes labelled “User Name” and
“Password” should be visible.
18
RESTRICTED
HOME COMMUNITY-BASED CARE MANUAL
RESTRICTED
3.2
HCBC
Logging on to SDIMS
In order to gain access to SDIMS, each user needs to supply the system with a unique
user name and password combination. User names are employee PERSAL numbers, and
passwords are assigned to each user by the systems administrator. Officials, who are not
in possession of a password, should contact the systems administrator.
The procedure for logging in is as follows:
1. Enter your user name (PERSAL number) AND password.
Both the user name (PERSAL number) and password are required for login.
Note: If you enter either of the inputs incorrectly, you can use the “Clear” button
to remove all entered text on the screen and begin again.
2. Press ENTER on the keyboard or click on the “Login” button on the
screen.
The system automatically verifies your user name and password.
Note: If either of the inputs is missing, the system will display a message, “For these
reasons your data could not be processed: User Name is required” OR “For these reasons your
data could not be processed: Password is required”. If you do not have a password, contact the
systems administrator.
If either of these inputs are incorrect the system will display the error message, “Invalid
username or password entered. Please try again”. Check that your PERSAL number and password
have been typed in correctly. Should the problem persist, contact the systems administrator to
verify your access level, username and password.
If a user with the same PERSAL number and password combination are already logged
in to the system, the system will automatically terminate the session of the previously logged on
Official. At no time should any one else be in possession of your unique user name and password
combination. Report this immediately to the systems administrator.
3. Once the user name and password combination is accepted by the
system, you are logged in to SDIMS.
3.3
Changing a user password
1. Users can change their own passwords at any time.
HOME COMMUNITY-BASED CARE MANUAL
RESTRICTED
19
RESTRICTED
HCBC
2. Once the user is logged into the system, the user should select “Administration”
from the (SDIMS) main menu.
3. The user should select “System Maintenance” from the HCBC main menu.
4. The “System Maintenance” submenu will Expand
5. Select “Change Password” button on the administration menu.
6.
The “Change User Password” screen loads. The user’s current password and persal
are automatically entered into the appropriate fields.
7. Enter the new password in the field labelled; “New Password”
20
RESTRICTED
HOME COMMUNITY-BASED CARE MANUAL
RESTRICTED
HCBC
8. Enter the new password a second time in the “Confirm Password” field.
9. Select “Module” from the drop down list
10. Select “Office” from the drop down list
11. Select “User Type” from the drop down list
12. Click on the “Change Password” button.
13. The system will take you to the login screen; you will have to type in your new login
detail.
•
You can also print the password reset form by clicking on the “Print
Password Change Form” button.
•
The password reset form will be display.
•
Click from the Internet explorer menu option; “File” “Print”.
14.
Select “HCBC” from the Main Menu.
The Main Menu screen appears. Selecting “HCBC” from the navigation bar on the left
hand side of the screen, allows the user to gain access to the Home Community-Based
Care Module.
HOME COMMUNITY-BASED CARE MANUAL
RESTRICTED
21
RESTRICTED
HCBC
15. When the mouse pointer is positioned over any of the buttons in the
navigation bar, a description of the relevant module will appear in the text
block to the right of the navigation bar.
This enables users to decide which module they need to go to.
Note: That your name is visible on the top right hand side of the screen, if not please
logout, and then login again.
User security restrictions may limit the number of buttons available on the navigation bar.
16. After selecting the “HCBC” button on the Main Menu, the HOME COMMUNITYBASED CARE main menu page loads.
22
RESTRICTED
HOME COMMUNITY-BASED CARE MANUAL
RESTRICTED
HCBC
Chapter 2:
Registration
The Home Community-Based Care Module requires the capturing official to capture
the identifying details of the organisation and personnel details working on that
organisation.
The starting point of the Home Community-Based Care is “Registration”, which is
the first option on the HCBC main menu with its submenus listed below it.
The major functions of the Registration feature include the following:
1.
2.
3.
4.
5.
6.
7.
8.
Check if a Organisation has previously been captured
Capture of Organisation details
Capture of Organisation address details
Capture of Organisation’s contact person details
Capture of NPO Operation Areas
Capture of Organisation’s Personnel details
Update Personnel Qualification/Training information
Reassign Personnel to another level or to another organisation
HOME COMMUNITY-BASED CARE MANUAL
RESTRICTED
23
RESTRICTED
HCBC
Chapter 2: Registration
Learning unit 1:
Organisation Search
Outcomes
Search for the organisation from the database using different search methods.
Navigate through the system to view organisation information that was captured previously.
1.
Searching for Organisation
1. Information from the manual input tool form must be used to update the online
Home Community-Based Care; the forms are loaded on the system and can be
printed at any point.
2. Before entering any information in the Home Community-Based Care, the
capturing official must first check to see whether the Organisation already exists in
the system.
3. The Capturer can search by HCBC No, NPO No and Organisation Name.
3.1.Click on the dropdown arrow and select preferred option.
3.2.Enter information according to the selected search criteria.
24
RESTRICTED
HOME COMMUNITY-BASED CARE MANUAL
RESTRICTED
HCBC
3.3.Click the “Search” button
Note: If the information you entered is incorrect, click on the “Clear” button and
begin again.
If the Organisation exists in the database, all details will be loaded on screen.
Organisation details are loaded. The user should proceed through the sub
Note:
If the entered Organisation details do not exist in the database, no
The
menus (brown hyperlinks at the top of the screen) to view all the information
Organisation information will be displayed. Use valid Organisation details and begin again, or
captured
that Organisation.
proceed
to the for
“Organisation
Details” hyperlink to capture the details of this new Organisation.
A message “*** No results were found for HCBC Number 100 ***” will be displayed
HOME COMMUNITY-BASED CARE MANUAL
RESTRICTED
25
RESTRICTED
HCBC
Chapter 2: Registration
Learning unit 2:
HCBC Information
Capturing
Outcomes
Capture relevant Organisation information on the system.
Edit previously captured Organisation information
1.
Organisation Details
1. “Organisation Details” is the first point of capture for a new Organisation.
Note: Capturing Official will always check if an Organisation is already in the system before
capturing new Organisation details (see “Organisation Search” above). This is extremely important in
order to avoid duplication in the system.
1.1.Click the “Add” button
26
RESTRICTED
HOME COMMUNITY-BASED CARE MANUAL
RESTRICTED
HCBC
1.2.Click in each field to capture the Organisation’s details OR use the drop
down lists to select the appropriate option.
An asterisk (*) to the right of a field’s label denotes a required field. Details will
not be saved to the database or be assigned a HCBC number if these required
fields have not been appropriately filled in.
Detailed field descriptions of the data required to be entered is a function of the
policy of the Department of Social Development and Department of Health, and
may change from time to time.
•
HCBC Number: This field is generated by the system and cannot be
entered or changed by the Capturer
•
NPO Registration Number: This field will be displayed automatically but
only if the organisation has been registered on the NPO Module, it cannot
be entered or changed by the Capturer.
•
Name of Organization
•
Registration Type: This field is defaulted to display “HCBC”; it cannot be
entered or changed by the Capturer. If the organisation has been captured
on the NPO Module it will display “HCBC/NPO”.
•
Registration Status
•
Child Care Forum: Click the box to indicate if HCBC belongs to Child Care
Forum.
•
Date Established
•
Record Creation Date: Automatically display today’s date
•
Nearest Hospital
•
Nearest CHCs
•
Clinics
1.3 Click the “Save” button
HOME COMMUNITY-BASED CARE MANUAL
RESTRICTED
27
RESTRICTED
HCBC
2. Once Organisation details are saved, the system displays an information message to
the Capturer regarding the saved status of the record “HCBC number 78 was
assigned to the organisation”. A HCBC number is automatically allocated to the
new Organisation, visible in the “HCBC number” field. All fields are greyed out.
Note:
If there is one or more required field not completed, the system generates an
information message stating which fields need to be filled in and the correct format to do so. The
Capturer should go back to those required fields and complete them accordingly. Once this is done,
the Capturer will click “Save” again.
If there are errors in the Organisation details OR it is necessary to change them, the
capturing official concerned should click on the “Edit” button. All greyed out fields are now enabled,
allowing the Capturer to make necessary changes. Note that the Capturer will only have access to
those fields ordinarily available to that Capturer. Any changes that are made to an Organisation’s
details need to be saved. If the “Save” button is not clicked, changes to any field will not be updated
in the database. As per the “Add” procedure, the normal procedure for adding and saving data
applies after the edit button has been clicked.
If the Capturer enters incorrect data whilst in “Edit” mode or “Add” mode, click the
“Cancel” button. All data will be cleared. The “Cancel” button should be used sparingly as all fields
completed are deleted. The backspace and delete keys should be used in conjunction with
highlighting the data with the cursor to delete or cancel data in a specific field, rather than using the
“Cancel” button.
3. Once all Organisation details have been captured and saved correctly, the Capturer
should proceed through the sub menus from left to right on the registration screen,
and complete all the forms that require Organisation data. The Capturer should pay
careful attention to the mandatory fields, as data will not be able to be saved on a
form where required fields have not been correctly completed.
28
RESTRICTED
HOME COMMUNITY-BASED CARE MANUAL
RESTRICTED
2.
HCBC
Address Details
1. To proceed to the next form, the capturing official should click on the text hyperlink
“Address Details”, adjacent to “Organisation Details”. “Address Details” is the
second sub menu of the “HCBC Organisation” main menu button.
Note: If Organisation was captured on the NPO Module, the system will not allow editing in
the Address page of HCBC, and amendment can only be done on the NPO Module select list.
2. The HCBC number, Name of Organisation, and Date Established are automatically
displayed for the Organisation currently being captured.
3. Capturing official capturing new Organisations should endeavour to ensure that
Address details are accurately captured and meticulously verified with the
Organisation. The successful implementation of the system rests largely on reliable
Address information. Without such information it is impossible to progress on an
organisation monitoring in a meaningful way.
3.1.Click the “Add” button
HOME COMMUNITY-BASED CARE MANUAL
RESTRICTED
29
RESTRICTED
HCBC
3.2.Click in each field to capture the Address details OR use the drop down
lists to select the appropriate option.
An asterisk (*) to the right of a field’s label denotes a required field. Details will
not be saved to the database if these required fields have not been appropriately
filled in.
Detailed field descriptions of the data required to be entered is a function of the
policy of the Department of Social Development and Department of Health, and
may change from time to time.
•
•
•
•
•
•
•
•
•
•
Address type: an organisation cannot have more that one address per
address type
Province: Capture select from the pre-loaded list
District: this field depends on the Province field, the system will only
populate district that belong to the selected Province.
Sub-district/Local Municipality: this field depends on the District field;
the system will only populate Sub-district/Local Municipality that belong to
the selected District.
GIS: Latitude (optional)
GIS: Longitude (optional)
P.O. Box / Street no
Suburb / Village
Town: this field depends on the Sub-district/Local Municipality field; the
system will only populate Town that belong to the selected Subdistrict/Local Municipality.
Postal Code: is automatically displayed once the Town is selected. The
capture has an option to edit.
Note:
If a town does not appear as an option, the Capturer should contact the module
administrator and have these details added to the select list.
3.3.Click the “Save” button
30
RESTRICTED
HOME COMMUNITY-BASED CARE MANUAL
RESTRICTED
HCBC
3.4. All Address details are saved to the database. The system displays an information
message to the Capturer regarding the saved status of the record. All fields are
greyed out.
Note:
If there is one or more required field not completed, the system generates an
information message stating which fields need to be filled in and the correct format to do so. The
Capturer should go back to those required fields and complete them accordingly. Once this is done,
the Capturer will click “Save” again.
If there are errors in the Address details OR it is necessary to change them, the capturing
official concerned should click on the “Edit” button. All greyed out fields are now enabled, allowing
the Capturer to make necessary changes. Note that the Capturer will only have access to those fields
ordinarily available to that Capturer. Any changes that are made to an Organisation’s details need to
be saved. If the “Save” button is not clicked, changes to any field will not be updated in the
database. As per the “Add” procedure, the normal procedure for adding and saving data applies after
the edit button has been clicked.
If the Capturer enters incorrect data whilst in “Edit” mode or “Add” mode, click the
“Cancel” button. All data will be cleared. The “Cancel” button should be used sparingly as all fields
completed are deleted. The backspace and delete keys should be used in conjunction with
highlighting the data with the cursor to delete or cancel data in a specific field, rather than using the
“Cancel” button.
4. Once all Address details have been captured and saved correctly, the Capturer should
proceed through the sub menus from left to right on the Registration screen, and
complete all the forms that require Organisation data.
HOME COMMUNITY-BASED CARE MANUAL
RESTRICTED
31
RESTRICTED
3.
HCBC
Contact Details
1. To proceed to the next form, the capturing official should click on the text hyperlink
“Contact Details”, adjacent to “Address Details”. “Contact Details” is the third
sub menu of the “HCBC Organisation” main menu button.
2. The HCBC number, Name of Organisation, and Date Established are automatically
displayed for the Organisation currently being captured
Note: There can only be one contact person captured in this page.
2.1.Click the “Add” button
32
RESTRICTED
HOME COMMUNITY-BASED CARE MANUAL
RESTRICTED
HCBC
2.2.Click in each field to capture the Contact’s details OR use the drop down
lists to select the appropriate option.
An asterisk (*) to the right of a field’s label denotes a required field. Details will
not be saved to the database if these required fields have not been appropriately
filled in.
Detailed field descriptions of the data required to be entered is a function of the
policy of the Department of Social Development and Department of Health, and
may change from time to time.
•
•
•
•
•
•
•
•
•
Name
Surname
Position
Previous Position
Telephone Number
Fax number
Cellular number
Email Address
Web Address
2.3. Click the “Save” button
HOME COMMUNITY-BASED CARE MANUAL
RESTRICTED
33
RESTRICTED
HCBC
2.4. All Contact details are saved to the database. The system displays an information
message to the Capturer regarding the saved status of the record. All fields are
greyed out.
Note:
If there is one or more required field not completed, the system generates an
information message stating which fields need to be filled in and the correct format to do so. The
Capturer should go back to those required fields and complete them accordingly. Once this is done,
the Capturer will click “Save” again.
If there are errors in the Contact details OR it is necessary to change them, the capturing
official concerned should click on the “Edit” button. All greyed out fields are now enabled, allowing
the Capturer to make necessary changes. Note that the Capturer will only have access to those fields
ordinarily available to that Capturer. Any changes that are made to an Organisation’s details need to
be saved. If the “Save” button is not clicked, changes to any field will not be updated in the
database. As per the “Add” procedure, the normal procedure for adding and saving data applies after
the edit button has been clicked.
If the Capturer enters incorrect data whilst in “Edit” mode or “Add” mode, click the
“Cancel” button. All data will be cleared. The “Cancel” button should be used sparingly as all fields
completed are deleted. The backspace and delete keys should be used in conjunction with
highlighting the data with the cursor to delete or cancel data in a specific field, rather than using the
“Cancel” button.
3. Once all Contact details have been captured and saved correctly, the Capturer should
proceed through the sub menus from left to right on the Registration screen, and
complete all the forms that require Organisation data.
34
RESTRICTED
HOME COMMUNITY-BASED CARE MANUAL
RESTRICTED
4.
HCBC
NPO Operation Areas
Areas
1. To proceed to the next form, the capturing official should click on the text hyperlink
“NPO Operation Area”, adjacent to “Contact Details”. “NPO Operation Area” is
the fourth sub menu of the “Registration” main menu button.
2. The HCBC number, Name of Organisation, and Date Established are automatically
displayed for the Organisation currently being captured.
HOME COMMUNITY-BASED CARE MANUAL
RESTRICTED
35
RESTRICTED
HCBC
2.1.Click the “Add” button
3.2 Click in each field to capture the NPO Operation Area OR use the drop
down lists to select the appropriate option.
An asterisk (*) to the right of a field’s label denotes a required field. Details will
not be saved to the database if these required fields have not been appropriately
filled in.
Detailed field descriptions of the data required to be entered is a function of the
policy of the Department of Social Development and Department of Health, and
may change form time to time.
• Province: Capturer select from the pre-loaded list
• District: this field depends on the Province field, the system will only
populate district that belong to the selected Province.
• Municipality: this field depends on the District field; the system will
only populate Municipality that belong to the selected District.
• Ward:
3.3 Click the “Save” button
36
RESTRICTED
HOME COMMUNITY-BASED CARE MANUAL
RESTRICTED
HCBC
3. All NPO Operation Area are saved to the database. The system displays an
information message to the Capturer regarding the saved status of the record. All
fields are greyed out.
Note:
If there is one or more required field not completed, the system generates an
information message stating which fields need to be filled in and the correct format to do so. The
Capturer should go back to those required fields and complete them accordingly. Once this is done,
the Capturer will click “Save” again.
If there are errors in the NPO Operation Area details OR it is necessary to change them, the
capturing official concerned should click on the “Edit” button. All greyed out fields are now enabled,
allowing the Capturer to make necessary changes. Note that the Capturer will only have access to
those fields ordinarily available to that Capturer. Any changes that are made to an Organisation’s
details need to be saved. If the “Save” button is not clicked, changes to any field will not be updated
in the database. As per the “Add” procedure, the normal procedure for adding and saving data
applies after the edit button has been clicked.
If the Capturer enters incorrect data whilst in “Edit” mode or “Add” mode, click the
“Cancel” button. All data will be cleared. The “Cancel” button should be used sparingly as all fields
completed are deleted. The backspace and delete keys should be used in conjunction with
highlighting the data with the cursor to delete or cancel data in a specific field, rather than using the
“Cancel” button.
4. The capturing official can delete an operation area from the list.
4.1. Click “Delete” from the grid, for the one that you want to delete.
HOME COMMUNITY-BASED CARE MANUAL
RESTRICTED
37
RESTRICTED
HCBC
5. The capturing official can print HCBC Information Form, which should be used as a
cover page of the NPO Report.
5.1. Click “Print” button.
6. HCBC Information Form will be displayed.
7. Once all NPO Operation Area have been captured and saved correctly, the Capturer
should proceed through the sub menus from left to right on the Registration screen,
and complete all the forms that require Organisation data.
38
RESTRICTED
HOME COMMUNITY-BASED CARE MANUAL
RESTRICTED
HCBC
Chapter 2: Registration
Learning unit 3:
Personnel Registration
Outcomes
Capture Personnel information on the system.
Edit previously captured Organisation information
1.
Personnel Maintenance
1. To proceed, the Capturing official should click on the text next sub-menu of
Registration called “Personnel”, below “HCBC Organisation” sub-menu.
HOME COMMUNITY-BASED CARE MANUAL
RESTRICTED
39
RESTRICTED
HCBC
2. The HCBC number, Name of Organisation, and Date Established are automatically
displayed for the Organisation currently being captured.
2.1.Click the “Add” button
2.2.Click in each field to capture the personnel details OR use the drop down
lists to select the appropriate option.
An asterisk (*) to the right of a field’s label denotes a required field. Details will
not be saved to the database if these required fields have not been appropriately
filled in.
Detailed field descriptions of the data required to be entered is a function of the
policy of the Department of Social Development and Department of Health, and
may change from time to time.
• Type of ID: Capturer select from the pre-loaded list
• ID Number: This field depend on the Type of ID field
• Name
• Surname
• Role: Capturer select from the pre-loaded list
• Other (Specify): If role is not on the list.
• Is the member disabled
40
RESTRICTED
HOME COMMUNITY-BASED CARE MANUAL
RESTRICTED
•
•
•
•
•
HCBC
Assigned Province: Capturer select from the pre-loaded list
Assigned District: this field depends on the Province field, the system will
only populate district that belong to the selected Province.
Date joined
Data Capturer: Automatically display the person currently logged in.
View Previous Role History
3.2 Click the “Save” button
3. All Personnel details are saved to the database. The system displays an information
message to the Capturer regarding the saved status of the record. All fields are
greyed out.
HOME COMMUNITY-BASED CARE MANUAL
RESTRICTED
41
RESTRICTED
HCBC
Note: If there is one or more required field not completed, the system generates an
information message stating which fields need to be filled in and the correct format to do so. The
Capturer should go back to those required fields and complete them accordingly. Once this is done,
the Capturer will click “Save” again.
If there are errors in the Personnel Maintenance details OR it is necessary to change them,
the capturing official concerned should click on the “Edit” button. All greyed out fields are now
enabled, allowing the Capturer to make necessary changes. Note that the Capturer will only have
access to those fields ordinarily available to that Capturer. Any changes that are made to an
Organisation’s details need to be saved. If the “Save” button is not clicked, changes to any field will
not be updated in the database. As per the “Add” procedure, the normal procedure for adding and
saving data applies after the edit button has been clicked.
If the Capturer enters incorrect data whilst in “Edit” mode or “Add” mode, click the
“Cancel” button. All data will be cleared. The “Cancel” button should be used sparingly as all fields
completed are deleted. The backspace and delete keys should be used in conjunction with
highlighting the data with the cursor to delete or cancel data in a specific field, rather than using the
“Cancel” button.
4. Once all Personnel details have been captured and saved correctly, the Capturer
should proceed through the sub menus from left to right on the Registration screen,
and complete all the forms that require Organisation data.
42
RESTRICTED
HOME COMMUNITY-BASED CARE MANUAL
RESTRICTED
2.
HCBC
Qualification/Training Status
1. To proceed to the next form, the capturing official should click on the text
hyperlink “Qualification/Training Status”, adjacent to “Maintain Personnel”.
“Qualification/Training Status” is the second sub menu of the “Personnel”
main menu button.
2. The HCBC number, Name of Organisation, and Date Established are automatically
displayed for the Organisation currently being captured.
3. A list of all Personnel in the organisation currently being captured will be displayed.
4. Click the “Select” next to the details of the person whose details need to be
updated
5. Click the “Add” button
HOME COMMUNITY-BASED CARE MANUAL
RESTRICTED
43
RESTRICTED
6.
HCBC
Click in each field to capture the Qualification/Training OR use the drop
down lists to select the appropriate option.
An asterisk (*) to the right of a field’s label denotes a required field. Details will
not be saved to the database if these required fields have not been appropriately
filled in.
Detailed field descriptions of the data required to be entered is a function of the
policy of the Department of Social Development and Department of Health, and
may change form time to time.
• Qualification/Training: Capturer select from the pre-loaded list
• Type: this field depends on the Qualification/Training field.
• View Member Training History:
7.
Click the “Save” button
8. All Qualification/Training are saved to the database. The system displays an
information message to the Capturer regarding the saved status of the record. All
fields are greyed out. The system will display a list of all Qualification/Training
captured for the selected person.
44
RESTRICTED
HOME COMMUNITY-BASED CARE MANUAL
RESTRICTED
HCBC
Note:
If there is one or more required field not completed, the system generates an
information message stating which fields need to be filled in and the correct format to do so. The
Capturer should go back to those required fields and complete them accordingly. Once this is done,
the Capturer will click “Save” again.
If there are errors in the Qualification/Training details OR it is necessary to change them,
the capturing official concerned should click on the “Edit” button. All greyed out fields are now
enabled, allowing the Capturer to make necessary changes. Note that the Capturer will only have
access to those fields ordinarily available to that Capturer. Any changes that are made to an
Organisation’s details need to be saved. If the “Save” button is not clicked, changes to any field will
not be updated in the database. As per the “Add” procedure, the normal procedure for adding and
saving data applies after the edit button has been clicked.
If the Capturer enters incorrect data whilst in “Edit” mode or “Add” mode, click the
“Cancel” button. All data will be cleared. The “Cancel” button should be used sparingly as all fields
completed are deleted. The backspace and delete keys should be used in conjunction with
highlighting the data with the cursor to delete or cancel data in a specific field, rather than using the
“Cancel” button.
Chapter 2: Registration
HOME COMMUNITY-BASED CARE MANUAL
RESTRICTED
45
RESTRICTED
HCBC
Learning unit 4:
Reassign
Outcomes
Reassign member of Organisation from one level to another.
Reassign member from one Organisation to another.
1.
Reassign Personnel
1. To proceed, the Capturing official should click on the text next sub-menu of
Registration called “Reassign”, below “Personnel” sub-menu.
2. The HCBC number, Name of Organisation, and Date Established are automatically
displayed for the Organisation currently being captured.
46
RESTRICTED
HOME COMMUNITY-BASED CARE MANUAL
RESTRICTED
HCBC
3. The Capturing Official can reassign a member to another level or to another
organisation.
•
•
•
•
Search either by member’s ID Number or Surname or HCBC Name
Click on the dropdown arrow and select preferred option.
Enter information according to the selected search criteria.
Click “Search” button
Note: If the capturer searched by ID Number, Member’s details will be displayed.
If the capturer searched by Surname, everyone in the database with that surname, their details will be
displayed.
If the capturer searched by HCBC Name, details of all the Members in that organisation will be
displayed.
•
Click “Select” next to the details of the member.
HOME COMMUNITY-BASED CARE MANUAL
RESTRICTED
47
RESTRICTED
HCBC
4. Click in each field to capture the Reassignment information OR use the drop
down lists to select the appropriate option.
An asterisk (*) to the right of a field’s label denotes a required field. Details will
not be saved to the database if these required fields have not been appropriately
filled in.
Detailed field descriptions of the data required to be entered is a function of the
policy of the Department of Social Development and Department of Health, and
may change from time to time.
• Role
• HCBC number
• Click “Show NPO Name”.
• HCBC Name and Date of joining the Organisation are displayed.
• Click “Assign” next to the details of the member.
48
RESTRICTED
HOME COMMUNITY-BASED CARE MANUAL
RESTRICTED
HCBC
5. Information saved to the database. The system displays an information message to the
Capturer regarding the saved status of the record. All fields are greyed out.
Note:
If there is one or more required field not completed, the system generates an
information message stating which fields need to be filled in and the correct format to do so. The
Capturer should go back to those required fields and complete them accordingly. Once this is done,
the Capturer will click “Save” again.
If there are errors in the Member’s re-assignment details OR it is necessary to change
them, the capturing official concerned should click on the “Edit” button. All greyed out fields are now
enabled, allowing the Capturer to make necessary changes. Note that the Capturer will only have
access to those fields ordinarily available to that Capturer. Any changes that are made to an
Organisation’s details need to be saved. If the “Save” button is not clicked, changes to any field will
not be updated in the database. As per the “Add” procedure, the normal procedure for adding and
saving data applies after the edit button has been clicked.
If the Capturer enters incorrect data whilst in “Edit” mode or “Add” mode, click the
“Cancel” button. All data will be cleared. The “Cancel” button should be used sparingly as all fields
completed are deleted. The backspace and delete keys should be used in conjunction with
highlighting the data with the cursor to delete or cancel data in a specific field, rather than using the
“Cancel” button.
HOME COMMUNITY-BASED CARE MANUAL
RESTRICTED
49
RESTRICTED
HCBC
Chapter 3:
Organisation Reports
The Home Community-Based Care requires the capturing official to capture the
Organisation reports.
This is the second option of HCBC main menu with its submenus listed below it.
The major functions of the “Organisation Reports” include the following:
1.
2.
3.
4.
50
Capture
Capture
Capture
Capture
and validate Organisation Reports
Monthly Stipend
Monthly Service
Quarterly Reports
RESTRICTED
HOME COMMUNITY-BASED CARE MANUAL
RESTRICTED
HCBC
Chapter 3: Organisation Reports
Learning unit 1:
Organisation Report
Outcomes
Capture and validate Organisation Reports
Amend Organisation Reports that were previously captured
1.
Organisation Report
Report
To proceed, the Capturing official should click on the next option of the main menu
“Organisation Reports”, below “Reassign” sub-menu.
The HCBC number, Name of Organisation, and Date Established are automatically
displayed for the Organisation currently being captured.
HOME COMMUNITY-BASED CARE MANUAL
RESTRICTED
51
RESTRICTED
HCBC
Click the “Add” button
Click in each field to capture the Organisation Report details OR use the drop down lists
to select the appropriate option.
An asterisk (*) to the right of a field’s label denotes a required field. Details will
not be saved to the database if these required fields have not been appropriately
filled in.
Detailed field descriptions of the data required to be entered is a function of the
policy of the Department of Social Development and Department of health, and
may change from time to time.
• Reporting Year
• Reporting Month
• Date of received
• Date of validated
• Date valid at the time of first submission
• Date Captured: defaulted to today’s date
• Data Capturer: Automatically display the person currently logged in.
• Date Capturing Completed
Click the “Save” button
52
RESTRICTED
HOME COMMUNITY-BASED CARE MANUAL
RESTRICTED
HCBC
All Organisation Reports details are saved to the database. The system displays a list of
all reports received and captured.
Note:
If there is one or more required field not completed, the system generates an
information message stating which fields need to be filled in and the correct format to do so. The
Capturer should go back to those required fields and complete them accordingly. Once this is done,
the Capturer will click “Save” again.
If there are errors in the Organisation Report details OR it is necessary to change them, the
capturing official concerned should click on the “Edit” button. All greyed out fields are now enabled,
allowing the Capturer to make necessary changes. Note that the Capturer will only have access to
those fields ordinarily available to that Capturer. Any changes that are made to an Organisation’s
details need to be saved. If the “Save” button is not clicked, changes to any field will not be updated
in the database. As per the “Add” procedure, the normal procedure for adding and saving data
applies after the edit button has been clicked.
If the Capturer enters incorrect data whilst in “Edit” mode or “Add” mode, click the
“Cancel” button. All data will be cleared. The “Cancel” button should be used sparingly as all fields
completed are deleted. The backspace and delete keys should be used in conjunction with
highlighting the data with the cursor to delete or cancel data in a specific field, rather than using the
“Cancel” button.
HOME COMMUNITY-BASED CARE MANUAL
RESTRICTED
53
RESTRICTED
2.
HCBC
Monthly Stipend
To proceed, the capturing official should click on the text hyperlink “Monthly Stipend”,
adjacent to “Organisation Report”. “Monthly Stipend” is the second sub menu of the
“Organisation Reports” main menu button.
Note:
The capturing official can not capture in this page if there is no information
captured in the Organisation report page.
The HCBC number, Name of Organisation, and Date Established are automatically
displayed for the Organisation currently being captured.
Click the “Add” button
54
RESTRICTED
HOME COMMUNITY-BASED CARE MANUAL
RESTRICTED
HCBC
Click in each field to capture the Monthly Stipend details OR use the drop down lists to
select the appropriate option.
An asterisk (*) to the right of a field’s label denotes a required field. Details will not be
saved to the database if these required fields have not been appropriately filled in.
Detailed field descriptions of the data required to be entered is a function of the policy
of the Department of Social Development and Department of health, and may change
from time to time.
• Reporting Year
• Reporting Month
Click the “Select” next to the month that needs to be captured or updated
HOME COMMUNITY-BASED CARE MANUAL
RESTRICTED
55
RESTRICTED
HCBC
Click “Select” next to the name of the person to load stipend for.
Click “Add Payment” to load Monthly Stipend.
56
RESTRICTED
HOME COMMUNITY-BASED CARE MANUAL
RESTRICTED
HCBC
Click in each field to capture the Monthly Stipend OR use the drop down lists to select
the appropriate option.
Status for the reporting month
Dept. of health
Dept of Soc Dev
Own
Other
Click “Save Payment” button
Click “Save” button
HOME COMMUNITY-BASED CARE MANUAL
RESTRICTED
57
RESTRICTED
HCBC
All details for that Month Stipend are saved to the database. The system displays a list
of all reports received and captured.
Note:
If there is one or more required field not completed, the system generates an
information message stating which fields need to be filled in and the correct format to do so. The
Capturer should go back to those required fields and complete them accordingly. Once this is done,
the Capturer will click “Save” again.
If there are errors in the Monthly Stipend details OR it is necessary to change them, the
capturing official concerned should click on the “Edit” button. All greyed out fields are now enabled,
allowing the Capturer to make necessary changes. Note that the Capturer will only have access to
those fields ordinarily available to that Capturer. Any changes that are made to an Organisation’s
details need to be saved. If the “Save” button is not clicked, changes to any field will not be updated
in the database. As per the “Add” procedure, the normal procedure for adding and saving data
applies after the edit button has been clicked.
If the Capturer enters incorrect data whilst in “Edit” mode or “Add” mode, click the
“Cancel” button. All data will be cleared. The “Cancel” button should be used sparingly as all fields
completed are deleted. The backspace and delete keys should be used in conjunction with
highlighting the data with the cursor to delete or cancel data in a specific field, rather than using the
“Cancel” button.
58
RESTRICTED
HOME COMMUNITY-BASED CARE MANUAL
RESTRICTED
3.
HCBC
Monthly Service
To proceed, the capturing official should click on the text hyperlink “Monthly Service”,
adjacent to “Monthly Stipend”. “Monthly Service” is the second sub menu of the
“Organisation Reports” main menu button.
Note:
The capturing official can not capture in this page if there is no information
captured in the Organisation report page.
The HCBC number, Name of Organisation, and Date Established are automatically
displayed for the Organisation currently being captured.
HOME COMMUNITY-BASED CARE MANUAL
RESTRICTED
59
RESTRICTED
HCBC
Click the “Select” next to the month that needs to be captured or updated
Click “Add” to load Monthly Services.
Click in each field to capture the Monthly Services OR use the drop down lists to select
the appropriate option.
60
RESTRICTED
HOME COMMUNITY-BASED CARE MANUAL
RESTRICTED
HCBC
RESTRICTED
61
Operating Province
Operating Province
Sub-district/Local Municipality
Reporting Items
Click “Save” button
HOME COMMUNITY-BASED CARE MANUAL
RESTRICTED
HCBC
All details for that Monthly Service are saved to the database. The system displays a list
of all reports received and captured.
Note:
If there is one or more required field not completed, the system generates an
information message stating which fields need to be filled in and the correct format to do so. The
Capturer should go back to those required fields and complete them accordingly. Once this is done,
the Capturer will click “Save” again.
If there are errors in the Monthly Services details OR it is necessary to change them, the
capturing official concerned should click on the “Edit” button. All greyed out fields are now enabled,
allowing the Capturer to make necessary changes. Note that the Capturer will only have access to
those fields ordinarily available to that Capturer. Any changes that are made to an Organisation’s
details need to be saved. If the “Save” button is not clicked, changes to any field will not be updated
in the database. As per the “Add” procedure, the normal procedure for adding and saving data
applies after the edit button has been clicked.
If the Capturer enters incorrect data whilst in “Edit” mode or “Add” mode, click the
“Cancel” button. All data will be cleared. The “Cancel” button should be used sparingly as all fields
completed are deleted. The backspace and delete keys should be used in conjunction with
highlighting the data with the cursor to delete or cancel data in a specific field, rather than using the
“Cancel” button.
62
RESTRICTED
HOME COMMUNITY-BASED CARE MANUAL
RESTRICTED
4.
HCBC
Training
To proceed, the capturing official should click on the text hyperlink “Training”, adjacent
to “Monthly Service”. “Training” is the forth sub menu of the “Organisation
Reports” menu.
The HCBC number, Name of Organisation, and Date Established are automatically
displayed for the Organisation currently being captured.
HOME COMMUNITY-BASED CARE MANUAL
RESTRICTED
63
RESTRICTED
HCBC
Click “Add” to load Training Page.
Click in each field to capture the Training Report OR use the drop down lists to select
the appropriate option.
•
•
•
•
•
•
•
•
Training/Workshop Facilitating Organisation
Course Accreditation Number (if accredited)
Title of Training/Workshop
Start Date
End Date
Duration (Hours)
Type of training
Brief Description of Course Content including Goal / Objectives /
Expected Outcomes
Click “Save” button
64
RESTRICTED
HOME COMMUNITY-BASED CARE MANUAL
RESTRICTED
HCBC
All details for that Training are saved to the database.
Note: If there is one or more required field not completed, the system generates an
information message stating which fields need to be filled in and the correct format to do so. The
Capturer should go back to those required fields and complete them accordingly. Once this is done,
the Capturer will click “Save” again.
If there are errors in the Training Report details OR it is necessary to change them, the
capturing official concerned should click on the “Edit” button. All greyed out fields are now enabled,
allowing the Capturer to make necessary changes. Note that the Capturer will only have access to
those fields ordinarily available to that Capturer. Any changes that are made to an Organisation’s
details need to be saved. If the “Save” button is not clicked, changes to any field will not be updated
in the database. As per the “Add” procedure, the normal procedure for adding and saving data
applies after the edit button has been clicked.
If the Capturer enters incorrect data whilst in “Edit” mode or “Add” mode, click the
“Cancel” button. All data will be cleared. The “Cancel” button should be used sparingly as all fields
completed are deleted. The backspace and delete keys should be used in conjunction with
highlighting the data with the cursor to delete or cancel data in a specific field, rather than using the
“Cancel” button.
HOME COMMUNITY-BASED CARE MANUAL
RESTRICTED
65
RESTRICTED
5.
HCBC
Procurement
To proceed, the capturing official should click on the text hyperlink “Procument”,
adjacent to “Training”. “Procument” is the fourth sub menu of the “Organisation
Reports” main menu button.
The HCBC number, Name of Organisation, and Date Established are automatically
displayed for the Organisation currently being captured.
Select the month you want to capture.
66
RESTRICTED
HOME COMMUNITY-BASED CARE MANUAL
RESTRICTED
HCBC
Click “Add” to load Procurement Report page.
Click in each field to capture the Procurement Report OR use the drop down lists to
select the appropriate option.
•
Items: Select from the list
•
•
•
•
•
Number left from last month
Number acquired this month
Number distributed or consumed
Number remaining this month
Comment/Observations
HOME COMMUNITY-BASED CARE MANUAL
RESTRICTED
67
RESTRICTED
HCBC
Click “Save Items” button
All Procurement details are saved to the database. The system displays a list of all
items.
Note:
If there is one or more required field not completed, the system generates an
information message stating which fields need to be filled in and the correct format to do so. The
Capturer should go back to those required fields and complete them accordingly. Once this is done,
the Capturer will click “Save” again.
If there are errors in the Procurement Report details OR it is necessary to change them, the
capturing official concerned should click on the “Edit Items” button. All greyed out fields are now
enabled, allowing the Capturer to make necessary changes. Note that the Capturer will only have
access to those fields ordinarily available to that Capturer. Any changes that are made to an
Organisation’s details need to be saved. If the “Save” button is not clicked, changes to any field will
not be updated in the database. As per the “Add” procedure, the normal procedure for adding and
saving data applies after the edit button has been clicked.
If the Capturer enters incorrect data whilst in “Edit” mode or “Add” mode, click the
“Cancel” button. All data will be cleared. The “Cancel” button should be used sparingly as all fields
completed are deleted. The backspace and delete keys should be used in conjunction with
highlighting the data with the cursor to delete or cancel data in a specific field, rather than using the
“Cancel” button.
68
RESTRICTED
HOME COMMUNITY-BASED CARE MANUAL
RESTRICTED
6.
HCBC
Quarterly Report
To proceed, the capturing official should click on the text hyperlink “Quarterly
Report”, adjacent to “Procument”. “Quarterly Report” is the second sub menu of
the “Organisation Reports” main menu button.
The HCBC number, Name of Organisation, and Date Established are automatically
displayed for the Organisation currently being captured.
HOME COMMUNITY-BASED CARE MANUAL
RESTRICTED
69
RESTRICTED
HCBC
Click “Add” to load Quarterly Report.
Click in each field to capture the Quarterly Report OR use the drop down lists to select
the appropriate option.
Reporting Year
Reporting Quarter
Reporting Information
Click “Save” button
70
RESTRICTED
HOME COMMUNITY-BASED CARE MANUAL
RESTRICTED
HCBC
All details for that Quarterly Report are saved to the database. The system displays a
list of all reports received and captured.
HOME COMMUNITY-BASED CARE MANUAL
RESTRICTED
71
RESTRICTED
HCBC
Note:
If there is one or more required field not completed, the system generates an
information message stating which fields need to be filled in and the correct format to do so. The
Capturer should go back to those required fields and complete them accordingly. Once this is done,
the Capturer will click “Save” again.
If there are errors in the Quarterly Report details OR it is necessary to change them, the
capturing official concerned should click on the “Edit” button. All greyed out fields are now enabled,
allowing the Capturer to make necessary changes. Note that the Capturer will only have access to
those fields ordinarily available to that Capturer. Any changes that are made to an Organisation’s
details need to be saved. If the “Save” button is not clicked, changes to any field will not be updated
in the database. As per the “Add” procedure, the normal procedure for adding and saving data
applies after the edit button has been clicked.
If the Capturer enters incorrect data whilst in “Edit” mode or “Add” mode, click the
“Cancel” button. All data will be cleared. The “Cancel” button should be used sparingly as all fields
completed are deleted. The backspace and delete keys should be used in conjunction with
highlighting the data with the cursor to delete or cancel data in a specific field, rather than using the
“Cancel” button.
72
RESTRICTED
HOME COMMUNITY-BASED CARE MANUAL
RESTRICTED
HCBC
Chapter 4:
Management
The Home Community-Based Care requires the capturing official to capture the
Management Information.
This is the third option of HCBC main menu with its submenus listed below it.
The major functions of “Management” include the following:
1.
2.
3.
4.
5.
Capture Funding Information
M&E Meeting
Supervisory Visit
Problem Tracking
Sign-off Report
HOME COMMUNITY-BASED CARE MANUAL
RESTRICTED
73
RESTRICTED
HCBC
Chapter 4: Management
Learning unit 1:
Funding Information
Outcomes
Capture information pertaining to funding of an Organisation
Amend previously captured funding information
Discontinue Funding
Record Meeting
Record Problem
Meeting Report Generation
Capture Supervisory Visit Summary
1.
Funding Information
To proceed, the Capturing official should click on the text hyperlink, sub-menu of
Management called “Funding Information”.
74
RESTRICTED
HOME COMMUNITY-BASED CARE MANUAL
RESTRICTED
HCBC
The HCBC number, Name of Organisation, and Date Established are automatically
displayed for the Organisation currently being captured.
Click the “Add” button
Click in each field to capture the Funding Information OR use the drop down lists to
select the appropriate option.
An asterisk (*) to the right of a field’s label denotes a required field. Details will
not be saved to the database if these required fields have not been appropriately
filled in.
Detailed field descriptions of the data required to be entered is a function of the
policy of the Department of Social Development and Department of health, and
may change from time to time.
• Funder
• Initial Funding Month
• Last Funding Month
• Amount Funded
• Status
Click the “Save” button
Note: Funding can be discontinued
HOME COMMUNITY-BASED CARE MANUAL
RESTRICTED
75
RESTRICTED
HCBC
All Funding Report details are saved to the database. The system displays a list of all
reports received and captured.
Note:
If there is one or more required field not completed, the system generates an
information message stating which fields need to be filled in and the correct format to do so. The
Capturer should go back to those required fields and complete them accordingly. Once this is done,
the Capturer will click “Save” again.
If there are errors in the Funding Report details OR it is necessary to change them, the
capturing official concerned should click on the “Edit” button. All greyed out fields are now enabled,
allowing the Capturer to make necessary changes. Note that the Capturer will only have access to
those fields ordinarily available to that Capturer. Any changes that are made to an Organisation’s
details need to be saved. If the “Save” button is not clicked, changes to any field will not be updated
in the database. As per the “Add” procedure, the normal procedure for adding and saving data
applies after the edit button has been clicked.
If the Capturer enters incorrect data whilst in “Edit” mode or “Add” mode, click the
“Cancel” button. All data will be cleared. The “Cancel” button should be used sparingly as all fields
completed are deleted. The backspace and delete keys should be used in conjunction with
highlighting the data with the cursor to delete or cancel data in a specific field, rather than using the
“Cancel” button.
76
RESTRICTED
HOME COMMUNITY-BASED CARE MANUAL
RESTRICTED
HCBC
Learning unit 2:
M&E Meeting
Outcomes
Record Meeting
Record Problem
Record Meeting Attendance
1.
M&E Meetings
1.1. Record Meeting
To proceed, the Capturing official should click on the text hyperlink, sub-menu of
Management called “M&E Meeting”.
The M&E Meeting screen will load.
Click the “Add” button
HOME COMMUNITY-BASED CARE MANUAL
RESTRICTED
77
RESTRICTED
HCBC
Click in each field to capture the M&E Meeting information OR use the drop down lists to
select the appropriate option.
An asterisk (*) to the right of a field’s label denotes a required field. Details will
not be saved to the database if these required fields have not been appropriately
filled in.
Detailed field descriptions of the data required to be entered is a function of the
policy of the Department of Social Development and Department of health, and
may change from time to time.
• Meeting Type (National, Provincial, District)
• Date
• Location
• Purpose
• Report Written By
• Number of Attendees
Click the “Save” button
All M&E Meeting details are saved to the database.
78
RESTRICTED
HOME COMMUNITY-BASED CARE MANUAL
RESTRICTED
HCBC
Note:
If there is one or more required field not completed, the system generates an
information message stating which fields need to be filled in and the correct format to do so. The
Capturer should go back to those required fields and complete them accordingly. Once this is done,
the Capturer will click “Save” again.
If there are errors in the M&E Meeting details OR it is necessary to change them, the
capturing official concerned should click on the “Edit” button. All greyed out fields are now enabled,
allowing the Capturer to make necessary changes. Note that the Capturer will only have access to
those fields ordinarily available to that Capturer. Any changes that are made need to be saved. If the
“Save” button is not clicked, changes to any field will not be updated in the database. As per the
“Add” procedure, the normal procedure for adding and saving data applies after the edit button has
been clicked.
If the Capturer enters incorrect data whilst in “Edit” mode or “Add” mode, click the
“Cancel” button. All data will be cleared. The “Cancel” button should be used sparingly as all fields
completed are deleted. The backspace and delete keys should be used in conjunction with
highlighting the data with the cursor to delete or cancel data in a specific field, rather than using the
“Cancel” button.
1.2. Record Problem
Once M&E Meeting details are saved you can continue to Record the problem by clicking
on the “Record Problem” button. Ensure that you select the correct meeting before
you continue to the problem page.
The Record Problem screen will load.
Click the “Add Problem” button.
HOME COMMUNITY-BASED CARE MANUAL
RESTRICTED
79
RESTRICTED
HCBC
Click in each field to capture the Problem information OR use the drop down lists to
select the appropriate option.
An asterisk (*) to the right of a field’s label denotes a required field. Details will
not be saved to the database if these required fields have not been appropriately
filled in.
Detailed field descriptions of the data required to be entered is a function of the
policy of the Department of Social Development and Department of health, and
may change from time to time.
• Report Date
• Problem Reference No (Will be auto generated by the system once the
record is saved)
• Reporter (Persal Number)
• Problem Affected Area (National, Provincial, District)
• Report Written By
• Problem Identified at
• Problem Status
• Date Problem Identified
• Date Problem Solved (If problem is not yet resolved, this date is not
mandatory)
• Number of days passed before resolution
• Problem Referred to
• Problem(One sentence)
• Problem Type
• Suggested Resolution
• Actual Resolution
• Problem Description
Click the “Save” button
80
RESTRICTED
HOME COMMUNITY-BASED CARE MANUAL
RESTRICTED
HCBC
All Problem details are saved to the database; a Problem reference no is allocated for
the problem.
Note:
If there is one or more required field not completed, the system generates an
information message stating which fields need to be filled in and the correct format to do so. The
Capturer should go back to those required fields and complete them accordingly. Once this is done,
the Capturer will click “Save” again.
If there are errors in the Problem details OR it is necessary to change them, the capturing
official concerned should click on the “Edit” button. All greyed out fields are now enabled, allowing
the Capturer to make necessary changes. Note that the Capturer will only have access to those fields
ordinarily available to that Capturer. Any changes that are made need to be saved. If the “Save”
button is not clicked, changes to any field will not be updated in the database. As per the “Add”
procedure, the normal procedure for adding and saving data applies after the edit button has been
clicked.
If the Capturer enters incorrect data whilst in “Update Problem” mode or “Add” mode,
click the “Cancel” button. All data will be cleared. The “Cancel” button should be used sparingly
as all fields completed are deleted. The backspace and delete keys should be used in conjunction with
highlighting the data with the cursor to delete or cancel data in a specific field, rather than using the
“Cancel” button.
Once M&E Meeting details are saved you can continue to Record the problem by clicking
on the “Record Problem” button. Ensure that you select the correct meeting before
you continue to the problem page.
HOME COMMUNITY-BASED CARE MANUAL
RESTRICTED
81
RESTRICTED
HCBC
1.3. Record Meeting Attendance
Once M&E Meeting details are saved you can continue to Record meeting attendance by
clicking on the “Attendees” adjacent to “M&E Meeting”.
The Attendees screen will load.
Search for the meeting type.
Select the meeting you want to add attendees for.
82
RESTRICTED
HOME COMMUNITY-BASED CARE MANUAL
RESTRICTED
HCBC
Click the “Add” button.
Click in each field to capture the Attendance information OR use the drop down lists to
select the appropriate option.
An asterisk (*) to the right of a field’s label denotes a required field. Details will
not be saved to the database if these required fields have not been appropriately
filled in.
Detailed field descriptions of the data required to be entered is a function of the
policy of the Department of Social Development and Department of health, and
may change from time to time.
• Name
•
Position
Click the “Save” button
HOME COMMUNITY-BASED CARE MANUAL
RESTRICTED
83
RESTRICTED
HCBC
All Attendees details are saved to the database. The system will list all Attendees
added.
Note:
If there is one or more required field not completed, the system generates an
information message stating which fields need to be filled in and the correct format to do so. The
Capturer should go back to those required fields and complete them accordingly. Once this is done,
the Capturer will click “Save” again.
If there are errors in the Attendees details OR it is necessary to change them, the capturing
official concerned should click on the “Edit” button. All greyed out fields are now enabled, allowing
the Capturer to make necessary changes. Note that the Capturer will only have access to those fields
ordinarily available to that Capturer. Any changes that are made need to be saved. If the “Save”
button is not clicked, changes to any field will not be updated in the database. As per the “Add”
procedure, the normal procedure for adding and saving data applies after the edit button has been
clicked.
If the Capturer enters incorrect data whilst in “Edit” mode or “Add” mode, click the
“Cancel” button. All data will be cleared. The “Cancel” button should be used sparingly as all fields
completed are deleted. The backspace and delete keys should be used in conjunction with
highlighting the data with the cursor to delete or cancel data in a specific field, rather than using the
“Cancel” button.
84
RESTRICTED
HOME COMMUNITY-BASED CARE MANUAL
RESTRICTED
HCBC
Learning unit 3:
Supervisory Visit
Outcomes
Record Visit
Record Problem
1. Supervisory Visit
To proceed, the Capturing official should click on the text hyperlink, sub-menu of
Management called “Supervisory Visit”.
The Supervisory Visit screen will load.
Click the “Add” button
HOME COMMUNITY-BASED CARE MANUAL
RESTRICTED
85
RESTRICTED
HCBC
Click in each field to capture the Visit information OR use the drop down lists to select
the appropriate option.
An asterisk (*) to the right of a field’s label denotes a required field. Details will
not be saved to the database if these required fields have not been appropriately
filled in.
Detailed field descriptions of the data required to be entered is a function of the
policy of the Department of Social Development and Department of health, and
may change from time to time.
• Date of visit
• Reporter (Persal Number)
• Reporter Name: Populated from Persal Number
• Officials Visited
• Accompanied By
• Visited Organisation: Once all organisations visited are listed,
o Click on “Visit Summary”, a box to capture finding for the
organisation is displayed.
o Click on “Problem Tracking”, the system will open the problem
tracking page to capture problems identified in the visit.
• Overall Visit Summary
86
RESTRICTED
HOME COMMUNITY-BASED CARE MANUAL
RESTRICTED
HCBC
2. Problem Tracking
To record the Problem, Click on “Problem Tracking”.
Click the “Add Problem” button.
HOME COMMUNITY-BASED CARE MANUAL
RESTRICTED
87
RESTRICTED
HCBC
Click in each field to capture the Problem information OR use the drop down lists to
select the appropriate option.
An asterisk (*) to the right of a field’s label denotes a required field. Details will
not be saved to the database if these required fields have not been appropriately
filled in.
Detailed field descriptions of the data required to be entered is a function of the
policy of the Department of Social Development and Department of health, and
may change from time to time.
• Report Date
• Problem Reference No (Will be auto generated by the system once the
record is saved)
• Reporter (Persal Number)
• Problem Affected Area (National, Provincial, District)
• Report Written By
• Problem Identified at
• Problem Status
• Date Problem Identified
• Date Problem Solved (If problem is not yet resolved, this date is not
mandatory)
• Number of days passed before resolution
• Problem Referred to
• Problem(One sentence)
• Problem Type
• Suggested Resolution
• Actual Resolution
• Problem Description
Click the “Save” button
All Problem details are saved to the database; a Problem reference no is allocated for
the problem. The system will take you back to the Supervisory Visit Page.
88
RESTRICTED
HOME COMMUNITY-BASED CARE MANUAL
RESTRICTED
HCBC
Note: If there is one or more required field not completed, the system generates an
information message stating which fields need to be filled in and the correct format to do so. The
Capturer should go back to those required fields and complete them accordingly. Once this is done,
the Capturer will click “Save” again.
If there are errors in the Supervisory Visit details OR it is necessary to change them, the
capturing official concerned should click on the “Edit” button. All greyed out fields are now enabled,
allowing the Capturer to make necessary changes. Note that the Capturer will only have access to
those fields ordinarily available to that Capturer. Any changes that are made need to be saved. If the
“Save” button is not clicked, changes to any field will not be updated in the database. As per the
“Add” procedure, the normal procedure for adding and saving data applies after the edit button has
been clicked.
If the Capturer enters incorrect data whilst in “Edit” mode or “Add” mode, click the
“Cancel” button. All data will be cleared. The “Cancel” button should be used sparingly as all fields
completed are deleted. The backspace and delete keys should be used in conjunction with
highlighting the data with the cursor to delete or cancel data in a specific field, rather than using the
“Cancel” button.
Click the “Save” button.
All Supervisory Visit details are saved to the database.
HOME COMMUNITY-BASED CARE MANUAL
RESTRICTED
89
RESTRICTED
HCBC
Learning unit 4:
Problem Tracking
Outcomes
Track and update Problem
1. Problem Tracking
To proceed, the Capturing official should click on the text hyperlink, sub-menu of
Management called “Problem Tracking”.
The Problem Tracking screen will load with Information captured on M&E Meeting page
or Supervisory Visit Page will be displayed.
Search by reference no. This was generated on the M&E Meeting page or Supervisory
Visit Page.
Click the “Edit” button.
90
RESTRICTED
HOME COMMUNITY-BASED CARE MANUAL
RESTRICTED
HCBC
Click in each field to capture the Problem information OR use the drop down lists to
select the appropriate option.
An asterisk (*) to the right of a field’s label denotes a required field. Details will
not be saved to the database if these required fields have not been appropriately
filled in.
Detailed field descriptions of the data required to be entered is a function of the
policy of the Department of Social Development and Department of health, and
may change from time to time.
• Report Date: This field can not be amended
• Problem Reference No: This field can not be amended
• Reporter (Persal Number) : This field can not be amended
• Problem Affected Area: you can amend this field if there are changes to
be made (National, Provincial, District)
• Report Written By: This field can not be amended
• Problem Identified at: This field can not be amended
• Problem Status you can amend this field if there are changes to be made
• Date Problem Identified: This field can not be amended
• Date Problem Solved (If problem is not yet resolved, this date is not
mandatory)
• Number of days passed before resolution: this field is calculated by
the system once “Date Problem Solved” is captured.
• Problem Referred to you can amend this field if there are changes to be
made
• Problem(One sentence) : This field can not be amended
• Problem Type: This field can not be amended
• Suggested Resolution you can amend this field if there are changes to
be made
• Actual Resolution you can amend this field if there are changes to be
made
• Problem Description: This field can not be amended
HOME COMMUNITY-BASED CARE MANUAL
RESTRICTED
91
RESTRICTED
HCBC
Click the “Save” button
All Problem details are saved to the database; a Problem reference no is allocated for
the problem.
Note:
If there is one or more required field not completed, the system generates an
information message stating which fields need to be filled in and the correct format to do so. The
Capturer should go back to those required fields and complete them accordingly. Once this is done,
the Capturer will click “Save” again.
If there are errors in the Problem details OR it is necessary to change them, the capturing
official concerned should click on the “Edit” button. All greyed out fields are now enabled, allowing
the Capturer to make necessary changes. Note that the Capturer will only have access to those fields
ordinarily available to that Capturer. Any changes that are made need to be saved. If the “Save”
button is not clicked, changes to any field will not be updated in the database. As per the “Add”
procedure, the normal procedure for adding and saving data applies after the edit button has been
clicked.
If the Capturer enters incorrect data whilst in “Update Problem” mode or “Add” mode,
click the “Cancel” button. All data will be cleared. The “Cancel” button should be used sparingly
as all fields completed are deleted. The backspace and delete keys should be used in conjunction with
highlighting the data with the cursor to delete or cancel data in a specific field, rather than using the
“Cancel” button.
92
RESTRICTED
HOME COMMUNITY-BASED CARE MANUAL
RESTRICTED
HCBC
Learning unit 5:
Sign-off Report
Outcomes
Capture Report
View report Status
Print Sign-off Report
1. SignSign-off Report
Note: Only Co-ordinators from both Department of Health and Department of Social
Development will capture Sign-off report details.
Department of Social Development Co-ordinator has access to capture only on the “DSD
specific section” and “General Section”. They will not be able to capture on the “DoH
specific section”, but will be able to view this section.
Department of Health Co-ordinator has access to capture only on the “DoH specific
section” and “General Section”. They will not be able to capture on the “DSD specific
section”, but will be able to view this section.
Values for outsourced / outcome indicators will only be entered if it an Annual Report
being captured
Once both officials are in agreement that the information captured is correct and they have
confirmed all sections on the system, the report will be submitted.
To proceed, the Capturing official should click on the text hyperlink, sub-menu of
Management called “Sign-off Report”. Click on the report type you will capture.
Note: The system will only allow the logged in person to capture only in their level, but
will be able to view other levels. E.g. if report type selected is National only national official will
have access to capture.
HOME COMMUNITY-BASED CARE MANUAL
RESTRICTED
93
RESTRICTED
HCBC
RESTRICTED
HOME COMMUNITY-BASED CARE MANUAL
The Sign-off report screen will load.
Click the “Add” button
Click on “Edit” in the your section.
94
RESTRICTED
HCBC
Click in each field to capture the Sign-off information OR use the drop down lists to
select the appropriate option.
An asterisk (*) to the right of a field’s label denotes a required field. Details will
not be saved to the database if these required fields have not been appropriately
filled in.
Detailed field descriptions of the data required to be entered is a function of the
policy of the Department of Social Development and Department of health, and
may change from time to time.
• Summary
• Challenges and solutions
• Plan for next term
• Contents confirmed by DSD officials: Click “Yes” if in agreement with
the content of the report. On the “General Section”.
• Section Completed: Click “Yes” if in the section is completed. On the
“DSD specific section”.
Click the “Save” button.
HOME COMMUNITY-BASED CARE MANUAL
RESTRICTED
95
RESTRICTED
HCBC
All Sign-off report details are saved to the database.
Note:
If there is one or more required field not completed, the system generates an
information message stating which fields need to be filled in and the correct format to do so. The
Capturer should go back to those required fields and complete them accordingly. Once this is done,
the Capturer will click “Save” again.
If there are errors in the Sign-off report details OR it is necessary to change them, the
capturing official concerned should click on the “Edit” button. All greyed out fields are now enabled,
allowing the Capturer to make necessary changes. Note that the Capturer will only have access to
those fields ordinarily available to that Capturer. Any changes that are made need to be saved. If the
“Save” button is not clicked, changes to any field will not be updated in the database. As per the
“Add” procedure, the normal procedure for adding and saving data applies after the edit button has
been clicked.
If the Capturer enters incorrect data whilst in “Edit” mode or “Add” mode, click the
“Cancel” button. All data will be cleared. The “Cancel” button should be used sparingly as all fields
completed are deleted. The backspace and delete keys should be used in conjunction with
highlighting the data with the cursor to delete or cancel data in a specific field, rather than using the
“Cancel” button.
Once Sign-off report details are confirmed complete and are saved, a report can be
submitted by clicking on the “Submit” button.
Note: No changes can be done for the sign-off once it has been submitted.
96
RESTRICTED
HOME COMMUNITY-BASED CARE MANUAL
RESTRICTED
1.1
HCBC
Printing SignSign-off report
Once Sign-off report for that quarter or for that year has been saved, a report can be
printed. There are two ways the sign-of report can be printed. (With Appendix and
without Appendix)
1.1.1 Print with Appendix
Click on “Print with Appendix” button. A Sign-off report will be printed with Monthly
Report; Quarterly Report, Registration report and (Outsourced Data - if Annual report)
HOME COMMUNITY-BASED CARE MANUAL
RESTRICTED
97
RESTRICTED
HCBC
1.1.2 Print without Appendix
Click on “Print without Appendix” button.
98
RESTRICTED
HOME COMMUNITY-BASED CARE MANUAL
RESTRICTED
1.2
HCBC
View Reporting
eporting Status
Before the coordinators submit the report, they can veiw the status of reporting to be
able to check the percentage of organisation report submissions.
HOME COMMUNITY-BASED CARE MANUAL
RESTRICTED
99
RESTRICTED
HCBC
Table 2 - Emergency Instructions
Lost Password
1. If a Capturer forgets his or her password, a call should be logged immediately so that
the Capturer password can be re-set. All calls must be logged through SITA
Helpdesk, for immediate attention with logged SDIMS related problems call SDIMS
Support centre, quote the SITA Helpdesk reference no.
2. Note: on the top right hand side of the screen there’s a SITA Helpdesk number to log
calls. When a SDIMS related problem is logged, an official (with a reference no for
the logged call ready) must call the SDIMS support centre at 043 700 8415 / 043
700 8434 / 043 700 8483 / 043 700 8445 for the call to be attended as soon as
possible.
3. A Capturer shall under no circumstances “borrow” a Username and password
combination from another Capturer, with or without his or her consent or knowledge.
Power Failure
1.
If a power failure occurs while a Capturer is in the process of entering information or
making changes to records in the Management Information System, and he or her
has not yet clicked the “Save” button, all information entered prior to the power
failure will not have been written to the database.
2.
All information must be re-captured once the system is online again.
Tips on Capturing
1.
When the system is process, be patient. Look out for the following depending on the
internet version you are using.
Wait until the
flag
stops
moving
Wait until this
circle
stops
moving
Wait until the
green
bars
reach the end
and disappear
On the bottom left corner, the system will display “Done” once the process is
100
RESTRICTED
HOME COMMUNITY-BASED CARE MANUAL
RESTRICTED
HCBC
completed.
2.
Add
3.
Indication on which button to use and when to use it.
Edit
Cancel
Save
Quick option on capturing date.
HOME COMMUNITY-BASED CARE MANUAL
RESTRICTED
101
RESTRICTED
HCBC
4.
When printing, look out for Pop-up blocker. Click on “Always allow pop-up”.
5.
The session gets terminated if you don’t capture anything on the system for 15
minutes. The system will display the following:
102
RESTRICTED
HOME COMMUNITY-BASED CARE MANUAL
RESTRICTED
HCBC
Use the back button then log out, and log in again.
6.
Depending on the internet version you use, if the following is displayed the refresh
the screen.
To refresh the screen press this button.
HOME COMMUNITY-BASED CARE MANUAL
RESTRICTED
or
103
RESTRICTED
HCBC
Table 3 - Reference List
Community Based KPA
Document (2002)
‘Community
Based
Services’.
Community
Based
Key
Performance Area (KPA) Document. Social Development.
National Government.
CorpInfo Services (2002)
‘Defense in depth. A Strategy for Securing Information in
Today’s
Networked
Environment.’
[Online].
Available:
www.corpinfo.com/Defense_in_Depth.doc [Accessed: 14
February 2003]
Document of Monitoring
and Evaluation System
(SDIMS) based on
performance indicators
Document (2002)
Process Impact
‘Terms of Reference’ Development of Monitoring and
Evaluation
System
based
on
performance
indicators
Document. Social Development. National Government.
‘Software Requirements Specification’. [Online]. Available:
www.processimpact.com/process_assets/srs_template.doc
[Accessed: 03 February 2003]
RUSecure (2002)
‘Information Security: A Managed Response’. [Online]
Available:
http://www.rusecure.co.uk/information_page.htm
[Accessed: 14 February 2003]
DEVELOPMENT OF MONITORING AND EVALUATION SYSTEM (SDIMS) BASED ON PERFORMANCE INDICATORS
DOCUMENT (2002)
104
RESTRICTED
HOME COMMUNITY-BASED CARE MANUAL
RESTRICTED
HCBC
Table 4 - Glossary
Attributes
The basic unit of information about an entity
occurrence.
Data Flow Diagram
DFDs show the logic and flow of data through an
information
system
in
a
graphical
and
top-down
manner.
Entity
Representations of people, places and things that
encapsulate the business model including rules, data
and relationships.
Entity Relationship
Diagram
ERD’s model entities (tables) and the relationships
between them.
Key Performance
Indicators
Management
Information System
Key performance indicators that can easily be tracked
by coordinators at all levels.
Organisation, storage and retrieval of data that is
accumulated and created by use of computers and
computer programs.
Software Requirements
Specification
The SRS document details what is to be produced and
the product to be generated from the definition.
HOME COMMUNITY-BASED CARE MANUAL
RESTRICTED
105
RESTRICTED
Systems Development Life
Cycle
A
process
analysts,
by
HCBC
which
programmers,
project
and
managers,
end
systems
Capturers
build
information systems. It consists of five phases:
1. Planning
2. Analysis:
currently
at
this
phase
of
development
3. Design
4. Implementation
5. Maintenance
Use Case Diagram
Describe functions of a system from a Capturers
standpoint. Consists of a scenario, which describes
current work situations. The scenario, which represents
the view of a Capturer, comprises the system that is
being developed as a black box. The inner workings of
the system are hidden to the Capturer. Only the
external system behaviour viewed from a concrete
working context of a Capturer is of interest. In this
perspective the focus is on typical interactions between
Capturers and the application system
106
RESTRICTED
HOME COMMUNITY-BASED CARE MANUAL