1
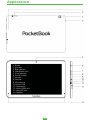
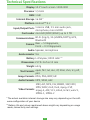
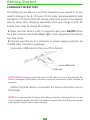
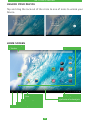
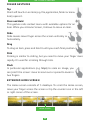
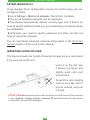
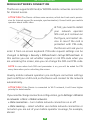
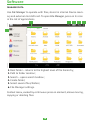
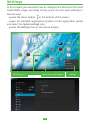
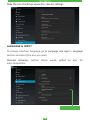
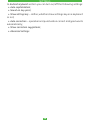
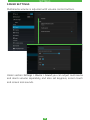
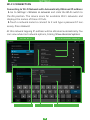
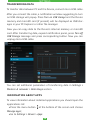
User Manual
PocketBook SURFpad 310,1’’
Contents
SAFETY PRECAUTIONS
Storage, Carriage and Usage Conditions
Maintenance
RF Safety
Utilization
4
4
4
5
5
APPEARANCE
6
TECHNICAL SPECIFICATIONS
7
GET TING STARTED
Charging The Battery
Unlock Your Device
Home Screen
Display Views
Finger Gestures
Extended Home Screen
Using the On-screen Keyboard
Menus
Establishing Wi-Fi
Inserting Micro SD Card
Mobile Networks Connection
8
SOFTWARE
Manage Data
Application Launching
Creating Folders on the Home Screen
Application Removing
List of Opened Applications
Preinstalled Applications
PBI Packages Support
Listen to the Music
Music Library
Gallery
8
9
9
10
11
11
12
12
13
13
14
16
16
17
18
19
19
20
22
23
23
24
MX Player
24
Camera
25
2
Photo and Video Modes
Browser
Email
Setting Up the Account
Inbox
25
25
26
26
26
SET TINGS
Language & Input
Sound Settings
Display Settings
Storage
Connecting Devices to Your Tablet
Unmounting External Memory and Devices
Location Access and Security
Date & Time
Restore Your Tablet to Factory Settings
Battery Charge State
Wi-Fi Connection
Connecting to Wi-Fi Network with Automatically
Obtained IP-address
Connection to Wi-Fi Network with Manual
&RQʼJXULQJ1HWZRUN6HWWLQJV
Advanced Options
Turn off Wi-Fi
Bluetooth
Transferring Data
Information about Apps
FIRMWARE UPDATE
Automatic Update
Manual Update
Troubleshooting
27
28
30
31
32
32
32
33
33
34
35
36
36
38
38
38
39
39
41
41
41
43
CUSTOMER SUPPORT
44
COMPLIANCE WITH INTERNATIONAL STANDARDS
45
3
Safety Precautions
Before start working with the Device, please, read this section carefully. Following these instructions will help you ensure your safety and extend service
life of the Device.
Storage, Carriage and Usage Conditions
'HYLFH RSHUDWLQJ WHPSHUDWXUH UDQJH LV rŋ WR rŋ VR GRQȒW H[SRVH WKH
Device to excessively high or low temperatures. Never leave cables near heat
sources. Heated cables or their insulation may become deformed or damaged,
which could lead to fire or electric shock.
Try to avoid next impacts:
Țdirect sunlight
Țdirect flame or smoke (cigarette, lighter, open fire etc.)
Țexposure to liquids or damp (do not use the Device in the rain, in the street
at higher humidity, near bodies of water etc.)
Țpenetration of liquids or moisture
Țexposure to strong electromagnetic fields, electrostatic charges and artificial sources of UV electromagnetic radiation
Țexcessive mechanical pressure on the screen, connectors and keys of the
Device.
Do not leave the Device for a long time in poorly ventilated environment, e.g.
in a car or in closed tight boxes/packaging.
Neither drop nor try to bend the Device. Protect the screen from objects that
may scratch or damage it. To ensure adequate protection of the screen, we
recommend storing the Device in a protective and/or hard cover.
Keep away from children.
Maintenance
Do not disassemble or modify the book reader.
Do not use the Device with a damaged battery, charger (broken case, poor
contact, broken feed cable) or SD card. If the battery is damaged (cracked case,
leakage of electrolyte, off-shape etc.) it should be replaced by the authorized
4
SAFETY PRECAUTIONS
personnel. Usage of home-made or modified batteries may cause an explosion and/or damage the Device. Do not use organic or inorganic solvents (e.g.
benzoyl etc.) to clean the screen/case. Use a soft cloth to remove dust from
WKH'HYLFHȒVVXUIDFH$SSO\DIHZGURSVRIGLVWLOOHGZDWHUWRUHPRYHGLUW
Up to five faulty pixels are acceptable in the screen and do not constitute a
warrantable defect of the screen.
When the product guarantee term is out of expiration, please contact the
nearest authorized service to diagnose whether the Device can be used safely.
For detailed information about service centers in your region please visit the official
website of PocketBook International: http://www.pocketbook-int.com/support/.
RF Safety
The Device receives and transmits radio frequencies and may interfere with
radio communications and other electronic equipment. If you use personal
medical Devices (e.g. a pacemaker or hearing aid) please contact your doctor
or the manufacturer to learn whether or not such medical devices are protected against external RF signals.
Do not use wireless communication in places where it is prohibited, e.g. onboard
a plane and in hospitals – this may affect airborne avionics or medical equipment.
Utilization
Incorrect disposal of this Device may have adverse impacts on the environment
and public health. To prevent such consequences follow the device-specific
disposal requirements. Recycling of these materials helps preserve natural
resources. For more information regarding recycling issues please contact local municipal authorities, your domestic waste collection service, store where
you purchased the Device, or the authorized service center.
Disposal of electric and electronic components (the Directive is applicable to
the EU and other European countries where separate waste disposal systems
exist). In other countries dispose batteries accordingly to local laws.
Do not destroy the battery by burning it to avoid the danger of explosion!
5
Appearance
1. Reset
2. Sim slot
3. Rear camera
4. Headphone jack
5. Front camera
6. On/Off button
9ROXPH
8. Volume 9. Microphone
10. Micro-USB
łŧŞŢŤŚŬŨŪ
12. Micro HDMI slot
13. microSD slot
14. Speaker
6
Technical Specifications
Display 10.1” touch screen 1280×800
Processor 1,5 GHz
RAM 1 GB
Internal Storage 16 GB *
Platform Android™ 4.2
1×micro USB, 3.5 mm audio jack,
microphone, micro HDMI
Card reader microSD (SDXC/SDHC) up to 2 TB
Input/Output Ports
Wi-Fi (b/g/n), 3G (HSDPA/UMTS), GPS,
Bluetooth
Rear — 5 Megapixels,
Camera
Front — 0.3 Megapixels
Audio Speaker, microphone
Communications
Accelerometer Yes
Battery Li-Polymer, 8000 mAh **
Dimensions 257.9×167.6×12 mm
Weight 642g
epub, fb2, txt, doc, rtf, html, chm, tcr, pdf,
Text Formats
pml
Image Formats JPEG, PNG, BMP, GIF
Audio Formats MP3, WMA, AAC
MKV, AVI, MP4, FLV, WEBM, 3GP, MOV,
MPG, WMV, divX, Xvid, mpeg-4 SP,
Video Formats
mpeg-4, ASF, VC1, H264, H263, wmv 9,
MPEG-1, MPEG-2
* The actual available internal storage size may vary depending on the softZDUHFRQʻJXUDWLRQRI\RXUGHYLFH
** Battery life and values mentioned above might vary depending on usage
mode, connectivity and settings
7
Getting Started
CHARGING THE BATTERY
The battery of your Device is not fully charged as you unpack it, so you
QHHGWRFKDUJHLWIRUKRXUV,WȒVVWURQJO\UHFRPPHQGHGWRNHHS
the Device off during the first charge, otherwise power consumption
may be more, than charging, especially when you charge it from PC.
Follow next steps to charge the battery:
1. Make sure the Device is off. In opposite case, press On/Off button
for a few seconds and select Power Off in menu appeared. The Device
will shut down.
2. Connect your Device to a computer or power supply using the microUSB cable included in package.
ȚConnect a USB cable to the jack of the Device:
micro HDMI cable
USB cable
AT TENTION! Incorrect connection of the USB cable can seriously damage the
'HYLFH'DPDJHVRIWKH'HYLFHFDXVHGE\LQFRUUHFWFRQQHFWLRQDUHQȒWFRYHUHGE\
warranty.
ȚWhile the USB cable is connected, the Device should be near to
PC/charger.
NOTE ,WȒVUHFRPPHQGHGWRFKDUJHWKHEDWWHU\XVLQJWKHFKDUJLQJGHYLFH,QFDVH
LI\RXFKDUJHWKHEDWWHU\IURP3&LWȒVEHWWHUWRNHHSWKH'HYLFHRIIEHFDXVHSRZHU
consumption may be more, than charging.
8
GETTING STARTED
UNLOCK YOUR DEVICE
Tap and drag the lock out of the circle to one of icons to unlock your
Device.
HOME SCREEN
Search in Google
or Yandex
Applications
Application/section
menu
Last opened applications
Return to Home Screen
Back - return to the previous screen
Notification area
Open a list of
applications and widgets
9
GETTING STARTED
DISPLAY VIEWS
The screen orientation is changed automatically when you hold the
Device horizontally to vertically, and vice versa. To enable/disable
screen auto-rotation, go to Settings > Device > Display.
Landscape view
Portrait view
10
GETTING STARTED
FINGER GESTURES
Tap
Short soft touch on an item (e.g. file, application, folder or menu
item) opens it.
Press and Hold
This gesture calls context menu with available options for an
item. While you at Home Screen, it allows to move an item.
Slide
Slide means move finger across the screen vertically or
horizontally.
Drag
To drag an item, press and hold it until you reach final position.
Flick
Flicking is similar to sliding, but you need to move your finger more
UDSLGO\,WȒVXVHGIRUVFUROOLQJWKURXJKOLVWV
Pinch
In particular applications (e.g. Maps) to scale an image, you
FDQȑSLQFKȒWKHVFUHHQPRYHWR]RRPRXWRUVSUHDGWR]RRPLQ
two fingers.
EXTENDED HOME SCREEN
The Home screen consists of 5 desktops. To scroll the Home screen,
move your finger across the screen or tip the counter icon in the left
or right corner of the screen.
Home screen
11
GETTING STARTED
USING THE ON - SCREEN KEYBOARD
To access the on-screen keyboard, touch any textbox. Enter your text
by touching the keys of the on-screen keyboard.
4
5
6
1
2
3
7
1. Switches to symbol mode;
2. Switches between upper and lower case;
3. Settings and additional features;
4. Field for text typing;
5. Backspace – delete a previous sign;
6. Input text;
7. Continuous press changes input languages.
MENUS
Most applications have two types of menu: application/section menu
and context one. Application/section menu is brought up by pressing Menu button . Context menu is called by continuous touch on a
screen or item, depending on application.
NOTE Application/section menu is available not for all applications. In this case
nothing happens when you press the Menu button.
12
GETTING STARTED
ESTABLISHING WI - FI
If you skipped Wi-Fi configuration during the initial setup, you can
configure it later.
1. Go to Settings > Wireless & networks. Check Wi-Fi checkbox
2.The list of available networks will be displayed.
3.7KH 'HYLFH DXWRPDWLFDOO\ GHWHFWV VHFXULW\ W\SH DQG LI WKHUHȒV QR
need to specify additional data (e.g. pre-shared key), connection would
be established.
4. Otherwise, you need to specify password and other security settings (if required) manually.
You can read about advanced network configuration in the Wi-Fi Connection chapter of the current User Manual.
INSERTING MICRO SD CARD
The Device already has 16 GB of internal storage, but you can extend
it by using micro SD card.
Insert it to the slot, like
it shown on a figure, and
slightly push until card
will be fixed.
To eject the card, slightly
press on its edge until it
will be unfixed, and pull
it to get.
AT TENTION! Before ejecting microSD card either turn the Device off or unmount
it: go to Settings > Storage settings > Unmount SD card. Otherwise the data stored
on microSD card might be damaged.
13
GETTING STARTED
MOBILE NETWORKS CONNECTION
The Device supports GSM and/or WCDMA mobile networks connection
for Internet access.
AT TENTION! 7KH'HYLFHXWLOL]HVVRPHVHUYLFHVZKLFKGRQȒWDVNXVHUȒVSHUPLVsion for Internet access (for example, synchronization). Consult with your mobile
operator about traffic rates.
At first, you need to install
your network operator
SIM-card, as it is shown on
the figure, and restart device. In case if the card is
protected with PIN-code,
the Device will ask you to
enter it from on-screen keyboard. PIN-code request settings can be
changed in Settings > Security > SIM card lock > Set up SIM card lock. In
this section you can set whether request or not PIN-code when you
are unlocking the screen, also you can change the SIM-card PIN-code.
NOTE In case when Lock SIM card parameter is on, you will be asked for PIN
HYHU\WLPHZKHQ\RXȒUHXQORFNLQJWKHVFUHHQ
Usually mobile network operators pre-configure connection settings
(such as APN) on a SIM-card, so the Device will connect to the network
automatically.
AT TENTION! If the Device is connected to Wi-Fi network, it will have higher
priority for data transfer.
If you need to change connection configuration, go to Settings > Wireless
& networks > More > Mobile networks.
Ț Data connection – turn mobile network connection on or off
Ț Data roaming – select whether use mobile network connection or
not when you are out of your mobile operator coverage, for example,
abroad
14
GETTING STARTED
ȚPrefferred networks
ȚNetwork mode – select the most suitable one for your mobile
network or set to auto-detect
ȚAccess Point Name – Internet access points configuration. If you
QHHG WR VHW XS RQH PRUH SRLQW RSHQ WKH VHFWLRQȒV PHQX E\ Menu
hardware key press and set the parameters provided by your mobile
operator
ȚNetwork operators – select network operator to connect to. Press
Select automatically to connect to the default network.
After pressing Select manually, the Device will search for available mobile networks and you will be able to select one. For example, this
feature could be useful when you are in roaming zone – you will be
able to select operator with the lowest rates.
NOTE Consult your mobile network operator about roaming rates.
15
Software
MANAGE DATA
Use File Manager to operate with files, stored in internal Device memory and external microSD card. To open File Manager, press on its icon
in the list of applications.
3
2
4
5
6
1
1. Root folder – returns to the highest level of file hierarchy;
2. Path to folder location;
3. Search – opens search textbox;
4. Create folder;
5. Select several files/folders;
6. File Manager settings.
Context menu, evoked by continuous press on element, allows moving,
copying or deleting files.
16
SOFTWARE
APPLICATION LAUNCHING
The application can be launched by short press on the icon on the
Homescreen or from the list of available applications. You can create
a shortcut to an application at any desktop. Scroll Home Screen to the
desktop you need, then open the application list.
Button for opening lists of applications and widgets
Touch and hold desired application icon until the desktop appears.
After you release a finger, an icon remains on a desktop. To launch application tap on its icon.
Applications
shortcuts
Widgets
To place a shortcut on Homescreen, press and hold
the one, selected in the list
17
SOFTWARE
CREATING FOLDERS ON THE HOME SCREEN
Desktop icons can be grouped into folders. To create a folder, tap and
hold the icon and drag it to the icon which you want to merge with,
and then release your finger.
You can add the icons of other programs
to this folder in a similar way. To rename a
folder, touch to its name and type the new
name on the appeared keyboard.
To open an application, located in a folder,
touch the icon of a folder and choose the
application in the displayed list.
18
A list of applications
in a folder
SOFTWARE
APPLICATION REMOVING
After continuous touch on icon or widget Sign of application removing
is activated. To delete element from the home screen or a folder,
drag-and-drop it to this sign and release after it highlights in red.
Sign of application removing
LIST OF OPENED APPLICATIONS
Opened applications are displayed in the list of opened applications
(button for invoking a list is located on the left bottom corner of the
screen). You can close application:
1. Invoke the list of opened applications;
2. Press and hold the application, you need to close;
3.When the dialog window appears, press Remove from list.
Applications, launched by the system automatically, can be stopped in
the Settings > Apps > Running > Stop (see more detailed information in
Information about Apps section of the current User manual).
19
SOFTWARE
3) Press ‘Remove from list’
2) Press and hold on the application in the list
1) Button for invoking opened applications
PREINSTALLED APPLICATIONS
Supports functions for comfortable web-pages viewing
Calculator Simple Android calculator
Browser
Calendar Events calendar with Google synchronizing
Camera
Standard Android (photo/video) camera
application
Clock Clock with alarm and screen saving function
People List of contacts
Download tool for music, documents, video
Downloads
and other files
Email Email client supporting POP3, IMAP, Exchange
File Manager Standard file manager
Picture gallery supporting JPEG, PNG, BMP,
Gallery GIF, video formats, and Google Picasa
synchronization
Search Search by Google-in Internet or within content
20
SOFTWARE
Settings Set your options and preferences
Music Music player, supporting MP3, WMA, AAC
Diary Organize your study schedule and homework
Book Store Book store application
Reader from Pocketbook EPUB (DRM),
PocketBook
PDF(DRM), FB2, TXT, HTML,RTF, CHM, DJVU
KidRead Launcher for kids
Play Store Shop Google Play on the web
Evernote Remember Everything
The most popular Internet Massage client
IM+
supporting several protocols
Popular English learning app from British
LearnEnglish
Council
SPB TV Popular TV channels streaming
Kingsoft Office
View and edit popular office file formats
Multilang
MX Player Video Player with advanced features
21
SOFTWARE
PBI PACKAGES SUPPORT
Sometimes the distribution of several programs is stored in one pbi
package. To install these programs open the package and mark the
programs you want to install.
Pre-installed pbi package is located in the mnt/sdcard/PB System.pbi
folder. To install it manually, go to the File manager and launch PB
System.pbi file. Sometimes the wizard automatically proposes to install
the pbi package:
Țafter formatting the device (without deleting user data);
Țafter installing firmware.
After starting the wizard do the following:
1. Check the applications you want to install and uncheck the
DSSOLFDWLRQV\RXGRQȒWZDQWWRLQVWDOO
2. Press Install.
3. After unpacking and installing selected applications press Finish.
All installed applications will appear on the Home screen. Some applications (KidRead, PocketBook) should be downloaded from the online
store by means of the home screen icon, which redirects to the online
store.
22
SOFTWARE
LISTEN TO THE MUSIC
Music Library
,Q0XVLF/LEUDU\\RXFDQVHHDOOWKHPXVLFVWRUHGLQWKH'HYLFHȒVPHPRU\
Replay (one
Artists
Albums
Tracks
Music library
6KXIʽH track, all, off)
Playlists
Now Playing
7R FUHDWH QHZ SOD\OLVW EULQJ XS VRQJȒV FRQWH[W PHQX VHOHFW Add to
playlist, and select New.
Volume is controlled by Volume +/- hardware buttons on a side panel
and by buttons on the bottom of the screen.
23
SOFTWARE
GALLERY
Gallery is an application for images and video management. To open
an image in full screen, just touch it. To scroll the collection use sliding gesture. To zoom an image, use scaling gestures (pinch/spread).
From Gallery menu you can delete, crop, set as wallpaper or contact
avatar, or rotate image.
Application supports almost all video formats. You can view file information in the application menu .
MX PLAYER
MX Player is an application for viewing video. Control panel is presented below:
Lock display
Previous
Play/
Pause
24
Next
Zoom mode
SOFTWARE
CAMERA
Photo and Video Modes
A panel of record
and photo modes.
Press to choose
one of them.
Last made photo or video. Touch to open Gallery
Toggle between front and rear cameras
Take a photo
Start/stop video recording
Camera settings
GPS location info
Exposure
Color effect
Scene mode
White balance
Image Properties
Face Detection
Self timer
Continuous shot
Picture size
ISO
EIS
Microphone
Audio mode
Time lapse interval
Video quality
BROWSER
Using Application menu you can perform the following operations:
Close tab
New tab
Application menu
Update page
Add to Bookmarks
Search
View bookmarks, history, saved pages
Next page
Previous page
Ț Stop/Update;
Ț New tab;
Ț New incognito tab
Ț Share page;
Ț Find on page;
Ț Request desktop site;
Ț Save for offline reading;
Ț Page info;
Settings.
25
SOFTWARE
EMAIL
Setting Up the Account
1. At the first run you will be suggested to enter from on-screen keyboard your account information: email address and password.
2. ,IDSSOLFDWLRQLVQȒWDEOHWRGHWHFWLQFRPLQJDQGRXWJRLQJVHUYHUVHWtings automatically, you would need to specify these settings manually
(they should be given by your email service provider).
3. Next step is to specify account name, as it will be stored in the
Device (e.g. Personal Mail or Office Mail) and your name, as it will be
displayed in From field of your composed messages.
4. To add an account, select corresponding item in application menu.
Accounts list, combined inbox, starred messages and drafts will be
displayed in Accounts section.
Inbox
Using context menu, you can do the following with message: Open,
Delete, Forward, Reply, Mark as read.
26
Settings
In this chapter you will learn how to configure the Device for the most
comfortable usage and make it truly yours. You can open settings in
several ways:
Ț press the menu button in the bottom of the screen;
Ț open all available applications (button on the application panel)
and select the System settings icon;
Ț press the Settings icon on the device display.
Button for invoking Settings icon
Settings menu
Button for invoking list of
applications and widgets
27
Press System
settings
SETTINGS
Slide the list of settings upward to view all settings.
LANGUAGE & INPUT
To change interface language, go to Language and input > Language
section and select the one you need.
Personal dictionary section stores words, added by user for
auto-completion.
Open submenu
28
SETTINGS
In Android keyboard section you can turn on/off the following settings:
ȚAuto-capitalization;
ȚSound on key-press;
ȚShow settings key – define, whether show settings key on a keyboard
or not;
ȚAuto-correction – spacebar and punctuation correct mistyped words
automatically;
ȚShow correction suggestions;
ȚAdvanced settings.
29
SETTINGS
SOUND SETTINGS
Multimedia volume is adjusted with volume control buttons.
Under section Settings > Device > Sound you can adjust multimedia
and alarm volume separately, and also set keypress, screen touch
and screen lock sounds.
30
SETTINGS
DISPLAY SETTINGS
Under section Settings > Device > Display you can set next parameters:
ȚBrightness;
ȚWallpaper;
ȚAuto-rotate screen;
ȚDaydream (screensaver): clock, colors, photo frame or photo table
ȚFont size
ȚHDMI settings — HDMI screen adaptation: you can configure the
interface for transferring uncompressed video data and compressed/
uncompressed digital audio data from an HDMI-compliant device:
ȚVXSSRUWRIWKHUHVROXWLRQIURPůZLWK+]IUHTXHQF\
V\QFKURQL]DWLRQWRůZLWKȐ+]
ȚScreen zoom
ȚSleep – set the delay before the screen goes down to save battery
charge;
ȚWireless display.
31
SETTINGS
STORAGE
Storage section displays information about the Device storage (internal and external SD-card memory): total, occupied, available space. In
this section you can also clean internal or external memory.
Press before
ejecting SD-card
Internal storage
CONNECTING DEVICES TO YOUR TABLET
USB devices are supported through the USB port, such as a keyboard,
mouse, game controller, digital camera, or storage device. If you want
external devices to be identified automatically, check Enable media
scanning on SD in Settings > Storage (as it is shown on the picture
above).
UNMOUNTING EXTERNAL MEMORY AND DEVICES
Before ejecting External memory or USB host press 6HWWLQJV!6WRUDJHb!
SD card/USB host > Unmount shared storage.
32
SETTINGS
LOCATION ACCESS AND SECURITY
In these Settings items you can set:
Țdetermining your location by network coordinates;
Țdifferent ways of screen locking and unlocking;
Țowner info;
Țencryption;
Țadministrators and passwords;
Țstoring accounts data.
DATE & TIME
In this chapter you can set date, time, time zone, time and date display
format (12 or 24 hour) or check Automatic to determine time and date
settings using wireless network data.
Set date and time
Marks for auto time sync confirmation
Touch numbers
to choose date
33
SETTINGS
RESTORE YOUR TABLET TO FACTORY SET TINGS
Select Settings > Backup & reset > Factory data reset menu item, in opened
window press Reset tablet and Erase everything. It will restore your tablet
to the factory settings and erase all your personal information: downloaded applications, system settings, google account.
Clean SD card storage
Press to reset tablet
Another way to restore your tablet to factory settings:
ȚPress and hold Volume + button and switch the Device on by pressing power button
ȚAndroid system recovery menu will appear. Now you can release Volume + button
ȚSelect wipe data/factory reset using Volume +/- hardware keys and
press On/Off key to confirm choice.
34
SETTINGS
ȚSelect yes – delete all user data and press Menu
ȚUnder service menu select reboot system now and press Menu
BAT TERY CHARGE STATE
It displays battery charge level (in percents), information whether the
Device is charging via network or working from battery. In Battery section you can view info about applications, consuming the power.
Charging by USB, charging level - 82%
Charging level > 15%
35
SETTINGS
WI - FI CONNECTION
Connecting to Wi-Fi Network with Automatically Obtained IP-address
1. Go to Settings > Wireless & networks and slide the Wi-Fi switch to
the On position. The device scans for available Wi-Fi networks and
displays the names of those it finds.
2.Touch a network name to connect to it and type a password if necessary. Press Connect.
At this network tapping IP-address will be obtained automatically. You
can view advanced network options, ticking Show advanced options.
Turn on Wi-Fi
Chosen Wi-Fi
List of available networks
Enter password
36
Press ‘Connect’
SETTINGS
Connection to Wi-Fi Network with Manual Configuring Network Settings
Tick it to view advanced options
Settings by default
1.To set parameters for Wi-Fi network access manually, press Add network in Settings, specify a network name, security protocol, password
in the opened window and press Save.
2.7RXFKKROGDQHWZRUNLQWKHOLVWRI:L)LQHWZRUNV\RXȒYHDGGHG
Networks search
Add network
Touch Modify network in the dialogue, which appears. Select Show advanced options.
3. If the network has no proxy settings, touch None under Proxy settings, else touch Manual in the menu that opens.
4. Enter the proxy settings supplied by your network administrator.
5.Touch Save.
6. touch Static under IP settings and enter IP address, gateway, DNS.
7.Touch Save.
37
SETTINGS
ADVANCED OPTIONS
Advanced options allow turning on/off notifications when an open
network is available. To envoke them, open Settings > Wi-Fi and press
the application menu button on the right top corner of the screen and
touch Advanced.
Button for evoking advanced options
TURN OFF WI - FI
To turn off Wi-Fi module slide the Wi-Fi switch to the Off position in
the Settings > Wireless &networks section.
BLUETOOTH
To establish Bluetooth connection, check the corresponding checkbox,
or press power management widget button.
To configure Bluetooth, go to Bluetooth settings section and specify
Device name, set visibility and its period. To detect other devices press
Scan for devices. To connect to the device, press its name in a list.
38
SETTINGS
TRANSFERRING DATA
To transfer data between PC and the Device, connect micro-USB cable.
After you connect the cable, a notification window suggesting to turn
on USB storage will popup. Press Turn on USB storage and the Device
memory and microSD card (if present) will be displayed as USB storages in your PC Explorer or other file manager.
1RZ\RXFDQFRS\GDWDWRWKH'HYLFHȒVLQWHUQDOPHPRU\RUPLFUR6'
card. After transferring data, expand notification panel, press Turn off
USB Storage message and press corresponding button. Now you can
unplug micro-USB cable.
You can set additional parameters of transferring data in Settings >
Wireless & networks > Data Usage section.
INFORMATION ABOUT APPS
To view information about installed applications you should open the
applications list:
Ț Press the menu button at the bottom of the screen and choose
Manage apps;
Ț Go to Settings > Device > Apps.
39
SETTINGS
$IWHUSUHVVLQJWKHDSSOLFDWLRQȒVWLWOH\RXȒOOEHDEOHWRYLHZLWVGHWDLOHG
LQIRUPDWLRQVWRSLWLILWȒVUXQQLQJDQGHUDVHDSSOLFDWLRQGDWD
Memory, occupied by applications
40
Installed applications
Choose the applications list
Firmware Update
Official firmware updates for the Device are published on the official
PocketBook website (www.pocketbook-int.com/us). Installation of official firmware updates is recommended, as they contain fixes and
additions improving the efficiency of the Device.
Official firmware updates do not influence the warranty conditions.
The warranty does not cover software installed from sources other
than the official PocketBook website.
You can update firmware in several ways.
AT TENTION! Please, make sure the Device is fully charged before updating the
firmware to avoid discharge during update process! This may cause severe damDJHRIWKH'HYLFHȒVVRIWZDUH
AUTOMATIC UPDATE
Your Device should be connected to the Internet for this update variant.
1. Enter Settings > System > About device > System updates section.
2. ,I\RXȒGOLNHWKH'HYLFHWRFKHFNIRUXSGDWHVDXWRPDWLFDOO\FKHFN
Enable or disable autoupdate checkbox
3.To check for updates immediately, press Check for the new firmware now.
If firmware updates are available, the Device will automatically download and install them.
AT TENTION! Sometimes a complect of several programs is stored in one pbi
package. To install them after firmware update, please, accept an offer of the pbi
package installation wizard (if it appears automatically) or launch the installaWLRQILOHIURPWKHȑ)LOH0DQDJHUȒVHHPRUHGHWDLOHGDERXWSELSDFNDJHVLQWKHPBI
Packages Support section).
MANUAL UPDATE
Variant 1
1. 'RZQORDGWR\RXU3&ILUPZDUHYHUVLRQ\RXȒGOLNHWRLQVWDOOwww.
pocketbook-int.com/us/support/pocketbook-surfpad)
41
FIRMWARE UPDATE
2. Connect your Device to PC and copy firmware file (.upkg extension)
to the internal storage or external microSD-card
3. Go to Settings > About device > System updates section
4. Select SD card. In the list appeared select the firmware version to
install and press OK.
Variant 2
1. 'RZQORDGWR\RXU3&ILUPZDUHYHUVLRQ\RXȒGOLNHWRLQVWDOO
2. Connect your Device to PC and copy firmware file (.upkg extension)
to the internal storage or external microSD-card
3. If the Device is on, turn it off by continuous power button press and
selecting the corresponding choice in switch off menu
4. Press and hold Volume + button and switch the Device on by pressing power button
5. Android system recovery menu will appear (Android logo). Now you
can release Volume + button
6. Select apply update from sdcard using Volume +/- hardware keys
and press On/Off key to confirm choice
7. Select the firmware file by Volume +/- buttons and press On/Off
button to confirm.
8.The Device will perform all the necessary update action and will reboot.
NOTE To exit Android system recovery, select reboot system now.
Variant 3
1. 'RZQORDGWR\RXU3&ILUPZDUHYHUVLRQ\RXȒGOLNHWRLQVWDOO
2. Connect your Device to PC and copy firmware file (.upkg extension)
to the internal storage or external microSD-card
3. Go to Settings > Backup & reset > Recovery Mode section.
4.The Device will reboot and Firmware update will continue according to the Variant 2 scenario, starting from 5th item.
42
FIRMWARE UPDATE
TROUBLESHOOTING
Issue
7KH'HYLFHGRHVQȒW
respond on screen
touches or keys
pressing
Solution
Restart the Device: Press and hold On/
Off button for 10 seconds until the Device goes off. If you will continue holding
On/Off button for 5 more seconds, the
'HYLFHȒVSRZHUPDQDJHPHQWV\VWHPZLOO
completely reboot. To switch the Device
on, press again the power button as usual.
If it does not help, press Reset button on
side panel with some thin item.
ȚTurn the Device off by continuous power
After turning on the
Device only splash button press
ȚPress and hold Volume + button and
screen is displayed
WKHORFNVFUHHQLVQȒW switch the Device on by pressing power
loaded) button
ȚAndroid system recovery menu will appear (Android logo with exclamation mark).
Now you can release Volume + button
ȚSelect wipe data/factory reset using Volume +/- hardware keys and press On/Off key
to confirm choice.
ȚSelect yes – delete all user data and
press Menu
ȚUnder service menu select reboot system now and press Menu
43
Customer Support
For detailed information about service centers in your country please
use contacts below:
ÊHVNR
800-701-307
Deutschland
0-800-187-30-03
France
0805-080277
Polska
0-0-800-141-0112
Slovensko
0-800-606-676
USA/Canada
1-877-910-1520
ŋũŬŬţź
8-800-100-6990
ŎťūśƁŨś
0-800-304-800
ŅśŢśŰŬŭśŨ
8-800-333-35-13
ļŠŦśūŮŬŷ
8-820-0011-02-62
ʹʨʽʨʸʯʭʬʲʵ
995-706-777-360
www.pocketbook-int.com/support/
[email protected]
44
Compliance with International Standards
The EUT should be supplied by USB port from complied Limited Power Source
of personal computer or notebook.
The EUT should be supplied by Adapter from complied Limited Power Source.
AC Power:
Manufacturer: PENGSHENGYE ELECTRONIC
Model: SAPA05010EU U
Rated output voltage: DC 5.0V 2.5A
IMPORTANT: Changes or modifications to this product not authorized could void the
EMC and wireless compliance and negate your authority to operate the product. This
product has demonstrated EMC compliance under conditions that included the use
of compliant peripheral devices and shielded cables between system components. It
is important that you use compliant peripheral devices and shielded cables between
system components to reduce the possibility of causing interference to radios, televisions, and other electronic devices.
European Community Compliance Statement
This equipment is marked with the 0678 symbol and can be used throughout
the European community.
This indicates compliance with the R&TTE Directive 1999/5/EC and meets
the relevant parts of following technical specifications:
EN 300 328 – Electromagnetic compatibility and Radio spectrum Matters
(ERM); Wideband Transmission Systems; Data transport equipment operating
in the 2.4 GHz ISM band and using wide band modulation techniques; Harmonized EN covering essential requirements under article 3.2 of the R&TTE
Directive
EN 301 489-1 – Electromagnetic compatibility and Radio spectrum Matters
(ERM); ElectroMagnetic Compatibility (EMC) standard for radio equipment and
services; Part 1: Common technical requirements
45
COMPLIANCE WITH INTERNATIONAL STANDARDS
ETSI EN 301 489-7 – Electromagnetic compatibility and Radio spectrum Matters (ERM); ElectroMagnetic Compatibility (EMC) standard for radio equipment
and services; Part 7: Specific conditions for mobile and portable radio and ancillary equipment of digital cellular radio telecom munications systems (GSM
and DCS)
EN 301 489-17 – Electromagnetic compatibility and Radio spectrum Matters (ERM); EMC standard for radio equipment and services; Part 17: Specific
conditions for 2.4 GHz wideband transmission systems and 5 GHz high performance RLAN equipment
ETSI EN 301 489-24 – Electromagnetic compatibility and Radio spectrum
Matters (ERM); ElectroMagnetic Compatibility (EMC) standard for radio equipment and services; Part 24: Specific conditions for IMT-2000 CDMA Direct
Spread (UTRA) for Mobile and portable (UE) radio and ancillary equipment
ETSI EN 301 511 – Global System for Mobile communications (GSM); Harmonized EN for mobile stations in the GSM 900 and GSM 1 800 bands covering
essential requirements under article 3.2 of the R&TTE directive (1999/5/EC)
ETSI EN 301 908-1 – Electromagnetic compatibility and Radio spectrum Matters (ERM); Base Stations (BS), Repeaters and User Equipment (UE) for IMT2000 Third-Generation cellular networks; Part 1: Harmonized EN for IMT-2000,
introduction and common requirements, covering essential requirements of
article 3.2 of the R&TTE Directive
EN 60950-1– Information technology equipment - Safety - Part 1: General
requirements
EN 62311: 2008 – Assessment of electronic and electrical equipment related
to human exposure restrictions for electromagnetic fields (0 Hz-300 GHz)
Marking by the symbol indicates that usage restrictions apply.
France - 2.4GHz for Metropolitan France:
In all Metropolitan departments, wireless LAN frequencies can be used under
the following conditions, either for public or private use:
46
COMPLIANCE WITH INTERNATIONAL STANDARDS
ȚIndoor use: maximum power (EIRP*) of 100 mW for the entire 2400-2483.5
MHz frequency band
ȚOutdoor use: maximum power (EIRP*) of 100 mW for the 2400-2454 MHz
band and with maximum power (EIRP*) of 10 mW for the 2454-2483 MHz
band
Certification information (SAR) The device meets guidelines for exposure to
radio waves
Your device is a radio transmitter and receiver. It is designed not to exceed the
limits for exposure to radio waves recommended by international guidelines.
These guidelines were developed by the independent scientific organization
ICNIRP and include safety margins designed to assure the protection of all
persons, regardless of age and health.
The exposure guidelines for devices employ a unit of measurement known as
the Specific Absorption Rate or SAR. The SAR limit stated in the ICNIRP guidelines is 2.0 watts/kilogram (W/kg) averaged over 10 grams of tissue. Tests
for SAR are conducted using standard operating positions with the device
transmitting at its highest certified power level in all tested frequency bands.
This equipment complies with the European Council Recommendation of 12
July 1999 on the Limitation of Exposure of the General Public to Electromagnetic Fields [1999/519/EC].
47