1
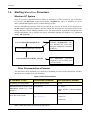
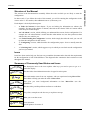
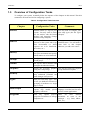
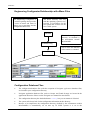
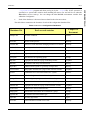
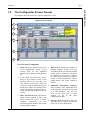
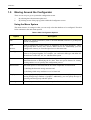
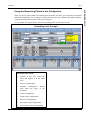
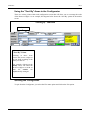
Introduction
Rev. 3
INTRODUCTION
Table of Contents
1.
Introduction .............................................................................................................1-2
1.1
About this Manual................................................................................................................. 1-2
Who Should Read This Manual ............................................................................................. 1-2
1.2
UNIX and Windows Operating System Considerations........................................................... 1-3
1.3
Starting MacroView Processes ............................................................................................... 1-3
UNIX System........................................................................................................................ 1-3
1.4
Starting MacroView Processes ............................................................................................... 1-4
Windows NT System............................................................................................................. 1-4
Other Documentation of Interest ............................................................................................ 1-4
Structure of the Manual ......................................................................................................... 1-5
Icons ..................................................................................................................................... 1-5
Summary of Commonly Used Notes and Icons ....................................................................... 1-5
1.5
Overview of Configuration Tasks........................................................................................... 1-6
1.6
Before You Start ................................................................................................................... 1-7
1.7
Engineering Configurator....................................................................................................... 1-7
Engineering Configurator Relationship with dBase Files......................................................... 1-8
Configuration Database Files................................................................................................. 1-8
Starting the Configurator ..................................................................................................... 1-10
1.8
The Configurator Screen Format.......................................................................................... 1-11
1.9
Moving Around the Configurator ......................................................................................... 1-12
Using the Menu System ....................................................................................................... 1-12
Using the Branching Points in the Configurator .................................................................... 1-13
Using the "Sort By" Areas in the Configurator ..................................................................... 1-14
Quitting the Configurator..................................................................................................... 1-14
Summary of Controls........................................................................................................... 1-15
The "How You Get Here" Descriptions ................................................................................ 1-16
List of Tables
Table 1: Comparison of UNIX and NT Pathnaming and File structure._________________________________ 1-3
Table 2: Other Documentation_________________________________________________________________ 1-4
Table 3: Configuration Tasks Overview__________________________________________________________ 1-6
Table 4: MacroView Configuration Databases ____________________________________________________ 1-9
Table 5: Starting the Configurator_____________________________________________________________ 1-10
Table 6: Main Configurator Options ___________________________________________________________ 1-12
UM-ENG-3.1.0
1-1
Introduction
Rev. 3
Table 7: Summary of Controls ________________________________________________________________ 1-15
1.
Introduction
The MacroView system is a Supervisory Control Package designed for the Process Control and
SCADA type market. MacroView provides:
• An easy-to-use graphical interface to multiple users in the operating, supervisory, technical
and managerial levels.
• An integrating framework for multiple sources of data.
• A historical storage facility.
• A number of facilities to perform control, logging and reporting functions and
• The interfacing tools to link into third party packages and third party computer systems.
The majority of tasks performed by MacroView on site can be configured using a simple fill-in-theblanks configuration procedure. This manual describes how you can take a raw off-the-shelf
MacroView system and configure it to perform the tasks required on your site.
1.1
About this Manual
Who Should Read This Manual
You should read this manual if you want to:
i.
Configure the MacroView system.
ii.
Maintain MacroView system or add new facilities to an existing system or
iii.
Investigate in detail the structure and functions of the MacroView product.
Note: It is highly recommended that anyone using this system should attend one of the standard
training courses offered by your distributor. Details of the courses can be found in the Maintenance
Chapter of this manual. This manual is designed to complement your training course, not replace it.
UM-ENG-3.1.0
1-2
Introduction
UNIX and Windows Operating System Considerations
This manual has been designed for use in the implementation of the MacroView system whether it is
used with the UNIX or Windows NT operating system. As each operating system has its own
conventions for path names, file names, syntax and the method in which programs are processed, the
examples and descriptions will include both formats where required. Table 1, below, lists some of the
important points to remember, however, it is assumed that the person configuring the system will have
some knowledge of the operating system they are using. Details on the starting of the MacroView
processes for each system are covered where appropriate, however, the next section in this Chapter
makes mention of the starting of MacroView processes.
Table 1: Comparison of UNIX and NT Pathnaming and File structure.
Description
Remarks
UNIX
Windows NT
Environment
Variables
$PATH
%PATH%
$MACRODIR
%MACRODIR%
HOME Directory
/u/macro (SCO UNIX)
C:\Users\Macro
/users/usr/macro (SOLARIS)
Executable files
1.3
MacroView operations xops3
program
winops.exe
Starting MacroView Processes
UNIX System
The MacroView start file is executed at UNIX boot up time.
/etc/rc2.d/S99MacroView
/u/macro/systems/start.<driver>
/u/macro/systems/start.<driver>
UM-ENG-3.1.0
This script is always executed
at system boot up and contains
the following instruction to run
the appropriate MacroView
start script for your system.
This
file
contains
the
instructions to start all the
relevant MacroView processes,
such as drivers, alarms and
history collection etc.
1-3
INTRODUCTION
1.2
Rev. 3
Introduction
1.4
Rev. 3
Starting MacroView Processes
Windows NT System
In an NT system, background processes (known as daemons in a UNIX system) are run as Windows
NT services. The MacroView Application Launcher, mvaplnch.exe, runs as a Windows NT service
and is controlled through the Service Control Manager (SCM).
The file %HOME%\System\MV_Start.NT provides the processes to be started, and is interpreted by
the MacroView Application Launcher. This file contains the instructions to start such processes as the
History Manager, Alarms Manager and drivers etc. The diagram below explains the concept and more
detailed information can be found in the Server Installation Manual for Windows NT, (document
number IM-NTS-310).
C:\Users\Macro\Bin\mvaplnch.exe
C:\Users\Macro\System\MV_Start.NT
C:\Users\Macro\System\MV_Start.NT
The MacroView Application
Launcher, mvaplnch.exe, runs
as a Windows NT service and
interprets instructions contained
in this file.
All
MacroView
processes
required to run at system start
are listed in this.
Other Documentation of Interest
The table shows other documents you could refer to depending on your current requirements. All these
documents are available from your distributor.
Table 2: Other Documentation
If You Want To Get -
Consult the Document
Documentation Number
A summary of specifications
General Specifications
G-GS
Detailed information on one of the User Manual
MacroView options (e.g. Lotus
Interface)
U –XXXX
Detailed technical programmer Man Documents
level data on the system
e.g. getval(c)
<name>(C)
where XXXX is the description
code.
<name>(F)
<name>(S)
Note: Further documents are listed in the Appendices.
UM-ENG-3.1.0
1-4
Introduction
Rev. 3
The sections in the documentation essentially follow the order in which you are likely to enter the
configuration.
In other words, if you follow the order of this manual, you will be entering the configuration in the
correct order i.e. first entities, then additional sources (if necessary) etc.
Each chapter is basically broken up into:
i.
A Table of Contents for that chapter. If you are looking for information on Alarms (for
example), first turn to the chapter on Alarms, then look at the Alarms Table of Contents which
is the first part of that chapter.
ii.
An "All About" section, which will help you understand the reasons for the configuration. For
example, the "All About Entities" section describes what entities are, how the system uses them
and how they are useful to you.
iii.
An "Understanding the Configurator" section, which simply describes the tools you can call
up from the configurator for that section.
iv.
A "Configuring" section, which describes the configuration proper - how to actually enter the
data.
v.
A "Checking Out" section, which suggests ways in which you can check out the configuration
you have just entered.
Icons
Icons have been used to help you find your way around the document and to describe the requirements
for the configuration of each of the databases. The diagram below summarises the icons that are used
throughout this manual.
Summary of Commonly Used Notes and Icons
The description next to the icon explains what keys you need to press to get to a
particular display.
This describes what information needs to be typed in at this point.
This information comes from our engineers who are experienced using MacroView.
These hints will help you make the most of MacroView.
This gives you some background information on how MacroView uses the
information.
This describes possible problems and how to avoid them.
Very often, examples are the best way to explain a concept
What you see on the screen.
Focus attention.
Special points to be aware of
UM-ENG-3.1.0
1-5
INTRODUCTION
Structure of the Manual
Introduction
1.5
Rev. 3
Overview of Configuration Tasks
To configure your system, essentially follow the sequence of the chapters in this manual. The table
summarises the tasks involved in configuring a system.
Table 3: Configuration Tasks Overview
Chapter
Configuration Tasks
Comments
Entities
Add the entities (i.e. tags) to your You may want to configure your
system. You may want to check own entity types (See the Types
out the entities with the Detail Chapter).
displays and Operating Groups
(See the Groups Chapter).
Sources
Add any additional data sources
(drivers) to the system and set up
their environments (i.e. which
registers are to be transferred,
how often, etc.)
History
Set up the Historical structure to
suit your environment and specify
which entities are to be historized.
Groups
Configure Operating groups and
Trend groups.
Alarms
Set up the Alarm structure and
configure the individual alarms.
Graphics
Create the free-form graphics You can also create any required
using the CAD package.
group and detail faceplates.
Security
Set up the security system so that
only authorised personnel can
make changes to the process.
Types
Add your own entity types - this
is how you define the structure or
grouping of attributes to a single
type or block.
Meta scripts
Add any high level functions for You will find the meta script
reports, logs, models, special language is an ideal tool for most
graphics, control etc.
process control applications.
Programs
Add
any
special
purpose There
are
more
detailed
programs for interfaces to foreign documents on some of the
computers etc.
packages - (e.g. Lotus, dBase,
SPC, etc.).
UM-ENG-3.1.0
Your system comes with one preinstalled source. You will need to
come back to this chapter
whenever you add a new source.
1-6
Introduction
Before You Start
Before you start configuring the system, you need to have:
i.
An installed MacroView system complete with the Engineering Configurator.
ii.
A login name (and password) to enable you to start up the configurator. This can be obtained
from your system administrator.
iii.
As a pre-requisite, you also need to have the following skills or knowledge:
•
A good idea of the capabilities of the MacroView system.
•
(You can get this from the General Specification document G-GEN3-01)
•
A good knowledge of the process that you will be monitoring and controlling.
•
A good knowledge of the DCS or PLC system you intend to use as the front end to
the MacroView system.
It is highly recommended that you attend an Engineering Training Course offered by your
distributor. These training courses are extremely practical by nature and not only include all the
information in this manual but also specifically address side issues such as:
•
Unix and the Unix platforms
•
Networking
•
dBase
Training course summary information and timetables can be obtained through your local MacroView
distributor.
1.7
Engineering Configurator
Virtually all configuration of the MacroView system is “fill-in-the-blanks” by nature.
•
This data entry is done through the Engineering Configurator, which is essentially a set of
menus and preformatted screens designed to assist you in setting up the MacroView database.
•
The "database" itself is a series of dBase compatible files that are stored in your configuration
directory.
•
Each database file specifies a different aspect of the configuration.
•
For example, the Alarms specification is held in a dBase file called: almspec.dbf
•
The diagram below shows the relationship between the Engineering Configurator and these
dBase files.
UM-ENG-3.1.0
1-7
INTRODUCTION
1.6
Rev. 3
Introduction
Rev. 3
Engineering Configurator Relationship with dBase Files
The Home directory will vary
with the operating system in use,
typically C:\Users\Macro for the
NT system and /u/macro for the
SCO UNIX system.
The Engineering Configurator is
a software package that provides
a series of menus and forms to
enable you to enter data into the
configuration dBase files.
$HOME
This is the configuration
directory. It is defined by
the environment variable
MACRODIR
$HOME/config
This is where the definition
of the entities is contained.
entities.dbf
Configuration Database Files
•
The configuration database files (with the exception of Navigator application database files)
are located in your configuration directory.
•
Navigator application database files (such as Groups and Trend Groups) are located in the
application directories. Please see the Navigator user manual for more details.
•
The configuration directory has the default name config but you can rename it if desired.
•
The system will always look for the configuration information in this directory.
•
Because of its importance, the configuration directory (defined by the environment variable
MACRODIR) is automatically set on start up. In UNIX systems it is set in the
UM-ENG-3.1.0
1-8
Introduction
Rev. 3
•
Each of the databases is discussed in more detail in the relevant sections.
The table below summarises the functions of each of the configuration database files:
Table 4: MacroView Configuration Databases
Database file
Each record contains
Chapter or
Document
almspec.dbf
An alarm condition.
Alarms
areas.dbf
An area of the process.
Security
consoles.dbf
The access code and alarm managing facilities of a console.
Security
entities.dbf
An entity and its data dictionary information.
Entities
exproc.dbf
A calculation to be performed
Programs
gateway.dbf
A gateway and its characteristics.
Sources
group.dbf
The entities in an operating group.
Groups
help.dbf
A graphic file name for a page of the help screens.
Graphics
hlist.dbf
An attribute and entity to be historized.
History
hspec.dbf
A historical file system. E.g. Hourly averages files.
History
overview.dbf
The graphic file name for a page of the overview screens.
Graphics
plc.dbf
A mnemonic to be associated with a PLC system.
Sources
plcaddr.dbf
A block of registers to be read into the system.
Sources
plcreg.dbf
A block of gateway registers to be read into the system.
Sources
plcstn.dbf
A mnemonic to be associated with a gateway PLC system.
Sources
schemat.dbf
A graphic file name for a page of the schematic screens.
Graphics
sources.dbf
A data source and its characteristics.
Sources
trndgrp.dbf
The attributes and entities to be trended in a group.
Groups
typeattr.dbf
An attribute associated with a type.
Types
types.dbf
An entity type name.
Types
users.dbf
A user and the associated access code.
Security
UM-ENG-3.1.0
1-9
INTRODUCTION
~/system/start program and when you log in (by the .login file). In NT systems it is
specified as a system-wide variable when installing the macro user and will be set when the
MacroView services start-up. You can change the MACRODIR environment variable from
within the Configurator.
Introduction
Rev. 3
Starting the Configurator
The method of how you start the Engineering Configurator will depend on which type of system you
are using and how your system administrator has set up your system. The table below summarises the
steps you must take to start up the Configurator.
Table 5: Starting the Configurator
System
Method
UNIX
Login to the MacroView system as macro and, from within a graphics
environment, type in the command eng3
NT
Login to the system as the macro user and either double click on the Configurator
icon or, from a dos prompt, type in the following :
"D:\Program Files\MacroView\Client\Bin\winops.exe" -application Configurator –
host TRNG4 -file ..\Eng\EngDir\Dgt\v3eng.dgt
Ensuring that the correct drive letter and host name is used.
Xterminal emulator
Double click on the Configurator icon which your system administrator has set up
for you.
In all cases, the engineering configuration screen shown below will appear and you can start
configuring your system.
UM-ENG-3.1.0
1-10
Introduction
INTRODUCTION
1.8
Rev. 3
The Configurator Screen Format
The diagram shows the layout of a typical Configurator screen.
Typical Screen Layout
1
2
3
4
5
6
Screen Layout Components
1. Menu: The menu can be used to get to 4. Browse Area: This shows a window of
every configuration screen in the
multiple database records. You may
system. There are also additional
scroll through the records and examine
options such as getting to Help displays
details about a selected record simply
etc.
by clicking on the record of interest.
You may also use the Browse widget to
2. b The detail area shows the various
branch to other configuration screens.
items of the selected record in the
Simply double click on the column of
database. This is the area where you
interest.
may edit the various items. This area
can also be used to control the order of 5. Additional Information windows:
the Browse widget. By clicking on the
These windows show information that
Labels, the Browse widget will be reis related to the selected record but that
sorted with the selected label as the sort
is in other databases. You may also
criteria.
click on the label areas of these
windows to get to the other
3. Filter and Search Area: The Browse
configuration screens.
widget can be filtered to show only
those records that satisfy a certain 6. Message Area: Suggestion, help and
condition. Alternatively, you may
error messages are sent to this area to
search through the database for records
assist you in your configuration
satisfying that condition.
UM-ENG-3.1.0
1-11
Introduction
1.9
Rev. 3
Moving Around the Configurator
There are two ways to get to a particular configuration screen.
i.
By selecting the relevant menu option and
ii.
By clicking on one of the pop-up points within the Configurator screen.
Using the Menu System
The menu structure is arranged so that you can easily select the database to be configured. The table
below summarises the main menu options.
Table 6: Main Configurator Options
Option
Description
File
Used to set various preferences (such as the MACRODIR) and also to get help and
exit the Configurator.
Data
Used to configure the various sources of information for the Data Dictionary. These
are typically DCS sources, PLC sources, dBase sources etc. Additionally, you can
configure the Gateway or Front End processors in this menu item.
Sources
Data Types
This menu option is used to set up the types or data structures that enable individual
points to be grouped together. For example, you could add a PID type and define all
the attributes such as PV, SV, etc. with this menu option.
Entities
Configure the basic tags or entities in the system. These points are used as the
fundamental means of identifying the live data. There are special features for cloning
existing entities so as to speed up the configuration process.
Historization
This menu option is concerned with the two main components of Historization.
(i) Defining the historical storage structure and
(ii) Defining which entity.attributes are to be historized.
Displays
Here the graphic displays are allocated page numbers so as to simplify the process of
moving through large numbers of graphics. Additionally, you can specify the tags in
operating and trend groups with this option.
Alarming
This menu option is selected when you set up the alarms in the system.
UM-ENG-3.1.0
1-12
Introduction
Rev. 3
There are various points within each configuration screen that will allow you to branch to screens that
hold related information. For example, by double clicking on the type column in the entities database,
a pop-up describing the structure of the type will appear.
As an example, the diagram below shows the branching points on the entities screen.
Branching Point Example
1
2
3
3
8
4
5
6
7
Branch Point Action
1. Clicking in this area selects the
entity and displays it in the detail
Area.
2. Sources Configuration.
3. Attribute Configuration. Branch
from either the Types or the
Attributes.
4. Alarm Configuration.
5. Trend Group Configuration.
6. Historical Configuration
7. Operating Group Configuration
8. PLC Register Detail Configuration.
UM-ENG-3.1.0
1-13
INTRODUCTION
Using the Branching Points in the Configurator
Introduction
Rev. 3
Using the "Sort By" Areas in the Configurator
There are various points within each configuration screen that will allow you to re-arrange the order
of the Browse widgets. As an example, the diagram below shows the "Sort By" points on the entities
screen.
“Sorting by” functions
Sort Buttons
"Sort By" Points
Clicking in these areas
causes the browse widget to
re-sort itself according to the
item you click on.
For example, clicking on the
Entity word, will cause the
browse widget to re-order so
that
the
entities
are
alphabetically arranged.
Quitting the Configurator
To quit from the Configurator, just select the File menu option and click on the Exit option.
UM-ENG-3.1.0
1-14
Introduction
Rev. 3
The table below shows how you achieve the various Engineering Configurator tasks.
Table 7: Summary of Controls
If You Want To…
You do the Following
Start the Engineering Refer to the table in "Starting the Configurator". Typically, you type eng3 at
Configurator.
the UNIX prompt.
Select a configuration Just pull the menu option down and if necessary, pull right until your cursor is
screen from the menu
over the desired option and release the mouse button.
Alternatively, you may use the keyboard and click on the relevant "fast key".
E.g. to exit the Configurator,
Press Alt F to select the file menu and,
Press E to exit the Configurator.
Select a configuration Click on the relevant branching point. The branching point may be in a
screen from within a particular column of a browse widget or it may be the label of a Browse
configuration screen
widget.
Quit the Configurator.
UM-ENG-3.1.0
Select the File menu option and click on the Exit option. Confirm you want to
exit the Configurator by clicking on the Yes button.
1-15
INTRODUCTION
Summary of Controls
Introduction
Rev. 3
The "How You Get Here" Descriptions
In the detailed configuration sections of this chapter, you will see an icon of a compass. This is called
the "How You Get Here" icon and it is placed next to the instructions on how you get to a particular
screen. The diagram below shows how this is used:
An Example of the “How You Get Here” Icon
The words
in bold and
italics
are
the
menu
1. Entities:Detail: This brings up the entities screen.
2. Click on the record to be cloned: The entity detail
will appear in the window.
3. Entities:Add Like: The record which is a copy of the
entity selected) will be added to the bottom of the
database.
4. Modify the "cloned"
characteristics.
UM-ENG-3.1.0
record
to
the
required
1-16