1
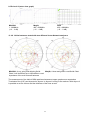
First edition:
Copyright © 2015 Harald Naumann, Neustadt
Ludwig-Kaufholz-Weg 4, 31535 Neustadt, Germany
E-mail: [email protected]
Phone: +49-5032-8019985
The book has been finalized and will be further updated as necessary. All purchasers and
sponsors will receive free PDF updates regularly. Any comments, requests, tips and suggestions
related to the book or download zone are welcome.
New chapters are marked with an update date and major changes are formatted with green text.
This approach is meant to help owners of previous editions to identify the changes and additions
more quickly.
2
Table of contents
1 Why Did I Write the IoT / M2M Cook
5
2 Fundamental considerations before starting the IoT / M2M project
7
3 Certifications and approvals
7
3.1 Examples for Radio approvals in EU and US 7
3.2 Examples for Radio approvals in US and Canada (PTCRB) 8
3.3 Examples for automotive related approvals in Europe
9
3.4 SAR - Specific Absorption Rate
10
4 Cellular data communication (GPRS, USSD, SMS, CSD, DTMF)
11
4.1 Voice communication 11
4.2 Modem / acoustic coupler / encryption
11
4.3 DTMF (Dual Tone Multi Frequency) 12
4.4 GPRS (General Packed Radio Service)
12
4.5 SMS
12
4.6 USSD (Unstructured Supplementary Service Data) 13
4.7 Comparison of power consumption (SMS, USSD and GPRS)
14
4.8 CSD (Circuit Switched Data) 15
5 Supply voltage
15
5.1 Power on timing and waiting 16
5.2 Cellular module in power save mode 16
5.3 Internal resistance of batteries and linear voltage transformers
16
5.4 Switched mode voltage regulator
18
5.5 Simulation of a switched power supplies with LT Spice
18
5.6 Capacitors at power supply and cellular module
20
5.7 Supply voltage for GNSS antenna
20
6 Antennas for IoT / M2M devices 20
6.1 Monopole and dipole antennas
20
6.2 Are you sure nothing will interfere with your embedded antenna? 21
6.3 Why do embedded chip or patch antennas have different resonant frequencies? 22
6.4 How will the ground plane affect your embedded antenna? 22
6.5 How to connect your embedded antenna with your wireless module
24
6.6 How to design an antenna matching circuit 26
6.7 Free of charge software to generate a matching circuit automatically
27
6.8 How to switch between an internal and external cellular or GNSS antenna inexpensively 27
6.9 Which GPS antenna should be used for a tracking device? 28
6.10 Which embedded antenna to select for a Bluetooth / GNSS application? 29
6.11 Dos and don’ts during embedded antenna design 32
6.12 Example: Embedded PCB antenna inside a vending machine
33
6.13 Example: Embedded antennas in Telematic device GPSauge IN1 v.2 of GPSoverIP
34
7 Simulation of an embedded GSM PCB track antenna
34
7.1 Definition of the antenna simulation project 34
7.2 Description of the inverted F antenna 35
7.3 3D model of the simulation
36
7.4 Optimization - determination of antenna shape
37
7.5 Typical requirements of a quad-band GSM antenna 37
7.6 Optimization of the quad-band antenna GSM antenna shape
39
7.7 Directional characteristics of the antenna for two GSM frequencies 39
7.8 Influence of the housing on antenna characteristics 41
7.9 Influence of the ground plane on antenna characteristics 42
7.10 Optimisation of the simulated antenna with matching circuit
44
7.11 Designing in the simulated antenna to a special GSM / GPS tracker
45
8 Components around the cellular module 47
8.1 SIM card
47
8.2 SIM card subscription 47
8.3 Low ESR capacitor
48
8.4 ESD protection 48
8.5 Loudspeaker and microphone 49
8.6 Firmware update for the final PCB
49
3
9 Examples of mistakes and errors during M2M development
49
9.1 Power down reset
49
9.2 SMS errors
49
9.3 CSD errors
50
9.4 IP connection errors 50
9.5 Analysis of several design mistakes in one M2M design
51
9.6 Analysis of mistakes of a PCB track antenna for GSM
52
9.7 Analysis of a GSM chip antenna on a small ground plane 53
9.8 Analysis of a Swiss GSM watch
54
9.9 Analysis of embedded LTE antenna in detail 54
10 Radiation noise, maximum spurious antenna radiation 55
10.1 Antenna radiation versus radiation noise
55
10.2 Conductive noise
57
10.3 Conductive noise transformed to radiated noise
57
10.4 Radiated noise transformed to conductive noise 57
10.5 Prevention against radiated noise 58
11 How to use a vector network analyser for IoT / M2M development
59
11.1 Quick Start Guide Vector Analyser MiniVNA Tiny 61
11.2 Explanation S11, VSWR, return loss, reflection coefficient and antenna bandwidth
11.3 Revealing the truth - four cellular antennas tested with MiniVNA 65
11.4 A comparison of three Vector Network Analysers 72
12 Testing your M2M device 78
12.1 TX power peaks by cellular module test mode
78
12.2 Pseudo load of 2 Ampere peak load with self-made function generator 78
12.3 TX power peaks with a GSM tester 79
12.4 Testing of the sensitivity
79
12.5 Testing radiated TX power 79
12.6 Where can you buy a cheap cellular tester? 80
12.7 Example of a measurement report from GSM test equipment
80
12.8 Ripple and peak voltage - visible on GSM test equipment 84
12.9 How to test a UMTS module on foreign band
85
12.10 Testing with UMTS testers 85
12.11 How to test an LTE module on foreign bands
86
12.12 Potential difficulties with LTE modules worldwide 87
12.13 Testing the GNSS module 87
12.14 Measurement of the cellular antenna in 3D
88
12.15 Summary of testing 89
13 AT Commands
89
13.1 AT commands during power on of your cellular module evaluation kit
89
13.2 ”Hello World” for GSM - AT commands to send a SMS
90
13.3 AT commands and logic loops to set up a communication channel
91
14 Project descriptions of IoT / M2M devices
91
14.1 Project description of a long-term tracking device 92
14.2 Project description of a flexible tracking device for bank notes
92
15 Thank you 93
4
63
1 Why Did I Write the IoT / M2M 95
I have worked in the Wireless M2M industry for more than a quarter of a century. Twenty-five years
ago, we didn’t even have a word for “M2M” or “IoT”. We developed Machine to Machine devices
without knowing that decades later these creations would be called “M2M devices”. Twenty-five
years ago, the GSM network for wireless data communication did not exist. I took my first steps in
wireless data communication with Frequency Shift Keying (FSK) on Private Mobile Radios (PMR).
On PMRs we achieved communication speeds of 3600 bits per second. A little later we started
using public analogue trunked radios. These trunked radio systems provided local terrestrial
wireless networks on FSK. Years ago, the last public analogue trunked radio network in Germany
was taken out of service. GSM jumped in with its Short Message Service (SMS) and Circuit
Switched Data (CSD). CSD provided us 9600 bits per second. We could use SMS and CSD for
straightforward countrywide data communication. Later on, GSM roaming offered us worldwide
data communication. Today, GSM/GPRS is being gradually phased out and is being replaced by
3G and 4G technology.
In the US, the cellular operator AT&T no longer accepts new M2M applications on GSM/GPRS.
AT&T will only accept applications on 3G and 4G (UMTS, HSPA, LTE). Some people try to
differentiate between M2M and IoT. Call it IoT or M2M - it does not matter. Applications for IoT or
M2M often use the same wireless technology. IoT is the umbrella term for a number of subsets of
wireless data communications. M2M is one of these subsets and maybe one of the oldest. Another
subset of IoT is called Industry 4.0 or Industrial Internet of Things (IIoT). Just wait a while and a
new buzz world will always come up.
This IoT / M2M Cookbook describes how to develop a tracking device based on cellular and GNSS
modules. You can create a telemetric device by ignoring the GNSS aspect. Typical devices without
GNSS include cellular routers with Ethernet ports or a cellular to Wi-Fi bridge. Nevertheless, the
navigation system for trucks described in this book already uses six different wireless technologies
(2G, 3G, GNSS, Classic Bluetooth, Bluetooth Low Energy and NFC) with five different antennas
within one enclosure.
Cellular networks for GSM, HSPA and LTE are the popular Wireless Wide Area Networks
(WWAN). However, in some regions we have WWAN over CDMA and WiMAX.
Sometimes it is not easy to come up with the appropriate English word for the terms in this book.
The common word for SMS in UK is "text message". In this book, we will consistently use the term
“SMS”. A prepaid SIM card in UK is called a "Pay as you go SIM card". I will typically use the
common words specified by ETSI - I will call it a prepaid SIM card. If I use the term “GSM module”,
this will cover 3G and 4G modules as well, because the fall-back of UMTS, HSPA and LTE is still
2G (GSM/GPRS). GPS is fundamentally an incorrect term. The Global Positioning System (GPS)
is just one out of several Global Navigation Satellite Systems (GNSS) that provide the functionality
we refer to as “GPS”. We can currently access the Russian GNSS called Glonass. The Chinese
GNSS is called Beidou. At some point we will be able to access the European GNSS called
Galileo.
The IoT / M2M Cookbook is intended to help developers of wireless applications save some time
and perhaps provide some inspiring ideas. It is a book for makers and summarizes the collective
experience across my different jobs. By leading the team of developers that is required to design a
mobile GSM/GPS tracking device, I learned to think like a developer of an IoT / M2M device. In
over fifteen years of working with manufacturing and distribution, I have repeatedly provided the
same hints and recommendations to developers of wireless applications. The origin of this book
was a 14-page application note written in July 2010. In May 2012, I made the decision to document
the story that I deliver weekly to customers within a book. The goal of this book is to guide
developers from the concept stage of an IoT / M2M device all the way to the final mass-produced
product. This book will not provide introductory details such as how an inverted F antenna works.
To explain those concepts, I will provide links to relevant supporting information. In any case, this
book will provide you with information that is often omitted in the official radio module and antenna
manufacturers’ documentation. This book shows an inverted F PCB antenna for GSM in detail. It
explains how to redesign it with your own PCB and how to encapsulate the whole design in epoxy
resin. It also explains how to integrate a chip or PCB antenna with coaxial cable.
5
Some power supply concepts including LT Spice modules for DC/DC regulators and load generator
for the 2 Ampere peak currents are included in the book, too. It should be noted that the power
down reset is still the main fault in designs with cellular modules.
I hope you will enjoy reading the book and I hope it will save you some time as well.
6
2 Fundamental considerations before starting the IoT / M2M project
Consider the design of an IoT/ M2M device in respect to its antenna and the necessary ground
plane for that antenna. You could potentially save a lot of time and money by starting with the
selection or design of the antenna and ground plane. However, you will have no chance of passing
tests for Total Radiated Power (TRP) and Total Isotropic Sensitivity (TIS) limits if you select an
antenna with poor efficiency. A smaller ground plane will significantly reduce TRP and TIS. The
smaller corresponding PCB design may require more than four PCB layers. However, if multiple
antennae for cellular, GNSS, Bluetooth, or Wi-Fi are in close proximity, as they are likely to
interfere with one another. Keep in mind that components such as switched power supplies,
displays and MCUs can create RF interference as well. If an IoT / M2M device fails the tests for
TIS, the culprit is often the spurious emission from the PCB generated by other noisy components.
If the spurious emission from your switched DC/DC regulator is high, then the RF signal level that
you should plan on receiving has to be a few dB higher. The worst case would be if you were to
create an undesired RF generator with a strong signal in the same frequency band as the one you
are intending to receive. A cellular module is sensitive within in the range of -109 dBm while a
GNSS module is sensitive in the range of -160 dBm. Your PCB design could mistakenly generate
interference signals higher than -110 dBm or -160 dBm very easily. Even if you are not concerned
with TRP and TIS requirements, a poor antenna design will drive a higher TX power level for the
cellular module on the PCB. This defect will drain the battery faster and decrease the standby time
of your M2M device. Ultimately customers will compare the battery life of your device to the familiar
one in their pockets -- the mobile phone. If you have any concerns or questions, it may make sense
to talk to third parties like the Field Application Engineer (FAE) of the local distributor or the FAE of
the local test laboratory. Both of these engineers often offer some basic level of consulting free of
charge. Budgeting for some additional consulting is often a good investment as well.
A feasibility study or a working prototype with basic functions can save a lot of money and time.
3 Certifications and approvals
The certifications and approvals in the table below represent an incomplete sample set. The
certifications and limits are specific to individual IoT / M2M devices. The most important
regulations, such as the R&TTE (now RED) in the EU and the FCC in the USA are listed below and
explained further in later chapters. Please note that certifications and regulations are subject to
change over time. The names may even change. The R&TTE (Radio and Telecommunications
Terminal Equipment) has been renamed to RED (Radio Equipment Directive). The new name is
not as commonly used right now so it will presently be more effective to use “R&TTE” in Internet
searches for documentation related to those regulations.
3.1
Examples for Radio approvals in EU and US
Testing Reference
Type of testing
Specification
for region
Europe R&TTE Directive Mobile Communication –
EN 301 511
(RED) Article 3.2 Radiated Spurious Emission 2G
Europe
Europe
Europe
Europe
Notes
POS terminal, People
tracker, Electricity
meter
Radio – Radio test EN 300 220 EN 300 220
Electricity meter (ISM
– Transceiver (Tx, Rx class 3)
868 MHz)
EMC – R&TTE acc. EN 301
EN 301 489-7 POS terminal, People
489-7 (GSM) – AC/DC powered
tracker, Electricity
meter
EMC – R&TTE acc. EN 301
EN 301 489-3 Electricity meter (ISM
489-3 (SRD) – add on testing
868 MHz)
R&TTE Directive
(RED) Article 3.2
R&TTE Directive
(RED) Article
3.1(b)
R&TTE Directive
(RED) Article
3.1(b)
R&TTE Directive Electrical safety test EN 60950- EN 60950-1
(RED) Article
1, main powered device
3.1(a)
7
POS terminal, People
tracker, Electricity
meter
11.4 A comparison of three Vector Network Analysers
Hopefully by now you have realised that a VNA (Vector Network Analyser) is a very useful
instrument for the IoT / M2M hardware developer, because it helps you to measure and to check
the most important part of the hardware design - the antenna and its transmission lines. It is one of
those tools you did not know you were missing until you've got one. One that will save you a lot of
time solving problems you are even not aware you have, but which can have a serious impact on
the quality of your design, for example: unnecessarily high battery drain, malfunction, impaired
range, etc.
The VNA measures complex (transfer) impedances of 1-port (and depending on instrument also on
2-port networks). RF is all about “matching impedances” and “getting networks to work together”,
so you can imagine that a VNA really can save you a lot of time and expense.
Until recently VNAs cost a lot of money, starting at around 20,000 Euro, not the amount of money
your manager would spend if you cannot promise in writing it will save him or her money.
The good news is that those instruments are available now for well under 5,000 Euro. Suddenly a
lot of RF-engineers have started regarding them as a tool they can really afford.
Therefore, this chapter on usability is for those RF design engineers, especially engineers
designing the bulk of today electronics: consumer electronics and industrial electronics in IoT and
M2M. This chapter will compare VNAs for lab bench use going up to at least 3 GHz and covering
the most used frequency bands in use for wireless IoT / M2M devices (e.g. NFC 13.42 MHz, GSM
at 900/1800 MHz, UMTS at 2150 MHz, Bluetooth at 2450 MHz) in the price range under 5,000
Euro.
5,000 Euro because under that limit you often do not need to walk all the way up to the CEO’s
office to get approval. (where it will be very difficult to explain to someone not involved with RF the
value it provides)
We have also included a VNA from Rohde & Schwarz (R&S) not because it is a very low cost unit
(around 20,000 Euro), but because R&S is well established when it comes to RF-T&M gear.
(In fact it is the low-cost R&S table top solution. Which shows low-cost is a relative term!)
Comparision of three VNA:
mRS: miniVNA-Tiny (approx. 430 Euro, 1 ... 3000 MHz)
MegiQ: VNA-0440 (2,900 Euro, 400 ... 4000 MHz)
Rohde & Schwarz: ZVL6 (20,000 Euro, 9 kHz ... 6000 MHz)
Summary:
mRS miniVNA Tiny: cheap, low quality; just useful for the radio amateur who has patience and
expertise to interpret results. Phase information not very useful in VHF and UHF range.
Rohde & Schwarz ZVL6: Professional quality, all round VNA, rather difficult to operate, very
expensive.
MegiQ VNA0440: Professional quality, for the RF designer, easy to use, low priced.
11.4.1 General overview
MegiQ: For a few thousand Euro the MegiQ solution is a little beyond of the budget of most radio
amateurs, but its performance makes is a very nice instrument for the professional. Also the
frequency range, 400 MHz - 4 GHz is targeted for professional use in design of today’s consumer
electronics. As a design engineer I am interested in the range of 400 - 4000 MHz and within this
frequency band we found the unit to give results comparable to the Rohde & Schwarz unit at a
fraction of the cost; really amazing.
Operation is easy and straight forward, and it has a lot of unexpected extras.
MiniVNA: The nice part is that you get coverage up from 1 MHz up to 3 GHz for very little money.
But of course, for the price you cannot expect a lot. The MiniVNA looks and feels like a solution for
the radio amateur. An advantage is that it is light and really tiny.
Its measurements are sensitive to warming up so you need to switch it on and leave it for a while to
reach a stable temperature. It is useful for measuring scalar parameters, like of Return Loss and
SWR. It is incredibly noisy and not useful at all for any measurements where phase is involved, so
if it comes to phase measurement it is not really a vector network analyser. Yes, it can display a
Smith Chart, but as an engineer I would not dare to really develop circuits based on those noisy
72
measurements. It is really more of a kind of scalar network analyser than a vector network
analyser. A spectrum analyser with a tracking generator is maybe the better solution.
Rohde & Schwarz: If you go for general specification, the R&S is the best, but you can buy a nice
car for that money. The frequency range is 9 KHz up to 6 GHz, it is a two port VNA. It is a one box
solution with display and knobs on the front panel, but it is impractical to work with without an
external mouse and keyboard. It “feels” like a German car, it is sturdy. But it is also heavy and
bigger than the other solutions, which can be a disadvantage in some circumstances. For me,
travelling around and is testing antennas in customers’ offices, this heavy machine is a non starter.
The results are what you would expect from a 20.000 Euro machine
Operation: Heavy to move around and front panel operation is cumbersome and very confusing.
MegiQ: The instrument is controlled over USB by a desktop user interface that gives a good
overview of measurement results, settings, saving/recalling. Operation is intuitive even with the
many features available, such as stepping through bias voltages in multiple sweeps, automatic
calculation of matching networks, etc.
The MegiQ user interface is by far the most pleasurable to work with. The manual gives a good
overview but you will hardly need it.
The software runs on Windows XP, 7 and 8 and there are people using it on an Apple computer.
Their web site says: “designed by and for RF-engineers”, and I got impression that the user
interface has really been developed in close cooperation with actual RF-engineer users.
It remembers where you left when closing the application, so when you start again you do not need
to choose all those parameters again. The Session Manager is a very powerful but simple tool to
group, save and recall your work: graphs, instrument settings, measurement data, calibration data,
etc. I met the developer at an exhibition in Appledorn. They spent two hours training me and we
measured some PCB antennas with coaxial cables together. Just to let you know, that the off-theshelf antennas resonated outside the GSM frequency range and showed a poor return loss as well.
The MeqiQ VNA is designed by engineers that have to develop RF circuits and antennas daily.
They developed a tool including accessories like the “sandbox” and help engineers with skills in
electronics to design RF electronics. They help not just with a good VNA - they also help with
documentation and accessories (sandbox) for self-education. If you combine it with the free of
charge software Atyune, then you have a very powerful combination. With the MeqiQ VNA you
measure the antenna, store the Touchtone file to your laptop, load it to Atyune and calculate the
matching circuit with simple mouse clicks.
MiniVNA: At first glance at the user interface you get an impression of the instrument, but if you
look closer, it is not that obvious what the state of the instrument is. It does not look like one
consistent program, but more like loose parts working together. For example if you want to see the
Smith Chart, it opens in a different window and disappears to the background every time you hit
the sweep button. And then you must save it using the “gif” button on the graph, this is a
completely different procedure from that used to save the Return Loss graph -it is confusing. If,
after performing an OSL calibration, you forget to hit the knob to actually use that calibration, you
have to start over again; and calibration is really slow. The advantage is that the software is written
in Java and will run without installation. The three helical antennas tested and listed in former
chapter were measured with the miniVNA. The result is available on the cookbook server for
download. For the scalar parameters VSWR and Return Loss the mniVNA shows a nice graph, but
if you switch to Smith Chart, then you can see that the graph is jumping around wildly. If you then
try to optimise a cellular PCB antenna shape multi resonant in GSM 850, 900, 1800, 1900 and
UMTS 2150 then you will see that the Smith Chart cycles around several times, and on top the
graph jumps around as well.
Rohde & Schwarz: The instrument is normally controlled using the front panel although there is
the possibility for remote control. To use it without a mouse and external USB keyboard is not
easy.
It runs under Windows, but the controls to access features like saving pictures (and where they
actually go) are very difficult to find. Perhaps it is explained somewhere in the hundreds of pages of
the user manual. And there are only two USB ports, so when using a keyboard and mouse, where
does the memory stick to save the pictures go then...
There are a lot of features, and the push buttons and context sensitive menus that pop up on the
side of the screen are not very intuitive (and that's an understatement), so setting up the instrument
before you can make a measurement is a tedious job. A seasoned RF engineer had to ask a
73
colleague who used the instrument daily for clues on how to operate it. I myself got lost. There are
too many buttons on the front panel and there are too many pages to read.
But of course once set up it works fine. The problem is that when you switch the instrument off, it
behaves as if it suffered complete amnesia and next time you start it up, it comes back in an a
completely different mode, other frequencies, etc. I assume there must be a setting for the defaults
somewhere, but I could not find it. The transmission line and the antenna in a IoT / M2M device are
the most important part, but the time you spend to get a VNA up and running has to be realistic.
Yes it is a nice instrument, but for the price it costs you would expect a better user interface, one
that is designed in cooperation with engineers who have to use the instrument daily.
11.4.2 Graphical presentation of results
Besides the “technical specs”, graphical presentation of the measurement data is of importance. If
you are doing a lot of measurements in a day you want a display that gives overview and in depth
information at a glance. If you are only making a measurement every now and then, you want
something easy to interpret.
MegiQ: The MegiQ user interface is by far the best when it comes to graphical presentation of the
results. You are completely free to arrange all kinds of graphical representations of the
measurement data on the screen. And it is easy to do. And if you save and then recall a
measurement, you can still rearrange the graphs and switch markers on and off.
While making changes to the settings, the displayed measurement stays visible.
The graphs are easily interpretable, even after you print them, since beside the markers there are
labels along the trace lines. Similarly, after printing a Smith chart you can see what frequencies you
are looking at along the trace. It is amazing that nobody else does this, not even the very
expensive R&S.
MiniVNA: You have one graph that displays the results. You can choose what parameter you want
to display in that graph, except the Smith Chart. For this there is an extra graph, but that one
disappears to the background every time you hit the sweep button. It was not easy to set multiple
markers. The software for miniVNA is freeware by third party.
Rohde & Schwarz: Without an external screen, the graphical presentation is a bit messy. The
screen is too small to display multiple graphs in a useful way.
11.4.3 Save / recall
MegiQ: When it comes to saving and recalling your work, setting etc, the MegiQ solution is the
most powerful and at the same time the easiest to operate. It has a Session Manager where you
group your settings, measurements, calibration tables in a very simple way and then save those
groups in Session Files. For example, a file for each project, or a file for each kind of
measurement.
So you do not save a “picture” but the complete state of the instrument together with the
measurements. From there you can of course choose to export the data in other formats to
integrate into your report. But the big advantage is that when you want a different graph on the
same data, or reposition the markers a week later, you can still do that (since you have the the
complete dataset at hand and can load it back into the instrument) and then export it to your report.
The MegiQ VNA was planned from the start to be connected to a laptop/PC and taking advantage
of all the benefits that you can expect from a PC based VNA. Absolutely everything and any data
including the settings are saved in one file. The measurement data, the markers, the calibration of
the VNA are all stored together. If you power it off on Friday you just power it on and load the file
on Monday and carry on without losing any time.
MiniVNA: There are several ways to export measurements, but is is not in a structured way. So
you can export e.g. to excel, csv, pdf, jpg, ... but are all separate files, so you have to remember
what went where...
Rohde & Schwarz: It is very unclear what you are saving and where you are saving it. If you look
it up in the manual, you find out, but one month when I came back to use it I had forgotten how and
where and had to look it up in the manual again. You can save the actual data and recall it, but it is
cumbersome and you need to go through different menus to do it. Remember that the first Rohde
& Schwarz VNAs were standalone machines without interface to a laptop, only later on did they get
interfaces for floppy disks.
74
11.4.4 Exporting
MegiQ: You have a print button that easily saves the measurement with a comment to EMF, which
is a standard vector format, so you can scale it in your report without losing resolution.
It uses the graphical representation you had put on the screen, so the the combined graphs and
markers provide the complete overview you had in mind for the measurements. You can recall
previous measurements, change the graphical representation, add markers, etc. and then again
export the results.
A method to export the graphs individually, is to use the right mouse button and copy & paste the
individual graphs into another application, like Microsoft Word or Excel.
Exporting the measurement data in TouchStone format is easy too, to import it in Excel or directly
into your favourite RF simulation package. (there are three columns: freq, real and imaginary
impedance)
MiniVNA: You save the Return Loss graphs separately from the the Smith Charts. The latter can
only be saved as a GIF. For the Return Loss graphs I had to rename the graphs in Windows every
time, which is tedious. There is also the possibility to save the RL graph in a PDF, but you cannot
combine the RL Graph with the Smith chart in one file for easy reporting. I export the data in
Touchstone format and import it to Atyune. Atyune is much more handy because the developer of
the software works daily with embedded antennas.
Data can be exported in Touchtone (SP1), CSV, Excel or XML format.
Rohde & Schwarz: Of course you can export in all kind of ways, but each is cumbersome: a lot of
menus to go through, and hard to remember one month later. It is just not obvious. I'm happy I
could get the graphs out of the instrument in order to use them in this report, but I had to ask
someone who uses the instrument daily how to do it. For my daily job it is not just too expensive, it
is not very user friendly as well. If you do not use it daily, then you will quickly forget how to use it.
It does not look good if you struggle onto a customer site with a heavy piece of equipment and then
spend hours reminding yourself how it works.
11.4.5 Some actual measurements
circuit 1
Of course in the end it is very important
that the instrument really does the job, so
we compared two simple RCL circuits, on
all three VNAs. The test will show graph of
the Return Loss and a Smith chart.
circuit 2
MiniVNA: When we see the Smith chart from the MiniVNA we see it is very noisy and it only gives
an indication of the impedance at best. As a “bonus” you get spurious peaks, which are rather
annoying: they are around the GPS frequency band.
As with the R&S, (and many others) you cannot see from the plot which frequency you are looking
at (only start and stop freq are clear). During the measurement you can put markers, but once the
results are printed you can only guess.
The Return Loss plot looks more useful, although it is rather “bumpy”. You do not see those bumps
with the MegiQ and the R&S. The line should be smooth.
MegiQ: A very clean Smith chart, very comparable to the data from the R&S box.
In one glance you now see the advantage of the labels along the trace: you see where you are,
also after saving it into a report!
The Return Loss plot looks nice, and gives the same results as the R&S VNA. No artefacts
(bumps) that should not be there.
Rohde & Schwarz: As you would expect from R&S a clean Smith chart, comparable to the MegiQ
graph. However it is not very easy to interpret the data after saving the picture, since we only know
the start and stop frequency. Looking at one point on the trace, you must make a very rough guess
at which frequency you are looking: There are no frequency labels along the trace.
The Return Loss plot looks nice, and gives the same results as the MegiQ VNA.
Let the graphs on the next pages speak for themselves...
75
11.4.6 Measuring LCR circuit 1
This is a capacitor in series with an inductor shunted with a resistor.
MiniVNA, circuit 1
400 ... 3000MHz
Note the graph is very noisy,
and only gives an impression
of impedance.
MegiQ, circuit 1
400 ... 4000MHz
R&S, circuit 1
400...4000MHz
LCR circuit 1 (return loss graph)
MiniVNA
1 ... 3000MHz
MegiQ
400...4000MHz
R&S
400...4000MHz
11.4.7 Measuring LCR circuit 2
This is a capacitor in parallel with an R and an L in series.
MiniVNA, LCR circuit 2
MegiQ, LCR circuit 2
400...3000 MHz
400...4000 MHz
Note the graph is very noisy,
and only gives an impression of
impedance.
76
R&S ZVL6, LCR circuit 2
400...4000 MHz
LCR circuit 2 (return loss graph)
MiniVNA
1...3000MHz
(-12 ... 0 dB)
MegiQ
400...4000MHz
(-15 ... 0 dB)
R&S
400...4000MHz
(-15 ... 0 dB)
11.4.8 Helical antennas tested with two different Vector Network analysers
MiniVNA: A very noisy and skipping Smith
Chart. It will be difficult up to impossible to read
impedance of the multi resonant antenna
MeqiQ: A clear and good to read Smith Chart.
The measurement of the helical GSM quad-band antenna at upper graphs were exported as
Touchstone files (S1P) and imported to Atyune. In Atyune it is easy to set markers. With Atyune it
is possible to set the colours and the thickness of the lines as well.
77
15 Thank you
I would like to say thank you to all companies and people that sponsored and supported this book
by text, graphics and schematic diagrams.
David Perry
Proofed the text of the book and helped me with the challenges of the English Language.
MegiQ
MegiQ helped with a free of charge personal training to me in Appeldorn. We measured several
GSM PCB antennas together. On top MegiQ offers a discount for readers of the IoT / M2M
Cookbook. In addition they measured some more antennas and the result is now a part of the
book. Many thanks to Gert de Gooijer for answering all my questions by email and phone.
http://www.megiq.com/
IK Elektronik
IK helped with five working days for the simulation of the quad-band antenna in different conditions.
Their graphics help a lot to explain how an embedded GSM antenna will work in standard, wrong
and worst case conditions.
www.ik-elektronik.com
Triptec
Triptec supported this book with the graphics about the power consumption during GPRS, SMS
and USSD. They also helped with some tests and developments based on embedded cellular
antennas. Many thanks to Wilhelm Oelers for the long term co-operation in the last few years, the
content for the book and the content for several articles.
http://www.triptec.de
Atyune
Atyune was so nice to give help with screen shots and with import and analysing of the simulated
GSM antenna in this book as well. Many thanks to Devis Iellici for making such a nice freeware
public and taking the time to explain the software by telephone.
http://www.atyune.com
SGS
SGS helped with several proposals for the book cover of the IoT / M2M Cookbook.
Specials thanks to Reimar Bührig, because he has not only looked after the book covers but has
helped with very good training regarding radio approvals and certifications for my customers as
well.
http://www.sgsgroup.de/#
Metasystem
Metasystem helped with the schematic diagram of the pseudo load generator. Special thanks to
Francesco Esposito because he helped with a short description how the generator works.
http://metasystem.it
antrax Datentechnik
The CEO Wolfgang Schrader has been co-operating with me for more than 15 years. He
developed several evaluation kits for different wireless modules for me. He used his VNA and
helped with four tests reports of the antennas plus photos.
http://www.antrax.de
95
Phasor Instruments
Dr. Silvio Kühn CEO of Phasor Instruments gave me a 3 hour training lesson on a VNA. The
lesson included measurement of 3 cellular antennas including export to S1P files and import to
open source Qucs (Quite Universal Circuit Simulator). Silvio has developed and produced his own
special VNA.
http://www.phasor-instruments.de
GPS over IP
GPSoverIP helped with the final version of the book cover. Specials thanks to Tim Kilian, because
he tweaked the photo and the colours of based on my wishes.
http://www.gpsoverip.de
96