1
/?\
in qdtr
back ffi)
l.l&;
Id
irp
b ilir,
op"ir mri.
A
A
./.\
EI
l"q:;ll$H*"1 /!\
el€cfic
d trE maafiiE.
*nm
sM(
hazard,
ThoG
mry b€ ffi*rd
plw ffi
Bllm
plobdiE
ort by qualifFd peMnnel.
that uniNlahd wltagp my qH [x*re tE rfig' atd
ii oasfid rft* of decfic sh@k; if it is rpt il)id€d, then lil grade q mod
sae ihre my Ue elted, whi*l is d$ a pmd b lgb urEab opqelin'
Ttis
tm
sr$d irdizE
This symbol prompts you to pay attention to the important opemlion and
maintenanG instruction in attached information.
Vlhm'mS
O lr
the
b rc maintailBue palt ireire the madire.
o]e*op-e.ttdrtEgE lwhfiomfBtrebcficshod(€ng
intmrdhnldph.
i ft s s.irpGtt'r.fl gFfEr.b dutlb.lh3eErg
lwos6slh'
prcduqt
of radbfi"(sHrcs it6flrcim6oE& d
imidHd ;nd applicdil aB rEt ado@, that b, the E{uiBmenb ot lhb mual @ not
iolomd gttdy, Orm rdo ffiunacdion uifl b3 hamtully hbrftmd
Waming
1.ln
ods b il)iJ itidat
cf
ebcfh shock pl€as rever ue pof,er
supply otlEr than siipulatim'
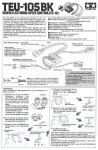
2.Never place or install the €meE on unstabl6 plaoe, support, tripod, bEcket or
OtheNiss, srious p€Ennd hurt or equipm€nt damage may be resulted.
platfm'
3.When cleaning is etrisd dt, ptrer ofi fiEtly, thon us a dry $fl cloth b wipo ofi lhe dirt on
emeE; if it is very dirty, then u$ fumituE cleanor lo Emove th6 dirt. Never dDp water on thE
@mponent of lhe produc{. (Otheilise, olectic sh@k or fic may be 6ulted).
4.Never install this devica at humid, dusly ol smoky plae, otherui$ electric sh@k or fiE may
be resulted.
Nev€r plae mduc'tor (such
on lhe €reE.
6:
$rewdriver, ircn wire or metal) or @ntainer filled with water
Contents
Precautions
l,Never drop th6 camem on ground or wbjoct to intenso impact and vibration, away from intense
vibration and place with electrcmagnetic interfeEnce.
2.Never insiall the equipment in too wam or too cold envircnment, the recommended using
temperature is between -5'C and 60"C.
3.lf it is required to move the installed prcduct, please power of before moving and reinstallation.
4.Prevent the
Brief introduction
Productproperties' "" ' ' ''01
Technical parameters'."
'
""' "'02
€mera from direct sun light, othemise CCD may be damaged.
5.lnstallthe equipment at ventilated place, and prevent hot sou@.
6,When the camera is installed outd@E, be€use of lemperature diferonce belw€en indoor and
outdoo( moisture may appoar insldo camere, Thercfore, rire reommend you to installthe 6m6m
indoors. When it is necessary to install the camera outd@re, please use;amera embodded with
fan or heating devi@.
Repair and failure description
l.Disconnect the power supply of camera, and have the equipment repaired by qualified
maintenan@ peGonnel under the following @nditions:
a
b
c
d
lf power @ble or plug is damaged.
lf the camera is wetted by rain or water
lf liquid splashes into €mem or object drops into camera.
lf you do not carry out conventional operation to the camera according to the operation
instruction (note that only the control m€chanism involved in the operation instruction can be
adjusted, b€@use if incorr6ct adjustment is carriod out to other control mechanism. then th6
equipmo_ntmay be damagod, and it €n be restored to normal state only through further repaii
by qualllied t€chnical pereonnol).
lf the amera dDps to the grcund, or the casing is damaged.
lf the camera has obvious variation in performan@.
e
f
2.D,uring the process of opemtion, if abnomal phenomenon (abnormal sound, smell or smoke)
or failure (no image etc) occurs, please immediately stop the using of camera and power
then contact the nearest distributor or the supplier ofthe area.
o(
3.Please dont dismantle or modify this product by any melhod. Any variation or modilicalion
activity unauthorized by the manufaclurer will result in canceling th; right of user to operate
the equipment. (The problem €used by unauthorized dlsmanfle-or repair by user is not dvered
by guarantee).
4lf.ther6 is very bright aBa on obj6ct, th€n vortiel or horizontal bright lln6 will app€ar on the smen.
-flare , which is a common phonomenon
r nrs rs €n6o
occurEd in solld camera tubg v€ry oft6n,
it is not a failure.
Description of menu functions
Mainmenu"' '
Lens"' ''
""" "'05
"""' " 05
' 06
Shutter/AutomaticGainControl ' "'
' '07
White balance setting "'
"09
Backlightsefting" '"
lmage adjustment "" "' "' 10
'
10
Adaptive Tone scale Repetition '
'
'
'
""
11
Motion detection sefting"""
"
"'"
"
'
11
Privacy area screeninS
'
'
"""
""
"
12
Day/night mode
'
"""
13
Noise Reduction"
" 13
Camera identification code '
"" " """""' "'
setting'"" ' """"'""'
Synchronizationrrrcde0,ennrsvncrrmairm}
Language
Camera reset
""'
"
14
14
15
Brief introduction
Product properties:
a Hlgh deflnltlon
Adopt 1/3'SONY Exview HAD ll 960H CCD, which has colorsd 650 lines (black & white
700 lines) hlgh detlnition, high sonsitivity picture quality.
a High Light Con6t6int (HLC)
This function is mainly used to screen the lighting of head lampdwhide, s astc adli€l€
mrect exposure, so that the machine can shoot well dofinod car license plate.
a Adaptive Tone scals Rspotltion (ATR)
ln the sc€nery area b6ing shot, carry out aubmsth brighbning compensalion b dulling part,
so that the whole picture will bo more clear and bright.
a Nolse Reductlon (NR)
2D digital noise roduction function, lt can afBc,tively ellminat6 video noise points and color
noise points, so that the picture will be cleaner.
a
Day/Nlght swltchlng
You can select auto, @lor or black & white modes; ussr can set it by himself to satisry
his requirement.
a
Color rolling constraint
When mmeE is usod under fluorescent lamp, this function can be used to eliminate
circular rolling phenomenon of color from white to blue, Pink and then to white again,
so as to achieve more stable picturo.
a
Back Llght Compen3atlon (BLC)
When tha background of the objoct baing shot is very bright, this function can be used
to componsate tho dulling part of the obiect being shot resulted from back light, so that
the foreground will be brighten
a
Prlvacy area scrgenlng
Up to 4 screening areas can be set at the same time, the area range and position en be
adjusted, the @lor and transparency of screening area can be adjusted, mosaicfunc{ion.
a iiotion dotection
When ths range
ofvids
obtained by camera is abnormal, a trigger signal will be output
as an alarm and switch.
a OSD monu
You can sst as Engli6h, Japaneso, G6rman, French, Polish, Portugusss, Spanish,
and Chines6.
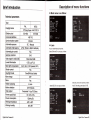
Digital Color CameE-o1
Brief introduction
Brief introduction
Technicai parameters
Technical parameters
Tvpe
Type
lmaging device
PAL
NTSC
1/3" Exview HAD CCDil
Effective pixel
Horizontal definition
Synchronization system
Automatic exposure
Automatic white balance
Automatic gain control
Gamma correction
976x582
976x494
650 TVL
lnternal
DC/ Manual
ATW/PUSH/USER/MANUAL
Yes
0.45
Video signal to noise ratio
More than 52dB
Lowest illumination
0.05 Lux(F1.2)
Back light compensation
Shutter control
Day/night mode
Miror image
Menu
Hidden screening
Motion detection
Video output
Power supply input
Power consumption
Working temperature
Working humidity
BLC / HLC / OFF (defautt:OFF)
Yes
Color/BWAuto Switch
OFF
Yes
4 zone
24x16 blocks
Composite 1 Vp-p/75 Ohms
DC 12V t100
12omArso/"
-20c-6(Ic
80% RH
Imaging device
PAL
NTSC
1l3" Sony Super HAD CCD tt
Effective pixel
Horizontal definition
752x582
Synchronization system
Automatic exposure
Automatic white balance
I
600
lntemal
DC/
Manua]
ATW/PUSH/USER/MANUAL
Automatic gain control
Yes
Gamma conection
0.45
Mdeo signal to noise ratio
Lowest illumination
Back light compensation
More than 52dB
0.05 Lux(F1.2)
BLC / HLC / OFF (defaultOFF)
Shutter control
Day/night mode
Yes
Color/BWAuto Switch
Mirror image
OFF
Menu
Yes
Hidden screening
Motion detection
Video output
Power supply input
Power @nsumption
Working temperature
Working humidity
768*492
ryL
4zone
24x16 blocks
Composite'l Vp-pf/s Ohms
oc
12v t10%
120mfur5%
-20c-6(rc
8070 RH
Digital Color CameE-O2
Digital Color CameE-o3
I
I
i
Description of menu functions
Brief introduction
O Main menu is as follow:
Technical parameters
Type
lmaging device
Effective pixel
Horizontal definition
Synchronization system
Automatic exposure
Automatic white balance
PAL
NTSC
1/3" Sony Super HAD CCD ll
512x582 |
StO,+92
480 TVL
lnternal
DC/ Manual
ATW/PUSH/USER/MANUAL
Automatic gain control
Yes
Gamma correction
0.45
Video signal to noise ratio
Lowest illumination
Back light compensation
Shutter control
Day/night mode
Mirror image
Menu
Hidden screening
Motion detection
Video output
Power supply input
Power consumption
Working temperature
Working humidity
Digital Color Camera-o4
a
Lens
You can select lvanual, Auto lens.
Select IManuall in Lens type, as follow:
More than 52dB
0.05 Lux(F1.2)
BLC / HLC / OFF (default:OFF)
Yes
Color/BWAuto Switch
OFF
Yes
4 zone
Select DC Lens to enter submenu as follow
Select (DC) in Lens type, as follow:
Auto DC iris setting, speed adjust: 0-255.
24x 1 6 blocks
Composite 1 Vp-p/75 Ohms
DC 12V
r.100/o
120mAt5o/o
.20c - 60c
80% RH
Digital Color Camera-05
Description of menu functions
Description of menu functions
Open iris setting, speed adjust
0-255
The main menu of setting manual mode
is as follow:
Select IManuall to enter submenu
as follow:
I
!)
I
,)
I
Shutter/Automatic Gain Gontrol
This function can be set as Manual, Auto.
The main menu ot rettjng auto mode is as follow:
Mode fixing: Shutter + AGC.
Shutter: 1/50, 1 12O, 1 1250, 1 50O,
1/1000, 1/2000, 1/4000, 1/10000.
Automatic Gain: 6.00, 12.00, 18.00,
24.00, 30.00, 36.00, 42.00, 44.80.
Select(Autolto enter submenu as followr
Adjust shutter to control exposure time,
so as to improve image quality.
Brightness adiust: 0-255
1
t
1
White balance setting
White balance setting can be adjusted continuously according to the difference of color
temperature of object being shot; the white balance will be adjusted automatically according to
existing environmental color.
This function can be set as ATW, Push, User 1/2, Anti Color Rolling, Push Lock, and Manual.
The main menu ofATW mode is as follow:
Select(ATWlto enter submenu as follow:
ln outdoor environment, the color temp
- 9500K,
which is suitable to useATW auto-tracing
white balance mode
Speed:0-255.
Delay control: 0-255.
Auto{racing white balance: x0.50,
x1.00, x1.50, x2.00
Environmental options: indoor, outdoor
'l
Set the submenu of automatic gain as follow
\
When the light
is dark, adjust gain
value
to affectlhe brightness of image.
The higherthe gain value, the brighter
the image brightness.
Briqhtness: x0 25, x0 5, 10.75, r100.
Digital Color Camera-06
-erature is between 2500K
Digital Color Camera-o7
Description of menu functions
Description of menu functions
The main menu of setting manual mode
Select (User 1/2I to entersubmenu
is as follow:
as follow:
The main menu of setting Anti Color Rolling
mode is as follow:
€mem is used underffuores@nt
lamp, this function can be used to
Vvhen
<) Back light setting
eliminate circular rolling phenomenon
of color lrom white to blue, pink and
image.
more stable picture.
lf the object being shot has very strong light, then you @n select 'High light
compensation" to reduce the exposure rate of the object, so as to achieve well derined image.
Note: "Brightness compensation" is mainly used to constraint the strong light of
cr
lamp at
night.This function can be set as back light compensation, high light @mpensation.
The main menu of setting Back Light
Digital Color Camera-08
a@rding
lf the scenery is in the environment with strong background light, then you €n select 'Back
Iight compensation" to carry out back light compensation setting to automati€lly adjust the
brightness of scenery so that the scenery will not be too dark, so as to achieve well defined
then to white again, so as to achieve
The main menu of setting Push Lock is
as follow:
User €n adjust blue/red gain
to existing environment.
B gain adjust 0-255.
R gain adjusl 0-255.
Compensation is as rollow:
The main menu of setting High Lighl
Compensation is as followl
When the background ofthe object being shot
is very bright, this tunctjon €n be used to @m
-pensate the dulling part of the object being
shot resulted from back light, so that the fore
-grcund will be brighter
This function is mainly used to screen
the lighting of head lamp of vehicle, so
as to achieve correct exposure, so that
the machine can shoot well defined car
license plate.
The main menu of setting Push is
as follow:
Digital Color CameE-09
DescriPtion of menu functions
Description of menu functions
I
i
lmage adjustment
You can make adjustment through the following options: Mirror' Brightness' Contrast,
Sharpness, Hue, Gain.
Enter image adjusting submenu as follow:
Mirror adjust: ON, OFF.
Motion detection setting
signal will be output as an
When the range ofvideo obtained by camera is abnormal, a trigger
alarm and switch.
Set Motion Detection submenu
Open the main menu of lvlotion Detection
as follow:
as follow:
Ooizonbr adiust)
Brightness adjust: 0-255.
Contrastadjust: 0-255.
Sharpness adjust: 0-255.
Hue adjust:0-255.
Gain adjust: 0-255
(coLorsaiu€tion adiust)
Detection sensitivity: 0-1 27
Block display: ON, OFF.
l\ronitor area: ON. OFF.
Area select: uP to 4 areas can be set.
Top:0-288. Bottom:0-288.
IPrivacyareascreening
<) Adaptive Tone scale RePetition
ln the scenery area being shot, carry out automatic brightening compensation to dulling part,
so that the whole picture will be more clear and bright
Open the main menu ofAdaptive Tone
scale Repetition as follow:
Enter (Adaptive Tone scale Repetition)
submenu as follow:
Lu(\$a\cq. Nq\. \q\- midde
CoD--a* rry!:
middle
Left:0-468
;*g;;"d ;;:lii;;
adjusted, mosaic function.
Open the main menu of Privacy area
Set Privacy area screening submenu
6s follow:
Colot:1-8.
franspareocy of screening: 0.5, 0.75, 1.@
Mosaicr
Digital Color Camera-1 0
Risht:0-468'
same time' the area
You can set to hide part area. Up to 4 screening areas can be set at-the
lan ne aalustea, the coloiand transparencv of screening area can be
oN,
OFF.
Digital Color Camera-11
Description of menu functions
Description of menu functions
as follow:
t
Day/Night mode
Ya €n slect
auto, @lor or black & white modes; use.
€n
set it by himsff to stis6/ his requirement
Aulo mode submenu is shown as follow:
i
Noise Reduction
2D digital noise reduction function, it €n effectjvely eliminate vid@ noise points and @lor noise points
under the extreme light @ndition of low illumination, so that the picture will be cleaner
Enter 2D Noise Reduction menu as follow:
Auto mode can be used to switch the
image at night or in low illumination
condition to black & white mode.
Burst: ON, OFF.
Delay @ntrol: 0-255.
The main menu of setting BlackMhite
mode is as follow:
Adjust the levels of C and
Y
Noise reduction mode: Y/C, Y C,
Day Night:0-255.
Y Level: 0-15.
Night Day:0-255.
C Level:0-15.
oFF
The main menu of setting Black4/Vhite
mode is as follow:
I
Camera identification code
Open the main menu of Camera lD
The submenu of setting Camera lD
address is as follow:
Burst: ON, OFF.
tJser defined lD address, CLR POS
Digiial Color Camera-12
(d€rlD)
Digital Color Camera-1 3
Description of menu functions
Description of menu functions
O Synchronization mode (internal synchronization)
I
Power supply synchronization mode, more stable in multiple @meEs switching,
When Camera Reset is selected, the @mera will be reslored to factory setting. As
Camera reset
stm belff
mlorless rolling, and AC24V optional. As shown below:
O Language setting
Bn st as English,
shM below:
You
As
Japanese, Geman, French, Polish, Portuguese, Spanish,
and Chin6e
Note:
Digital Color Camera-14
Digital Color Camera-15