1
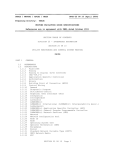
TAPClean Front End User Manual
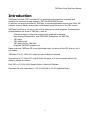
Introduction
TAPClean Front End ("FE" henceforth) is a graphical environment for analyzing and
handling the contents of tape images in TAP and DC2N DMP format.
It relies on the engine provided by TAPClean, a console application derived from Final TAP
(console version) whose source code is distributed under the terms of the GPL license.
TAPClean Front End is not just a front end program as its name suggests. It incorporates
unique features not found in TAPClean, such as:
•
•
•
•
•
•
Interactive report of the tape contents with graphical breakdown
Hex monitor, Disassembler, and CBM BASIC untokenizer for PRG files
TAP editor
TAP splitting tool
TAP repair tool for CBM files
Graphical TAP/DMP analysis tool
Please note that TAPClean FE is not distributed under the terms of the GPL license, yet it
is freeware.
TAPClean FE is (C) 2006-2012 Luigi Di Fraia. All Rights Reserved.
This manual is (C) 2008-2012 Luigi Di Fraia. No parts of it can be quoted without the
author's written permission.
Final TAP is (C) 2001-2006 Stewart Wilson, Subchrist Software.
Document ID: $Id: index.html,v 1.35 2012/06/08 21:15:43 luigidifraia Exp $
1
TAPClean Front End User Manual
Table of Contents
Introduction..................................................................................................................1
Installation...................................................................................................................4
Executing TAPClean FE..................................................................................................5
The Toolbar - part 1......................................................................................................6
Open........................................................................................................................6
Batch.......................................................................................................................6
The Tabbed area - part 1...............................................................................................7
Scanners..................................................................................................................7
Options...................................................................................................................10
Read tolerance....................................................................................................10
Allow detected files to overlap..............................................................................10
Only scan for the loader whose signature is found in CBM files...............................11
EOF markers are mandatory for CBM files.............................................................11
Ignore Cyberload F3 bad checksum of $04............................................................11
Raise cleaning tolerance......................................................................................11
Add a trailing silence at the end of the file after cleaning.......................................11
Create PRG files..................................................................................................12
Connect neighboring PRG's into a single file......................................................12
Extract Visiload loader patching files.....................................................................12
Make batch scan include subfolders......................................................................12
Batch scan sorts report by CBM CRC values..........................................................12
Make audio recorder use sine waves.....................................................................12
Move files to their original folder after clean..........................................................12
TAPClean console location....................................................................................13
Additional parameters..........................................................................................13
The Toolbar - part 2....................................................................................................14
Test........................................................................................................................14
Clean......................................................................................................................14
Convert..................................................................................................................14
Record....................................................................................................................15
The Tabbed area - part 2.............................................................................................16
Report....................................................................................................................16
Plain...................................................................................................................16
Interactive..........................................................................................................16
Save summary................................................................................................18
File types............................................................................................................18
Prg Files.................................................................................................................19
Hex View............................................................................................................20
Convert screen codes......................................................................................20
DASM.................................................................................................................22
Exclude CBM file header...................................................................................22
Auto comment asm code.................................................................................23
BASIC.................................................................................................................24
2
TAPClean Front End User Manual
Displaying foreign PRG files..................................................................................24
Tools......................................................................................................................26
Tape Editor.........................................................................................................26
Tape Split............................................................................................................27
CBM File Repair...................................................................................................29
Tape Analysis......................................................................................................31
System Log.................................................................................................................32
Redirect console command output to log window..................................................32
3
TAPClean Front End User Manual
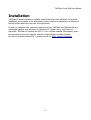
Installation
TAPClean FE doesn't include an installer under OSes other than Windows. For manual
installation, the contents of the distribution archive need to be extracted in a location of
the file system where the user has write permission.
In order to maximize user experience and ease of use, TAPClean and TAPClean FE are
distributed together in binary form for Windows 32, Debian Linux, and Solaris 10
sparc/x86. TAPClean FE requires the GTK+ 2.10+ runtime installed. Alternatively, users
can download the archive with the relevant runtime libraries bundled together.
For more information about GTK+, please consult the GTK+ Project homepage.
4
TAPClean Front End User Manual
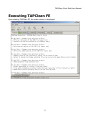
Executing TAPClean FE
Upon starting TAPClean FE, the main window is displayed.
5
TAPClean Front End User Manual
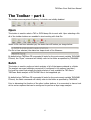
The Toolbar - part 1
The toolbar area comprises 6 buttons, 4 of which are initially disabled.
Open
This button is used to select a TAP or DC2N dump file to work with. Upon selecting a file
all of the toolbar buttons are enabled to start working with that file:
When no file has been selected yet, the status bar will look as per image below:
If a file is then selected, the status bar keeps track of the filename:
By default when TAPClean FE is executed it looks for the environment variable TAPHOME:
If found, the "Open" command will initially refer to the folder as specified by TAPHOME.
Batch
This button is used to perform a batch analysis of all of the tapes contained in a folder.
The analysis can scan subfolders recursively if configured in the options (see later).
It should be noted that actually the batch analysis is only available for TAP files in
TAPClean. Batch analysis of DC2N DMP files is not supported yet.
By default when TAPClean FE is executed it looks for the environment variable TAPHOME:
If found, the Batch command will initially refer to the folder as specified by TAPHOME.
Prior to discussing the function of the other toolbar buttons, it is convenient to have a look
at the various options that can be configured to perform a tape image analysis.
6
TAPClean Front End User Manual
The Tabbed area - part 1
This area comprises a number of tabs, two of which are used to show the analysis report
and the execution log. These will be discussed in detail later on, when we'll look at the
analysis controls.
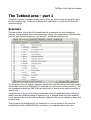
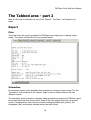
Scanners
This tab contains a list of the file formats that will be searched for and checked for
integrity, where possible, within the opened tape image. The component in TAPClean that
looks for each format is referred to as "scanner", hence the reference here.
The list shown above is entirely read upon startup from the file scanners.txt that's located
in the folder from where TAPClean FE is executed (i.e. the current working directory). The
only exception is about the CBM ROM one which built-in and does not require inclusion in
scanners.txt.
Using the copy in the current working folder means that the application can be forced to
read in and use a different subset of scanners (e.g. a stripped down list of the available
ones), based on the current working directory. Symbolic links can be created to obtain this
result as well.
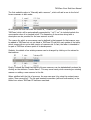
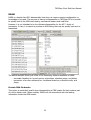
This list can be controlled directly, by checking in or out any subset of the scanners
(excluding the built-in CBM ROM one), as shown in the example below where the
7
TAPClean Front End User Manual
"Accolade/EA Loader" has been excluded:
The reason for which a subset of scanners may require being excluded during the analysis
is that they may trigger false recognitions. File type mismatch is often the reason beyond
an incomplete recognition or recognition with errors in TAPClean.
It should be noted that the order in which the scanners are used in TAPClean is relevant.
If an area of the tape image file has been acknowledged to use a certain format by
mistake then, under normal circumstances, that area cannot be acknowledged again while
looking for another file format.
Finally, the order in which the scanners are used in TAPClean is not as shown in the above
list. The order is hardcoded in TAPClean and has been engineered based on experience.
In case of large tape images where the file formats in use are already known, it may be
worth selecting just those file formats, to speed up the analysis process and avoid
misrecognition as well. The "Select None" button will come handy in such circumstances to
check out all of the scanners so that users can then select just the desired ones.
Similarly, the "Select All" button would check back in all of the scanners for usage.
An additional mechanism for scanner selection is based on their frequency of occurrence
in commercial tapes. Normalized frequency values have been selected based on field
expertise. Only those scanners whose frequency of occurrence is greater than or equal to
the selected "Frequency threshold" will be included.
The "Exclude all scanners but CBM ROM (doc64)" checkbox is used to override the settings
for what concerns checked in and checked out scanners. If this option is enabled then the
only active file format searched for during the analysis is the CBM ROM one.
It is often convenient to activate this option where it's known that the only file format
used in a tape is the CBM ROM one. Also, it may be useful to activate this option to make
a quick scan of the selected tape image and let TAPClean guess which formats are
expected to be therein. This attempt is done by checking the CBM ROM files (usually part
of the boot sequence) for known portions of code that uniquely identify a file format (also
referred to as "signatures").
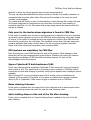
A right mouse click over the list of scanners will bring up a contextual menu as per image
below:
8
TAPClean Front End User Manual
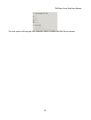
The first available option is "Manually add a scanner", which will add a row to the list of
known scanners in edit mode:
At this point the user can enter the loader id, "<loaderid>", passed as argument to
TAPClean (which will be automatically prepended by "-do"/"-no") to include/exclude the
new scanner when it is checked in/out. The frequency of occurrence along with a
description can be provided for the new scanner as well.
The reason for which a new scanner can be defined is that support for that scanner may
be added in TAPClean but not yet listed in TAPClean FE until the next update of the latter,
which comes with an up-to-date version of scanners.txt. In fact, the latter is intended to
be part of TAPClean at some point of its development.
Similarly, the details of an existing scanner can be changed by clicking on the values for
that scanner:
Finally, it should be noted that the list of known scanners can be alphabetically ordered by
clicking on the attribute "Loader Name". This may come handy when renaming an existing
scanner or adding a new scanner to the list.
When satisfied with the list of scanners, the user can save it by using the context menu
option "Save current list". The list gets created/overwritten (without confirmation) in the
folder from where TAPClean FE has been executed.
9
TAPClean Front End User Manual
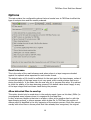
Options
This tab contains the configurable options that are handed over to TAPClean to affect the
type of analysis done and the results produced.
Read tolerance
This is the value of the read tolerance used when pulses in a tape image are checked
against the optimal values expected for each known format.
The default value of 10 should be sufficient for the main part of the tape images, unless of
course the quality of the tape image is not very good, which would produce read errors
during the analysis. In the latter case the user may try to increase this value. It is advised
to check the quality of the tape dumping process if the default value doesn't apply to any
of the tape images that have been made during the process.
Allow detected files to overlap
This option should only be used when in the analysis report (more on this later) GAPs (i.e.
unrecognized areas) appear where it is expected to find data files.
In fact, what may happen is that due to a failure, either at the medium level or with the
tape dumping process, a silence appears within a data file. In TAPClean the position of
silence points is identified in the very beginning of the analysis process. Since files cannot
overlap with other files or silence points that have already been recognized, the original
10
TAPClean Front End User Manual
data file in which the silence appears does not get recognized at all.
The user can allow detected files and silence points to overlap. It's usually a question of
unexpected silence points within other files and not file overlap in the sense the word
"overlap" could suggest.
The results may get messy in case of misrecognition: when allowing file overlap one area
of the tape image can be recognized to use more than one format, thus resulting in
unexisting data files. It is for this reason that a tape image cannot be cleaned while file
overlap is enabled.
Only scan for the loader whose signature is found in CBM files
If this option is enabled then the set of running scanners is reduced to the one (including
its variants) whose signature is found in the CBM files at the beginning of the tape image.
Of course, if this option is enabled and a known signature is found in the CBM files then
the analysis process may be a lot faster. The drawback occurs when the tape image also
contains additional files using a format that is not the one whose signature has been
found: these files will not be recognized, thus producing GAPs.
EOF markers are mandatory for CBM files
Even if uncommon, some CBM files lack the end of file markers. What happens is that
those files will not get recognized during the analysis. Disabling this option will improve
the detection percentage of CBM files that lack those markers, for they will be
acknowledged during the analysis.
Ignore Cyberload F3 bad checksum of $04
It has been discovered that sometimes Cyberload F3 files come with a wrong checkbyte,
whose value is $04. This would result in a checksum error condition in TAPClean that is
concerned to check data integrity by actually verifying files against their checkbytes where
available.
With Cyberload F3 a wrong checkbyte value of $04 should not be considered as an
indicator of file corruption. Therefore, if this option is enabled then a wrong checksum
value of $04 in Cyberload F3 files doesn't trigger a checksum error in TAPClean.
Raise cleaning tolerance
If this option is enabled then the upper limit of the tolerance used to discriminate pulses
during the cleaning process can grow far past the read tolerance value.
Add a trailing silence at the end of the file after cleaning
If this option is enabled then a 5 second trailing silence is added at the end of the file
after cleaning.
11
TAPClean Front End User Manual
Create PRG files
If this option is enabled then file data will be extracted to PRG files. PRG files can then be
inspected by means of other tools embedded in TAPClean FE and grouped in the tabbed
area named "Prg Files".
Connect neighboring PRG's into a single file
If this option is enabled then a block of data spanned on multiple adjacent files is joined
into a single PRG file.
Extract Visiload loader patching files
If this option is enabled then Visiload loader patching files are decoded and their CRC
value used to calculate the overall CRC of the data within the tape image. Also, PRG files
are created out of them if PRG creation is enabled.
Those Visiload patching files are used by the Visiload loader to modify its own code during
the loading process. They usually contain a few ASM instructions of no interest to the end
user.
Make batch scan include subfolders
If this option is enabled then the batch scan is performed recursively on subfolders.
Batch scan sorts report by CBM CRC values
If this option is enabled then the batch scan report will be sorted by CBM CRC values. This
feature has proven to be really useful to identify games that use the same file format. In
that case, there's a good chance that the contents of the first CBM Data file are the same,
thus producing the same CRC value.
In fact, it is common with commercial software on tape that the first CBM Data file
contains the loader used to load the remainder of the files at a higher speed. That's why
these are often referred to as "turbo loaders".
Make audio recorder use sine waves
If this option is enabled then sine waves are used instead of square ones by the audio
converter to sample the resulting audio file. More on the audio converter later on.
Move files to their original folder after clean
If this option is enabled then each cleaned file is moved to the folder where the source file
is. It should be noted that this option is not handed over to TAPClean but provided by
TAPClean FE itself. Also, this option is only meaningful for releases of TAPClean older than
0.25.
12
TAPClean Front End User Manual
TAPClean console location
This is the folder where TAPClean is expected to be found. It defaults to the folder from
where TAPClean FE has been executed. This also means that different versions of
TAPClean can be used in conjunction with TAPClean FE simply by starting TAPClean FE
from a different location or using this option to pick up the version of TAPClean the user
wishes to work with.
Under normal operations it is advised to keep TAPClean and TAPClean FE in the same
folder, along with scanners.txt. It should also be noted that if TAPClean is not found then
TAPClean FE will not complain.
Additional parameters
This is a group of additional parameters silently passed to TAPClean. The dropdown button
provides a list of valid built-in parameters.
As example, VIC20 tapes can be analyzed by passing the -20 parameter to TAPClean.
13
TAPClean Front End User Manual
The Toolbar - part 2
This paragraph covers the details of tape image analysis, cleanup, and conversion.
Test
This button is used to perform the analysis of the tape image that has been previously
opened. Despite of the fact TAPClean can analyze more than one tape image when
executed, thus preserving some information between each analysis, it's not actually
possible to do so by means of TAPClean FE. The analysis refers to just one tape image in
turn.
When the analysis is finished, the tabbed areas "Report", "Prg Files", and "System Log"
will be updated with information about the analysis.
Clean
This button is used to perform the analysis and cleaning of the tape image that has been
previously opened. Despite of the fact TAPClean can analyze and clean more than one
tape image when executed, thus preserving some information between each analysis, it's
not actually possible to do so by means of TAPClean FE. Just one tape image in turn can
be processed.
When the cleaning process is finished, the tabbed areas "Report", "Prg Files", and "System
Log" will be updated with information about the analysis.
Please note that the purpose of cleaning a tape image is not to save disk space. Yes, a
cleaned file improves compression ratio, but that's not the point.
Tape images are cleaned to restore their quality and remove noise. The cleaning process
often changes the total load time of a program because of the fact the image is
completely remastered using average timings that are not recalculated on a per tape
basis.
It is strongly advised to keep the raw tape image somewhere safe for future comparison.
Besides, if it is proven that the cleaning process is buggy and gets fixed, the user will later
on be able to clean the raw image properly.
Convert
This button is used to convert the opened file into either TAP version 0 or 1.
A drop-down menu is used to select the output format as per image below:
14
TAPClean Front End User Manual
Record
This button is used to convert the opened file into an audio file using either the AU or WAV
format.
A drop-down menu is used to select the output format as per image below:
The use of those audio files is recording them to either a tape directly or to a CD (and
then possibly to tape) to play them back on a real computer for which the contents are
intended.
15
TAPClean Front End User Manual
The Tabbed area - part 2
Back on this topic to illustrate the use of the "Report", "Prg Files", and "System Log"
areas.
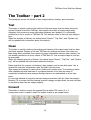
Report
Plain
This area shows the report generated by TAPClean upon analyzing or cleaning a tape
image. The report will look like the one provided below:
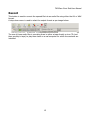
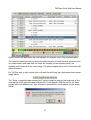
Interactive
An interactive report is also available when analysing or cleaning a tape image. The tab
"Interactive" at the bottom of the "Report" page is used to switch between the two
different reports.
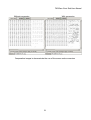
The interactive report provides a summary table generated by parsing the TAPClean report
and a tape layout bar that shows which areas of the tape image have been recognized
(green), recognized but with read errors and/or failing checkbyte test (yellow), not
recognized (red), and actually selected within the table (blue):
16
TAPClean Front End User Manual
Clicking inside the tape layout bar will highlight the relevant row in the summary table.
The result of checkbyte tests (to check the data integrity of those files that use some sort
of content check) and read tests (to check the integrity of the encoding itself) are
available at the bottom of the report page. The status images will be red if these tests fail,
green otherwise.
For TAP files only, a right mouse click over each file will bring up a contextual menu as per
image below:
The "Show in graphical tape analysis tool" option is used to jump to the beginning of the
selected file in the graphical tape analysis tool. If the attached TAP file has not yet been
parsed within the analysis tool, then the user is prompted for confirmation, as per image
below:
17
TAPClean Front End User Manual
Save summary
The summary table can be exported to an HTML file by means of the provided button.
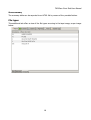
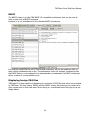
File types
This additional tab offers a view of the file types occurring in the tape image, as per image
below:
18
TAPClean Front End User Manual
Prg Files
If PRG file generation is enabled, the PRG files generated by TAPClean upon analyzing or
cleaning a tape image will be available for content inspection here. An example is given in
the image below:
After selecting a PRG file with a single left mouse click, a right mouse click over the list of
PRG files will bring up a contextual menu as per image below:
19
TAPClean Front End User Manual
Hex View
The Hex viewer comes handy when it is required to have a quick look at the contents of a
file.
Convert screen codes
This option is useful when looking for strings within a file. The text to be shown on screen
in capital letters in a CBM computer does not use printable ASCII values. Therefore it is
not easy to spot this kind of text in a hex viewer. The conversion forces some of the
screen codes to become printable ASCII characters.
An example of the use of this feature is given by the following comparison:
20
TAPClean Front End User Manual
Without conversion
With conversion
Comparative images to demonstrate the use of the screen code conversion
21
TAPClean Front End User Manual
DASM
DASM is a hassle-free 6510 disassembler that does not require massive configuration or
knowledge to be used. The purpose of having a disassembler in TAPClean FE is to be able
to quickly look at the ASM code used by commercial loaders and small files.
However, it is not intended to be the ultimate disassembler for the 65** family of
processors. In fact, it is meant to produce an ASM listing that may be quickly read and reassembled.
The above example shows just a few of the interesting features available in DASM:
•
•
automatic labelling for: branch points, subroutines, absolute jumps, and tables
generation of a cross-reference for: conditional branches, subroutine calls, and
jumps
Exclude CBM file header
This option is particularly useful when disassembling a CBM header file that contains part
of a turbo loader code. When enabled, DASM will not mess about with the leading
information inside the CBM header.
22
TAPClean Front End User Manual
As the above image shows clearly, the CBM header area used for file type, start+end
addresses, and filename (from $033C to $0350) is not disassembled at all when this
option is enabled.
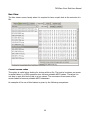
Auto comment asm code
If this option is enabled then the source code is commented automatically. Comments are
available for:
•
•
•
•
•
•
•
•
VIC-II registers at $D000-$D02E
VIC-II mirror registers at $D040-$D3FF
SID registers at $D400-$D41C
SID mirror registers at $D420-$D7FF
CIA #1 registers at $DC00-$DC0F
CIA #2 registers at $DD00-$DD0F
Kernal Jump Table at $FF81-$FFF3
6510 Hardware Vectors at $FFFA-$FFFF
23
TAPClean Front End User Manual
BASIC
The BASIC viewer is a fully CBM BASIC V2 compatible untokenizer that can be used to
have a quick look at BASIC programs.
However, it is not intended to be the ultimate BASIC untokenizer.
It should be noted that the set of CBM special characters will not be rendered. Each of
them will be substituted with a dot. This substitution looks fair enough, considering that
the BASIC listing is not produced to be automatically re-tokenized by a BASIC interpreter,
either a native or a cross-platform one.
Displaying foreign PRG files
TAPClean FE is also capable of displaying the contents of PRG files that were not produced
by TAPClean. The Hex viewer, DASM, and the BASIC viewer allow doing so by means of a
right mouse click on their text area. When doing so, a contextual menu will pop up as per
image below:
24
TAPClean Front End User Manual
The first option will bring up a file selection dialog to select the PRG file to process.
25
TAPClean Front End User Manual
Tools
Tape Editor
At present, the TAP file editor can be used to remove blocks from a TAP file, which is
particularly useful when an optimized tape contains small unrecognized areas that are not
necessary.
This tool saves users from editing TAP files in an hex editor, which has the added burden
of having to fix the data size inside the TAP file header.
As with the interactive report, a right mouse click over each file will bring up a contextual
menu used to jump to the beginning of the selected file in the graphical tape analysis tool.
26
TAPClean Front End User Manual
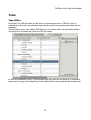
Tape Split
An automated TAP file splitting tool is available to e.g. split compilations into single TAP
files, as per image below:
As with the interactive report, a right mouse click over each file will bring up a contextual
menu used to jump to the beginning of the selected file in the graphical tape analysis tool.
The tool is capable of identifying the start of a CBM boot file and to mark it as a split point
via the "Analyze" button.
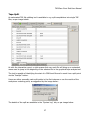
Users can either manually mark split points in the first instance or use the results of the
analysis as a starting point, as suggested by the image below:
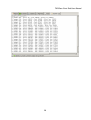
The details of the split are available in the "System Log" tab, as per image below:
27
TAPClean Front End User Manual
28
TAPClean Front End User Manual
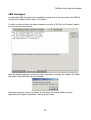
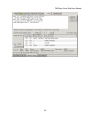
CBM File Repair
An automatic CBM file repair tool is available to repair one of the two copies of a CBM file
should one be faulty and the other one healthy.
In order to check whether the above scenario occurs for a TAP file, the "Analyze" button
can be used, as shown below:
After the analysis has been carried out (and, optionally, a review), the "Repair All" button
will repair those CBM files that can be fixed:
Advanced users can review the details of each faulty file and its healthy copy by
expanding the "Region breakdown" control, as per below:
29
TAPClean Front End User Manual
30
TAPClean Front End User Manual
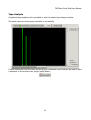
Tape Analysis
A graphical tape analysis tool is provided in order to inspect tape image contents.
The pulse trace can be arranged vertically or horizontally.
A right mouse click over the trace will bring up a contextual menu that can be used to take
a snapshot of the current view, as per image below:
31
TAPClean Front End User Manual
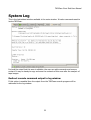
System Log
This is the last tabbed window available in the main window. It tracks commands used to
invoke TAPClean.
It should be noted that this area is editable: the user can add comments and remove
content. It may be handy to copy and save the contents of this area after the analysis of
tape images.
Redirect console command output to log window
If this option is enabled then the output from the TAPClean console program will be
redirected to the log window.
32