1
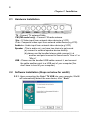
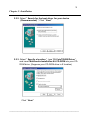
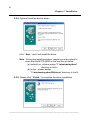
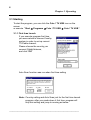
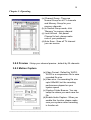
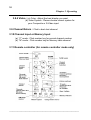
Cute ! TV USB
USB TV box
User's Manual
_____________________________________________________________________________
FEDERAL COMMUNICATIONS COMMISSION
This device complies with Part 15 of the FCC Rules Operation is subject to
the following two conditions: this device may not cause harmful interference,
and (2) this device must accept any interference received, including
interference that may cause undesired operation.
This equipment has been tested and found to comply with the limits for a
Class B Digital Device, pursuant to part 15 of the FCC Rules. These limits
are designed to provide reasonable protection against harmful interference
in a residential installation. This equipment generates, uses and can
radiated radio frequency energy and, if not installed and used in accordance
with the instruction, may cause harmful interference to radio communication.
However, there is no grantee that interference will not occur in a particular
installation. If this equipment does cause harmful interference to radio or
television reception, which can be determined by tuning the equipment off
and on, the user is encouraged to try to correct the interference by one or
more of the following measures:
-Reorient or relocate the receiving antenna.
-Increase the separation between the equipment and receiver.
-Connect the equipment into an outlet on a circuit different from that to
which the receiver is connected.
-Consult the dealer or an experienced radio/TV technician for help.
Notice: Changes or modifications not expressly approved by the party
responsible for compliance could void the user’s authority to operate the
equipment.
CE DECLARATION
This device complies with CE . These limits are designed to provide reasonable protection
against harmful interface in a residential installation.
Printed in TAIWAN R.O.C. No.04020801
All contents are subject to change without notice.
All trademarks are the property of their respective owner
Table of Contents
Chapter 1. Overview ---------------------------------------------------------1.1
1.2
1.3
1.4
1.5
1
Introduction ----------------------------------------------------------------Features --------------------------------------------------------------------Specifications --------------------------------------------------------------Package Contents --------------------------------------------------------Minimal System Requirements -----------------------------------------
1
1
2
2
2
Chapter 2. Installation -------------------------------------------------------
3
2.1
2.2
Hardware Installation ----------------------------------------------------Software Installation ------------------------------------------------------
3
4
Chapter 3. Operating -------------------------------------------------------
7
3.1
3.2
3.3
3.4
3.5
3.6
3.7
3.8
3.9
3.10
3.11
Starting ----------------------------------------------------------------------Hardware push button ---------------------------------------------------Change Video Size -------------------------------------------------------Change Video Source ---------------------------------------------------Still Image Capture--------------------------------------------------------Motion Capture ------------------------------------------------------------Channel Preview ----------------------------------------------------------Configuration Tools -------------------------------------------------------Channel Return ------------------------------------------------------------Channel Input or Memory Input----------------------------------------Remote Controller ---------------------------------------------------------
Chapter 4. Trouble Shooting ---------------------------------------------
7
8
8
9
9
9
9
9
11
11
11
12
_____________________________________________________________________________
Chapter 1. Overview
1.1 Introduction
Congratulations on your purchase of Cute ! TV USB bring television to
your desktop or notebook computer, You can now get breaking news
or watch your favorite sports game on your computer! With the Cute !
TV USB, you can also capture live video, still images and record
television programs. Just plug this external device into your USB port
and turn your computer into a complete video entertainment system
1.2 Features
λ External USB TV device with built-in TV Tuner.
λ Unique WJPG compression technology to minimize recorded file
size
λ Hardware push button for Motion capture, Snap shot & Channel
selection
λ Watch TV on a desktop or notebook computer
- Resizable TV window from QCIF size to full screen.
- 181 channel ready TV Tuner Function.
- Parental Channel Lock-Out
- 25-Channel Preview
- Channel number direct input
- Auto channel scan.
λ Image/Video Capture including external video source input
- Motion Capture and playback
- Capture video up to 30fps--NTSC and 25fps--PAL
- Supports Coaxial, Composite and S-Video Input.
- Full screen (UP to 640X480) motion capture capability.
- Snapshot function at 1600x1200 pixels BMP/JPG/TIFF format
λ Supports Brightness, Contrast, Saturation, Hue, Volume, Mute
adjustments
λ Video Source and Video Standard Selection .
λ Video always on top.
λ Plug & Play; Powered by USB port.
λ Optional remote controller functions
λ With FM radio model available
___________________________________________________________
1
Chapter 2. Installation
1.3 Specifications
λ Input Signal:
- 75 ohm Coaxial TV Antenna/Cable Input
- FM radio input (FM model only)
- S-Video Input
- Composite Video Input
- Two L/R audio Input from external video source
λ Output Signal:
- Stereo audio output (direct to speaker or Loop to Sound Card)
λ Warranty: 1 year parts and labor.
1.4 Minimum System Requirements
λ
λ
λ
λ
λ
λ
USB port
Pentium 233 MMX or better.
Windows 98/Me/2000/XP
32 MB RAM
Minimum 8 MB free disk space.
Sound card(optional for AVI capture audio)
1.5 Package includes
λ One Cute ! TV USB unit
λ
λ
λ
λ
λ
λ
One 3.5mm stereo to 3.5mm stereo audio cable
One USB cable
One software CD
Manual
One Remote controller (Optional)
Ulead VideoStudio Software CD (Optional)
___________________________________________________________
2
Chapter 2. Installation
2.1 Hardware Installation
TV : Connect TV antenna/Cable
FM (FM model only) : Connect FM radio antenna
S-in : S-Video input from external video device(e.g.VCR)
C-in : Composite video input from external video device(e.g.VCR)
Audio-in : Audio input from external video device(e.g.VCR)
Speaker : This is audio out, you have two choice to get sound.
(a) connect to external speaker device directly.
(b) please use the bundled stereo cable connect it, at
another end point connect to Sound card's "Line in" or
“Mic-in”
USB : Please use the bundled USB cable connect it, and connect
the cable another point to a USB port of your computer(You
don't have to turn off your computer).
2.2 Software Installation (Steps as below for win98)
2.2.1. Upon connecting the Cute ! TV USB into your computer, Win98
will automatically detect the new device, click " Next "
___________________________________________________________
3
Chapter 2. Installation
2.2.2. Select " Search for the best driver for your device
(Recommended) "; Click " Next "
2.2.3. Select " Specify a location ", type “E:\CuteTVUSB\Driver ”,
and insert Multimedia Installation Kit CD-ROM into your CDROM drive; (Suppose your CD-ROM drive in E location)
Click " Next "
.
___________________________________________________________
4
Chapter 2. Installation
2.2.4. System found the device driver,
click " Next " and it will install the driver.
Note : During the install procedure, maybe you were asked to
insert the Win98 CD-ROM to find two files as below.
(a) ksclockf.ax : please assign "C:\windows\system"
directory to find it.
(b) ks.sys : please assign
"C:\windows\system32\drivers" directory to find it.
2.2.5. Please click " Finish " to complete the driver installation
___________________________________________________________
5
Chapter 2. Installation
2.2.6. Install application software
(a) Please run " E:\CuteTVUSB\AP software\Setup.exe "
(b) Follow the instruction and finish Application software
installation.
2.2.7. Please restart your computer
After the software installed, you will find the Cute ! TV USB icon on the
screen.
Also there are five items under Cute ! TV USB program group.
(a) Configuration Tool : Setup the configuration.
You can setup it even the Cute! TV USB didn't connect.
Use the BACKUP & RESTORE function, you can keep two sets
configuration.(e.g. you can have USA and JAPAN configuration)
(b) Cute! TV USB : Main application software
(c) Reset Cute ! TV USB : After your first time choose TV system, if
you want change another country TV system, you can run this
program to change.
(d) Uninstall : Remove the Program
(e) User's Guide : Detail operating manual
___________________________________________________________
6
Chapter 3. Operating
3.1 Starting
To start the program, you can click the Cute ! TV USB icon on the
screen
or execute " Start Æ Programs Æ Cute ! TV USB Æ Cute ! TV USB ".
3.1.1 First time launch
If you execute program first time,
you were asked to choose Country
system in order to set up correct
TV/Cable channel;
Please choose the country you
connect Cable/Antenna,
and click “OK”
Auto Scan function was run when first time setting
Note : Country setting and Auto Scan just for the first time launch
program, after you made down it first time, program will
skip this setting and jump to running as below.
___________________________________________________________
7
Chapter 3. Operating
After executed, you can see display as below
3.2 Hardware push button : There are four buttons on the box.
◄ CH ►
TV Channel up and down
Motion Video Capture
(Push for recording, push again for stop)
Still Image Capture
3.3 Change Video Size
(a) There are three video size for switching.
(b) Full screen display : Please double click the screen change to full
screen, double click again back to last size.
___________________________________________________________
8
Chapter 3. Operating
3.4 Change Video Source : Click it to switch between
Antenna/Cable/Composite/S-Video input
source
3.5 Still Image Capture : When you click, you will see the capture
windows as below, if you want save the
image, just click anyone you want,
and save the file name. Be sure you type file
name to save, or these image will not save
automatically,
3.6 Motion Capture : Click it to start recording, you can click again to
stop the recording.
Recording file will save as MDDHHMMN.avi automatically according
your computer system day/time.
M : Month; from 1 to 9, Oct->O, Nov.->N, Dec.->D
DD : Day; from 01 to 31
HH : Hour; from 01 to 24
MM : Minute; from 01 to 59
N : From 1 to 9 if you make a couple of times recording during
same minute.
3.7 Channel Preview : You can have 25 channel preview, also you can
click any channel to display.
3.8 Configuration Tools
3.8.1 TV Tuner : This function for Cable/Antenna only, if your video
source switch to Composite or S-Video, there is no
such function; Please refer 3.4 Change Video
Source
___________________________________________________________
9
Chapter 3. Operating
(a) Channel Group : There are
Normal Group for all TV channels
and Memory Group for your
memory channels
(b) In Normal Group mode, click
“Memory” to memory channel
(c) Lock/UnLock : Set parent
Channel to lock, please make
note of your password
(d) Auto Scan : Scan all TV channel
you can receive.
3.8.2 Preview : Setup your channel preview , default by 25 channels
3.8.3 Motion Capture
(a) Video Format : Default by WJPG;
WJPG is a compression file to save
recorded file size.
(b) Video size : the recording file size
upto 640x480, but the recording
performance depend on your
system speed
(c) Capture Folder Browse : You can
setup the where you want save the
file.
(d) Enable Audio Capture : When you
enable this function, please make
sure your system sound recording
is function ok.
___________________________________________________________
10
Chapter 3. Operating
3.8.4 Video : (a) Color : Adjust the best display you want
(b) Video System : Please choose correct system for
your Composite or S-Video input.
3.9 Channel Return : Click to back last channel
3.10 Channel Input or Memory Input
(a) “C” mode : Click number key for normal channel number.
(b) “M” mode : Click number key for Memory table channel
3.11 Remote controller (for remote controller mode only)
___________________________________________________________
11
Chapter 4. Trouble Shooting
Q1 : Why Black/White video display instead of Color ?
A1 : (1) In TV mode : Maybe you choose TV system incorrect in the first
time setup. Please exit the Cute ! TV USB program and reset
again(run Start->Programs->Cute!TV USB->Reset Cute!TV
USB) ; please refer Page 6, 2.2.7 (c) and run Cute ! TV USB again
(2) In Composite or S-Video input mode : Please make sure video
system setup correct; please refer Page11, 3.8.4 Video, (b) video
system
Q2 : Why can not hear anything when preview mode?
A2 : Maybe audio conection incorrect or sound card setup incorrect
(1) Please higher the volume of Cute TV USB Panel
(2) Check the cable connection, you must connect to external Speaker
or Sound card Line-in.(ref.2.1 Hardware installation)
(3) Please check your sound card volume control panel.(exit the Cute !
TV USB software and play your sound card only to test sound card
work or not, please play any audio file for testing)
Q3 : Why can not hear anything after playback the recording file?
A3 : (1) Please check your sound card recording function, do not make Line-In
to be mute, and check the recording volume.
You can recording other audio device(e.g.VCR) and playback the
file for testing.
(2) Make sure enable audio capture before recording, please refer
page 10, 3.8.3 Motion capture (d)
Q4 : When I play Cute ! TV USB, the program is not stable(hang!)
A4 : (1) Maybe your VGA card driver can not compatible with direct draw very
well, please update new VGA driver
(2) Your system resident too many program and share the memory,
please release some program as below.
Please go to Start->Programs->Accessories->Sytem Tools->
System Information->Tools->System Configuration Utility->
Startup to release
___________________________________________________________
12
Chapter 4. Trouble Shooting
(3) Please lower the hardware accelerator, you can go to
My Computer->Control panel->Display->Settings->Advanced->
Performance to adjust it.
Q5 : How can I get best performance in recording mode?
A5 : The best performance recording depend on computer system
performance, but you also can make some step as below to make
better.
(1) Keep Hardisk space larger.
(2) Make your hardisk drive DMA active; Go to My Computer
->Control Panel->System->Device Manager->Disk drives
->GENERIC IDE DISK TYPE47->Properties->Settings,
click “DMA”.
(3) Use speed more than 7200 Rotation hardisk drive
(4) Disable Power Management in BIOS
(5) Disable Power Saving mode of monitor
(6) Close some resident programs of your system
(7) Restruct your hardisk
(8) Do not run other program during recording
Q6 : Why can’t I get smooth display in full screen?
A6 : Real time display depend on CPU speed, VGA & memory, please try to
lower your system color(e.g. true color->high color), maybe you can get
the better display.
Q7 : When I change different USB port, the push button function can not
work?
A7 : Please restart computer.
Q8 : Why TV box functions are all work, but Channel up/dwon on box can
not work, also remote controller can not work ?
A8 : Maybe your notebook IR port is enable, please disable it.
___________________________________________________________
13