1
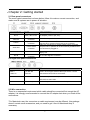
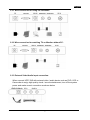
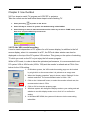
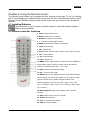
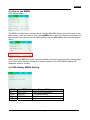
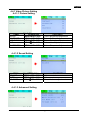
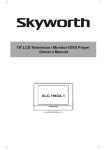
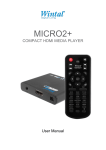
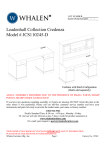
English Chapter 1: Introduction The new Genius TVGo A31 is an excellent combination of PC and TV system, without the need of a screw driver or any software driver installation. Just plug the cables and power adapter in, and you get HDTV quality TV reception and you can watch Analog TV on your TFT LCD / CRT monitor or projector. It supports higher resolution from 800 x 600 up to WSXGA 1680 x 1050 pixels. The TVGo A31 also supports the PIP (picture in picture) re-sizing feature, and you can work on your PC and still watch your favorite TV or video programs. You can also connect the TVGo A31 to a DVD player, VCD player, camcorder or video game, so you can experience more visual and audio entertainment. 1.1 Package Contents Make sure the following parts are included when you open the package. If not, contact your distributor or dealer. TVGo A31 TV Box AC adapter YPbPr cable IR remote VGA-In loop back Audio cable for connecting to PC sound controller cable (for PIP mode User’s Manual system use) 1.2 System Requirements • Display unit CRT / LCD with Standard VGA connector (D-Sub 15 pin). A PC system is necessary when PIP mode is required. • RF antenna signal or CATV signal. • Independent of OS (operating system), no software driver installation or HDD space is needed. 1.3 Main Features Resolution up to WSXGA: 1680 x 1050 resolution. The most optimized VIDEO display setting is 1024 x 768 with the vertical refresh rate at 75Hz gives the best performance In a generic 15 inch LCD monitor, while in 20 inch LCD wide monitor you can set it to 1680x1050。 PiP Function supports sub-Video display in PC: In addition to full screen display, the PIP feature allows you to watch TV while working on your PC, the PIP sub video window is moveable to any place on the VGA monitor. MTS Stereo: HDTV WS supports SAP and Stereo audio, according to the broadcasting program, you can choose a second language for receiving stereo audio. 16 Channels TV wall for program preview: the TV program can be previewed in 4, 9 or 16 display windows, and can be easy manipulated using the function key or remote control。 Sharper and stunning picture: Adaptive 3D noise reduction filter, enhanced motion adaptive 3D de-interlacing and adaptive Luma/Chroma enhanced engine. Multiple input /output source: The support connector includes (RCA) input and output, S-VHS input, 3.5 mm stereo audio input and output, convent to VCR or DVD connection。 1 English Chapter 2: Getting started 2.1 Rear panel connectors The most typical connection is shown below; follow it to make a correct connection, and make sure all systems are in power off situation. CONNECTOR DC In VGA Out VGA In TYPE 5mm, INT+, EXT15 pin D-Sub connector 8 pin Mini DIN connector Audio Out 3.5mm stereo connector Video Out RCA Jack RF IN TV antenna connector DESCRIPTION AC adapter, power in (5V, 2 A)。 Main video output. Connect to CRT/LCD Monitor。 VGA-In loop back cable: The other end of this cable connects to PC system VGA D-sub 15 pin connector. Audio out: Connect to PC sound system (Line-in of sound card) the built-in speaker will be automatically disabled when this connector is plugged in。 Video output. Can be used to connect to Video input of display unit. TV or CATV signal in connector。 2.2 Right Side panel connectors CONNECTOR TYPE DESCRIPTION YPbPr / 7 pin Min Din YPbPr / S-VHS type external video input source. can be S-Video In connector connected to DVD,VCR or Camcorder.。 Video In RCA JACK External composite video input source, can be connected to DVD,VCR or Camcorder.。 Audio In RCA audio jack RCA audio jack used for external audio input source. 2.3 Wire connection There is no sequential requirement which cable should be connected first except the AC adapter, it is strongly recommended to connect the AC adapter last when you finish all the connections. *For Macintosh user, the connectors or cable requirement may be different, this package doesn’t contain such accessories, and you need to get it from a Macintosh shop if necessary. 2 English 2.3.1 Wire connection for using PIP functions: 2.3.2 Wire connection for watching TV on Monitor without PC: 2.3.3 External Video/Audio input connection: When connect HDTV WS with external video / audio device such as DVD, VCR or Camcorder to enjoy high quality visual / sound entertainment, turn off the system power and make correct connection as shown below. 3 English Chapter 3: Use the Box! 3.1 Four steps to watch TV program on LCD/CRT or projector Take the remote control and follow these steps to start watching TV. 1. Press power key to power on the device 2. Press SYS key to choose TV system. Our default setting is PAL BG/DK. 3. Press Exit key to return to main menu and use VOL+/VOL- key to select “TUNE” menu, choose Auto scan and press Menu key to start scan. 3.2 PC side VGA resolution setting It can be used independent of PC system for a full screen display. In addition to the full screen display, when it is connected to a PC, the PIP sub video window can also be displayed on the top of the PC system VGA surface. This gives you the option of watching TV while you work on the PC or just enjoy the full screen program. While in PIP mode, in order to have the optimized performance, it is recommended to set PC system VGA in XGA mode (1024 x 768) and the monitor’s refresh rate at 75Hz. See below for the VGA setting. 1. In Windows system, the VGA resolution setting page can be invoked by a right click on the mouse when it is pointed at an empty area. 2. When the “display properties” page is shown, select “Settings” for the desired resolution. The recommended value is 1024 x 768. 3. Click on the “Advanced” button, to select the monitor refresh rate, the recommended value is 75Hz 4. Click on OK to close the property page. 5. Windows system will change the display mode to your setting and ask whether to use this display mode or not, click “ok” to confirm the setting. 6. In Windows ME 95/98, the system will reboot to let the new setting take effect. 4 English Chapter 4: Using the Remote Control The remote control allows you to operate this box, such as turning your TV on / off, viewing the TV, and changing the channels and volume. Aim the front of the Remote Control at the Remote Control Receiver and press the control buttons as you would on the infrared ray receiver. 4.1 Installing Batteries Open the back cover of remote controller and put in two AAA batteries (alkaline battery recommended). 4.2 Remote controller functions 1. Power: power on/off control. 2. MUTE: Volume mute or resume. 3. Numbers: Program number select 4. -/ --: Single or Double digits channel 5. RECALL: Recall last program you watched. 6. TV/AV: Source select. 7. CH+: Channel Up. 8. PC/TV: Switch to select PIPPC mode or full screen TV mode. 9. VOL-: Volume Down. 11. CH-: Channel Down. 10. VOL+: Volume Up. 12. MENU: When in [full screen TV mode], pop out the MENU for further setting. When in [PIP PC mode], use to allocate PIP position in conjunction with CH+/-, Vol +/- key. 13. EXIT: Exit form current Menu setting. 14. PIP: Enter into PIP mode. 15. MODE: When in PIP Mode (connect to PC)]: Mode changes the PIP display (TV screen) size. When in Full screen TV mode (without connect to PC)]: Mode changes the HDTV WS resolution setting to the next level. 800 x 600 to 1024 x 768 (15”~17” Monitor), 1280 x 1024 (19”~21” Monitor), 1680 x 1050 (22” or above). 16. MULTI-DISPLAY: Multi-picture display. Up to 16 video windows. 17. SKIP: Skip/no skip current TV channel. 18. SLEEP: Set sleep time. 19. SYS: TV system format setting. 20. OSD: On Screen Display. 5 English 4.3 How to use MENU OSD display Menu The MENU configuration is shown above. Use the CH+/CH- key to move the cursor to the desired item, once you reach it, click on the MENU key to select it. If there is a sub Menu for the selected item, you can set the Value setting; use the VOL+/VOL- key to set the proper value. Either press the EXIT key on the remote controller to return to previous menu setting page or exit from menu setting. If there is no further operation, the OSD MENU display will disappear within 8-10 secs. 4.4 OSD display MENU Setting MENU PIC TUNE SYS OSD ITEMS PICTURE SOUND SETTING Display MENU setting Video picture adjustment TV program setting TV system format setting On screen display。 6 English 4.4.1 Video Picture Setting 4.4.1.1 Picture Setting ITEMS BRIGHT CONTRAST SATURATION HUE SHARPNESS OPERATION MENU→VOL+/VOLMENU→VOL+/VOLMENU→VOL+/VOLMENU→VOL+/VOLMENU→VOL+/VOL- CONTENTS Picture Brightness Adjustment Picture Contrast Adjustment Picture Saturation Adjustment Picture Hue Adjustment Picture Sharpness Adjustment 4.4.1.2 Sound Setting ITEMS VOLUME MUTE BALANCE OPERATION MENU→VOL+/VOLMENU→VOL+/VOLMENU→VOL+/VOL- CONTENTS Volume control Volume mute or resume Sound balance adjustment 4.4.1.3 Advanced Setting 7 English ITEMS NOISE REDUCTION BLACE LEVEL MULTI-DISPLAY SET PIP MODE OPERATION MENU→VOL+/VOLMENU→VOL+/VOLMENU→VOL+/VOLMENU→VOL+/VOL- PS – GAME OPTION MENU→VOL+/VOL- CONTENTS Noise reduction control Enhance video signal. 4, 9,16 Multi-channel display Change PIP display size. PS2 video enhance, ON/OFF 4.4.2 TV Program Setting ITEMS CURRENT CH EXCHANGE CH OPERATION VOL+/VOL→MENU VOL+/VOL→MENU EXCHANGE SAVE SKIP FINE - TUNING AUTO SCAN MANUAL SCAN MENU→VOL+/VOL- CONTENTS Display current channel Change current channel sequence list Save adjusted channel sequence list To skip the undesired channels Channel Frequency fine tune Auto TV channel scanning TV channel scanning manually MENU→VOL+/VOLMENU→VOL+/VOLVOL+/VOLMENU→VOL+/VOL- 4.4.3 TV System Format Setting 8 English ITEMS TV SYSTEM OPERATION MENU→VOL+/VOL- BLUE SCREEN MENU→VOL+/VOL VIDEO SOURCE DISPLAY SCALE RESOLUTION MENU→VOL+/VOL DISPLAY TYPE RESET MENU→VOL+/VOLMENU→VOL+/VOL- CONTENTS PAL TV system standard select Background color setting Input video source select, TV/AV/SV Video output mode select 16:9, 16:10, 4:3 Output image resolution select CRT/LCD output select Reset to factory default setting MENU→VOL+/VOL MENU→VOL+/VOL- 4.4.4 On Screen Setting ITEMS LANGUAGE H POSITION V POSITION BACK COLOR OPERATION MENU→CH+/CHMENU→CH+/CHMENU→CH+/CHMENU→CH+/CH- CONTENTS English or Chinese select Adjust horizontal position Adjust vertical position Window background color setting Setting window transparency setting OSD display time setting TRANSPARENCY MENU→CH+/CHOSD TIMEOUT MENU→CH+/CH- 9