1
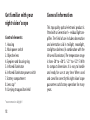
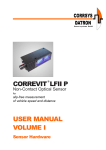
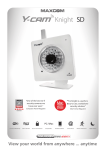
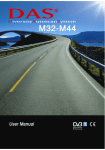
MINOX NV mini
Anleitung
Instruction
Mode d’emploi
Minox NV mini
• Deutsch
• English
• Français
Achtung! Attention!
Entfernen Sie bitte niemals bei
Tageslicht den Objektivschutzdeckel.
Never remove the lens cap in daylight.
N’enlevez jamais le couvercle de
l’objectif en plein jour.
Contents
Introduction
Get familiar with
your night vision ‘scope
- Control elements
General information
Operating instructions
For use in daylight
- Inserting the battery
- Switching on
- Switching off
16
Page
Page
Page
Page
Page
Page
Page
Page
Page
17
18
18
18
19
19
19
19
19
For use at night
- Switching on
- Adjustment
- Infrared illuminator
- Switching off
Safe keeping
Important information
Advice on care
Troubleshooting
Technical Data
Customer Service
Conditions of warranty
Page
Page
Page
Page
Page
Page
Page
Page
Page
Page
Page
Page
20
20
20
20
20
21
21
22
23
25
26
28
Introduction
Dear MINOX Customer,
Congratulations on your purchase of this night
vision ‘scope. You have chosen a product that
boasts highest optical quality and precision mechanics.
This User’s Manual will advise you on how to
obtain the best performance results from your
MINOX night vision ‘scope.
We hope this night vision ‘scope scope will give
you a great deal of pleasure and always keep
you perfectly in the picture!
17
MINOX NV mini
4 9
1
2
3 5
6
7
8
Get familiar with your
night vision ‘scope
Control elements
1. Housing
2. Main power switch
3. Objective lens
4. Eyepiece and focusing ring
5. Infrared illuminator
6. Infrared illuminator power switch
7. Battery compartment
8. Lens cap*
9. Carrying strap position held
*never remove in daylight !
18
General information
This top quality optical-electronic product is
fitted with a Generation 1+ residual light amplifier. The field of use includes observation
and orientation aid in twilight, moonlight,
starlight or darkness (in combination with the
infra-red illuminator). The temperature range
is from -30° to +50° C / -22° to +122° F. With
its compact dimensions it is easy to handle
and ready for use at any time. When used
and cared for correctly this night vision ‘scope
guarantees satisfactory operation for many
years.
Operating instructions
For use in daylight
Inserting the battery
Please ensure that the lens of your NightVision scope is covered by the lens cap.
Remove the battery compartment lid and
insert the battery (1 CR 1/3 N). Always observe
correct poling. Fully close the battery compartment again.
Switching on
To protect the sensitive image tube against
irreparable damage, never remove the lens
cap in daylight. The small opening in the
center of the cap is adequately dimensioned
for daylight use.
Actuate the main switch. The green LED display
lights up. When you look through the eyepiece you will see a bright, green, fluorescing
image.
Switching off
Actuate the main switch. When you look
through the eyepiece you will still see the
green image for a few minutes, before it disappears. This is normal and not a fault, because
the Night-Vision scope always switches off
gradually.
19
For use at night
Switching on
Remove the lens cap. Actuate the main switch
and hold it down. The green LED lights up.
When you look through the eyepiece you will
see a green, fluorescing image.
Adjustment
Aim at an object situated at a distance of 20
to 30 m (22 to 33 yds). Turn the focusing ring
on the eyepiece to get a sharp image. Then
turn the front focusing ring to make the image
sharper still. Repeat this procedure if necessary.
20
Infrared illuminator
By actuating the button for the infrared illuminator in addition to the main power button
you can achieve a better imaging result in
inadequate light. Hold this switch down as
well to make the image appear brighter.
Switching off
As soon as you let go of the main power
button the device gradually switches off. You
will see the green image for a few more
minutes before it disappears. This function is
normal and is not a cause for a complaint.
Important note:
For longer battery service life we recommend
you not to leave the Night-Vision scope switched on continuously. It is better to switch it
off every now and again.
Safe keeping
Please protect the lens with the lens cover at
all times.
Important information
To avoid irreparable damage to your MINOX
night vision ‘scope, please always observe the
following instructions:
- Never remove the lens cover when using
the scope in daylight. The small opening in
the center of the cover is perfectly
adequate for using the device in daylight.
- Never disassemble the scope.
- Always insert the batteries as specified
and observe correct poling.
- Do not use an external power supply.
- Remove the batteries from the battery
compartment if the device is not being
used for a prolonged period.
21
- Always cover the lens with the lens cap
when not in use.
- Do not expose the device to direct sunlight.
- Do not keep the device under extremely low
or high temperatures.
- Do not keep the device in damp, dusty or
dirty areas.
- Keep the device safe from any external
influence.
- Never subject the device to knocks or
impact.
22
Advice on care
Protect the Night-Vision scope against falling,
damp, dirt and extreme temperatures. Protect
all optical surfaces against damp and abrasive
agents. These may otherwise damage the antireflection coating.
Only remove dust and dirt from the lens using
a soft, dry cloth. For safety reasons please remove the batteries!
Troubleshooting
The night vision ‘scope
does not switch on
Check that the batteries are correctly installed. Check the performance of the batteries.
continues the surrounding area may be too
bright. This can occur even with mounted lens
cap. In a dark environment this phenomena is
reduced or disappears completely.
No image appears
Select your subject matter. Turn the eyepiece
adjustment to obtain a sharp image. Then turn
the lens ring to further enhance pin-sharp definition. Repeat this process, if necessary.
The device fogs up
If the device is used at low temperatures and
is then suddenly exposed to a warmer ambient temperature, condensation may develop
on the cold surface of the device. It can take
up to 5 hours before the scope has acclimatized to the ambient temperature.
Flashes
During the first two minutes after switching
on the scope, flashes may occur. If this flashing
The image diminishes or disappears
Excessive light (moonlight, spotlights or projectors) can lead to faulty imaging. Move the
23
scope away from the light source immediately.
The image will be restored within a period of
two minutes. Imaging results can also only be
achieved at short distances if there is severe
fog, haze or under extremely dark conditions.
night vision ‘scope is used correctly the
service life is approximately 10,000 hours. The
service life is reduced if the night vision ‘scope
is exposed to strong light sources such as
street lamps or headlights/spotlights.
Black dots in the visual field
When you view the image of your night vision
‘scope through the eyepiece you may perceive
small black dots. This is not a quality fault but
a typical feature of night-vision equipment of
this type.
The image tube is defective
The image tube is subject to natural wear. If
the light amplification of the image tube
becomes less, please send your night vision
‘scope directly to the MINOX Customer Service
where a new image tube can be inserted, if
neccessary.
Light power of image tube lessens
The light power of the image tube decreases
in the course of its service life. When the
24
Technical Data
Integral IR LED
Optical magnification:
Lens diameter
Resolution:
field of view:
Tube type:
Diopter compensation:
Operating temperatures:
Water resistant:
Battery:
Dimensions
Weight
Scope of delivery:
yes
2x
22 mm / 0.87 inch
35 lp/mm
11°
Gen. 1+
+/- 4dpt
-30° up to +50° C / -22° up to +122° F
yes
1 CR 1/3 N (3.0 V)
33 x 41 x 107 mm / 1.30 x 1.61 x 4.21 inch
180 g / 6.35 oz
hand strap, battery
25
Customer Service
You can reach our Customer Service under the
following address, where they will be pleased
to help you:
MINOX GmbH
Walter-Zapp-Str. 4
D-35578 Wetzlar / Germany
Tel.: +49 (0) 6441 / 917-0
Fax: +49 (0) 6441 / 917-612
[email protected]
www.minox.com
26
For your notes
27
Conditions of warranty
With the purchase of this MINOX product you have acquired a product which has been manufactured and checked to special quality standards. For this product the MINOX GmbH provides
warranty of 2 years. The period commences on the date of purchase from an authorized dealer and
the warranty is subject to the following conditions:
1) During the warranty period we shall deal with complaints based on faulty manufacture (free of
charge) by repair, replacement of defective parts or replacement by an identical flawless product
at our own discretion. Consequential claims, no matter what kind of what legal argument in connection with this warranty, cannot be accepted.
2) Claims under warranty are null and void, if the defect has been caused by improper handling –
which also can include the use of non-MINOX accessories – if the MINOX product is serviced by
unauthorized persons or workshops, or if the serial number has been obliterated.
3) Warranty claims can only be made by submission of the typewritten sales slip of an authorized
dealer.
28
4) When submitting claims under warranty please return the MINOX product together with the
typewritten sales slip and a description of the claim to the MINOX GmbH or MINOX agency.
5) Tourists may, if required, make use of the Agency of the country in which they are travelling
(within the terms of the Warranty of the MINOX GmbH) by presenting the typewritten sales slip.
MINOX GmbH, Walter-Zapp-Str. 4, D-35578 Wetzlar, Germany
www.minox.com
29
Änderungen in Konstruktion und Ausführung vorbehalten.
Die Marke MINOX ist eine eingetragene Marke der MINOX GmbH, Wetzlar.
Design subject to alterations without notice.
MINOX is a registered trademark of MINOX GmbH, Wetzlar.
Sous réserve de modifications.
MINOX est une marque déposée par MINOX GmbH, Wetzlar.
MINOX GmbH
Walter-Zapp-Str. 4
D - 35578 Wetzlar, Germany
Tel.: +49 (0) 6441 / 917-0
Fax: +49 (0) 6441 / 917-612
e-mail: [email protected]
www.minox.com
99424 02/04/DX/F