1
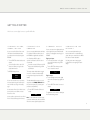
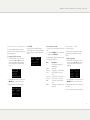
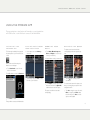
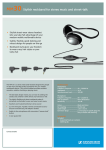
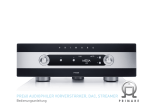
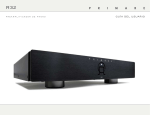
MM30 Media Module
FOR I32
A N D P RE 3 2
user guide
M M 3 0 M EDI A M O DU L E USER GUIDE
Welcome!
Welcome to the Primare Media Module! The Media Module is an audiophile 24bit/
192kHz digital interface for your PRE32 or I32 preamplifier.
Not Coax digital
available output
Optical Coax digital
USB B
digital inputs
input
USB A
Ethernet
On/off
M M 3 0 M EDI A M O DU L E USER GUIDE
Getting Started
Here’s how to connect digital sources to your Media Module:
1 Conn e c t an i po d ,
i p h on e , o r i P A D
2 Conn e c t T O A
c omp u t e r
You can connect an iPod, iPhone, iPad, or other
UPnP device to the Media Module, to allow
you to play music from the device through the
PRE32/I32:
You can connect the Media Module to a Windows
PC or Macintosh USB input to allow you to use
the PRE32/I32 as a digital audio output device.
•
Turn the SELECTOR until the Media source is
selected:
•
Connect iPod, iPhone, iPad, or other UPnP
device to the USB A port using the cable
supplied with the device.
The PRE32/I32 display will show:
On a PC, Windows XP/SP2 or later is
required. On a Macintosh, OSX 10.4 or later is
recommended.
•
Connect the computer’s USB port to the USB
B input on the Media Module using a USB A
to USB B cable.
3 Conn e c t I N P UTS
You can connect up to three digital optical inputs
and one digital coax input to the Media Module
to allow you to play digital sources through your
PRE32/I32.
Digital optical inputs
•
Connect the optical inputs 1 to 3 to digital
sources with optical outputs, using TOSlink
optical cables.
•
Turn the SELECTOR until the appropriate
source is selected; for example:
Digital coax input
•
You can now browse the music on your device,
and control playback, using the Primare App; for
more information see Using the Primare App,
page 6.
The Media Module will then appear as a sound
output device called XMOS USB Audio 2.0 in
the Sound control panel (PC) or Sound system
preferences panel (Macintosh).
Connect the digital coax input 4 to a digital
source with a coax output using a digital coax
cable.
•
Turn the SELECTOR until the Coax source is
selected:
You need another iPhone, iPod or iPad to browse
the music which is on the USB-A connected
iPhone, iPod or iPad.
•
iPod
It is also possible to play the music from your iPod,
iPhone or iPad over Wifi using the Primare App.
Turn the SELECTOR until the USB source is
selected:
USB
You can connect the Media Module to the
Internet via either Wi-Fi or a standard Ethernet
cable, to allow you to stream audio to the PRE32/
I32, or listen to Internet radio stations.
See Setting up the network settings, page 4,
for information about configuring the network
settings.
Tos1
The first time that the Media Module is plugged
in to the PC or Macintosh it will automatically
be recognised, and appropriate drivers will be
installed.
Media
4 Conn e c t T O THE
I N TER N ET
Coax
The digital inputs can be renamed or disabled, just
like the standard analogue inputs.
Note: For best results set the computer volume
control to its maximum value, and use the PRE32/
I32 volume control to adjust the playback volume.
M M 3 0 M EDI A M O DU L E USER GUIDE
Setting up the network settings
To connect the Media Module to an Ethernet network you need to configure the options on the Ethernet settings or Wlan
settings menu.
Using the settings
menu
To display the settings menu
•
Hold down the @ button on the front panel,
or press and hold the MENU button on the
remote control.
The settings menu is displayed:
Setting up wi-fi
If you have a Wi-Fi network, the simplest way to
connect the Media Module to the Internet is via
Wi-Fi.
•
1
Enabled
•
Turn the SELECTOR control on the front
panel, or press the A or V buttons on the
remote control, until the Network item is
highlighted:
Ethernet settings
Wlan settings
Apply settings
Network disconnected
•
•
Front
Reset
Settings
Settings
Press the R button on the front panel, or the
SELECT button on the remote control.
•
•
Scan
SSID
Security
IBSS
vol25
WPA
False
To scan for Wi-Fi networks
•
•
Highlight Scan on the Wlan settings menu.
Press the R button on the front panel, or the
SELECT button on the remote control.
Press the R button on the front panel, or the
SELECT button on the remote control.
Scan
SSID
Security
IBSS
•
Turn the SELECTOR control on the front
panel, or the < or > buttons on the remote
control, to highlight the first letter.
•
Press the R button on the front panel, or the
SELECT button on the remote control, to
select it:
Wlan settings
vol25
Home
WPA
False
To enter the network password
•
Highlight Passphrase on the Wlan settings
menu.
•
Press the R button on the front panel, or the
SELECT button on the remote control.
vol25
56789ABCDEF
Highlight the network you want to use.
Wlan settings
Press the R button on the front panel, or the
SELECT button on the remote control.
Wlan settings
Wlan settings
The network name will be displayed in the SSID
option:
The Wlan settings menu will be displayed:
General settings vol25
IR input
Factory DF
Firmware
Network
Turn the SELECTOR control on the front
panel, or press the A or V buttons on the
remote control, until the Wlan settings item is
highlighted on the Network settings menu:
The passphrase editor is displayed:
vol25
Home
Office
Othernetwork1
Othernetwork2
Network settings vol25
The Media Module adds two items to the General
settings menu: Firmware and Network.
To select the Network settings menu
Network scan
To configure the Wi-Fi settings
General settings vol25
Input
Status
The menu shows a list of accessible Wi-Fi
networks:
vol25
NOPQRSTUVWX
S
•
•
Repeat for the remaining letters.
Press the
button on the front panel
twice to return to the Network settings menu.
Network settings vol25
Ethernet settings
Wlan settings
Apply settings
Connected Wireless
The menu should show Connected Wireless.
M M 3 0 M EDI A M O DU L E USER GUIDE
SETTI N G U P ETHER N ET
To connect the Media Module to an Ethernet
network you need to configure the settings on the
Ethernet settings menu.
To configure the Ethernet settings
•
Turn the SELECTOR control on the front
panel, or press the A or V buttons on the
remote control, until the Ethernet settings
item is highlighted on the Network settings
menu:
Network settings vol25
Ethernet settings
Wlan settings
Apply settings
Network disconnected
•
Press the R button on the front panel, or the
SELECT button on the remote control.
The Ethernet settings menu will be displayed:
Ethernet settings vol25
DHCP
Enabled
IP
10.0.1.11
IP Mask255.255.2...
Gateway 10.0.1.1
To use DHCP
To set up Ethernet manually
If your network supports DHCP this is the
recommended way of connecting to Ethernet, as
the other settings are configured automatically
for you.
This option is only recommended for experienced
users.
Ethernet settings vol25
The following table explains the remaining options
on the Ethernet settings menu:
DHCP
Enabled
IP
10.0.1.11
IP Mask255.255.2...
Gateway 10.0.1.1
•
Configure the DHCP option on the Ethernet
settings menu to Disabled.
Description
The IP address assigned to the
Media Module.
IP Mask
The IP mask.
Gateway
The gateway or router IP address.
Proxy
Set to Enabled to use a proxy
server.
Proxy server The IP address of a proxy server.
Proxy port
The port to use for the proxy.
DNS1
The address of the main DNS
server.
DNS2
The address of an optional second
DNS server.
Up d a t i n g t h e
f i r mwa r e
From time to time you may be informed that
updated firmware is available for the Media
Module.
To update the firmware
•
Item
IP
Turn the SELECTOR control on the front
panel, or press the A or V buttons on the
remote control, until the Firmware item is
highlighted:
General settings vol25
Input6
IR input
Factory DF
Firmware
•
Normal
Front
Reset
Settings
Press the R button on the front panel, or the
SELECT button on the remote control.
The Media Module will then scan for firmware on
the network.
For more information see the Primare Web site.
M M 3 0 M EDI A M O DU L E USER GUIDE
Using the Primare APP
This page explains how to install and use the Primare App to control playback from
an iPod, iPhone, iPad, or other UPnP device connected to the Media Module.
In s t all i n g t h e
P r i ma r e A pp
P la y i n g m u s i c f r om
your ios device
B r ow s i n g y o u r
music
The Primare App is available for free download
from the App Store on your iPhone, iPod Touch,
or iPad:
•
•
Touch Artists, Albums, Composers,
Genres, or Playlists to choose how you
browse your music library.
•
Select the album or track you want to play:.
On the Queue screen touch Library to
select music.
M ana g i n g t h e q u e u e
The Queue screen shows the track that is
currently playing, and the tracks queued to play
next.
When you first run the Primare App the
Welcome screen is displayed.
•
Touch Start Search to search for music
devices on the network.
The MM30 will then be shown in the Devices list:
•
•
On the Library screen touch iPod to display
the music on your iOS device.
•
Touch Play All to empty the queue and play
all the tracks in the album, or Queue All to
add the tracks to the end of the queue.
The Queue screen will then show what is
currently playing.
•
Touch the button to display the album
cover full size.
The controls at the bottom of the Queue screen
allow you to manage the queue, pause the music,
and adjust the volume.
•
Touch Src to change the source of the music,
Clear to empty the queue, Edit to delete
tracks from the queue, or Save to save the
queue as a named playlist.
Touch Done to select it.
The App will then connect to the Media Module.
M M 3 0 M EDI A M O DU L E USER GUIDE
Technical specification
Cop y r i g h t an d
a c k nowl e d g m e n t s
Copyright © 2012 Primare AB.
All rights reserved.
Primare AB
Renvägen 1
SE-352 45 Växjö
Sweden
http://www.primare.net
F e at u r e s
P e r fo r man c e
Issue: MM/1
External Inputs:
Inputs selectable from I32 and PRE32
1 x Coax input at 192kHz
Each input will have its default name, but can be
renamed by the user (up to six characters) in the
same way as any other input in the I32/PRE32
display architecture.
The information in this guide is believed to be
correct as of the date of publication. However,
our policy is one of continuous development and
so the information is subject to change without
notice, and does not represent a commitment on
the part of Primare AB.
3 x Toslink inputs at 192kHz
1 x asynchronous USB-B input allowing playback
of 192kHz audio from a computer
1 x asynchronous USB-A input, allowing the
device to play audio from USB/iPhone
1 x Coax output transmitting at 192 kHz. Always
connected to the active input source.
N e t wo r k
c onn e c t i on
The Media board can be connected to a wired or
wireless network.
Network settings can be found under general
settings, and allow the user to:
Scan for wireless networks
Explicitly name a network SSID
Configure DHCP or Fixed IP
The inputs are selected using the C23 remote
control or the front panel input selector switch.
Primare is a trademark of Primare AB.
Toslink 1-3
This guide was produced by
Human-Computer Interface Ltd.
http://www.interface.co.uk
USB-B input (from computer USB interface)
Safety compliance
USB-A input, allowing the device to play audio
from USB/Iphone
This product has been designed to meet the IEC
60065 international electrical safety standard.
Coax input
MEDIA input – this input must be selected to play
streaming media.
The media module can be controlled by an
external App:
Switch to the MEDIA input
Use either the Primare App (for iPhone/iPad, or
the Android version) or any generic UPnP
A pp
Some features, like playing media from USB thumb
drive, USB-connected iPhone, iPod Touch, or iPad,
and playing vTuner, require the use of the Primare
App.
the sound and vision of scandinavia
p l e a s e v i s i t primare.net f o r m o r e
information about our products
p r i m a re ab
renvägen 1
se- 35 2 45 växjö
sweden
primare.net