1
NAC Image Technology Inc
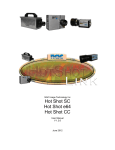
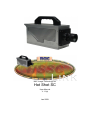
Hot Shot SC
User Manual
V 1.1(a)
Jan 2009
Contents
Contents ..................................................................................................................... 2
1 Camera Hardware ............................................................................................... 5
1.1
Compatibility................................................................................................. 5
1.2
Rear Panel ................................................................................................... 5
1.2.1
LED Indicators....................................................................................... 6
1.2.2
BNC Connectors ................................................................................... 6
1.2.3
Other Connectors.................................................................................. 6
1.3
The Electronic View Finder .......................................................................... 6
2 Software Licence Agreement .............................................................................. 7
2.1
Grant of License ........................................................................................... 7
2.2
Copying ........................................................................................................ 7
2.3
Term............................................................................................................. 7
2.4
NAC's Rights ................................................................................................ 7
2.5
Limited Warranty .......................................................................................... 7
2.6
Liability ......................................................................................................... 8
2.7
Termination of the Agreement ...................................................................... 8
2.8
Governing Law ............................................................................................. 8
2.9
Entire Agreement ......................................................................................... 8
3 Copyright ............................................................................................................. 8
4 Initial Setup, Software & Driver Installation.......................................................... 9
4.1
Un-installing Software .................................................................................. 9
4.2
Installing Software ........................................................................................ 9
4.3
The FIRST CONNECTION to the CAMERA .............................................. 10
5 Control & Download Software : HotShot SC Link ............................................. 11
5.1
Quick Start Guide ....................................................................................... 12
5.2
The Main Window....................................................................................... 14
5.3
Control Area ............................................................................................... 15
5.3.1
Connect
5.3.2
Open File
5.3.3
Close
5.3.4
Download
5.3.5
Format Convert
.................................................................................. 16
.............................................................................. 16
....................................................................................... 16
............................................................................. 16
................................................................ 17
5.3.6
Bulk Convert
..................................................................... 17
5.4
Record Controls ......................................................................................... 19
5.4.1
Recording FPS
5.4.2
Shutter
............................................................................ 19
5.4.3
5.4.4
AOI
Trigger
{Area of Interest} ..................................................... 20
............................................................................ 20
5.4.5
Low Light Mode
5.4.6
Gain
HotShot SC User Manual
Jimmy Robinson
............................................................... 19
............................................................................ 21
................................................................................ 21
Rev 1.1.1.9 –Nov 2008
2
© NAC Image Technology Inc
5.4.7
Digital Shift
...................................................................... 22
................................................. 22
5.4.8
Auto Exposure Control
5.5
Image Quality Controls............................................................................... 22
5.5.1
5.6
White Balance
Chroma
5.6.1
Gamma
................................................................. 23
.................................................................................. 23
.......................................................................... 23
5.6.2
Enhance
......................................................................... 23
5.7
Play Controls .............................................................................................. 25
5.7.1
Speed Boost........................................................................................ 26
5.7.2
Loop Playback..................................................................................... 26
5.7.3
Play Back Speed
.................................................................. 26
5.7.4
The Scroll Bar ..................................................................................... 26
5.8
Synchronization Modes .............................................................................. 26
5.8.1
Sync In ................................................................................................ 27
5.8.2
Sync Out ............................................................................................. 27
5.9
Trigger Setting............................................................................................ 28
5.10 Double Exposure Mode.............................................................................. 28
5.11 Comments.................................................................................................. 29
5.12 Memory Segmentation ............................................................................... 29
5.12.1 Defining Segments.............................................................................. 29
5.12.2 Auto-ReArm ........................................................................................ 30
5.12.3 Allow Overwrite ................................................................................... 30
5.13 View / reticle Controls................................................................................. 31
5.14 Measure Tools ........................................................................................... 32
5.14.1 Calibration ........................................................................................... 32
5.14.2 Measure Distance
......................................................................... 33
5.14.3 Manual Tracking Reticule.................................................................... 33
5.14.4 Automatic Tracking Reticule................................................................ 34
5.14.5 Grid Overlay ........................................................................................ 40
5.14.6 Image Centre Reticule ........................................................................ 40
5.15 Advanced Tools.......................................................................................... 41
5.15.1 Auto Trigger ........................................................................................ 41
5.15.2
Auto Run
.................................................................................. 43
5.16 Main Menus
..................................................................... 43
5.16.1 Settings | Preferences ......................................................................... 44
5.16.2 Settings | Auto Run ............................................................................. 45
5.16.3 Settings | Camera Info......................................................................... 46
5.16.4 Settings | Show Histogram .................................................................. 47
5.16.5 Settings | Reticule ............................................................................... 48
5.16.6 Settings Firmware Upgrade................................................................. 48
5.16.7 Settings | Adjust DACs ........................................................................ 48
5.16.8 About................................................................................................... 48
6 Multi Channel Wave Inserter ............................................................................. 50
7 Automatic Firmware Upgrade............................................................................ 52
7.1
EEPROM Update ....................................................................................... 54
HotShot SC User Manual
Jimmy Robinson
Rev 1.1.1.9 –Nov 2008
3
© NAC Image Technology Inc
8
Disclaimer.......................................................................................................... 56
HotShot SC User Manual
Jimmy Robinson
Rev 1.1.1.9 –Nov 2008
4
© NAC Image Technology Inc
1 Camera Hardware
1.1 Compatibility
This manual and the HSSCLink software are compatible with the following cameras :
•
•
HotShot 512 SC
HotShot Mega SC
Any other cameras not listed are not supported.
1.2 Rear Panel
HotShot SC User Manual
Jimmy Robinson
Rev 1.1.1.9 –Nov 2008
5
© NAC Image Technology Inc
1.2.1 LED Indicators
The Rear Panel has five (5) LED indicators
•
•
•
•
•
POWER LED – Indicated that the camera has Power. After camera boot up
this should be solid Green.
DATA LED – Indicates when Data is being transferred between the camera
and the control PC. Lights Blue during Data Transfer
STATUS LED – TBD
ARM LED – Will light RED when the camera is in ARM Mode and recording
into the memory loop
REC LED – Will light ORANGE when the camera has received a trigger and is
completing recording
1.2.2 BNC Connectors
There are Three BNC connectors on the real panel of the camera
•
•
•
SYNC IN – Used to slave the camera to an external Sync Pulse. Also can be
used as a “Hardware ARM” input.
SYNC OUT – Used to Master the camera for external equipment. Will provide
a 5v TTL pulse High OR Low (user selectable) during each frame EXPOSURE
TRIGGER IN – Used to trigger the camera. Can be a contact Closure OR a 5v
FALLING EDGE or RISING EDGE TTL Pulse
1.2.3 Other Connectors
•
•
•
•
•
USB – Connects to the control PC USB2 socket via USB cable.
POWER – Provides power to the camera from the supplied power supply.
Input requirement is 12 – 28V DC.
BATTERY – Connector for Batter Power – TBD
EVF – Electronic Viewfinder. Provides NTSC video plus power to the external
Viewfinder.
HSIO – High Speed Input Output. Used for multi Channel wave inserter
(MCWI) see chapter 6.
1.3 The Electronic View Finder
The EVF will ALWAYS show a live camera image. It can be used for initial setup
of the camera view. A live image is also available on the PC via the Control
Software (see later). The EVF live image is ALWAYS in monochrome regardless
of the actual camera sensor (colour OR mono).
HotShot SC User Manual
Jimmy Robinson
Rev 1.1.1.9 –Nov 2008
6
© NAC Image Technology Inc
2 Software Licence Agreement
2.1 Grant of License
In consideration for your payment of any applicable license fee NAC hereby grants
you a limited license to use the Software. You may use the Software on any
personal computer at your physical location. You will not reverse engineer,
decompile or disassemble the whole or any part of the Software. If you dispose of
any media or apparatus containing the Software you will ensure that you have
completely erased or otherwise destroyed any Software contained on such media or
stored in such apparatus. This License is personal to you. You may not transfer or
sub-license, either temporarily or permanently, your rights to use the Software under
this Agreement, or any rights which you may have under this Agreement, and you will
not give, lend, rent or sell the Software or any part of it to any other person.
2.2 Copying
You may install the Software by copying it onto the hard drive or into the CPU
memory of any personal computer system at your physical location. You may take
such copies of the Software as may be reasonable for back-up or archival purposes.
2.3 Term
This Agreement is effective from the day you first install the Software onto any
system and continues until you return the original media to NAC.
2.4 NAC's Rights
You acknowledge that the Software is the sole and exclusive property of NAC. By
accepting this Agreement you do not become the owner of the Software but you do
have the right to use the Software in accordance with this Agreement.
2.5 Limited Warranty
NAC warrants for a period of ninety (90) days from the effective date of this
Agreement that, under normal use, the material of the media and any related
documentation will not prove defective and that the program is properly recorded on
the media. If during the ninety-day period a defect in the Software should appear you
may return the Software to NAC and NAC will, at its option, either replace the
Software without charge or refund the license fee. This warranty does not apply to
any media which has been damaged by abuse, accident. misuse or neglect. This
warranty is personal to you and you cannot transfer or pass on this warranty to any
other person.
THE WARRANTY ABOVE SETS OUT NAC'S ENTIRE LIABILITY FOR ANY
DEFECTS IN THE SOFTWARE. EXCEPT FOR THE LIMITED WARRANTY ABOVE
THERE ARE NO WARRANTIES, EITHER EXPRESSED OR IMPLIED, BY THIS
AGREEMENT. THESE INCLUDE, BUT ARE NOT LIMITED TO, IMPLIED
WARRANTIES OF MERCHANTABILITY OR FITNESS FOR A PARTICULAR
HotShot SC User Manual
Jimmy Robinson
Rev 1.1.1.9 –Nov 2008
7
© NAC Image Technology Inc
PURPOSE AND WARRANTIES ARE EXPRESSLY DISCLAIMED. NO ORAL OR
WRITTEN INFORMATION OR ADVICE GIVEN BY ANY NAC OR MIRA EMPLOYEE
OR REPRESENTATIVE WILL CREATE A WARRANTY FOR THE SOFTWARE AND
YOU MAY NOT RELY ON ANY SUCH INFORMATION OR ADVICE.
2.6 Liability
You agree that, regardless of the form of any claim you may have, NAC's liability for
any damages to you or to any other party shall not exceed twice the licence fee paid
for the Software.
NAC WILL NOT BE RESPONSIBLE FOR ANY SPECIAL, DIRECT, INCIDENTAL
OR CONSEQUENTIAL DAMAGES SUCH AS, BUT NOT LIMITED TO, LOSS 0F
PROFITS, LOSS OF DATA, LOSS OF GOODWILL OR DAMAGE TO PROPERTY
RESULTING FROM THE USE OF THE SOFTWARE OR ARISING OUT OF ANY
BREACH OF THE WARRANTY, EVEN IF NAC HAS BEEN ADVISED OF THE
POSSIBILITY DAMAGE OR LOSS.
2.7 Termination of the Agreement
If any of the terms and conditions of this Agreement are broken, NAC has the right to
terminate the Agreement and demand that you return the Software to NAC.
2.8 Governing Law
This Agreement is to be governed by, and interpreted in accordance with, the laws of
England and Wales.
2.9 Entire Agreement
This Agreement constitutes the entire agreement between you and NAC relating to
the Software.
3 Copyright
HotShot SC Link Software and this document are copyright NAC Image Technology
Inc.
Information in this document is subject to change without notice and does not
represent a commitment on the part of NAC Image Technology inc, or any suppliers.
No part of this document may be reproduced, transmitted, stored, transcribed, stored
in any retrieval system, or translated into any language by any means without the
express written permission of NAC Image Technology. The software described in
this document is supplied under a licence agreement. The software may be used or
copied only in accordance with the terms of the agreement.
HotShot SC User Manual
Jimmy Robinson
Rev 1.1.1.9 –Nov 2008
8
© NAC Image Technology Inc
4 Initial Setup, Software & Driver Installation
IMPORTANT READ THIS COMPLETLY PRIOR TO INSTALLING SOFTWARE OR
OPERATING THE CAMERA
To install the software you should run the install program provided with the camera.
The installer ALSO installs the drivers for the camera. So you should install the
software BEFORE you make a connection to the camera. This way the camera will
“plug and play”.
If you have an earlier version of the software installed you MUST un-install this
software FIRST. You MUST do this WITHOUT a connection to a camera.
4.1 Un-installing Software
If you have previous version of HotShot SC Link installed you first un-install this. You
can do this via the Windows Un-Install feature OR run the un-installer directly.
To run the uninstaller directly either :
1) Choose Un-Install from START|PROGRAMS|NAC|HOTSHOT SC {where
available}
OR
2) Run “c:\program files\nac\hotshot sc\unwise.exe”
After un-install you should reboot the PC
4.2 Installing Software
The Installation CD should Auto-Run. If it does not then find the install program on
the software CD supplied {HSSC Link Install x.x.x.x.EXE – the x will relate to the
version number of the software}.
Follow the installation dialogs.
HotShot SC User Manual
Jimmy Robinson
Rev 1.1.1.9 –Nov 2008
9
© NAC Image Technology Inc
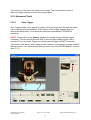
4.3 The FIRST CONNECTION to the CAMERA
The software and Hardware is configured such that the camera FIRMWARE version
must match the SOFTWARE Version. During the First Time connection to the
camera the Firmware version will be checked and will AUTOMATICALLY be
upgraded.
*** If you have Multiple Cameras you MUST connect only one at a time in the
first instance in order for the FIRMWARE upgrade to be successful ***
The FIRMWARE upgrade is a
two part process, the first
Upgrades the cameras
firmware and the second
modified the Cameras Flash
Memory (EEPROM).
If you see the Dialog right when
you first connect to the camera
then please refer to Chapter 6
of this manual immediately.
HotShot SC User Manual
Jimmy Robinson
Rev 1.1.1.9 –Nov 2008
10
© NAC Image Technology Inc
5 Control & Download Software : HotShot SC Link
The software can be accessed from the following location :
START | Programs | NAC | HotShot SC | HotShot SC Link
A shortcut is also placed on the Windows Desktop.
HotShot SC User Manual
Jimmy Robinson
Rev 1.1.1.9 –Nov 2008
11
© NAC Image Technology Inc
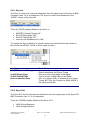
5.1 Quick Start Guide
Make Sure the camera is connected to the PC via the USB cable and has been
powered up. The power light on the camera will show green.
1) Click the CONNECT button.
2) WAIT for connection. You will see camera info appear in the image area when
completed and the camera STATUS will show READY in the Item List.
3) Push the VIEW button (Now in VIEW MODE)
4) Select the required recording FPS
5) Select the required Shutter Speed (exposure)
6) Select the required Trigger Mode
7) Select the required GAIN
8) Select the required DIGITAL SHIFT
9) Set up the required Shot to be recorded
10) Push the VIEW/ARM Button (Now in ARM Mode)
11) Trigger a recoding (use the Hardware Trigger OR the TRIGGER button)
12) Review the Images on the camera with the PLAY CONTROLS
13) Adjust the IMAGE QUALITY if required
14) Push the DOWNLOAD Button to Download the RAW data. The Raw Data File
will Open in the Main Window
HotShot SC User Manual
Jimmy Robinson
Rev 1.1.1.9 –Nov 2008
12
© NAC Image Technology Inc
15)
16)
17)
18)
Review the Images in the file with the PLAY CONTROLS
Adjust the IMAGE QUALITY if required
Push the FORMAT CONVERT Button to save as AVI
Finished!
HotShot SC User Manual
Jimmy Robinson
Rev 1.1.1.9 –Nov 2008
13
© NAC Image Technology Inc
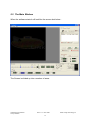
5.2 The Main Window
When the software starts it will look like the screen shot below :
The Screen is divided up into a number of areas.
HotShot SC User Manual
Jimmy Robinson
Rev 1.1.1.9 –Nov 2008
14
© NAC Image Technology Inc
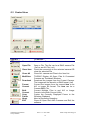
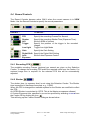
5.3 Control Area
Use this …
Connect
Open File
Close Item
Close All
MultiView
Download
Format
Convert
Bulk
Convert
Copy
Frame
Abort
EXIT
HotShot SC User Manual
Jimmy Robinson
To do this…
Connect to a Camera
Open a File. The file can be a RAW camera File
(.hsf) or an AVI File (.avi)
Close the connection to the selected camera OR
close the selected File
Close ALL camera and Files in the Item List
TOGGLE Display All Open Files & Connected
Cameras as Thumbnail Windows
Download the images from the Current Camera.
The images will be stored in a RAW format (.hsf)
Convert the images from the current item to an
AVI or image file format. The Item can be a
Camera OR a File.
Convert Multiple Files to and AVI or Image
Format via the Bulk Convert Utility
Copies the Currently Displayed Frame to the
Windows Clipboard
Abort a Recording Operation
Close All Open files AND Cameras and Exit the
software
Rev 1.1.1.9 –Nov 2008
15
© NAC Image Technology Inc
5.3.1 Connect
This will search the USB ports for a connected camera. Is a camera is found then it
will be added to the Item List. If the camera has NO recording then it will be set in
READY status. This will be shown in the Item List.
If the camera as a recording in Memory then the Status will show RECD. In this case
the Playback tools will be enabled.
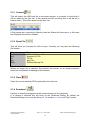
5.3.2 Open File
This will allow you to brows for a file to open. Currently you may open the following
file formats :
Extension
.hsf
.AVI
.tif
.jpg
.bmp
Type
HotShot RAW data File
Windows AVI File
Tiff File
Jpeg File
Windows Bitmap File
Where an image file is selected, the software will search for an image sequence
based on incremental numbering of the filename.
5.3.3 Close
Close the current camera OR File selected in the Item List.
5.3.4 Download
Use this to download images from the camera memory to the computer.
If a camera is selected this will bring up the Download Dialog. By default the
Download Range is as is set by the Mark In and Mark Out in the Play Controls.
HotShot SC User Manual
Jimmy Robinson
Rev 1.1.1.9 –Nov 2008
16
© NAC Image Technology Inc
You can adjust the download range using the Spin Controllers in the Save Out
Range area.
5.3.5 Format Convert
Use this to convert RAW data to standard Image Files. You can use this to convert a
RAW (.hsf) file OR to download and convert directly from the camera. If this is done
directly from the camera then a raw (.hsf) file is NOT created. The Convert
DIRECTLY from the camera will take LONGER to perform than a RAW data
Download. It is recommended that RAW data is downloaded and then converted.
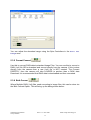
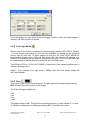
5.3.6 Bulk Convert
Where Multiple RAW (.hsf) files need converting to image files, this can be done via
the Bulk Convert Option. This will bring up the dialog shown below :
HotShot SC User Manual
Jimmy Robinson
Rev 1.1.1.9 –Nov 2008
17
© NAC Image Technology Inc
Before starting the Bulk Conversion you can modify the parameter of the output files
as follows :
Conversion Start
Conversion End
Format
Filename
Save Folder
To modify the parameter for an individual item, click the parameter in the table.
To modify the parameter for ALL items in the table, click the parameter in the
COLLECTIVE entry in the table, this is the FIRST Row in the table.
HotShot SC User Manual
Jimmy Robinson
Rev 1.1.1.9 –Nov 2008
18
© NAC Image Technology Inc
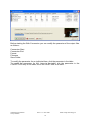
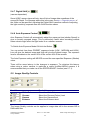
5.4 Record Controls
The Record Controls become active ONLY when the current camera is in VIEW
Mode. Use the Record Controls to specify the record parameters.
Use this …
To do this…
FPS
Specify the recording Frames Per Second
Shutter
AOI
Trigger
Low Light
Specify the recording Shutter Time (Exposure Time).
Set the AREA of Interest
Specify the position of the trigger in the recorded
images
Toggle Low Light Mode
Gain
Specify the Gain Setting
Digital Shift Specify the Digital Shift Setting
Set the Auto Exposure Control
Auto
Exposure
5.4.1 Recording FPS
The available recording Frames (pictures) per second are given on the Selection
Combo. To change the recording FPS select the required value from the Combo. If a
reduced image size is required for the selected FPS this will be automatically
adjusted.
5.4.2 Shutter
The shutter time (or exposure time) is set using this Selection Combo. The Shutter
time is specified in fractions of seconds. e.g., 1/2000.
When the FPS is changed the available options for the Shutter are modified to reflect
the FPS.
An OPEN Shutter is equivelant to 1/FPS. This is the Maximum exposure allowed.
A Custom Exposure time, specified in µs can be specified by selecting CUSTOM from
the Combo OR by clicking the Icon
.
This will bring up the Custom Shutter Dialog as shown below :
HotShot SC User Manual
Jimmy Robinson
Rev 1.1.1.9 –Nov 2008
19
© NAC Image Technology Inc
5.4.3 AOI
{Area of Interest}
When the FPS is modified the default AOI (maximum allowed) is set for the selected
FPS. By reducing the AOI you can increase the available record time. To set a
Custom AOI push the Button next the the AOI indicator.
You will see the AOI selection screen as below :
You can enter the desired AOI by changing the value for width hand height.
Special Considerations & Limitations
The AOI must conform to the following restrictions :
1) Width (W) must be a multiple of 8
2) Height (H) must be a multiple of 8
3) Total area (pixels) i.e., W x H must be a multiple of 1024
The software will AUTOMATICALLY adjust your input to meet these criteria. To meet
Criteria 3 it will adjust the width or height that you are NOT currently specifying. For
Example, if you change the width to a value that does not meet criteria 3 then the
HEIGHT will be automatically adjusted to meet this criteria.
5.4.4 Trigger
The Trigger Position is set using the Trigger Selection Combo. The Options available
are START, CENTRE, END and CUSTOM. See section for an explanation of how the
triggering operates.
A START trigger allows a 5% pre-trigger.
An END trigger allows a 5% post-trigger.
For a TRUE START or END trigger use the CUSTOM option. Select CUSTOM from the
Selection Combo OR Click the icon.
HotShot SC User Manual
Jimmy Robinson
Rev 1.1.1.9 –Nov 2008
20
© NAC Image Technology Inc
From this dialog you can select a precise trigger location, either as a percentage of
memory OR as a number of frames.
5.4.5 Low Light Mode
Where a lot of illumination is needed for the recording (usually HIGH FPS or Shutter)
, it is not always convenient to have the light available for setting up the recording
(focus, field of View etc). In these cases you can turn on LOW LIGHT MODE by
pressing this toggle button. With low light mode ON, the camera will operate at a
lower FPS and shutter for the purpose of setting up the shot. The Low Light Mode will
be automatically disabled when the camera is put into ARM mode.
The Effective FPS in LOW LIGHT MODE is specified in the camera preferences in
software Settings (see ).
NOTE : If you choose a low light mode < 500fps, then the View Finder Image will
NOT be available.
5.4.6 Gain
This sets the gain on the camera sensor. A higher gain will increase light sensitivity
BUT will also introduce noise into the image.
The Gain settings available are :
0dB
3dB
6dB
12dB
The ideal setting is 0dB. This gives the minimum amount of noise.Values of 3, 6 and
12 dB Will compensate for inadequate lighting BUT will suffer from noise.
HotShot SC User Manual
Jimmy Robinson
Rev 1.1.1.9 –Nov 2008
21
© NAC Image Technology Inc
5.4.7 Digital Shift
(camera dependant)
Some HSSC camera types will only store 8 bits of image data regardless of the
sensor Bit Depth. For cameras where this is the case, the bit significance of
the 8 bits can be specified. Adjusting the Digital Shift is another method of adjusting
the light sensitivity, separate from the GAIN function above.
5.4.8 Auto Exposure Control
Auto Exposure Control will automatically adjust the exposure time (shutter Speed) to
give a correctly exposed image. This is particularly useful when recording outside
where clouds might affect the light levels in an unknown manner.
To Switch Auto Exposure Mode ON click the Button.
You can select from three PRESET exposure levels (LOW , MEDIUM and HIGH).
Low will give the darkest image and High will give the lightest image. The exposure
level is calculated on the center 80% of the current AOI of the camera.
The Auto Exposure setting will NEVER exceed the user specified Exposure (Shutter)
value.
There will be some latency in the changes to exposure. To minimize this latency
when using a colour camera, in particular a colour HotShot MEGA camera, it is
recommended that you make use of the SPEED BOOST function (see 5.7.1).
5.5 Image Quality Controls
Use this …
White Balance
Chroma
Gamma
Enhance
To do this…
Select the White Balance
Select the Chroma (Colour) level
Select the Gamma level
Select the Enhance level
The Image Quality controls can be applies to image data still in the camera OR to
RAW data files.
HotShot SC User Manual
Jimmy Robinson
Rev 1.1.1.9 –Nov 2008
22
© NAC Image Technology Inc
5.5.1 White Balance
The White Balance will adjust the White Point of the Image depending on the lighting
used. The options available are :
OFF
TUNGSTEN
DAYLIGHT
FLOURESCENT
AUTO
USER DEFINED
Selecting AUTO will do an AUTO White Balance on the CURRENT FRAME.
To define the White Point, select USER Defined. Then click the White Balance
Button
. Click a White Point in the image to set the White Balance. The system will
continue to modify the White Point as the image is clicked until the White Balance
Button is Depressed (click it again!).
When Using AUTO mode, the camera will calculate the AUTO White Balance Level
on the Current Frame or the FIRST Frame if a live image (VIEW MODE). If this first
frame is not correctly illuminated it might be necessary to reselect AUTO in irder to
recalculate the AUTO Levels.
5.6 Chroma
Use the Chroma Combo to select the level of colour in the image. The level can
range from 0% (monochrome) to 200% (colour boost). The default value is 100%.
5.6.1 Gamma
Use the Gamma setting to adjust the GAMMA curve of the image. Increasing the
GAMMA will brighten up the dark (shadows) areas in the image without affecting the
bright areas.
Gamma Settings available are :
OFF
LOW
NORMAL
5.6.2 Enhance
The Enhance Option will perform an Edge Enhance image processing function on the
image. Enhance Settings available are :
HotShot SC User Manual
Jimmy Robinson
Rev 1.1.1.9 –Nov 2008
23
© NAC Image Technology Inc
OFF; LOW; NORMAL; HIGH
HotShot SC User Manual
Jimmy Robinson
Rev 1.1.1.9 –Nov 2008
24
© NAC Image Technology Inc
5.7 Play Controls
The play controls are used to control image playback either on the camera OR from a
File.
Use this …
To do this…
Rewind
Go to Start Frame OR Mark In Frame
Step Back
Step ONE frame Backwards
Play
Backwards
Loop
Backwards
STOP
Play the images backwards
Play
Forwards
Loop
Forwards
Step
Forwards
Fast
Forward
VIEW ARM
TRIGGER
Play Back
Speed
LOCK
Mark IN
Mark Out
SPEED
BOOST
HotShot SC User Manual
Jimmy Robinson
Loop Playback Backwards (push button 2x)
• Stop Playback / Loop Playback
• Abort Recording
• Exit View Mode
Play the images forwards
Loop Playback Forwards (push button 2x)
Step ONE Frame Forwards
Go to the End frame OR the Mark Out Frame
• Go To VIEW Mode (if READY)
• Go to ARM Mode (if VIEW)
• Software Trigger the Camera (if ARMED)
• Go to Trigger Frame
Select the Requested Play Back Speed
Lock the Play Back Speed
Mark the current frame as the Start Frame.
This mark is used for :
• Loop Playback
• Rewind Command
• Setting the Download / Format Conversion Range
Mark the current frame as the End Frame.
This mark is used for :
• Loop Playback
• Rewind Command
• Setting the Download / Format Conversion Range
Speed up the processing and display of colour images
Rev 1.1.1.9 –Nov 2008
25
© NAC Image Technology Inc
5.7.1 Speed Boost
The Speed boost is especially useful when working with a HotShotMEGA colour
camera. Rather than process the entire image as normal, with the speed boost on,
the software “BINS” squares of four pixels together. While this leads to a slightly
pixilated image, it increases the speed of the image display dramatically. The Speed
Boost image is only the displayed image, the full quality image is always available by
turning off the speed boost.
It is recommended to use the speed boost when using the Auto Trigger and Auto
Exposure functions. It is also useful to use when setting up a shot with the HSMega
Colour camera.
5.7.2 Loop Playback
Loop playback will repeat play the images within the selected range. The range is
defined by the Mark In and Mark Out Buttons.
5.7.3 Play Back Speed
The Play Back Speed setting is used to request a playback speed for the images.
The software will attempt to match this speed. However, the actual speed will depend
on the source of the images (e.g., camera or file) the size of the images, the image
processing required and the speed of the host PC. If the speed cannot be matched
then the system will play back at the fastest possible. Selecting the LOCK option will
force the system to maintain the requested playback speed, even if this means
“skipping” frames during the playback operation.
5.7.4 The Scroll Bar
The Scroll bar indicates the frames available on the camera or in the file. The mark
IN and OUT frames are shown by the triangles as indicated above. These triangles
CAN be dragged to adjust the mark IN and Out Frames. The current frame is
indicated by the Slider. This can be dragged to change the current frame.
The Trigger frame is indicated by the RED mark.
5.8 Synchronization Modes
Synchonisation Mode of the connected camera/s is initially determined by the Default
Sync Modes as defined in the Software Preferences. (See 5.16.1).
HotShot SC User Manual
Jimmy Robinson
Rev 1.1.1.9 –Nov 2008
26
© NAC Image Technology Inc
5.8.1 Sync In
The Sync In mode of the camera determines how the signal input to the Sync In BNC
Connector (see 1.2.2) is interpreted. The Sync In mode is also displayed in the
“MODE” column of the Item List.
There are FOUR possible States for the Sync In.
•
•
•
•
MASTER (Internal Timing) “M”
SLAVE Rising Edge “SR”
SLAVE Falling Edge “SF”
Internal (with Hardware Arm) “MA”
To change the Sync In Mode of a specific camera you should select the camera in
the item list and RIGHT CLICK to show a pop up menu.
Use this …
MASTER (Internal Timing)
SLAVE Rising Edge
SLAVE Falling Edge
Internal (Harware Arm)
To do this…
Ignore the Sync In Signal and use an internal
clock to determine the Frame Timing
Frame at each rising Edge of the Signal
Frame at each falling Edge of the Signal
Use an internal clock to determine the Frame
Timing BUT Set the Camera to ARM MODE if
this input goes HIGH
5.8.2 Sync Out
The Sync OUT mode of the camera determines how the signal input to the Sync OUT
BNC Connector (see 1.2.2) is interpreted.
There are THREE possible States for the Sync OUT.
•
•
HIGH During Exposure
LOW During Exposure
HotShot SC User Manual
Jimmy Robinson
Rev 1.1.1.9 –Nov 2008
27
© NAC Image Technology Inc
•
ARM STATUS
To change the Sync OUT Mode of a specific camera you should select the camera in
the item list and RIGHT CLICK to show a pop up menu.
Use this …
HIGH During Exposure
LOW During Exposure
ARM Status
To do this…
Set the Sync Out signal to be HIGH (5v) when
the camera is Exposing a frame and LOW (0v)
at all other time
Set the Sync Out signal to be LOW (0v) when
the camera is Exposing a frame and HIGH (5v)
at all other time
Set the Sync Out signal to be HIGH (5v) when
the camera is in ARM status
5.9 Trigger Setting
You can define the TTL state used to trigger the camera via the Trigger BNC
connector.
For a Make Switch you should use HIGH to LOW, which is the default setting.
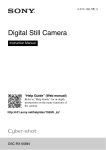
5.10 Double Exposure Mode
The HotShot SC Cameras can operate a Double
Exposure Mode. In this mode the camera will take
pictures in “pairs” with the inter frame time between
the pairs being very SMALL. This is particularly useful
for Particle image velocimetry (PIV) applications. To
Enable / Disable Double Exposure Mode right click
HotShot SC User Manual
Jimmy Robinson
Rev 1.1.1.9 –Nov 2008
28
© NAC Image Technology Inc
the camera in the item list and click Double Exposure. If Double Exposure is ON then
a TICK will be displayed net to the menu item.
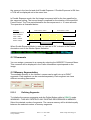
In Double Exposure mode, the first image is exposed with for the time specified by
the exposure setting. The second image is exposed for the duration of the specified
Frame Period. The Time period betewwn the two exposures is < 15 nano seconds.
The opreration is illustrated below :
Example
Double Exposure
AOI = 512x512
Start
FPS = 2000
<---EXP=250us--> <---------------EXP=500us-------------->
Frame Period = 500us
Frame Period = 500us
Start
EXP1 = 250us
EXP2 = 500us
End
End
Readout=250us
Readout=250us
When Double Exposure Mode is used you can see a ‘DX’ indicator in the Frame
Annotation next to the Shutter Speed indication.
5.11 Comments
You can assign a comment to a camera by selecting the ADD/EDIT Comment Menu.
This comment will be displayed in the Frame Information superimposed on the
image.
5.12 Memory Segmentation
The available memory in the HotShot camera can be split into up to EIGHT
segments. Each segment can be recorded separately. Each segment can have
different recording parameters.
5.12.1
Defining Segments
To initialize the memory segments push the Define Button whilst in READY mode.
WARNING : THIS WILL DESTROY ANY EXISTING RECORDINGS IN MEMORY.
Select the desired number of segments. The camera memory will be divided equally
between the selected number of memory segments.
HotShot SC User Manual
Jimmy Robinson
Rev 1.1.1.9 –Nov 2008
29
© NAC Image Technology Inc
The “default setting” for each of these segments will be the current settings. This
includes FPS, Exposure/Shutter, Gain, Digital Shift. It does not currently include a
custom AOI.
To change the current segment use the selection Drop Down.
5.12.2
Auto-ReArm
If the Auto ReArm is checked then after a segment is recorded the system will
advance to the next segment and Re-Arm the camera in that segment. This process
will continue until All segments are recorded OR the next segment is ALREADY
recorded.
5.12.3
Allow Overwrite
If Allow Overwrite is Checked then the Auto RE-Arm function will REARM in the next
segment EVEN IF that segment has a recording in it. In this case the existing
recording will be lost.
HotShot SC User Manual
Jimmy Robinson
Rev 1.1.1.9 –Nov 2008
30
© NAC Image Technology Inc
5.13 View / reticle Controls
Use these tools to “drill Down” into the image.
Use this …
Zoom In
Zoom Out
Reset Zoom
Fit to Screen
Histogram
To do this…
Zoom in to the image by 10% (each Click)
Zoom out of the image by 10% (each Click)
Reset the Zoom to 100% (No Zoom)
Zoom the image to fit the screen
Show the Image Histogram (see 5.16.5 )
The X and Y indicate the image co-ordinate of the Mouse Pointer
The Coloured Number Values indicate the Red, Green and Blue levels of the Pixel
under the mouse pointer.
HotShot SC User Manual
Jimmy Robinson
Rev 1.1.1.9 –Nov 2008
31
© NAC Image Technology Inc
5.14 Measure Tools
HotShot SC Link is equipped with some basic measurement tools.
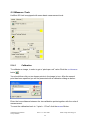
5.14.1
Calibration
To calibrate an image, in order to get a “pixels per unit” value Click the calibrate
button
.
You should then click on two known points in the image in turn. After the second
point has been specified you will be presented with a calibration dialog as below :
Enter the know distance between the two calibration points together with the units of
measurement.
To reset the calibration back to “1 pixel = 1 Pixel” click the Reset Button.
HotShot SC User Manual
Jimmy Robinson
Rev 1.1.1.9 –Nov 2008
32
© NAC Image Technology Inc
To cancel the calibration click Cancel.
To accept the calibration click OK.
5.14.2
Measure Distance
To make a distance measurement in the image press down the Measure Button
Now Click and Drag in the image. The length of the dragged line is displayed
next the the measure button. The units of measurement will be the same as the
calibration units. You can keep making measurements unit you click the Measure
Button Again.
The measure button is a TOGGLE button.
5.14.3
Manual Tracking Reticule
The Manual Tracking tool will allow you to manually track up to ten (10) points in the
image. The results are stored in an CSV file that can easily be opened in a spreadsheet
application.
To begin manual tracking click the Manual Tracking Button
A floating window will appear as shown below :
Use this …
Open File
To do this…
Open a previously saved Reticule File (WARNING :
Will overwrite and current data)
Save the Current reticule data to the file
Save File
Save the Current Reticule data to a NEW file
Save as new File
Zoom in the Image
Zoom In
Zoom out the image
Zoom Out
Undo the Zoom (return to original size)
Undo Zoom
Delete
Current Delete the coordinate data for the current point
Point Data
Delete All Point Delete the current coordinate data for ALL Points
(on
Data
HotShot SC User Manual
Jimmy Robinson
Rev 1.1.1.9 –Nov 2008
33
© NAC Image Technology Inc
.
Delete All Data
Auto Advance Frame
Set Point Colour
this frame)
Delete ALL coordinate data for all points on ALL
frames
Set the Auto Advance point count. The image data
will move on ONE frame when this number of point
coordinated have been specified.
Set the Display colour of the Points
Set Selected Point Set the Display colour of the selected point
colour
Hide
Tracking Hide the Reticule window (and stop manual
tracking)
Window
5.14.3.1
Quick Guide to Manual Tracking
1. Click the Manual Tracking button to open the manual tracking tool window
2. Set the Auto Advance spin edit to the number of points you wish to track
3. Click the points, in the image, in turn
4. The frame advances automatically after the set number of points is positioned
5. When tracking is completed click the Save, or save as button.
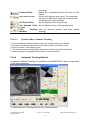
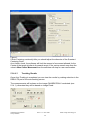
5.14.4
Automatic Tracking Reticule
In addition to Manual Tracking, it is possible to AUTOMATICALLY track a single point
in the image sequence.
To Start Automatic Tracking click the Auto Tracking Button.
HotShot SC User Manual
Jimmy Robinson
Rev 1.1.1.9 –Nov 2008
34
© NAC Image Technology Inc
You will see the following window appear.
Use this …
Quadrant Target
Correlation Target
Delete Target
Delete Tracked Data
5.14.4.1
To do this…
Define a target as a Quadrant Type
Define a target as a Correlation Type
Delete the current Target
Begin Tracking
Delete the tracked data for the current
target
Start Automatic Tracking
Target Settings
View / Edit the Target Settings
Zoom In
Zoom Out
Confirm Point
Zoom in on the target Window
Zoom Out of the target Window
Undo Move Point
Undo a manual Move of a point
Confirm a point (if requested)
Getting Started with Auto Tracking
HotShot SC User Manual
Jimmy Robinson
Rev 1.1.1.9 –Nov 2008
35
© NAC Image Technology Inc
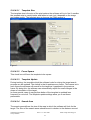
Start by deciding which target type you wish to track, either a Quadrant shape or
correlation (no specific shape). Click the appropriate button. Then click in the image
in the center of the target to be tracked. For a Quadrant shape the software will
”auto-center” on the target.
Next check the target settings by clicking the Target Settings Button (see 5.14.4.2).
Now click Start tracking.
The software will track the target over from the defined frame to the end of the
sequence (or until stopped by the user).
If the target is lost, or the software is unsure of it’s location then it will stop and ask
for user confirmation. You can confirm the suggested location by clicking the
CONFIRM POINT button OR move the target indicator to the correct location and
then click the CONFIRM POINT button. If you move the point by mistake you can
click the UNDO MOVE button and then click CONFIRM POINT.
Once tracking is completed then you can look at the results
5.14.4.2
Target Settings
The Tracking point parameters form has a different layout depending on what point
type is selected.
Some of the setting are common while others relate to the target type.
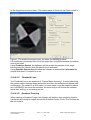
For Quadrant Targets
Figure 1 Point Properties
HotShot SC User Manual
Jimmy Robinson
Rev 1.1.1.9 –Nov 2008
36
© NAC Image Technology Inc
5.14.4.2.1
Template Size
The template size is the size of the pixel pattern the software will try to find. A smaller
the template size is usually better and faster to track, but it depends on the image
and image quality. The template size is show as the PINK square in
Figure 1.
5.14.4.2.2
Force Square
This check box will force the template to be square
5.14.4.2.3
Template Update
During tracking, the template which the software looks for during the target search
process can be updated. The default is that it updates every frame. This means tat in
each frame the software will search for the target as it appeared in the previous
frame. By doing this, the software can automatically adjust for small changes in the
shape or orientation of the target.
In some special cases it may perform better of the template is updated less
frequently or not at all. The template update settings allow you to set these
parameters.
5.14.4.2.4
Search Area
The search area defines the size of the area in which the software will look for the
target. The Size of the search areas should be set in relation to the distance moved
HotShot SC User Manual
Jimmy Robinson
Rev 1.1.1.9 –Nov 2008
37
© NAC Image Technology Inc
by the target from frame to frame. The search areas is shown by the Cyan square in
Figure 1. The smaller the search area, the faster the tracking process.
If the software consistently fails to find the target then it might be because the search
area is too small.
Using Predictive Search, the software will first predict the position of the target
before setting the Search Area. By default this is activated.
Using Dynamic Search Area will allow the software to automatically decrease the
search area size if it is useful to do so.
5.14.4.2.5
Threshold Limit
The Threshold Limit is the measure of “Pattern Match Accuracy”. If during searching
the pattern match accuracy drops below this level then the software will request user
confirmation. The default is a 90% match. In some cases it may be helpful to reduce
this. HOWEVER, the more the reduction, the more likely it will be that the software
could start “drifting” in its tracking results.
5.14.4.2.6
Quadrant Centring
When tracking a Quadrant Target, the software will perform Auto centering function.
It does this by looking for edges around the Quadrant Centre Circle. This is shown as
the red circle in
HotShot SC User Manual
Jimmy Robinson
Rev 1.1.1.9 –Nov 2008
38
© NAC Image Technology Inc
Figure 1.
If Auto Centering continually fails you should adjust the diameter of the Quadrant
Centering Circle.
As a further check, the software will limit the amount of movement allowed for the
Centre of the target (similar to the search area). If the centre moved more than the
value in Max Centre Movement then the software will stop for user confirmation.
5.14.4.3
Tracking Results
Once Auto Tracking is completed you can view the results by making selection in the
RESULTS part of the auto tracking screen.
The measurements will be base on the image CALIBRATION if conducted (see
5.14.1), otherwise they will be based on image Pixels.
HotShot SC User Manual
Jimmy Robinson
Rev 1.1.1.9 –Nov 2008
39
© NAC Image Technology Inc
Use this …
5.14.5
To do this…
Select Axis
Select the axis direction to graph
Graph Results
Draw a graph
Position
Graph the position of the point from the Origin
Displacement
Graph the Displacement of the point
Velocity
Graph the Velocity of the point
Acceleration
Graph the Acceleration of the point
RPM
Graph the Revs per minute of the point (where applicable)
Origin
Place the origin of measurements. Tracked data will be
measured from this point. Default is top left or bottom left of the
image (depending on the Y Direction)
AXIS
Select the Y axis direction
Export to CSV
Export the tracking data to a Coma Separated Data File
Export To Excel
Start Microsoft Excel and post the data into a
worksheet (MS Excel must me installed on the PC)
Grid Overlay
You can overlay a grid onto the images. The grid lines can be horizontal, vertical,
both horizontal AND vertical, or a Polar Grid.
The Starting point of the grid, and the grid size and rotation can be defined.
Use this …
X,Y,Y&X,POLAR
Type
To do this…
Specify the type of grid to overlay onto the image
Toggle the Grid Display ON and Off
Specify the “Origin” of the grid
Rotate Grid
Rotate the grid by the specified Degrees
Frequency
Specify the frequency of the grid lines. This will be in
“calibrated Units” intervals or in Pixels if the image is not
calibrated.
Specify the colour of the grid lines
Colour
5.14.6
Image Centre Reticule
HotShot SC User Manual
Jimmy Robinson
Rev 1.1.1.9 –Nov 2008
40
© NAC Image Technology Inc
This will put a Cross Hair in the center of the image. This can be used to assist in
aligning multiple cameras onto the same target object.
5.15 Advanced Tools
5.15.1
Auto Trigger
Auto Trigger allows you to specify a region in the live image from the camera which
will be monitored by the software. If this portion of the image changes above a
defined threshold level, it will cause the camera to automatically TRIGGER a
recording.
NOTE : There will be some latency between the image change and the trigger
command. This tool should be used ONLY when an approximate trigger time is
required. For an accurate Trigger you should use the trigger IN BNC connection.
To minimize this latency when using a colour camera, in particular a colour HotShot
MEGA camera, it is recommended that you make use of the SPEED BOOST function
(see 5.7.1).
HotShot SC User Manual
Jimmy Robinson
Rev 1.1.1.9 –Nov 2008
41
© NAC Image Technology Inc
Use this …
To do this…
Define Area
Enable
Trigger
5.15.1.1
Auto
Define the area to be monitored by the Auto Trigger
Function.
Activate The Auto Trigger Function
Live
Monitor
Sensitivity
Show Live results of the Auto Trigger Threshold
Threshold
Change the Trigger Threshold Level by moving the Arrow up
or down
Show the Threshold at which the Trigger Will be Applied
Define Area
To Define the Auto Trigger area, depress this button and then drag a rectangle on
the Main Image. The Camera should be in VIEW mode when this is done. The
selected area will appear in the area below the Define Area Button as shown in the
above Screen Shot.
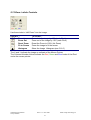
5.15.1.2
Live Monitor
Checking the Live Monitor will allow the current threshold level of the target area to
be displayed in the Threshold monitor.
In the example left, the image in the auto trigger area has changed by
a nominal value of 14. The threshold (sensitivity) for the Auto Trigger
is set to 15. If the image changes slightly more then the camera will
trigger.
5.15.1.3
Enable Auto Trigger
This must be checked for the auto trigger to be active. You should check this just
prior to putting the camera into ARM Mode.
HotShot SC User Manual
Jimmy Robinson
Rev 1.1.1.9 –Nov 2008
42
© NAC Image Technology Inc
5.15.1.4
Adjusting the Auto Trigger Threshold
The Arrow to the left of the threshold monitor can be moved up and down the bar to
adjust the Auto Trigger Threshold.
5.15.2
Auto Run
This button will activate / De-Activate the Auto Run function (see section 5.16.2).
5.16 Main Menus
Use this …
File
Connect
Open file
Download
Format Conversion
Bulk Convert
Close
Exit
To do this…
See Control Area for More information
Connect to a Camera
Open an Image File
Download Images From Camera
Convert RAW data to image files
Convert Multiple HSF files to Image Files
Close the current File or Camera
Quit the Application
Settings
Preferences
Auto Run
Camera Info
Show Histogram
Reticule
Firmware Upgrade
Adjust DACs
Help
Hot Keys
User Manual
About
HotShot SC User Manual
Jimmy Robinson
Define Software & Camera Preferences
Specify Auto Run Settings
View Connected Camera Information
Show the live Image Histogram Window
Open the Manual Tracking Reticule Window
Manually update camera Firmware
(** CAUTION **)
Adjust camera DAC Settings
(** CAUTION **)
Show available Hot Key Commands
Open the Ser Manual
Show the About Screen
Rev 1.1.1.9 –Nov 2008
43
© NAC Image Technology Inc
5.16.1
Settings | Preferences
The preferences Screen below is displayed :
5.16.1.1
Sync In Setting
This sets the DEFAULT Sync In Mode of the camera see 5.8.1
5.16.1.2
Sync Out Setting
This sets the DEFAULT Sync In Mode of the camera see 5.8.2
5.16.1.3
Image Background Colour
Sets the colour of the window behind the image
5.16.1.4
Low Light Setting
Sets the effective Frames Per Second when the camera is put into LOW LIGHT
MODE (See 5.4.5). NOTE : If the setting is less than 500 then the LIVE VIDEO
OUT will be disabled in Low Light Mode.
HotShot SC User Manual
Jimmy Robinson
Rev 1.1.1.9 –Nov 2008
44
© NAC Image Technology Inc
5.16.1.5
Frame Annotation
Specifies how image “meta data” is displayed in the image.
5.16.1.6
Live Video Out
Sets the Live Video Out (from EVF connector, see 1.3) mode.
5.16.1.7
Default Open Location
Specifies the folder which is first opened when a File Open is requested
5.16.1.8
Default Save Location
Specifies the folder which is first opened when a File Save is requested
5.16.1.9
Auto Connect on Startup
If this is selected then when the software starts it will immediately connect to any
available cameras
5.16.1.10
Debug
The settings should not be modified unless instructed to do so by a NAC
representative.
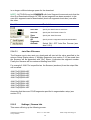
5.16.2
Settings | Auto Run
This menu takes you to the Auto Run Setup Screen
You can use AUTO Run to put the camera into Semi Automatic Operation.
In Auto Run Mode, after the camera
recording is finished it will
automatically download the
specified number of frames and
then Re-ARM the camera ready for
a subsequent recording. The Auto
Run will continue until it is
interrupted by the user (Press
STOP key in ARM Mode) OR there
HotShot SC User Manual
Jimmy Robinson
Rev 1.1.1.9 –Nov 2008
45
© NAC Image Technology Inc
is no longer sufficient storage space for the download.
NOTE : AUTO RUN can be COMBINED with Auto Segment Increments such that the
Auto Run Download will begin AFTER the last segment has been recorded. In this
case ALL segments can be downloaded (check all segments check box) one after
the other.
Use this …
5.16.2.1
To do this…
Save Path
Specify the Path to save the files to
Save Start
Specify the Start Frame to save from
Save End
Specify the End Frame to Save To
Save
Filename
All
Segments
Activate
Specify the Save File name
Specify that ALL segments should be downloaded
Switch ON / OFF Auto Run Process (see
also 5.15.2)
Auto Run Filenames
The filename use to store auto run downloads will start wit the value specified in the
autorun Setup Display above. If Multiple Segments (see section 5.12) are used then
the filename will be appended with “[Sx]” where x indicates the segment number.
Finally the filename will be numbered starting from 0000.
For example if JUN17Ar is specified as the filename (as above) then the output files
will be called :
JUN17Ar[S1]0000.HSF
JUN17Ar[S2]0000.HSF
JUN17Ar[S3]0000.HSF
JUN17Ar[S4]0000.HSF
JUN17Ar[S1]0001.HSF
JUN17Ar[S2]0001.HSF
JUN17Ar[S3]0001.HSF
JUN17Ar[S4]0001.HSF
Assuming that there are FOUR segments specified in segmentation setup (see
section 5.12)
5.16.3
Settings | Camera Info
This menu will bring up the following screen.
HotShot SC User Manual
Jimmy Robinson
Rev 1.1.1.9 –Nov 2008
46
© NAC Image Technology Inc
5.16.3.1
Rename Camera
Push this button to rename the camera. The camera name is used in the item list to
identify the camera and is also used as the default save name for downloaded image
files.
5.16.3.2
Calibrate Black Frame
Use this button to re-calibrate the Black Frame. The black frame calibration will
reduce Fixed Pattern Noise in the image. Black Frame calibration is performed before
the camera leave the factory, but it is worth re-calibrating every 12 Month or so or if
FPN noise becomes more visible in the images. To calibrate the black frame, click
the button and follow the on screen instructions. You will be required to CLOSE the
lens or put on the lens cap. If you fail to do this the black frame calibration will not
work properly and you will introduce noise into your images.
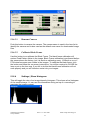
5.16.4
Settings | Show Histogram
This will toggle the view of an image intensity histogram. This shows a live histogram
of the camera image. Yu can use this information during set up of a recording to
maximize the image contrast.
HotShot SC User Manual
Jimmy Robinson
Rev 1.1.1.9 –Nov 2008
47
© NAC Image Technology Inc
5.16.5
Settings | Reticule
See section 5.14.3.
5.16.6
Settings Firmware Upgrade
This menu allows for manual Firmware Upgrade of the camera. Under normal
operation, any firmware upgrades are performed automatically. You will not normally
need to use this function. This function is Password Protected and you will be talked
through using this by a NAC engineers should It be necessary.
5.16.7
Settings | Adjust DACs
This menu allows for manual modification of the camera DAC’s. Under normal
operation, any modifications are performed automatically. You will not normally need
to use this function. This function is Password Protected and you will be talked
through using this by a NAC engineers should It be necessary.
5.16.8
About
Choosing the About Menu Option display the About Dialog.
This dialog indicates version information about the connected camera and the
software. This information is useful in case you need to contact Technical Support
regarding this system. Please make a note of this information before contacting NAC
technical Support. In particular you should note the FW Versions numbers and the
Software build number. In the example below the software build number is 0.1.8.2.
HotShot SC User Manual
Jimmy Robinson
Rev 1.1.1.9 –Nov 2008
48
© NAC Image Technology Inc
HotShot SC User Manual
Jimmy Robinson
Rev 1.1.1.9 –Nov 2008
49
© NAC Image Technology Inc
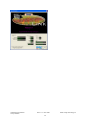
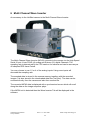
6 Multi Channel Wave Inserter
An accessory to the HotShot camera is the Multi Channel Wave Inserter.
The Multi-Channel Wave Inserter (MCWI) connects to the camera via the High Speed
Serial IO port. It has FOUR (4) analog and Sixteen (16) digital Channels. The
sampling rate is determined by the FPS used on the camera and can be as many as
40 samples PER frame Period.
You may choose to use 1,2 or 4 of the analog inputs. Using more inputs will
decrease the sampling rate.
The sampled data is stored in the camera memory together with the recorded
images. It is also stored in the downloaded data files (.hsf files). The data can be
reviewed directly from the camera and also from a saved file.
The recorded MCWI data is displayed with a synchronised cursor which will scroll
along the data as the image sequence plays.
If the MCWI unit is detected then the Wave Inserter Tab will be displayed in the
software.
HotShot SC User Manual
Jimmy Robinson
Rev 1.1.1.9 –Nov 2008
50
© NAC Image Technology Inc
HotShot SC User Manual
Jimmy Robinson
Rev 1.1.1.9 –Nov 2008
51
© NAC Image Technology Inc
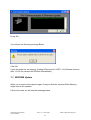
7 Automatic Firmware Upgrade
When you connect (see section 5.3.1) to the camera for the First time after installing
new software it may also be necessary for some, or all, of the camera FIRMWARE to
be upgraded. If this is the case then you will see the Firmware Upgrade window
appear as shown below :
To proceed with the Firmware Upgrade you should press OK. If you CANCEL the
process at this stage then the camera may not function correctly. In most cases,
unless instructed otherwise by a NAC engineer, you should press OK.
The Software will now check which firmware requires and update and will also verify
that the correct firmware upgrade is available.
One it is ready to perform the upgrade you will see a confirmation message. This is
the final opportunity to cancel the Firmware Upgrade. The Confirmation message is
shown below.
At this point you MUST make sure the power to the camera is secure. If you are
using BATTERY power you should NOT PROCEED with the upgrade and should re
start the process using MAINS power.
After Clicking OK the Upgrade process begins
HotShot SC User Manual
Jimmy Robinson
Rev 1.1.1.9 –Nov 2008
52
© NAC Image Technology Inc
During the firmware upgrade the ARM and REC LED indicators, on the rear panel of
the camera will flash. After approx 90 seconds you will get a WARNING message as
below :
NOTE : For Software Versions
after Version 1.0.0.4 this
message is NOT displayed. The
process
continues
Automatically.
You MUST confirm that the ARM and REC LED have STOPPED FLASHING before
you press OK. When the ARM and REC LED’ have stopped flashing you should only
see the POWER LED illuminated GREEN.
WARNING : IF THE LED’S are ANY OTHER STATE then you should keep power to
the camera and call NAC Technical Support immediately.
There are FOUR parts to the Firmware. The number parts requiring and UPGRADE
will vary depending on your current system.
IMPORTANT : The FINAL Firmware is known as the PXA. The PXA upgrade takes
MUCH LESS TIME than the other parts. For this you WILL NOT see the ARM and
REC Lights flashing. You might see the DATA LED Flash once.
Once all the Firmware has been updated you will see the message below :
HotShot SC User Manual
Jimmy Robinson
Rev 1.1.1.9 –Nov 2008
53
© NAC Image Technology Inc
Press OK.
You will see the Warning message Below.
Click OK
Cycle the power on the camera. (Unplug & Reconnect). NOTE : For Software Version
after 1.0.0.4 the camera will RE-Boot Automatically.
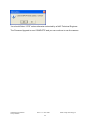
7.1 EEPROM Update
When you connect to the camera again, it may be that the cameras Flash Memory
might need to be updated.
If this is the case you will see the message below
HotShot SC User Manual
Jimmy Robinson
Rev 1.1.1.9 –Nov 2008
54
© NAC Image Technology Inc
You should Select “YES” unless otherwise instructed by a NAC Technical Engineer.
The Firmware Upgrade is now COMPLETE and you can continue to use the camera.
HotShot SC User Manual
Jimmy Robinson
Rev 1.1.1.9 –Nov 2008
55
© NAC Image Technology Inc
8 Disclaimer
We reserve the right to modify the function of the software, without notice, to allow for
continuous improvement to our software and Hardware systems. Due to this, this
manual may not exactly match the software version that you have.
HotShot SC User Manual
Jimmy Robinson
Rev 1.1.1.9 –Nov 2008
56
© NAC Image Technology Inc
INDEX
FPS...........................................2, 9, 15
Gain........................................2, 15, 16
Gamma ..................................2, 17, 18
LED Indicators ................................... 4
Low Light...............................2, 15, 16
Open file .......................................... 24
Open File ...............................2, 12, 13
Record Controls........................... 2, 14
Select Segment .............................. 15
Shutter .....................................2, 9, 15
Trigger ...................2, 9, 15, 16, 19, 20
White Balance .......................2, 17, 18
Abort ..........................................13, 19
About ............................................3, 24
BNC Connectors.............................2, 5
Bulk Convert .............................12, 14
Chroma ..................................2, 17, 18
Close................................2, 12, 13, 24
Connect ............................2, 12, 13, 23
Digital Shift............................2, 15, 17
Download .. 2, 8, 10, 12, 13, 14, 19, 24
Electronic ViewFinder .....................2, 5
Enhance.................................2, 17, 18
Format Convert.....................2, 12, 14
HotShot SC User Manual
Jimmy Robinson
Rev 1.1.1.9 –Nov 2008
57
© NAC Image Technology Inc