1
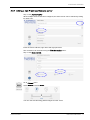
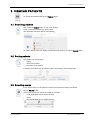
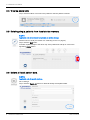
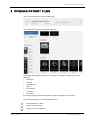
Planmeca mRomexis
™
EN
user's manual
10037441_1
Table of contents
1
INTRODUCTION ................................................................................................................. 1
2
GETTING STARTED ........................................................................................................... 1
2.1
Configuring Planmeca mRomexis server ............................................................................... 1
2.2
Installing Apache Tomcat server for mRomexis desktop browser use ................................... 2
2.3
Configuring Planmeca mRomexis settings ............................................................................. 2
3
VIEWING PATIENTS .......................................................................................................... 5
3.1
Searching patients .................................................................................................................. 5
3.2
Sorting patients ...................................................................................................................... 5
3.3
Selecting source ..................................................................................................................... 5
3.4
Viewing comments ................................................................................................................. 6
3.5
Deleting single patients from local device memory ................................................................ 6
3.6
Delete all local patient data .................................................................................................... 6
4
OPENING PATIENT FILES ................................................................................................. 7
5
VIEWING 2D IMAGES ......................................................................................................... 9
5.1
Adding annotations ................................................................................................................. 9
5.2
Adding measurements .......................................................................................................... 10
5.3
Adjusting brightness and contrast ........................................................................................ 10
5.4
Save to gallery ...................................................................................................................... 11
6
VIEWING 3D IMAGES ....................................................................................................... 12
6.1
Volume moving mode ........................................................................................................... 12
6.2
Axis moving mode ................................................................................................................ 13
6.3
Moving in the slices .............................................................................................................. 13
6.4
Slice rendered view .............................................................................................................. 13
6.5
Moving up or down slice by slice .......................................................................................... 14
6.6
Rotate - volume mode .......................................................................................................... 14
6.7
Rotate - axis mode ............................................................................................................... 14
6.8
Zoom in ................................................................................................................................ 15
6.9
Zoom out .............................................................................................................................. 15
6.10
Maximize or minimize views ................................................................................................. 15
6.11
Save to gallery ...................................................................................................................... 16
User’s manual
Planmeca mRomexis
1
Table of contents
The manufacturer, assembler and importer are responsible for the safety, reliability and
performance of the unit only if:
- installation, calibration, modification and repairs are carried out by qualified authorised personnel
- electrical installations are carried out according to the appropriate requirements such
as IEC 60364
- equipment is used according to the operating instructions.
Planmeca pursues a policy of continual product development. Although every effort is
made to produce up-to-date product documentation this publication should not be regarded as an infallible guide to current specifications. We reserve the right to make
changes without prior notice.
COPYRIGHT PLANMECA
Publication number 10037441 Revision 1
Released 06 March 2015
2
Planmeca mRomexis
User’s manual
1 INTRODUCTION
1 INTRODUCTION
The Planmeca mRomexis is a software intended for displaying and visualizing dental and
medical 2D and 3D images from imaging devices, such as radiographs, CBCT images and
photographs. This manual describes how to use the software.
NOTE
Planmeca mRomexis software is not intended for diagnostic purposes.
The Planmeca mRomexis application has been designed to provide similar user
experience on all supported platforms. Therefore nearly all the navigation methods are the
same and the user should have little difficulty switching between different platform
versions. All version differences are clearly marked in this documentation.
The web version follow the guidelines of the landscape oriented tablet version, unless
otherwise stated.
2 GETTING STARTED
2.1 Configuring Planmeca mRomexis server
Configure your Planmeca Romexis server to listen to Planmeca mRomexis (port 8093 by
default) in the Configuration application as shown below.
Also configure your firewall to allow access the following executable:
C:\Program Files\Planmeca\Romexis\server\RomexisService64exe.
User’s manual
Planmeca mRomexis
1
2 GETTING STARTED
2.2 Installing Apache Tomcat server for mRomexis desktop browser use
In order to use mRomexis in desktop browser make sure to select Apache Tomcat server
for mRomexis installation component during installation.
Windows
1.
2.
Reboot computer after Planmeca Romexis installation.
Install Tomcat service by running install_mRomexis_service.bat as administrator from
<installdir>\Planmeca\Romexis\apache-tomcat folder
3.
Set Apache Tomcat 8.0 mRomexis service to start automatically from Windows
services control and start it if not already started.
4.
Go to http://RomexisServerIP:8080/mromexis/ (replace RomexisServerIP by the
actual Romexis server IP address) in browser to open mRomexis.
OS X
1.
Install mRomexis Tomcat daemon by running loadMRomexisDaemon.sh as
administrator from /Applications/Romexis/apache-tomcat.
2.
Go to http://RomexisServerIP:8080/mromexis/ (replace RomexisServerIP by the
actual Romexis server IP address) in browser to open mRomexis.
2.3 Configuring Planmeca mRomexis settings
Open Planmeca mRomexis.
There are two top-level selection menus in Planmeca mRomexis:
•
Patients for viewing patient images
•
Settings for setting up server connections
In the Settings menu you can enter and configure Planmeca Romexis server and Cloud
server settings.
2
Planmeca mRomexis
User’s manual
2 GETTING STARTED
2.3.1 Adding a new Planmeca Romexis server
Tap or click Add new server.
When multiple servers have been configured, the active server can be selected by ticking
its name entry.
Enter the server address, login name and login password.
The connection can be tested using the Test Connection button.
Tap or click Save and Exit.
Go to Patients menu.
Select Source and then Server.
You can now start browsing patient images from the server.
User’s manual
Planmeca mRomexis
3
2 GETTING STARTED
2.3.2 Adding new Planmeca Romexis Cloud configuration
NOTE
These settings are applicable only for mobile devices.
Tap or click the Add new server button under Cloud servers.
Enter server name and address, login name and password.
The connection can be tested using Test Connection button.
Private keys must be downloaded to receive cases from Planmeca Romexis Cloud. Note
that you must be connected to a Planmeca Romexis server to transfer your private key
from its database.
Tap or click Download private key.
Tap or click Save and Exit.
4
Planmeca mRomexis
User’s manual
3 VIEWING PATIENTS
3 VIEWING PATIENTS
To access the Patients view tap the Patients button.
3.1 Searching patients
Tap or click the Search button on top of the window.
Enter your search criteria in the Search field.
The application starts the search automatically.
To exit the Search view and display the other buttons re-tap or re-click the Search button.
3.2 Sorting patients
The patients can be sorted by:
•
activity
•
name of the patient
•
ID number of the patient
In addition the patients can be further sorted in ascending or descending order.
3.3 Selecting source
In the Source view you can select the source from where the images are viewed.
Tap the Source button
Choose the source from where the images are viewed.
User’s manual
•
Local (applicable only for mobile devices)
•
Server
•
Cloud (applicable only for mobile devices)
Planmeca mRomexis
5
3 VIEWING PATIENTS
3.4 Viewing comments
Tap or click the balloon icon next to the patient to view the patient comment.
3.5 Deleting single patients from local device memory
NOTE
Applicable only to locally stored patients on mobile devices.
Set the source to local (see section 3.3 "Selecting source" on page 5).
Tap or click the Edit button.
To delete a patient swipe to the left on top of the patient line and tap or click on the
appearing Delete button.
3.6 Delete all local patient data
NOTE
Applicable only for mobile devices.
Go to Settings
Tap or click the Delete All button to delete all locally stored patient data.
6
Planmeca mRomexis
User’s manual
4 OPENING PATIENT FILES
4 OPENING PATIENT FILES
Tap or click the patient to open the patient file.
The patient file and the list of all images appears.
The images are grouped according to image types. The different image types are the
following:
•
panoramic
•
intraoral
•
cephalometric
•
photo
•
2D snapshot
•
3D volume
•
3D surface
If the image category does not contain any images the category is not shown.
The following symbols are used to indicate that the
User’s manual
•
Image belongs to a stack
•
Image is part of a study
•
Image is part of a diagnosis
Planmeca mRomexis
7
4 OPENING PATIENT FILES
Tap the thumbnail of an image to open it. The image opens in full-screen either in
landscape or portrait mode depending on the device’s orientation.
NOTE
Only 3D images stored on the server can be viewed. The 3D images are not stored locally .
To view other patient images tap the arrow and select the image to open from the list.
The patient information is shown on top of the toolbar.
The information related to the current image is shown inThis image field.
The activities list shows the last updated images for this patient.
To return to the patient file tap or click the Overview button.
8
Planmeca mRomexis
User’s manual
5 VIEWING 2D IMAGES
5 VIEWING 2D IMAGES
Tap or click on the arrow on the right side of the screen to open the side control panel.
The menu with the following functions opens.
1
Resets the image to original state
2
Opens a text box for adding annotations on the image
3
Opens a ruler for making measurements
4
Opens the brightness & contrast adjustment tool
5
Saves image to gallery
(Applicable only for mobile devices)
5.1 Adding annotations
To open a text-box for adding an annotation to the image tap or click this button.
Tap on the box to add a note. The added annotations show as small dots which can be
moved on the image by dragging.
To edit an annotation tap or click the text box.
To move the text box drag it on the image.
To delete annnotation drag it down to the coloured bar at the bottom of the screen.
To show/hide annotations check / uncheck this check box
Multiple annotations can be added.
NOTE
The annotations are not saved once you close the image. To save a view of the image with
annotations select Save to gallery, see section 5.4 "Save to gallery" on page 11 for more
information.
User’s manual
Planmeca mRomexis
9
5 VIEWING 2D IMAGES
5.2 Adding measurements
To open the measurement tool tap or click this button.
Draw a measurement line.
To move the measurement line move your fingers around the image.
To move the measurement value box drag the dots on the image.
To move either end of the measurement line individually place you finger on the end of the
line and drag it where needed. The measurement value automatically changes according
to the new position(s).
To delete a measurement drag it down to the coloured bar at the bottom of the screen.
NOTE
The measurements are not saved once you close the image. To save a view of the image
with measurements select Save to gallery, see section 5.4 "Save to gallery" on page 11 for
more information.
5.3 Adjusting brightness and contrast
To open the brightness and contrast tool tap or click this button.
The brightness and contrast adjustment indicators appear on the top and the bottom and
on the left and right side of the window.
To adjust the brightness of the image drag your finger or mouse up and down on the
image.
To adjust the contrast of the image drag your finger or mouse left and right on the image.
10
Planmeca mRomexis
User’s manual
5 VIEWING 2D IMAGES
5.4 Save to gallery
The screen shot of images can be saved locally on tablets.
Tap the Save to gallery icon on the right side of the window to save the image to device
memory.
User’s manual
Planmeca mRomexis
11
6 VIEWING 3D IMAGES
6 VIEWING 3D IMAGES
Tap or click on the arrow on the right side of the screen to open the side control panel.
The menu with the following functions opens.
1
Resets the image to original state
2
Opens the brightness & contrast adjustment tool
3
Move / rotate volume mode toggle button
4
Saves image to Gallery
(Applicable only for mobile devices)
There are two modes for moving images; the volume mode and the axis mode. The
behaviour is different depending on the mode selected.
6.1 Volume moving mode
When the Volume mode is on the volume icon is highlighted.
Move the volume by dragging the finger on the volume. (1)
Note that in the 3x3 view the one finger drag trackball rotates the 3D model around its
origin. (2)
1
3
One finger
drag
Left mouse
button drag
2
12
Planmeca mRomexis
User’s manual
6 VIEWING 3D IMAGES
6.2 Axis moving mode
To enable the Axis moving mode turn off the volume mode by de-selecting the volume
tool. (3) The axis moving mode is enabled by default.
To move the origin of the axes drag your finger or tap anywhere on the window . (1)
In the 3x3 view dragging with one finger with trackball rotates the 3D model around its
origin. (2)
1
&
3
&
One finger
tap
or drag
Left mouse
button drag
2
&
6.3 Moving in the slices
To move in the slices drag two fingers up or down. (1)
The 3D model is sliced perpendicular to what the user is seeing. The slicing is maintained
even when rotating the model. (2)
Two-finger
drag up
and down
1
Both mouse
buttons and
up and down
2
6.4 Slice rendered view
To slice a rendered view use either the three-finger move or right mouse button and drag.
Right mouse button and drag
User’s manual
Planmeca mRomexis
13
6 VIEWING 3D IMAGES
6.5 Moving up or down slice by slice
To move up in the slices one step at a time two-finger tap or click both mouse buttons at
the upper half of the view-port. (1)
To move down in the slices tap or click at the lower half of the view-port (2)
Twofinger tap
1
Both mouse
buttons
click
2
6.6 Rotate - volume mode
To turn on the volume mode select the Volume mode. (3)
To rotate the volume, turn two fingers or hold down the right mouse button while dragging
up and down. (1)
It is not possible to rotate in the 3x3 view. (2)
1
Two-finger
turn
3
Right mouse
button and
up/down
2
6.7 Rotate - axis mode
To turn on the Axis mode deselect the Volume mode. (3)
To rotate the origin turn two fingers or hold down the right mouse button and drag up and
down.(1)
It is not possible to rotate the volume in the 3x3 view. (2)
1
3
Two-finger
turn
Right mouse
button and
up/down
2
14
Planmeca mRomexis
User’s manual
6 VIEWING 3D IMAGES
6.8 Zoom in
To zoom in the image either spread two fingers (1) or turn the mouse wheel away from
yourself.
On some track-pads this is also done by scrolling with two fingers.
1
Two-finger
spread
Mouse
wheel
away
from user
6.9 Zoom out
To zoom out the image either pinch two fingers or turn mouse wheel towards yourself. (1)
On some track-pads this can also be done by scrolling with two fingers.
1
Two-finger
pinch
Mouse
wheel
towards
user
6.10 Maximize or minimize views
Double-tap or double left-click on any view-port to maximize it. (1)
To get back to the MPR view double tap/click again.
1
Double
tap
Double
left-click
2x
User’s manual
Planmeca mRomexis
15
6 VIEWING 3D IMAGES
6.11 Save to gallery
See section 5.4 "Save to gallery" on page 11.
16
Planmeca mRomexis
User’s manual
Planmeca Oy | Asentajankatu 6 | 00880 Helsinki | Finland
tel. +358 20 7795 500 | fax +358 20 7795 555 | [email protected] | www.planmeca.com