1
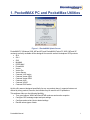
PocketMAX
User Manual
(875-0178-000 Rev. A1)
Copyright Notice
© Copyright 2007 Hemisphere GPS, LLC. All rights reserved. No part of this manual may be
stored in a retrieval system, transmitted, or reproduced by any means, including, but not limited
to photocopy, photograph, digitizing, or otherwise, without the prior written permission from
Hemisphere GPS, LLC
Trademarks
The Hemisphere GPS, COAST™, and e-Dif™ are trademarks of Hemisphere GPS, LLC. All
other trademarks are the property of their respective owners.
Hemisphere GPS LLC.
4110 9th Street SE
Calgary, Alberta, Canada T2G 3C4
Telephone number:
Fax number:
E-mail address:
Web Site:
+1-403-259-3311
+1-403-259-8866
[email protected]
www.hemispheregps.com
PocketMAX User Manual
ii
Table of Contents
Preface.................................................................................................................................................... iv
Customer Service........................................................................................................................... iv
World Wide Web Site ..................................................................................................................... iv
Document Conventions.................................................................................................................. iv
Notes and Cautions........................................................................................................................ iv
1.
PocketMAX PC and PocketMax Utilities .....................................................................................1
1.1 Connecting to PocketMAX PC................................................................................................2
1.1.1 Serial Communication .................................................................................................2
1.2 Connecting to PocketMAX......................................................................................................4
1.2.1 Bluetooth Communication ...........................................................................................6
1.3 Using PocketMAX PC.............................................................................................................7
1.3.1 GPS Menu ...................................................................................................................8
2.
Differential Source .....................................................................................................................12
2.1.1 SBAS Menu ...............................................................................................................12
2.1.2 BEAC Menu...............................................................................................................13
2.1.3 LBAND Menu.............................................................................................................15
2.1.4 None option ...............................................................................................................16
2.1.5 E-Dif menu.................................................................................................................17
2.1.6 EXT This Port Option ................................................................................................17
2.1.7 EXT OTHER PORT Option .......................................................................................17
2.1.8 Base Menu ................................................................................................................18
2.1.9 Rover Menu ...............................................................................................................18
3.
Name? ........................................................................................ Error! Bookmark not defined.
3.1 The TMNL Menu Button .......................................................................................................19
3.1.1 The LOGS Menu Button............................................................................................21
3.1.2 The HDG Menu Button..............................................................................................23
4.
Closing PocketMAX ...................................................................................................................25
PocketMAX User Manual
iii
Preface
Customer Service
If you encounter problems during the operation of this software, or cannot find the information
you need, please contact your dealer, or Hemisphere GPS Customer Service. The contact
numbers and e-mail address for Hemisphere GPS Service are:
Telephone number:
Fax number:
E-mail address:
+1-480-348-6390
+1-480-348-6370
[email protected]
Technical Support is available from 8:00 AM to 5:00 PM Mountain Time, Monday to Friday.
World Wide Web Site
Hemisphere GPS maintains a World Wide Web home page at the following address:
www.hemispheregps.com
A corporate profile, product information, application news, GPS and DGPS literature, beacon
coverage information, and software are available at this site.
Document Conventions
Bold is used to emphasize certain points.
Notes and Cautions
Notes and Cautions stress important information regarding the configuration and operation of
the PocketMAX PC program.
Note - Notes outline important information of a general nature.
Cautions - Cautions inform of possible sources of difficulty or situations that may cause
damage to the product.
PocketMAX User Manual
iv
1. PocketMAX PC and PocketMax Utilities
Figure 1-1 PocketMAX Splash Screen
PocketMAX PC (Windows 2000, ME and XP) and PocketMAX (Pocket PC 2000, ME and XP
versions) are freely available utilities designed for use with several Hemisphere GPS products:
• SLX
• SX-1
• SX2
• MiniMAX
• DGPS MAX
• PowerMAX
• Vector
• Vector Pro
• Vector Sensor
• Crescent V100 series
• Crescent Vector OEM
• Crescent Vector OEM
• Crescent A100
• Crescent VS100
• Crescent R100 series
As this utility was not designed specifically for any one product alone, it supports features not
offered by every product, however, the interface may be used for all I/O operations.
This software offers you the following flexibility:
• Tune your beacon, WAAS and OmniSTAR receivers and monitor reception
• Configure GPS message output and port settings
• Configure and monitor Vector related settings
• Record various types of data
PocketMAX Manual
1
PocketMAX PC runs on any PC or laptop computer with the operating systems Windows 2003. The
most current version of PocketMAX PC can be downloaded from the Hemisphere GPS website, or it
can be made available to you by contacting Hemisphere GPS. Once you have saved the
PocketMAX PC executable to your computer, the program can be started by clicking on the file
name or icon.
PocketMAX runs on any PDA with PocketPC 2000, 2002, or 2003. Hemisphere GPS offers two
different executables, one labeled PocketPC 2002, which works on both 2000 and 2002 operating
platforms and one labeled PocketPC 2003, which works on the 2003 platform. You must have the
corresponding cable for your PDA to connect to a serial port on your product. If you don’t have the
latest version of PocketMAX, you can download it from the Hemisphere GPS website, or it can be
made available to you by contacting Hemisphere GPS.
Once you have the PocketMAX executable appropriate for your PDA’s operating system, you can
copy it over to your PDA to whichever folder you wish. To start the program, navigate to the
executable on your PDA and tap the file.
Caution – It is important to note that when you are using PocketMAX PC, or PocketMAX, the
program is doing many operations behind the scenes. This includes modifying the data
output from the serial port as the program requires, which is screen dependant. When you
close PocketMAX PC, or PocketMAX, it will confirm if you want to save any configuration
changes. Once you have the settings configured properly for you, it is imperative to let the
program close completely on its own before you disconnect or power down the receiver.
This may take up to 10 seconds. If this is not performed, the receiver will not be configured
as you feel it should, and can output a mixture of binary and NMEA data.
1.1 Connecting to PocketMAX PC
1.1.1 Serial Communication
First power on the receiver and connect it to your computer’s com port. A configuration screen,
Figure 1-2 on page 3, will appear and you will be prompted to choose the COM port and baud rate
of the receiver. You also have the option of allowing the program to cycle through all baud rates if
you don’t know your current communication settings (the Auto-Baud feature). Another option you
have at this point is to use the “Demo Mode” button. If you tap this button instead of the “Search”
button, PocketMAX PC will allow you to view all the different screens without being connected to a
receiver. This mode may be useful to get comfortable with the program, or to demonstrate the
software if you don’t have a receiver nearby.
PocketMAX Manual
2
You can also monitor your connection status through the icon at the lower right of the screen. If the
two cables are shown as connected, then your computer still has a valid connection with the
receiver.
Figure 1-2 Serial Port Settings Screen
If you are properly connected, the Status window will display a “Receiver Found” message as
shown in Figure 1-3. You will then be prompted to choose one of three receiver types. Select
“Hemisphere Vector if you are using a Vector family receiver. Select Hemisphere Bluetooth if you
are using a Bluetooth™ adaptor to access a com port. Select Hemisphere GPS for all other
receivers. You can also choose the check box to “Generate Report”. This option brings up a
summary of the receiver’s settings (Figure 1-4 on page 4) and then gives you the option of closing
the program or continuing on if you would like more information or if you’d like to change the
settings.
Figure 1-3 Connection Established Screen
PocketMAX Manual
3
Figure 1-4 Configuration Report Screen
If you get a message “Receiver not found…”, check your connections, your com port and your baud
rate and try again.
1.2 Connecting to PocketMAX
PocketMAX Manual
4
First connect the PDA cable to the PDA and the other end to a null modem cable, which is then
connected to the receiver. Ensure the receiver is set up properly and is tracking GPS. If you are
using the PocketPC 2003 version and you have a Bluetooth capable PDA, you can cancel the
Bluetooth manager, as in the figure below, in order to continue with regular serial communication.
Only the PowerMAX is Bluetooth compatible.
Caution – It is very important to connect a null modem cable in-line with the PDA cable.
Otherwise, communication will not be possible. A null modem cable is just like a straight
through RS232 cable, but the Rx and Tx lines are crossed. In other words, pin 2 and 3 are
switched on one end. We offer a null modem cable for purchase (P/N 051-0108-000).
Figure 1-5 Bluetooth Browser Screen (Only on PocketPC 2003)
A configuration screen, Figure 1-6 on page 6 will appear and you will be prompted to choose the
COM port and baud rate of the receiver. You also have the option of allowing the program to cycle
through all baud rates if you don’t know your current communication settings (the auto-baud
feature). Another option you have at this point is to use the “Demo Mode” button. If you tap this
button instead of the “Search” button, then PocketMAX will allow you to view all the different
screens without being connected to a receiver. This mode may be useful to get comfortable with the
program, or to demonstrate the software if you don’t have a receiver near by.
Note – For serial communication, COM 1 is the port usually used by PDA’s, although this
may differ by brand. You may have to try several com ports before you find the proper one.
PocketMAX Manual
5
Figure 1-6 Serial Port Settings Screen
1.2.1 Bluetooth Communication
Figure 1- 7 will appear if you are using Bluetooth to communicate with your receiver, but instead of
canceling this screen, you must wait until your Bluetooth receiver appears, as in the Figure 1-7. You
must then tap the PowerMAX symbol and then the serial port setting screen will appear (Figure 13). You must then select the Bluetooth com port and the auto baud check box. This will then bring
you back to the Bluetooth console screen and you must again select the PowerMAX.
Note – For bluetooth communication, COM 8 is the port sometimes used by PDA’s, however,
this will vary by brand. You may have to try several com ports before you find the proper one
for bluetooth communications.
Figure 1-7 Bluetooth Device Found Screen
If you are properly connected, the Status window will display a ‘Receiver Found’ message as shown
in Figure 1-8 below. You will then be prompted to choose your receiver type. There are three
PocketMAX Manual
6
receiver types to choose from. The Mini MAX and DGPS MAX are classified as “Hemisphere GPS”
products. The PowerMAX is classified as a “Hemisphere GPS Bluetooth” product and the Vector
family is classified as “Hemisphere GPS Vector”. You can also choose the check box to “Generate
Report”. This option brings up a summary of the receiver’s settings (Figure 1-8) and then gives you
the option of closing the program or continuing on if you would like more information or if you’d like
to change the settings.
Figure 1-8 Connection Established Screen
Figure 1-9 Configuration Report Screen
If you get a message “Receiver not found…”, check your connections, your com port and your baud
rate and try again.
1.3 Using PocketMAX
PocketMAX Manual
7
Once you have successfully connected PocketMAX to your receiver, the screen will look similar to
Figure 1-10.
The buttons along the bottom of the window are the main menus and are used to switch screens
within PocketMAX PC. The primary menu buttons along the bottom are as follows: GPS (Global
Positioning System), SBAS (Space Based Augmentation System, which includes WAAS and
EGNOS) or BEAC (Beacon) or LBAND (OmniSTAR), TMNL (Terminal), e-Dif®, L-Dif® Base,
L-D-f base, external this port, ext. other port, L- LOGS and HDG (Heading – only appears when you
select a Vector receiver type), and none.
Within each of these menu buttons, there are tabs along the top, as shown in the figure 1-10.
These tabs allow you to navigate within the menu and vary in number and name depending on
which main menu you are currently in.
There are three indicator lights along the bottom of the screen, just above the menu buttons (four if
you are using a Vector product). The first indicator light is either grey or green and indicates either
your communications or your position fix status. The second light is either grey or yellow and
indicates whether or not you are tracking GPS signals. The third light is either grey or yellow and it
indicates whether or not you are successfully tracking your differential source. If you are using a
Vector product, then there will be a fourth light named Heading which will be either grey or blue to
indicate whether or not you have a valid heading.
1.3.1 GPS Menu
Within the GPS menu button, the tabs are: Pos’n (Position), Sats (Satellites), Setup, Precision, Plot
and About.
The Position tab contains all the main position information, including latitude, longitude, altitude,
speed and precision, all with configurable formats. There is also other information in this tab,
including the differential source.
Figure 1-10 GPS Position Screen
PocketMAX Manual
8
Note: When the receiver is receiving GPS information from satellites, the fields Lat, Lon,
Date and Time in the GPS Position screen will all report current information. If these fields
stop updating every few seconds, then you likely have a GPS or antenna problem.
The Satellite tab has a sky plot of viewable satellites, how many satellites the receiver is tracking,
the PRN numbers of which satellites are being tracked and the bit error rate of the differential
source. The receiver should be tracking at least 4 GPS satellites in order to compute a position, and
ideally between 5 and 12 for best performance.
Figure 1-11 GPS Satellites Screen
The Setup tab allows you to change the configuration of the receiver including turning on and off
NMEA messages, the elevation mask, the maximum COAST™ age and the baud rates.
Figure 1-12 GPS Setup Screen
The Precision tab gives a graphical representation of horizontal accuracy in the form of an error
ellipse. It also displays numerical precision in northing, easting, and altitude components in
configurable formats.
PocketMAX Manual
9
Figure 1-13 GPS Precision Screen
The Plot tab plots the northing or easting error over time and allows you to adjust your scale and
timeline as required. This plot allows you to monitor performance over a time period with respect to
either a known coordinate or an arbitrary one.
Figure 1-14 GPS Plot Screen
PocketMAX Manual
10
The About tab allows you to capture the current firmware version of the receiver.
Figure 1-15 GPS About Screen
PocketMAX Manual
11
2. Differential Source
The box at the bottom of the screen labeled DiffMode within the GPS menu button, in the Pos’n tab
is where you can change differential sources. The other place you can change the differential mode
is in the menu for the differential source (either SBAS/BEAC/LBAND), in the Status tab. In either of
these, you can switch between SBAS (WAAS/EGNOS) and Beacon (or OmniSTAR if applicable)
just by tapping the circle beside the desired differential source. By switching the differential source,
the menu along the bottom of the screen will automatically update to reflect the current
configuration.
2.1.1 SBAS Menu
The main SBAS tabs are: Status and Plot.
The Status tab provides details of the satellites being used in the SBAS differential system, which
covers both WAAS and EGNOS. The PRNs, longitude, elevation and azimuth, and the bit error rate
of the satellites that are being tracked are also displayed. The SBAS Bit Error Rate shows the
quality of the SBAS data received from the satellite(s). This number(s) should stay below 150 to
maintain differential lock. Ideally, this value will remain between 0 and 50.
Figure 2-1 SBAS Status Screen
The Plot tab charts and gives a bar graph of the bit error rate (BER) of up to two SBAS satellites
being tracked, however only one satellite is required to provide corrections.
PocketMAX Manual
12
Figure 2-2 SBAS Plot Screen
2.1.2 BEAC Menu
The tabs within the beacon menu button are Status, Tune and Plot.
The Status tab provides details of the beacon station providing corrections, including the name (if
available), the frequency and the MSK rate, as well as the signal strength (SS) and signal-to-noise
ratio (SNR) values.
Figure 2-3 Beacon Status Screen
The Tune tab gives you the option of automatically tuning to the strongest signal, specifying a
specific frequency or MSK bit rate, or selecting a station by region. Once you have made your
selections, you must press the adjacent ‘Tune’ button for the settings to take place.
PocketMAX Manual
13
Figure 2-4 Beacon Tune Screen
The Plot tab charts the signal strength, the signal to noise ratio (SNR) or the frequency of the
beacon signal.
Figure 2-5 Beacon Plot Screen
PocketMAX Manual
14
2.1.3 LBAND Menu
The tabs within the L-Band (OmniSTAR) menu button are Status, Tune, Subscription and Plot.
The Status tab gives the name (if available), the frequency and the data rate of the L-Band satellite
that is currently being used. It also gives the bit error rate, the satellite location and the status
information.
Figure 2-6 L-Band Status Screen
The Tune tab gives the name (if available), the frequency and the data rate of the L-Band satellite
that is currently being used. It also gives the option of tuning manually by frequency and data rate,
automatically or by the name of the satellite.
Figure 2-7 L-Band Tune Screen
PocketMAX Manual
15
The Subscription tab provides the begin and expiry dates of the subscription as well as the serial
number of the unit and the countdown timer which gives you the amount of time you have left in
your subscription.
Figure 2-8 L-Band Subscription Screen
The Plot tab plots and gives a bar graph of the bit error rate (BER) of the L-Band satellite being
tracked.
Figure 2-9 L-Band Plot Screen
2.1.4 None option
The differential type selection NONE causes the receiver to operate without differential inputs. This
option will not display a menu specific to the option, but will instead jump to the GPS/Pos’n menu.
PocketMAX Manual
16
2.1.5 e-Dif menu
This single tab menu contains options to configure the receiver for e-Dif operation. An error will
display If e-Dif is not subscribed.
Figure 2-10: e-Dif subscription error
The receiver can be subscribed using the terminal mode with commands described in the receiver’s
manual using codes supplied when the option is purchased. Contact Hemisphere GPS’ sales for
additional information on purchasing an e-Dif subscription.
For receivers with valid subscriptions, this menu allows the user to initialize based on the multiple
run, a known reference point, entered in the boxes labeled “Lat,” “Lon,” and “Hgt” to set the latitude,
longitude, and height of a reference position or single run. Please refer to receiver user manual for
more details on which option is appropriate to your application.
Figure 2-11: e-Dif menu
2.1.6 EXT This Port Option
The differential type selection EXT THIS PORT causes the receiver to look for the differential inputs
on THIS port. This option will not display a menu specific to the option, but will instead jump to the
GPS/Pos’n menu.
2.1.7 EXT OTHER PORT Option
The differential type selection EXT OTHER PORT causes the receiver to look for the differential
inputs on the OTHE Rport. This option will not display a menu specific to the option, but will instead
jump to the GPS/Pos’n menu.
PocketMAX Manual
17
2.1.8 Base Menu
This single tab menu contains options to set the latitude, longitude, and height of a reference
position and to select the port the receiver uses to connect to a radio that broadcasts local
differential correctors. The reference position must be within five meters of the position estimated of
the receiver. The settings may be sent to the receiver with the Initialization button that will highlight
when the lat, lon, Hgt, and port are set to valid values.
Figure 2-12: Base Menu
2.1.9 Rover Menu
This single tab menu contains no user parameters. Its purpose is simply to show that the receiver is
configured as a L-Dif rover.
Figure 2-13: Rover Menu
PocketMAX Manual
18
3. Other Functionalities
3.1 The TMNL Menu Button
The tabs within the terminal menu button are Terminal and Hot Keys.
The Terminal tab gives you direct terminal access to the receiver for issuing commands and
observing their response. The commands to communicate with the receiver are available in the
Programming Manual. Click
once you have typed in the command and the response will
appear in the window above. If you wish to re-enter a command you have previously entered, you
may also select it from the dropdown menu.
Figure 3-1 Terminal Screen
PocketMAX Manual
19
The Hot Keys tab allows you to set up frequently used commands, and assign them to the buttons
displayed in the Terminal tab. The name of the key is entered in the left column, while the command
is in the right column. There are 4 levels of hot keys, with 9 buttons each, for a total of 36 available
buttons for programming.
Figure 3-2 Terminal Hot Keys Screen
PocketMAX Manual
20
3.2 The LOGS Menu Button
The tabs within the LOGS menu button are NMEA, Raw Data and Binary. Please refer to your
receiver’s manual for more information on each particular type of message that can be recorded.
There are three options when logging: to Append to Existing File, Overwrite Existing File or to
Create New File. When appending to or overwriting an existing file, you must select Browse to
choose the appropriate file to modify. If writing a new file, the default file name of DYYMMDDx.txt is
generated, specifying YY(year), MM(month), DD(day), x (numbers new files to differentiate between
multiple files created on the same day). This may be overwritten with whatever name you wish to
assign the file.
The NMEA tab allows you to setup NMEA messages to be logged. You can then browse for the
location of the file and start recording data. When you have collected all of the data, press Stop to
end recording.
Figure 3-3 Logs NMEA Screen
The Raw Data tab allows you to log the raw binary 95 and 96 messages for post-processing.
Figure 3-4 Logs Raw Data Screen
PocketMAX Manual
21
The Binary tab allows you to log a variety of binary messages.
Figure 3-5 Logs Binary Screen
The points menu allows you to log a point each time the Log Point button is pressed. Point IDs may
be assigned automatically or may be assigned custom names using the custom radio button and
the edit box shown in the New Point ID group.
Figure 3-6 Points Menu
The polygon menu allows you to log polygons and displays the enclosed area. Click
begin. Click
PocketMAX Manual
to
to end.
22
3.3 The HDG Menu Button
The tabs within the HDG (heading) menu button are Status, Setup and Plot.
The Status tab gives you a graphical representation and numerical values for heading, rate of turn
(ROT), course over ground (COG) and speed. By pressing GO, this is equivalent to issuing the
$JSEARCH command, and causes the receiver to reject its current RTK solution and re-compute
heading.
Figure 3-7 Heading Status Screen
The Setup tab shows you the current configuration that is unique to the Vector products and allows
you to change this configuration.
Figure 3-8 Heading Setup Screen
PocketMAX Manual
23
The Plot tab plots the current heading and also displays the current rate of turn.
Figure 3-9 Heading Plot Screen
PocketMAX Manual
24
4. Closing PocketMAX
The process of closing PocketMAX pc, or PocketMAX, is critical in the proper configuration of your
receiver. It is very important to let PocketMAX PC, or PocketMAX, fully close in order to allow it to
first configure your receiver and secondly display a report of the new configuration before exit.
When you tap on the ‘X’ in the upper right hand corner of the program to exit, the following screen
will appear.
Figure 4-1 Exit Screen
Exit and Save Profile saves a profile with your selected settings to a receiver configuration file as
described in section 1.3.1. It then saves the configuration to flash memory built into the receiver. It
then exits the program.
Exit and Save will close the program and save any configuration changes you have made. If you do
not wish to save your modifications, then Exit Without Saving. Otherwise, if you wish to return to
using PocketMAX, press Cancel. If you have selected to save the changes, the screen below will be
seen. It is imperative to let the program complete all of the steps to close and save the
configurations properly.
PocketMAX Manual
25
Figure 4-2 Closing Screen
PocketMAX PC, or PocketMAX, will automatically jump to the configuration report so that you can
verify that all the settings are correct for your application. See the configuration report in the figure
below.
Figure 4-3 Configuration Report Screen
From this screen you have the option of going back into PocketMAX PC, or PocketMAX, to change
the configuration and then closing again. If you are happy with the current configuration,
click
to close the program and save all the settings to the receiver. It is vital to allow
PocketMAX PC, or PocketMAX to close and to not disconnect your receiver from the PC until the
close is complete. Otherwise, you risk saving the wrong settings.
Caution – You may lose settings that you have configured using PocketMAX PC, or
PockeMAX, if you disconnect or power down your receiver while PocketMAX PC is still
running. Be sure to let it close completely.
PocketMAX Manual
26