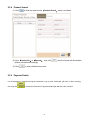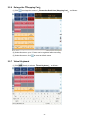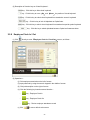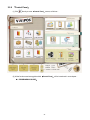
1
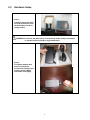
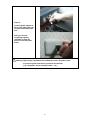
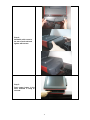
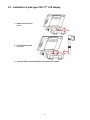
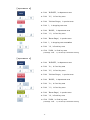
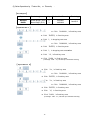
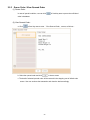
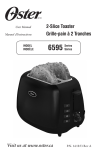
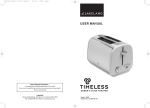
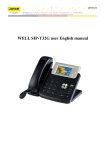
2. GETTING STARTED
2.1
Safety Precautions
Please observe the precautions described below to ensure safe use of equipment.
1.
Disconnect the equipment from AC outlet before cleaning. Use only moist cloth (with water). Do not
use detergent.
2.
Power outlet must be easily accessible and near the equipment.
3.
Keep the equipment away from humid and dusty environment.
4.
Place the equipment on a stable surface during installation and operation.
5.
Do not place any load on the power cord.
6.
All cautions and warnings on the equipment should be noted.
7.
When the equipment is not in use, disconnect it from the power source to avoid damage by transient
over-voltage.
8.
Liquid into the equipment may cause fire or electrical shock.
9.
Only qualified service personnel should be allowed to open the equipment.
10. If any of the following situations arises, ask service personnel to check the equipment:
A. Power cord / plug is damaged
B. Liquid penetrates into the equipment
C. The equipment does not function properly and/or cannot work according to the User Manual
D. The equipment has been dropped
E. The equipment shows signs of damage
8
2.2
Hardware Setup
Step 1:
Carefully remove the main
unit and accessories from
the box and put on flat or
sturdy surface.
WARNING: Do not use the main unit in an excessively humid, dusty environment,
or expose to direct sunlight or high temperature.
Step 2:
Find power adaptor and
power cord from the
accessories package. And
connect power adaptor
with power cord tightly.
9
Steps 3:
Connect power adaptor to
DC-in (12V) port in the rear
I/O panel of VIVIPOS main
unit.
After you connect
everything together,
remember to plug the
power cord to AC power
outlet.
Warning: High voltage equipments are prohibited to share AC power outlet
to prevent system crash due to protective mechanism.
(e.g. refrigerator, stereo, and light stand… etc.)
10
Step 4:
Assemble cable cover to
the rear of main unit and
tighten with screws.
Step 5:
Press power button in the
front. VIVIPOS is ready to
use now.
11
2.3 Installation of pole-type VFD / 2nd LCD display
1. Remove the lid on I/O
cover
2. Fix VFD holder to the
I/O cover
3. Connect RJ45 or RS-232 (D-Sub 9-pin) cable to the system
12
2.4
Sign In / Main Screen
2.4.1 Sign In Screen
Number
Keypad
User List Area
Passcode
Input Area
Sign In Button
This test unit has been preset the following「User Name」and「Sign In Passcode」:
User Name
joyce
manager
staff
superuser
Sign In Passcode
0000
1111
2222
3333 ç suggested sign-in by “superuser” for maximum authority
Sign In Process:
1. Click user name in 「User List Area」
2. Input passcode by clicking Number Keypad
3. Click Sign In Button
After sing in successfully, a default main screen will pop up. Please refer to「2.5.2 Default Main
Screen Introduction」and「2.6 Basic Cashier Operations」for more detail.
13
2.4.2 Default Main Screen
Transaction
Summary
Transaction
Status
Department Area
Transaction
Detail Area
(Shopping Cart)
Product Area
(PLUs)
Input Line
Fixed Key Area
&
Funtion Panel
System Message Line
Introduction:
- Transaction Summary:Display total amount, and paid/unpaid amount, and changes.
- Status Line:Display current price level, tax code, item count, and register#... etc.
- Transaction Detail Area (Shopping Cart):Transaction detail is displayed here.
If over 9 items are registered, user may scroll this area by page via
and
buttons.
- Fixed Key Area:The 10-key numeric pad and 13 essential function keys are fixed.
Fixed keys can not be removed or changed.
- Department Area:Display product category / department information.
- Product Area (PLUs):Display product (PLUs) information.
- Programmable Function Panel:User may program frequent-use function buttons in this
area. Detail setup process please refer to「3.5.2 Function Panel Configuration」.
- System Message Line:Display machine ID, user name, time and date and system alert /
error messages.
14
2.5
Basic Cashier Operations
2.5.1 Sales
(1) If product unit price is pre-set:
【Example】
Department
Product registered
Q’ty
BURGER
Chicken Burger ($3.0)
2
BAGEL
Bacon Bagel ($1.5)
3
Tendering
Cash $15
( ) represents pre-set product unit price
【O peration 1】
Z Click 「BURGER」in department area
Z Click 「Chicken Burger」in product area twice
Z Click 「BAGEL」in department area
Z Click 「Bacon Bagel」in product area 3 times
Z Click 「15」in fixed key area
Z Click「CASH」in fixed key area
Z
(A message「CHG: 4.5」will show up in transaction summary)
【O peration 2】
Z Click 「BURGER」in department area
Z Click 「Chicken Burger」in product area
Z Click「+」in shopping cart area
Z Click 「BAGEL」in department area
Z Click 「Bacon Bagel」in product area
Z Click「+」in shopping cart area twice
Z Click 「15」in fixed key area
Z Click「CASH」in fixed key area
Z
(A message「CHG: 4.5」will show up in transaction summary)
15
【Op eration 3】
Z Click 「BURGER」in department area
Z Click 「2 x」in fixed key area
Z Click 「Chicken Burger」in product area
Z Click 「BAGEL」in department area
Z Click 「3 x」in fixed key area
Z Click 「Bacon Bagel」in product area
Z Click 「15」in fixed key area
Z Click「CASH」in fixed key area
(A message「CHG: 4.5」will show up in transaction summary)
(2) If product unit price is open:
【Example】
Product registered
Q’ty
Open price to be
registered
BURGER
Chicken Burger ($3.0)
2
$2.5
BAGEL
Bacon Bagel ($1.5)
3
$1.2
Department
Tendering
Cash $10
( ) represents pre-set product unit price
【Op eration 1】
Z Click 「BURGER」in department area
Z Click 「2.5」in fixed key area
Z Click 「Chicken Burger」in product area twice
Z Click 「BAGEL」in department area
Z Click 「1.2」in fixed key area
Z Click 「Bacon Bagel」in product area 3 times
Z Click 「10」in fixed key area
Z Click「CASH」in fixed key area
(A message「CHG: 1.4」will show up in transaction summary)
16
【Op eration 2】
Z Click 「BURGER」in department area
Z Click 「2.5」in fixed key area
Z Click 「Chicken Burger」in product area
Z Click「+」in shopping cart area
Z Click 「BAGEL」in department area
Z Click 「1.2」in fixed key area
Z Click 「Bacon Bagel」in product area
Z Click「+」in shopping cart area twice
Z Click 「10」in fixed key area
Z Click「CASH」in fixed key area
(A message「CHG: 1.4」will show up in transaction summary)
【Op eration 3】
Z Click 「BURGER」in department area
Z Click 「2 x」in fixed key area
Z Click 「2.5」in fixed key area
Z Click 「Chicken Burger」in product area
Z Click 「BAGEL」in department area
Z Click 「3 x」in fixed key area
Z Click 「1.2」in fixed key area
Z Click 「Bacon Bagel」in product area
Z Click 「10」in fixed key area
Z Click「CASH」in fixed key area
(A message「CHG: 1.4」will show up in transaction summary)
17
(3) Sales Operations by「Product No.」or「Barcode」:
【Example】
Department
Product registered
Q’ty
Product No. / Barcode
BURGER
Chicken Burger ($3.0)
2
00100001
BAGEL
Bacon Bagel ($1.5)
3
00200002
Tendering
Cash $15
【Operation 1】
Z Click 「00100001」in fixed key area
Z Click 「ENTER」in fixed key area
Z Click「+」in shopping cart area
Z Click 「00200002」in fixed key area
Z Click 「ENTER」in fixed key area
Z Click「+」in shopping cart area twice
Z Click 「15」in fixed key area
Z Click「CASH」in fixed key area
(A message「CHG: 4.5」will show up in transaction summary)
【Op eration 2】
Z Click 「2 x」in fixed key area
Z Click 「00100001」in fixed key area
Z Click「ENTER」in fixed key area
Z Click 「3 x」in fixed key area
Z Click 「00200002」in fixed key area
Z Click「ENTER」in fixed key area
Z Click 「15」in fixed key area
Z Click「CASH」in fixed key area
(A message「CHG: 4.5」will show up in transaction summary)
18
2.5.2 Correction / Void
(1) Void single item:
a. Click single item which user intends to void in shopping cart
b. Click
in fixed key area
(2) Correct single item:
(i) Quantity correction
a. Click single item which user intends to correct quantity in shopping cart
b. Input new q’ty(0 ~ 9)in fixed key area
c. Click
in fixed key area
d. Click
in fixed key area
(ii) Price correction
a. Click single item which user intends to correct price in shopping cart
b. Input new price(0 ~ 9)in fixed key area
c. Click
in fixed key area
(iii) Quantity & Price correction at once
a. Click single item which user intends to correct quantity & price in shopping cart
b. Input new q’ty(0 ~ 9)in fixed key area
c. Click
in fixed key area
d. Input new price(0 ~ 9)in fixed key area
d. Click
in fixed key area
(3) Void unfinished order:
Click
in fixed key area directly, all items in shopping cart will be deleted
19
2.5.3 Queue Order / View Queued Order
(1) Queue Order:
In case of special condition, user can click
in fixed key area to queue the unfinished
order in database
(2) View Queued Order:
a. Click
in fixed key area to enter 「View Queued Order」screen, as follows:
b. Select the queued order and click
in above screen
c. The detail of selected queued order will be restored in the shopping cart of default main
screen. User can continue the transaction and close the deal accordingly.
20
2.5.4 Product Search
(1) Click
in fixed key area to enter「Product Search」screen, as follows:
(2) Input「Product No.」or「Barcode」, then click
product information accordingly
(3) Click
, the left of screen will show detail
to return default main screen
2.5.5 Payment Details
If a multi-payment is executed during the transaction (e.g. by cash, credit card, gift card, or other currency),
user may click
to review the information of payment detail right after the order is closed.
21
2.5.6 Enlarge the「Shopping Cart」
(1) Click
to enlarge the screen of「Transaction Detail Area (Shopping Cart)」, as follows:
(2) Under this screen, up to 15 items can be registered without scrolling
(3) Under this screen, click
to revert to default screen
2.5.7 Virtual Keyboard
(1) Click
directly to activate「Virtual Keyboard」, as follows:
22
(2) Description of function keys on Virtual Keyboard:
-
key:Click this key to hide virtual keyboard
-
key:Click this key to move「Up」and「Down」the position of virtual keyboard
-
key:Click this key to switch virtual keyboard from standard to numeric keyboard
-
key:Click this key to lock all alphabets as Capital letter
-
key:Click this key to switch virtual keyboard from standard to special symbol keyboard
-
key:Click this key to switch alphabets between Capital and lowercase letter
2.5.8 Employee Clock In / Out
(1) Click
directly to enter「Employee Clock In / Clock Out」screen, as follows:
(2) Operations:
(i) Click employee name/code on the left of screen
(ii) Input passcode by using the numeric keypad in the middle of screen
(iii) Click job description on the right of screen
(iv) Click the following key based on actual situation:
-
key:Employee Clock In
-
key:Employee Clock Out
(v) Click
key:Review employee attendance record
to return default main screen
23
2.5.9 「Control Panel」
(1) Click
directly to enter「Control Panel」screen, as follows:
(2) All the functions and setup guide within「Control Panel」will be introduced in next chapter:
「3. PROGRAMMING GUIDE」
24