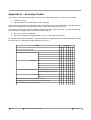
1
eqFocus
USER AND INSTALLATION MANUAL
FOR VERSION 3.12
(REVISION 1)
Environmental Systems & Services Pty Ltd
8 River Street
Richmond, Victoria
(mail: PO Box 939, Hawthorn)
Australia 3121
Phone: +61 3 8420 8999
Fax: +61 3 8420 8900
http://www.esands.com
Table of Contents
Introduction........................................................................................................................4
Records in the eqSuite database..................................................................................4
Starting and Stopping eqFocus.........................................................................................5
Starting eqFocus and connecting to the Event database.............................................5
Exiting from eqFocus.....................................................................................................5
Creating a new event location...........................................................................................6
Setting date and origin time automatically....................................................................6
Setting date and origin time manually...........................................................................6
Adding arrival data.............................................................................................................7
Copying arrival data from eqWave................................................................................7
Importing arrival data from the Events database..........................................................7
Adding arrivals manually...............................................................................................7
Retrieving an existing event location.................................................................................7
Retrieving a location from the events database ...........................................................8
Viewing location data.........................................................................................................9
Location control panel...................................................................................................9
Location information available in the main window tabs...............................................9
Calculating and refining the location................................................................................10
Typical steps in refining and finalizing a location........................................................10
The Location control panel..........................................................................................11
Calculation Status messages......................................................................................12
Adding, Editing and Selecting Arrival Data......................................................................13
Viewing arrival data.....................................................................................................13
Possible actions with arrival records...........................................................................14
Including or excluding arrival data from the calculation..............................................14
Adding extra arrival data..............................................................................................14
Editing arrival data in the Arrival data table.................................................................15
Viewing and adjusting the location map..........................................................................16
Map Tab.......................................................................................................................16
Wadati Plot.......................................................................................................................25
Uncertainties....................................................................................................................26
Calculating the magnitude of the seismic event..............................................................28
Magnitude formulas.....................................................................................................28
Annotating and saving location details............................................................................30
Annotating the location record.....................................................................................30
Saving the location data..................................................................................................31
Saving the location as a file.........................................................................................31
Printing a summary of the event..................................................................................32
Technical notes................................................................................................................32
Directory structure.......................................................................................................32
eqSuite database.........................................................................................................32
Location determination algorithm................................................................................32
Earth models................................................................................................................32
Installation Guide.................................................................................................................33
Environmental Systems & Services
Page 2 of 31
Installation Overview........................................................................................................33
Installation steps..........................................................................................................33
Choosing a Database for eqFocus to Use.......................................................................34
Selecting SimpleSQL...................................................................................................34
Selecting MySQL.........................................................................................................34
Appendix A – Accuracy Codes............................................................................................35
eqFocus
Environmental Systems & Services
Page 3 of 31
Introduction
eqFocus:
●
Calculates the location and magnitude of a seismic event from a set of arrival data.
●
Retrieves and stores the location data in the eqSuite database.
You can use eqFocus to:
● Retrieve existing location records
● Import location records and associated arrival records from SeisAn or eqWave data files
● Manually add arrival records
● Edit location records, add further arrival data and recalculate the location
● View, zoom and pan a map displaying the location of the seismic event and the sites that recorded
the arrival data
● Annotate location records
● Save multiple versions of location records for an event in the Events database
● Export a set of event location (and arrival) data for an event as a SeisAn file
Records in the eqSuite database
All data in the eqSuite database belongs to an event record. Each event record is associated with one or
more location records. Each location record is associated with a number of arrival records. Arrival records
can be associated with more than one location record.
Notes
●
●
Each location record needs arrival data from at least 2 sites.
You can retrieve the location and arrival records for further processing and calculate a more
accurate location. To improve the accuracy of the event location, you may exclude existing arrivals
or add data recorded by other seismographs. The results will become a new location record
associated with the event.
Environmental Systems & Services
Page 4 of 31
Starting and Stopping eqFocus
Starting eqFocus and connecting to the Event database
To start eqFocus:
1. Click the Windows Start button, click Programs→eqSuite→eqFocus3.9.
eqFocus displays a splash screen, connects to the Events database and then displays the Database
Browser dialog box.
2. There are two options for obtaining location data to work with.
1. If you want to create a new location record (for a new event), select New Location (see “Creating
a new event location” below).
2. If you want to load an existing location record from the Events database, use the Database
Browser (see “Retrieving a location from the Event database” below) and then Click Open.
3. After you complete this step, the eqFocus (workspace) window appears.
Exiting from eqFocus
To exit from eqFocus select exit from the File menu.
eqFocus
Environmental Systems & Services
Page 5 of 31
Creating a new event location
When a new location is selected (New Location from the File menu) the date and origin time are cleared. A
new date and origin time can be set either automatically or manually.
Setting date and origin time automatically
The date and origin time can be set by importing arrival times from eqWave.
●
In eqWave select Copy Arrivals from the Edit menu.
●
In eqFocus select Paste from the Edit menu.
●
eqFocus displays the arrival picks in the Arrival Data tab. A location and event time based on the
arrival data is automatically entered.
Setting date and origin time manually
1. If you have not done so already, click the Arrival Data tab.
2. In the Arrival control panel, specify the first arrival's date and time in one of the following formats
1. yyyymmdd hhmm
2. yyyy-mm-dd hhmm
3. yyyy/mm/dd hhmm
3. and click the Set button (eqFocus ignores seconds).
4. You can now add the arrival records (see Add Arrival Data below).
Once saved, eqFocus will create a new event record for this location.
Environmental Systems & Services
Page 6 of 31
Adding arrival data
You can associate arrival data with an event by copying from eqWave, importing from the Events database,
or by manually typing it in.
Copying arrival data from eqWave
To copying all arrival time and amplitude information from an eqWave waveform display;
●
In eqWave select Copy Arrivals from the Edit menu.
●
In eqFocus, select Paste from the Edit menu.
Importing arrival data from the Events database
To associate arrival data from the Events database with the current event:
●
Click the Arrival Data tab.
eqFocus displays the Arrivals control panel.
●
In the second text box, specify the time interval to search in minutes.
●
Click import. eqFocus displays a list of arrivals that were recorded during the specified time interval.
●
In the Import column tick the check box for each arrival that you require and click the Import button.
●
eqFocus displays an Import Report dialog box. Click OK.
Adding arrivals manually
Data that has been read from a seismogram or obtained from an external source can be typed in manually.
●
Click the Arrival Data tab.
●
For each arrival, type the data into the new arrival panel at the top of the Arrival Data window.
Required fields are Site, Wave and Obs Time.
See “Arrival data fields” below for an explanation of the fields.
●
When you have entered all of the data for an arrival press the Add button.
Retrieving an existing event location
You can retrieve an existing location record by:
eqFocus
Environmental Systems & Services
Page 7 of 31
●
Retrieving a location record from the Events database.
●
Importing location data from a SeisAn S-format or eqFocus file (use File / Open File). This will
automatically create a new event location.
Retrieving a location from the events database
1. Select File → Get Location.
2. Use the Open Event Location dialog box to specify the date of the event that you want to retrieve.
To specify a day:
Type the year, month and day into the Go To Date text box using the format
yyyy/mm/dd or yyyy-mm-dd
Press ENTER or click OK.
The Event Browser displays an expanded list of events that occurred on that day. You can specify a
different date by editing the date in the Go To Date text box. If the date that you specified is not
visible in the Event Browser window, scroll up or down to locate it.
To browse to find a day:
The Event Browser displays events and locations in a tree structure.
3. Click the location you want to load and select OK.
Environmental Systems & Services
Page 8 of 31
Viewing location data
When you load or import a location record, eqFocus displays its basic data in the Location control panel.
You can view further information about the location by selecting the main window tabs.
Location control panel
When eqFocus locates an event, it calculates the following fields from the arrival data and parameters. This
is the basic data in the location record. You can modify this data if required. See “Calculating and refining
the location” below.
Origin Time
Date and time of event in Universal Time in the format:
yyyy-mm-dd hhmm
This is the base minute used by eqFocus.
The origin time and all arrival times are expressed in seconds relative to this base minute.
Longitude and Latitude
Longitude and Latitude of seismic event in degrees, rounded to four decimal places.
Depth
Calculated depth in kilometres. If the field is followed by a “C” or a “G” then the depth has been constrained
by the operator.
Location information available in the main window tabs
Following is a summary of the main eqFocus window tabs. For further information see the sections detailing
each tab later in this manual.
Arrival Data
Lists the arrivals associated with the location, indicating whether they are used in the current location
calculation. You can use this tab to manually add or edit arrival data.
Map
Shows the current location on a map. eqFocus has a range of options for the map display. You can use the
Map tab for manually placing the initial location estimate before calculation.
Uncertainties
Shows statistical estimates about the current location. This helps you to evaluate the accuracy and reliability
of the calculation.
Model
This shows the characteristics of the local model of the Earth that eqFocus is using.
Magnitudes
eqFocus
Environmental Systems & Services
Page 9 of 31
Use this tab to calculate the magnitude of the event.
Comments
Use this tab to enter comments for the web-ready report and to store with the location record.
Summary
Use this tab to view a summary of the event (generated dynamically), including location, magnitude and
arrival times.
Finalize
Use this tab to enter further information about the event.
Wadati Plot
A plot of S-P times vs P times.
Calculating and refining the location
After loading a location to be refined or creating a new location, the next step is to select and adjust arrivals
and parameters, and recalculate the location until you have the optimal solution.
To calculate the location with current settings, click Go in the Location Control Panel.
This section explains how to adjust arrivals, parameters and displays so that you can obtain the best location
solution.
Typical steps in refining and finalizing a location
Depending on requirements, you may use some or all of these steps and you may repeat them or perform
them in a different order.
1. Ensure that all available arrivals are present and active (See “Adding, Editing and Selecting Arrival
Data”).
2. Display and manipulate a map of the current solution, including manually placing the initial estimate
and recalculating (See “Viewing and adjusting the location map” and “Manually placing the initial
estimate”).
3. Assess the quality of the solution by:
•
Observing the standard deviation (SD) of arrival residuals. (See “SD of Arrival Residuals”)
•
Analysing uncertainties (see “Uncertainties”).
4. Calculate the magnitude of the seismic event (See “Calculating the magnitude of the seismic event”)
5. Annotate and save location details (See “Annotating location details” and “Storing the location data”)
6. Communicate the results of the event location (See “Exporting the location record and associated
arrival records”)
Environmental Systems & Services
Page 10 of 31
The Location control panel
The Location control panel is in the top left corner of the eqFocus window.
It enables you to specify longitude and latitude or an initial estimate of it, initial depth estimate or fixed depth,
Depth Constraint type, Stabilization Factor and to select the Local Model.
It contains the Go button for recalculating the current location and displays the origin time and standard
deviation of arrival residuals.
Longitude and Latitude
This is the longitude and latitude of the seismic event in
degrees.
You may want to manually specify the longitude and
latitude if you have an idea of the longitude and latitude.
eqFocus can converge to the solution much more quickly if
it starts with a good estimate of longitude and latitude.
When you click Go, eqFocus calculates the location and
changes the values in these text boxes.
Depth
If you are using a fixed depth (see “Depth Constraint”
below), enter the fixed depth value here. If eqFocus is
calculating the depth, select Depth Constraint option
‘None’. You do not need to change this text box - eqFocus will display the calculated depth in it. The initial
estimate of the depth is given with the ‘Normal Depth’ option, as set in Properties in the File menu.
Depth Constraint
The Depth Constraint shows the method of calculating the event depth. You can enter a fixed value or
eqFocus can calculate it. To specify Depth Constraint, select the appropriate option from the drop-down list,
according to this table.
When
Select
Depth Value
What else to do
Seismic event occurred at the
normal depth for the region.
Normal
Fixed
Normal Depth value in Properties
Event was presumed to have
occurred at a known depth (for
example, mine blast)
Geophysicist
Fixed
Depth value specified.
Type the Geophysicist's depth estimate
into the Depth text box.
Constrained
Fixed
Depth value specified.
Type the depth estimate into the Depth
text box.
When refining the location after
the initial calculation
None
Calculated
Depth value is initial value.
Select this after eqFocus has calculated an
initial location.
If you select Normal, eqFocus will use the default depth value specified in Properties (the parameter is called
Normal Depth). This is the usual depth for seismic events in the region. You can change it by editing
Properties in the File menu.
Stabilization Factor
This is the maximum allowable change per iteration. The default value is 1000, and you should not need to
change it.
eqFocus
Environmental Systems & Services
Page 11 of 31
eqFocus should calculate a location with a small standard deviation of arrival residuals. If, instead, as you
recalculate a location a number of times, eqFocus jumps between a number of standard deviation values,
you can reduce the value of the Stabilization Factor. An appropriate initial value is the median distance
between the seismograph stations.
Local Model
This is the name of the layered model that eqFocus uses to model the seismic velocities within the earth.
Click the model tab and select a model from the drop-down list. You can view the characteristics of the
model in the Model tab.
eqFocus uses the IASPEI (1991) whole earth model for regional and world wide events. This table of travel
times is stored in the eqSuite database.
Go
Click the Go button to recalculate the location using your current arrivals selection and parameter settings.
SD of Arrival Residuals
This value is the standard deviation of the differences between the observed arrival times and the calculated
arrival times (in seconds). eqFocus tries to minimise this value, and displays it in red. You can use it as an
indicator of the quality of a location calculation.
Calculation Status messages
When you calculate a location (click the Go button), eqFocus calculates the location and then displays a
message in the status bar at the bottom of the screen.
●
No improvement possible after calcHessianAndGradient or No change needed after
calcHessianAndGradient
There is not enough data in the arrival records to improve the location (arrival data is poor).
●
No further refinement possible
eqFocus cannot calculate a more accurate location using the current property values.
●
No change needed
eqFocus has calculated a solution that has a minimum standard deviation of arrival residuals.
eqFocus cannot calculate a more accurate location using the current arrival data.
Environmental Systems & Services
Page 12 of 31
Adding, Editing and Selecting Arrival Data
Viewing arrival data
To view arrival data, click the Arrival Data tab. eqFocus displays the Arrivals control panel.
The Arrival Data tab showing the list of existing arrivals associated with the current event. The first row of the
table is the data entry panel (see below).
Site
The site code is a 3–5 character abbreviation of the site name.
Type
●
+, - indicate first motion.
●
i or e indicates an Impulsive or Emergent arrival.
Wave
Type of wave. All models support P and S waves with other models supporting additional wave types.
Obs Time (Observed Arrival Time)
Time of the arrival in seconds relative to the current Origin Time minute as shown in the upper left corner of
the Window.
Unc (Arrival Time Uncertainty)
Estimate of the possible error of the arrival time (in seconds). Default value is 0.01.
eqFocus uses this value in the calculation of the uncertainty of the event location fields.
Calc Time (Calculated Arrival Time)
eqFocus
Environmental Systems & Services
Page 13 of 31
The arrival time (in seconds) calculated by eqFocus.
Residual
The difference between the observed and calculated arrival times (in seconds).
Distance
The distance from the site to the calculated epicentre in kilometres together with calculated error.
Active
Turn off this check box if you want to exclude the arrival from the location calculation.
Weight
The calculated weight for this arrival (the higher the weighting the more this arrival 'contributes' to the
solution). Emergent arrivals are automatically given a lower weighting.
Possible actions with arrival records
●
Include or exclude arrivals from a location calculation (see below)
●
Add extra arrival data (see below)
●
Edit the data in an arrival record (see below)
●
Sort the arrival records (Double click the column heading you want to sort by)
●
Delete arrival records (Right click the record and select Delete from the pop up menu)
Including or excluding arrival data from the calculation
●
To include an arrival in the location calculation, turn on its Active check box.
●
To exclude an arrival from the location calculation, turn off its Active check box.
Adding extra arrival data
Extra arrival data can be entered in the data entry panel.
Site
The site code is a 3–5 character abbreviation of the site name. If you do not enter a site code, or you enter
an invalid site code, the field will remain yellow with red text. It will remain this way until a recognized site
code is entered.
Type (Optional)
Select the type from the drop-down list.
●
+, - indicate first motion. Does this arrival start with the waveform moving in a positive or negative
direction?
●
i indicates an Impulsive arrival. A sharp, clearly defined, easily picked arrival.
●
e indicates an Emergent arrival for which a first motion cannot be picked.
●
w indicates a very poor arrival which is difficult to accurately pick.
Wave
Specify the type of wave. All models support P and S waves with other models supporting additional wave
types.
Environmental Systems & Services
Page 14 of 31
Obs Time (Observed Arrival Time)
Specify the time of the onset of the selected wave (in seconds) from the current Origin Time minute as
shown in the upper left corner of the Window.
Unc (Arrival Time Uncertainty) - (Optional)
Estimate of the possible error of the arrival time (in seconds). Default value is 0.01. Specify a larger arrival
time uncertainty for emergent arrivals.
Add
Once the required fields are filled with valid entries the Add button will enable the arrival to be added to the
current list of arrivals.
Editing arrival data in the Arrival data table
In the arrival data table you can edit entries in the Type, Wave, Obs Time, and Unc fields.
Wave, Obs Time and Unc fields can be edited by:
○
Double clicking to position the cursor within the cell
○
Triple clicking to select the entire cell
The Type field can be edited by:
○
Clicking in it to bring up a drop down menu (select blank i+, i-, e or w).
The Active field can be toggled by:
○
Checking the Active check box
An arrival can be Deleted or Duplicated by ctrl-clicking in an field of that arrival. Duplicating an arrival is
usefull when comparing arrival times for different phases – simply duplicate the arrival and then change the
wave Type.
Note:
●
eqFocus
If you change information in the arrival data set, eqFocus displays the status bar message
"Location Needs Updating”. Click the Go button on the Location control panel to recalculate the
location
Environmental Systems & Services
Page 15 of 31
Viewing and adjusting the location map
Map Tab
The Map tab shows a map along with information to help you refine the seismic event location including the
calculated epicenter, S-P circles, solution path, seismographs, place names, on maps of varying detail.
When switching to the map tab you will normally see a map representing the world with standard geographic
decorations as shown below:
Geographical regions surrounded by a red line indicate a more detailed map is available which will be
displayed at the appropriate zoom level. To the left of the map there is a Map Controls window with various
controls for moving around the map, zooming, manipulating map layers, and switching between mouse
modes.
Environmental Systems & Services
Page 16 of 31
Navigation Rosette
Pan around the map including centering over the calculated
epicentre
Zoom
Zoom the map in and out
Layers
Display the layers window.
Mouse Modes
Switch between the Navigate, Distance, and Gestures mouse
modes.
The Google Maps button will send the epicenter location to Google maps for display in your Web browser,
the Google Earth button will show the epicentre and seismograph locations in Google earth.
Navigation
You can navigate around the map in a number of ways, using the navigation rosette click on the
corresponding button to pan the map in the button direction, use the centre button to centre the map on the
calculated epicenter. More conveniently, you can pan the map by clicking on the map directly to centre it on
the mouse click if the mouse mode is set for Navigation.
Zooming
Using the zoom buttons you can zoom into and out from the map, in any mouse mode you can use your
mouse's scroll wheel to alter the zoom level of the map, in Navigation mouse mode click-dragging a
rectangular section of the screen with cause the map to zoom to the bounds of the selected rectangle.
eqFocus
Environmental Systems & Services
Page 17 of 31
As you zoom into the map you will notice that at a certain point a more detailed map will be loaded (if one is
available), along with place information – the higher the zoom level the more detailed is the information.
Layers
Once you have a location displayed on the map the other map controls become useful.
In the above example we have a location represented by the red circle, calculated using two seismographs
(MLWM and TOMM). Since we also have both P-wave and S-wave arrival times S-P circles are shown . The
red line from the MLWM site to the epicenter is the solution path calculated by the program. The city of
Melbourne is shown at this zoom level.
Each of the geographic features described above can be switched on and off through the Layers Control
button.
Mouse Modes
Environmental Systems & Services
Page 18 of 31
We have already discussed the navigation button of the Mouse Modes to navigate around the map and
zoom into a region using the mouse. The other mouse modes include the Distance and Gestures mode.
In Distance mode single clicking on the map and moving the mouse displays a distance line (and range
circle), each click of the mouse adds a new distance line. The status line at the bottom of the map shows the
point location, the distance, and angle (from north) from the start of that leg to the mouse position.
You can clear the line by double clicking anywhere on the map.
The Gestures mode allows the eqicentre to be manually positioned on the map so subsequent location
calculations use the manual position as its starting point. In the example above two possible solutions exist,
one where the program has calculated the epicentre and one to the south east of Melbourne (a mirror
location). Once we are in Gestures mode we can click on the map to move the epicentre to a new starting
position as show below.
eqFocus
Environmental Systems & Services
Page 19 of 31
Google Maps and Google Earth
The Google Maps button displays the epicenter location using Google Maps in your browser, automatically
starting your browser if necessary. If the program cannot determine your web browser then it simply displays
the URL it would have used.
The first time the Google Earth button is pressed you will be prompted to locate your installed version of
Google Earth. Once specified the location along with the locating seismographs will be displayed in Google
Earth.
Environmental Systems & Services
Page 20 of 31
Wadati Plot
A wadati plot is a graph of S-P times vs P times. The plot does not depend upon the location and can be
used to check the consistency of P and S arrival times at each site.
The blue line is a regression fit to the plotted points.
A menu that controls the graphing parameters can be accessed by right-clicking on the graph.
eqFocus
Environmental Systems & Services
Page 21 of 31
Uncertainties
In the Uncertainties tab, eqFocus displays attributes of the location that indicate its reliability.
Each uncertainty is the measure of the difference between the calculated value on the left and two standard
deviations either side of that value. Assuming a normal distribution, the true value has a 95% chance of
being within the range given.
The uncertainties tab show the calculated uncertainties for the solution for each earthquake location
parameter (time, latitude, longitude, and depth). Other parameters give an indication to the confidence of the
location: the amount to data used, distance, gap-angle etc.
Number of Arrivals
Number of sets of arrival data associated with the event location.
●
Used
Number of sets of arrival data used (active).
●
Deferred
Number of sets of arrival data deferred (not active).
Distance to Nearest Seismograph
Distance between the event location and the nearest site used to locate the event.
Gap angle
Maximum difference between site azimuths, in degrees.
If there is a large area between sites around the event location (a large difference between site azimuths),
then generally your confidence in the solution will be lower compared with a solution surrounded by
seismographs.
In the illustration below, the left-hand diagram shows sites surrounding the location well. If you draw a line
from each site to the location, the maximum angle between lines is about 60o. In the right-hand diagram, the
sites do not surround the location well. The maximum angle between sites is about 210o.
Number of Seismographs
Number of seismographs that provided data for the seismic event location.
Environmental Systems & Services
Page 22 of 31
Accuracy code
A one or two character code to indicate the accuracy of the location calculation. Specify a value for this field
after viewing the other data on the Uncertainties tab.
The first character indicates the location accuracy
The second character (optional) describes special aspects of location
See "Appendix A - Accuracy Codes for Victorian Earthquakes" for some example codes.
This same data also appears on the Finalize tab, and you can modify it there if required.
eqFocus
Environmental Systems & Services
Page 23 of 31
Calculating the magnitude of the seismic event
The following magnitudes can be determined with eqFocus:
●
Richter Local Magnitude (ML)
●
Duration Magnitude (MD)
●
Body-wave magnitude (Mb)
●
Surface-wave magnitude (MS)
eqFocus calculates the magnitude for each site that you specify. eqFocus also calculates the average
magnitude of the sites.
Magnitude formulas
You can select the magnitude formula that you wish to use from the drop-down list at the bottom left of the
Magnitude tab.
eqFocus supports the following magnitude types:
Model
Code
Limitations
Formula
Richter Local
ML
<600km
Log (at/R) + logA0
Duration
Magnitude
MD
No limitations.
p1 + 0.45 * power((log(D)),2.4) + 0.0045 * Rf *
power(e,(-0.002 * Rf))
Body-wave
magnitude
Mb
>3° and depth <70km.
Distance correction terms (Q) between 3° and 15° will
depend on local crustal structure.
Log(V/2π) + Q(R)
Surface-wave
magnitude
MS
Depth <50km
Log(V/2π) + Q(R)
You can modify the expressions that calculate the magnitudes by selecting Properties from the File menu.
Assigned Magnitude Value
Use this text box to enter the magnitude for eqFocus to store in the database.
Calculating the magnitude of the event
1. Ensure that you have entered all of the arrival data you require (Arrival Data tab).
2. Click the Magnitudes tab.
3. The table in the Magnitudes tab shows each seismograph used in the location calculation and its
distance from the location.
Each magnitude formula has two columns — a Use (on/off) column and the magnitude value (for
'ML', 'MD', 'MS, and 'MB'.
See “Calculating the magnitude for each site” below for instructions about calculating
magnitudes for individual sites.
If you want to use the calculated the magnitude for a site in the magnitude calculation, tick the
appropriate check box the ‘Use’ column.
eqFocus calculates the magnitude of the event as the average of the magnitudes for the sites
you select. It displays the mean of each magnitude type at the bottom of the each magnitude
column.
4. Select the chosen magnitude type from the drop down list in the Assigned Magnitude Value panel
Environmental Systems & Services
Page 24 of 31
and type the mean magnitude value.
Calculating the magnitude for each site
For each site:
1. Click in the column for the magnitude formula you require. eqFocus displays the appropriate
Magnitude control panel.
2. If you know the magnitude, you can enter it directly into the Value text box and tick the Fixed check
box. You would do this if you calculated the magnitude using some other method or if a magnitude
was provided by another agency.
If you have copied amplitude information from eqWave then the required magnitude measures
(amplitude and frequency, or duration) will already be entered. Values can be entered manually.
In order to calculate an ML, MS or Mb magnitude, there must be a Response File for the site or the
seismic data must contain the response information . See ‘Response Files’ in the technical notes.
ML, MS, Mb
MD
Amplitude
-
For ML Amplitude is Maximum amplitude of S-wave coda on vertical channel.
For MS Amplitude is Maximum amplitude of surface-wave coda on vertical channel.
For Mb Amplitude is Maximum amplitude of P-wave coda on vertical channel.
Standard uncertainty = 10%
Frequency
-
Frequency at time of maximum amplitude
Standard uncertainty = 1–2 Hz
-
Duration
Time interval between P arrival and Finish
Finish is defined as the point where the amplitude falls to double the level prior to the P arrival.
You can edit the properties file if you want to change the calculation for MD to use a different
definition of Finish time
Standard uncertainty = 10%
Value
eqFocus uses the formula specified in the properties file to calculate this value.
You can enter a known magnitude directly into this text box
Fixed
Tick this check box to stop eqFocus from recalculating the magnitude for this site when the
duration or event location change. Do this if you entered a known magnitude directly into the
Value text box
A0
-
Distance correction factor
3. For each magnitude measure, enter a value for the uncertainty (+–). Uncertainties are often about
10% of the magnitude measure.
4. Press ENTER. eqFocus calculates the magnitude for the site, and displays that magnitude in the
corresponding magnitude cell in the Magnitudes tab.
eqFocus
Environmental Systems & Services
Page 25 of 31
Annotating and saving location details
Annotating the location record
Before you save your location (and the event if it is a new one), you can enter final annotations.
Completing final annotations
Click on the Finalize tab. eqFocus displays text boxes for the annotations that it stores with the location data.
eqFocus does not calculate values for these fields. It does however draw on settings in the properties file for
some values.
eqFocus uses some of these values for the event and location names. If you do not specify them, the event
and location may have 'null' in their name.
Initials
Your personal code (up to three characters). eqFocus uses this in the location name.
Authority
A three-character code that identifies your organization. eqFocus uses this in the location name.
Location Date
The date located for the location.
Local Time Offset
The local time offset from UTC (in hours).
Accuracy code
A one or two character code to indicate the accuracy of the location calculation.
This data also appears on the Uncertainties tab, and you can modify it there, too, if required. Since it is the
same data, it always appears the same in both places.
See “Accuracy Code” in “Uncertainties” above for details.
Maximum Observed Intensity
An optional field that you can use to record the maximum reported observed intensity. Enter the appropriate
value from the scale specified by your database manager.
Source type
Select the cause of the seismic event from this drop-down menu.
Dependence
Select the association of the seismic event with other events from this drop down menu.
Location Status
Select the appropriate description from the drop down menu to describe the proportion of available data that
was used to locate this event.
Effect
Select the described consequences of the seismic event from the drop-down menu.
Place Name
Description of the place where the seismic event occurred. If you chose the type of town you wish to locate
from the drop down menu and then click Get Place, eqFocus will search the Events database for the nearest
Environmental Systems & Services
Page 26 of 31
place name based on the longitude and latitude.
Saving the location data
To store as a location for an existing event
1. Click Save Location under the File menu.
2. eqFocus displays the Save Location dialog box.
If you select Yes, eqFocus will save the file as the preferred location and will display this new
location with an asterisk the database browser.
3. Click OK in the Save Confirmation dialog box.
To store as a location for a new event
1. Click Save Location.
2. eqFocus displays the Save Location dialog box containing a database browser. eqFocus displays
the database browser for information to allow you to associate this location to an existing event or to
create a new event.
3. eqFocus suggests the appropriate name for the event in the Event Name text box below the dialog
box.
You can edit this name, but regardless of what you type, or what you do on the database browser,
eqFocus stores this as a location for an event on the day specified by the origin time.
4. Click Save.
eqFocus stores the location and event data as new records in the Events database.
eqFocus will save your new location as the preferred location for the event by default.
Saving the location as a file
You can save event, location and arrival records from the eqFocus workspace to a file in a format that you
can import into another application.
eqFocus exports data in SeisAn S-format file format and EQLOCL format.
1. Select Export from the File menu, and select your preferred format.
2. eqFocus displays the Location dialog box. Enter a file name.
3. Click Save.
eqFocus
Environmental Systems & Services
Page 27 of 31
Printing a summary of the event
You can generate a copy of the eqFocus Summary information as viewed in the Summary tab by selecting
the print option under the File menu.
Technical notes
Directory structure
eqFocus maintains a standard directory structure separate from the installation directory. These directories
are created in you 'home' directory (eg drive:\Documents and Settings\username\.eqsuite on windows). A
standard collection of model files and response templates are maintain by eqFocus and you can add files to
the appropriate directory or specify a different directory (eg. a shared directory) from the properties dialog.
Please contact us if you would like different or additional model and response files.
eqSuite database
The eqSuite database stores the event, location and arrival records. Refer to the Installation section for more
information.
Location determination algorithm
eqFocus locates an earthquake (seismic event) by minimising the weighted mean square of time residuals.
Each time residual is the difference between the measured arrival time (AT), and the computed arrival time
(CT) that is derived from the estimated earthquake location and an assumed seismological model of the
earth.
Earth models
Distances up to 500km - layered model
eqFocus uses a seismological model that consists of horizontal layers with specified thickness and seismic
velocities (both P and S). eqFocus supports the use of direct waves, refraction, reflections and some
converted waves. The earth model can have up to seven layers. I
Distances between 500km and 1000km
eqFocus uses a cosine spline to give a smooth transition from the layered model to the IASPEI model.
Distances over 1000km - IASPEI model
eqFocus uses P and S travel times that are specified by the International Association of Seismology and
Physics of the Earth’s Interior (IASPEI).
Environmental Systems & Services
Page 28 of 31
Installation Guide
Installation Overview
This document provides a brief overview of the steps required to install eqFocus and its supporting products:
MySQL and associated tools, and the Java virtual machine.
Installation steps
A number of simple scripts have been provided on your installation CD to ease the installation of multiple
packages which make up the eqFocusof programs. These are:
1. RUNME_CORE.BAT
●
Install the core components required for workstation and server computers, this script should
be run first. It Installs the following packages:
●
Installs JAVA 6 Runtime environment
●
Installs MySQL Server
●
●
During the installation you will be prompted to sign up to the MySQL.com
service you can choose to skip this step.
●
At the end of the installation you will be prompted to configure MySQL which
you should then do. When prompted select Standard Configuration and
ensure you install MySQL as a windows service, set the admin password to
rich3121.
Runs the Created Database Program which creates the eqSuite database, tables,
and loads required data in the appropriate tables. Click on the CreateDB button, then
Exit once the script completes.
2. RUNME_WORKSTATION.BAT
●
eqFocus
Installs the workstation components being eqFocus.
Environmental Systems & Services
Page 29 of 31
Choosing a Database for eqFocus to Use
EqFocus supports a number of database formats and MySQL and SimpleSQL data bases are provided on
the installation CD. The installation above installs MySQL, but you can choose to use the SimpleSQL data
base.
Selecting SimpleSQL
●
To use the SimpleSQL database copy from the CD the eqsuite.dbs file from
Optional\Databases\SimpleSQL into a directory of your choosing.
●
Select the database to use from the database tab of the properties dialog within eqFocus
(file→properties).
●
○
For SimpleSQL select a profile to use (1, 2 or 3), select the org.simplesql.Driver in the driver
pulldown menu.
○
select the simplesql entry in the server URL, add the path to the last field in this entry.
eg. jdbc:simplesql:c:/mydatabaselocation/eqsuite.dbs
○
The username and password fields can be left blank.
Use the test button to test the connection to the database. If the test fails check you have specified
the correct driver and location of the database.
Selecting MySQL
●
●
As part of the installation of eqFocus you would have installed a copy of MySQL server and created
a eqsuite database. To use MySQL set the properties of the database tab of the properties dialog
within eqFocus (file→properties).
○
For MySQL select a profile to use (1, 2 or 3), select the com.mysql.jdbc.Driver in the driver
pulldown menu.
○
select the mysql entry in the server URL, the entry should be correct for a local installation of
MySQL.
eg. jdbc:mysql://localhost:3306/eqsuite
○
Use a username of root and password of rich3121.
Use the test button to test the connection to the database. If the test fails check you have specified
the correct driver and location of the database.
Environmental Systems & Services
Page 30 of 31
Appendix A – Accuracy Codes
The accuracy code indicates the relative accuracy of an earthquake location. It has one or two letters:
1. Location accuracy
2. Special aspects of the earthquake location (optional)
In this accuracy code system, uncertainty is twice the standard error in each parameter, computed using the
larger of the residual or the estimated uncertainty for each arrival as given by eqFocus
The accuracy code system uses the following criteria to allocate a code to an event. The event should meet
all of the criteria, except that just one criterion may fail by up to:
●
50% for one of the uncertainties
●
50% for the nearest seismograph distance, or 30° for the gap (except for E)
For regional earthquakes (interstate) - multiply uncertainties, nearest distance and standard deviation criteria
by a factor of 2. For teleseisms multiply these by a factor of 3.
RULES
ACCURACY
A B C D E F U
•
Local seismological model used
•
Uncertainty in east, north, and depth < 50
•
10
•
5
2
Azimuth gap < 150
•
•
•
•
•
180
•
270
•
330
Nearest seismograph closer than 2 earthquake depths from epicentre
•
•
•
3 earthquake depths from epicentre
S-P < 0.25
0.60
Standard deviation of residuals less than 1.0 seconds
An earthquake did occur, and was probably in this general area.
Micro earthquake very close to seismograph
eqFocus
Environmental Systems & Services
•
•
•
•
•
Page 31 of 31