1
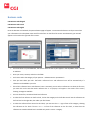
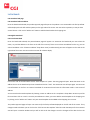
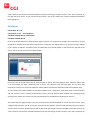
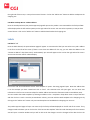
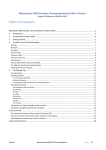
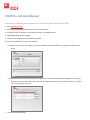
 PrintSYS – CGI User Manual You have to install on your computer the latest version of Acrobat and Flash. 1. Go to dmsstore.cgi.com. 2. Key in your user name and password. Click on the login button. 3. If you don’t have an account in this Stationery Portail, you should create it. 4. Opening off the Browse item page. 5. Select an item category that you would like to order. 6. One click or Double click on the item category 6.1. (With one click on the item category) A list of the different models available for this category will appear to the screen. 6.2. (With double click on the item category) The page opens a list of the different models available for this category which you can choose from. Select the model that you would like to order then click on "Personalize" or “Add to cart” at the right end of the line. 7. Order the different products: Pads CGI pad 4˝x 6˝ static CGI pad 5.5˝x 8.5˝ with lines Once the pad selected, the product approval page will open as this product is not customizable. The final proof PDF will be displayed on the left and the quantity on the right side of the screen. You must select a quantity in case you have several choices. Click on the “Add to cart” button to add the pad to the shopping cart. CGI pad 4˝x 6˝ (customizable) Once the pad selected, the personalization page will appear. To customize the pad you must enter your first name and last name in the form on the left of the screen. Simultaneously your text will appear on the card on the right side of the screen. You can use the zoom tool for a better display. Click on the "OK" at the left bottom next to "Save template as" option. The saving page will open. Write the name that is on the pad you have created and click on "Save". The customize area will open again. You can write new information in the form to create a pad for someone else and save the information under a new name. You can visualize the saved templates by choosing a name in the « Templates » drop down menu on top of the form and then click on « Load ». Once the personalization is done, you must add the saved template to the shopping cart by clicking on the “Add to cart” button. Only one saved template can be added to the shopping cart at a time. The product approval page will open. You must verify the final proof PDF displayed on the left side of the screen. If any changes needs to be done you can click on the “Click here to edit template” blue link under the PDF proof. The customize area will open in another window and you will be able to do the changes. Once the changes will be done click on the “Save” button to see the final proof PDF updated. Verify that the changes are done correctly. Then select a quantity on the right side of the screen, in case you have several choices. Click on the “Add to cart” button to add the pad to the shopping cart. Business cards CGI Business card Bilingual CGI Business card French CGI Business card English Once the business card selected, the personalization page will appear. To customize the business card you must select your information in the drop down menu and fill out the form on the left of the screen. Simultaneously your text will appear on the card on the right side of the screen. •
You must select a city and addresses, the various offices in that city will appear in the dropdown menu. « Choose an address » •
Enter your name, surname, and title in the fields. •
You have to select the category of your position « administrative or operational ». •
then you must select your title. The fields « reference line 1 and reference line 2 will be activated only if a reference can be added to your title. •
If the field « reference line 1 and reference line 2 is activated, you can select 2 references. To select the first one, you must click on the text box under reference line 1. A « pop‐up » will appear in the center of the screen, showing 4 categories available. •
You can choose first, second and third level reference. •
To select the first reference on the first level, click on the category on the left side. You will see the references on the first level on the right side, than make your final choice. •
To select the reference from second or third level, you must use the « + » sign in front of the category, showing the reference on first level. If there is a « + » in front of the reference on the first level, it means that the reference on second and third level is available only under « sector » category. • You can click on reference of first level to see the reference on the second level. To select a reference of the second level, you have to make your choice in the right section. •
In the case of the category « areas of activities » there is only one level. To select a reference, you have to click on « areas of activities » and you have to make your final choice in the right section. •
To select a reference of the third level (available in the « sector » category only. You have to click a reference of the second level on the left and make your final choice on the right section. •
The same steps applies for selecting a second reference. •
You can have an overview of the business card instantly on the right side of the screen. Use the enlargement tool for a better view. •
Click on « OK » at the bottom left of the screen to save your information. « save as ». A new page is displayed and you must include the same name and first name in the form use in the previous page and click on « save ». You will automatically be redirected to the page customization. •
You can select new information in the fields to create a business card for another employee and make a new save. •
You can view your files saved by selecting the desired first and last name in the dropdown menu. « Folder list » above to the left of the page and click on «download ». •
When you have finished customizing the file, your click on « add to cart », to do so, please enter new information or download a previously saved file. Only one file will be added to your shopping cart at a time. To add a new item to your shopping cart, please click on the buttom « add to cart » at the bottom right of the screen. •
The approval page of the article will appear, you must verify that the PDF proof to the left of the screen contains the right information. If you want to change the file, click on the bue link « click here to modify ». •
The customization page will open again (in a new window ) to allow you to make the necessary changes. •
When changes are complete, click on the save buttom reapproved the PDF. Recheck that the PDF contains the right information. Next, please select a quantity if you have several choices. •
To confirm the addition of the business card to your shopping cart, you must then click on « confirm » •
Follow the same steps for the CGI bilingual business card and fill on the back of the business card. To access the back you must click on the little visual « page 2 » on the right of the screen. Letterheads CGI Letterhead 2nd page CGI Letterhead without address Once the letterhead selected, the product approval page will open as this product is not customizable. The final proof PDF will be displayed on the left and the quantity on the right side of the screen. You must select a quantity in case you have several choices. Click on the “Add to cart” button to add the letterhead to the shopping cart. CGI English Letterhead CGI French Letterhead Once the letterhead selected, the personalization page will appear. To customize the letterhead you must select the sector, city and the address in the form on the left of the screen (if there is more than one address for this city, you can select the address in the “Choose an address” drop down menu). Simultaneously your text will appear on the card on the right side of the screen. You can use the zoom tool for a better display. Click on the "OK" at the left bottom next to "Save template as" option. The saving page will open. Write the sector or the address that is on the letterhead you have created and click on "Save". The customize area will open again. You can write new information in the form to create a letterhead for someone else and save the information under a new sector of address. You can visualize the saved templates by choosing a sector or address in the « Templates » drop down menu on top of the form and then click on « Load ». Once the personalization is done, you must add the saved template to the shopping cart by clicking on the “Add to cart” button. Only one saved template can be added to the shopping cart at a time. The product approval page will open. You must verify the final proof PDF displayed on the left side of the screen. If any changes needs to be done you can click on the “Click here to edit template” blue link under the PDF proof. The customize area will open in another window and you will be able to do the changes. Once the changes will be done click on the “Save” button to see the final proof PDF updated. Verify that the changes are done correctly. Then select a quantity on the right side of the screen, in case you have several choices. Click on the “Add to cart” button to add the letterhead to the shopping cart. Envelopes CGI Envelope 10˝ x 13˝ CGI Envelope 9˝ x 12˝ ‐ Security address CGI White Envelope No 10 – with window CGI White Envelope No 10 Once the envelope selected, the personalization page will appear. To customize the envelope you must select a city and an address in the form on the left of the screen (if there is more than one address for this city, you can select the address in the “Choose an address” drop down menu). Simultaneously your text will appear on the card on the right side of the screen. You can use the zoom tool for a better display. Click on the "OK" at the left bottom next to "Save template as" option. The saving page will open. Write the address that is on the envelope you have created and click on "Save". The customize area will open again. You can write new information in the form to create a envelope for another address and save the information under a new address name. You can visualize the saved templates by choosing an address in the « Templates » drop down menu on top of the form and then click on « Load ». Once the personalization is done, you must add the saved template to the shopping cart by clicking on the “Add to cart” button. Only one saved template can be added to the shopping cart at a time. The product approval page will open. You must verify the final proof PDF displayed on the left side of the screen. If any changes needs to be done you can click on the “Click here to edit template” blue link under the PDF proof. The customize area will open in another window and you will be able to do the changes. Once the changes will be done click on the “Save” button to see the final proof PDF updated. Verify that the changes are done correctly. Then select a quantity on the right side of the screen, in case you have several choices. Click on the “Add to cart” button to add the envelope to the shopping cart. CGI White Envelope No 10 – without address Once the envelope selected, the product approval page will open as this product is not customizable. The final proof PDF will be displayed on the left and the quantity on the right side of the screen. You must select a quantity in case you have several choices. Click on the “Add to cart” button to add the letterhead to the shopping cart. Labels CGI label 4˝ x 3˝ Once the label selected, the personalization page will appear. To customize the label you must select a city and a address in the form on the left of the screen (if there is more than one address for this city, you can select the address in the “Choose an address” drop down menu). Simultaneously your text will appear on the card on the right side of the screen. You can use the zoom tool for a better display. Click on the "OK" at the left bottom next to "Save template as" option. The saving page will open. Write the address that is on the envelope you have created and click on "Save". The customize area will open again. You can write new information in the form to create a envelope for another address and save the information under a new address name. You can visualize the saved templates by choosing an address in the « Templates » drop down menu on top of the form and then click on « Load ». Once the personalization is done, you must add the saved template to the shopping cart by clicking on the “Add to cart” button. Only one saved template can be added to the shopping cart at a time. The product approval page will open. You must verify the final proof PDF displayed on the left side of the screen. If any changes needs to be done you can click on the “Click here to edit template” blue link under the PDF proof. The customize area will open in another window and you will be able to do the changes. Once the changes will be done click on the “Save” button to see the final proof PDF updated. Verify that the changes are done correctly. Then select a quantity on the right side of the screen, in case you have several choices. Click on the “Add to cart” button to add the envelope to the shopping cart. 8. Once you have added to the shopping cart all the items you need to order, click on the «Shopping cart » tab. The green check mark under status means that the product is approved. 9. You can check the « Save my shopping cart for my next session » option. This option is very useful. Your shopping cart will be saved in the browser and the computer you are presently using for a future use. 10. You must enter a shipping address in the shipping module and save it for future use (please do not enter a space in the postal code). You can load an address in the « Load address » drop down menu if you saved one previously. 11. Click on the “Proceed” button. 12. To confirm your order click on the « Proceed » button. The application will generate a 4 digit confirmation number. You can view the invoice by clicking on th « View printable receipt » blue link. 13. IMPORTANT: Please remember to copy the bid quote number shown on the top left hand of the form in your eProcurement request to avoid a delay of 72 hours to process your request. *** We can’t proceed with your order without an eProcurement PO sorry.