1
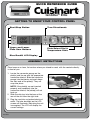
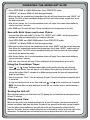
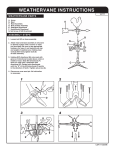
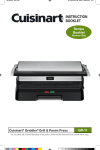
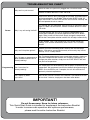
TROUBLESHOOTING CHART
Check to make sure your unit is plugged into a functional outlet.
Why won’t my unit turn on?
Contact Customer Service at 1-800-726-0190.
If the PLATE SELECT dial is not turned to ON within 10 minutes of the
unit being plugged in, the Griddler® Elite will enter SLEEP mode. All
lights will turn off. Turn the PLATE SELECT dial to ON to “wake up” the
unit and operate the unit as normal.
Power
Why is my unit turning itself off?
It is possible the unit overheated. Wait for the unit to cool down and try
again. If it does not turn back on, contact Customer Service at 1-800726-0190.
If already cooking and you want to change the temperature of the
current plate selection, you do not need to hit START/STOP button
again. Doing so will turn the unit off. Simply change the temperature
dial for the current plate selection and the unit will adjust automatically.
If your Griddler® Elite is not turned off or if you do not change any
settings, it will shut off automatically after 2 hours. This is a safety
feature.
Programming
Why won’t the plates get hot?
Confirm you have inserted the plates correctly into the connection
blocks. If the plates are not fitted correctly and securely, they will not
heat up. This is a safety feature.
Can I change my temperature or
plate selection when the unit is
already cooking?
Yes. To change temperature of your current plate selection, simply turn
the plate’s temperature dial and the unit will adjust automatically. To
change your plate selection, simply turn the PLATE SELECT dial and
set your new temperature.
Can I sear when I’m
already cooking?
Yes. Simply press the SEAR button(s) and the plates will preheat to sear
temperature. We recommend you take the food off during preheating to
SEAR. Once the SEAR cycle is complete, the unit will revert back to
previously selected temperatures.
Can I adjust my SEAR
cycle time?
You can only sear for 2 minutes max. However if you would like to sear
for less than 2 minutes, simply press the down arrow button.
IMPORTANT!
Do not throw away. Keep for future reference.
This Quick Start Guide is intended to supplement the Instruction Booklet.
In order to ensure safe operation and optimum performance,
please read the entire Instruction Booklet.
QUICK REFERENCE GUIDE
Griddler® Elite
GETTING TO KNOW YOUR CONTROL PANEL
Start/Stop Button
Upper and Lower
Plate Sear Buttons
Time Directionals
Plate Select Dial &
Temperature Dials
Blue Backlit LCD Display
Assembly Instructions
Place base on a clean, flat surface where you intend to cook, with the controls directly
in front of you.
1.Locate the connector prongs on the
plate(s) and line up with the appropriate
connection blocks. Slide the connector
prongs into the blocks and push down
the front end of the plate(s). They will
snap into place.
NOTE: If the plate(s) are not inserted
properly and completely into the
connection blocks, the plate(s) will not
heat up.
1.
2.Slide the drip tray into the base at the
rear of the unit from the right side.
3.Plug the cord into a standard electrical
outlet. The blue backlight on the LCD
screen will illuminate, indicating the unit
is energized. The LCD will display the
current settings.
PG-29495
2.
Griddler® Elite Positions
STORAGE Position – Upper plate/cover rests flat on the lower plate/base
and cover height adjuster is in Lock position.
PREHEAT Position – Upper plate cover rests flat on the lower plate/base
and cover height adjuster is in Unlock position.
OPEN COOKING Position – To Cook on Lower Plate Only: Lift the handle so
upper plate/cover is vertical. Plate does not “float” in this position.
CLOSED COOKING Position – To Contact Grill or Panini Press: Start with unit in
Open Cooking position. Lower top carefully until plate contacts food. Hinge will automatically
release the plate, allowing it to “float” and rest evenly on food.
To Top Melt: Start with unit in Open Cooking position. Wearing an oven mitt, press
down slightly on front of upper plate/cover to release hinge, allowing plate to “float.” Lower
it to close to the desired height, then slide the cover height adjuster into a notch to set
the position.
FLAT COOKING Position – To Cook on Full Grill, Full Griddle or Half Grill/Half
Griddle: Upper plate/cover opens to lie flat, level with the lower plate/base.
To adjust to this position from the Preheat position, open unit and slide the hinge release lever
up while pushing the handle back. The upper plate/cover will sit flat, resting on the handle.
Operating the Griddler® Elite
Cooking with Upper or Lower Plate Only:
• Turn the Plate Select dial to UPPER or LOWER. On the LCD, “UPPER” or “LOWER” and the
temperature position will display, indicating it is ready for selection.
• Turn the Upper or Lower temperature dial to desired temperature. Press START/STOP button.
• “PREHEAT” will display. The Upper or Lower plate temperature will flash during preheating.
• When the plate has reached temperature, the unit will beep three times and “READY” will
display.
Cooking with Both Upper and Lower Plates:
• Turn the Plate Select dial to BOTH. On the LCD, “UPPER” and “LOWER” and the temperature
positions will display, indicating they are ready for selection.
• Turn the Upper and Lower temperature dials to desired temperature. Press START/STOP
button.
• “PREHEAT” will display. The Upper and Lower plate temperatures will flash during preheating.
• When the first plate reaches temperature it will show “READY” and the unit will beep one
time. When the second plate reaches temperature it will show “READY” and the unit will beep
three times.
Sear with Upper or Lower Plate Only:
• Turn the Plate Select dial to UPPER or LOWER. On the LCD, “UPPER” or “LOWER” and the
temperature position will display, indicating it is ready for selection.
Operating the Griddler® Elite
• Press UPPER SEAR or LOWER SEAR button. Press START/STOP button.
• “PREHEAT” will display. SEAR will flash during preheating.
• When the plate has reached sear temperature, the unit will beep three times and “READY” will
display. The 02:00 minute countdown display will flash ten times to allow enough time to put
the food on the plate.
• After the ten flashes, the 2-minute countdown timer will begin. Press down arrow button to
sear for less than 2 minutes.
• After SEAR cycle, the unit will beep 3 times and adjust to the temperature on the dial.
Sear with Both Upper and Lower Plates:
• Turn the Plate Select dial to BOTH. On the LCD, “UPPER” and “LOWER” and the temperature
positions will display, indicating they are ready for selection.
• Press UPPER SEAR and LOWER SEAR buttons. Press START/STOP button.
• “PREHEAT” will display. SEAR will flash during preheating.
• When the first plate reaches sear temperature it will show “READY” and the unit will beep one
time. When the second plate reaches sear temperature it will show “READY” and the unit will
beep three times. The 02:00 minute countdown display will flash ten times to allow enough
time to put the food on the plates.
• After the ten flashes, the 2-minute countdown timer will begin. Press down arrow button to
sear for less than 2 minutes.
• After sear cycle, the unit will beep 3 times and adjust to the temperatures on the dials.
Using the Countdown Timer:
• Press
or
arrows. Holding buttons down scrolls quickly; pressing and releasing
advances more slowly. Time will appear in LCD display. Once you have selected your time,
release the buttons. After 3 seconds of no button being pressed, the timer will automatically
begin to count down.
• Once time reaches “00:00”, the unit will beep 3 times. The unit will continue to operate until it
is turned off.
• To stop and reset the timer at any time, hold both
and
at the same time for 2 seconds
NOTE: The timer does not stop cooking or turn off the unit. And the timer is inactive during a
SEAR cycle.
Turning the Unit off:
When finished cooking, turn Plate Select to OFF. Unplug the unit and allow to cool completely for
at least 30 minutes.
Cleaning and Care:
Make sure the plates have cooled completely for at least 30 minutes. Use the cleaning tool to
remove any leftover food from the plates. Dispose of any grease from the drip tray once cooled.
Press the plate release buttons on the right side of the unit to remove the plates from the
housing. The plates, drip tray, and cleaning tool can be cleaned by hand or on the top shelf of the
dishwasher. The housing base and control panel can be wiped clean with a soft, dry cloth.