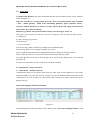
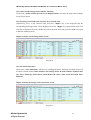
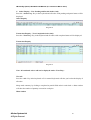
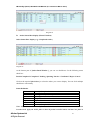
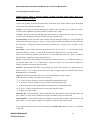
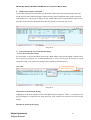
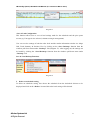
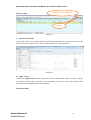
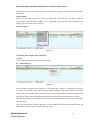
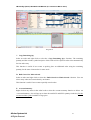
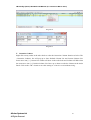
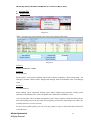
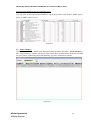
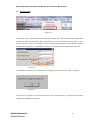
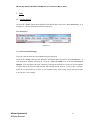
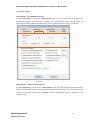
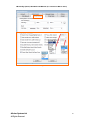
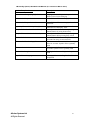
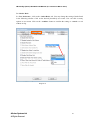
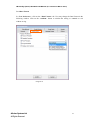
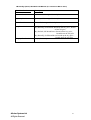
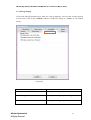
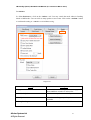
1
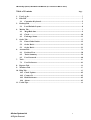
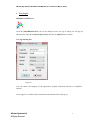
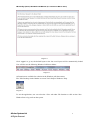
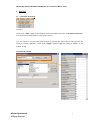
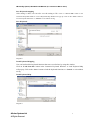
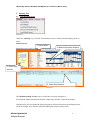
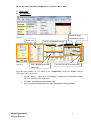
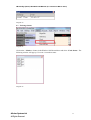
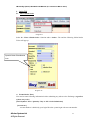
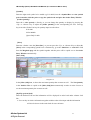
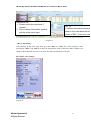
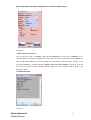
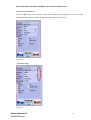
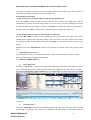
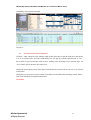
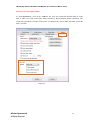
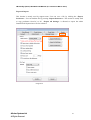
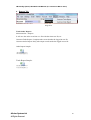
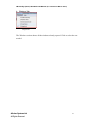
e
B
r
o
k
e
r
S
y
s
t
e
m
s
L
Subsidiary of Front Office Technology (HK) Co Ltd
iDoubleClick2 (For Stock) User Guide
(2.2.3.5 March 2012 version_Account
_Account Mode)
Mode
i
m
i
t
e
d
eBrokerSys (Stock) iDoubleClick2 Manual (2.2.3.5 Version March 2012)
Table of Contents
Page
1.
2.
User Log In .................................................................................................................... 3
Edit Tab .......................................................................................................................... 5
3.
2.1 Customize Keyboard ......................................................................................... 5
Desktop Tab ................................................................................................................... 8
4.
3.1 Load Default Layout.......................................................................................... 8
Market Tab .................................................................................................................... 9
4.1
4.2
MegaHub data .................................................................................................... 9
Clock ................................................................................................................. 10
5.
4.3 Exchange Status ................................................................................................11
Order Tab .................................................................................................................... 12
6.
5.1 Enter Global Order ......................................................................................... 12
5.2 Order Book ....................................................................................................... 22
5.3 Order Book ....................................................................................................... 23
Account Tab ................................................................................................................. 38
7.
6.1 Position View .................................................................................................... 38
6.2 Trade Summary ............................................................................................... 39
6.3 User Password .................................................................................................. 40
Tools.............................................................................................................................. 41
7.1 User Preference ................................................................................................ 41
8. Reports Tab.................................................................................................................. 60
9. Windows Tab ............................................................................................................... 61
10. Help Tab ....................................................................................................................... 62
10.1 Check Update ................................................................................................... 62
10.2 Contact Us ........................................................................................................ 62
10.3 Risk Disclosure ................................................................................................. 62
10.4 About ................................................................................................................. 63
11. Useful Tips ................................................................................................................... 64
eBroker Systems Ltd
All Rights Reserved
2
eBrokerSys (Stock) iDoubleClick2 Manual (2.2.3.5 Version March 2012)
1. User Log In
iDOUBLECLICK2 Icon
Click the [iDOUBLECLICK2] icon on the desktop screen, user log in dialog box will pop up
automatically. Enter [User ID] and [Password], and click on [OK] button to confirm.
User log in dialog box
Diagram 1
User can choose the language of the application, English, Traditional Chinese or Simplified
Chinese.
Once logged in, a risk disclosure statement for the internet client will pop up:
eBroker Systems Ltd
All Rights Reserved
3
eBrokerSys (Stock) iDoubleClick2 Manual (2.2.3.5 Version March 2012)
Diagram 2
Click “Agree” to go on, the default layout or the last saved layout will be automatically loaded.
User will also see the following Windows Pull Down Menu:
Diagram 3
10 Functions are available for selection in the Windows pull down menu:
File/ Edit/ Desktop/ Order/ Market/ Account/ Tools/ Report/ Windows/ Help.
Diagram 4
To exit the application, user can select the <Exit> tab under File function or click on the Close
Window Box to log out from the system.
eBroker Systems Ltd
All Rights Reserved
4
eBrokerSys (Stock) iDoubleClick2 Manual (2.2.3.5 Version March 2012)
2. Edit Tab
2.1 Customize Keyboard
Diagram 5
Click on the <Edit> button in the Windows Pull Down Menu and select <Customize Keyboard>.
A Customize Keyboard Window will pop up as below..
User can choose to load the preset shortcut style by selecting the desired one or either preview the
setting by clicking <preview>. Click on the <Apply> button to apply the setting or <Close> to exit
without saving.
Customize Keyboard
eBroker Systems Ltd
All Rights Reserved
5
eBrokerSys (Stock) iDoubleClick2 Manual (2.2.3.5 Version March 2012)
To select additional keyboard mappings, user can also select the desired one in the categories
section, and then select the desired command. Press on the new shortcut key and click on the
<Assign> button to assign the command or <Remove> to remove the command.
A list of the command shown in the table below.
Category
Main
Command
Defintiion
keyAcShortCut
Fast key to call up set account short cut function
keyBulkCancelForm
Fast key to call up bulk cancel function
keyCloseAllPositionBy Account
Fast key to close all position by specified account
keyCloseOnePosition
Fast key to close the selected position
Market Mon keySwitchToAMSPrice
Fast key to focus on stock symbol in AMS window
keySwitchToMultiPrice
Fast key to switch to multiprice screen
keyToggleFuturesMultiPriceFast key to switch to futures multiprice screen
Order Book keyActivate
Fast key to activate highlighted order
keyActivateAll
Fast key to activate all orders
keyCancelAll
Fast key to cancel all orders in order book
keyCancelLastNewOrder Fast key to cancel the last new order
keyCancelNReplace
Fast key to cancel highlighted order and copy order details with order ticket
keyCancelNReverse
Fast key to cancel highlighted order and replace same order with different side
keyChangePrice
Fast key to change highlighted order price
keyChangeQty
Fast key to change highlighted order quantity
keyInactivate
Fast key to inactivate highlighted order
keyInactivateAll
Fast key to inactivate all orders
keyOrderCancel
Fast key to cancel highlighted order
keyFocusFilter
Fast key to focus order book filter
keyFocusOrderBook
Fast key to focus order book
keyOrdbkPage
Fast key to focus order book page
keyPrint
Fast key to print out order book
keySearchOrder
Fast key to quick search an order
keySetFilterFocus
Fast key to set filter focus
keyShowAcctOrder
Fast key to show all orders for a selected account in an order ticket
keyShowSymbolOrder
Fast key to show all orders for a selected symbol in order ticket
keyOrderRejEnq
Fast key to show all rejected orders in order book
keyOrderEnq
Fast key to show all pending orders in order book
keyTranEnq
Fast key to show all completed orders in order book
keyZoom
Fast key to zoom in order book
keyReply
Fast key to confirm completed order with client
Order Entry keyAO
Fast key to check the auction order box
keyBuy
Fast key to select buy button
keyBuyBestBid
Fast key to place buy order with best bid price
keyBuyQueue
Fast key to place buy order with first bid price
keyBuyTran
Fast key to place buy order with first ask price
keyCalMaxQty
Fast key to calculate maximum buy quantity
keyClearOrderEntry
Fast key to clear data in order entry ticket
keyCopyPosition
Fast key to copy highlighted position to order ticket
keyOddLot
Fast key to check odd lot order box in order ticket
keyQuoteRequest
Fast key to perform quote request function
keySell
Fast key to select sell button
keySellAllPosition
Fast key to sell all position for this account
keySellBestAsk
Fast key to place sell order with best ask price
keySellQueue
Fast key to place sell order with first ask price
keySellTran
Fast key to place sell order with best bid price
keySubmit
Fast key to click on submit button
eBroker Systems Ltd
All Rights Reserved
6
eBrokerSys (Stock) iDoubleClick2 Manual (2.2.3.5 Version March 2012)
Save Keyboard mapping
After setting is done, user can also save the setting to file. Click on <Save to file> button in the
Customize Keyboard Windows. A Save Keyboard Map Window will pop up. Click on the <Save> button to
save the keyboard functions or <Cancel> to exit without saving
Save Keyboard
Diagram 6
Load Keyboard Mapping
User can load back the keyboard functions that were saved before by using this window.
Click on <Load from file> button in the Customize Keyboard Windows. A Load Keyboard Map
will pop up. Click on the <Save> button to load the keyboard functions or <Cancel> to exit without
saving
Load Keyboard Map
Diagram 7
eBroker Systems Ltd
All Rights Reserved
7
eBrokerSys (Stock) iDoubleClick2 Manual (2.2.3.5 Version March 2012)
3. Desktop Tab
3.1 Load Default Layout
Diagram 8
Under the <Desktop> top, select the Load Default Layout to load the default desktop layout as
below.
Default Layout
1. Screen Menu
2. Market Information Window
3. Order Entry
Window
4. Order Book Window
Diagram 9
The [Default Desktop Layout] can be divided into 4 sections (Diagram 3):
Screen Menu/ Market Information Window/ Order Entry Window/ Order Book Window
Alternatively, user can make the desired layout as preferred and save the desktop layout.
Upon next login, user can then load the desktop layout previously saved.
eBroker Systems Ltd
All Rights Reserved
8
eBrokerSys (Stock) iDoubleClick2 Manual (2.2.3.5 Version March 2012)
4. Market Tab
4.1 MegaHub data
Broker Queues
Diagram 10
With broker names
Stock Info
Last 5 or10 Bid/Ask Queues
Last 4 Bid/Ask Executed
Diagram 11
provide link bar for quick access
trades info
Enter the stock symbol (eg. 5 for 0005) in the <Symbol Box >and press <Enter> and the
followings will be displayed:
•
Day Hi / Day Lo / Open/ Prev Close/Change/ Nominal Price/ transaction volume/
Turnover/ Lotsize/Currency/Spread…
•
last 5 bids /last 10 bids and asks queuing info
•
last 4 executed trade information (see page 50-AppII for trade type details)
eBroker Systems Ltd
All Rights Reserved
9
eBrokerSys (Stock) iDoubleClick2 Manual (2.2.3.5 Version March 2012)
10 spreads Key
button on the right side to view the last 10 Bid/Ask Queues and it will change from
Click on
to
. Click on
button to view the last 5 Bid/Ask Queues.
Diagram 12
Diagram 13
4.2 Clock
Diagram 13
Click on the < Market > button in the Windows Pull Down Menu and select < Clock>. The
following window will pop up. User can view the time of the workstation.
eBroker Systems Ltd
All Rights Reserved
10
eBrokerSys (Stock) iDoubleClick2 Manual (2.2.3.5 Version March 2012)
Diagram 14
4.3 Exchange Status
Diagram 15
Click on the < Market > button in the Windows Pull Down Menu and select <Exch Status>. The
following window will pop up. User can view market status.
Diagram 16
eBroker Systems Ltd
All Rights Reserved
11
eBrokerSys (Stock) iDoubleClick2 Manual (2.2.3.5 Version March 2012)
5. Order Tab
5.1 Enter Global Order
Diagram 17
Select the <Enter Global Order> function under <Order> Tab and the following Global Order
Ticket will pop up.
Special Order Checkboxes
Icon
Diagram 18
A. Normal Order Entry
You need to enter following information before submitting any orders to the Exchange: (regardless
of data entry order)
[Stock Symbol / Price / Quantity / Buy or Sell / Order Submission]
[Account no. ]
Account number is default by your login ID as the system login with Account number.
eBroker Systems Ltd
All Rights Reserved
12
eBrokerSys (Stock) iDoubleClick2 Manual (2.2.3.5 Version March 2012)
[Symbol]
Enter the right stock symbol to be traded (eg.5 for 0005) into the <Symbol Box> to view symbol
price in market, click the price to copy the symbol code and price into Order Entry Window.
[Order Quantity]
Enter the < order quantity > directly, or you can change the quantity on display by pressing the
<Up> or <Down> Key to adjust the [Order quantity] in the corresponding lot sizes. Fast Qty
key-in in Order Ticket Fast key for quantity input in order ticket:
K for 000
M for 000000
[Space Bar] for 000.
[Price]
Enter the < Price > into the [Price Box], or you can press the <Up> or <Down> Key to adjust the
[Price] in the corresponding spread levels. Alternatively, go to the <Bid Size> or <Ask Size> field
from the Magahub page and the symbol together with the price will be copied over to the Order
Entry Window automatically.
[Max (Sell)]
Diagram 19
In the [Max (Sell)] box, it shows the maximum quantity that account can sell. The Net Quantity
in the Position View is copied to the [Max (Sell)] box automatically to make it easier for user to
see the maximum quantity the account can sell.
[Ref ID] (optional field)
Enter the Reference ID and the information will be displayed in order book under column <Ref
ID>.
a. User can key in relative information together with the order ticket input and this information
will also be shown in the order book for user reference.
eBroker Systems Ltd
All Rights Reserved
13
eBrokerSys (Stock) iDoubleClick2 Manual (2.2.3.5 Version March 2012)
Reference Info
1. Please unlock the check box if
needed.
2. Key in relative information together
with the order ticket input.
REF_ID
1. Relative information would be
shown in the order book with the
column of REF_ID for user refer
Diagram 20
[Buy or Sell Order ]
After entering all the order entry data, press the< Buy> or <Sell> Key in the keyboard. After
pressing the <BUY> and <SELL> button, the background colour of the Order Entry Window will
change to Blue and Red respectively to show the order side distinctly to the user.
BUY/SELL color changes
Diagram 21
eBroker Systems Ltd
All Rights Reserved
14
eBrokerSys (Stock) iDoubleClick2 Manual (2.2.3.5 Version March 2012)
Diagram 22
[Submit Order Command ]
You can then press the < Confirm > Key in the Keyboard or click on the <Submit> Icon a
confirmation box will pop up (Diagram 19). Check the order details as listed and press <Enter> or
click on the <Yes> Button to proceed sending this order direct to the Exchange. If there is any
missing information, a warning message of [Please enter the relevant field ] will pop up. User can
also select to send out order directly without clicking on the <Submit> button in the User
Preference Table.
Confirmation Box
Diagram 23
eBroker Systems Ltd
All Rights Reserved
15
eBrokerSys (Stock) iDoubleClick2 Manual (2.2.3.5 Version March 2012)
[Clear Order Information]
Press the <Del > Key in the keyboard or click on the <Clear> Icon (Diagram 27) to cancel all the
information that you have entered into the Order Entry Window previously.
Diagram 24
[Fields Locking]
Diagram 25
eBroker Systems Ltd
All Rights Reserved
16
eBrokerSys (Stock) iDoubleClick2 Manual (2.2.3.5 Version March 2012)
Check box to lock the symbol, price, and /or quantity fields for faster order entry. Press <Enter> to
skip the locked fields and jump to the next unlocked field.
B. Fast Quick Order Entry
-To place an order in the buy/sell queue using the best bid/ask price
Press the <BUY> button in the keyboard and the stock symbol; best BID price will be
automatically copied to the order entry window. The cursor now rests in the Quantity field. Enter
the quantity and the account number and press <Confirm> to send out this order for quick queuing.
Similarly, press the <SELL> button in the keyboard to queue using the best ASK price.
-To buy using the best ask price or sell using the best bid price
Press the <BUYTRAN> button in the keyboard and the stock symbol; best ASK price will be
automatically copied to the order entry window. The cursor now rests in the Quantity field. Enter
the quantity and the account number and press <Confirm> to send out this order for quick order
filling
Similarly, press the <SELLTRAN> button in the keyboard to fill the order using the best ASK
price.
C. Order Entry Preset Focus
In User Preference Table, user can preset the Order Ticket focus field namely account, symbol,
price or quantity after order has been submitted.
D. SPECIAL ORDER ENTRY
i.
Fill or Kill Orders
Click the < Fill or Kill > check box first and then input all the order data. This order will not be
sent to Exchange for queuing. Either the order will be fully matched or the order will be cancelled.
Diagram 26
ii.
Fill & Kill Orders
Click the < Fill & Kill > check box first and then input all the order data. This order will not be sent
to Exchange for queuing. The order will be matched with the quantity in the market with the
eBroker Systems Ltd
All Rights Reserved
17
eBrokerSys (Stock) iDoubleClick2 Manual (2.2.3.5 Version March 2012)
outstanding order amount cancelled.
Diagram 27
iii.
At Auction Orders (Mouse Function)
Click the < AO> check box first and then input all the order data except the limit price and submit
it as an at auction order. An order confirmation box will pop up with the option noted as “AO”.
Press <Yes> to proceed and this order will be sending to the Exchange as an Auction order. An
“AO” remark will be shown in the order book.
During the Order Input period, limit orders entered into the system will be sent out as At Auction
Limit orders.
During the pre-open period, orders cannot be amended or cancelled in the matching session. Please
refer to the Exchange for updated information.
AO Orders
eBroker Systems Ltd
All Rights Reserved
18
eBrokerSys (Stock) iDoubleClick2 Manual (2.2.3.5 Version March 2012)
Diagram 28
iv.
eBroker Stop Orders
This function enables the system to execute stop limit orders.
1. Check the <eBroker Stop> button at the Order Entry Window. Then enter Account, Symbol,
Limit Price and Quantity and the Stop Price for the order. Click on the BUY or SELL button
and the SUBMIT button. Click <Yes> on the Order Confirmation Box to send the order into the
system.
2. The order will be shown as Pending in the Order Book Window with a remarks showing STP
and the stop price as specified.
Notes:
i.
DOWN Trigger: limit price <= stop price < nominal price
ii.
UP Trigger:
OR
limit price => stop price > nominal price
3. The system will send the Stop Limit Order to the exchange for matching upon the nominal
price reaching the specified stop price.
4. Stop order up and down trigger direction will use previous close price as reference price if there
is no nominal/ last price available (for stock & futures).
eBroker Systems Ltd
All Rights Reserved
19
eBrokerSys (Stock) iDoubleClick2 Manual (2.2.3.5 Version March 2012)
Diagram 29
Stop Order Confirmation Box
Diagram 30
Stop Order Pending for Execution
eBroker Systems Ltd
All Rights Reserved
20
eBrokerSys (Stock) iDoubleClick2 Manual (2.2.3.5 Version March 2012)
Diagram 31
v.
Enhanced Limit Order
Diagram 32
Check the <Enhanced> box to place Enhanced Limit Orders.
Remark:
[Options]
Check [Options] box to lock all the special order conditions or uncheck to allow send different
specific order.
eBroker Systems Ltd
All Rights Reserved
21
eBrokerSys (Stock) iDoubleClick2 Manual (2.2.3.5 Version March 2012)
5.2 Order Book
Diagram 33
Under <Order> Tab, select <Order Book> to open the Order Book Window with functions as below:
Last Order Display
Last Trade Display Window
Window
Diagram 34
Order Book Full
Screen Icon
Print
Multi Sorting
Orderbook Selector
Delete
New View
Diagram 35
Order Level Display Button
Filter Box
Order & Exch Order
Quick Search Icon
Display Button
GO Button
Diagram 36
Display
Sorter
Order Status Checkboxes
Market Status Bar
All Button
eBroker Systems Ltd
All Rights Reserved
22
eBrokerSys (Stock) iDoubleClick2 Manual (2.2.3.5 Version March 2012)
5.3 Order Book
In [Order Book Window], the order information that the user has entered before will be shown as
below (Diagram 21):
Order no. /Account No., Account Name & Tel No. / User/ User Name/Symbol / Side / Quantity
/ Price / Filled quantity / Filled Price/ Remaining Quantity/ Queue Quantity/ Status /
Currency/ Broker ID(shown in Trade level only)/ Source/ Reject ID/ Approval ID/ Ref ID/
Order Time / Exec Time/ Exchange/
Remarks (eg. odd lot order, Auction Order and any error messages)/ Last User
Note: Source shows from which channel is the order coming from with the following abbreviations:
C- OMSClient
R- Order Routing(if applicable)
D- DoubleClick
I – Internet Channel
You can sort any of these columns by clicking on the column headings.
You can drag and move any columns around to your desire.
You can right click anywhere in the Order Book Window to change the font type and size.
There will be an order level for any order that has been entered into this system.
For orders that have been sent to the Exchange, there will be an Exchange Order Level with the
prefix EXCH..
For orders executed, there will be a trade level with prefix TRADE.
5.3.1 Orderbook Viewing Functions
A. Order Status – Default Grid View
Automatically when you log into the order book, the order book will be displayed in a tree mode
where the sorting is by user first, then by account. Go to the Order Book Selector and click on the
<Default Grid> to view all orders in a table format where sorting is by orders with the last one on
displayed on top.
Order Status Display (Default Grid Mode)
Diagram 37
After submitting the orders, the details will be shown in the <Last Orders Display Window> with
eBroker Systems Ltd
All Rights Reserved
23
eBrokerSys (Stock) iDoubleClick2 Manual (2.2.3.5 Version March 2012)
the last order on the top. The order details will be shown in the following sequence:
Buy or Sell/ Stock No./ Qty/ Order Price/ Order Status
Click on any order previously entered from below and the cursor will take you to the corresponding
order in the <Order Book Window> for more details.
Last Orders Display
Last Trade Box
Order History
Diagram 38
<Last Trade Box>
The system will issue a Ding sound real-time whenever an order has been successfully executed.
The sound alert is a setting which can be set at the User Preference Table. The trade will be shown
in the <Last Trade Box>. Click to open the Last Trade Box and all the trades will be displayed
with the last one on top. Select a trade you want to view the details and click on it and this order
will be automatically be highlighted in the Order Book for easy viewing. The records will be
cleared after logged out and only the last trade will be kept upon re-logon.
B. Order Viewing
View the Order Level Only (Mouse Function)
Click on the <Order Level Display Button> and only the Order levels will be shown.
Display of Order Levels Only
Diagram 39
eBroker Systems Ltd
All Rights Reserved
24
eBrokerSys (Stock) iDoubleClick2 Manual (2.2.3.5 Version March 2012)
View Order and Exchange Orders (Mouse Function)
Click on the <Order and Exch Order Level Display Button> and only the Order and Exchange
levels will be shown.
View Exchange Order and trade reference for a selected order
Alternatively, move to the selected order and press <Right> key in the keyboard and the
corresponding Exchange Order will be displayed. Press the <Right> key again and the trade level
will also be displayed. Press the <Left> key to hide the trade level and press the <Left> key again
to hide the Exchange Order.
Display of Order and Exchange Order Levels
Diagram 40
View All (Mouse Function)
Click on the <View All Button> and all levels including the Order; Exchange and Trade levels will
be shown. Details include Order Number & Exchange Order & Trade Number/ Symbol/ Side/
Qty/ Price/ Filled Qty/ Filled Price/ Status/Broker ID/ Order Time/ Trade Execution Time/
Remarks
Display of Order/ Exchange Orders and Trade Levels
Diagram 41
eBroker Systems Ltd
All Rights Reserved
25
eBrokerSys (Stock) iDoubleClick2 Manual (2.2.3.5 Version March 2012)
C. Order Enquiry - View Pending and Partial Orders Only
Press the <Order Enq> Key in the keyboard and all orders with pending and partial status will be
displayed.
Order Enquiry
Diagram 42
Transaction Enquiry - View Completed Orders Only
Press the <Tran Enq> Key in the keyboard and all orders with completed status will be displayed.
Transaction Enquiry
Diagram 43
Note: All confirmed orders will not be displayed under <Tran Enq>.
View All
Press the <All > Key in the keyboard or F1 in normal keyboards will take you back to the display of
all orders.
Merge trade summary by clicking a completed or partial filled order in order book. A hints window
will show the number of quantity executed at each price.
Hints window
eBroker Systems Ltd
All Rights Reserved
26
eBrokerSys (Stock) iDoubleClick2 Manual (2.2.3.5 Version March 2012)
Diagram 44
D.
Order Status filter display (Mouse Function)
Order Status filter display (e.g.: Completed trades )
Diagram 45
At the bottom part of [Order Book Window ], you can see checkboxes for the following status
check box:
Partial Completed / Completed / Pending / Queuing/ Inactive / Confirmed / Reject /Cancel
Click on the required [check box ] to select the orders you want to display. You can click multiple
checkboxes concurrently.
Status Definition
Part
Partially Completed
Comp
Completed
Pend
Pending in the system only
Queu
Queuing in the market
Conf
Completed order confirmed with client
Reje
Rejected
Canc
Cancelled
PCXL
Partially Completed but Cancelled Afterward
Note: All partial cancelled and unfilled cancelled orders will have the status <Canc > as shown
in order book. Apply the PCXL filter to show all partial cancelled orders and the Canc filter to
eBroker Systems Ltd
All Rights Reserved
27
eBrokerSys (Stock) iDoubleClick2 Manual (2.2.3.5 Version March 2012)
show all unfilled cancelled orders.
Display Orders Under a Specific Symbol/ Account/ Executed Time/ Order Side/ User/
Source/ Approval/ Remarks
Click on the Symbol/ Account/ Executed Time/ Order Side/ User/ Source Sorter Icon at the bottom
of the Order Entry Window (Diagram 30).
Symbol – Select Symbol first and then enter the symbol in the Filter Box (eg. 5) and press <Enter>
or click on the GO Button to display all orders with the same symbol.
Account – Select Account first and then enter the Account no. in the Filter Box and press <Enter>
or click on the GO Button to display all orders for this selected client.
Executed Time –Select Executed Time and then enter the time after which you want to display all
orders in the Filter Box and press <Enter> or click on the GO Button to display all orders after this
specified time. To display all orders with trades executed after: 10:30am, enter <103000> in the
Filter Box.
BUY/SELL – Select Order Side first and then enter the <0> for buy or <1> for sell orders in the
Filter Box and press <Enter> or click on the GO Button to display all buy or sell side orders.
User – Select User first and then enter the User no. in the Filter Box and press <Enter> or click on
the GO Button to display all orders under this User.
Source –Select Source first and then enter the Source in the Filter Box, <C> for inhouse orders; <I>
for Internet orders and <T> for TWM orders and press <Enter> or click on the GO Button to
display all orders come from a selected source.
Remark – Select the Remark filter first and input any words in the filter box eg. Odd to show all
odd lot trades or AO to show all auction orders and all orders with such remarks field will be
highlighted for easy searching.
Approval –This function allows the user to view selected type of inactive orders:
Select the Approval Filter and input in the Filter Box
“1” or “limit” to show all inactive orders with insufficient trading limit only
“2” or “position” to show all inactive orders with insufficient position only
“3” to show all inactive orders with insufficient trading limit + insufficient position
“4” or “price” to show all inactive orders over the price checking limit
“7” to show all inactive orders
Reference ID – Select Reference ID first and then enter the Reference ID in the Filter Box and
press <Enter> or click on the GO Button to display all orders for this selected client.
Order Number – Select Order number first and then enter the Order number in the Filter Box and
press <Enter> or click on the GO Button to display all orders for this selected client.
If you want to disable the filter, clear all wordings in the Filter Box and press <Enter> or click GO
to proceed.
eBroker Systems Ltd
All Rights Reserved
28
eBrokerSys (Stock) iDoubleClick2 Manual (2.2.3.5 Version March 2012)
Order Book Sorter
Diagram 46
E. Multiple condition filter
Click on the <More> button in Order Book.
Diagram 47
Multi Filter pops up
Fill in the details and click <Apply> to apply the multiple filter. Click on <Clear> to clear contents
of the filter and exit.
The following fields can be set in the filter:
Account no/ Symbol (eg. 5)/ User no/ BUY or SELL/ Source (I or T)/ Exchange (eg. SEHK)
Diagram 48
The filter set is displayed for easy reference.
Cancel & Copy and order function for faster order entry by right click an order in order book.
eBroker Systems Ltd
All Rights Reserved
29
eBrokerSys (Stock) iDoubleClick2 Manual (2.2.3.5 Version March 2012)
F. Visible order statistic with STAT
Click [STAT] button next to the [More] at the bottom of the order book or the quickpad, the total
buy & total sell order filled (included Completed order, partial completed order, partial cancelled
order)statistic box will pop up to display current visible orders shown in the specified order book or
quickpad. Press [Fresh] to update the data and click [Close] to close this pop up box.
Diagram 49
G. Create/ Rename & Save Order Book Settings
- Create an Order Book Setting
Set all settings as desired and then click on the <New View> Order Book Setting Function and a
box will pop up (Diagram 31). Confirm whether this is a tree (sort by user & account) or a grid
setting and click <OK> and a new setting will be created (eg. Default grid 1).
New View
New View Button
Diagram 50
H. Rename an Order Book Setting
Highlight an order book setting from the Order Book Selector and press <Enter>, a rename box will
pop up (Diagram 32). Enter the new name and click <OK> and the new name will be saved for this
setting.
Rename an Order Book Setting
eBroker Systems Ltd
All Rights Reserved
30
eBrokerSys (Stock) iDoubleClick2 Manual (2.2.3.5 Version March 2012)
Diagram 51
-Save & Load Configuration
This function allows user to save & load settings made for the orderbook and the price quote
screens (eg. Font type & size selected, columns sorting & arrangement).
User can save the settings of both the order book and the market information window inc. Maga
Hub, Trade Summary & Position View by clicking on the <Save Desktop> function from the
windows pull down menu under <Desktop> Tab (Diagram 57). After logging out, the settings can
be loaded by clicking the <Load Desktop> function from the windows pull down menu under
<Desktop> Tab.
Save & Load Desktop Functions
Diagram 52
I. Delete an orderbook setting
To delete an orderbook setting, first choose the orderbook from the Orderbook Selector to be
displayed and click on the <Delete> Icon and this order book setting will be deleted.
eBroker Systems Ltd
All Rights Reserved
31
eBrokerSys (Stock) iDoubleClick2 Manual (2.2.3.5 Version March 2012)
Delete Icon for orderbook
Delete a setting
Print Icon
Diagram 53
J. Print An Order Book
Click on the <Print> Icon and the order book will be displayed in the browser for review. From the
Browser Pull Down Menu, select <Print> and the order book will be printed out.
Diagram 54
K. Quick Search
Click on the <Quick Search > Icon at the bottom of the order book and a quick search box will pop
up. Enter the field you like to search eg. Account number, symbol, buy, sell etc and all orders with
these fields will be highlighted for easy searching.
Quick Search Box
eBroker Systems Ltd
All Rights Reserved
32
eBrokerSys (Stock) iDoubleClick2 Manual (2.2.3.5 Version March 2012)
Diagram 55
5.3.2 Order Book Order Action Functions
B. Modify Orders - Change & Cancel Order
First, go to the order you want to change by pressing the <Order Book> key and pressing the
<Up>/<Down> Key and then press < Change Qty> or <Change Price> key or click on the
<Change/cancel> icon and a dialog box will pop up (Diagram 61). Enter the corresponding
[Modified Price] and/or [Modified Quantity] to replace the old data. Finally, press the <Enter > Key
to execute.
Alternatively change order by clicking <Now> button in the column of change, which is displayed
in Order book.
Note: Change or cancel command only apply to orders with [Pending] or [Partial] status. For
orders with any other status, change/cancel command cannot be activated.
Diagram 56
eBroker Systems Ltd
All Rights Reserved
33
eBrokerSys (Stock) iDoubleClick2 Manual (2.2.3.5 Version March 2012)
Alternatively cancel order by clicking <Now> button in the column of cancel, which is displayed in
Order book.
Cancel Order
First, go to the order you want to cancel by pressing the <Order Book> key and pressing the
<Up>/<Down> Key, then press <CXL> key or <CXL All> (Cancel all Key) and a dialog box will
pop up . Press the <OK> Key to execute.
Cancel an Order
Diagram 57
5.3.3 Order Book Right Click Functions
A. Font
User can change the font type and size as preferred.
B. Cancel and Copy
Diagram 58
Select an order and right click to select the <Cancel and Copy> function. A dialogue box will pop
up. Click <Yes> and the order selected will be cancelled with the order details copied to the order
ticket. Click <No> and the order selected will not be cancelled with the order details copied to the
order ticket. Change any order information as desired and click submit to submit the new order.
This function is useful if user wants to quickly place an additional order for the same client and/or
for same stock.
Note: This function only works if the order is NOT completed. For Partial completed orders, the
unfilled order quantity will be copied to the order ticket.
eBroker Systems Ltd
All Rights Reserved
34
eBrokerSys (Stock) iDoubleClick2 Manual (2.2.3.5 Version March 2012)
Diagram 59
C. Copy Remaining Qty
Select an order and right click to select the <Copy Remaining Qty> function. The remaining
quantity and the account, symbol and price of this order will be copied to order ticket automatically
for fast order entry.
This function is useful if user wants to quickly place an additional order using the remaining
quantity for the same client and/or for same stock.
D. Bulk Cancel for Muti-selected
Select an order and right click to select the <Bulk Cancel for Muti-selected> function. User can
select many orders and cancel them by one button.
This function is useful if user wants to quickly cancel orders.
E. Account Summary
Right click on any orders in the order book to select the account summary function as below. An
<Account Summary> box will pop up to show the total BUY and SELL quantity for the day for this
account and this symbol with the average price.
eBroker Systems Ltd
All Rights Reserved
35
eBrokerSys (Stock) iDoubleClick2 Manual (2.2.3.5 Version March 2012)
Diagram 60
Diagram 61
F. Customize Column
Right click on any orders in the order book to select the Customize Column function as below. The
<Customize Column> box will pop up to show Default Column List and Custom Column List.
Items move into [>>] Custom list column will show in the order book and Column will hide when
the items move into [<<] Default Column List. Press up or down to order the Column in the Order
Book. Click on the <OK > button to save this setting or <Cancel> to exit without saving.
eBroker Systems Ltd
All Rights Reserved
36
eBrokerSys (Stock) iDoubleClick2 Manual (2.2.3.5 Version March 2012)
Diagram 62
eBroker Systems Ltd
All Rights Reserved
37
eBrokerSys (Stock) iDoubleClick2 Manual (2.2.3.5 Version March 2012)
6. Account Tab
6.1 Position View
Diagram 63
Under <Account> tab, select position View to show the position of the client.
Diagram 64
Section 1:
Client’s account no. / Name
Section 2:
Stock Summary:
Stock Symbol / Stock Name (English)/ Stock Name (Chinese)/ Quantity / Short Sell Quantity / On
Hold Qty/ Nominal / Market Value / Margin Rate/ Margin Value/ Total Market Value/ Total Margin
Value
Section 3:
Account Summary:
Initial Trading Limit/ Unrealized Trading Limit/ Initial Trading Limit (Internet)/ Trading Limit
(Internet)/ Total Market Value/ Total Acceptable Value/ Realized Cash Balance/ Asset
All executed trades will be updated automatically in the client’s portfolio. Initial Purchasing Power
shows the trading limit set for this client at the beginning of trade day. Purchasing Power shows the
available limit for use at any one time.
To sell a stock symbol quickly, user can select any symbol to copy to order ticket and click on Sell
to sell the stock.
eBroker Systems Ltd
All Rights Reserved
38
eBrokerSys (Stock) iDoubleClick2 Manual (2.2.3.5 Version March 2012)
Export Position Button on the top right hand corner:
User can click on the Export Position Button to export the position of the client to HTML Page as
below or further export to excel.
Diagram 65
6.2 Trade Summary
Click on the < Account > button in the Windows Pull Down Menu and select < Trade Summary >.
The “Trade Summary” window will pop up. This screen shows all transactions for the day real time
for each symbol: Symbol/ Buy/Sell/ Sum Quantity/ Avg Price/ Transaction Amount.
Diagram 66
eBroker Systems Ltd
All Rights Reserved
39
eBrokerSys (Stock) iDoubleClick2 Manual (2.2.3.5 Version March 2012)
6.3 User Password
Diagram 67
Click on the <User Password> function under the Account Tab. The User Password Dialogue Box
will pop up. Enter the Old and the New Password twice to reset it and then click on <OK> to save
the new setting or <Cancel> to withdraw. (The password should be numeric with minimum length 6
and Maximum length 20) A confirmation will pop up to confirm the new setting has been saved.
Diagram 68
A confirmation will pop up to confirm the new setting has been saved. Click <OK> to proceed.
Diagram 69
In case the User forgets or loses his password, a new password must be assigned in the System
Administrator Module for the User.
eBroker Systems Ltd
All Rights Reserved
40
eBrokerSys (Stock) iDoubleClick2 Manual (2.2.3.5 Version March 2012)
7. Tools
7.1 User Preference
Click on the <Tools> button in the Windows Pull Down Menu and select <User Preference> as in
Diagram 61. The user preference window will pop up.
User Preference
Diagram 70
7.1.1 Color & Sound Settings
User can select the desired color template using this function.
Click on the <Tools> button in the Windows Pull Down Menu and select <User Preference>. A
User Preference Window will pop up. Click on <Color & Sound> box in the User Preference
Window. User can choose the color schema by selecting the desired one eg. the 256 Color template
or either choose the colors for bid/ask font, bid/ask background, data etc.. Click on the <Confirm>
button to save this setting or <Cancel> to exit without saving. After saving, log out and log on again
to use the new color settings.
eBroker Systems Ltd
All Rights Reserved
41
eBrokerSys (Stock) iDoubleClick2 Manual (2.2.3.5 Version March 2012)
Color Schema
Diagram 71
Overview of the 256Color Schema
Diagram 72
eBroker Systems Ltd
All Rights Reserved
42
eBrokerSys (Stock) iDoubleClick2 Manual (2.2.3.5 Version March 2012)
User can select the desired sound template using this function.
Click on the <Tools> button in the Windows Pull Down Menu and select <User Preference>. A
User Preference Window will pop up. Click on <Color & Sound> box in the User Preference
Window. User can choose the Sound Style by selecting either DefaultSound or HumanSound.
Click on the desired [checkbox] user wants for a sounding. User can click as many sounding as user
wants. Click on the <Confirm> button to save this setting or <Cancel> to exit without saving.
After saving, log out and log on again to use the new sound settings.
Sounding Setting
Description
Enable place order confirmation
Sounding for order placed
Enable change order sound
Sounding for change order
Enable inactive order sound
Sounding for inactive order
Enable reject order sound
Sounding for reject order
Enable trade arrived sound
Sounding for trade arrived
Enable manual trade sound
Sounding for manual trade
Sound Template Picker
eBroker Systems Ltd
All Rights Reserved
43
eBrokerSys (Stock) iDoubleClick2 Manual (2.2.3.5 Version March 2012)
Diagram 73
eBroker Systems Ltd
All Rights Reserved
44
eBrokerSys (Stock) iDoubleClick2 Manual (2.2.3.5 Version March 2012)
7.1.2 Order Entries
Order Entries – Warning/Max Lot Size
In <User Preference>, click on the <Order Entries> tab. User can set the limit for an account in
Stock/Future/Options. User will get a warning when placed orders more than the limit for
Stock/Future/Options. If the maximum limit is set, user cannot place any orders over the limit.
Diagram 74
Order Entries – Order Entry Preference
In <User Preference>, click on the <Order Entries> tab. User may change the setting of Order
Entry in the following window. Click on the desired [checkbox] user wants. User can click as many
options as user wants. Click on the <confirm> button to confirm the setting or <cancel> to exit
without saving.
eBroker Systems Ltd
All Rights Reserved
45
eBrokerSys (Stock) iDoubleClick2 Manual (2.2.3.5 Version March 2012)
Diagram 75
eBroker Systems Ltd
All Rights Reserved
46
eBrokerSys (Stock) iDoubleClick2 Manual (2.2.3.5 Version March 2012)
Order Entry Preference
Description
Smart Price Change (Highlight last 2)
Highlight the last 2 digits in the price field in
Order Ticket for fast changing
Order Ticket will become empty after submit
Clear Order Entry After Submit
Clear Order Entry After Send Out
Quantity Thousand Multiple By [.]
Buy/Sell ShortCut Send Order Directly
Buy/Sell Button Send Order Directly
Enable Default Account
Focus After ShortCut/Copy Price
Focus After Submit
Select Price Length
Symbol Name Language
eBroker Systems Ltd
All Rights Reserved
Order Ticket will become empty after order
Send Out
Type [.] in the quantity field in the order
ticket and it will display “000”
Directly send order out without pressing
Submit button by using shortcut key
Directly send order out without pressing
Submit button after pressing Buy or Sell
Order Ticket will automatically show default
account if no entry in account field
Select to set the Focus After ShortCut/Copy
Price in Account/ Symbol/ Price/ Quantity
field
Select to set the Focus After Submit in
Account/ Symbol/ Price/ Quantity field
Highlight the last no. of digits in the price
field
Show symbol name in English/ Traditional/
Simplified
47
eBrokerSys (Stock) iDoubleClick2 Manual (2.2.3.5 Version March 2012)
7.1.3 Order Book
In <User Preference>, click on the <Order Book> tab. User may change the setting of Order Book
in the following window. Click on the desired [checkbox] user wants. User can click as many
options as user wants. Click on the <confirm> button to confirm the setting or <cancel> to exit
without saving.
Diagram 76
eBroker Systems Ltd
All Rights Reserved
48
eBrokerSys (Stock) iDoubleClick2 Manual (2.2.3.5 Version March 2012)
Order Book Preference
Description
Enable Real Time Sort
Tick to allow Real Time Sort for orderbook
automatically
Not allow to do sorting by clicking column head
Disable Sorting by Click Column
Enable Multi Sort
Allow Multi Sort – the Multi-sort button will appear
on the right top hand corner
Child Order Without Filter
No filter on child order
Child Order Show Detail Info
Display detail info on child order
Display New Order In Last Row
New order displays in last row
Enable Child Order Background Color
Display on child order background color
Double Click Order Grid
Allow double click in order grid
Selection Mode when Order Coming
Allow selection when order coming
eBroker Systems Ltd
All Rights Reserved
49
eBrokerSys (Stock) iDoubleClick2 Manual (2.2.3.5 Version March 2012)
7.1.4 Market
Diagram 77
In <User Preference>, click on the <Market> tab. User may change the setting of AMS Price in
the following window. For IDC get market data from MagaHub, so this preference setting will not
work in IDC.
eBroker Systems Ltd
All Rights Reserved
50
eBrokerSys (Stock) iDoubleClick2 Manual (2.2.3.5 Version March 2012)
Account
In <User Preference>, click on the <Account> tab. User may change the setting of Account in the
following window. Click on the desired [checkbox] user wants. User can click as many options as
user wants. Click on the <confirm> button to confirm the setting or <cancel> to exit without
saving.
Diagram 78
eBroker Systems Ltd
All Rights Reserved
51
eBrokerSys (Stock) iDoubleClick2 Manual (2.2.3.5 Version March 2012)
Account Preference
Description
Display Zero Quantity Record
Show also record in position view which
quantity is zero
Show margin call warning
Enable Account Info Margin Call Warning
Enable Negative Position Warning
Show Cash Client In Margin Call Window
Zebra Color Mode
eBroker Systems Ltd
All Rights Reserved
Show negative position warning in
Account Info Window
Display client’s cash in margin call
window
To show Position, Account Info Only ,
Position and Account Info in the style of
Zebra color
52
eBrokerSys (Stock) iDoubleClick2 Manual (2.2.3.5 Version March 2012)
Close Position Mode (it is not apply to IDC)
To choose the Close Position Mode (Aggressive Level) click on the drop down list and a list of
numbers from -5 to 5 will come out. Click the desired number. Click on the <confirm> button to
confirm the setting or <cancel> to exit without saving.
Close position Mode Setting
Meaning place Sell order using
5
5th bid spread
4
4th bid spread
3
3rd bid spread
2
2nd bid spread
1
1st bid spread
0
nominal price
-1
-1st ask spread
-2
-2nd ask spread
-3
-3rd ask spread
-4
-4th ask spread
-5
-5th ask spread
.
The preset price will be used when click on the <Close Position> button in Position View Window.
eBroker Systems Ltd
All Rights Reserved
53
eBrokerSys (Stock) iDoubleClick2 Manual (2.2.3.5 Version March 2012)
7.1.6 Data Format
In <User Preference>, click on the <Data Format> tab. User may change the Data Format in the
following window. Click on the <confirm> button to confirm the setting or <cancel> to exit
without saving.
Diagram 79
eBroker Systems Ltd
All Rights Reserved
54
eBrokerSys (Stock) iDoubleClick2 Manual (2.2.3.5 Version March 2012)
Precision Preference
Description
Amount Precision
Amount will show typed decimal places
Quantity Precision
Quantity will show typed decimal places
Price Precision
Price will show typed decimal places
Avg Price Mode
Both Default: Round off the buy and sell price
Buy RoundUp, Sell Default: Round up the buy price ; Round
off the sell price
Buy Default, Sell RoundDown: Round off the buy price ;
Round down the sell price
Buy RoundUp, Sell RoundDown: Round up the buy price ;
Round down the sell price
Display decimal place even the number is zero
Display Zero Decimal
eBroker Systems Ltd
All Rights Reserved
55
eBrokerSys (Stock) iDoubleClick2 Manual (2.2.3.5 Version March 2012)
7.1.7 Message Popup
Click on the desired [checkbox] user wants for a Pop up Message. User can click as many options
as user wants. Click on the <confirm> button to confirm the setting or <cancel> to exit without
saving.
Diagram 80
Message Popup
Description
Enable place order confirmation
Message box will pop up when placed new order
Enable change order confirmation
Message box will pop up when change order
Enable cancel order confirmation
Message box will pop up when cancel orders
eBroker Systems Ltd
All Rights Reserved
56
eBrokerSys (Stock) iDoubleClick2 Manual (2.2.3.5 Version March 2012)
7.1.8 Others
In <User Preference>, click on the <Others> tab. User may switch the mode either in Docking
Mode or MDI mode. User can click as many options as user wants. Click on the <confirm> button
to confirm the setting or <cancel> to exit without saving.
Diagram 81
Setting
Copy price in double click action
Auto Check Update
Show Update Alert
Locking Docking
eBroker Systems Ltd
All Rights Reserved
Description
Doubleclick instead of single click to copy price
from AMSPrice window to order ticket
Check version update automatically
Alert box will pop up if update version is
available
Cannot move windows in doubleclick
57
eBrokerSys (Stock) iDoubleClick2 Manual (2.2.3.5 Version March 2012)
P&L Cost (it is not apply to IDC)
In <User Preference>, click on the <Others> tab. User may switch the Default either in Today
P&L or P&L cost. Click on the Show Name [checkbox], Buy Sell Break Down [checkbox], Day
Trade Only [checkbox] if needed. If the boxes are checked, any click on P&L will show item in the
P&L Cost table.
Diagram 82
eBroker Systems Ltd
All Rights Reserved
58
eBrokerSys (Stock) iDoubleClick2 Manual (2.2.3.5 Version March 2012)
Export & Import
This Section is mostly used by support team. User can save a file by clicking the <Export
Preference>. User can load the file by pressing <Import Preference>. This section is usually used
to copy preference from PC to PC. <Export All Settings> is allowed to export the whole
DoubleClick2 System into a file for reference.
Diagram 83
eBroker Systems Ltd
All Rights Reserved
59
eBrokerSys (Stock) iDoubleClick2 Manual (2.2.3.5 Version March 2012)
8. Reports Tab
Diagram 84
Trade/Order Reports
Main menu bar > Reports
It will save the order record into csv file with date-time-user ID, etc.
Customer Trade Report: Complete trades records under the logged in user ID
Customer Order Report: Daily order input records under the logged in user ID
Order Report Sample:
ORDER-201203071
74440-BROKER011.csv
Trade Report Sample:
TRADE-2012030717
4426-BROKER011.csv
eBroker Systems Ltd
All Rights Reserved
60
eBrokerSys (Stock) iDoubleClick2 Manual (2.2.3.5 Version March 2012)
9. Windows Tab
Diagram 85
The Windows section shows all the windows already opened. Click to select the one
needed.
eBroker Systems Ltd
All Rights Reserved
61
eBrokerSys (Stock) iDoubleClick2 Manual (2.2.3.5 Version March 2012)
10. Help Tab
Diagram 86
Click on the <Help> Tab and select <About> to show the current version number.
10.1 Check Update
Click on <Check Update> to get program update.
10.2 Contact Us
It will link to the Contact page of eBroker’s Website.
Diagram 87
10.3 Risk Disclosure
Show Risk Disclosure page.
eBroker Systems Ltd
All Rights Reserved
62
eBrokerSys (Stock) iDoubleClick2 Manual (2.2.3.5 Version March 2012)
Diagram 88
10.4 About
User can check the Version and Build that is currently used. Click <OK> to close the window.
Diagram 89
eBroker Systems Ltd
All Rights Reserved
63
eBrokerSys (Stock) iDoubleClick2 Manual (2.2.3.5 Version March 2012)
11. Useful Tips
Based on security reason, please remember to log out the system once you leave the operating
environment.
To move along different fields, press the <Tab> key to move in one direction and press the <Shift>
and <Tab> keys together to move in opposite direction.
Customer Service Hotline:
:2157 2688
eBroker Systems Ltd
All Rights Reserved
64