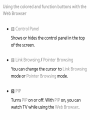
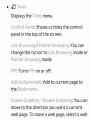
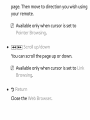
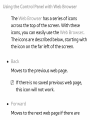
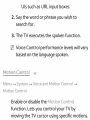
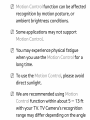
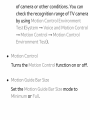
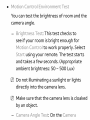
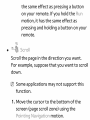
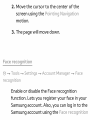
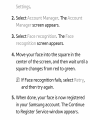
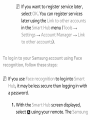
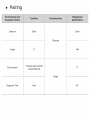
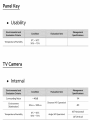
1
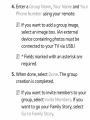
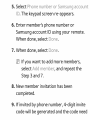
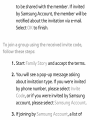
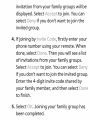
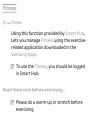
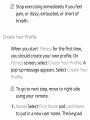
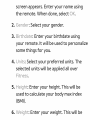
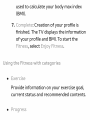
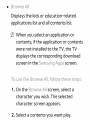
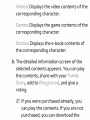
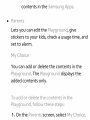
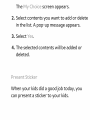
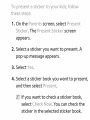
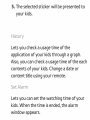
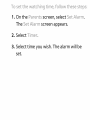
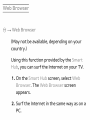
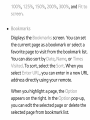
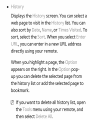
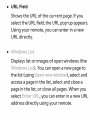
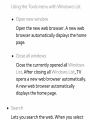
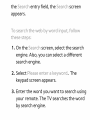
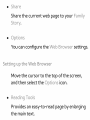
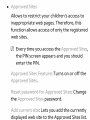
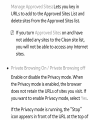
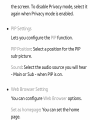
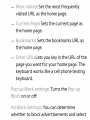
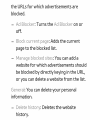
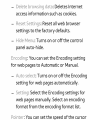
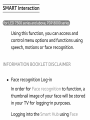
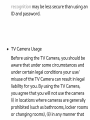
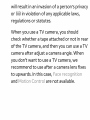
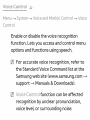
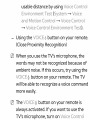
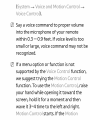
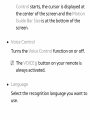
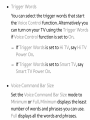
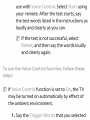
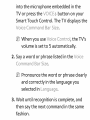
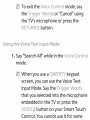
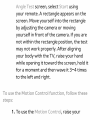
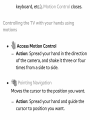
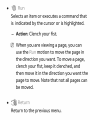
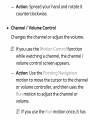
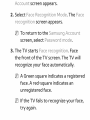
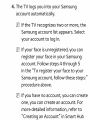
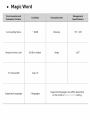
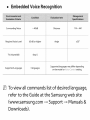
E MANUAL
SUPPORT
Thank you for purchasin9 this Samsuno
oroquc_.
To recewe more complete service, please register
your product at
www.samsung.com/register
Vlodel
Serial No.
3. Select an application in the Search Scope.
A ,,_¢_
mark disappears in the check box.
4. When done, Press the RETURN9 button.
®
Search H sto_yy
You can delete the keyword
in the search
history. Also, if you select Deete A, delete all
your search history.
ur Video
-_
u__>
Vdeo
(May not be available, depending on your country.)
Using this service from the Smart Hub, you
can get video recommendation
for movies from multiple
and search
providers.
Usng tBe You___
Vdeo
1. On the SmaN:: Hub screen,
select
2. Enjoy your movie watching with a
u/"
customized
recommendation
video
on
demand
service.
(VOD)
Family Sto_7
-+ Famiiy Story
Famy Story feature allows you to share
photos, messages, and events with your
family.
®
Create Group
if you are starting Famy Story for the first
time among your family members, you can
create a group and invite members.
•
/nvte
Members
After creating a group, you can invite your
family members who you want to share your
family's photos and events with.
®
Join G_"oup
if you were invited to this service from your
family member, you can select Jon Group to
enjoy Fsmy St:o/'y service.
To create a famy
group,t, foow
these steps:
1. On the Smart Hub screen, select Famy
The Famy
Story screen appears.
2. Select Create Group. The Create Group
screen appears.
3. Select AGREE. it is required
to agree with
the terms prior to using Famy
Story.
4. Enter a G_*oupName,
u_"Name and
u_"
Pt:_oneNumbe__ using your remote.
@ if you want to add a group image,
select an image box. (An external
device containing photos must be
connected to your TV via USB.)
@ * Fields marked with an asterisk are
required.
5. When done, select Done. The group
creation is completed.
@ if you want to invite members to your
group, select/nvte
Membe_*s. if you
want to go your Family Story, select
Go _::oFamy
Sto/"y.
nvte
these
membe_"s
to
you_ "_<Famy
Story
foow
steps:
[]
From the starting menu of Famy St::o_"y,
open the _os menu using your remote,
and then select G_'_oupMembe_s. The
G/"oup Membe/ys screen appears.
2. Select/nvte
Members, The Invite
Members for your Family Story screen
appears.
3. Select _iieect to ente__ Name,_.The keypad
screen appears.
4. Enter member's
name using your remote.
When doner select Done.
5. Select Phone number or Samsung account:
/D. The keypad screen re-appears.
6. Enter member's phone number or
Samsung account ID using your remote.
When done, select Done.
7. When done, select Done.
@ if you want to add more members,
select Add member, and repeat the
Step 3 and 7.
8. New member invitation
has been
completed.
9. if invited by phone number, 4-digit invite
code will be generated and the code need
to be shared with the member, if invited
by Samsung Account, the member will be
notified about the invitation via e-mail.
Select OK, to finish.
foow
these ste
1. Start Family Story and accept the terms.
m
You will see a pop-up message asking
about invitation type. if you were invited
by phone number, please select/nvte
Code, or if you were invited by Samsung
account,
please select Samsu_:_gAccount.
3. If joining by Samsung Account, a list of
invitation from your family groups will be
displayed. Select s,-,-_,_- tojoin. You can
select :'_@nvif you don't want to join the
invited group.
m
If joining by/nvte
Code, firstly enter your
phone number using your remote. When
done, select Do_:t_e.
Then you will see a list
of invitations from your family groups.
Select Ace pt: to join. You can select De_'_y
if you don't want to join the invited group.
Enter the 4-digit invite code shared by
your family member, and then select Do:_e
to finish.
5. Select _pt<.Joining your family group has
'Y'%'
been completed.
-_ Fitness
Using this function provided by Smart Hub,
Lets you manage F tness using the exerciserelated application downloaded in the
@ To use the F tness, you should be logged
in Smart Hub.
Read these note befo_e
exe_c
@ Please do a warm-up or stretch before
exercising.
@ Stop exercising immediately if you feel
pain, or dizzy, exhausted, or short of
breath.
C_eate You__ p_of
e
When you start F tness for the first time,
you should create your own profile. On
I::t:ness screen, select (:}_eate u_y P_yof e. A
pop-up message appears. Select C_eat:e
Plyof e.
@ To go to next step, move to right side
using your remote.
I.Name: Select Frst Name and Last Name
to put in a new user name. The keypad
u_y
screen
the
appears.
remote.
When
Enter
done,
your
name
select
using
Ot.
2. Gender: Select your gender.
3. B rthdate: Enter your birthdate
using
your remote. It will be used to personalize
some things for you.
4. Unts: Select your preferred
units. The
selected units will be applied all over
5. He gk_t: Enter your height. This will be
used to calculate your body max index
(BMi).
6. We ght: Enter your weight. This will be
used to calculate your body max index
(BMi).
7. Comp e_I:e:Creation
of your profile is
finished. The TV displays the information
of your profile and BMI. To start the
F t:ness, select E_oy F t:ness.
Usng _!_heF t:ness with cs_t®gor es
•
Exert se
Provide information on your exercise goal,
current status and recommended contents.
®
Provide information
on your basic body
profile, exercise progress, achievements for
your goals, etc,,
@ _ Kids
Using this function provided by Smart Hub,
lets you provides a quick launcher and the
recommended list to access the kids or
education-related application or contents
easily and quickly. Also, it helps user (parents)
to manage your kids.
Usng _!:heKds wth cat®go_ es
®
P ayg_ound
Displays recommended
contents and
applications. When you select an application
or content, the TV executes an application
or contents immediately.
@ The maximum number of contents list is
40.
@ The contents list can be edited by user
(parents). For more detailed information,
refer to "My C}t:_o
ce" in this section.
• St:cke__ Book
Displays the Sticker Books collected
stickers
which your kids received. Also, it can be
share with your Fsmy
3t:oPy¢
_ur kds can rece ve the st cker through
these methods
By User (parent): Presents a sticker
using the Present St cker function
arents menu.
Automatically:
in the
Presents a sticker when
watching content.
Creat ng a St cker Book
1, if you want to create a new St cker
Book, select Create a Ne
The Create a Ne
Stoker
Stcker
Book.
Book screen
appears.
2, Enter the Sticker Book's name using your
remote,
3.
Select
When
a
done,
select
Next,
color of the Sticker Book. When
done, select Next.
4. Check the created
sticker book. If you
want to change
a name, select Edt. If you
want to change
a color, select Back.
5. When done, select Done. A new Story
Book is created.
@ You can create
a new sticker book.
Maximum number
of books is 10.
@ You can check arrived stickers in the Get
Ne
St ckers. A new sticker will be saved
only 10 stickers which recently received.
•
B_,_o
se A
Displays
the
applications
kids
or
list
and
education-related
all
contents
list.
@ When you select an application
contents,
if the application
or
or contents
were not installed to the TV, the TV
displays the corresponding
screen in the _ms;ung
To use s::heB_o
1. On the Bro
se A/fOow
download
screen.
s::hesess:eps:
se A screen, select a
character
you wish. The selected
character
screen appears.
2. Select a contents
you want play.
V deos: Displays the video contents of the
corresponding
character.
Games: Displays the game contents of the
corresponding
character.
Stores: Displays the e-book contents of
the corresponding
m
character.
The detailed information
selected contents
the contents,
Story, add to
screen of the
appears. You can play
share with your I;:_m y
_sygrou_:_d,and give a
rating.
@ if you were purchased already, you
can play the contents,
purchased,
if you are not
you can download
the
contents
in the
Samsung
®
Lets you can edit the P ayground, give
stickers to your kids, check a usage time, and
set to alarm.
My Choce
You can add or delete the contents in the
P ayground. The P ayground displays the
added contents only.
To add or deete the contents
P ayground,
foow
n the
these steps:
1. On the Parents screen, select My Cho ce.
The My Choce screen appears.
2. Select contents you want to add or delete
in the list. A pop-up message appears.
3. Select _s.
4. The selected contents
will be added or
deleted.
Present St cker
When your kids did a good job today, you
can present a sticker to your kids.
To present a st cker to your kds foow
these steps
1. On the Parents screen, select Present
St cker. The Present St cker screen
appears.
2. Select a sticker you want to present. A
pop-up message appears.
3. Select _s.
4. Select a sticker book you want to present,
and then select Present.
if you want to check a sticker book,
select Check Now. You can check the
sticker in the selected sticker book.
5. The selected sticker will be presented to
your kids.
Lets you check a usage time of the
application
of your kids through
a graph.
Also, you can check a usage time of the each
contents
content
of your kids. Change a date or
title using your remote.
Set Aarm
Lets you can set the watching
time of your
kids. When the time is ended, the alarm
window
appears.
To
set
the
atch
ng
tree
foow
these
steps;
1. On the Parents screen, select Set Aarm.
The Set Aarm screen appears.
2. Select Truer.
3. Select time you wish. The alarm will be
set.
Web Browser
-+ Web Browser
(May not be available, depending on your
country.)
Using this function
provided
Hub, you can surf the Internet
by the Smart:
on your TV.
1. On the Smart: Hub screen, select Web
Browser. The Web Bro set screen
appears.
2. Surf the lnternet in the same way as on a
PC.
®
'
.........
<._
o
I <,
I
<,._
Shows or hides the control
panel in the top
of the screen.
0
®
PlP
Turns _:;,;_P
_'°';=
°....on or off, With _'°
_'
};;_
on_ you
can
watch TV while using the We_>S,",",,*,,::=:_
"
®
_os
Displays the _os
Contro
menu.
Pane: Shows or hides the control
panel in the top of the screen.
Link B_o sing / Pointe__B_o sing: You can
change the cursor to Link B_o sing mode or
Ponte/_ B/_o sng mode.
P/P: Turns PIP on or off.
Add to Bookma_yk:Add to current page to
the Bookma_yks.
Enabe G_sbb ng / Dsabe
move to the direction
G_yabbng: You can
you want a current
web page. To move a web page, select a web
page. Then move to direction you wish using
your remote.
ID Available only when cursor is set to
_.....
B_
_owsnq
_
®
You can scroll the page up or down,
ID Available only when cursor is set to Link
®
R@t::uPt_
Close the Web B_'*_owse_,
Usng the Cont:ro
The Web Bro
Pane with Web Browser
set has a series of icons
across the top of the screen. With these
icons, you can easily use the Web Bro
set.
The icons are described below, starting
the icon on the far left of the screen.
with
®
Moves to the previous web page.
@ if there is no saved previous web page,
this icon will not work.
• For
ard
Moves to the next web page if there are
saved URLs.
@ if there is no saved next web page, this
icon will not work.
®
Refreshes the current
current
connection
page or stops the
from loading.
®
Goes to the URL you specified as your the
home page.
®
Zoo
m
You can select a zoom level of <_'_%
"_" 7 <_<
c'
®
Displays the Bookmarks
the current
favorite
screen. You can set
page as a bookmark
or select a
page to visit from the bookmark
list.
You can also sort by D_:::e, N_isme,or
V s t:e. To sort, select the 3_o_yt:.
When you
select f_n_:::e_
_ URL, you can enter in a new URL
address directly
using your remote.
When you highlight a page, the Opton
appears on the right, in the Opton
pop-up,
you can edit the selected page or delete the
selected page from bookmark
list.
Delete all bookmark lists.
Sets the current
page as a bookmark.
®
You can import a bookmark file saved in
the other device like a PC.
®
LX w ........
,_,©OObma<_'<
You can export a bookmark file from your
TV to the other device connected your
TV.
®
Displays the H story screen. You can select a
web page to visit in the H story list, You can
also sort by Dte,
N_me, or Trees V s t:ed. To
sort, select the So_yt::.
When you select f_:st:e_
_
URL, you can enter in a new URL address
directly using your remote.
When you highlight a page, the Opton
appears on the right. In the Opton popup you can delete the selected page from
the history list or add the selected page to
bookmark.
if you want to delete all history list, open
the Toos menu using your remote, and
then select Deete/_.
=
URL Field
Shows the URL of the current page. if you
select the URL field, the URL pop=up appears.
Using your remote, you can enter in a new
URL directly.
• Wndows
Lss:_
Displays list or images of open windows
Wndo
(the
s LsO. You can open a new page to
the list (using
ne
ndow),
select and
access a page in the list, select and close a
page in the list, or close all pages. When you
select fEn_:::e_
_ URL, you can enter in a new URL
address directly
using your remote.
®
_s_Js_
n
c:_
W/NCIOW
Open the new web browser. A new web
browser automatically
displays the home
page.
Close the currently opened all Wndo
s
Lst. After closing all W ndows Lst, TV
opens a new web browser automatically.
A new web browser automatically
displays the home page.
®
Lets you search the web. When you select
the
Search
entry
field,
the
Search
screen
appears.
To searchthe
eb by
ord input follow
these steps:
1. On the Search screen, select the search
engine. Also, you can select a different
search engine.
:2. Select Pease enter a keyword_. The
keypad screen appears.
3. Enter the word you want to search using
your remote. The TV searches the word
by search engine.
•
Sna/ye
Share the current web page to your" ....
®
_
You can con
ure the We
Bro'_,'_:_c::_r
settings.
....
..._,._,._
os_,_,o_
t_e Web B _Jw_e_
Move the cursor
to the top of the screen,
and then select the _"_,_°
,_,_,<_
icon
®
Provides an easy-to-read
the main text.
page by enlarging
®
Approved
Stes
Allows to restrict your children's access to
inappropriate
web pages. Therefore, this
function allows access of only the registered
web sites.
@ Every time you access the Approved
Stes,
the PIN screen appears and you should
enter the PIN.
Approved
Stes Feature: Turns on or off the
Approved
Stes.
Reset pass ord for Approved Stes: Change
the Approved Stes password.
Add current
ste: Lets you add the currently
displayed web site to the Approved
Sites list.
Manage
URLs
Stes:
to
delete
add
sites
to
from
the
Lets
Approved
the
Approved
you
key
Sites
Sites
in
List
and
list.
@ if you turn Approved Stes on and have
not added any sites to the Clean site list,
you will not be able to access any lnternet
sites.
•
Prvate
Brows
On / Prvate
Bro
sng off
Enable or disable the Privacy mode. When
the Privacy mode is enabled, the browser
does not retain the URLs of sites you visit, if
you want to enable Privacy mode, select _s.
if the Privacy mode is running, the _Stop"
icon appears in front of the URL at the top of
the screen.
To disable Privacy mode, select it
again when Privacy mode is enabled.
®
t9 / P C _s_ __ _ c
Lets you configure
the P_
_"= function.
P_ Post on: Select a position for the PiP
sub-picture.
_" _'w
_"Select the audio source you will hear
- Main or Sub - when PiP is on.
®
Most v s ted: Set the most frequently
visited URL as the home page.
Current Page: Sets the current page as
the home page,
Bookmarks:
Sets the bookmarks
URL as
the home page.
Enter URL: Lets you key in the URL of the
page you want for your home page. The
keyboard
works like a cell phone texting
keyboard.
Pop_up Bock sett rigs: Turns the Pop_up
Bock on or off.
Ad Book Sett ngs: You can determine
whether to block advertisements
and select
the URLs for which advertisements
are
blocked.
Ad Bocker:
Turns the Ad B ocker on or
off.
Bock current page: Adds the current
page to the blocked list.
Manage bocked stes: You can add a
website for which advertisements should
be blocked by directly keying in the URL,
or you can delete a website from the list.
Genera: You can delete your personal
information.
Deete h story: Deletes the website
history.
Deete
brows
access
information
ng
data:
Deletes
such
lnternet
as cookies.
Reset Sett ngs: Reset all web browser
settings to the factory
defaults.
Hde Menu: Turns on or off the control
panel auto-hide.
Encod ng: You can set the Encoding setting
for web pages to Automatic
or Manual.
Auto se ect: Turns on or off the Encoding
setting for web pages automatically.
Sett ng: Select the Encoding
settings for
web pages manually. Select an encoding
format
from the encoding
format
list.
Po nter: You can set the speed of the cursor
-.,
_ ::,_:_eec_.
Selecta ointers ee
version information
about the We@Browser.
Skype created
a little piece of software
makes communicating
that
with people around
the world easy and fun.
With Skype you can say hello or share a
laugh with anyone, anywhere. And if both
of you are on Skype, it's free. Communicate
with people around the world!
ID For more information,
download the
Skype user's manual from
samsung.com.
WWW.
Due to the various capabilities of products
Samsung Smart Hub - Content Service,
in the available content,
featuring
the
as well as limitations
certain features, applications,
and services may not be available on all devices or in all
territories.
Some features
peripheral
on Smart Hub may also require additional
devices or membership
fees that are sold
separately. Please visit http://www.samsung,
information on specific device information
availability.
The services and availability
com for more
and content
of content
through
Smart Hub are subject to change from time to time without
prior notice.
SMART Interaction
Using this function, you can access and
control menu options and functions using
speech, motions
HFORM
or face recognition.
OH BOOKLET D SCLA MER
,, Face recognition Log-in
in order for Face _:_ecognt: on to function, a
thumbnail image of your face will be stored
in your TV for logging-in purposes.
Logging into the Smart Hub using Face
recogn t on may be less secure than using an
ID and password.
®
TV Camera Usage
Before using the TV Camera, you should be
aware that under some circumstances and
under certain legal conditions
your use/
misuse of the TV Camera can result in legal
liability for you. By using the TV Camera,
you agree that you will not use the camera
(i) in locations
prohibited
or changing
where cameras are generally
(such as bathrooms,
locker rooms
rooms), (ii) in any manner that
will result in an invasion of a person's privacy
or (iii) in violation of any applicable laws,
regulations or statutes.
When you use a TV camera, you should
check whether
a tape attached
or not in rear
of the TV camera, and then you can use a TV
camera after adjust a camera angle. When
you don't want to use a TV camera, we
recommend to use after a camera lens fixes
to upwards. In this case, Fssce_yecogrst: o_:s
and Mo_::o_:sCo_:st:_yoare not available.
(}}}O [ t Y0
Menu -_
stem -_ vote
and Moton
Contro
-_ vote
Enable or disable the voice recognition
function.
Lets you access and control menu
options and functions using speech.
@ For accurate voice recognition, refer to
the Standard Voice Command list at the
Samsung web site (www.samsung.com
support _ Manuals & Downloads).
function can be affected
@ _5,.,.,_.r _:_s_._-,_
recognition
by unclear pronunciation,
voice level, or surrounding
noise,
To use Voce Contro, you must
pronounce words and phrases clearly and
correctly
in the language you selected in
Ambient noise may cause Voce Contro
to malfunction. (Appropriate surrounding
noise: Below 40dB)
Your TV can "hear" your voice commands in
two ways:
Using the TV's microphone. (Distant
Recognition)
We are recommended using Vote
Co_:_t::_ofunction within about 13
ft with your TV. You can check the
usable
distance
by
using
EnvronmentTest
and
-*
Moton
Vote
Vote
yJstem
Contro
Contro
÷
fZnv
Vote
ronment
÷
Contro
Vote
Contro
Test).
Using the VOCE_ button on your remote.
(Close Proximity Recognition)
@ When you use the TV's microphone,
words may not be recognized
the
because of
ambient noise. If this occurs, try using the
VOCE_
button
on your remote. The TV
will be able to recognize
a voice command
more easily.
@ The VOCE:@ button on your remote is
always activated, if you want to use the
TV's microphone, turn on Vote Contro
m _ Voce and Moron Contro
Voce Contro ).
@ Say a voice command to proper volume
into the microphone of your remote
within 0.3 m 0.9 feet. if voice level is too
small or large, voice command
may not be
recognized.
@ if a menu option or function is not
supported by the Voce Contro
function,
we suggest trying the Moron Cont:_'_o
function. To use the Moron Cont_'o, raise
your hand while opening it toward the
screen, hold it for a moment and then
wave it 3~4 time to the left and right.
Moron Cont_'o starts, if the Moron
_. _ 0_ ,J starts,
the
center
:; ,_ :::_DG
of
the
the
cursor
screen
.:::_
_:Y_::_
.....
iS at
is displayed
and
the
at
__,_
9_._o ,_ 0
the bottom of the
screen.
_,_,,_,c,_jbutton on your remote is
always activated.
®
L_,,_,_c_
:_c _ ::_
o osudge
Select the recognition
use.
language you want to
®
Tr gger Words
You can select the trigger words that start
the Voce Contro
function. Alternatively
you
can turn on your TV using the Tr gger Worcts
if Vote CoP_tro function is set to On.
if Tr gger Words is set to H TV, say H TV
Po er On.
if Tr gger Words is set to Smart TV, say
Smart TV Po er On.
• Vote
Command
Bar Sze
Set the Voce Command
nmum
or Fu. Mnmum
Bar Sze mode to
displays the least
number of words and phrases you can use.
Fu displays all the words and phrases.
®
Voce Sens t vty
You can configure the sensitivity of Voice
recognition.
How ng: Select howling levels.
Recogn t: on _'espons veness: Select the
responsiveness level of Voice recognition.
• Voce Cons:to Envronment: Tes:t:
You can test the amount of ambient noise
level detected by the TV microphone.
se _s_:: This test checks the amount
of ambient
microphone.
will prevent
noise detected
by the TV
Too much ambient
Voice Command
noise
from
functioning.
your
To
remote.
a few
Mc
from
select
test
the
keep
TV
using
and
takes
as quiet
as
test.
_ _st:
the
Next
starts
Please
during
& Speake_
sound
The
seconds.
possible
run,
Determines
speakers
by the TV microphone
if the
picked
up
will disrupt Voice
Command. To run, select 3t_yt using your
remote. The test starts and takes a few
seconds. Please keep as quiet as possible
during the test.
@ Available only when Speake__Seect is
set to TV Speaker.
Voce Cont_ro _st:
This test checks the
volume level and clarity of your voice for
use with Voce Contro.
Select Start using
your remote. After the test starts, say
the test words listed in the instructions
as
loudly and clearly as you can.
@ if the test is not successful, select
Retest, and then say the words loudly
and clearly again.
To use the Voce Contro
@ if Vote
Contro
funct
function
on foow
these
is set to On, the TV
may be turned on automatically
the ambient environment.
by effect of
I.Say the Tr gger Words that you selected
into
TV
the
or
Smart
Voce
microphone
press
the
Touch
embedded
VO/CE_
Control.
Comm_nd
B_/"
button
The
TV
in the
on
your
displays
the
Sze.
@ When you use Voce Con_:ro, the TV's
volume is set to 5 automatically.
2. Say a word or phrase listed in the Voce
Command Bar Sze.
@ Pronounce the word or phrase clearly
and correctly
in the language you
selected in L_ngu_sge.
3. Wait until recognition
is complete, and
then say the next command in the same
fashion.
@ To exit the Voce Con_:ro mode, say
the Tr gger Words or "Cancel" using
the TV's microphone or press the
RE!TURN9 button.
Usng the Voce Text nput Mode
1. Say "Search All" while in the Voce Cont:ro
mode.
@ When you use a QWERTY keypad
screen, you can use the Voice Text
Input Mode. Say the Tr gger Words
that you selected into the microphone
embedded
in the TV or press the
VO/C£@ button on your Smart Touch
Control. You cannot use it for some
Uls
such
as
URL
input boxes.
2. Say the word or phrase you wish to
search for.
3. The TV executes the spoken function.
@ Voice Control performance
levels will vary
based on the language spoken.
Moron
Cont_'_o
Menu _ Sys'l::em_ Vote
and Mot: on Con¢i:ro
Mot:on Con¢i:ro
Enable or disable the Mo_ on Con_:_o
function.
Lets you control
your TV by
moving the TV cursor using specific motions.
Moron
Contro
recognition
ambient
function
by
brightness
motion
can
be
posture,
affected
or
conditions.
Some applications may not support
Moron Contro.
You may experience physical fatigue
when you use the Mot on Con_::ro for a
long time.
To use the Moron Contro,
please avoid
direct sunlight.
We are recommended
using Moron
Con tro function within about 5 - 13 ft
with your TV. TV Camera's recognition
range may differ depending
on the angle
of camera or other conditions. You can
check the recognition
range of TV camera
by using Moron Contro
f_nvronmerYt:
ys'tem
Voce _:_ndMoron Contro
÷ Moron Contro
Mot:on Contro
f_nv ronment Test).
•
Moron
You
Contro
can
camera
test
EnvronmentTest
the
brightness
of
room
and
the
angle.
Br ghtness _st:
This test checks to
see if your room is bright enough for
Mot:on
Contxyo to work properly.
Stx_d::using your remote.
Select
The test starts
and takes a few seconds. (Appropriate
ambient brightness:
50 - 500 Lux)
@ Do not illuminating a sunlight or lights
directly into the camera lens.
@ Make sure that the camera lens is cloaked
by an object.
Came_a Ange _st:
On the Came_a
Ange _st
screen, select Start using
your remote. A rectangle appears on the
screen. Move yourself into the rectangle
by adjusting the camera or moving
yourself in front of the camera, if you are
not within the rectangle position, the test
may not work properly. After aligning
your body with the TV, raise your hand
while openin 9 it toward the screen, hold it
for a moment and then wave it 3~4 times
to the left and right.
To use the Mot:on
Contro
funct
1. To use the Moron Contro,
on foow
these
raise your
hand
hold
it for
time
to
opening
the
left
and
and
if the
cursor
is displayed
screen
and
bottom
it toward
a moment
starts,
the
2.
while
the
of
Control
the
TV
useable
motions,
the
Mot:on
it 3~4
(}ont:_o
starts,
center
Gude
screen,
wave
Moron
(:ont:_yo
at
the
then
right.
Moron
the
the
of
B_r
the
Sze
is at
screen.
using
see
your
hands.
For
the
below.
@ Note that the Moron Cont:ro function
closes if your hands go out of the camera
range.
@ While using the Mot:on Cont:ro, if you
use the other devices (i.e. remote control,
0
Access Motion Control
Action:Spread your hand inthedirection
ofthecamera,and shake itthreeor four
timesfrom a sideto side,
0
Moves the cursor to the position you want.
Action: Spread your hand and gu idethe
cursor to position you want.
0
Selects an item or executes a command that
is indicated by the cursor or is highlighted.
-
Action:
Clench your fist.
When you are viewing a page, you can
use the R_._2r._
motion to move the page in
the direction
you want. To move a page,
clench your fist, keep it clenched, and
then move it in the direction
you want the
page to move. Note that not all pages can
be moved.
0
Return to the previous menu.
Action:
Spread
your
hand
and
rotate
it
counterclockwise.
.
Channel / Volume Control
Changes the channel or adjust the volume.
@ if you use the Moron Contro function
while watching a channel, the channel/
volume control screen appears.
Action: Use the Pont ng Nav gat on
motion to move the cursor to the channel
or volume controller,
and then uses the
Run motion to adjust the channel or
volume.
ID if you use the Run motion once, it has
the same effect as pressing a button
on your remote. If you hold the Run
motion, it has the same effect as
pressing and holding a button on your
remote.
%
0
C_
_t
Scroll the page in the direction you want.
For example, suppose that you want to scroll
down.
Some applications may not support this
function.
1. Move the cursor to the bottom of the
screen (page scroll zone) usin 9 the
_"
_
motion
2. Move the cursor to the center of the
screen using the Po nt: ng Nav gat: on
motion.
3. The page will move down.
Face recogn
-+ Toois -+ Sett:ings -+ Account: Manager
-+ Face
Enable or disable the Face recognition
function.
Lets you register
your face in your
Samsung account.
Also, you can log in to the
Samsung account
using the Face recogr_ t: on
function without
inputting your account ID
or your account password.
@ You can register your face in only one
account.
To registe_ _'_
you___
face n you_"_<
Samsung account
foow
these steps:
@9To use this function, you must log into Smart
Hub. if you don't have a Samsung account, you
should create one before using this function.
To create your Samsung account, refer to
"Creating an Account" in Sm_s_'_t
Hub.
1. On the 3_mart Hub screen, open the Toos
menu using your remote, and then select
Sett
ngs,
2. Select Account Manager, The Account
Manager screen appears.
3. Select Face recogn t on, The Face
recogn t on screen appears.
4. Move your face into the square in the
center of the screen, and then wait until a
square changes from red to green.
if Face recognition
fails, select Retry,
and then try again.
5. When done, your faceis now registered
in your Samsung account. The Continue
to Register Service window appears.
@ if you want to register service later,
select OK. You can register services
later using the Lnk to ott_er accounts
in the Smart Hub menu (TOos
Settngs _ Account Many,get -_ Lnk
to ott/_er accounts),
To og ris_
to your Samsurs_gaccours_tusng Face
recogrs tiorss foow these steps
@ if you use Face recogn t on to log into Smart
Hub, it may be less secure than logging in with
a password.
1. With the Smart Hub screen displayed,
select lyl using your remote. The Samsung
Account:
screen
appears.
2. Select Face Recog_:_t: oI:_Mode. The Face
/-ecogn _:on screen appears.
@ To return to the Samsung Account::
screen, select Pass ord mode.
3. The TV starts Face recogn t: on. Face
the front of the TV screen. The TV will
recognize your face automatically.
% A Green square indicates a registered
face. A red-square
unregistered
indicates an
face.
63 if the TV fails to recognize your face,
try again.
4. The
TV
logs
you
into your Samsung
account automatically.
if the TV recognizes
Samsung account
your account
two or more, the
list appears. Select
to log in.
if your face is unregistered,
register
you can
your face in your Samsung
account.
Follow steps 4 through
5
in the "To register
your face to your
Samsung account,
follow these steps:
procedure
above.
if you have no account,
you can create
one, you can create an account.
more detailed information,
_Creating an Account"
For
refer to
in Smart Hub
section.
Specification
for SMART Interaction
Voice Control
• Wake On Voice
Surrounding
Noise
Required Voice Level
~ 40dB
Distance
60 dB or higher
Angle
1M --4M
+_30°
i/
iJ
Supported
Languages
3 languages
Supported languages may differ depending
on the model or Vo:_ (;o_;tr(:_ setting.
= Magic Word
Surrounding
Noise
~ 40dB
Distance
RequiredVoice Level
60 dB or higher
Angle
TV Volume(dB)
Step 10
Supported Languages
3 languages
1M --4M
+30 °
Supported languages may differ depending
on the model or V:_ce
_,_setting.
• Embedded Voice Recognition
Surrounding
Noise
~ 40dB
Distance
Required Voice Level
60 dB or higher
Angle
Supported Languages
3 languages
I M --4M
+30 °
Supported languages may differ depending
on the model or V(:_c_!:
_,setting.
To view all commands list of desired language,
refer to the Guide at the Samsung web site
(www.samsung.com
Downloads).
Support
Manuals &
Motion
.
Control
Conditions for Recognition
Operating Speed
Environment
[Illumination]
Background
Recognition
Slow / Fast
50Lux--
White
500Lux
or Grey
Distance
1.5M --4M
Horizontal Angle
+15 °
Vertical Angle
+I0 °
Face recognition
.
Conditions for Recognition
Skin Color
Environment
[Illumination]
Background
Recognition
Response Time
White, Yellow, Black,
Indian, Hispanic
50Lux--
White
500Lux
or Grey
2 sec (for 1 person) -8 sec (for 5 persons)
Distance
1.5M --4M
Horizontal Angle
+15 °
Vertical Angle
+10 °
Smart Touch Control
• Touch
Within 300 msec,
(Connected State)
Response Time
......
Distance
......
Within 1,5 sec,
(Disconnected State)
30cm
....
4M
Vertical Angle
Horizontal Angle
0° -- 20 °
0°-
85 °
• Server Voice
Surrounding
Noise
45-
50dB
Voice Recognition
Distance
Remote
Operating
Required Voice Level
60 dB or higher
TV Volume (dB)
Step 50
Supported
Languages
Response Time
3 languages
~ 5 sec
Control
Distance
I Ocm -- 30cm
30cm -- 4M
• Hot Keys
Connected State
30cm
Distance
Disconnected
State (IR)
4M
Vertical Angle
0° -- 20 °
.......................................................................................................................
...............................................................
Horizontal Angle
00--85 °
• Pairing
Distance
30cm
30cm
Distance
Angle
0°
Angle
Response Time
Panel Key
•
Usability
TV Camera
• Internal
Surrounding
IM
Noise
Environment
[Illumination]
Temperature/Humidity
Distance (AF Operation)
30Lux--
500Lux
Ooc-- 50oc
50% -- 75%
4M
45°(Horizontal)
Angle (AF Operation)
20°(Vertical)
• External
Surrounding
Noise
Environment
[Illumination]
Temperature/Humidity
~ 40dB
30Lux--
500Lux
OoC-- 50oC
50% -- 75%
Distance (AF Operation)
4M
45°(Hodzontal)
......................................................
20°(Vertical)
Angle (AF Operation)
............................................................................
J
Manufactured
under license from DTS Licensing
the Symbol, and DTS and the Symbol together
PremiumAudio
trademarks
The terms
I-I."1 1
Limited.
DTS,
are registered
of DTS, Inc. © 2011 DTS, Inc. All Rights Reserved.
HDMI and HDMI High-Definition
and the HDMI Logo are trademarks
HDMI Licensing
Multimedia
or registered
LLC in the United States and other
Interface,
trademarks
of
countries.
Open Source License Notice
In the case of using open source software,
product
Open Source
menu.
Open Source
License Notice
is written
only English.
Licenses are available on the