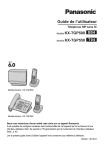
1
User Guide
SIP Cordless Phone
Model No.
KX-TGP500
Model No.
KX-TGP550
Model shown is KX-TGP500.
Model shown is KX-TGP550.
Thank you for purchasing a Panasonic product.
You can configure some of the features of this unit through the Web user interface. See
“Programming through the Web user interface”, page 40.
Please read this guide before using the unit and save it for future reference.
Document Version: 2012-01
Table of Contents
Introduction
Y Phonebook using the Handset
About this guide . . . . . . . . . . . . . . . . . . . . . . . . . 4
Model composition . . . . . . . . . . . . . . . . . . . . . . . 4
About the Web user interface . . . . . . . . . . . . . . . 4
Emergency calls . . . . . . . . . . . . . . . . . . . . . . . . . 5
Additional/replacement accessories . . . . . . . . . . 5
Expanding your phone system . . . . . . . . . . . . . . 5
Using the phonebook . . . . . . . . . . . . . . . . . . . .
Adding entries. . . . . . . . . . . . . . . . . . . . . . . . . .
Finding and calling a phonebook entry. . . . . . .
Editing entries. . . . . . . . . . . . . . . . . . . . . . . . . .
Erasing entries . . . . . . . . . . . . . . . . . . . . . . . . .
Chain dial . . . . . . . . . . . . . . . . . . . . . . . . . . . . .
Speed dial. . . . . . . . . . . . . . . . . . . . . . . . . . . . .
Export/import phonebook entries . . . . . . . . . . .
Getting Started
Controls (Handset) . . . . . . . . . . . . . . . . . . . . . . . 6
Controls (Base unit) . . . . . . . . . . . . . . . . . . . . . . 6
Understanding the indicators on the base unit . . 8
Display . . . . . . . . . . . . . . . . . . . . . . . . . . . . . . . . 9
Initial settings . . . . . . . . . . . . . . . . . . . . . . . . . . 10
Y Making and Answering Calls using
the Handset
Making calls . . . . . . . . . . . . . . . . . . . . . . . . . . . 12
Using the speakerphone . . . . . . . . . . . . . . . . . . 12
Adjusting the receiver or speaker volume . . . . . 12
Making a call using the redial list . . . . . . . . . . . 12
Editing/erasing/storing a number in the redial list
. . . . . . . . . . . . . . . . . . . . . . . . . . . . . . . . . . . . . 12
Answering calls . . . . . . . . . . . . . . . . . . . . . . . . . 13
Auto talk . . . . . . . . . . . . . . . . . . . . . . . . . . . . . . 13
Adjusting the handset ringer volume. . . . . . . . . 13
Temporary handset ringer off . . . . . . . . . . . . . . 13
Hold. . . . . . . . . . . . . . . . . . . . . . . . . . . . . . . . . . 13
Making another call during a call . . . . . . . . . . . 13
Useful features during a call . . . . . . . . . . . . . . . 13
Transferring calls to an outside party . . . . . . . . 14
Conference calls . . . . . . . . . . . . . . . . . . . . . . . . 15
: Making and Answering Calls
using the Base Unit (KX-TGP550
only)
Making calls . . . . . . . . . . . . . . . . . . . . . . . . . . . 16
Using the speakerphone . . . . . . . . . . . . . . . . . . 16
Off-hook monitor . . . . . . . . . . . . . . . . . . . . . . . . 16
Adjusting the receiver or speaker volume . . . . . 16
Making a call using the redial list . . . . . . . . . . . 16
Editing/erasing/storing a number in the redial list
. . . . . . . . . . . . . . . . . . . . . . . . . . . . . . . . . . . . . 17
Answering calls . . . . . . . . . . . . . . . . . . . . . . . . . 17
Adjusting the base unit ringer volume . . . . . . . . 17
Temporary base unit ringer off . . . . . . . . . . . . . 17
Hold. . . . . . . . . . . . . . . . . . . . . . . . . . . . . . . . . . 17
Making another call during a call . . . . . . . . . . . 17
Useful features during a call . . . . . . . . . . . . . . . 18
Transferring calls to an outside party . . . . . . . . 18
Conference calls . . . . . . . . . . . . . . . . . . . . . . . . 19
20
20
20
21
21
21
21
22
: Phonebook using the Base Unit
(KX-TGP550 only)
Using the phonebook . . . . . . . . . . . . . . . . . . . .
Adding entries. . . . . . . . . . . . . . . . . . . . . . . . . .
Finding and calling a phonebook entry. . . . . . .
Editing entries. . . . . . . . . . . . . . . . . . . . . . . . . .
Erasing entries . . . . . . . . . . . . . . . . . . . . . . . . .
Chain dial . . . . . . . . . . . . . . . . . . . . . . . . . . . . .
Speed dial. . . . . . . . . . . . . . . . . . . . . . . . . . . . .
Copying base unit phonebook entries . . . . . . .
Export/import phonebook entries . . . . . . . . . . .
23
23
23
24
24
24
24
25
25
Y Programming using the Handset
Programmable settings. . . . . . . . . . . . . . . . . . .
Call forward . . . . . . . . . . . . . . . . . . . . . . . . . . .
Do not disturb . . . . . . . . . . . . . . . . . . . . . . . . . .
Block anonymous calls . . . . . . . . . . . . . . . . . . .
Call block (Caller ID service users only) . . . . . .
Anonymous calls (Block Caller ID) . . . . . . . . . .
Changing the handset name . . . . . . . . . . . . . .
Date and time . . . . . . . . . . . . . . . . . . . . . . . . . .
Updating the base unit software . . . . . . . . . . . .
26
29
30
30
30
31
31
31
32
: Programming using the Base
Unit (KX-TGP550 only)
Programmable settings. . . . . . . . . . . . . . . . . . .
Call forward . . . . . . . . . . . . . . . . . . . . . . . . . . .
Do not disturb . . . . . . . . . . . . . . . . . . . . . . . . . .
Block anonymous calls . . . . . . . . . . . . . . . . . . .
Call block (Caller ID service users only) . . . . . .
Anonymous calls (Block Caller ID) . . . . . . . . . .
Date and time . . . . . . . . . . . . . . . . . . . . . . . . . .
Updating the base unit software . . . . . . . . . . . .
33
36
37
37
37
38
38
38
Programming through the Web User
Interface
Programming through the Web user interface . 40
Registering a Unit
Registering a unit . . . . . . . . . . . . . . . . . . . . . . . 41
Special Features
Using Caller ID service . . . . . . . . . . . . . . . . . . . 42
2
Document Version 2012-01
Table of Contents
Caller list . . . . . . . . . . . . . . . . . . . . . . . . . . . . . . 42
Voice mail service . . . . . . . . . . . . . . . . . . . . . . . 44
Intercom Features
Intercom features between handsets . . . . . . . . 45
Intercom features between the handset and base
unit (KX-TGP550 only) . . . . . . . . . . . . . . . . . . . 46
Handset locator . . . . . . . . . . . . . . . . . . . . . . . . . 47
Useful Information
Belt clip . . . . . . . . . . . . . . . . . . . . . . . . . . . . . . . 48
Wall mounting . . . . . . . . . . . . . . . . . . . . . . . . . . 48
Error messages. . . . . . . . . . . . . . . . . . . . . . . . . 50
Troubleshooting . . . . . . . . . . . . . . . . . . . . . . . . 51
Specifications . . . . . . . . . . . . . . . . . . . . . . . . . . 56
Open Source Software
Open Source Software . . . . . . . . . . . . . . . . . . . 57
Index
Index . . . . . . . . . . . . . . . . . . . . . . . . . . . . . . . . 63
Document Version 2012-01
3
Introduction
About this guide
This guide explains how to operate and customize KX-TGP500/KX-TGP550. Please be sure your
network is configured for KX-TGP500/KX-TGP550. Contact your administrator about the network
settings and available features.
Model composition
■ KX-TGP500 series
■ KX-TGP550 series
Base unit
Handset
Part No.
Part No.
KX-TGP500
KX-TGP500
KX-TPA50
1
KX-TGP550
KX-TGP550
KX-TPA50
1
Series
Model No.
KX-TGP500 series
KX-TGP550 series
Quantity
Feature differences
Intercom
Series
Making or answering
calls with base unit
Between base unit
and handset
Between handsets
KX-TGP500 series
–
r*1
–
KX-TGP550 series
r
r*1
r
*1 Intercom calls can be made between the handsets by purchasing and registering one or more optional
handsets (page 5).
About the Web user interface
You can configure some of the features of this unit through the Web user interface (page 40). You can
access this interface from a web browser on any computer connected to the network. Contact your
administrator for further information.
4
Document Version 2012-01
Introduction
Emergency calls
All lines including unassigned lines are available for emergency calls if the phone numbers are
configured in the Web user interface. Availability depends on your phone system. Contact your
administrator for further information.
Additional/replacement accessories
Please contact your nearest Panasonic dealer for sales information.
Accessory item
Order number
Rechargeable
batteries
HHR-4DPA*1
L For users in the United States:
To order, please call 1-800-332-5368 or visit
http://www.panasonic.com/batterystore
Battery type:
– Nickel metal hydride (Ni-MH)
– 2 x AAA (R03) size for each handset
Headset
KX-TCA60, KX-TCA93, KX-TCA94
*1 Replacement batteries may have a different capacity from that of the supplied batteries.
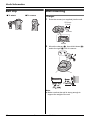
Expanding your phone system
You can expand your phone system by registering
optional handsets (6 max.) to a single base unit.
B04
Handset (optional): KX-TPA50
Document Version 2012-01
5
Getting Started
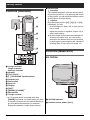
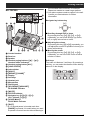
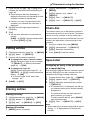
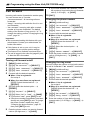
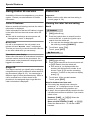
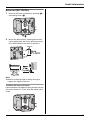
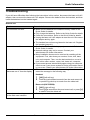
Controls (Handset)
A
G
H
B
I
C
D
J
E
F
■ Control type
A Soft keys
The handset features 2 soft keys and a joystick.
By pressing a soft key, or by pressing the center
of the joystick, you can select the feature shown
directly above it on the display.
B Joystick
By pushing the joystick ({^}, {V}, {3}, or {4})
repeatedly, you can:
– scroll through (up, down, left, or right) various
lists or items
– adjust the receiver or speaker volume (up or
down) while talking
L As all multiple items cannot be displayed on
screen at the same time, you can quickly
search for the desired item to move screens
by pushing the joystick right or left, instead of
scrolling down or up line by line (page 10).
K
L
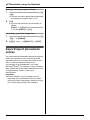
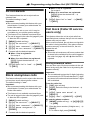
Controls (Base unit)
LINE
KX-TGP500
A
A
B
A Charge indicator
Ringer indicator
Message indicator
B Speaker
C {C} (TALK)
D {s} (SP-PHONE: Speakerphone)
E Headset jack
F Dial keypad
G Receiver
H Display
I {OFF}
J {REDIAL} {PAUSE}*1
K Microphone
L Charge contacts
*1 A 3.5 second pause is inserted each time
{PAUSE} is pressed. It is useful when you want
to operate voice mail service without listening to
pre-recorded announcement, for example.
Repeat as needed to create longer pauses.
6
B
A STATUS indicator
B Handset locator button {ALL}
Document Version 2012-01
Getting Started
KX-TGP550
E
D
A
B
F
C
G
HI
pre-recorded announcement, for example.
Repeat as needed to create longer pauses.
*2 Your phone system needs to support voice mail.
Contact your administrator for further
information.
Navigator key/volume key
J
{^}
{<}
{>}
{V}
K
L
M
A
B
C
D
E
F
G
H
I
J
K
L
M
N
O
P
Q
R
S
T
N
OM
P
QR S T
Corded handset
Receiver
Speaker
Handset paging buttons ({j} – {k})
Handset status indicators
Handset paging button {ALL}
{LINE STATUS}
Index sticker
{HOLD}
{REDIAL} {PAUSE}*1
Display
Soft keys
Headset jack
Microphone
Dial keypad
{SP-PHONE} {HEADSET}
SP-PHONE indicator
{MUTE}
STATUS indicator
Navigator key ({^}/{V}/{3}/{4})
VOL. (Volume: {^}/{V})
{VOICE MAIL}*2
VOICE MAIL indicator
{EXIT}
■ Scrolling through lists or items
By pressing this key ({^}, {V}, {3}, or {4})
repeatedly, you can scroll through (up, down,
left, or right) various lists or items.
■ Adjusting the volume
By pressing this key ({^} or {V}) repeatedly, you
can adjust the receiver or speaker volume (up or
down) while talking.
■ Moving the cursor
By pressing this key ({^}, {V}, {3}, or {4})
repeatedly, you can move the cursor to edit a
number or name.
Soft keys
The base unit features 3 soft keys. By pressing a
soft key, you can select the feature shown directly
above it on the display.
*1 A 3.5 second pause is inserted each time
{PAUSE} is pressed. It is useful when you want
to operate voice mail service without listening to
Document Version 2012-01
7
Getting Started
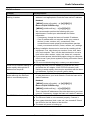
Understanding the indicators on the base unit
STATUS indicator
During the startup process you may notice that the STATUS indicator on the base unit is flashing. This
indicates that the base unit is booting up with your phone system. You may find the following flash
patterns helpful:
Status
Meaning
Color
Light pattern
Green
On
L The base unit is connected to the Internet. The startup process is
complete and you may now make and receive Internet calls.
Flashing
L The base unit is downloading data. Do not disconnect the Ethernet
cable or AC adaptor from the base unit until the STATUS indicator
stops flashing and lights in steady green.
On
L When the base unit is turned on, the STATUS indicator lights in red
for about 10 seconds.
Flashing
L The base unit is registering a handset.
Flashing
rapidly
L The base unit is paging handsets. (KX-TGP500 only)
On
L The base unit’s IP address may conflict with the IP addresses of
other devices on your local network. Contact your administrator for
further information.
Flashing
L The base unit is obtaining an IP address or is obtaining
configurations. Please wait.
L The base unit is registering with your phone system. Please wait.
L If the STATUS indicator continues flashing, check the following:
– Network settings may not be correct. Contact your administrator.
– Many installation issues can be resolved by resetting all the
equipment. First, shut down your modem, router, hub, base unit,
and computer. Then, turn the devices back on one at a time in this
order: modem, router, hub, base unit, computer.
– If you cannot access Internet Web pages using your computer,
check to see if your phone system is having connection issues in
your area.
– For more troubleshooting help, contact your administrator.
Flashing
rapidly
L Unplug the base unit’s AC adaptor to reset the unit, then reconnect
the AC adaptor. If the STATUS indicator is still flashing rapidly, there
may be a problem with the base unit hardware. Contact your phone
system dealer.
Red
Amber
Off
8
—
L The base unit power is off.
L The Ethernet cable is not connected properly. Connect it.
L Your network devices (hub, router, etc.) are turned off. Check the
LEDs for the link status of the devices.
L The base unit power is booting up.
Document Version 2012-01
Getting Started
Handset status indicators
Item
Meaning
,!
Handset 1 is in use.
“1”–“6”: Handset
“0”: Base unit (KX-TGP550 only)
s
The shared line is in use. (page
14)
t
The line is now registering the
VoIP server.
Available for: KX-TGP550
The handset status indicators on the base unit
show the status of each handset as follows:
Status
Meaning
Light off
The handset is free.
Light on
The handset is in use.
Flashing
The handset is paging the base
unit or being paged by it.
Line number (8 max.)
L When receiving a call, the last 4
digits are displayed.
Main menu icons
The following icons are shown when you press
down on the center of the joystick in standby
mode.
Display
Handset display items
Icon
Feature
m
Line status
Display items
IP service
Item
Meaning
#
New Voice Mail
w
Within range of the base unit
x
Intercom
_
Out of range of the base unit
"
Initial settings
l
The line is available.
C
Phonebook
C
The line is in use.
L When flashing:
The call is put on hold.
L When flashing rapidly:
An incoming call is now being
received.
s
Speaker is on. (page 12)
~
Ringer volume is off. (page 13)
y
The line is set to allow other units
to join the call. (page 12, 13)
m
Handset number
&
Battery level
$
Blocked call (page 30)
n
Block anonymous call (page 30)
o
Base unit display items
Available for: KX-TGP550
Display items
Item
Meaning
l
The line is available.
C
The line is in use.
L When flashing:
The call is put on hold.
L When flashing rapidly:
An incoming call is now being
received.
Call forward (page 29)
~
Ringer volume is off. (page 17)
p
Do not disturb (page 30)
y
q
Anonymous calls (Block Caller ID)
(page 31)
The line is set to allow other units
to join the call. (page 16, 17)
$
Blocked call (page 37)
n
Block anonymous call (page 37)
o
Call forward (page 36)
6
The line has received new voice
mail messages. (page 44)
Document Version 2012-01
9
Getting Started
Item
Meaning
p
Do not disturb (page 37)
q
Anonymous calls (Block Caller ID)
(page 38)
6
The line has received new voice
mail messages. (page 44)
,!
Handset 1 is in use.
“1”–“6”: Handset
s
t
– Push the joystick left to return to the previous
screen.
Initial settings
Symbol meaning:
Symbol
Meaning
The shared line is in use. (page
18)
Y
Perform with the handset.
:
Perform with the base unit.
The line is now registering the
VoIP server.
Example:
{V}/{^}: “Off”
Handset: Push the
joystick down or up to
select the words in
quotations.
Base unit (KX-TGP550):
Press {V} or {^} to select
the words in quotations.
Line number (8 max.)
L When receiving a call, the last 4
digits are displayed.
Main menu icons
The following icons are shown when you press
{MENU} (middle soft key) in standby mode.
Icon
Feature
m
Line status
Display language
You can select “English”, “Español”, or
“Français” as the display language. The default
setting is “English”.
IP service
U
Ringer settings
"
Initial settings
C
Phonebook
W
Caller list
Y Handset
1
{MENU} (center of joystick) i
{#}{1}{1}{0}
2
3
{V}/{^}: Select your desired setting.
Temporarily switching the handset
display mode
You can select to display either a single item or
multiple items on one screen at a time for the
phonebook list, caller list, and redial list.
You can temporarily switch the handset display
mode as follows by pressing the right soft key
shown when viewing the lists with:
– {MULTI}: Multiple items are shown on one
screen at a time.
– {SINGLE}: An item is shown on one screen at a
time. You can confirm the detailed information.
Note:
L When in multiple display mode, you can move
screens by pushing the joystick right or left,
without scrolling down or up through the list:
– Push the joystick right to go to the next
screen.
10
Press down the center of the joystick to save.
i {OFF}
: Base unit
Available for: KX-TGP550
1
2
3
{MENU} (middle soft key) i {#}{1}{1}{0}
{V}/{^}: Select your desired setting.
Press the middle soft key to save. i {EXIT}
Confirming your phone number(s)
You may have more than one phone number,
depending on your phone system. The numbers
can be shared with multiple units (page 14, 18).
Contact your administrator for further information.
Confirming the line status of VoIP server
The unit shows all available phone numbers in
your phone system and their current status. You
can select a line to make a call.
Document Version 2012-01
Getting Started
Y Handset
1
2
{LINE} (right soft key)
3
{OFF}
{V}/{^}: Select the desired line.
L The display shows the current status of the
line. See page 9 for details.
L To select the line to make a call, press
{C}.
: Base unit
Available for: KX-TGP550
1
2
{LINE STATUS}
3
{EXIT}
{V}/{^}: Select the desired line.
L The display shows the current status of the
line. See page 9 for details.
L To select the line to make a call, lift the
corded handset.
Document Version 2012-01
11
Y Making and Answering Calls using the Handset
Making calls
1
Lift the handset and dial the phone number.
L To correct a digit, press {CLEAR}.
2
Press {CALL} or {C}.
L The unit selects the default line configured
by your administrator.
L You can also select the line manually as
follows:
{LINE} i {V}/{^}: Select the desired line.
i {CALL}
3
Making a call using the redial
list
The last 10 phone numbers dialed are stored in the
redial list (each 32 digits max.).
1
2
3
When you finish talking, press {OFF} or place
the handset on the charger.
Note:
L If y is displayed during the call, other units may
join the conversation (page 14, 18). Contact
your administrator for further information.
L A maximum of 3 lines can be used at a time.
L To use the optional headset, plug the headset
into the headset jack before performing step 1.
Using the speakerphone
1
Dial the phone number and press {s}.
L The unit selects the default line configured
by your administrator.
L You can also select the line manually as
follows:
{LINE} i {V}/{^}: Select the desired line.
i {s}
L Speak alternately with the other party.
2
When you finish talking, press {OFF}.
Note:
L For best performance, use the speakerphone in
a quiet environment.
L To switch back to the receiver, press {C}.
Adjusting the receiver or
speaker volume
{REDIAL}
{V}/{^}: Select the desired phone number.
{C}/{s}
L If {s} is pressed and the other party’s line is
engaged, the unit automatically redials
multiple times. While the handset is waiting
to redial, the ringer indicator flashes. To
cancel, press {OFF}.
Editing/erasing/storing a
number in the redial list
1
2
3
{REDIAL}
{V}/{^}: Select the desired phone number. i
{MENU}
Proceed with the desired operation.
■ Editing a number before calling:
{V}/{^}: “Edit and Call” i {SELECT}
i Use the joystick to move the cursor. i
Edit the number. i Press {CALL} or
{C}.
■ Erasing a number:
{V}/{^}: “Erase” i {SELECT} i
{V}/{^}: “Yes” i {SELECT} i {OFF}
■ Storing a number to the phonebook:
{V}/{^}: “Save phonebook” i
{SELECT} i To store the name, continue
from step 3, “Editing entries”, page 21.
Note:
L When editing:
– To erase a number, place the cursor on the
number, then press {CLEAR}.
– To insert a number, place the cursor to the
right of where you want to insert the number,
then press the appropriate dial key.
Push the joystick up or down repeatedly while
talking.
12
Document Version 2012-01
Y Making and Answering Calls using the Handset
Answering calls
When a call is being received, the ringer indicator
on the handset flashes rapidly. The last 4 digits of
the line number on which the call is being received
are displayed.
1
2
Lift the handset and press {CALL}, {C}, or
{s} when the unit rings.
L You can also answer the call by pressing
any dial key from {0} to {9}, {*}, or {#}.
(Any key answer feature)
When you finish talking, press {OFF} or place
the handset on the charger.
Note:
L If the auto talk feature is turned off (page 13),
you can select which line answers when more
than one call is being received:
{CALL} i {V}/{^}: Select the desired line.
i Press {CALL}, {C}, or {s}.
L If y is displayed during the call, other units may
join the conversation (page 14, 18). Contact
your administrator for further information.
While the handset is ringing due to a call, you can
turn the ringer off temporarily by pressing {~}.
Hold
This feature allows you to put an outside call on
hold.
1
2
Press {HOLD} during an outside call.
To release hold, press {HOLD} or {C}.
Note:
L If a call is kept on hold for more than 9 minutes,
an alarm tone starts to sound and the ringer
indicator on the handset flashes. If the outside
party hangs up the call, the unit disconnects the
line and goes into standby mode.
Making another call during a
call
Auto talk
You can answer calls simply by lifting the handset
off the charger. You do not need to press {CALL}
or {C}. To turn this feature on, see page 27.
Adjusting the handset ringer
volume
■ While the handset is ringing due to an
incoming call:
Push the joystick up or down repeatedly to
select the desired volume.
■ Programming the volume beforehand:
1
{MENU} (center of joystick) i
{#}{1}{6}{0}
2
3
{V}/{^}: Select the desired volume.
{SAVE} i {OFF}
Temporary handset ringer
off
You can make a call using the other line by holding
the 1st call.
1
2
3
Press {HOLD} to put the 1st call on hold.
Dial the phone number. i {CALL}
To return to the 1st call, press {SWITCH}.
Useful features during a call
Mute
While mute is turned on, you can hear the other
party, but the other party cannot hear you.
1
2
Press {MUTE} during an outside call.
To return to the conversation, press {MUTE}
again.
Note:
L {MUTE} is a soft key visible on the display
during a call.
Document Version 2012-01
13
Y Making and Answering Calls using the Handset
Call waiting
This feature allows you to receive calls while you
are already talking on the phone. If you receive a
call while on the phone, the 2nd caller’s
information is displayed on the handset that is in
use after you hear the interrupt tone (page 28).
The feature depends on your phone system.
Contact your administrator for further information.
1
2
Press {SWITCH} to answer the 2nd call.
To switch between calls, press {SWITCH}.
Transferring calls to an
outside party
Outside calls can be transferred to an outside
party. To transfer outside calls to another unit, see
“Transferring calls”, page 45, 47.
1
2
3
During an outside call, press {MENU}.
4
Wait for the paged party to answer.
L If the paged party does not answer, press
{CANCEL} 2 times to return to the outside
call.
5
{TRANS}
Call share
Joining a call
You can join an existing outside call. Availability
depends on your phone system. Contact your
administrator for further information.
Important:
L The line must be set to allow other units to join
through the Web user interface (“Privacy
Mode”). y is displayed on the unit currently in
use when it is allowed to join the call. Contact
your administrator for further information.
1
Press {LINE} when the other unit is on an
outside call.
2
{V}/{^}: Select the desired line to join. i
{SELECT}
Sharing line numbers among multiple base
units
If you have multiple base units, shared line
number(s) may be assigned to selected units by
your administrator. While the shared line is being
used by other units, s is displayed when viewing
the line status (page 10). Availability depends on
your phone system. Contact your administrator for
further information.
Note:
L This feature is explained as “Enable Shared
Call” in the Web user interface.
14
{V}/{^}: “Transfer” i {SELECT}
Dial the phone number.
L To correct the number, press {CANCEL} to
clear the number and enter again.
Note:
L In step 3, you can dial the phone number from
the phonebook:
{C} i {V}/{^}: Select the desired entry. i
{CALL}
Transferring a call without speaking
to the outside party
1 During an outside call, press {MENU}.
2 {V}/{^}: “Blind transfer” i {SELECT}
3 Dial the phone number.
L To correct the number, press {CANCEL} to
clear the number and enter again.
4
{TRANS}
L The outside call rings at the other unit.
Note:
L In step 3, you can dial the phone number from
the phonebook:
{C} i {V}/{^}: Select the desired entry. i
{CALL}
Document Version 2012-01
Y Making and Answering Calls using the Handset
Conference calls
Multiple people can establish a conference call.
1
2
3
During an outside call, press {MENU}.
4
Wait for the paged party to answer.
L If the paged party does not answer, press
{CANCEL} 2 times to return to the outside
call.
5
{CONF}
L If you want to add a new party to the
conference, repeat from step 1.
{V}/{^}: “Conference” i {SELECT}
Dial the phone number.
L To correct the number, press {CANCEL} to
clear the number and enter again.
Note:
L In step 3, you can dial the phone number from
the phonebook:
{C} i {V}/{^}: Select the desired entry. i
{CALL}
Document Version 2012-01
15
: Making and Answering Calls using the Base Unit (KX-TGP550 only)
Making calls
1
Dial the phone number.
L To correct a digit, press {CLEAR}.
2
Lift the corded handset.
L The unit selects the default line configured
by your administrator.
L You can also select the line manually as
follows:
{LINE} i {V}/{^}: Select the desired line.
i Lift the corded handset.
3
When you finish talking, place the corded
handset on the cradle.
Note:
L You can also dial the phone number after lifting
the corded handset.
L If y is displayed during the call, other units may
join the conversation (page 14, 18). Contact
your administrator for further information.
L A maximum of 3 lines can be used at a time.
Using the headset (optional)
First, plug the headset into the headset jack. Then,
press {SP-PHONE/HEADSET} instead of using
the corded handset in steps 2 and 3, “Making
calls”, page 16.
L To end the call, press {SP-PHONE/HEADSET}.
L {SP-PHONE/HEADSET} is stated as {SPPHONE} in the following steps through this User
Guide.
Using the speakerphone
1
Dial the phone number and press {SPPHONE}.
L The unit selects the default line configured
by your administrator.
L You can also select the line manually as
follows:
{LINE} i {V}/{^}: Select the desired line.
i Press {CALL} or {SP-PHONE}.
2
When the other party answers, speak into the
base unit microphone.
L Speak alternately with the other party.
3
When you finish talking, press {SP-PHONE}.
16
Note:
L For best performance, use the speakerphone in
a quiet environment.
L To switch to the receiver, lift the corded handset.
Off-hook monitor
You can let other people in the room listen to a
conversation through the speaker while continuing
the conversation using the corded handset.
During a conversation with the corded handset,
press {SP-PHONE}.
L While the feature is turned on, the SP-PHONE
indicator on the base unit lights.
L To return to the private call, press {SP-PHONE}.
Adjusting the receiver or
speaker volume
Press {^} or {V} repeatedly while talking.
Making a call using the redial
list
The last 10 phone numbers dialed are stored in the
redial list in each unit (each 32 digits max.).
1
2
3
{REDIAL}
{V}/{^}: Select the desired phone number.
Lift the corded handset or press {SPPHONE}.
L If {SP-PHONE} is pressed and the other
party’s line is engaged, the unit
automatically redials multiple times. While
the base unit is waiting to redial, the SPPHONE indicator on the base unit flashes.
To cancel, press {EXIT}.
Document Version 2012-01
: Making and Answering Calls using the Base Unit (KX-TGP550 only)
Editing/erasing/storing a
number in the redial list
Adjusting the base unit
ringer volume
1
2
{REDIAL}
3
Proceed with the desired operation.
■ Editing a number before calling:
{V}/{^}: “Edit and Call” i {SELECT}
i Press {3} or {4} to move the cursor.
i Edit the number. i Lift the corded
handset.
■ Erasing a number:
{V}/{^}: “Erase” i {SELECT} i
{V}/{^}: “Yes” i {SELECT} i {EXIT}
■ Storing a number to the phonebook:
{V}/{^}: “Save phonebook” i
{SELECT} i To store the name, continue
from step 3, “Editing entries”, page 24.
■ While the base unit is ringing due to an
incoming call:
Press {^} or {V} repeatedly to select the desired
volume.
■ Programming the volume beforehand:
{V}/{^}: Select the desired phone number. i
{MENU}
Note:
L When editing:
– To erase a number, place the cursor on the
number, then press {CLEAR}.
– To insert a number, place the cursor to the
right of where you want to insert the number,
then press the appropriate dial key.
Answering calls
The last 4 digits of the line number on which the
call is being received are displayed.
1
Lift the corded handset or press {CALL} or
{SP-PHONE} when the unit rings.
2
When you finish talking, place the corded
handset on the cradle. When the
speakerphone is used, press {SP-PHONE}.
Note:
L You can select which line answers when more
than one call is being received:
{CALL} i {V}/{^}: Select the desired line.
i Lift the corded handset or press {CALL} or
{SP-PHONE}.
L If y is displayed during the call, other units may
join the conversation (page 14, 18). Contact
your administrator for further information.
1
{MENU} (middle soft key) i
{#}{1}{6}{0}
2
3
{V}/{^}: Select the desired volume.
{SAVE} i {EXIT}
Temporary base unit ringer
off
While the base unit is ringing due to a call, you can
turn the ringer off temporarily by pressing {~}.
Hold
This feature allows you to put an outside call on
hold.
1
Press {HOLD} during an outside call.
L If you are using the corded handset, you can
place it on the cradle.
2
To release hold, lift the corded handset, or
press {HOLD} or {SP-PHONE}.
Note:
L If a call is kept on hold for more than 9 minutes,
an alarm tone starts to sound. If the outside
party hangs up the call, the unit disconnects the
line and goes into standby mode.
Making another call during a
call
You can make a call using the other line by holding
the 1st call.
1
Press {HOLD} to put the 1st call on hold.
L If you are using the corded handset, place
the corded handset on the cradle.
Document Version 2012-01
17
: Making and Answering Calls using the Base Unit (KX-TGP550 only)
2
3
Dial the phone number.
4
To return to the 1st call, press {SWITCH}.
Proceed with the desired operation.
■ When you are using the corded handset:
Lift the corded handset.
■ When you are using the speakerphone:
Press {SP-PHONE}.
Useful features during a call
Sharing line numbers among multiple base
units
If you have multiple base units, shared line
number(s) may be assigned to selected units by
your administrator. While the shared line is being
used by other units, s is displayed when viewing
the line status (page 10). Availability depends on
your phone system. Contact your administrator for
further information.
Note:
L This feature is explained as “Enable Shared
Call” in the Web user interface.
Mute
While mute is turned on, you can hear the other
party, but the other party cannot hear you.
1
2
Press {MUTE} during an outside call.
To return to the conversation, press {MUTE}
again.
Call waiting
This feature allows you to receive calls while you
are already talking on the phone. If you receive a
call while on the phone, the 2nd caller’s
information is displayed on the base unit that is in
use after you hear the interrupt tone (page 34).
The feature depends on your phone system.
Contact your administrator for further information.
1
2
Outside calls can be transferred to an outside
party. To transfer outside calls to a handset, see
“Transferring calls”, page 47.
1
2
3
During an outside call, press {MENU}.
4
Wait for the paged party to answer.
L If the paged party does not answer, press
{CANCEL} 2 times to return to the outside
call.
5
{TRANS}
Press {SWITCH} to answer the 2nd call.
To switch between calls, press {SWITCH}.
Call share
Joining a call
You can join an existing outside call. Availability
depends on your phone system. Contact your
administrator for further information.
Important:
L The line must be set to allow other units to join
through the Web user interface (“Privacy
Mode”). y is displayed on the unit currently in
use when it is allowed to join the call. Contact
your administrator for further information.
1
Press {LINE STATUS} when the handset is
on an outside call.
2
{V}/{^}: Select the desired line to join. i
{SELECT}
18
Transferring calls to an
outside party
{V}/{^}: “Transfer” i {SELECT}
Dial the phone number.
L To correct the number, press {CANCEL} to
clear the number and enter again.
Note:
L In step 3, you can dial the phone number from
the phonebook:
{C} i {V}/{^}: Select the desired entry. i
{CALL}
Transferring a call without speaking
to the outside party
1 During an outside call, press {MENU}.
2 {V}/{^}: “Blind transfer” i {SELECT}
3 Dial the phone number.
L To correct the number, press {CANCEL} to
clear the number and enter again.
4
{TRANS}
L The outside call rings at the other unit.
Document Version 2012-01
: Making and Answering Calls using the Base Unit (KX-TGP550 only)
Note:
L In step 3, you can dial the phone number from
the phonebook:
{C} i {V}/{^}: Select the desired entry. i
{CALL}
Conference calls
Multiple people can establish a conference call.
1
2
3
During an outside call, press {MENU}.
4
Wait for the paged party to answer.
L If the paged party does not answer, press
{CANCEL} 2 times to return to the outside
call.
5
{CONF}
L If you want to add a new party to the
conference, repeat from step 1.
{V}/{^}: “Conference” i {SELECT}
Dial the phone number.
L To correct the number, press {CANCEL} to
clear the number and enter again.
Note:
L In step 3, you can dial the phone number from
the phonebook:
{C} i {V}/{^}: Select the desired entry. i
{CALL}
Document Version 2012-01
19
Y Phonebook using the Handset
Using the phonebook
The phonebook allows you to make calls without
having to dial manually. You can add 100 names
and phone numbers to the phonebook.
Key
Character
{5}
J
K
L
5
j
k
l
5
M
N
O
6
m
n
o
6
{6}
{7}
Adding entries
{8}
1
2
3
4
{MENU} (center of joystick)
5
Enter the party’s phone number (32 digits
max.). i {OK}
L If you do not need to assign the ringer ID, go
to step 8.
6
7
{V}/{^}: “Set Ringer ID” i {SELECT}
8
{SAVE}
L To add other entries, repeat from step 4.
9
{OFF}
{9}
{V}/{^}: “Phonebook” i {SELECT}
Q
R
S
7
p
q
r
s
7
T
U
V
8
t
u
v
8
W
X
Y
Z
9
w
x
y
z
9
0
{ADD}
{0}
Space
Enter the party’s name (16 characters max.).
i {OK}
{#}
#
{V}/{^}: Select the desired setting (page 42).
i {OK}
Note:
L In step 3, you can also press {MENU}. i
{V}/{^}: “New entry” i {SELECT}
L If you select “No Ringer ID” (default), the unit
uses the ringer tone you selected on page 28
when a call is received from that caller.
Character table for entering names
While entering characters, you can switch
between uppercase and lowercase by pressing
{*}.
Key
Character
{1}
Space
;
,
{2}
A
B
a
b
c
2
{3}
D
E
F
3
d
e
f
3
{4}
G
H
I
4
g
h
i
4
20
P
#
&
’
(
–
.
/
1
C
2
)
L To enter another character that is located on the
same dial key, push the joystick right to move
the cursor to the next space.
Correcting a mistake
Use the joystick to move the cursor to the
character or number you want to erase, then press
{CLEAR}. Enter the appropriate character or
number.
L Press and hold {CLEAR} to erase all characters
or numbers.
Finding and calling a
phonebook entry
Scrolling through all entries
1 {MENU} (center of joystick)
2 {V}/{^}: “Phonebook” i {SELECT}
3 {V}/{^}: Select the desired entry.
4 {C}
L You can also select the line manually as
follows:
{LINE} i {V}/{^}: Select the desired line.
i Press {CALL} or {C}.
Searching by first character
(alphabetically)
1 {MENU} (center of joystick)
2 {V}/{^}: “Phonebook” i {SELECT}
Document Version 2012-01
Y Phonebook using the Handset
3
Press the dial key ({0} – {9}, or {#}) which
contains the character you are searching for
(page 20).
L Press the same dial key repeatedly to
display the first entry corresponding to each
character located on that dial key.
L If there is no entry corresponding to the
character you selected, the next entry is
displayed.
2
{V}/{^}: “Phonebook” i {SELECT} i
{MENU}
3
{V}/{^}: “Erase all items” i
{SELECT}
4
5
{V}/{^}: “Yes” i {SELECT}
4
{V}/{^}: Scroll through the phonebook if
necessary.
Chain dial
5
{C}
L You can also select the line manually as
follows:
{LINE} i {V}/{^}: Select the desired line.
i Press {CALL} or {C}.
This feature allows you to dial phone numbers in
the phonebook while you are on a call. This feature
can be used, for example, to dial a calling card
access number or bank account PIN that you have
stored in the phonebook, without having to dial
manually.
Editing entries
1
2
3
4
Find the desired entry (page 20). i {MENU}
1
2
3
4
{V}/{^}: “Yes” i {SELECT} i {OFF}
During an outside call, press {MENU}.
{V}/{^}: “Phonebook” i {SELECT}
{V}/{^}: Select the desired entry.
Press {CALL} to dial the number.
{V}/{^}: “Edit” i {SELECT}
Proceed with the desired operation.
■ To change the name or phone number:
{V}/{^}: Select the name or phone number.
i {SELECT} i Edit the information
(page 20). i {OK}
■ To change the ringer ID:
{V}/{^}: Select the current ringer ID. i
{SELECT} i {V}/{^}: Select the desired
setting. i {OK}
L To turn the ringer ID off, select “No
Ringer ID”.
{SAVE} i {OFF}
Speed dial
Assigning an entry in the phonebook
to a speed dial key
Dial keys {1} to {9} can each be used as a speed
dial key, allowing you to dial a number from the
phonebook by simply pressing a dial key.
1
2
3
Erasing entries
Erasing an entry
1 Find the desired entry (page 20). i {MENU}
2 {V}/{^}: “Erase” i {SELECT}
3 {V}/{^}: “Yes” i {SELECT} i {OFF}
Erasing all entries
1 {MENU} (center of joystick)
4
Find the desired entry (page 20). i {MENU}
{V}/{^}: “Speed dial” i {SELECT}
{V}/{^}: Select the desired dial key number.
i {SELECT}
L If “Overwrite?” is displayed, the dial key
you selected has a phone number already
assigned to it.
To overwrite with the currently selected
phone number, go to step 4.
To select another dial key, press {BACK},
then repeat this step.
{V}/{^}: “Yes” i {SELECT} i {OFF}
Note:
L When a dial key is already being used for speed
dialing, “Q” is displayed next to the dial key
number.
Document Version 2012-01
21
Y Phonebook using the Handset
Making a call using a speed dial key
1
Press and hold the desired speed dial key ({1}
– {9}).
L You can view other speed dial assignments
by pushing the joystick down or up.
2
{C}
L You can also select the line manually as
follows:
{LINE} i {V}/{^}: Select the desired line.
i Press {CALL} or {C}.
Canceling a speed dial assignment
1
Press and hold the desired speed dial key ({1}
– {9}). i {ERASE}
2
{V}/{^}: “Yes” i {SELECT} i {OFF}
Export/import phonebook
entries
You can export the phonebook entries through the
Web user interface to your computer as a tab
separated value file. It makes it possible to add,
edit, or erase phonebook entries more
conveniently on a spreadsheet (.csv) using
Microsoft® Excel®, for example, on your computer.
After editing, the file should be imported to the unit.
To export/import entries, contact your
administrator.
Important:
L Entries deleted on your computer are not
replicated in the phonebook of the unit when
importing. Erase unnecessary entries with your
unit, not through the Web user interface.
22
Document Version 2012-01
: Phonebook using the Base Unit (KX-TGP550 only)
Using the phonebook
The phonebook allows you to make calls without
having to dial manually. You can add 100 names
and phone numbers to the phonebook.
Key
Character
{5}
J
K
L
5
j
k
l
5
M
N
O
6
m
n
o
6
{6}
P
Q
R
S
7
p
q
r
s
7
T
U
V
8
t
u
v
8
W
X
Y
Z
9
w
x
y
z
9
{0}
Space
0
{#}
#
{7}
Adding entries
1
2
3
{8}
{C} (left soft key)
{9}
{ADD}
Enter the party’s name (16 characters max.).
i {OK}
4
Enter the party’s phone number (32 digits
max.). i {OK}
L If you do not need to assign the ringer ID, go
to step 7.
L To enter another character that is located on the
same dial key, press {4} to move the cursor to
the next space.
5
6
{V}/{^}: “Set Ringer ID” i {SELECT}
Correcting a mistake
{V}/{^}: Select the desired setting (page 42).
i {OK}
7
{SAVE}
L To add other entries, repeat from step 3.
8
{EXIT}
Press {3} or {4} to move the cursor to the
character or number you want to erase, then press
{CLEAR}. Enter the appropriate character or
number.
L Press and hold {CLEAR} to erase all characters
or numbers.
Note:
L In step 2, you can also press {MENU}. i
{V}/{^}: “New entry” i {SELECT}
L If you select “No Ringer ID” (default), the unit
uses the ringer tone you selected on page 34
when a call is received from that caller.
Character table for entering names
While entering characters, you can switch
between uppercase and lowercase by pressing
{*}.
Key
Character
{1}
Space
;
,
{2}
A
B
a
b
c
2
{3}
D
E
F
3
d
e
f
3
{4}
G
H
I
4
g
h
i
4
#
&
’
(
–
.
/
1
C
2
)
Finding and calling a
phonebook entry
Scrolling through all entries
1 {C} (left soft key)
2 {V}/{^}: Select the desired entry.
3 Lift the corded handset.
L You can also select the line manually as
follows:
{LINE} i {V}/{^}: Select the desired line.
i Lift the corded handset.
Searching by first character
(alphabetically)
1 {C} (left soft key)
2 Press the dial key ({0} – {9}, or {#}) which
contains the character you are searching for
(page 23).
Document Version 2012-01
23
: Phonebook using the Base Unit (KX-TGP550 only)
L Press the same dial key repeatedly to
display the first entry corresponding to each
character located on that dial key.
L If there is no entry corresponding to the
character you selected, the next entry is
displayed.
3
{V}/{^}: Scroll through the phonebook if
necessary.
4
Lift the corded handset.
L You can also select the line manually as
follows:
{LINE} i {V}/{^}: Select the desired line.
i Lift the corded handset.
4
{V}/{^}: “Yes” i {SELECT} i {EXIT}
Chain dial
This feature allows you to dial phone numbers in
the phonebook while you are on a call. This feature
can be used, for example, to dial a calling card
access number or bank account PIN that you have
stored in the phonebook, without having to dial
manually.
1
2
3
During an outside call, press {C}.
{V}/{^}: Select the desired entry.
Press {CALL} to dial the number.
Editing entries
1
2
3
4
Find the desired entry (page 23). i {MENU}
Speed dial
{V}/{^}: “Edit” i {SELECT}
Proceed with the desired operation.
■ To change the name or phone number:
{V}/{^}: Select the name or phone number.
i {SELECT} i Edit the information
(page 23). i {OK}
■ To change the ringer ID:
{V}/{^}: Select the current ringer ID. i
{SELECT} i {V}/{^}: Select the desired
setting. i {OK}
L To turn the ringer ID off, select “No
Ringer ID”.
Assigning an entry in the phonebook
to a speed dial key
Dial keys {1} to {9} can each be used as a speed
dial key, allowing you to dial a number from the
phonebook by simply pressing a dial key.
1
2
3
{SAVE} i {EXIT}
Erasing entries
Erasing an entry
1 Find the desired entry (page 23). i
{ERASE}
2
{V}/{^}: “Yes” i {SELECT} i {EXIT}
Erasing all entries
1 {C} (left soft key) i {MENU}
2 {V}/{^}: “Erase all items” i
4
24
{V}/{^}: “Yes” i {SELECT}
{V}/{^}: “Speed dial” i {SELECT}
{V}/{^}: Select the desired dial key number.
i {SELECT}
L If “Overwrite?” is displayed, the dial key
you selected has a phone number already
assigned to it.
To overwrite with the currently selected
phone number, go to step 4.
To select another dial key, press {BACK},
then repeat this step.
{V}/{^}: “Yes” i {SELECT} i {EXIT}
Note:
L When a dial key is already being used for speed
dialing, “Q” is displayed next to the dial key
number.
Making a call using a speed dial key
1
Press and hold the desired speed dial key ({1}
– {9}).
L You can view other speed dial assignments
by pressing {V} or {^}.
2
Lift the corded handset.
{SELECT}
3
Find the desired entry (page 23). i {MENU}
Document Version 2012-01
: Phonebook using the Base Unit (KX-TGP550 only)
L You can also select the line manually as
follows:
{LINE} i {V}/{^}: Select the desired line.
i Lift the corded handset.
Canceling a speed dial assignment
1
Press and hold the desired speed dial key ({1}
– {9}). i {ERASE}
2
{V}/{^}: “Yes” i {SELECT} i {EXIT}
Copying base unit
phonebook entries
You can copy base unit phonebook entries to the
phonebook of a handset.
Note:
L Ringer ID for phonebook entries are not copied.
L You can copy handset phonebook entries to
another handset or base unit by exporting the
data to a computer and importing it (page 25).
Export/import phonebook
entries
You can export the phonebook entries through the
Web user interface to your computer as a tab
separated value file. It makes it possible to add,
edit, or erase phonebook entries more
conveniently on a spreadsheet (.csv) using
Microsoft Excel, for example, on your computer.
After editing, the file should be imported to the unit.
To export/import entries, contact your
administrator.
Important:
L Entries deleted on your computer are not
replicated in the phonebook of the unit when
importing. Erase unnecessary entries with your
unit, not through the Web user interface.
Copying an entry
1 Find the desired entry (page 23). i {MENU}
2 {V}/{^}: “Copy” i {SELECT}
3 Enter the handset number you wish to send
the phonebook entry to.
L When an entry has been copied,
“Completed” is displayed.
L To continue copying another entry:
{V}/{^}: “Yes” i {SELECT} i Find the
desired entry. i {SEND}
4
{EXIT}
Copying all entries
1 {C} (left soft key) i {MENU}
2 {V}/{^}: “Copy all items” i {SELECT}
3 Enter the handset number you wish to send
the phonebook entry to.
L When all entries have been copied,
“Completed” is displayed.
4
{EXIT}
Document Version 2012-01
25
Y Programming using the Handset
Programmable settings
You can customize the unit by programming the following features.
To access the features, there are 2 methods:
– scrolling through the display menus (page 26, 27)
– using the direct commands (page 27)
Some of the features can be programmed through the Web user interface (page 40).
L Direct command is the main method used in this User Guide.
Programming by scrolling through the display menus
1 {MENU} (center of joystick)
2 Select the desired main menu by pushing the joystick in any direction. i {SELECT}
3 Push the joystick down or up to select the desired item in sub-menu 1. i {SELECT}
L In some cases, you may need to select from sub-menu 2. i {SELECT}
4
Push the joystick down or up to select the desired setting. i {SAVE}
L This step may vary depending on the feature being programmed.
L To exit the operation, press {OFF}.
Note:
L See page 27 for the default settings.
L In the following table, ( ) indicates lines you need to select for the settings.
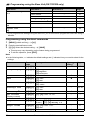
Main menu
Line status
m
IP service
Sub-menu 1
Sub-menu 2
–
Network setting
Call features
Page
–
DHCP*1, *2
10
–
IP settings*1, *2
–
Embedded web
40
Call forward
(Line 1: 8 max.)
– Unconditional*1
– Busy*1
– No answer*1
29
Do not disturb*1
(Line 1: 8 max.)
30
Block anonymous*1
(Line 1: 8 max.)
30
Block Caller ID*1
(Line 1: 8 max.)
31
Settings*1, *2
40
New Voice Mail
#
–
–
44
Intercom
x
–
–
45, 46
26
Document Version 2012-01
Y Programming using the Handset
Main menu
Sub-menu 1
Sub-menu 2
Initial settings
"
Ringer settings
Ringer volume
Page
13
Ringer tone
(Line 1: 8 max.)
–
–
Interrupt tone
Date and time*1
–
31
Call block*1
–
30
Auto Intercom
–
45
LCD contrast
–
–
Key tone
–
–
Auto talk
–
13
–
44
Message alert
Registration
41
Register handset
41
Deregistration
Handset name
–
31
Change language
–
10
Software version*1
–
32
–
20
–
Phonebook
C
*1 If you program these settings using one of the handsets, you do not need to program the same item
using another unit.
*2 We recommend programming this setting with your administrator. Contact your administrator for
further information.
Programming using the direct commands
1 {MENU} (center of joystick) i {#}
2 Enter the desired feature code.
3 {V}/{^}: Select the desired setting. i {SAVE}
L This step may vary depending on the feature being programmed.
L To exit the operation, press {OFF}.
Note:
L In the following table, < > indicates the default settings and ( ) indicates lines you need to select for the
settings.
Feature
Feature
code
Setting code
System
setting*1
Auto Intercom
{2}{7}{3}
{1}: On (Ringer On)
{2}: On (Ringer Off)
{0}: <Off>
–
45
Auto talk*2
{2}{0}{0}
{1}: On
{0}: <Off>
–
13
Call block
{2}{1}{7}
Change language
{1}{1}{0}
Date and time
{1}{0}{1}
–
{1}: <English>
{2}: Español
{3}: Français
–
Document Version 2012-01
Page
r
30
–
10
r
31
27
Y Programming using the Handset
Feature
Feature
code
Setting code
System
setting*1
–
Page
Deregistration
{1}{3}{1}
–
41
DHCP*3
{5}{0}{0}
{1}: <On>
{0}: Off
r
–
Embedded web
{5}{3}{4}
{1}: On
{0}: <Off>
–
40
Handset name
{1}{0}{4}
–
–
31
Intercom call
{2}{7}{4}
–
–
45, 46
Interrupt tone*4
{2}{0}{1}
–
14, 45,
46
IP settings*3
{5}{0}{1}
r
–
Key tone*5
{1}{6}{5}
{1}: <On>
{0}: Off
–
–
LCD contrast
(Display contrast)
{1}{4}{5}
{1} – {6}: Level 1–6 <3>
–
–
Message alert
{3}{4}{0}
{1}: On
{0}: <Off>
–
44
{1}: <On>
{0}: Off
–
Phonebook
{2}{8}{0}
–
–
20
Register handset
{1}{3}{0}
–
–
41
Ringer tone
{1}{6}{1}
(Line 1:
8 max.)
–
–
Ringer volume*6
{1}{6}{0}
{1} – {6}: Level 1–<6>
{0}: Off
–
13
Software version
{1}{5}{6}
–
r
32
New Voice Mail
{3}{3}{0}
–
–
44
{1} – {6}: Tone <1>-6
{7} – {9}: Melody 1-3
*1 If you program these settings using one of the handsets, you do not need to program the same item
using another unit.
*2 If you want to view the caller’s information after lifting up the handset to answer a call, turn off this
feature.
*3 We recommend programming this setting with your administrator. Contact your administrator for
further information.
*4 This tone lets you know when you receive an outside call while you are on the other outside call or an
intercom call.
*5 Turn this feature off if you prefer not to hear key tones while you are dialing or pressing any keys,
including confirmation tones and error tones.
*6 When the ringer volume is turned off, ~ is displayed and the handset does not ring for outside calls.
However, even when the ringer volume is set to off, the handset rings at the lowest level for intercom
calls (page 45, 46) and paging (page 47).
28
Document Version 2012-01
Y Programming using the Handset
L If you have selected “No answer”, enter
the number of rings before the unit forwards
calls (0, 2-20 rings). i {SAVE}
Call forward
Incoming calls can be forwarded to another party.
You can choose one of 3 modes:
– “Unconditional”: All incoming calls are
forwarded.
– “Busy”: Incoming calls while the line is in use
are forwarded.
– “No answer”: Incoming calls after a certain
number of rings are forwarded. The default
setting of the number of ring count is “3”. To
change the setting, perform “Changing the ring
count”, page 29.
Important:
L We recommend setting this feature with your
administrator. Contact your administrator for
further information.
L If this feature is set on your unit, it may be
overridden by your phone system settings.
L This feature is not available on shared lines.
L The call is logged in the caller list (page 42) with
Q after the call is forwarded.
Turning call forward on/off
1 {MENU} (center of joystick)
2 {V}/{^}: “IP service” i {SELECT}
3 {V}/{^}: “Call features” i {SELECT}
4 {V}/{^}: “Call forward” i {SELECT}
5 Proceed with the desired operation.
■ When 1 line is registered:
Go to step 6.
■ When 2 or more lines are registered:
{V}/{^}: Select the desired line. i
{SELECT}
6
{V}/{^}: Select the desired option. i
{SELECT}
7
8
{V}/{^}: “On/Off” i {SELECT}
9
{V}/{^}: Select “On” or “Off”. i {SAVE}
L If you select “Off”, press {OFF} to exit.
L If the phone number forwarded to has been
already set, press {OFF} to exit. To change
the phone number, repeat from step 7,
“Changing the phone number”, page 29,
then press {OFF} to exit.
10
{OFF}
Changing the phone number
1 {MENU} (center of joystick)
2 {V}/{^}: “IP service” i {SELECT}
3 {V}/{^}: “Call features” i {SELECT}
4 {V}/{^}: “Call forward” i {SELECT}
5 Proceed with the desired operation.
■ When 1 line is registered:
Go to step 6.
■ When 2 or more lines are registered:
{V}/{^}: Select the desired line. i
{SELECT}
6
{V}/{^}: Select the desired option. i
{SELECT}
7
8
{V}/{^}: “Phone number” i {SELECT}
Enter the phone number you want to forward
calls to (24 digits max.). i {SAVE} i
{OFF}
Changing the ring count
You can change the number of rings before which
the call is forwarded if “No answer” is selected.
1
2
3
4
5
{MENU} (center of joystick)
6
7
8
{V}/{^}: “No answer” i {SELECT}
{V}/{^}: “IP service” i {SELECT}
{V}/{^}: “Call features” i {SELECT}
{V}/{^}: “Call forward” i {SELECT}
Proceed with the desired operation.
■ When 1 line is registered:
Go to step 6.
■ When 2 or more lines are registered:
{V}/{^}: Select the desired line. i
{SELECT}
{V}/{^}: “Ring count” i {SELECT}
Enter the number of rings before the unit
forwards calls (0, 2-20 rings). i {SAVE} i
{OFF}
Enter the phone number you want to forward
calls to (24 digits max.). i {SAVE}
Document Version 2012-01
29
Y Programming using the Handset
■ When 1 line is registered:
Go to step 6.
■ When 2 or more lines are registered:
{V}/{^}: Select the desired line. i
{SELECT}
Do not disturb
This feature allows the unit to reject calls on
selected lines.
The default setting is “Off”.
Important:
L We recommend setting this feature with your
administrator. Contact your administrator for
further information.
L If this feature is set on your unit, it may be
overridden by your phone system settings.
L This feature is not available on shared lines.
L The call is logged in the caller list (page 42) with
Q after the call is rejected.
1
2
3
4
5
{MENU} (center of joystick)
6
{V}/{^}: Select “On” or “Off”. i {SAVE}
i {OFF}
{V}/{^}: “IP service” i {SELECT}
{V}/{^}: “Call features” i {SELECT}
{V}/{^}: “Do not disturb” i {SELECT}
Proceed with the desired operation.
■ When 1 line is registered:
Go to step 6.
■ When 2 or more lines are registered:
{V}/{^}: Select the desired line. i
{SELECT}
Block anonymous calls
This feature allows the unit to reject calls when the
unit receives a call without phone number.
The default setting is “Off”.
Important:
L We recommend setting this feature with your
administrator. Contact your administrator for
further information.
L This feature is not available on shared lines.
L The call is logged in the caller list (page 42) with
Q after the call is rejected.
{V}/{^}: Select “On” or “Off”. i {SAVE}
i {OFF}
Call block (Caller ID service
users only)
This feature allows the unit to reject calls from
specified phone numbers that you do not want to
answer such as junk calls.
When a call is received, the unit does not ring while
the caller is being identified. If the phone number
matches an entry in the call block list, the unit
rejects the call.
Important:
L When the unit receives a call from a number that
is stored in the call block list, the call is logged in
the caller list (page 42) with $ after the call is
rejected.
Storing unwanted callers
You can store up to 30 phone numbers in the call
block list by using the caller list or by entering the
numbers directly.
Important:
L You are advised to store the 10 digits (including
an area code) for PSTN calls because if 7 digits
are stored, all numbers that have the last 7 digits
will be blocked.
From the caller list:
1
2
{CID} (left soft key)
{V}/{^}: Select the entry to be blocked. i
{MENU}
3
{V}/{^}: “Save call block” i
{SELECT}
4
{V}/{^}: “Yes” i {SELECT} i {OFF}
By entering phone numbers:
1
2
3
4
{MENU} (center of joystick)
5
Proceed with the desired operation.
30
6
{V}/{^}: “IP service” i {SELECT}
{V}/{^}: “Call features” i {SELECT}
{V}/{^}: “Block anonymous” i
{SELECT}
1
{MENU} (center of joystick) i
{#}{2}{1}{7} i {ADD}
2
Enter the phone number (24 digits max.). i
{SAVE}
L To erase a digit, press {CLEAR}.
Document Version 2012-01
Y Programming using the Handset
3
{OFF}
Viewing/editing/erasing call block
numbers
1 {MENU} (center of joystick) i
{#}{2}{1}{7}
2
{V}/{^}: Select the desired entry.
L To exit, press {OFF}.
3
Proceed with the desired operation.
■ Editing a number:
{MENU} i {V}/{^}: “Edit” i
{SELECT} i Edit the phone number. i
{SAVE} i {OFF}
■ Erasing a number:
{MENU} i {V}/{^}: “Erase” i
{SELECT} i {V}/{^}: “Yes” i
{SELECT} i {OFF}
Note:
L When editing, press the desired dial key to add,
{CLEAR} to erase.
Anonymous calls (Block
Caller ID)
This feature allows the unit to make a call
anonymously.
The default setting is “Off”.
Important:
L We recommend setting this feature with your
administrator. Contact your administrator for
further information.
1
2
3
4
{MENU} (center of joystick)
5
Proceed with the desired operation.
■ When 1 line is registered:
Go to step 6.
■ When 2 or more lines are registered:
{V}/{^}: Select the desired line. i
{SELECT}
6
{V}/{^}: “IP service” i {SELECT}
Changing the handset name
Each handset can be given a customized name
(“Bob”, “Kitchen”, etc.). This is useful when you
make intercom calls between handsets. You can
also select whether or not the handset name is
displayed in standby mode. The default setting is
“Off”. If you select “On” without entering any
handset name, “Handset 1” to “Handset 6” is
displayed.
1
{MENU} (center of joystick) i
{#}{1}{0}{4}
2
Enter the desired name (10 characters max.;
see the character table, page 20).
L If not required, go to step 3.
3
4
{OK}
Date and time
If the unit does not show the date and time, you
can set the date and time through the Web user
interface and also program it to adjust
automatically using the SNTP. Also, daylight
saving time setting is available through the Web
user interface. Contact your administrator for
further information.
1
{MENU} (center of joystick) i
{#}{1}{0}{1}
2
Enter the current month, date, and year.
Example: March 15, 2010
{0}{3} {1}{5} {1}{0}
3
Enter the current hour and minute (12-hour
clock format).
Example: 9:30
{0}{9} {3}{0}
4
5
{AM/PM}: Select “AM” or “PM”.
{V}/{^}: “Call features” i {SELECT}
{V}/{^}: “Block Caller ID” i
{SELECT}
{V}/{^}: Select “On” or “Off”. i {SAVE}
i {OFF}
{V}/{^}: “On” i {SAVE} i {OFF}
{SAVE} i {OFF}
Note:
L When English is selected as the display
language, 12-hour clock format is used. When
Spanish or French is selected, 24-hour clock
format is used.
L To correct a digit, push the joystick left, right, up,
or down to move the cursor to the digit, then
make the correction.
Document Version 2012-01
31
Y Programming using the Handset
Updating the base unit
software
Your phone system dealer may offer new features
and improve its software version from time to time.
If you set the base unit software update setting to
manual mode through the Web user interface, you
need to download the update when “Update
version.Press OK.” is displayed. Contact your
administrator for further information.
Important:
L Make sure the STATUS indicator on the base
unit is lit in green and no line is in use (page 8).
1
Press {OKL} while “Update
version.Press OK.” is displayed.
L The current and new base unit software
versions are displayed.
L If you want to download the update later,
press {CANCEL}. When you are ready to
download, see “Confirming the base unit
software version”, page 32.
2
{OK}
Note:
L The STATUS indicator on the base unit flashes
while downloading. When the download is
complete, the STATUS indicator stops flashing
and changes to steady green.
Confirming the base unit software
version
1 {MENU} (center of joystick) i
{#}{1}{5}{6}
L The current base unit software version is
displayed. To exit, press {OFF}.
2
32
If “Update version?” is displayed, press
{OK} to download. To exit without
downloading, press {CANCEL}.
Document Version 2012-01
: Programming using the Base Unit (KX-TGP550 only)
Programmable settings
You can customize the unit by programming the following features.
To access the features, there are 2 methods:
– scrolling through the display menus (page 33, 34)
– using the direct commands (page 34)
Some of the features can be programmed through the Web user interface (page 40).
L Direct command is the main method used in this User Guide.
Programming by scrolling through the display menus
1 {MENU} (middle soft key)
2 Press {^}, {V}, {3}, or {4} to select the desired main menu. i {SELECT}
3 Press {V} or {^} to select the desired item in sub-menu 1. i {SELECT}
L In some cases, you may need to select from sub-menu 2. i {SELECT}
4
Press {V} or {^} to select the desired setting. i {SAVE}
L This step may vary depending on the feature being programmed.
L To exit the operation, press {EXIT}.
Note:
L See page 34 for the default settings.
L In the following table, ( ) indicates lines you need to select for the settings.
Main menu
Line status
m
IP service
Sub-menu 1
Sub-menu 2
–
Network setting
Call features
Ringer settings
U
DHCP*1
10
–
IP settings*1
–
Embedded web
40
Call forward
(Line 1: 8 max.)
– Unconditional*1
– Busy*1
– No answer*1
36
Do not disturb*1
(Line 1: 8 max.)
37
Block anonymous*1
(Line 1: 8 max.)
37
Block Caller ID*1
(Line 1: 8 max.)
38
–
Ringer volume
Ringer tone
Page
–
17
(Line 1: 8 max.)
–
–
–
Interrupt tone
Document Version 2012-01
33
: Programming using the Base Unit (KX-TGP550 only)
Main menu
Sub-menu 1
Initial settings
"
Date and time*1
Sub-menu 2
–
38
Call block*1
–
37
LCD contrast
–
–
Change language
–
10
Software version*1
Page
–
38
Phonebook
C
–
–
23
Caller list
W
–
–
42
*1 If you program these settings using the base unit, you do not need to program the same item using a
handset.
Programming using the direct commands
1 {MENU} (middle soft key) i {#}
2 Enter the desired feature code.
3 {V}/{^}: Select the desired setting. i {SAVE}
L This step may vary depending on the feature being programmed.
L To exit the operation, press {EXIT}.
Note:
L In the following table, < > indicates the default settings and ( ) indicates lines you need to select for the
settings.
Feature
Feature
code
Setting code
–
37
–
10
r
38
r
–
{1}: On
{0}: <Off>
–
40
{1}: <On>
{0}: Off
–
18, 46
{2}{1}{7}
{1}{1}{0}
Date and time
{1}{0}{1}
DHCP*2
{5}{0}{0}
{1}: <On>
{0}: Off
Embedded web
{5}{3}{4}
Interrupt tone*3
{2}{0}{1}
{5}{0}{1}
LCD contrast
(Display contrast)
{1}{4}{5}
{1}: <English>
{2}: Español
{3}: Français
–
–
{1} – {6}: Level 1–6 <3>
–
Phonebook
{2}{8}{0}
Ringer tone
{1}{6}{1}
(Line 1:
8 max.)
Ringer volume*4
{1}{6}{0}
{1} – {3}: Level 1–<3>
{0}: Off
Software version
{1}{5}{6}
34
Page
r
Call block
Change language
IP settings*2
System
setting*1
{1} – {6}: Tone <1>-6
{7} – {9}: Melody 1-3
–
Document Version 2012-01
r
–
–
–
–
23
–
–
–
17
r
38
: Programming using the Base Unit (KX-TGP550 only)
*1 If you program these settings using the base unit, you do not need to program the same item using a
handset.
*2 We recommend programming this setting with your administrator. Contact your administrator for
further information.
*3 This tone lets you know when you receive an outside call while you are on the other outside call or an
intercom call.
*4 When the ringer volume is turned off, ~ is displayed and the base unit does not ring for outside calls.
However, even when the ringer volume is set to off, the base unit rings at the low level for intercom
calls (page 46).
Document Version 2012-01
35
: Programming using the Base Unit (KX-TGP550 only)
L If you have selected “No answer”, enter
the number of rings before the unit forwards
calls (0, 2-20 rings). i {SAVE}
Call forward
Incoming calls can be forwarded to another party.
You can choose one of 3 modes:
– “Unconditional”: All incoming calls are
forwarded.
– “Busy”: Incoming calls while the line is in use
are forwarded.
– “No answer”: Incoming calls after a certain
number of rings are forwarded. The default
setting of the number of ring count is “3”. To
change the setting, perform “Changing the ring
count”, page 36.
Important:
L We recommend setting this feature with your
administrator. Contact your administrator for
further information.
L If this feature is set on your unit, it may be
overridden by your phone system settings.
L This feature is not available on shared lines.
L The call is logged in the caller list (page 42) with
Q after the call is forwarded.
Turning call forward on/off
1 {MENU} (middle soft key)
2 {V}/{^}: “IP service” i {SELECT}
3 {V}/{^}: “Call features” i {SELECT}
4 {V}/{^}: “Call forward” i {SELECT}
5 Proceed with the desired operation.
■ When 1 line is registered:
Go to step 6.
■ When 2 or more lines are registered:
{V}/{^}: Select the desired line. i
{SELECT}
6
{V}/{^}: Select the desired option. i
{SELECT}
7
8
{V}/{^}: “On/Off” i {SELECT}
9
36
{V}/{^}: Select “On” or “Off”. i {SAVE}
L If you select “Off”, press {EXIT} to exit.
L If the phone number forwarded to has been
already set, press {EXIT} to exit. To change
the phone number, repeat from step 7,
“Changing the phone number”, page 36,
then press {EXIT} to exit.
10
{EXIT}
Changing the phone number
1 {MENU} (middle soft key)
2 {V}/{^}: “IP service” i {SELECT}
3 {V}/{^}: “Call features” i {SELECT}
4 {V}/{^}: “Call forward” i {SELECT}
5 Proceed with the desired operation.
■ When 1 line is registered:
Go to step 6.
■ When 2 or more lines are registered:
{V}/{^}: Select the desired line. i
{SELECT}
6
{V}/{^}: Select the desired option. i
{SELECT}
7
8
{V}/{^}: “Phone number” i {SELECT}
Enter the phone number you want to forward
calls to (24 digits max.). i {SAVE} i
{EXIT}
Changing the ring count
You can change the number of rings before which
the call is forwarded if “No answer” is selected.
1
2
3
4
5
{MENU} (middle soft key)
6
7
8
{V}/{^}: “No answer” i {SELECT}
{V}/{^}: “IP service” i {SELECT}
{V}/{^}: “Call features” i {SELECT}
{V}/{^}: “Call forward” i {SELECT}
Proceed with the desired operation.
■ When 1 line is registered:
Go to step 6.
■ When 2 or more lines are registered:
{V}/{^}: Select the desired line. i
{SELECT}
{V}/{^}: “Ring count” i {SELECT}
Enter the number of rings before the unit
forwards calls (0, 2-20 rings). i {SAVE} i
{EXIT}
Enter the phone number you want to forward
calls to (24 digits max.). i {SAVE}
Document Version 2012-01
: Programming using the Base Unit (KX-TGP550 only)
■ When 1 line is registered:
Go to step 6.
■ When 2 or more lines are registered:
{V}/{^}: Select the desired line. i
{SELECT}
Do not disturb
This feature allows the unit to reject calls on
selected lines.
The default setting is “Off”.
Important:
L We recommend setting this feature with your
administrator. Contact your administrator for
further information.
L If this feature is set on your unit, it may be
overridden by your phone system settings.
L This feature is not available on shared lines.
L The call is logged in the caller list (page 42) with
Q after the call is rejected.
1
2
3
4
5
{MENU} (middle soft key)
6
{V}/{^}: Select “On” or “Off”. i {SAVE}
i {EXIT}
{V}/{^}: “IP service” i {SELECT}
{V}/{^}: “Call features” i {SELECT}
{V}/{^}: “Do not disturb” i {SELECT}
Proceed with the desired operation.
■ When 1 line is registered:
Go to step 6.
■ When 2 or more lines are registered:
{V}/{^}: Select the desired line. i
{SELECT}
Block anonymous calls
This feature allows the unit to reject calls when the
unit receives a call without phone number.
The default setting is “Off”.
Important:
L We recommend setting this feature with your
administrator. Contact your administrator for
further information.
L This feature is not available on shared lines.
L The call is logged in the caller list (page 42) with
Q after the call is rejected.
6
{V}/{^}: Select “On” or “Off”. i {SAVE}
i {EXIT}
Call block (Caller ID service
users only)
This feature allows the unit to reject calls from
specified phone numbers that you do not want to
answer such as junk calls.
When a call is received, the unit does not ring while
the caller is being identified. If the phone number
matches an entry in the call block list, the unit
rejects the call.
Important:
L When the unit receives a call from a number that
is stored in the call block list, the call is logged in
the caller list (page 42) with $ after the call is
rejected.
Storing unwanted callers
You can store up to 30 phone numbers in the call
block list by using the caller list or by entering the
numbers directly.
Important:
L You are advised to store the 10 digits (including
an area code) for PSTN calls because if 7 digits
are stored, all numbers that have the last 7 digits
will be blocked.
From the caller list:
1
2
{CID} (right soft key)
{V}/{^}: Select the entry to be blocked. i
{MENU}
3
{V}/{^}: “Save call block” i
{SELECT}
4
{V}/{^}: “Yes” i {SELECT} i {EXIT}
By entering phone numbers:
1
2
3
4
{MENU} (middle soft key)
5
Proceed with the desired operation.
{V}/{^}: “IP service” i {SELECT}
{V}/{^}: “Call features” i {SELECT}
{V}/{^}: “Block anonymous” i
{SELECT}
1
{MENU} (middle soft key) i {#}{2}{1}{7}
i {ADD}
2
Enter the phone number (24 digits max.). i
{SAVE}
L To erase a digit, press {CLEAR}.
Document Version 2012-01
37
: Programming using the Base Unit (KX-TGP550 only)
3
{EXIT}
Viewing/editing/erasing call block
numbers
1 {MENU} (middle soft key) i {#}{2}{1}{7}
2 {V}/{^}: Select the desired entry.
L To exit, press {EXIT}.
3
Proceed with the desired operation.
■ Editing a number:
{MENU} i {V}/{^}: “Edit” i
{SELECT} i Edit the phone number. i
{SAVE} i {EXIT}
■ Erasing a number:
{MENU} i {V}/{^}: “Erase” i
{SELECT} i {V}/{^}: “Yes” i
{SELECT} i {EXIT}
Note:
L When editing, press the desired dial key to add,
{CLEAR} to erase.
Anonymous calls (Block
Caller ID)
This feature allows the unit to make a call
anonymously.
The default setting is “Off”.
Important:
L We recommend setting this feature with your
administrator. Contact your administrator for
further information.
1
2
3
4
{MENU} (middle soft key)
5
Proceed with the desired operation.
■ When 1 line is registered:
Go to step 6.
■ When 2 or more lines are registered:
{V}/{^}: Select the desired line. i
{SELECT}
6
{V}/{^}: Select “On” or “Off”. i {SAVE}
i {EXIT}
38
{V}/{^}: “IP service” i {SELECT}
{V}/{^}: “Call features” i {SELECT}
{V}/{^}: “Block Caller ID” i
{SELECT}
Date and time
Set if the unit does not show the date and time. You
can set the date and time through the Web user
interface and also program it to adjust
automatically using the SNTP. Also, daylight
saving time setting is available through the Web
user interface. Contact your administrator for
further information.
1
2
{MENU} (middle soft key) i {#}{1}{0}{1}
3
Enter the current hour and minute (12-hour
clock format).
Example: 9:30
{0}{9} {3}{0}
4
5
{AM/PM}: Select “AM” or “PM”.
Enter the current month, date, and year.
Example: March 15, 2010
{0}{3} {1}{5} {1}{0}
{SAVE} i {EXIT}
Note:
L When English is selected as the display
language, 12-hour clock format is used. When
Spanish or French is selected, 24-hour clock
format is used.
L To correct a digit, press {3}, {4}, {^}, or {V} to
move the cursor to the digit, then make the
correction.
Updating the base unit
software
Your phone system dealer may offer new features
and improve its software version from time to time.
If you set the base unit software update setting to
manual mode through the Web user interface, you
need to download the update when “Update
version.Press OK.” is displayed. Contact your
administrator for further information.
Important:
L Make sure the STATUS indicator on the base
unit is lit in green and no line is in use (page 8).
1
Press {OKL} while “Update
version.Press OK.” is displayed.
L The current and new base unit software
versions are displayed.
Document Version 2012-01
: Programming using the Base Unit (KX-TGP550 only)
L If you want to download the update later,
press {CANCEL}. When you are ready to
download, see “Confirming the base unit
software version”, page 39.
2
{OK}
Note:
L The STATUS indicator on the base unit flashes
while downloading. When the download is
complete, the STATUS indicator stops flashing
and changes to steady green.
Confirming the base unit software
version
1 {MENU} (middle soft key) i {#}{1}{5}{6}
L The current base unit software version is
displayed. To exit, press {EXIT}.
2
If “Update version?” is displayed, press
{OK} to download. To exit without
downloading, press {CANCEL}.
Document Version 2012-01
39
Programming through the Web User Interface
Programming through the
Web user interface
You can program the following features through
the Web user interface. The password is required.
Contact your administrator for further information.
– Network settings
– Call forward (page 29, 36)
– Do not disturb (page 30, 37)
– Block anonymous calls (page 30, 37)
– Call block*1 (page 30, 37)
– Anonymous calls (Block Caller ID) (page 31, 38)
– Updating the base unit software*2 (page 32, 38)
*1 This feature is explained as “Call Rejection
Phone Numbers” in the Web user interface.
*2 This feature is explained as “Firmware Update”
in the Web user interface.
Embedded Web
You need to activate the Web user interface every
time you program features using a computer. The
Web user interface is deactivated after setting on
the computer.
The default setting is “Off”.
Y Handset
1
{MENU} (center of joystick) i
{#}{5}{3}{4}
2
3
{V}/{^}: Select the desired setting.
{SAVE} i {OFF}
: Base unit
1
2
3
40
{MENU} (middle soft key) i {#}{5}{3}{4}
{V}/{^}: Select the desired setting.
{SAVE} i {EXIT}
Document Version 2012-01
Registering a Unit
Deregistering a handset
A handset can cancel its own registration (or the
registration of another handset) that is stored to
the base unit. This allows the handset to end its
wireless connection with the system.
Registering a unit
Operating additional units
Additional handsets
Up to 6 handsets can be registered to the base
unit.
Registering a handset to the base
unit
The supplied handset and base unit are preregistered. If for some reason the handset is not
registered to the base unit (for example, _ is
displayed even when the handset is near the base
unit), re-register the handset.
1
2
Handset:
{MENU} (center of joystick) i
{#}{1}{3}{0}
1
{MENU} (center of joystick) i
{#}{1}{3}{1}
2
3
{3}{3}{5} i {OK}
4
{V}/{^}: “Yes” i {SELECT}
L When you cancel a different handset than
the one you are now using, press {OFF} to
exit.
{V}/{^}: Select the desired unit. i
{SELECT}
: Base unit
Available for: KX-TGP550
Base unit:
■ KX-TGP500:
Press and hold {ALL} for about 4 seconds
until the STATUS indicator flashes in red.
■ KX-TGP550:
Press and hold {ALL} for about 4 seconds
until the registration tone sounds and the
STATUS indicator flashes in red.
L If all registered handsets start ringing, press
the same button to stop. Then, repeat from
step 1.
L The next step must be completed within 90
seconds.
3
Y Handset
1
Press and hold {ALL} until the registration
tone sounds and the STATUS indicator
flashes in red.
L If all registered handsets start ringing, press
the same button to stop. Then, repeat this
step.
2
Press and hold the handset number ({1} –
{6}) that you want to cancel until a
confirmation tone sounds.
Handset:
Press {OKL}, then wait until a long beep
sounds.
L When the handset has been registered
successfully, _ will change to w.
Note:
L When you purchase an additional handset, refer
to the additional handset’s installation manual
for registration.
Document Version 2012-01
41
Special Features
Using Caller ID service
Caller list
Availability of this service depends on your phone
system. Contact your administrator for further
information.
Important:
L Make sure the unit’s date and time setting is
correct (page 31, 38).
Caller ID features
Viewing the caller list and calling
back
When an outside call is being received, the caller’s
information is displayed.
Caller information for the last 100 callers is logged
in the caller list from the most recent call to the
oldest.
L If the call is received as an anonymous call,
“Anonymous call” is displayed.
Missed calls
If a call is not answered, the unit treats it as a
missed call and “Missed call” is displayed.
This lets you know if you should view the caller list
to see who called while you were away.
Y Handset
1
2
{CID} (left soft key)
3
To call back, press {C}.
To exit, press {OFF}.
Push the joystick down to search from the
most recent call, or push the joystick up to
search from the oldest call.
L You can see the detailed information about
the caller by pressing {SINGLE}.
: Base unit
Phonebook name display
When caller information is received and it matches
a phone number stored in the phonebook, the
stored name in the phonebook is displayed and
logged in the caller list.
Available for: KX-TGP550
1
2
{CID} (right soft key)
3
To call back, lift the corded handset.
To exit, press {EXIT}.
Ringer ID
This feature can help you identify who is calling by
using different ringers for different callers stored in
the phonebook (page 20, 23). You can assign a
different ringer to each phonebook entry. When a
call is received from a caller stored in the
phonebook, the assigned ringer rings after the
caller information is displayed.
42
Press {V} to search from the most recent call,
or {^} to search from the oldest call.
L If an arrow (D) is displayed after the
number, the whole phone number is not
shown. Press {4} to see the remaining
numbers. To return to the previous display,
press {3}.
Note for handset and base unit:
L If the entry has already been viewed or
answered, “Q” is displayed, even if it was
viewed or answered using another unit.
L In step 3, the unit automatically uses the line the
call was received from to call back. If you want to
select a line:
Handset: {LINE} i {V}/{^}: Select the
desired line. i {C}
Base unit (KX-TGP550): {LINE} i {V}/{^}:
Select the desired line. i Lift the corded
handset.
Document Version 2012-01
Special Features
Editing a caller’s phone number
before calling back
2
3
4
Y Handset
1
2
{CID} (left soft key)
3
4
5
{MENU}
6
Press {CALL} or {C}.
{V}/{^}: Select the desired entry.
L You can see the detailed information about
the caller by pressing {SINGLE}.
6
1
2
{CID} (right soft key)
{V}/{^}: Select the desired entry. i
{ERASE}
{V}/{^}: “Edit and Call” i {SELECT}
3
Edit the number.
L Press dial key ({0} – {9}) to add, {CLEAR}
to delete.
Erasing all caller information
{V}/{^}: Select the desired entry.
L If an arrow (D) is displayed after the
number, the whole phone number is not
shown. Press {4} to see the remaining
numbers. To return to the previous display,
press {3}.
{MENU}
{V}/{^}: “Yes” i {SELECT}
Available for: KX-TGP550
1
2
Edit the number.
L Press dial key ({0} – {9}) to add, {CLEAR}
to delete.
{V}/{^}: “Yes” i {SELECT}
Y Handset
1
2
Lift the corded handset.
Erasing selected caller information
{CID} (right soft key) i {ERASE}
Storing caller information to the
phonebook
{V}/{^}: “Edit and Call” i {SELECT}
{CID} (left soft key)
{CID} (left soft key) i {ERASE}
: Base unit
{CID} (right soft key)
Y Handset
{V}/{^}: “Yes” i {SELECT} i {EXIT}
Y Handset
1
2
Note for handset and base unit:
L In step 6, the unit automatically uses the line the
call was received from to call back. If you want to
select a line:
Handset: {LINE} i {V}/{^}: Select the
desired line. i Press {CALL} or {C}.
Base unit (KX-TGP550): {LINE} i {V}/{^}:
Select the desired line. i Lift the corded
handset.
1
{V}/{^}: “Yes” i {SELECT} i {OFF}
Available for: KX-TGP550
Available for: KX-TGP550
3
4
5
{V}/{^}: “Erase” i {SELECT}
: Base unit
: Base unit
1
2
{V}/{^}: Select the desired entry. i {MENU}
3
4
5
{CID} (left soft key)
{V}/{^}: Select the desired entry.
L You can see the detailed information about
the caller by pressing {SINGLE}.
{MENU}
{V}/{^}: “Save phonebook” i {SELECT}
Continue from step 3, “Editing entries”, page
21.
: Base unit
Available for: KX-TGP550
1
2
{CID} (right soft key)
{V}/{^}: Select the desired entry.
L If an arrow (D) is displayed after the
number, the whole phone number is not
shown. Press {4} to see the remaining
Document Version 2012-01
43
Special Features
numbers. To return to the previous display,
press {3}.
3
4
5
1
{VOICE MAIL} i {V}/{^}: Select the
desired line. i {SELECT}
L 6 is displayed next to the line if it has new
messages.
L If an arrow (D) is displayed after the
number, the whole phone number is not
shown.
Press {4} to see the remaining numbers. To
return to the previous display, press {3}.
L Lift the corded handset if needed.
2
When finished, press {SP-PHONE} or place
the corded handset on the cradle.
{MENU}
{V}/{^}: “Save phonebook” i {SELECT}
Continue from step 3, “Editing entries”, page
24.
Voice mail service
Voice mail service is available depending on your
phone system. Your phone system answers calls
for you when you are unavailable to answer the
phone or when your line is busy. Messages are
recorded by your phone system, not your
telephone. Please contact your phone system
dealer for details of this service.
Message alert
You can select whether or not the message
indicator on the handset flashes slowly when new
voice mail messages are recorded. The default
setting is “Off”.
Listening to voice mail messages
The unit lets you know that you have new voice
mail messages in the following ways:
– “New Voice Mail” is displayed if message
indication service is available.
– The message indicator on the handset flashes
slowly if message alert feature is turned on
(“Message alert”, page 44).
– KX-TGP550: The VOICE MAIL indicator on the
base unit flashes.
Y Handset
1
{MENU} (center of joystick) i
{#}{3}{4}{0}
2
{V}/{^}: Select the desired setting. i
{SAVE} i {OFF}
Note:
L While the message alert is on, battery operating
time is shortened.
Y Handset
1
2
3
{MENU} (center of joystick)
4
When finished, press {OFF}.
{V}/{^}: “New Voice Mail” i {SELECT}
{V}/{^}: Select the desired line. i
{SELECT}
L 6 is displayed next to the line if it has new
messages.
L If an arrow (D) is displayed after the
number, the whole phone number is not
shown.
Push the joystick right to see the remaining
numbers. To return to the previous display,
push the joystick left.
: Base unit
Available for: KX-TGP550
44
Document Version 2012-01
Intercom Features
Intercom features between
handsets
Intercom
Intercom calls can be made between handsets.
Note:
L If you receive an outside call while talking on the
intercom, you hear interrupt tones (page 28). To
answer the call, press {OFF}, then press {C}.
L When paging the handset, the paged handset
beeps for 1 minute.
Making an intercom call
1
{MENU} (center of joystick) i {V}/{^}:
“Intercom” i {SELECT}
2
{V}/{^}: Select the desired unit. i {CALL}
L To stop paging, press {OFF}.
3
When you finish talking, press {OFF}.
Answering an intercom call
1
2
Press {C} to answer the page.
When you finish talking, press {OFF}.
Auto intercom/Room monitor
This feature allows you to:
– answer an intercom call without pressing any
buttons on the handset.
– listen to the sound in a room where the handset
is located.
Turning auto intercom on/off
“Off” (Default): Turns this feature off.
“On (Ringer On)”: When an intercom call is
received, the handset rings 2 times, then the
speakerphone is automatically turned on.
“On (Ringer Off)”: When an intercom call is
received, the handset does not ring and the
speakerphone is automatically turned on. This
allows you to easily monitor a baby’s room, for
example, from different areas of the house.
1
{MENU} (center of joystick) i
{#}{2}{7}{3}
2
3
{V}/{^}: Select the desired setting.
Note:
L Auto intercom cannot be used when:
– your handset is receiving a transferred
outside call.
– all handsets are being paged by the base unit.
Answering an intercom call using auto
intercom
1
When you are paged by another handset,
speak into the microphone.
L To switch to the receiver, press {C}.
2
To end the intercom, press {OFF}.
Monitoring audio in a room
You can listen to the sound in a room where
another handset is located.
Important:
L Before using this feature, set auto intercom on
the destination handset to “On (Ringer
Off)” to allow access by other handsets.
1
Call the destination handset (page 45).
L You can listen to the audio.
2
To mute your sound output, press {MUTE} if
necessary.
3
Press {OFF} to stop monitoring.
Transferring calls
Outside calls can be transferred between 2
handsets.
1
2
3
During an outside call, press {MENU}.
4
Wait for the paged party to answer.
L If the paged party does not answer, press
{C} to return to the outside call.
5
{OFF}
{V}/{^}: “Intercom” i {SELECT}
{V}/{^}: Select the desired handset. i
{CALL}
Transferring a call without speaking to the
other handset user
1
Perform from step 1 to 3, “Transferring calls”,
page 45.
2
{OFF}
L The outside call rings at the other handset.
{SAVE} i {OFF}
Document Version 2012-01
45
Intercom Features
Note:
L If the other handset user does not answer the
call within 1 minute, the call rings at your
handset again.
Answering a transferred call
Press {C} to answer the page.
Note:
L After the paging party disconnects, you can talk
to the outside caller.
Intercom features between
the handset and base unit
(KX-TGP550 only)
Answering an intercom call
Y Handset
1
2
Press {C} to answer the page.
When you finish talking, press {OFF}.
: Base unit
1
Lift the corded handset or press {SP-PHONE}
to answer the page.
2
When you finish talking, place the corded
handset on the cradle or press {SP-PHONE}.
Answering an intercom call using auto
intercom
Before using the auto intercom, turn auto intercom
on (page 45).
Y Handset
Intercom
Intercom calls can be made between the handset
and base unit.
Note:
L If you receive an outside call while talking on the
intercom, you hear interrupt tones (page 28, 34).
– To answer the call with the handset, press
{OFF}, then press {C}.
– To answer the call with the base unit, place
the corded handset on the cradle, then lift it
again. If the speakerphone is used, press
{SP-PHONE} 2 times.
L When paging the handset, the paged handset
beeps for 1 minute.
Making an intercom call
1
When you are paged by the base unit, speak
into the microphone.
L To switch to the receiver, press {C}.
2
To end the intercom, press {OFF}.
Monitoring audio in a room using auto
intercom
You can listen to the sound in a room where the
handset is located using the auto intercom.
Important:
L Before using this feature, set auto intercom on
the destination handset to “On (Ringer
Off)” to allow access by the base unit.
: Base unit
Y Handset
1
2
3
{MENU} (center of joystick)
4
When you finish talking, press {OFF}.
{V}/{^}: “Intercom” i {SELECT}
{V}/{^}: Select the desired unit. i {CALL}
L To stop paging, press {OFF}.
1
Call the destination handset (page 46).
L You can listen to the audio.
2
To mute your sound output, press {MUTE} if
necessary.
3
To stop monitoring, press {SP-PHONE} or
place the corded handset on the cradle.
: Base unit
1
Press {j} – {k} or {ALL}.
L Lift the corded handset if needed.
L To stop paging, press the same button.
2
When you finish talking, press {SP-PHONE}
or place the corded handset on the cradle.
46
Document Version 2012-01
Intercom Features
: Base unit
Transferring calls
Outside calls can be transferred between the
handset and base unit.
Y Handset
1
2
3
4
During an outside call, press {MENU}.
Lift the corded handset or press {SP-PHONE} to
answer the page.
Note for handset and base unit:
L After the paging party disconnects, you can talk
to the outside caller.
{V}/{^}: “Intercom” i {SELECT}
{V}/{^}: Select the base unit. i {CALL}
Wait for the paged party to answer.
L If the paged party does not answer, press
{C} to return to the outside call.
5
{OFF}
Handset locator
You can locate a misplaced handset by paging it.
1
Base unit:
{ALL}
L All registered handsets beep for 1 minute.
2
To stop paging:
Base unit:
Press {ALL}.
Handset:
■ KX-TGP500:
Press {OFF}.
: Base unit
1
During an outside call, press {j} – {k} or
{ALL}.
2
Wait for the paged party to answer.
L If the paged party does not answer, press
the same button as in step 1 to return to the
outside call.
3
Place the corded handset on the cradle.
■ KX-TGP550:
Press {C}, then press {OFF}.
Transferring a call without speaking to the
other handset or base unit user
Y Handset
1
Perform from step 1 to 3, “Transferring calls”,
page 47.
2
{OFF}
L The outside call rings at the other unit.
: Base unit
1
During an outside call, press {j} – {k} or
{ALL}.
2
Place the corded handset on the cradle.
L The outside call rings at the other unit.
Note for handset and base unit:
L If the other handset or base unit user does not
answer the call within 1 minute, the call rings at
your unit again.
Answering a transferred call
Y Handset
Press {C} to answer the page.
Document Version 2012-01
47
Useful Information
Belt clip
■ To attach
Wall mounting
■ To remove
Charger
1 Drive the screws (not supplied) into the wall.
25.4 mm
(1 inch)
Screws
Hooks
2
Mount the charger (A), then slide it down (B)
and to the right (C) until it is secure.
A
B
C
Note:
L Make sure that the wall is strong enough to
support the weight of the unit.
48
Document Version 2012-01
Useful Information
Base unit (KX-TGP500)
1 Remove the base unit stand by pushing (A)
and sliding down (B).
A
B
2
Mount the base unit by inserting the screws
(not supplied) into the round openings on the
unit, then slide the unit down to secure it.
Screws
Note:
L Make sure that the wall is strong enough to
support the weight of the unit.
To attach the base unit stand
Place the base unit stand by fitting the tab into the
slot on the base unit. Then, slide the stand until it
clicks.
Document Version 2012-01
49
Useful Information
Error messages
If the unit detects a problem, one of the following messages is shown on the display.
Display message
Cause/solution
Busy
L The called unit is in use.
L The line you tried to join is not set to accept other units
(page 14, 18).
L 3 lines are already being used. Wait until C changes to
l (page 9).
L Other units are in use and the system is busy even though
l is displayed. Try again later.
L The handset you are using is too far from the base unit.
Move closer and try again.
L The line is in use. You can check the status of the line
(page 10).
Error!!
L Other units are in use and the system is busy. Try again
later.
Failed
L Phonebook copy failed (page 25). Confirm the other unit
(the receiver) is in standby mode and try again.
Incomplete
L Phonebook copy is incomplete. The receiver’s phonebook
memory is full. Erase unnecessary phonebook entries
(page 21, 24) from the other unit (the receiver) and try
again.
Invalid
L The unit does not have a registered line. Contact your
administrator.
L The handset you paged from the base unit is not
registered (KX-TGP550 only).
L If the STATUS indicator still does not light in green, see
“STATUS indicator”, page 53.
Memory full
L The phonebook memory is full. Erase unnecessary
entries (page 21, 24).
L The call block list memory is full. Erase unnecessary
entries (page 31, 38).
No link to base. Reconnect
main base AC adaptor.
L The handset has lost communication with the base unit.
Move closer to the base unit and try again.
L Unplug the base unit’s AC adaptor to reset the unit.
Reconnect the adaptor and try again.
L The handset’s registration may have been canceled. Reregister the handset (page 41).
Plug Ethernet cable.
L The supplied Ethernet cable has not been connected yet
or not connected properly. Check the connections. Refer
to the Quick Guide for details. If the STATUS indicator still
does not light in green, see “STATUS indicator”, page 53.
Use rechargeable battery.
L A wrong type of battery such as Alkaline or Manganese
was inserted. Use only the rechargeable Ni-MH batteries
noted on page 5.
50
Document Version 2012-01
Useful Information
Troubleshooting
If you still have difficulties after following the instructions in this section, disconnect the base unit’s AC
adaptor, then reconnect the base unit’s AC adaptor. Remove the batteries from the handset, and then
insert the batteries into the handset again.
General use
Problem
Cause/solution
The unit does not work.
L Make sure the batteries are installed correctly. Refer to the
Quick Guide for details.
L Fully charge the batteries. Refer to the Quick Guide for details.
L Check the connections. Refer to the Quick Guide for details.
L Unplug the base unit’s AC adaptor to reset the unit. Reconnect
the adaptor and try again.
L The handset has not been registered to the base unit. Register
the handset (page 41).
I cannot hear a dial tone.
L Confirm the Ethernet cable is properly connected. Refer to the
Quick Guide for details.
L Network settings may not be correct. Contact your
administrator for further information.
L Many installation issues can be resolved by resetting all the
equipment. First, shut down your modem, router, hub, base
unit, and computer. Then, turn the devices back on one at a
time in this order: modem, router, hub, base unit, computer.
L If you cannot access Internet Web pages using your computer,
check to see if your phone system is having connection issues
in your area. Contact your administrator for further information.
I do not know how to erase
L There are unviewed missed calls remaining. View them and
“Missed call” from the display.
erase the message in the following way.
Handset:
1
2
{CID} (left soft key)
Push the joystick down to search from the most recent call,
or push the joystick up to search from the oldest call.
Base unit (KX-TGP550):
1
2
I cannot remember the password
for the Web user interface.
{CID} (right soft key)
Press {V} to search from the most recent call, or press {^}
to search from the oldest call.
L Contact your administrator.
Document Version 2012-01
51
Useful Information
Programmable settings
Problem
Cause/solution
I cannot program items.
L Programming is not possible while either another handset or
the base unit is being used. Try again later.
L Programming is not possible while the base unit is downloading
data. Wait until the STATUS indicator stops flashing and lights
in steady green.
The display is in a language I
cannot read.
L Change the display language (page 10).
While programming, the unit starts
to ring.
L A call is being received. Answer the call and start again after
hanging up.
I cannot register a handset to the
base unit.
L The maximum number of handsets (6) is already registered to
the base unit. Cancel unused handset registrations from the
base unit (page 41).
L Place the handset and the base unit away from other electrical
appliances.
I have programmed the Call
forward/Do not disturb/Block
caller ID/Block anonymous calls,
but the unit does not work as
programmed.
L The features may have been programmed by your
administrator. Contact your administrator for further
information.
L Features set on your unit may be overridden by your phone
system settings.
L Call forward (“Busy”/“No answer”) does not work when Do
not disturb is turned on (page 30, 37).
52
Document Version 2012-01
Useful Information
STATUS indicator
Problem
Cause/solution
The STATUS indicator continues
flashing in amber.
L An IP address may not have been acquired or the static IP
address is not appropriate. Check the base unit’s IP address:
Handset:
{MENU} (center of joystick) i {#}{5}{0}{1}
Base unit (KX-TGP550 only):
{MENU} (middle soft key) i {#}{5}{0}{1}
We recommend to perform the following with your
administrator. Contact your administrator for further
information.
– If necessary, change the base unit’s static IP address.
– If an IP address was not acquired, check your network
devices’ (router, modem, etc.) connections. If the
connections are made properly but the problem persists,
check your network devices’ (router, modem, etc.) settings.
L Many installation issues can be resolved by resetting all the
equipment. First, shut down your modem, router, hub, base
unit, and computer. Then, turn the devices back on one at a
time in this order: modem, router, hub, base unit, computer.
L If you cannot access Internet Web pages using your computer,
check to see if your phone system is having connection issues
in your area.
L For more troubleshooting help, contact your administrator.
The STATUS indicator flashes in
amber rapidly although the IP
address was acquired.
L Unplug the base unit’s AC adaptor to reset the unit, then
reconnect the AC adaptor. If the STATUS indicator is still
flashing in amber rapidly, there may be a problem with the base
unit hardware. Contact your phone system dealer.
The STATUS indicator lights in
amber although the Ethernet
cable is connected properly.
L The base unit’s IP address may conflict with the IP addresses
of other devices on your local network. Check the base unit’s
static IP address:
Handset:
{MENU} (center of joystick) i {#}{5}{0}{1}
Base unit (KX-TGP550 only):
{MENU} (middle soft key) i {#}{5}{0}{1}
Then, check the IP addresses of the other devices on your local
network. If necessary, change the base unit’s static IP address.
The STATUS indicator is off.
L The base unit power is off.
L The Ethernet cable is not connected properly. Connect it.
L Your network devices (hub, router, etc.) are turned off. Check
the LEDs for the link status of the devices.
L The base unit power is booting up.
Document Version 2012-01
53
Useful Information
Battery recharge
Problem
Cause/solution
The handset beeps and/or d
flashes.
L Battery charge is low. Fully charge the batteries. Refer to the
Quick Guide for details.
I fully charged the batteries, but d
still flashes or 0 is displayed.
L Clean the charge contacts and charge again. Refer to the Quick
Guide for details.
L It is time to replace the batteries. Refer to the Quick Guide for
details.
I fully charged the batteries, but
the operating time seems to be
shorter.
L Clean the battery ends (S, T) and the charge contacts with a
dry cloth and charge again.
Making/answering calls, intercom
Problem
Cause/solution
_ is displayed.
L The handset is too far from the base unit. Move closer.
L The base unit’s AC adaptor is not properly connected.
Reconnect the AC adaptor to the base unit.
L You are using the base unit or handset in an area with high
electrical interference. Re-position the base unit and use the
handset away from sources of interference.
L The handset is not registered to the base unit. Register it (page
41).
Noise is heard, sound cuts in and
out.
L You are using the handset or base unit in an area with high
electrical interference. Reposition the base unit and use the
handset away from sources of interference.
L Move closer to the base unit.
The handset does not ring.
L The ringer volume is turned off. Adjust the ringer volume (page
13).
L Call forward, Do not disturb, or Block anonymous calls may
have been programmed by your administrator. Contact your
administrator for further information.
The base unit does not ring.*1
L The ringer volume is turned off. Adjust the ringer volume (page
17).
L Call forward, Do not disturb, or Block anonymous calls may
have been programmed by your administrator. Contact your
administrator for further information.
I cannot make a call.
L Check if the STATUS indicator is lit in green. If it is not lit in
green, see “STATUS indicator”, page 8.
L You cannot make a call while the base unit is downloading the
software update. Wait until the STATUS indicator stops flashing
and changes to steady green.
L The handset is too far from the base unit. Move closer and try
again.
L If the problem is not solved after trying the solutions above,
contact your administrator.
54
Document Version 2012-01
Useful Information
Problem
Cause/solution
During a conversation, the
following occurs:
– noise is heard.
– the sound is interrupted.
– the sound is delayed.
L It may be caused by someone using a computer connected to
the same network as the unit.
L Confirm the speed of Internet connection. The unit requires 100
kbps for each upstream and downstream. If less than 100 kbps
is provided, contact your administrator.
*1 KX-TGP550
Caller ID
Problem
Cause/solution
Caller information is not
displayed.
L Availability of this service depends on your phone system.
Contact your administrator.
The displayed caller information is
not correct.
L Caller information may not be correct depending on your phone
system.
Caller information is displayed
late.
L Move closer to the base unit.
The name stored in the
phonebook is not displayed fully
while an outside call is being
received.
L Edit the phonebook entry name to fit in 1 line of text (page 21,
24).
Liquid damage
Problem
Cause/solution
Liquid or other form of moisture
has entered the base unit/
handset.
L Disconnect the AC adaptor and Ethernet cable from the base
unit. Remove the batteries from the handset and leave to dry for
at least 3 days. After the base unit/handset are completely dry,
reconnect the AC adaptor and Ethernet cable. Insert the
batteries and charge fully before use. If the unit does not work
properly, contact your phone system dealer.
Caution:
L To avoid permanent damage, do not use a microwave oven to speed up the drying process.
Document Version 2012-01
55
Useful Information
Specifications
■ Standard:
DECT 6.0 (Digital Enhanced Cordless Telecommunications 6.0)
■ Frequency range:
1.92 GHz to 1.93 GHz
■ RF transmission power:
115 mW (max.)
■ Power source:
120 V AC, 60 Hz
■ Network interface:
10/100base-TX auto MDI/MDIX Ethernet LAN port
■ Support codecs:
G.722, G.711 µ-law, G.711 A-law, G.726 (32k), G.729A
■ Power consumption:
Base unit:
KX-TGP500
Standby: Approx. 1.3 W
Maximum: Approx. 1.9 W
KX-TGP550
Standby: Approx. 2.1 W
Maximum: Approx. 3.6 W
Charger:
Standby: Approx. 0.1 W
Maximum: Approx. 2.6 W
■ Operating conditions:
0 °C – 40 °C (32 °F – 104 °F), 20 % – 80 % relative air humidity (dry)
Note:
L Design and specifications are subject to change without notice.
L The illustrations in these instructions may vary slightly from the actual product.
Trademarks
L Microsoft Excel is a registered trademark of Microsoft Corporation in the United States and/or other
countries.
L All other trademarks identified herein are the property of their respective owners.
56
Document Version 2012-01
Open Source Software
Open Source Software
Parts of this product use Open Source Software. Relevant conditions apply to this software. Panasonic
cannot accept inquiries regarding the content of the following copyright and license information.
<<NetBSD kernel>>
This product uses a part of NetBSD kernel.
The use of a part of NetBSD kernel is based on the typical BSD style
license below.
Copyright (c)
The Regents of the University of California. All rights reserved.
Redistribution and use in source and binary forms, with or without
modification, are permitted provided that the following conditions
are met:
1. Redistributions of source code must retain the above copyright
notice, this list of conditions and the following disclaimer.
2. Redistributions in binary form must reproduce the above copyright
notice, this list of conditions and the following disclaimer in the
documentation and/or other materials provided with the distribution.
3. All advertising materials mentioning features or use of this software
must display the following acknowledgement:
This product includes software developed by the University of
California, Berkeley and its contributors.
4. Neither the name of the University nor the names of its contributors
may be used to endorse or promote products derived from this software
without specific prior written permission.
THIS SOFTWARE IS PROVIDED BY THE REGENTS AND CONTRIBUTORS ``AS IS'' AND
ANY EXPRESS OR IMPLIED WARRANTIES, INCLUDING, BUT NOT LIMITED TO, THE
IMPLIED WARRANTIES OF MERCHANTABILITY AND FITNESS FOR A PARTICULAR PURPOSE
ARE DISCLAIMED. IN NO EVENT SHALL THE REGENTS OR CONTRIBUTORS BE LIABLE
FOR ANY DIRECT, INDIRECT, INCIDENTAL, SPECIAL, EXEMPLARY, OR CONSEQUENTIAL
DAMAGES (INCLUDING, BUT NOT LIMITED TO, PROCUREMENT OF SUBSTITUTE GOODS
OR SERVICES; LOSS OF USE, DATA, OR PROFITS; OR BUSINESS INTERRUPTION)
HOWEVER CAUSED AND ON ANY THEORY OF LIABILITY, WHETHER IN CONTRACT, STRICT
LIABILITY, OR TORT (INCLUDING NEGLIGENCE OR OTHERWISE) ARISING IN ANY WAY
OUT OF THE USE OF THIS SOFTWARE, EVEN IF ADVISED OF THE POSSIBILITY OF
SUCH DAMAGE.
However, parts of the NetBSD Kernel are provided with the following copyright notices.
Copyright (c) 1980, 1983, 1988, 1993 The Regents of the University of California. All rights reserved.
Copyright (c) 1980, 1986, 1989, 1993 The Regents of the University of California. All rights reserved.
Copyright (c) 1980, 1986, 1991, 1993 The Regents of the University of California. All rights reserved.
Copyright (c) 1980, 1986, 1993 The Regents of the University of California. All rights reserved.
Copyright (c) 1982, 1985, 1986, 1988, 1993, 1994 The Regents of the University of California. All rights reserved.
Copyright (c) 1982, 1986, 1988, 1990, 1993 The Regents of the University of California. All rights reserved.
Copyright (c) 1982, 1986, 1988, 1990, 1993, 1994, 1995 The Regents of the University of California. All rights
reserved.
Copyright (c) 1982, 1986, 1988, 1990, 1993, 1995 The Regents of the University of California. All rights reserved.
Copyright (c) 1982, 1986, 1988, 1991, 1993 The Regents of the University of California. All rights reserved.
Copyright (c) 1982, 1986, 1988, 1993 The Regents of the University of California. All rights reserved.
Copyright (c) 1982, 1986, 1988, 1993, 1995 The Regents of the University of California. All rights reserved.
Copyright (c) 1982, 1986, 1989, 1991, 1993 The Regents of the University of California. All rights reserved.
Copyright (c) 1982, 1986, 1989, 1993 The Regents of the University of California. All rights reserved.
Copyright (c) 1982, 1986, 1990, 1991, 1993 The Regents of the University of California. All rights reserved.
Copyright (c) 1982, 1986, 1990, 1993 The Regents of the University of California. All rights reserved.
Copyright (c) 1982, 1986, 1990, 1993, 1994 The Regents of the University of California. All rights reserved.
Copyright (c) 1982, 1986, 1991, 1993 The Regents of the University of California. All rights reserved.
Copyright (c) 1982, 1986, 1991, 1993, 1994 The Regents of the University of California. All rights reserved.
Document Version 2012-01
57
Open Source Software
Copyright (c) 1982, 1986, 1991, 1993, 1995 The Regents of the University of California. All rights reserved.
Copyright (c) 1982, 1986, 1993 The Regents of the University of California. All rights reserved.
Copyright (c) 1982, 1986, 1993, 1994 The Regents of the University of California. All rights reserved.
Copyright (c) 1982, 1986, 1993, 1994, 1995 The Regents of the University of California. All rights reserved.
Copyright (c) 1982, 1986, 1993, 1995 The Regents of the University of California. All rights reserved.
Copyright (c) 1982, 1988, 1991, 1993 The Regents of the University of California. All rights reserved.
Copyright (c) 1983, 1990, 1993 The Regents of the University of California. All rights reserved.
Copyright (c) 1983, 1993 The Regents of the University of California. All rights reserved.
Copyright (c) 1985, 1986, 1993 The Regents of the University of California. All rights reserved.
Copyright (c) 1985, 1986, 1993 The Regents of the University of California. All rights reserved.
Copyright (c) 1986, 1989, 1991, 1993 The Regents of the University of California. All rights reserved.
Copyright (c) 1986, 1993 The Regents of the University of California. All rights reserved.
Copyright (c) 1987, 1991, 1993 The Regents of the University of California. All rights reserved.
Copyright (c) 1987, 1993 The Regents of the University of California. All rights reserved.
Copyright (c) 1987, 1993 The Regents of the University of California. All rights reserved.
Copyright (c) 1988 Regents of the University of California. All rights reserved
Copyright (c) 1988 Stephen Deering.
Copyright (c) 1988 University of Utah.
Copyright (c) 1988, 1989, 1993 The Regents of the University of California. All rights reserved.
Copyright (c) 1988, 1991, 1993 The Regents of the University of California. All rights reserved.
Copyright (c) 1988, 1992, 1993 The Regents of the University of California. All rights reserved.
Copyright (c) 1988, 1993 The Regents of the University of California. All rights reserved.
Copyright (c) 1989 The Regents of the University of California. All rights reserved.
Copyright (c) 1989, 1991, 1993 The Regents of the University of California. All rights reserved.
Copyright (c) 1989, 1993 The Regents of the University of California. All rights reserved.
Copyright (c) 1989, 1993, 1994 The Regents of the University of California. All rights reserved.
Copyright (c) 1990, 1991, 1993 The Regents of the University of California. All rights reserved.
Copyright (c) 1990, 1993 The Regents of the University of California. All rights reserved.
Copyright (c) 1991, 1993 The Regents of the University of California. All rights reserved.
Copyright (c) 1991, 1993, 1994 The Regents of the University of California. All rights reserved.
Copyright (c) 1992 Regents of the University of California. All rights reserved.
Copyright (c) 1992, 1993 The Regents of the University of California. All rights reserved.
Copyright (c) 1993 The Regents of the University of California. All rights reserved.
Copyright (c) 1993 Adam Glass
Copyright (C) 1993 by Sun Microsystems, Inc. All rights reserved.
Copyright (c) 1994 Gordon W. Ross
Copyright (c) 1994 Winning Strategies, Inc. All rights reserved.
Copyright (c) 1995 The Regents of the University of California. All rights reserved.
Copyright (C) 1995, 1996, 1997, and 1998 WIDE Project. All rights reserved.
Copyright (c) 1996 The Regents of the University of California. All rights reserved.
Copyright (c) 1996 John S. Dyson All rights reserved.
Copyright (c) 1996 Matt Thomas. All rights reserved.
Copyright (c) 1996 Matthew R. Green. All rights reserved.
Copyright (c) 1996 Paul Kranenburg
Copyright (c) 1996, 1997, 1999, 2001 The NetBSD Foundation, Inc. All rights reserved.
Copyright (c) 1996, 2000 Christopher G. Demetriou. All rights reserved.
Copyright (c) 1996,1999 by Internet Software Consortium.
Copyright (c) 1996-1999 by Internet Software Consortium.
Copyright (c) 1997 Jonathan Stone and Jason R. Thorpe. All rights reserved.
Copyright (c) 1997 Christos Zoulas. All rights reserved.
Copyright (c) 1997 Manuel Bouyer. All rights reserved.
Copyright (c) 1997, 1998 The NetBSD Foundation, Inc. All rights reserved.
Copyright (c) 1997, 1998, 1999, 2000 The NetBSD Foundation, Inc. All rights reserved.
Copyright (c) 1997, 1998, 1999, 2001 The NetBSD Foundation, Inc. All rights reserved.
Copyright (c) 1997, 1998, 1999, 2002 The NetBSD Foundation, Inc. All rights reserved.
Copyright (c) 1997, 1998, 2000, 2001 The NetBSD Foundation, Inc. All rights reserved.
Copyright (c) 1997, 1998, 2001 The NetBSD Foundation, Inc. All rights reserved.
Copyright (c) 1997,98 The NetBSD Foundation, Inc. All rights reserved.
Copyright (C) 1997-2000 Sony Computer Science Laboratories Inc. All rights reserved.
Copyright (c) 1997-2002 The NetBSD Foundation, Inc. All rights reserved.
Copyright (c) 1998 The NetBSD Foundation, Inc. All rights reserved.
Copyright (c) 1998 Todd C. Miller <[email protected]> All rights reserved.
Copyright (c) 1998, 1999 The NetBSD Foundation, Inc. All rights reserved.
Copyright (c) 1998, 1999, 2000 The NetBSD Foundation, Inc. All rights reserved.
58
Document Version 2012-01
Open Source Software
Copyright (c) 1998, 1999, 2000, 2001 The NetBSD Foundation, Inc. All rights reserved.
Copyright (c) 1998, 2000 The NetBSD Foundation, Inc. All rights reserved.
Copyright (c) 1998, 2000, 2001 The NetBSD Foundation, Inc. All rights reserved.
Copyright (c) 1999 The NetBSD Foundation, Inc. All rights reserved.
Copyright (C) 1999 WIDE Project. All rights reserved.
Copyright (c) 1999, 2000 Jason L. Wright ([email protected]) All rights reserved.
Copyright (c) 1999, 2000 The NetBSD Foundation, Inc. All rights reserved.
Copyright (c) 1999, 2000, 2001 The NetBSD Foundation, Inc. All rights reserved.
Copyright (c) 1999, 2001 The NetBSD Foundation, Inc. All rights reserved.
Copyright (c) 2000 The NetBSD Foundation, Inc. All rights reserved.
Copyright (c) 2000, 2001 The NetBSD Foundation, Inc. All rights reserved.
Copyright (c) 2000, 2001, 2002 The NetBSD Foundation, Inc. All rights reserved.
Copyright (c) 2001 The NetBSD Foundation, Inc. All rights reserved.
Copyright (c) 2002 The NetBSD Foundation, Inc. All rights reserved.
Copyright 1998 Massachusetts Institute of Technology. All rights reserved.
Copyright 2001 Wasabi Systems, Inc. All rights reserved.
Portions Copyright (c) 1993 by Digital Equipment Corporation.
Portions Copyright (c) 1995 by International Business Machines, Inc.
Copyright (c) 1983, 1989 The Regents of the University of California. All rights reserved.
Copyright (c) 1996 by Internet Software Consortium. All rights reserved.
Copyright (c) 1980, 1986, 1989 Regents of the University of California. All rights reserved.
Copyright (c) 1988 The Regents of the University of California. All rights reserved.
Copyright (c) 1992, 1993 The Regents of the University of California. All rights reserved.
Copyright (c) 1994 Christopher G. Demetriou. All rights reserved.
Copyright (c) 1997 The NetBSD Foundation, Inc. All rights reserved.
Copyright (c) 1999 The NetBSD Foundation, Inc. All rights reserved.
Copyright (c) 2001 The NetBSD Foundation, Inc. All rights reserved.
Copyright (c) 1996 Gardner Buchanan <[email protected]> All rights reserved.
Parts of the NetBSD Kernel are provided with the licenses that are slightly different from the
above Berkeley-formed license. Please refer the source code of the NetBSD Kernel about the details.
The source code of the NetBSD Kernel is provided by the NetBSD CVS Repositories
(http://cvsweb.netbsd.org/bsdweb.cgi/), and this product includes parts of the source code in the
following directories.
http://cvsweb.netbsd.org/bsdweb.cgi/src/sys/kern/
http://cvsweb.netbsd.org/bsdweb.cgi/src/sys/net/
http://cvsweb.netbsd.org/bsdweb.cgi/src/sys/netinet/
<<OpenSSL>>
The product includes software developed by the OpenSSL Project and it is used under the following license.
LICENSE ISSUES
==============
The OpenSSL toolkit stays under a dual license, i.e. both the conditions of
the OpenSSL License and the original SSLeay license apply to the toolkit.
See below for the actual license texts. Actually both licenses are BSD-style
Open Source licenses. In case of any license issues related to OpenSSL
please contact [email protected].
OpenSSL License
--------------/* ====================================================================
* Copyright (c) 1998-2004 The OpenSSL Project. All rights reserved.
*
* Redistribution and use in source and binary forms, with or without
* modification, are permitted provided that the following conditions
* are met:
*
* 1. Redistributions of source code must retain the above copyright
* notice, this list of conditions and the following disclaimer.
*
Document Version 2012-01
59
Open Source Software
* 2. Redistributions in binary form must reproduce the above copyright
* notice, this list of conditions and the following disclaimer in
* the documentation and/or other materials provided with the
* distribution.
*
* 3. All advertising materials mentioning features or use of this
* software must display the following acknowledgment:
* "This product includes software developed by the OpenSSL Project
* for use in the OpenSSL Toolkit. (http://www.openssl.org/)"
*
* 4. The names "OpenSSL Toolkit" and "OpenSSL Project" must not be used to
* endorse or promote products derived from this software without
* prior written permission. For written permission, please contact
* [email protected].
*
* 5. Products derived from this software may not be called "OpenSSL"
* nor may "OpenSSL" appear in their names without prior written
* permission of the OpenSSL Project.
*
* 6. Redistributions of any form whatsoever must retain the following
* acknowledgment:
* "This product includes software developed by the OpenSSL Project
* for use in the OpenSSL Toolkit (http://www.openssl.org/)"
*
* THIS SOFTWARE IS PROVIDED BY THE OpenSSL PROJECT ``AS IS'' AND ANY
* EXPRESSED OR IMPLIED WARRANTIES, INCLUDING, BUT NOT LIMITED TO, THE
* IMPLIED WARRANTIES OF MERCHANTABILITY AND FITNESS FOR A PARTICULAR
* PURPOSE ARE DISCLAIMED. IN NO EVENT SHALL THE OpenSSL PROJECT OR
* ITS CONTRIBUTORS BE LIABLE FOR ANY DIRECT, INDIRECT, INCIDENTAL,
* SPECIAL, EXEMPLARY, OR CONSEQUENTIAL DAMAGES (INCLUDING, BUT
* NOT LIMITED TO, PROCUREMENT OF SUBSTITUTE GOODS OR SERVICES;
* LOSS OF USE, DATA, OR PROFITS; OR BUSINESS INTERRUPTION)
* HOWEVER CAUSED AND ON ANY THEORY OF LIABILITY, WHETHER IN CONTRACT,
* STRICT LIABILITY, OR TORT (INCLUDING NEGLIGENCE OR OTHERWISE)
* ARISING IN ANY WAY OUT OF THE USE OF THIS SOFTWARE, EVEN IF ADVISED
* OF THE POSSIBILITY OF SUCH DAMAGE.
* ====================================================================
*
* This product includes cryptographic software written by Eric Young
* ([email protected]). This product includes software written by Tim
* Hudson ([email protected]).
*
*/
Original SSLeay License
----------------------/* Copyright (C) 1995-1998 Eric Young ([email protected])
* All rights reserved.
*
* This package is an SSL implementation written
* by Eric Young ([email protected]).
* The implementation was written so as to conform with Netscapes SSL.
*
* This library is free for commercial and non-commercial use as long as
* the following conditions are aheared to. The following conditions
* apply to all code found in this distribution, be it the RC4, RSA,
* lhash, DES, etc., code; not just the SSL code. The SSL documentation
* included with this distribution is covered by the same copyright terms
* except that the holder is Tim Hudson ([email protected]).
*
* Copyright remains Eric Young's, and as such any Copyright notices in
* the code are not to be removed.
* If this package is used in a product, Eric Young should be given attribution
60
Document Version 2012-01
Open Source Software
* as the author of the parts of the library used.
* This can be in the form of a textual message at program startup or
* in documentation (online or textual) provided with the package.
*
* Redistribution and use in source and binary forms, with or without
* modification, are permitted provided that the following conditions
* are met:
* 1. Redistributions of source code must retain the copyright
* notice, this list of conditions and the following disclaimer.
* 2. Redistributions in binary form must reproduce the above copyright
* notice, this list of conditions and the following disclaimer in the
* documentation and/or other materials provided with the distribution.
* 3. All advertising materials mentioning features or use of this software
* must display the following acknowledgement:
* "This product includes cryptographic software written by
* Eric Young ([email protected])"
* The word 'cryptographic' can be left out if the rouines from the library
* being used are not cryptographic related :-).
* 4. If you include any Windows specific code (or a derivative thereof) from
* the apps directory (application code) you must include an acknowledgement:
* "This product includes software written by Tim Hudson ([email protected])"
*
* THIS SOFTWARE IS PROVIDED BY ERIC YOUNG ``AS IS'' AND
* ANY EXPRESS OR IMPLIED WARRANTIES, INCLUDING, BUT NOT LIMITED TO, THE
* IMPLIED WARRANTIES OF MERCHANTABILITY AND FITNESS FOR A PARTICULAR PURPOSE
* ARE DISCLAIMED. IN NO EVENT SHALL THE AUTHOR OR CONTRIBUTORS BE LIABLE
* FOR ANY DIRECT, INDIRECT, INCIDENTAL, SPECIAL, EXEMPLARY, OR CONSEQUENTIAL
* DAMAGES (INCLUDING, BUT NOT LIMITED TO, PROCUREMENT OF SUBSTITUTE GOODS
* OR SERVICES; LOSS OF USE, DATA, OR PROFITS; OR BUSINESS INTERRUPTION)
* HOWEVER CAUSED AND ON ANY THEORY OF LIABILITY, WHETHER IN CONTRACT, STRICT
* LIABILITY, OR TORT (INCLUDING NEGLIGENCE OR OTHERWISE) ARISING IN ANY WAY
* OUT OF THE USE OF THIS SOFTWARE, EVEN IF ADVISED OF THE POSSIBILITY OF
* SUCH DAMAGE.
*
* The licence and distribution terms for any publically available version or
* derivative of this code cannot be changed. i.e. this code cannot simply be
* copied and put under another distribution licence
* [including the GNU Public Licence.]
*/
<<MD5>>
This software uses the Source Code of RSA Data Security, Inc. described in the RFC1321 (MD5 Message-Digest
Algorithm).
----------------------------------------------------------------Copyright (C) 1991-2, RSA Data Security, Inc. Created 1991. All
rights reserved.
License to copy and use this software is granted provided that it
is identified as the "RSA Data Security, Inc. MD5 Message-Digest
Algorithm" in all material mentioning or referencing this software
or this function.
License is also granted to make and use derivative works provided
that such works are identified as "derived from the RSA Data
Security, Inc. MD5 Message-Digest Algorithm" in all material
mentioning or referencing the derived work.
RSA Data Security, Inc. makes no representations concerning either
the merchantability of this software or the suitability of this
software for any particular purpose. It is provided "as is"
without express or implied warranty of any kind.
These notices must be retained in any copies of any part of this
documentation and/or software.
-----------------------------------------------------------------
Document Version 2012-01
61
Open Source Software
<<MT19937>>
The MT19937 software that Takuji Nishimura and Makoto Matsumoto developed
is contained, and this product shall be used subject to the following
license conditions.
Copyright (C) 1997 - 2002, Makoto Matsumoto and Takuji Nishimura,
All rights reserved.
Redistribution and use in source and binary forms, with or without
modification, are permitted provided that the following conditions
are met:
1. Redistributions of source code must retain the above copyright
notice, this list of conditions and the following disclaimer.
2. Redistributions in binary form must reproduce the above copyright
notice, this list of conditions and the following disclaimer in the
documentation and/or other materials provided with the distribution.
3. The names of its contributors may not be used to endorse or promote
products derived from this software without specific prior written
permission.
THIS SOFTWARE IS PROVIDED BY THE COPYRIGHT HOLDERS AND CONTRIBUTORS
"AS IS" AND ANY EXPRESS OR IMPLIED WARRANTIES, INCLUDING, BUT NOT
LIMITED TO, THE IMPLIED WARRANTIES OF MERCHANTABILITY AND FITNESS FOR
A PARTICULAR PURPOSE ARE DISCLAIMED. IN NO EVENT SHALL THE COPYRIGHT OWNER OR
CONTRIBUTORS BE LIABLE FOR ANY DIRECT, INDIRECT, INCIDENTAL, SPECIAL,
EXEMPLARY, OR CONSEQUENTIAL DAMAGES (INCLUDING, BUT NOT LIMITED TO,
PROCUREMENT OF SUBSTITUTE GOODS OR SERVICES; LOSS OF USE, DATA, OR
PROFITS; OR BUSINESS INTERRUPTION) HOWEVER CAUSED AND ON ANY THEORY OF
LIABILITY, WHETHER IN CONTRACT, STRICT LIABILITY, OR TORT (INCLUDING
NEGLIGENCE OR OTHERWISE) ARISING IN ANY WAY OUT OF THE USE OF THIS
SOFTWARE, EVEN IF ADVISED OF THE POSSIBILITY OF SUCH DAMAGE.
<<thttpd>>
The thttpd software that ACME Labs developed is contained, and this product shall be used subject to the following
license conditions.
Copyright 1995,1998,1999,2000 by Jef Poskanzer <[email protected]>.
All rights reserved.
Redistribution and use in source and binary forms, with or without
modification, are permitted provided that the following conditions
are met:
1. Redistributions of source code must retain the above copyright
notice, this list of conditions and the following disclaimer.
2. Redistributions in binary form must reproduce the above copyright
notice, this list of conditions and the following disclaimer in the
documentation and/or other materials provided with the distribution.
THIS SOFTWARE IS PROVIDED BY THE AUTHOR AND CONTRIBUTORS ``AS IS'' AND
ANY EXPRESS OR IMPLIED WARRANTIES, INCLUDING, BUT NOT LIMITED TO, THE
IMPLIED WARRANTIES OF MERCHANTABILITY AND FITNESS FOR A PARTICULAR PURPOSE
ARE DISCLAIMED. IN NO EVENT SHALL THE AUTHOR OR CONTRIBUTORS BE LIABLE
FOR ANY DIRECT, INDIRECT, INCIDENTAL, SPECIAL, EXEMPLARY, OR CONSEQUENTIAL
DAMAGES (INCLUDING, BUT NOT LIMITED TO, PROCUREMENT OF SUBSTITUTE GOODS
OR SERVICES; LOSS OF USE, DATA, OR PROFITS; OR BUSINESS INTERRUPTION)
HOWEVER CAUSED AND ON ANY THEORY OF LIABILITY, WHETHER IN CONTRACT, STRICT
LIABILITY, OR TORT (INCLUDING NEGLIGENCE OR OTHERWISE) ARISING IN ANY WAY
OUT OF THE USE OF THIS SOFTWARE, EVEN IF ADVISED OF THE POSSIBILITY OF
SUCH DAMAGE.
62
Document Version 2012-01
Index
Memory full: 50
Menu icons: 9, 10
Missed calls: 42
Mute: 13, 18
Index
A
Additional handset: 41
Anonymous calls: 31, 38
Answering calls
Base unit: 17
Handset: 13
Auto intercom: 45
Auto talk: 13
B
Battery: 5
Belt clip: 48
Block anonymous: 30, 37
Block Caller ID: 31, 38
C
Call block: 30, 37
Caller ID service: 42
Caller list: 42
Caller list edit: 43
Call forward: 29, 36
Call share: 14, 18
Call waiting: 14, 18
Chain dial: 21, 24
CID (Caller ID): 42
Conference calls: 15, 19
D
Date and time: 31, 38
Direct commands: 27, 34
Display
Contrast: 28, 34
Language: 10
Do not disturb: 30, 37
E
Embedded web: 40
Emergency calls: 5
Error messages: 50
H
Handset
Deregistration: 41
Locator: 47
Name: 31
Registration: 41
Hold: 13, 17
I
Intercom: 45, 46
Interrupt tone: 28, 34
IP address: 8, 53
IP service: 26, 33
IP settings: 28, 34
J
Joining a call: 14, 18
K
Key tone: 28
L
Line status: 10
P
Phonebook: 20, 23
R
Redialing: 12, 16
Ringer tone: 28, 34
Room monitor: 45, 46
S
Shared lines: 14, 18
Software update: 32, 38
Speed dial: 21, 24
SP-PHONE (Speakerphone): 16
STATUS indicator: 8, 53
T
Transferring calls: 14, 18, 45, 47
Troubleshooting: 51
V
Voice mail: 44
Volume
Receiver: 12, 16
Ringer (Base unit): 17, 34
Ringer (Handset): 13, 28
Speaker: 12, 16
W Wall mounting: 48
Web user interface: 40
M Making calls
Base unit: 16
Handset: 12
Document Version 2012-01
63
1-62, 4-chome, Minoshima, Hakata-ku, Fukuoka 812-8531, Japan
Web Site: http://panasonic.net/pcc/support/sipphone
Copyright:
This material is copyrighted by Panasonic System Networks Co., Ltd., and may be reproduced for
internal use only. All other reproduction, in whole or in part, is prohibited without the written consent of
Panasonic System Networks Co., Ltd.
© Panasonic System Networks Co., Ltd. 2012
PNQX2112WA
CM0709SY4032