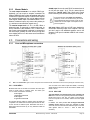
1
On-air consoles User’s manual 3 de Febrero 3254 (1429) Buenos Aires - Argentina Phone: +54 11 4702 0090 e-mail: [email protected] Fax: +54 11 4702 2375 W eb: www.SolidynePRO.com Last revision: September 2012 Page 2 Broadcast mixing consoles - 2300 series SOLIDYNE Table of Contents- Chapter 1 Getting started........................................5 1.1 What’s in the box?.........................................5 1.2 Brief description............................................5 1.2.1 Inputs............................................................5 1.2.2 Output...........................................................5 1.2.3 DigiSolid Bus................................................5 1.2.4 Cue...............................................................5 1.2.5 VCA Operation..............................................6 1.2.6 On-Air Mics Button........................................6 1.3 Expansions & accessories...........................6 1.3.1 Solidyne 2300 series....................................6 1.3.2 VU and stereo phase vector.........................6 1.3.3 Timer / Clock................................................6 1.3.5 AES-3 outputs (AES/EBU)............................7 1.3.5.1 Connections.................................................................7 1.3.5.2 Settings........................................................................7 1.3.6 STUDIO BOX................................................8 1.3.6.1 Connections.................................................................8 1.3.6.2 Using the Studio Box...................................................8 Chapter 2 Installing and connecting .....................9 2.1 About installation..........................................9 2.1.1 Parasitic signals............................................9 2.1.2 RF interference.............................................9 2.2 Inputs & Outputs connections....................10 2.2.1 Rear Panel..................................................10 2.2.1.1 MONITOR OUTPUTS................................................10 2.2.1.2 HEADPHONES..........................................................10 2.2.1.4 STUDIO LIGHT (TALLY)...........................................11 2.2.1.5 CONNECTING THE TELEPHONE LINES................11 2.2.1.5.1 Connecting a cell phone.........................................11 2.2.1.6 Connecting an external Hybrid..................................11 2.2.2 INPUT MODULES......................................12 2.2.2.1 Line inputs..................................................................12 2.2.2.2 Digital inputs..............................................................12 2.2.2.3 Microphone inputs.....................................................12 2.2.2.4 Inserts........................................................................12 2.2.2.5 Digital control: DigiSolid in/out...................................12 2.2.3 Master Module............................................13 2.3 Connectors and wiring................................13 2.3.1 Line and Microphone connectors................13 2.3.2 MASTER 2307............................................14 2.3.2.1 Connector pin-out......................................................14 2.3.3 Wiring.........................................................15 2.4 Customizing the modules...........................19 2.4.1 Using a mic into the Control Room.............19 2.4.2 48V Phantom power...................................19 2.4.3 Inserts.........................................................19 2.4.4Jumper’s description Table..........................20 2.4.5 Jumpers on Master Module........................21 2.4.5.1 Hybrid’s priority circuit................................................21 2.4.5.2 Mute the control room speakers ...............................21 2.4.5.3 External control of Master MIC button.......................22 2.5 Adding modules to console........................22 2.5.1 USB 2302...................................................22 2.5.2 2330 VQR module......................................22 2.6 Adjusting the input gains............................23 2.7 2300 XZ console – Installation....................25 2.7.1 LCD Displays..............................................25 2.7.2 Wiring.........................................................25 2.7.3 Mounting the rear panel..............................26 Chapter 3 Operation...............................................27 3.1 Introduction..................................................27 3.1.1 Checkout....................................................27 3.2 Master module.............................................27 3.2.1 Telephone line Mini-Central .......................27 3.2.1.1 Operation...................................................................27 3.2.1.2 HYBRID OUT.............................................................28 3.2.1.3 Using a cell phone.....................................................28 3.2.1.4 Hybrid rejection adjustment (NULL)..........................28 3.2.1.5 Make a conference on the Air....................................28 3.2.2 Master Module general description.............29 3.2.3 Monitors and headphones..........................30 3.2.4 CUE............................................................30 3.2.5 Master MIC button......................................30 3.2.6 Talkback.....................................................30 3.3 2310 Microphone module & 2301 Line module................................................................31 3.4 2312 Microphone Modules..........................32 3.5 2320 AES-3 digital module..........................33 3.5.1 Remote control...........................................33 3.5.2 Display information.....................................33 3.5.4 Programming the 2320...............................33 3.5.3 Operation....................................................34 2.3.3.1 Master 2307...............................................................15 2.3.3.22301 & 2320 Line modules.........................................15 2.3.3.2 2310 MIC Modules.....................................................16 3.6 2330 VQR Hybrid’s processor module.......35 3.6.1 Using the VQR............................................35 2.3.4 Ground connections recommended for protection against electric storms........................17 3.8 How to record with the 2300’s....................37 SOLIDYNE Broadcast mixing consoles - 2300 series Page 3 3.8.1 Recording the Hybrid..................................37 Maintenance..........................................39 4.1 On console’s temperature .............................39 4.2 Cleaning........................................................39 4.3 Preventive maintenance................................39 4.4 Parts Replacement........................................39 Chapter 5 Specifications & Measurements.........41 5.1 General Measurements...............................41 5.1.1 Microphone...................................................................41 5.1.2 Line...............................................................................41 5.1.3 Aux Input ......................................................................41 5.1.4 Balanced Outputs.........................................................41 5.1.5 Unbalanced Outputs ....................................................41 5.1.6 Gain..............................................................................41 5.1.7 Frequency Response....................................................41 5.1.8 Phase............................................................................42 5.1.9 Stereo Tracking............................................................42 5.1.10 Harmonic Distortion (THD).........................................42 5.1.11 Equivalent Input Noise................................................42 5.1.12 Signal/Noise ratio........................................................42 5.1.13 Crosstalk.....................................................................42 Blocks diagram .................................................43 5.2.1 2310 MIC module. 2 main channels for microphone..........................43 5.2.2 2312 MIC module. 3 main channels for mic with processing.............44 Master module. Model 2307..............................47 5.3 Specifications................................................49 Page 4 Broadcast mixing consoles - 2300 series SOLIDYNE CHAPTER 1 1.1 Getting started What’s in the box? With the 2300 console, you will receive the following items: • • • • • • • • • • • • This user’s manual. 1 Interlock power cord. A guaranty certificate. If you don’t acquire the optional wiring kit, you receive a DB-25 connector for each module. A tubular connector for ‘on the air’ lights (Tally). 1 set of self-adhesive labels for channel identification. 4 self-adhesive rubber supports. 1 screwdriver for adjustment of gain presets. 1 flat cable 2-pins to 2-pins for Pahntom 48V 1 flat cable 2-pins to 3-pins for Mic “Mute “(Dj-speaker) 1 spare parts kit (2 - TL074; 1 - TL072; 1 - CD4013; 1 button MEC; 1 button MULTIMEC; 1 fader 10 K LIN; 1 rotating fader 50 K LIN) OPTIONALS • • • • Digital inputs (2320 and 2302): The modules 2320 manage two digital inputs AES-3 and two analogical unbalanced inputs (AUX). Each channel have an LCD that shows the input level, assigned buses, selected input, and more. Modules 2302 offers direct connection to the PC via USB. It works as external sound card, living to the PC 2 playing devices and 2 recording devices (PGM and AUD can be recorder directly). 1.2.2 All outputs are located on the Master 2307. Line and microphone modules have 3 stereo sends to the master: PGM (program), AUD (audition) and SEND. • • • AIR Tally light MNG2300 wiring kit STUDIO BOX MIC BOX (4 mic patchbay) • 1.2 Brief description 1.2.1 Inputs 1.2.3 The Solidyne 2300 consoles have a great flexibility since are fully modular. It allows to reconfigure the console without leaving the air. The inputs modules are double. Each module has two faders of 100mm that manage two stereo signals, and each channel has two inputs (Line or Microphone and Auxiliary) commutable from a button in the front panel. There are different models that manage different signals, that is: Microphone modules (2310 and 2312): The modules 2310 manage two microphone channels (MIC) and two unbalanced line stereo inputs (AUX). The 2310 includes pan-pot and a gain control with range of 30dB (+/- 15 dB) that allows to adjust the input levels for comfortable operation of the main fader. They also have a 2 bands equalizer Baxandall type, with a range of +/- 15dB. The modules 2312 manage three microphone channels and three unbalanced line inputs (AUX). It have the same features that the 2310 and include a stage of microphone processor with compression and noise gate. Line modules (2301): Manage two balanced stereo inputs (LIN) and two unbalanced (AUX). Main and auxiliary gains can be adjusted using 4 presets located at the panel, to match the levels of the different sources. SOLIDYNE Output The PROGRAM output is the main output, used to send the audio signal to the transmitter. AUDITION is used to record or to hear audio in control monitors but not on the air. SEND is a stereo bus. It’s used, by example, to make a mix of all input channels, except the microphones. This mix can be sent to the studio monitors. This way the speakers will be able to listen a return in the loudspeakers, without necessity of headphones, still on the air. The CUE bus allows hearing the signals with the channel off and fader closed. The monaural audio will be listened on the internal speaker, located at the right of the meter bridge. CUE can be assigned to the main monitors of Control Room. DigiSolid Bus Each channel has a DigiSolid Out control. This control (supported in all Solidyne equipment) allows controlling satellite programs, the Audicom software, digital audio processors (VirtualRack), or to start others devices that supports remote control. The DigiSolid OUT is supported in all modules. It activates when you open the main fader or press the AIR button on the channel. The DigiSolid IN (only for modules 2320) is commanded from a PC via parallel port to turn on/off the input channels with progressive fades digital controlled. 1.2.4 Cue When you press the CUE button, the signal present on this channel is listened in the built-in speaker, whenever the channel is turning off or on the air. Pressing CUE again the operation is canceled. If CUE is activated in several channels, you will hear the sum of the signals present in each module. The level is adjusted with a CUE fader, located in the Master module. A button allows hearing the CUE in the main speakers of Control Room (and at the headphones). Broadcast mixing consoles - 2300 series Page 5 1.2.5 • 2300 XL: It allows to house up to 16 channels (8 double VCA Operation The VCA (Voltage Controlled Amplifier) avoids audio signal circulate trough the fader. The level is adjusted using amplifiers of low noise and great stability. The fader controls a DC signal that modifies the gain of these amplifiers. Main advantages of the VCA technology are: • • • • 1.2.6 Eliminates the possibility of noise generated by dirty faders. Eliminates the maintenance and cleaning of the faders. Maintains a perfect stereo tracking (error > 0,2 dB). Allows the automation of the console from a computer. On-Air Mics Button Located above the main fader in each input channel, this button sends the channel on the air when is pressed. Pressing it again the channel is turning off. This button lights when is on. The On-Air button is electronically activated using VCA technology; instead mechanical switching. It gives free clicks and plops operation, due the fact that Solidyne uses a fast slope fading action instead of the hard switch that other brands offer. When the console operates under PC control, AIR button is commanded from the PC. A master microphone button is located on the 2307 Master module, which activates all microphones channels at the same time. Or you can change, using internals jumpers, the microphones that go to air in the same batch. When the AIR button is on, turns on the tally light (the console gives 12 V DC as tally signal). Also, a relay is activated to mute the studio monitors. This modality allows an interesting facility; because you will always use the MIC master button. 1.3 Expansions & accessories 1.3.1 Solidyne 2300 series All Solidyne consoles can be customized according to the requirements of your radio station. You decide how many microphone and line modules will have your console. You can opt, also, to include other optional features that are described next. The different models of the series 2300 are: modules 2301, 2320, 2310, 2312. Include a Master 2307 and a meters panel with four needle VU-meters (Program and Audition). Optionally it can include the VC180 option that is a display with Bar Graph LED true peak VU + Stereo Phase Vector; Clock & Timer. • 2300 XX: has capacity for 26 channels (13 modules 2301, 2310, 2320, 2312) or 16 channels with central desktop (width 400 mm). Incorporates a master 2307 and a meters panel with four needle VU-meters (Program and Audition). Optionally it can include the VC180 option that is a display with Bar Graph LED true peak VU + Stereo Phase Vector; Clock & Timer and AES-3 digital outputs. • 2300 XZ: allows to house up to 26 channels (13 modules 2301 / 2310 / 2320 / 2312), or 16 channels with central desktop (width 400 mm). Extended VU-meters panel with 2 LCD flat screens (15”) video monitors. Usually has 3 x VC180 units, plus Timer 1.3.2 VU and stereo phase vector The Stereo Phase Vector allows measuring the stereo phase relationship and therefore the grade of stereo sensation achieved. The range is 0 degrees (mono) to 90 degrees (maximum stereo); with inverted phase indication (180 grades), to prevent to the operator that a connection’s error exists in the microphones, or among equipment’s with analogical connections The analogical section is gauged in steps of 20 degrees, with quadrant of vectors. This allows following the quick program variations. By other hand, the digital section retains for an instant the maximum value reached by the phase rotation. A musical program with good stereo sensation will have averages (analogic) of 40 to 60 degrees, with peaks (digital) of 80 degrees. Readings of 0 and 20 almost indicate a monaural signal. The indication -0 or INVERTED implies the serious problem of inverted phase. This must be quickly corrected because the inverted signals ‘disappear’ when they are listen in mono FM receivers. 1.3.3 Timer / Clock This panel (TM option) replaces the CUE speaker, and it includes also the speaker and a numeric display with two functions: • 2300 XS: It allows to house up to 12 channels (6 double modules), that can be microphone modules 2310/2312 and line modules 2301. They have a Master 2307 and a meters panel with two needle VU-meters (Program). Optionally it can include the VC180 option that is a display with Bar Graph LED true peak VU + Stereo Phase Vector; Clock & Timer and AES-3 digital outputs. Page 6 a) Clock mode: provides the time while the microphone channels are turned-off. b) Timer mode: shows a count up (minutes: seconds) when the microphones are on the air. Broadcast mixing consoles - 2300 series SOLIDYNE The timer mode is activated when the mics are activated using the Master On-Air button. When you turn off the microphones, the time will be retained on screen by 3 sec and then the display will return to ‘clock mode’. If you turn on the microphones again (in this 3 sec window) the timer will resume. 1.3.5.1 Connections The AES/EBU (now named AES-3) output is balanced with transformer. Use shielded twisted pair audio cables to connect it. The connection to the Master module uses a DB-9 connector with the following distribution: DB-9 Connector 5 AUDITION AES-3 Clock Adjustment 1 PGM AES-3 6 NC To adjust the time there are three buttons: MODE, UP and DOWN. Pressing MODE button the adjustment starts. The less significant minute will blink. With Up and Down buttons, change the value. Pressing Mode again you can change the most significant minute. Finally, pressing Mode again the hour character will blink. Modify the hour and press Mode to finish the time adjustment. 2 PGM AES-3 7 GND 3 GND 8 GND 4 AUDITION AES-3 9 NC 1.3.5 AES-3 outputs (AES/EBU) Optionally, the Master 2307 can have AES-3 (aka AES/EBU) digital outputs for program and audition. If you have an XL2300 with /2Dout option, the AES-3 outputs comes from factory. This accessory (DG2300 option) can be acquired later and added to the console. In this case you will install it like is described next. 1.3.5.2 Settings Some parameters of the AES-3 protocol can be changed with the jumpers located on the components side of the DG2300 card. Then, it will be necessary to remove the card from the panel, in order to modify the jumpers. The following figure shows the default position of the jumpers. 11.2896 crystal for Fs 44.100 Hz The optional DG2300 card will be fixed to the Master back side, like shows the following figure. Turn off the console before the installation. Remove the fixation screws of the Master, move away it carefully and place the DG2300 card. Fix it whit the three screws like it is indicated in the figure. After fixing the DG2300, put the interconnection cable. The connector only can be connected in a unique position. DG2300 card (default configuration) DG2300 card DB-9 connector Fixation screws Link ribbon cable JP2 Copyright OFF Normal operation (Factory) ON Copy Not allowed with copyright JP6 JP7 Emphasis OFF ON Normal operation (default) ON ON Emphasis JP1 JP4 JX Sampling Fs OFF ON 1-2 48 KHz (standard) ON OFF 2-3 44.1 KHz (*user modified) * to work with fs = 44.1 KHz, place a cristal of 11,2896 MHz where the above figure indicates. ON- AIR input Fig. 1 - Rear view of the Master 2307 with the optional card DG2300 SOLIDYNE ‘Copyright', ‘Emphasis' and sample rate (Fs) configurations are the same ones for Program and Audition. The jumper JX is common for both outputs. The non mentioned jumpers (JD-AUD and JD-PRG) must remain unchanged. Broadcast mixing consoles - 2300 series Page 7 1.3.6 1.3.6.2 STUDIO BOX Studio Box is an optional accessory which concentrates in a unique box all monitoring facilities into the Studio. Studio Box offers the following features: • 5 headphones outputs with independent control level. • Output (line level) for Studio Monitors with level con- Using the Studio Box On the Studio Headphones Although each headphone has its control of level; the maximum level is determined by the console. As you can suppose, which listening is also depended on the selection done in console. trol. • Tally • Timer / Clock • Talkback, to talk with the Control Room operator. MIC GAIN MIC (to control room) On the Studio Monitors Like happens with the headphones, the loudspeakers output has level control, but the maximum level and what you hear is depended on the console. If the loudspeakers are connected directly to the console’s speaker outs; “Loudspeaker” doesn’t take effect. On the Studio Talkback The white button has two functions: 1.- When the microphones off-air, press the button to speak to the Control Room. The Studio Box has a built-in microphone for this purpose. Usually the Studio Box is placed on the table; but a good choice is fix them to the wall when the table is next to the Control-Studio window. 1.3.6.1 Connections Studio Box connects to the Solidyne 2300 console using only one cable. This cable is female DB-9 to male DB-9 pin-to-pin (NOT crossed), and is provided with the unit (5 M length). Through this cable the console sends to the Studio the monitoring signals for headphones and loudspeakers. Headphone outputs use ¼” stereo TRS (jacks). Any combination of headphones can be used (16; 32 and 64 ohms). Loudspeakers output use a 1/8” stereo TRS (minijack). This is a line level output, so you must use powered speakers for the Studio. If you have conventional loudspeakers, you can use the amplified output of the console instead the monitors output of the Studio Box. In this case the volume could be controlled only by the operator from the console Page 8 At the Control Room, the operator will hear you directly by the Left loudspeaker. The volume is fixed, independent from the loudspeakers knob of the console (Studio Box has a MIC Gain preset, accessible from the frontal panel). To answer, the operator will use the Talkback of the console. 2.- Being on-the-air, the white button illuminates in red indicating that microphones are “on-air”. Obviously, in this condition Talkback feature is disabled. The preset located below the MIC allows to adjust the microphone gain, so it adjust the listening level on the Control Room. On Timer / Clock The display shows the current time (off-air) or the time lapsed on air (when microphones activates). This function operates like the accessory TIMER for 2300 consoles. Please see 1.4.3 – Timer / Clock for details. An additional option respect to the accessory TM in console is that the “counter mode” can be disabled; quitting an internal jumper. Open the back cover of the Studio Box and to retire the jumper. There is a unique jumper available. This will always deactivate the on-air lapsed time counter, being always the time on display. Broadcast mixing consoles - 2300 series SOLIDYNE Installing and connecting CHAPTER 2 2.1 About installation Installation of Solidyne audio console doesn’t present particular problems. However, keep in mind the basic rules for all professional audio installations. The inputs and outputs of the 2300 series incorporate DB-25 multi-pin connectors. You can acquire the Solidyne connection’s kit (MNG2300), which incorporate most of basics connections for the radio equipment, so you only will make some few connections. All balanced connections will be made using double shielded cable. Use only good quality audio cables. The high-level unbalanced inputs and outputs can be wired using shielded cable. For loudspeakers outputs, use cable with 2 mm2 section. The microphone and loudspeaker cables will take separated paths. If you use a microphone connector’s box, it will be completely shielded and connected to a good ground (the same ground that the console). To avoid loops grounds, that can produce hum and noise, don’t connect the audio GND with the AC ground. This connection is carrying out only by the third pin of the power supply cord. 2.1.1 Parasitic signals erated by communications transmitters or industrial equipment. If these signals penetrate into audio lines, with sufficient intensity, can surpass the action of the special protection filters, and to reach some sensible part of the input stages. In that case, the interfering signals can be demodulated and already turned audio signal, and will be amplified by the rest of the system. It is fundamental, therefore, to maintain the interference within reduced margins. It is obtained avoiding very long audio lines, with aerial sections or that pass near of transformers or RF transmitters. For protection against very high frequencies is advisable to use double shielded cables, guarantied by the manufacturer CROSSTALK is the reception of signals coming from other lines of audio. This, like all unwanted noise, it can be supposed controlled when its level is below the level of the system residual noise. Then, all considerations mentioned for the case of buzz are valid. 2.1.2 RF interference 2300 consoles have numerous internal protections against RF fields, for the AM and FM broadcasting band. When the transmission station is installed correctly, there will be no interference problems, still with FM equipment of 50 kW installed in the terrace of the radio station. Nevertheless, when the antenna is badly positioned with respect to the Studio or has severe SWR problems, then it does not have the minimum value of field intensity, downward. Or maybe there is a faulty ground connection, then, strong standing waves will appear on the cables of the Studio that can induce high electrical currents inside the audio console. Generally, are considerate parasitic signals all unwanted signals that appear in audio lines. A common type are denominated humming, low frequency signals (multiples of 50/60 Hertz) caused by the interaction of electromagnetic fields coming from the AC line. When the interference source is a magnetic field (generally originated in a supply transformer) the resultant interference will be denominated electromagnetic humming. When the interference is due to such electric potentials as cables that take supply tensions, that are elevated in comparison with the audio signals present in the circuit, you will be in presence of electrostatic humming. The distinction is not merely academic, because the resolution of a problem supposes the knowledge of the noise type to apply the correct solution. Symptoms: If the interference takes place at the A.M. band, the sound transmitted by the A.M. radio will be listened in the loudspeakers on background (or at buses PGM, AUD or SEND). In case of FM transmissions, the interference inside the console demodulates the A.M component of the FM carrier; (usually hum from power supply) causing background humming, because in many transmitters of FM, the final output stage is not powered with stabilized tension. Therefore, if console 2300 presents humming, please make a test shutting down the transmitter a few seconds to check if the problem disappears. Sometimes, an FM transmitter with the output stage badly calibrated also produce interference in which you can hear the transmitted audio (due to the misalignment a part of the FM modulation is translated to AM modulation). Examples: To minimize the reception of electromagnetic humming in the wires, remember the following rule: "THE AREA AMONG TWO AUDIO WIRES WILL BE MINIMUM." It implies that the cables will be tied very close, like the shielded twisted pair audio cables. They should pass far away from any transformer or devices that manage high-intensity currents. Is important to remember that a wire can be good shielded, but if his conductors don’t complete the conditions of minimum area it will be susceptible to take magnetic humming. Solution: 2300 consoles already have internal filters to avoid the RF interference. Therefore, if interference’s appears, normally is caused by installation problems on the transmission station that generate elevated currents in the wiring of audio on the Studies, due to the standing waves. These currents circulates inside the cabinet of the 2300, and enters to the console when overpass the barriers that impose to this currents the built-in RF filters. The solution, then, must be external to the console. Other parasitic signals are: AC HUM, RADIO FREQUENCY and CROSSTALK. As hum noises like the radio frequency are originated by electromagnetic fields of high frequency; the first ones are originated by disturbances due to the connection and disconnection of equipment’s to the AC line, the seconds ones are gen- SOLIDYNE The solution is to acquire ferrite O-rings of 60 mm diameter, to allow passing the cables and connectors. They will be used in each one of the D25 connectors, in the inputs and outputs. The total set of cables that goes to each connector, will have to be twisted with a complete return around the ring (see 2.3.3 - Wiring). Broadcast mixing consoles - 2300 series Page 9 2.2 Inputs & Outputs connections 2.2.1 Rear Panel Fig.3a Rear panel– power source Fig.3b Rear panel– connectors Looking the console back side, you will find at the left side the power on/off switch, the main fuse (1 Amp) and the AC connector for Interlock power-cord (provided with the unit). Near to the AC interlock, there is a voltage selector (220/110 VAC). To access to this board you must remove the back panel of the console. To disable the amplification for Studio loudspeakers, quit the jumpers J15 and J16. To disable the amplification for Control loudspeakers, quit the jumpers J18 y J20. See next image: BEFORE CONNECT THE UNIT TO THE POWER LINE, CHECK THE 110 / 220 VAC SELECTOR The rear panel also contains the connectors for the loudspeakers monitors, headphones, and telephone lines with their associate telephone set and on-air light output (tally). All inputs connectors are multi-pin DB-25 type, located under the rear panel. Remember: good connections between the console and audio equipment are very important question to guaranty a sure and free of flaws operation. For that, we recommend you take the necessary time to carry out the wiring of the console, with a great care and always using high quality components. A good solution is to acquire the connection’s cables kit, accessory Solidyne MNG2300. 2.2.1.1 MONITOR OUTPUTS The STUDIO and CONTROL ROOM outputs are powered, so you can directly connect the loudspeakers (4 – 8 Ohms) The internal stereo amplifiers gives 15W RMS power (7,5W + 7,5W). Amplification can be disabled by jumper to change the outputs to line level in order to use active speakers. There are two jumpers for Studio outs and two for Control Room outs. Page 10 2.2.1.2 The loudspeaker DC resistance is very near to the nominal impedance, For this reason, we recommend previous to the installation, to measure with a tester the resistance that presents the loudspeaker and to discard all the units that has n value smaller than 3 Ohms. Loudspeakers outputs use ‘RCA’ phono connectors. Take care with polarity. If loudspeakers work with inverted phase, it can cause remarkable lost at low frequencies. HEADPHONES There are independent outputs for STUDIO and CONTROL ROOM, with ¼” jacks connectors. STUDIO output allows to connect up to 8 headphones, whereas the CONTROL ROOM output supports up to 2 head- Broadcast mixing consoles - 2300 series SOLIDYNE phones. Headphone outputs are protected against accidental short circuits. At the console, the operator has independent level controls for Studio and Control headphones. Into the Studio is convenient to install the Solidyne Studio Box headphones distributor. This unit is placed on the table and brings up to 5 headphones with its volume control. 2.2.1.4 STUDIO LIGHT (TALLY) The STUDIO LIGHT output gives 12 volts / 0,3 A when the studio microphones are activated. This allows activating LED’s On-Air lights that are highly reliable and don't need replacement as the systems of incandescent light does. The Solidyne “On-Air Light” kit, with characters 100 mm high, is a professional solution. respondent to your cellular and to consult the documentation of the unit to make the connection (see the next image). Basically, which transmits the cell phone through the “free hands” connector is the audio signal of the cell telephone: microphone and loudspeaker. The HA-202/204 receives, via cell phone, the remote audio (that is to say, the audio of who is at the other side of the line). On the other hand, the hybrid sends to the cell phone the audio from the studies of the radio (return signal). Usually, microphone and loudspeaker of the cell phone are disconnected while “hands free” connector is used. 2.2.1.5 CONNECTING THE TELEPHONE LINES The Hybrid 2307 manages 2 telephone lines and 1 cell phone input. It has internal precision adjustments factory calibrated. So user adjustments don’t be required. Only the rejection factor must be re-adjusted to be adapted to the local telephone line (please see 3.2.1 – Hybrid 2307) In the rear panel there are 5 connectors RJ11 type. Two are telephone lines inputs; two are for connecting the associated telephone sets (Production Phones) and the fifth is the cell phone input. The lines can be connected directly to the internal radio telephone PBX system instead to the public switch. Of course the radio station can connect it to public switching. The hybrid inputs have internal filters for RF rejection, effective in AM, FM and UHF bands. Usually isn’t necessary to add additional filter. The telephone lines have internal high tension protection using Metal Oxide Varistors. But we recommend having additionally a good external protection. Phone lines protection The telephone lines will always have protection against lightning and electrical surges. Please, see general protection diagram at the end of this chapter. 2.2.1.5.1 Connecting a cell phone Cell phone connects directly to “CELL” RJ-11. An adaptation cable is required for connect the cell phone to the console, that defers according to mark and model from the cellular. The cellular connects to the hybrid using the “free hands” connection that the cell phones have. Consult with his Solidyne dealer by this accessory. For make this yourself, please read the following indications. You need a special cable RJ-11 whose connection will depend on the brand and model of your cell phone. You will need to purchase the “free hands” accessory corSOLIDYNE 2.2.1.6 Connecting an external Hybrid Series 2300 have SEND and RETURN connections for external Hybrid trough ¼” Jack located on rear panel (also available in pins 13 and 15 of DB-25 Master connector). This send is Mix-minus, that to say, it includes all the signals of the PGM Bus, with exception of the Return from Hybrid, to avoid a feedback loop. The signal the incomes by the external hybrid’s return, is routed through the same control circuit that the signals of the internal hybrid. Therefore the Hybrid fader control will behave in the same way that it works with the telephone lines connected to the console, sending the signal to the air or to CUE, according to the fader position. When you connect an external hybrid, the internal hybrid of the console remains active and can be used independently of external hybrid. You can conference between the lines connected to console and the hybrid content. Remember: once a call is on air, the Hybrid cue channel is disconnected, so you must use a phone associated with that line to speak privately with the second call. Broadcast mixing consoles - 2300 series Page 11 When a conference between internal and external hybrid are made, take care with the output level at the external hybrid, so an excessive level can cause feedbacks. 2.2.2 INPUT MODULES 2.2.2.1 Line inputs In order to use the inserts, remove the 'jumpers' JF8 and JF9 in the module. This jumper connects the send (SND) with return (RTN) when there aren’t insert connection. (See 2.4 – ‘Customizing the modules’). The connection is detailed in 2.3.1 – ‘Line and microphone connectors’. 2.2.2.5 All line inputs are stereo, electronically balanced (transformerless). It allows the connection of high-level signals balanced or unbalanced. Input gain adjusts from the frontal panel with the GAIN LINE presets (L & R). In order to unbalance this inputs, connect the negative (-) pin to GND and positive pin to signal (see 2.2.4 – “Connections tables”). AUX inputs are unbalanced stereo. It manages -10dBu / 10KOhms and +4/+8 dBu line levels. Input gain adjusts from the frontal panel with the GAIN AUX presets (L&R). The LINE and AUX input impedance is bigger than 10 Kohms (Bridging inputs). This is compatible with all current equipment (sound cards, CD-player, etc.). But if you need to adapt the input to 600 ohms, place inside the connector a 680 ohms resistor in parallel with the input. Digital control: DigiSolid in/out Each module has a connector to send 'DigiSolid' control signals. When you open the main fader, the 'DigiSolidOut' activates, starting devices like the Audicom system, Solidyne 262 digital audio processors, CD or Mini-disc players, etc. DigiSolid-Out uses an open collector circuit; with the fader closed the output presents an open circuit. When you open the fader, the circuit closes. It can manage until +24V, 100mA. In the 2301, 2310 and 2312 modules, the DigiSolid-Out connector is located under the module, on the circuit board, for that, you must to move away the module in order to connect it (see 2.4 – ‘Customizing the modules’). DigiSolid out uses a 3-pins polarized connector whose location and connections are the same for 2301, 2310 and 2312 modules. 1 = DigiSolid - Out A 2.2.2.2 Digital inputs 2300 console's can have AES-3 inputs (modules 2320) which also supports SPDIF signals; and direct USB connection to computer (modules 2302). • To known about AES connecting please refers to “2.3.1.1 – 2320 AES-3” • To known about USB connecting please see “2.3.1.2 – 2302 USB”. • To know the use of AES-3 module 2320 please see “3.5 – 2320 AES-3 digital module” 2.2.2.4 Inserts Microphone modules have insert connections in both microphone channels (MIC-A and MIC-B), while the line modules only have a stereo insert for the LINE A. Through the insert connection, the console sends audio to a external processor (i.e. a compressor). The processed signal returns to the microphone module to be mixed in the console. That is to say that the processor is connected in series to the input of the module, therefore, if the processor is power off or disconnected, there won't be audio signal in the module input. Page 12 3 = DigiSolid-Out B Modules 2312 has a third DigiSolid connector for the channel “C”. see diagram in 2.4 – ‘Customizing the modules’ In the 2320 digital module the DigiSolid connector locates at the back side of the module, beside the DB-25. Is a 5pines polarized connector that includes a DigiSolid input, which allows to control the 2300 channels from the Audicom computer (via parallel port), enabling the inputs by the automation software to control, for example, Satellite programs. The distribution is indicated in the next table: 2.2.2.3 Microphone inputs Microphone inputs are electronically balanced. Gain adjusts from the frontal panel with a preset control with 30dB of range. The pan-pot allows change the microphone position in the stereo image. AUX inputs are similar to line modules, but they don't have gain presets. The DB25 connector has the same pin-out that the line inputs connectors. Please see connections at 2.3 ‘Connections and wiring’. 2 = GND 1 2 2320 DigiSolid Connector Out B 4 3 GND In B 5 Out A In A This connectors are provided with the 2320 modules. DigiSolid inputs of channels A and B can be connected in parallel mode, in order to command both channels with an only control signal. The channels will be programmed so that when receiving the DigiSolid control signal, a channel is activated increasing its level progressively, while the other one will fading until zero, achieving this way an perfect automatic cross fade. Different attenuation slopes and delay times can be programmed (see 3.4 – ‘2320 digital line modules’). Please refers to the documentation of your on-air assistant software to know where to connect the digiSolid inputs. It varies on each system (Audicom uses an USB port). Broadcast mixing consoles - 2300 series SOLIDYNE 2.2.3 ON-AIR input: Next to the main DB-25 connector there is Master Module The main output connector is a multi-pin DB25 type. Optionally, you can require a complete connections kit Solidyne MNG2300 that includes all standard cables and connectors for inputs and outputs. PGM and AUD outputs are electronically balanced, with a high reject common mode signals. SEND output is unbalanced stereo. To unbalance a balanced output, only connect the positive pin (+), and leave unconnected the negative one (-). The nominal output level is: 0 VU = +4 dBm. When a balanced output is connected to unbalanced inputs, its level is reduced in 6 dB, therefore 0 VU= -2 dBm. Notice that if some nonprofessional equipment is connected to the 2300 output, possibly the level will be too high and some clipping will occur. In this cases use a fixed fader to reduce the level. 2.3 Connectors and wiring 2.3.1 Line and Microphone connectors an 1/8” jack (see page 7 fig.1). This is a stereo input to connect an external tuner. Both Studio and Control Room monitoring must be done hearing the on-air signal. Use professional tuners with outputs of low impedance (600 Ohms). In case of use consumer tuners, you must add a line amplifier between the tuner outputs and the “Air” input of Master 2307. This line amplifier is for adapt the tuner output to low impedance. CUE input: Master 2307 have a CUE input, designed to connect the monitoring output of the computer. This way you don’t’ need to use additional speakers next to the computer. CUE input is available at DB-25 main connector (pin 23). Note: In the 2312 modules, right connector corresponds to the channels A and B; and the left one to the channel C (viewing the console from rear). 2.3.1.1 2320 AES-3 Modules 2320 use for the AES-3 connection the same pins used for AUX inputs in modules 2301 and 2310 (see “2.3.3.2 2301 and 2320 line modules”) 5 and 6 signal 18 ground for channel A 8 and 9 signal 21 ground for channel B This means that the cables of modules 2301 and 2320 are compatible. The cables that are AUX inputs entered for first; for the second are AES-3 inputs. Remember that to be a digital signal both channels by an only balanced cable are transmitted. SOLIDYNE You can enter to the AES-3 input with S/PDIF, connecting signal S/PDIF to terminal 2 of the XLR and the shield to terminals 1 and 3. 2.3.1.2 2301 USB The 2302 module connects directly to the computer via USB. Each channel is recognized by Windows© as USB external sound card. In this way, the audio is send directly from the computer to the console, without leave the digital domain. In addition, the 2302 provides two analogical balanced auxiliary inputs. Balanced inputs are available on DB25 connector, and are wired like the balanced inputs of module 2301 (please refers to “2.3.3.2 – 2301 & 2320 line modules”). Broadcast mixing consoles - 2300 series Page 13 Each USB channel is independent and can connect to the same computer or two different computers. Both channels are compatible with USB 1.1 and 2.0. ATTENTION Windows XP: Check the output level in the Windows mixer ("Programs → Accessories → Entertainment → Volume Control"). Before connecting the USB port of the console to your PC, make sure that both the console and the PC have a ground through its power cords. To be safe, connect one tester in the range of 25 VAC between the chassis of the PC and console and check that the voltage is zero volts. Only then connect the USB cable. Of Doing so may damage the USB port of your console or PC. Connect the 2302 module to any USB port of a computer running Windows©. When connecting it, Windows© recognizes the 2302 and install the drivers. Additional drivers are not required. Each channel appears on Windows like one stereo USB playing device and one stereo recording device. When you plug a channel, the display on the module will show “PC4” indicating that one stereo play channel and one stereo recording channel are active. If the second channel is connected, the display will change to “PC8”; indicating that the eight channels were recognized (2 stereo outputs and 2 stereo inputs). You can check the available sound devices from “Control Panel > Sound devices > Audio”. In this Window’s panel you can set the default sound devices. Remember to update the settings on your recording and on-air software. ATTENTION We recommend do not change the USB cable conection to other USB ports, to avoid that Windows change the order of USB devices. Windows 7: Verify that the OS has correctly recognized the audio recording device. If Windows 7 was recognized incorrectly as "microphone device", the recordings will be mono (the same signal in both channels). To correct this: Control Panel → Sound → Record → choose the USB device (shown as USB microphone) and click [Properties]. Then select the tab "Advanced", display the menu of formatting options and choose a format recording stereo (2 channels, 16 bits, 44100Hz). Before connecting the USB port of the console to the PC make sure that both the console and the PC have an effective ground by cables. For safety,connect a tester in the range of 25VAC between the chassis of the PC and console and verify that the voltage is zero. Only then connect the USB. If there are differences of tension, the USB input on the console or your PC may be damaged. In addition, module 2302 offers two digital USB sends that appears at Windows like “USB recording devices”. 2302 Channel-A gives the program signal (PGM) and the 2302 Channel-B sends the Audition signal (AUD). The USB PGM out can be used, for example, to web-casting. The level of USB signal is set according to the standard K15. The 0 VU (+4 dBu) corresponds to -15 dBfs at USB digital output. There are 15 dB of headroom before clipping (above +4 dBu). Note that the ballistics of the needle VUmeter shows the average level (do not show instantaneous peaks), while the LED displays VC180's shows the true peak level, being the full scale 0 dBfs. 2.3.2 MASTER 2307 2.3.2.1 Connector pin-out 1, 2 Left balanced PGM output 22 GND 14 GND 23 CUE INPUT (PC Cue) 3, 4 Right balanced PGM output 11 Mono PGM output 16 GND 12 GND 5, 6 Left balanced AUD output 13 PGM out (send) to external hybrid 18 GND 15 Input for External Hybrid return 7, 8 Right balanced AUD output 17 No connected 20 GND 19 EXT – L IN 9 SEND L 21 EXT – R IN 10 SEND R Page 14 The Pin number that appears in first is the positive (+). The pin number that appears first is the positive (+) The 0VU reference is +4 dBm. To unbalance an output, leave unconnected the negative pin (never connect it to ground). 24, 25 GND Broadcast mixing consoles - 2300 series SOLIDYNE 2.3.3 Wiring 2.3.3.1 Master 2307 2.3.3.2 2301 & 2320 Line modules The cable for AES-3 2320 module is similar to the shown one above, except for the AUX inputs that corresponds to the AES/EBU inputs (See 2.3.1). AES/EBU inputs typically uses female XLR connectors. Analogical balanced inputs for the USB 2302 modules are wired like balanced inputs of 2301 modules. SOLIDYNE Broadcast mixing consoles - 2300 series Page 15 2.3.3.2 2310 MIC Modules NOTE: If you hear background hum, it can be produced by RF stationary waves, induced from the FM antenna. In this case, you must install ferrite o-rings (60mm diameter) in all input & output cables like shows the left image (see 2.1.2 – RF interference). Page 16 For use the INSERTS CONNECTIONS, you must remove the jumpers JF8 y JF9 from the correspondent module, as is indicated in 2.4 – Customizing modules. Broadcast mixing consoles - 2300 series SOLIDYNE 2.3.4 Ground connections recommended for protection against electric storms. SOLIDYNE Broadcast mixing consoles - 2300 series Page 17 Schematic Diagram – Recommended connection of 2300 consoles Page 18 Broadcast mixing consoles - 2300 series SOLIDYNE 2.4 Customizing the modules According to the connections and use, some console's modules can require a customized configuration. connected without problems to a phantom powered channel, since this kind of microphones are designed so that they operate without the phantom voltage affects them, because the DC never pass trough the coil. 2.4.1 To enable the 48V phantom voltage, remove the the rear panel and locate the connectors J1 y J2 showed in the figure. You can connect up to two MIC modules (3210 or 2312). Using a mic into the Control Room There are three features that must be changed to be able to use with comfort a microphone at the Control Room: a) Unlink the channel from the “Master Mic” button. b) Enable the MUTING for Control Room monitors. c) Disable the talkback “auto-cue” for this channel. To avoid risk of electric shock, shut down the console and unplug it from the AC outlet before remove the rear panel By default, all microphone modules are turned-on when master MIC button is pressed, but this feature can be disabled by jumper (JA) for each channel. That’s very useful for Dj’s who talk’s on-the-air from the control room. In this case, the microphone located in the control room will not be activated by the Master button (to avoid accidental loopbacks if this fader is open). Radios in which studio and control are the same room can connect the monitors directly to “Studio speakers” output. For make this, remove the JA jumper (“a”, “b” or “c” according to the channel). This way, you can turn-on the control room microphone only by pressing ON button on this channel. On the other hand, you can configure the channel, so when you turn-on this microphone, the speakers monitors at the Control Room are muted to avoid feedbacks. For this feature, you need to connect the Digi-Solid out of the MIC channel (DG-AB connector, see Digi-Solid, 2.2.4) to the MUTE input at the Master module. Quit the Master and locate a 2-pins connector labeled MUTE. To connect it, you need the special flat cable (2-pins to 3-pins) provided with the console (see page 14 for details). Finally, is possible to disable the “auto-cue” feature that allows cueing the microphones after pressing the Talkback button. For make this; quit the jumper Jcue’a or Jcue’b according to corresponds. 2.4.2 48V Phantom power Built-in 48V phantom powering is standard in series "X" (XL, XX, etc.). It allows to obtain a phantom voltage of 48 volts on up to 6 microphone inputs (2 x 2312 modules), and enables them to operate with condenser microphones. When a 2300’s MIC module connects to the phantom voltage, the voltage is applied to all channels of these module. Conventional dynamic microphones can be SOLIDYNE Use the connection cable provided with the console (2pin polarized connector at both ends, connected CROSSED) to connect the phantom voltage output (J1 or J2) to the microphone module; quitting JPH1 jumper and plugging the cable there (see the following table). REMEMBER When a microphone module is connected to the phantom power supply, the phantom voltage applies to all channels of this module. Conventional dynamic microphones can be connected without problems to a phantom powered channel, since dynamic microphones are designed so that they are not affected by phantom power supply. 2.4.3 Inserts Microphone and line modules have insertion points, which must be enabled by jumpers (JI open) to be used. When inserts are enabled, you will not have audio signal in the module until equipment is connected (e.g. a compressor) to the insertion send / return. Next table describe all configurations including the Digi-Solid out connections (the DigiSolid connections for digital modules 2320 are explained in 3.5 - 2320 Digital line module). Obviously, it will be necessary to retire the modules of the cabinet to carry out the changes. Normally, you don’t need to turn-off the console. Broadcast mixing consoles - 2300 series Page 19 2.4.4 MOD. Jumper’s description Table JUMPER DESCRIPTION STATE 2310 2312 JPH1 Enables Phantom-power: 12V provided by module or 48V internal power supply. For 48V: Quit the jumper and connect here the 48V phantom cable. Notice that JPH2 must be open (see below). For 12V: Quit the jumper from JPH1 and put it on JPH2. When the phantom-power isn’t used, a jumper will have to be placed on JPH1 (default). 2310 2312 JPH2 12V Phantom-power sent to MIC modules Disabled from factory (Jumper OFF). To enable the 12V phantom-power, quit the jumper from JPH1 and put it on JPH2. Never leave both jumpers ON. If 48V phantom power is present, leave JPH2 open. 2310 JE’a JE’b Bypass EQ Jumper 1-2 = EQ disable (by-pass). Jumper 2-3 = EQ enable 2310 JA’a JA’b (**) 2312 JA’a JA’b JA’c 2310 2312 2301 2310 2312 2301 Module activation from Mas- ON = Commutable from Master (default) ter AIR button OFF = Commutable only from MIC module CHANNEL All All See last letter of jumper name See last letter of jumper name JI’a Enable inserts Jumper ON by default. Remove it for use insertions. In line modules, enables the insert for left chnl of LINE A. MIC A Line A - Left JI’b Enable inserts Jumper ON by default. Remove it for use inserts. In line modules, enable the insert for right chnl of LINE A. MIC B Line A - Right 2312 JI’c Enable inserts Jumper ON by default. Remove it for use inserts. 2312 Jcue’a Jcue’b Jcue’c Disconnect CUE of the Autoswitch (Talkback) Jumper ON = auto switch enabled Jumper OFF = auto switch disabled 2301 2302 START Force the channel A to ONAIR when the console is power-on. Disable by default (2-3), both channels remain OFF when the console starts. To enable it, change the jumper to pins 1-2: 'Channel A' will turned on when the console is turned-on. 2310 2312 2301 DG-AB DigiSolid-OUT (refers to 2.2.4) 2312 DG-C 1=DigiSolid A 2=GND 3=DigiSolid B DigiSolid-OUT 1=DigiSolid Out 2=GND 3=Unconnected MIC C See last letter of jumper name A A/B C Line modules only have two jumpers, which must be out when the INSERT is used. Fig.11 - Microphone module 2312 (welds side) Page 20 Broadcast mixing consoles - 2300 series SOLIDYNE Fig.12 - Microphone module 2310 (welds side) Fig. 13 - Line module 2301 (welds side) Fig. 14 - Line module 2302 (welds side) 2.4.5 Jumpers on Master Module 2.4.5.2 2.4.5.1 When microphones in the control room are used, the loudspeakers must silence when activating these microphones, in the same way that happen in the study, to avoid feedback. Hybrid’s priority circuit The circuit of priority of the hybrid attenuates the audio coming from the telephone line when the studio speaker speaks. This is thus to give priority to the speaker in a debate (when both speak simultaneously, the speaker is listened on whom calls) and to improve the audio quality of the local voice. In some uses, like sport transmissions, this effect is undesired (it is not desired to attenuate the atmosphere of the stage when the speaker from studies reads an announcement). The priority can be disabled quitting the jumper JPRIORITY located in Master circuit board. SOLIDYNE Mute the control room speakers This is obtained connecting cable “MUTE” provided with the console; that connects MUTE of the Master (2 pins) with the microphone module (3 pins) used into the Control Room. By default, the loudspeakers are silenced by the activation of the MIC-A. So that the loudspeakers be muted by channel B; change in the 3-pin connector the pin 1 to pin 3 (removing and changing the inter- Broadcast mixing consoles - 2300 series Page 21 nal contact). You can joint 1 to 3 to mute the loudspeakers using A or B channels indifferently. 2.4.5.3 External control of Master MIC button Connector EXT MIC CONTROL allows to turn-on remotely the “Masters MIC” button. By the other hand, sends a positive voltage when Masters MIC button is ON. “Master MIC” can be turned-on from outside joining terminals 3 and 4 of this connector (for example using a relay). When the Masters MIC button is on, there are 15 VCC in pin 1 of the connector. 1 OUT 15 V (Master Mic pressed) 2 3 4 GND The fig.14 (see 2.4.2 – Jumpers on the modules...) shows the 2302 module circuit board side. The connector labeled 'JD' must beconnected to the Master with the ribbon cable supplied with the module. When you screw the module, be sure to attach the lock washers (star washers) in the top screws of the module, as these washers ensure electrical continuity between the plate of the module and the console cabinet. You can use the washers removed from the blind panel or replace new washers. At the 2307 Master You must remove the Master module to connect the ribon cable; but you don't need to unplug the Master. Locate the 10-pin connector 'JD' and plug in the ribbon cable. MASTER MIC ON (joint to turn-on) VQR At the module CONTROL ROOM MUTING ...to mic module (3-pins DG-AB connector) When replacing the Master module into her position, be sure to attach the lock washers (star washers) in the top screws of the module. These washers ensure electrical continuity between the plate of the module and the console cabinet. 2.5.2 2330 VQR module This optional module adds to the console a processing stage for improve the audio quality of telephonic communications. If you acquire this optional module after purchase the console, proceed as follow to mount it into the console. The 2330 VQR requires one simple-module space available in the mainframe (it has the same wide of a 2310 module) Since it requires connection to the 2307 Master module, must be placed beside the Master. Fig. 15 - Master 2307 – circuit board view 2.5 Adding modules to console 2.5.1 USB 2302 The USB 2302 digital module requires connection to the 2307 Master module, to enable the recording on the PC of Audition and Program signals. When you buy this module separately, you receive a ribbon cable with 10-way connector pins. Page 22 If you do not connect the ribbon cable to the Master, the 2302 module works well , but only as playing device. When connects the USB cable, the module is detected by Windows and the USB devices will be available, but if you try to record audio, the computer will record silence. If your console does not have free space next to the Master, considers moving all the modules that are necessary to leave a place beside the Master. Is easy to do it since the modules are interconnected by a ribon cable with polarized connectors. In order to retire a module of the cabinet, remove the subjection screws. Modules and blind panels have a washer type star in the superior screws that assures electric contact between the module and the body of the console; in order to guarantee a correct grounding. Does not omit to return to place these washers after move a module. Broadcast mixing consoles - 2300 series SOLIDYNE Once available the space for the 2330 module you need to retire the Master, to connect the cable that will join it to the 2330 VQR. This cable provides with the module. The previous figure shows the location of connector VQR in the rear side of the Master. This is a 6-pins polarized connector, so that the cable can be plugged only in one way. The module 2330 VQR has identical connector, to which the other end of the VQR cable is connected. This is the only connections that the module requires. The 2330 VQR DON NOT connects to the main bus like others modules. Place the fixation screws and power on the console. By pressing the on/off button on the 2330 VQR module, this stage is enabled and the NOISE CONTROL indicator lights (it trigger due to the absence of signal from the phone line). 2.6 Adjusting the input gains These adjustments are necessary to calibrate the input module gain, so that equal positions of faders represent equal outputs levels in all modules. In order to set the input gain for each channel, use a sinusoidal tone of 1KHz@0dB or a calibration CD. To adjust the input gain, play the test tone and cali brate the presets with the screwdriver provided with the console. Left and Right presets at the front panel, must be calibrated to obtain a measurement of 0VU, with the faders at the center of the gray zone (-15 dB). To calibrate the PC channel, proceed in the same way playing loud music or voice from the PC. Proceed the same way to calibrate other sources, like decks, mini-discs, etc. Remember: The audio equipment handle different signal levels: The professional audio level, with balanced outputs operates at +4dBm or + 8 dBm, whereas home equipment with unbalanced outputs manages -10dBm levels. Use the balanced inputs of the console for professional devices, and the AUX unbalanced inputs for home quality devices (DAT decks, Cassette players, etc). SOLIDYNE Broadcast mixing consoles - 2300 series Page 23 PAGE INTENTIONALLY EMPTY Page 24 Broadcast mixing consoles - 2300 series SOLIDYNE 2.7 2300 XZ console – Installation The model 2300 XZ allows to mount into the meter bridge two 15” plasma flat screen video monitors (I.E. Viewsonic VE500 or similar). Usually the video monitors are not sold by Solidyne. The 2300 XZ is packed disassembled, for a maximum space saving for reduction of shipment costs. Therefore, you will need to assemble the console as it’s described next. don’t be possible to mount the monitor in the console. To install the video monitors, proceed in the following way: a) Remove the cover of the rear panel, which is mounted with screws. b) Relax the fixation belt (that will support the screens) and the adjustable support squares. c) Put the video monitor in the rear panel from back, as shows the figure. d) Adjust the squares so that the screen will be positioned at the correct height. 2.7.1 LCD Displays e) Fit the fixation belts, stretching them so that the screen First: video monitors will be mounted. When you acquire the monitors, verify that its base can dismount. Recommended model is Viewsonic VE500 or similar. Notice: if the base of the monitor is fixed to the body, 2.7.2 is well firm. f) Connect the video and power source cables. g) Proceed in the same way for the second display. When the mounting finishes, put the rear cover. Wiring Before assembling both parts of 2300 XZ, is strongly recommended to make all connections to the console, so the cables will pass through the rear panel, as is showed in the next figure. Place on the table the console main body and place the rear panel behind, but without assembling them, in order to fit all the connectors with comfort. The back panel has an opening that allows retiring the cables backwards. Another solution is to perforate the table below the rear panel, so that the cables leave downwards. This way the cables are not at sight. Observe the following figures: SOLIDYNE Broadcast mixing consoles - 2300 series Insert the module Page 25 The previous figure shows the way that must cross the cable once connected to the module. The gray zone of the figure indicates the opening for exit of cables. 2.7.3 Mounting the rear panel The following step will be to joint the rear panel with the body of the 2300 XZ. This task is very simple, since you only must assemble both parts doing to agree the subjection eyelashes, as she is next. Once the parts agree, to place the screws "Allen" (5/32 xs 25) in the lateral ones. The modules can be disconnected and be retired with no need to disassemble the console. The rear panel has a cover that allows acceding to the connectors. In order to disconnect a module: raise this cover and retire the connector. Remember that the connectors Db-25 type is mounted with two screws. If it were necessary to remove the module, clear the panel screws and retire it towards you. In this way you will access to the connector with greater freedom. Notice that to remove the module completely, you will have to disconnect the BUS connector from the console. Page 26 Broadcast mixing consoles - 2300 series SOLIDYNE CHAPTER 3 3.1 Operation • Introduction You can discriminate different areas in the console: the input channels; the monitoring levels control, phone hybrid and talk-back (master 2307); and the VU-meters panel. The audio signals coming from the PC, Satellite, DAT, Mini-disc, Microphones, etc, enters to the console through the input channels that amplify them. You can control all sources levels using the main faders, and to listen the signals before send to the air pressing the CUE buttons. To send a channel on the air, press the AIR button and open the main fader until reach the desired level. The buses assignments button’s (PGM, AUD, and SND) sends the channel’s signals to the Master outs. Each input section can receive signal of two different sources: Microphones or stereo Line. The source is selected by a switch located at top of the module. Remember that the modules are doubles: each module has two faders that manage two inputs. Depending of the model this inputs can be: • 2310 Microphone module manages 2 microphones (MIC) and 2 stereo unbalanced inputs (AUX). • 2312 Microphone module manages 3 microphones with EQ and processing, and 3 stereo auxiliary inputs. • 2301 Line modules manages 2 balanced stereo line inputs (LIN) and 2 unbalanced stereo (AUX.) • 2320 Digital module manages 2 AES/EBU or S/PDIF inputs (DIG) and 2 balanced stereo analog inputs (AUX). The 2307 master module manages the monitoring circuits, Talk-back, and telephone lines. The VU-meters panel has four needle VU-meters that shows PGM and AUD levels, and the built-in loudspeaker for monitoring (CUE). In addition, depending of the model, the VU-meters panel can include: Stereo Phase Vector, LED’s VU-meters and Clock + Timer. Some console models can use VC180 units instead of needle VU-meters. 3.1.1 Checkout At next, basics procedures for checking connections are described. To check if the signal enters to the module, follow the next steps: • • Use any signal source, like a CD-players, microphone, etc. According to the used equipment, select the corresponding input (MIC-aux or Lin-aux, according to module). Press CUE on the channel which the signal enters. SOLIDYNE If you don’t listen anything, check if the CUE fader in the Master section is open. The audio will be listened thought the built-in loudspeaker. To send the signal to the air: • • • Press PGM on the bus section. The signal will be routed to the PGM main output. Press AIR to activate the channel. Open the main fader. The signal will be sent to the air and it will visualize in the PGM VU-meters. If the channel have Pan-Pot, it must be in the central position. 3.2 Master module 3.2.1 Telephone line Mini-Central The Master 2307 manages 2 telephone lines and one cell phone, operating as multi-line system. It allows conferences between a journalist and 3 phone interviewees. The four peoples can be on the air, in conference, at the same time. Cell phone connects to the console using the "free hands" connector (see "2.1.5 Telephone Lines"). The cell phone also supports conference with the lines. The operation is easy and safe against operation errors, due to its logic of security and automatic control circuits. In spite of being an advanced call center system (and not a simple Hybrid), we will continue denominating it hybrid from now, due to their habitual denomination. 3.2.1.1 Operation The 2307 Hybrid must be connected as is indicated in the Chapter 2 of this manual. The operation procedures are the following ones: When a call is incoming; press the line button with the blinking LED. The ‘ring’ will be listened on the CUE speaker (this volume adjusts with the RING knob). You can answer the call in two ways: a) From the telephone set associated to that line or b) from the hybrid of the console. To answer from the console, press the blinking button, the hybrid will take the line and a pilot light will indicate that the phone line has been taken by the Hybrid. The ON AIR Hybrid fader must be closed so that the communication will be routed through the CUE circuit. Under these conditions, you will listen to the caller in the CUE speaker. The level is adjusted using the CUE knob. To dialogue, use the Talk-back microphone, by pressing the button PHONE. This button is retained, so you must press Broadcast mixing consoles - 2300 series Page 27 it again to listen the answer at the CUE speaker, since it’s a half-duplex communication. But you can dialog in full duplex and free hands, staying pressed the button PHONE. In this mode, the Control Room loudspeakers are muted to avoid loopbacks, so you must use headphones to dialog with the caller (when the two lines are taken, the talk-back MIC sent signal to both lines). • If you listens high return with boosted basses of your own voice in headphones; the rejection of the hybrid badly is fit. It can directly fit maintaining it the communication in “free hands” mode, and varying preset NULL until finding the point in where the return of your own voice is smaller. This adjustment is equivalent to the explained previously. • If the communication listens saturated, with high background sound, the level of preset CUE is too high. Diminishes this level until obtaining an optimal listening. With the console a small screwdriver is provided to make these adjustments. When finishing private conversation, release the PHONE button and use HOLD position of the Hybrid ON-AIR command to send the program signal to the telephone line. This mode, named waiting mode, allows sending the program signal to the caller. Finally, when you open the ON AIR fader, the telephone call is sent to the air, and the audio program returns to the caller so that he can dialogue with the journalist. The CUE return is disconnected automatically. Please do not exaggerate with the level on-air of a communication. Due to the analogical hybrids are not perfect, a part of the audio sent to the line, that is the voices of the study, is not cancelled and returns through hybrid, adding itself to the direct voices of the study (this is what fits the rejection). Working with normal levels this effect is not noticeable; but using the hybrid at high levels, the voices of the study can be soiled (coloration). A telephone communication not necessarily must arrive at 0 VU to equal the loudness of the voices of the study. Have in mind that the LF, that carries greater energy, is not present in the telephone line, but in the voices of the study. The lows are those that produce greater deviation in VU METERS. Nevertheless, for the ear the loudness is defined by the mid rage frequencies. So that if you note that VU Meter “peaks lower” with the telephone line that with the voices of the study, this not necessarily means that “it is listened lower”. On the other hand, the audio processor of the radio will be in charge to equal both signals. Conclusion: you do not leave the VU deceives to you when mix voices of the floor with telephone calls. To retake the communication in private mode, close ON AIR fader and press the line button. The line will be addressed to the associated telephone set. If the telephone is hanged, the communication ends. HYBRID OUT This button allows to assign the hybrid’s to PGM or AUD bus. Sending the hybrid to AUD you can record a communication without it leaves on-air (one line channel assigned to PGM with music; MIC’s, hybrid and monitors assigned to Audition). Note that when hybrid is assigned to AUD, it only receives signal from channels assigned to AUD buses. 3.2.1.3 REMEMBER 3.2.1.2 Using a cell phone The work-flow is the same one that used for standard phone lines. The difference is that the call is not taken from the console, but from the cellular phone (you don’t need to press the line buttons in the console). When you answer the call from the mobile, the audio enters to the console through "ON AIR" fader. We can listen who calls in previous and engaging in a dialog pressing PHONE (CUE); to leave the call in WAITING (AUDIO SEND) or to send the call to the air (AIR). If you need to call from the cell phone, you can make the call and and next to plug the hands-free cable to the cellphone. Or you can make the calling with the cell-phone connected to the console, hearing by CUE speaker and pressing PHONE to dialog (hybrid fader in CUE position). 3.2.1.4 Hybrid rejection adjustment (NULL) The rejection factor expresses the capacity of the hybrid to avoid that the transmitted signal returns to the system. Whichever greater it is the rejection factor “more clean” will be the audio quality of the studio voices. In order to fit the rejection, proceed as follow: a) Establish a phone call through the hybrid. Listen it in the CUE speaker, closing the ON AIR fader. b) Press and hold the TEST button using a pencil c) adjust the preset ADJ until minimizing the audio level (PGM) that you hear on the CUE speaker. Increase the CUE level, if needed, to hear well this minimum level. Another method is to adjust the rejection factor while a calling is answered in free hands mode, turning the preset ADJ until obtain the minimum level of your own voice at the headphones (see 3.2.1.1). 3.2.1.5 Make a conference on the Air The conference must be done previously, calling from the associated telephone sets and sending them to the air by pressing the line 1 and line 2 buttons. Let us suppose that the speaker is dialoguing with an interviewee that called (or it was called) by the line number 1; and we want to add to the chat to another person. We make the call from the line number 2, with the associated telephone set. Once the communication has been established, we press the Line 2 button to send it to the air. CONFERENCES between CELL PHONE and traditional LINES are SUPPORTED. Page 28 Broadcast mixing consoles - 2300 series SOLIDYNE 3.2.2 Master Module general description Assigns PGM to Studio Studio headphones level Assigns AUD to Studio Studio monitors speakers level Assigns ‘AIR’ input to Studio (external tuner). Assigns PGM to Control Room Control Room headphones Assigns AUD to Control Room Control Room monitor speakers Assigns SEND to Control Room Assigns ‘AIR’ input to Control Room CUE level. Manages the level of the built-in speaker Assigns CUE to Control Room main Monitors Ring level (it’s listened on the CUE speaker) * If several buttons are pressed, the signals are mixed. Hybrid Output. PGM to send on-air AUD to recordings. Hybrid’s rejection factor (aka Null). (See the following pages) Adjusts the hybrid level sent to CUE Line taken LED’s Line calling LED Takes the audio from Cell phone On-air hybrid’s level. Automatic switching between CUE– ON AIR. Takes the phone lines. Both lines and the cellular can be in conference. PZM MIC for Talk-Back and telephonic communications Talkback level preset Talkback button Automatic switching threshold Cue: establish the communication by the CUE speaker (or free hands mode). Line Hold: Sends PGM signal to the caller. AIR: When the fader is over this indication, the calling is sent on-air. Talk to telephone line. “Free hands” dialog mode. When this button i pressed the Control Room monitors are muted. The calling is listened on headphones. The PGM audio stays in background Master MIC button. Enables all microphone channels and lights the Tally. SOLIDYNE Broadcast mixing consoles - 2300 series Page 29 3.2.3 Monitors and headphones The Master 2307 monitoring section has two sections: “Studio Monitor” y “Control Room”. Here you find the monitoring selection (what signal do you hear) and the volume control for monitors and headphones of Studio and Control Room. Monitor options at the Studio are: • PGM: to listen directly the main output of the console (the signal that is sent to the transmitter). • AUD: Allows you to hear only the channels assigned to AUD bus. This way, assigning only a channel to the AUD bus, you can hear the audio of that channel in the main monitors and headphones, while the console remains on the air. Usually this bus output is connected to the recording system. • AIR: Switch to an external output, typically connected to an AM/FM receiver, in order to hear the real transmission of the radio station. This is the recommended method for all radios. For the Control Room all previous options are available, in addition of the following ones: • SND: Allows hearing only the channels that are assigned to the SEND output. • CUE to SPK (cue to speaker): Allows to send the CUE signal to main monitors. When this button is pressed, being CUE pressend on one or more channels, the “CUE” will be listened by the Control Room main monitors and headphones, while the PGM signal remains attenuated in background. Although this button remains pressed, it will not produce no effect if does not have audio signal in CUE. “CUE to Speaker” acts by audio detection on the CUE bus, so that it only attenuates Program when audio is present on CUE bus. REMEMBER Although the final level regulates from the loudspeakers and headphones level knobs; the level with which CUE is sent to monitoring is fixed, that is to say, it depends on the own input signal. By such reason CUE can sound higher than the PGM signal. If you are monitoring at a high level, agree that you lower the level of the loudspeakers (or headphones) before pressing “CUE to SPK” (or CUE if “CUE to SPK” is already pressed). Into the Studio we recommend to install a headphone distributor; like the Solidyne Studio Box. Studio Box brings 5 headphones outputs with independent control levels. Remember that when microphones are on-the-air; Studio monitors are muted, to avoid feedbacks. 3.2.4 CUE The unit has a built-in loudspeaker for previous listening. Each channel has a button named CUE, that allows to listen the signal present in that channel leaving off-air (button “AIR” off and main fader closed). If you press CUE in several channels, the CUE signals are Page 30 mixed. At the Masters, CUE knobs manages the level of previous listening in loudspeakers or headphones according to correspond. CUE signal can be sent to the Control Room main monitors (and headphones), as was explained previously. 3.2.5 Master MIC button The MASTER MIC button (located at the 2307 Master module) activates all microphone modules, and mutes the Studio monitors to avoid signal feedback. Obviously, the headphones are not muted. MIC channels can be customized (by jumper) to disconnect them from the Master MIC button. This way, the channel only can be activated from its own AIR button. 3.2.6 Talkback The talkback system allows the operator to dialogue with the speaker, located into the studio. The talkback controls are located at the 2307 Master module. Solidyne uses a proprietary AutoSwitch system To make a communication, press the Studio button; the Control Room monitors will be muted to avoid signal feedbacks and the operator will be listened into the Studio at the loudspeakers. The Program is attenuated staying in background. This is made for not losing the air program reference. Otherwise, if the order is too long, they will lose the listening to a correspondent that speaks from a stadium or reporting news. When the talkback button is released, the AutoSwitch system activates during 3 seconds CUE on all MIC modules, to listen to the speaker's answer. Pressing the TBK button again, this time lengthens. The operator hears the sum of all the microphones. Then, still when the speaker is far from one microphone, be taken by another. If one of the microphones is used at the control room instead the studio, you must use a microphone with on/off switch. Make sure that the MIC switch will be at off position, to avoid acoustic feedback. On modules 2312 you can modify the jumpers to avoid auto-CUE on talkback in that channel. In this way you get the dialogue by pressing only one button. The level of the talk-back microphone is calibrated in factory, and usually isn’t necessary to modify it. If you need to change it, there is a preset located above the Talkback button. If you have the Solidyne Studio BOX, you can talk at any time with the Control Room (using the Talkback button of Studio BOX); without having to hope that the operator is watching trough the window. Broadcast mixing consoles - 2300 series SOLIDYNE 3.3 2310 Microphone module & 2301 Line module 2310 microphone module AUX / MIC input switch (AUX/LINE in 2301modules) Two bands EQ Balance Gain adjustment for MIC input Assigns the channel to PGM output. Assigns the channel to AUD output. Assigns the channel to ‘SEND’ output. Cue Air Button. Activates the channel when is pressed. Paste here the channel ID stickers (provided with the console) Main fader for program level 2301 LINE MODULES have the same controls that 2310 module, with the exception of EQ stage, which isn’t included in line modules. On the other hand, 2301 module have gain presets for AUX inputs. SOLIDYNE Broadcast mixing consoles - 2300 series Page 31 3.4 2312 Microphone Modules At the right, a channel of a 2312 module is showed. The microphone module 2312 has three channels located in the same panel. This module requires the same space that two standard 2310 modules. The EQ and processor works with the MIC input only. The stereo line input has no processing. AUX/MIC input selection MIC input gain 4 bands EQ Pan-Pot Gate threshold. Turn the knob to the left to disable the gate. To use the gate, turn the knob slowly to the right, until the background noise is reduced. Listen carefully into the pauses while speaking. Activates or by-pass the compressor/expander stage. EQ On / Off Indicates the action of the compressor, which manage the dynamic range to avoid noticeable differences in the voice level. The compression degree regulates with the main fader. Will must operate at the midle of scale. Output buses assignment (PGM, AUD, SEND) CUE, for previous listening in the built-in speaker. AIR button. Press this button to send the channel to the air. Paste here the channel ID stickers (provided with the console) Main fader. Manage the on-the-air mic level. Page 32 Broadcast mixing consoles - 2300 series SOLIDYNE 3.5 2320 AES-3 digital module The XL2300 consoles with 2320 digital modules can manage analog and digital signals. The 2320 are a dual module with two channels. Each channel have two inputs, one balanced analog input and one professional AES/EBU digital input (now called AES-3), transformer balanced (or unbalanced S/PDIF), with automatic sample rate selection (32, 44.1 and 48 KHz). You can select the source for each channel with the DIG/LIN button, located at top of the module. When you press the DIG/LIN input button this name changes too. The pin-out for the AES/EBU inputs is: 5, 6, 18-GND for Channel A; 8, 9, 21-GND for Channel B. 1. Release the 3 bus buttons (neither bus button must be pressed). The fader 2320 is digital, manages DC signals that are converted later to digital code that controls a digital amplifier with 0,5dB steps. This method guarantees ultra-low distortion (absolutely undetectable for the human hearing) and eliminates the possibility of noise produced by mechanical contacts in the fader. 2. Press and hold the AIR button for 3 seconds. PROGRAM INPUT indication will appear in the display and the LED will blink. 3.5.1 Remote control The module 2320 supports remote control from PC, for example, to enable one or several satellites, remote news, to connect with other stations, operation from Internet, etc. For this, the 2320 has an additional connector, beside the D25, with inputs and outputs for remote control. The DigiSolid-IN allows to activate remotely (with positive or negative slope) the AIR button of each channel, opening or closing the fader with three preset speeds (Fast, Slow1, Slow2), with or without delay. Delay time is used to make cross fades between channels A and B. The DigiSolid-OUT is activated every time that you open the main fader (with AIR button activated). It's an output with open collector circuit that manages from +5V up to +24V / 0,25 Amp., and it's used to activate relays, to starts others devices, activation of the automation PC or 'on-air' indication lights. The module 2320 is programmable, with nonvolatile EEPROM memory and has a LCD screen. 3.5.2 Programming the 2320 a) Choosing the Input’s labels To enter to the programming mode, follow the next steps: When you release the AIR button, the legend ‘Program Input’ disappear and the LED stays blinking to indicate that this channel is in programming mode. Moving the main fader you explore the input names, sorted alphabetically. There are 50 names available. Choose a name and press the AIR button to confirm it. You can press the DIG/LINE button instead AIR, in this case, the choose name is stored in the flash memory, and you stays in programming mode in order to assign a name for the other input. Moving the fader, you can choose a name for the second input. After pressing AIR, you enters directly to the ‘Set fader speed’ mode, which is explained next. b) Fade value selection (optional) You access to this mode after choosing the input label. A new list of options appears, which you can explore moving the main fader. The available options are: FAST/SLOW1(+)=2sec; SLOW2(+)=4sec; SLOW1(+) +Delay; SLOW2(+)+Delay; SLOW1(-)=2sec; SLOW2(-)=4sec; SLOW1(-)+Delay; SLOW2 (-) +Delay. Press AIR to select an option and leave the programming mode. The option FAST disables the DigiSolid input; in this mode the DigiSolid-In will be ignored. Display information The first text line indicates the bus assignment for this channel (PGM, AUD, SND, PGM AUD, ALL BUS, etc). When you modify the fader position, the LCD shows the exact attenuation, expressed in dB. Then, it passes to show the input mode (analogic or digital) and the sample rate for digital signals. After few seconds, the display returns to the initial mode, showing the buses status. The display always indicates the input name, that you can configure choosing among 50 names stored in the internal memory (Audio-1, LINE #2, Studio 3, etc). SOLIDYNE 3.5.4 The values FAST, SLOW1 AND SLOW2 indicate the speed of attenuation when pressing AIR or when the console is remotely controlled by DigiSolid IN. The default value is FAST. All the positive values (+) indicates that using DIGISOLID IN with logic “1”, the AIR is activated. With the negative values (-) the logic of DigiSolid input is inverted (“0” instead “1”). For the options that uses delay (SLOWX(k)+Delay) the operation of going from MUTE (fader closed) to any fader value is not changed, but the inverse operation (from open fader to MUTE) begins after 2 seconds. This allows achieving a perfect cross fade with overlapping of audio channels, when the console is controlled by a computer. Broadcast mixing consoles - 2300 series Page 33 3.5.3 Operation The 2320 controls are completely compatible with all others 2300 modules (2301, 2310, etc.), in order to unify the operation of the console and to avoid that the operator finds operative differences between analogical and digital modules. Input selector: it switch between analog input (balanced line) and digital input (AES/EBU with 3 sampling frequencies). Gain: for analog input only. Adjusts like was explained for the 2301 line modules. Bus selection: operates exactly in the same way that the analog modules. The only difference is that its action is showed at the LCD. CUE: allows listening the audio signal ‘before the fader’ AIR button: press this button to put the channel on the air. The signal's level is controlled by the main fader. The commutation is made electronically, increasing the level by a quick slope (all modules 2300 uses this method), avoiding 'clicks' and 'plops' habitual when the signal is switched mechanically. The AIR button can be programmed in 'Slow1' or 'Slow2' mode, for slow fader slopes. This way, you can operate the console in 'semiautomatic' mode, because pressing one button you get a perfect cross fade, like when you open and close the faders slowly. This simplifies the operation of the console. Page 34 Broadcast mixing consoles - 2300 series SOLIDYNE 3.6 2330 VQR Hybrid’s processor module If you acquired this module after purchase the console, please see “Chapter 2 – Installation” to connect it. Solidyne VQR (Voice Quality Restoration) is a type of audio processing that allows improving the audio quality of a telephone communication. This technique bases on the reconstruction of the spectrum lost due the transmission. • Degree of restoration for low frequencies. • Degree of restoration for high frequencies. • Action of the Noise Cancel As you know, the bandwidth transmitted through a telephone line reduces approximately to 300 Hz – 3.000 Hz, because this is the range of the human voice. Therefore, the components of low and high frequency, presents in the original signal, are lost in the transmission. These components, although are not important for the understanding of the words, ARE VERY IMPORTANT FOR THE AUDIO QUALITY, because they give “weightiness” and “presence” to the voice. System VQR really reconstructs the bass of the voice, reaching the frequencies of up to 50 Hertz, being able also reconstructing component of high frequency to recreate the highs that are of extreme importance to obtain the presence sensation. In addition, stage VQR has a third control to improve to the dynamic range, obtaining values of up to 70 dBA in a telephone transmission. This processing is applicable as much to calls by terrestrial lines, like a calls made through the mobile telephony. Although the reconstruction reaches to callings made using the internal microphones of the cellular or the fixed telephones, the best results are obtained using a portable audio console and dynamic microphones of good quality. For details on VQR, you can consult the information available in the section “Technical Documentation” on our Web site. 3.6.1 Using the VQR Module 2330 VQR works as much with the internal hybrid of the 2300 console like with any external hybrid; connected to the Master 2307 using the “External Hybrid Send & Return” connections. The module has a complete panel with luminous level indicators that shows: SOLIDYNE The VQR processing can be enabled or bypassed pressing the on/off button on the module. By pressing this button the VQR stage activates and the MID BAND indicator lights, (or NOISE CANCEL if the fader NOISE is open, due the absence of audio signal). With the button up the module is by-passed and the audio of the calling is sent on the air without processing. Broadcast mixing consoles - 2300 series Page 35 The user adjusts the amount of processed signal using the faders “Low band” and Hi Band”. REMEMBER • The optimal level of work is obtained when the indicator MID BAND lights with the signal peaks. Lower audio levels can affect the behavior of the VQR processing. Both controls even have an ample rank of work, making possible the processing in telephone signals whose bandwidth is very restricted. NOISE Control (expander) Low band Manages the level of lows added to the original signal. With the fader closed there is no reconstruction for low frequencies. The level of reconstruction, or the amount of low frequencies that is possible to add to the signal, depends on the audio quality of the telephone line (all communications don’t transmit the same bandwidth) and the telephone or microphone used at the other end. Obviously, same results are not obtained using the small microphone of a cellular telephone or a microphone of good quality with a portable console. at least quality has the transmission (smaller bandwidth) smaller will be the action of VQR processing. Make sure to listen to the processing in the main monitors of the control room, to avoid an excessive reinforcement of lows in the processed signal; that can take place if you are monitoring the communication using small headphones or loudspeakers of bad quality. Hi band It controls the level of high frequencies added to the original audio coming from the telephone line. With the fader closed the high processing deactivates. The action of this control is much more critical that the Low Band, since an excess of highs processing will generate an “artificial” sound; and in extreme case “crashed high” sound can take place, that will be annoying to the listener. On the other hand, consider that an A.M. radio can require more emphasis in high frequency than a FM; to obtain a well-known improvement on the air; therefore the control Hi Band has an ample rank of action. The reconstruction level -or amount of highs added to the signal- depends on the quality of the transmission. This stage will be affected, mainly, if the line has much background noise. Page 36 This control is used to reduce the background noise present in the phone line. It acts only during the silences in the conversation, attenuating the level of the signal to suppress the noise. This is quick action gate reason why its effect is imperceptible with normal levels of noise, not affecting the word. The NOISE fader acts changing the threshold of the expander/gate. When de background noise is under this threshold the expander/gate works attenuating the noise. Closing the fader the expander/gate is turned off. When opening the fader increases the threshold, that is to say, the signal level below which the expander/gate goes off. The action of the expander/gate is showed in the display by the NOISE CONTROL indicator. How use this control Increase the threshold raising the NOISE fader until eliminating the background noise. An insufficient level will do that the noise remains, although reduced. An excessive level will cause that the audio appears “intermittent”. Next some important tips to take in mind when use this control: • If the background noise in the communication is very high, will be always over the maximum threshold (fader at top) with which the expander/gate will not work correctly. • Consider that the expander/gate releases whenever the audio signal is below the threshold. If the background noise is very variable in level (noise from a street, for example), it agrees not to use the NOISE CONTROL to avoid that during the pauses it activates and deactivates generating an intermittent background sound. In these cases it is preferred to leave the ambient noise. • Also can happen that the background noise is very notorious (a strong humming or buzz) and although the gate can attenuate it during Broadcast mixing consoles - 2300 series SOLIDYNE the pauses, the effect “appearance” and “disappearance” of the noise is more annoying than the own noise, due to a psychoacoustic phenomenon according to which the ear “is accustomed” to the floor of constant noise when concentrating the attention in the word. According to these advice, the good criterion of the operator will determine when it will make use of the noise gate and in which cases it will prefer not to use it. 3.8.1 Recording the Hybrid The output of the Master 2307’s Hybrid can be sent to PGM or AUD outputs. This allows to make recordings while the console is on-the-air. To make this proceed as follow: a) Assign the source of Program to PGM (i.e.: computer or CD player). b) Assign to AUD one o more mic’s and the hybrid. c) Select AUD as source for the Control Room and Studio monitors. 3.8 How to record with the 2300’s To recordings, you can use the Audition bus (AUD). This allows using a channel for recordings while others channels stays on the air. Let’s suppose that you need to record a commercial spot to the PC audio card, while stay on the air with a musical program. To record the spot, suppose you will use a microphone and a CD player. Proceed in the following way: d) Under these conditions, make the calling. The audio will be present only at the AUD output, to which the recording device is connected. e) ON-AIR fader sets the recording level of the calling. f) In addition, others channels can be assigned to AUD, by example to add a background music. a) In the Monitor Section of the Master module, select AUD to monitoring only the channels assigned to audition bus. b) Press AUD in the channels that you will record, in this case, one microphone channel and one CD player. Make sure that the others bus assignments buttons are unassigned. c) Check the channel that is on the air, to verify that this channel doesn’t be assigned to AUD bus. Now, you can make the recording. To activate the microphone, press the AIR button of the channel. The recording level is visualized on the AUD VU-meters of the console, but we recommend you that always check it on the VU-meters of the recording device. The speakers will listen the return in the headphones or the Studio monitors.. When the recording ends, leave all controls in theirs normal position, to prevent confusions. SOLIDYNE Broadcast mixing consoles - 2300 series Page 37 PAGE INTENTIONALLY EMPTY Page 38 Broadcast mixing consoles - 2300 series SOLIDYNE CHAPTER 4 Maintenance In order to obtain great results with the 2300 consoles that Solidyne guarantees with its design and manufacture, we recommended following the indicated operative procedures in this manual. 4.1 On console’s temperature The rear panel of the VU-meters turret is made in aluminum and dissipates the heat produced by the power supply and audio amplifiers. In models XS and XL the value of overheating with respect to the atmosphere is of around 68º F. That is to say, with a normal atmosphere of 77º F the back panel normally will work at 113º F. In models XL with 16 channels working with 110 V AC (the extreme condition) the temperature can reach 131º F (with 77º atmosphere) in the back panel. This it is a safe value and the console is designed to work at these temperatures, so you don’t worry about it. Models XX and XZ have duplicated power supply, for this reason the nominal temperatures are lower that in XL models. 4.2 4.3 Preventive maintenance The preventive maintenance is carried out during the normal operation of the console to avoid flaws. The 2300 console is manufactured using hi-tech integrated circuits and heavy-duty electronic components, that guarantee an excellent reliability and allows eliminating the routines of preventive maintenance. The linear faders manage only DC current. Under normal conditions, the useful life of these faders exceeds 200.000 full cycle operations. Use carefully: don’t’ kick the faders and don’t’ push them with excessive force. Special models are provided with the new ESF electrostatic fader technology, without moving contacts, that lasts 25 years. 4.4 Parts Replacement All modules are assembled using connectors. The inputs modules can be disconnected and reconnected while the console stays on the air (Hot Swap technology). The main faders have connectors too. They are mounted to the chassis with two screws, so its replacement is very easy. Cleaning Maintain the room clean and free of dust. The surface of the console can be cleaning using a very smooth detergent (like are used for painted walls) and a sponge or fine cloth hardly humid. NEVER USE alcohol, benzene or petroleum derivatives. Take this rule: NO SMOKING at the control room. The cigarette ashes are LETHAL for the faders and affect, in addition, to other equipment of the radio (CD players, minidisks, etc.). By the same reason, don't drink or eat while you are working on the equipment. If after using the console for a long time, you note that the faders become difficult to handle (hard to move) or fails, probably they are dirty. In order to clean it consults with the technical department of your radio. They will have to use special products. If after cleaning the faders the faults remain, consults with your Solidyne dealer to acquire the corresponding spare parts. 4.5 Service Manual You can obtain a service manual of this equipment, free costs. For it the Director of the radio must send by FAX to Solidyne a signed Agreement of Confidentiality (the text is available in our Web). You will receive a link to download the service manual, which include schematics; components layouts and technical information. The document installs in a PC that will be used in the Technical Office of the radio. Downloaded manual only can be viewed in that PC. For more details please consult www.solidynePRO.com. Go to English > Manuals > Service Manuals. Polycarbonate plastic protection: Solidyne consoles use all the front panel modules covered by a hard polycarbonate sheet painted and labeled from the reverse side. This unique protection technology allows for a full protection from hands abrasion. The 2300 console will remains unaltered after a full life of operation. SOLIDYNE Broadcast mixing consoles - 2300 series Page 39 PAGE INTENTIONALLY EMPTY Page 40 Broadcast mixing consoles - 2300 series SOLIDYNE CHAPTER 5 5.1 Specifications & Measurements General Measurements The radio stations that have their own Engineering Department sometimes needs to carry out measurements when receiving the console. Also some engineers estimate convenient to carry out every five years a general inspection of the console to verify if the specifications continues being perfect. The following methods and comments refers to Technical Specifications that figure at the end of this chapter. Before starts any measurement, make sure that all modules present the following conditions: PAN POT at the center position. PGM, AUD, and SEND buttons released; AIR and CUE must be off. Be sure the console is properly grounded and no RF is present at the measurement Laboratory. 5.1.1 Microphone Connect an audio generator to a microphone input. Connect an audio level meter and an oscilloscope to the PGM left output (then repeat with the right). Connect a 600 ohms charge to the output. Set the audio generator to 1 kHz -80 dBm. Select MIC and PGM on the channel which the generator is connected. Enable the channel pressing the AIR button. Move the main fader from this channel to the maximum. Increase the gain of the module until obtain +4dBm at the output. Move GAIN to the minimum. Change the generator to -45 dBm. Move the fader until you verify that can obtain +4 dBm without clipping at the output. Change to the right input of this channel (or to another module) and repeat the procedure. 5.1.2 Line Connect the generator to left input of a line channel, with a level of -20 dBm at 1 Khz. Verify that the oscilloscope and audio level meter are connected to the left PGM output. Select LIN and PGM in the channel under test. Enable the module by pressing the Air button; move to the maximum the GAIN preset and move the main fader until you verify that can obtain +4 dBm at the output. Change the gain control to the minimum; and increase the input level up to +18 dBm; move the fader until obtain +4 dBm at the output without visible clipping. Increase the gain with the main fader until obtaining +15 dBm at the output. Use this value like reference. Connect the balanced input in common mode joining both signal terminals. Then, verify that the output level decrease at least 40 dB. Change the test frequency to verify the common mode rejection specification. SOLIDYNE Repeat for the right input of this channel or for another module. 5.1.3 Aux Input Connect the generator to the AUX left input. Select AUX and repeat the procedure explained for the line channels, with levels of -25 dBm and +4 dBm. Take in mind that the common mode rejection isn’t applicable for this input. 5.1.4 Balanced Outputs All the measurements must be carried out in the same way that the unbalanced outputs, but disconnecting of GND the instrumental used and connect it between the two balanced terminals. Another possibility is to measure all in unbalanced mode (only one pin), adding 6dB to the results. 5.1.5 Unbalanced Outputs Connect the audio generator to line left input; adjusted at +4dBm/1KHz. Connect an audio level meter and the oscilloscope with a charge of 600 ohms, to the SEND left output (pin 9 of the master connector). In the channel under test, select LIN and SEND. The other buttons must be out. Enable the channel by pressing the AIR button. Open the main fader up to -10 dB. Change the generator level until reach the limit of clipping. Verify that the oscilloscope shows a greater or equal level +18 dBm. Repeat for the right channel (terminal 10 of the Master connector). In the previous condition, repeat the output measurement for mono PGM output. 5.1.6 Gain Connect the microphone input to an audio generator. Connect the audio level meter and the oscilloscope to the output. Charge this output with 600 ohms. Adjust the generator to 1 kHz / -80 dBm. Select MIC and PGM in the channel. Enable the module by pressing the AIR button. Take the main fader and the gain control to the maximum position. The difference between the obtained output level and -80dB is the gain of the console. 5.1.7 Frequency Response Connect the generator to a microphone input. Connect an audio level meter and an oscilloscope to the output. Load it with 600 ohms. Change the audio generator to 1 kHz / -50 dBm. Select MIC and PGM in the channel. Enable the module pressing the AIR button. Move the main Broadcast mixing consoles - 2300 series Page 41 fader to the value -10 dB. Change the gain of the module or the generator output until obtaining +4dBm at the output. Change the frequency between 20 and 20.000 Hz and verify the frequency response. 5.1.8 Phase Staying the conditions of the previous item, connect the generator to both microphone inputs (right and left). Connect a digital phase meter to the channels left and right of the program output. Load each channel with 600 ohms. Change the generator’s frequency to measure the phase. The variation will be smaller than 2 degree between 50 Hz -15 KHz. 5.1.9 Harmonic Distortion (THD) Connect the audio generator at 1 KHz / + 4 dBm, to a left line input. Connect a Harmonic Distortion meter and the oscilloscope to the left program output. Load this output with 600 Ohms. Then, select LIN and PGM in this channel. The other switches should be out. Enable the module by pressing the AIR button. Take the fader to the maximum level (0 dB). Then, change the preset line level until obtaining +4 dBm on the left output. Measure now the total harmonic distortion. Change the frequency between 30 and 15,000 Hz and to check if the distortion is below the specification. Repeat for right channel. Reduce now the level from the generator to -50 dBm and connect it to the microphone input. Take the fader to 0 dB position. Select MIC; change the level from the MIC preset gain, until obtaining + 4 dBm at the output and to proceed like in the previous item. It is necessary to keep in mind so that this measurement has validity, the following conditions must be verified: 1. The measurement chain must have a distortion smaller than 0,002%. 2. The distortion components, just as they are seen at the oscilloscope screen, connected to the output of the THD meter, must be clearly distinguished from the residual noise and buzz. 5.1.11 Equivalent Input Noise Connect the audio generator to a microphone input. Load it with 600 ohms. Connect to PGM output an audio level Page 42 Now, replace the audio generator by a resistor of 150 ohms placed inside the D-25 MIC input connector. Measure the residual noise in the audio level meter with “Aweighting” filter. We will denominate it Vn(dBm). Verify in the oscilloscope that there is not any buzz; only random noise signal. In order to eliminate buzz, reconnect the grounds of the measurement instruments so that the buzz disappears. The level of equivalent input noise will be: EIN = Vgen + Vn-REF; that is to say: EIN (dBm) = 49 + Vn (dBm) Stereo Tracking Maintain the conditions of the previous item. Change the generator frequency to 1 kHz. Take the main fader to the maximum. Adjust the Pan-Pot to obtain the same level in both channels (L & R) of PGM output. This level will be in order of +10 dBm. Now, move the fader between 0 and -30 dB and measure the difference among the levels of both program outputs. This difference will be below +/0.2 dB 5.1.10 meter with A-weighted filter. Change the generator output to 1KHz / -45 dBm. Select MIC and PGM in the channel under test. Enable the module by pressing AIR. Set the main fader to -10 dB. Change the gain control until obtaining +4 dBm at the console output (this is the reference level: REF). Waited value: 133 dBm 5.1.12 If the “A- weighted” filter is not available, a simple RC filter will be used, that attenuates 3 dB in 15 KHz. The measured noise will be between 5 and 7 dB above to the real one. Signal/Noise ratio In the same outline of the previous point, connect the audio generator at 1 kHz / + 4 dBm to the line input. Connect to the output an audio level meter with “A” weighting filter and an oscilloscope. Load the output with 600 ohms. Move the fader to -10dB position. Adjust the line level preset until get +4dBm output and use this value as reference for the measurement of noise. Replace the generator by a resistor of 600 ohms and measure the new output level. This value plus + 4dBm is the S/N ratio. 5.1.13 This measurement result is the noise level in dBA. Crosstalk Connect the audio generator (+4 dBm; 1kHz), to an left channel of a line input. Connect an audio level meter with “A” weighting filter, an oscilloscope and a load of 600 ohms to the left AUD output. Connect another load of 600 ohms to the left PGM output. Select all buses (LIN, PGM and AUD) in the module. All buses in others modules must be out. Enable the module pressing AIR. Move the fader to the maximum. Change the level of the generator until obtaining +15dBm in the AUD output. Change the position of the audio level meter from AUD to PGM output. Verify that the audio level is +15 dBm +/- 0,5 dB. Release the PGM button and measure the residual level of the signal. This level, referred to +15 dBm, is the crosstalk between left audition and left program. Repeat for all the combinations of left and right program with left and right audition. In the same way, the crosstalk on PGM bus can be measured. Check it with the console specifications. Broadcast mixing consoles - 2300 series SOLIDYNE Blocks diagram 5.2.1 2310 MIC module. 2 main channels for microphone. SOLIDYNE Broadcast mixing consoles - 2300 series Page 43 5.2.2 Page 44 2312 MIC module. 3 main channels for microphone with processing Broadcast mixing consoles - 2300 series SOLIDYNE 5.2.3 2301 Line module. 2 main channels for line SOLIDYNE Broadcast mixing consoles - 2300 series Page 45 5.2.4 Power supply and monitoring amps Page 46 Broadcast mixing consoles - 2300 series SOLIDYNE Master module. Model 2307 SOLIDYNE Broadcast mixing consoles - 2300 series Page 47 PAGE INTENTIONALLY EMPTY Page 48 Broadcast mixing consoles - 2300 series SOLIDYNE 5.3 Specifications Audio Inputs Dynamic Range 2 (two) stereo inputs each module; One balanced stereo line (or mono Mic); and one AUX. unbalanced. Option: Digital AES/EBU, SPDIF inputs, transformer isolated From Line to PGM > 110dBA (Better than CD quality) Inputs Level/Impedance Distortion Balanced MIC= -25 dBu/-80 dBu; 150/250 Ohms Balanced LINE = -20 dBu/+22 dBu; 600~ 10Kohms Unbalanced AUX = -20 dBu/+15dBu; 600~ 10Kohms AES/EBU inputs, 110 ohms balanced, with transformer Outputs 3 bus outputs; PGM & AUD balanced + 4 dBm; AUX Unbalanced + 4 dBm Balanced Outs; Max Level +26dBu (10K), +20dBm (600ohms) Unbalanced Outs; Max Level = +20dBm/600 ohms Optional Digital AES/EBU output for PGM & AUD. Inserts Inserts for both MIC inputs in microphone modules. Stereo insert for LINE A in LINE modules. Monitor & Hybrid Outputs 1 Separate Hybrid CUE, +4dBu / 10K 1 Hybrid On-Air Receive + 4 dBu/10K 1 Hybrid send (MIX-Minus) +4 dBu / 10K Power Monitors Internal Monitor Amplifiers: 3W CUE monitor with internal speaker. 2 Stereo Monitor outputs; Control Room & Studio, with Muting Relays. Stereo Power: 14 W rms/ 4 ohms, Response: 30-15.000 Hz +/-0.5dB THD<0.05 % Noise<80dBA Crosstalk PGM-AUD-SEND > 85 dBA @30-10.000 Hz L-R & R-L > 85 dBA @ 1khz From digital AES/EBU input to PGM out: Harmonic Distortion < 0,002 % 30 - 15.000 hz From Analog LINE or MIC to PGM out THD < 0.02 % @30-15.000 Hz. Phase From Line to PGM, < 2º L&R @50-10.000 Hz Stereo tracking Below 0.2 dB error L/R in fader range 0 to 40 dB Phone Hybrid 2 line active Hybrid is standard in all models. It includes a mini-PBX with Ringer, line attention with free hands operation, and line transfer. Frequency Response: 300 - 3.400 Hz Noise: > 60 dBA S/N Rejection: > 40 dB rejection Rejection adjust: quick Test Mode to adjust the hybrid balance without disturbing On-air operation. Preference atenuator: 12 dB local speaker interrupt priority Automatic On-Air logic: Audio & Logic are managed from a single 100mm slide fader that performs all the operations in error-free mode. Talkback Microphone Included Talkback MIC, with Audio Limiter. Noise Cancelled PZM type / Outputs to Phone Line Hybrid and Studio Speaker with AutoSwitch (AutoSwitch allows one-touch Studio communication) VU-meters 2 needle VU-meters for PGM bus (standard) 4 needle VU-meters por PGM & AUD (XL & XX models) Optional MIC module model 2312, 160mm wide, with 3 MIC One Stereo Phase Vector Meter & True Peak Bar Graph VU (option with processing facilities. 4 band EQ, 80 Hz and 10 kHz shelv- for X models). ing, 160 Hz & 5 kHz bell shaped; +/- 14 dB action. Expander Timer /Clock Option Gate to eliminate backgound noise. Audio Compressor, 20 dB Timer counts minutes:seconds during on-air MIC in order to avoid excessive speaker on-air time action. Iluminated switchs for EQ and Compressor-Expander When Timer is off, a standard clock is activated Microphone Processor Monitor & Hybrid Outputs Phantom 48v & Jumpers 1 Separate Hybrid CUE, +4dBu / 10K 1 Hybrid On-Air Receive + 4 dBu/10K 1 Hybrid send (MIX-Minus) +4 dBu / 10K Phantom 12 V is standard, jumper selected Optional 48 V internal supply (for 6 MIC) Internal jumpers for MIC EQ cancellation and logic programation. Power Monitors Internal Monitor Amplifiers; 3W CUE monitor with internal speaker. Stereo Monitor output for Control Room, with Muting Relays. Stereo Power: 14 W rms/ 4 ohms Response: 30-15.000 Hz +/-0.5dB THD<0.05 % Noise<80dBA Muted Studio monitor outputs for active speakers Headroom 22 dB @ LIN to PGM Ref + 4dBu/10 k Digital Control Bus One output DigiSolid Bus for each input module. This allows to control Virtual Rack processors and start audio devices. One DigiSolid input for crossfade in option 2320 Frequency response 20-20.000 Hz +/- 0.25 dB (LIN or MIC to PGM) Noise MIC input, EIN=-132 dBu/200 ohms LINE input, S/N > 95 dBA SOLIDYNE ON-AIR Signal ON-AIR signal output (turns on when MIC is open) 12 VDC @ 0,3 amp Cabinet Models 2300, 2 VU meters, 12 channel mainframe 2300XL, 4 VUmeters, 16 channel mainframe 2300XX, 4 VUmeters, 16 channel + Desk or 26 channel mainframe. Optional double Power Supply 2300XZ, idem XX with VC180 meters and video monitor Power 110-127 V / 190-240V, with switch, 50/60 hz, 80 VA Dimensions & Weight D: 500 x 670 x 123 mm (2300 compact) D: 550 x 840 x 140 mm (XL model) D: 550 x 1240 x 140 mm (XX model) W: 17 Kg included power supply, model 2300 Broadcast mixing consoles - 2300 series Page 49