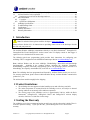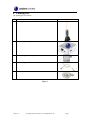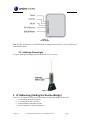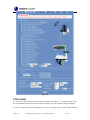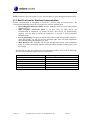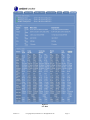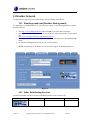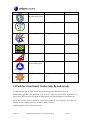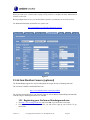
1
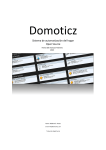
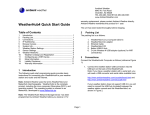
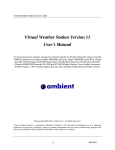
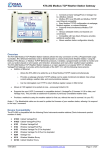
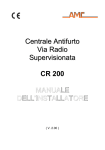
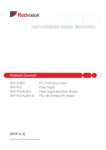
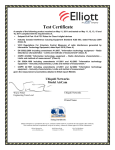
Ambient Weather AirBridge for Davis Weather Stations Quick Start Guide Table of Contents 1 2 3 4 5 0BIntroduction ..................................................................................................................................... 2 Product Limitations ......................................................................................................................... 2 Voiding the Warranty ...................................................................................................................... 2 1BPacking List .................................................................................................................................... 3 2BConnections..................................................................................................................................... 4 5.1 WeatherBridge Status Lights .................................................................................................. 4 5.2 AirBridge Status Light ........................................................................................................... 5 6 3BIP Addressing (finding the WeatherBridge) .................................................................................... 5 6.1 Magic IP Finder (preferred).................................................................................................... 6 6.2 Software Scan Tool (alternate IP finder) ................................................................................ 6 6.3 Reading the Blinks from the Status/Reset Light (alternate IP finder) .................................... 7 6.4 Using USB Stick (alternate IP finder) .................................................................................... 8 7 4BBrowser Access ............................................................................................................................... 8 8 5BLicense ............................................................................................................................................ 8 9 System ............................................................................................................................................. 9 9.1 Network .................................................................................................................................. 9 9.2 Security (password) ................................................................................................................ 9 9.2.1 Remote Login ................................................................................................................... 10 9.3 Localization .......................................................................................................................... 10 10 6BSSetup Network .......................................................................................................................... 11 10.1 Type of Connection and Configuring WiFi .......................................................................... 12 10.2 IP Address............................................................................................................................. 12 10.3 Restoring the default IP Address .......................................................................................... 12 10.4 Restoring to Factory Default ................................................................................................ 12 10.5 Advanced Network Settings ................................................................................................. 12 11 Select Station ............................................................................................................................ 13 11.1 Weather Station Type............................................................................................................ 13 11.2 Frequency ............................................................................................................................. 13 11.3 Rain Bucket Gain ................................................................................................................. 14 11.4 Transmitter ID ...................................................................................................................... 14 11.5 RF Sensitivity ....................................................................................................................... 14 11.6 Local Settings ....................................................................................................................... 14 11.6.1 Station Altitude ............................................................................................................ 14 11.6.2 Pressure Correction ...................................................................................................... 14 11.6.3 Temperature Offset....................................................................................................... 14 11.6.4 Rain Multiplier ............................................................................................................. 14 11.6.5 Humidity Stretch .......................................................................................................... 14 12 8Live Data .................................................................................................................................. 15 12.1 Best Practices for Wireless Communication ............................................................................. 16 13 Weather Network ...................................................................................................................... 18 13.1 Wunderground.com (Weather Underground) ....................................................................... 18 13.2 Other Web Hosting Services................................................................................................. 18 Version 1.0 ©Copyright 2014, Ambient LLC. All Rights Reserved. Page 1 14 15 15.1 16 16.1 16.2 17 18 19 20 21 Push Services (Email, Twitter, http, ftp and mysql) ................................................................. 19 AirCam Weather Camera (optional) ......................................................................................... 20 Registering your AirCam on Wunderground.com ................................................................ 20 More Information ..................................................................................................................... 21 Copyright.............................................................................................................................. 21 Open Source Obligations...................................................................................................... 21 AirBridge Specifications .......................................................................................................... 22 Troubleshooting Guide ............................................................................................................. 22 Certifications ............................................................................................................................ 22 Liability Disclaimer .................................................................................................................. 23 13BWarranty Information ............................................................................................................... 24 1 Introduction 0B Note: For technical issues, please email the developer: [email protected]. Please reference Section 9.2.1 for instructions on providing remote access to the developer. Provide the URL and your password. The Ambient Weather AirBridge communicates directly to any Davis Instruments® VantagePro2™, VantagePro2 Plus™ and VantageVue™ wireless sensor suites. No display console or data logger is required to receive the data from the sensor suite. The following quick start programming guide provides basic instructions for configuring your AirBridge. This is a supplement to the detailed information provided at www.MeteoBridge.com. Note: Ambient Weather uses the terms AirBridge, WeatherBridge, MeteoStick and MeteoBridge interchangeably. AirBridge is the complete product, including the AirBridge Transmitter, WeatherBridge computer (TP-LINK), and operating system. The operating system is referred to as MeteoBridge, developed by smartbedded UG, on the web at www.MeteoBridge.com. Note: The AirBridge has been programmed and licensed by Ambient Weather before you receive it. For warranty replacement, please contact Ambient Weather directly. Ambient Weather warranties this product for 1 year. The unit has been tested thoroughly before shipping. 2 Product Limitations The AirBridge does not support an indoor humidity sensor and will always read 40%. The indoor temperature is measured inside the AirBridge receiver, and subject to internal heating, and does not accurately reflect ambient temperature. The wireless range of the AirBridge receiver is approximately 300 feet, unlike the Davis Instruments® VantagePro2™, VantagePro2 Plus™ and VantageVue™ wireless display consoles, which have a 1,000 feet wireless range. 3 Voiding the Warranty The AirBridge receiver has a transparent housing to satisfy any curiosity about what is inside. There is no need to open the housing. If you open the case, you will damage the receiver and void the warranty. Version 1.0 ©Copyright 2014, Ambient LLC. All Rights Reserved. Page 2 4 Packing List 1B The packing list is as follows: No 1 Description AirBridge Receiver and Cradle 3 WeatherBridge Computer 4 WeatherBridge Power Adapter 5 WeatherBridge Power USB Cable 6 Ethernet Cable Image Figure 1 Version 1.0 ©Copyright 2014, Ambient LLC. All Rights Reserved. Page 3 5 Connections 2B Connect the WeatherBridge Computer as follows (reference Figure 2): X Figure 2 Step 1 2 3 Description Remove the transparent cap from the AirBridge receiver. Connect the AirBridge to the AirBridge cradle. Connect the AirBridge cradle to the WeatherBridge USB port. Connect the WeatherBridge to your router with an Ethernet cable. Note: You can disconnect it later after configuring the WiFi settings. Connect the included USB cable to the included power adapter. Connect the USB mini connector to the USB mini port on the WeatherBridge. Plug into wall power. Note: This cable has a mini USB and full sized USB connector. The full sized USB connector is not used. 5.1 WeatherBridge Status Lights The power light will turn ON (reference Figure 3). The Status/Reset light will flash slowly, then rapidly, then solid green. This process can take several minutes. Once the status/reset light is solid green, you are ready to begin. If it does not turn green, and continues to flash rapidly, it has not made a connection to the Internet. Check your connections and firewall settings. Version 1.0 ©Copyright 2014, Ambient LLC. All Rights Reserved. Page 4 Figure 3 Status Lights Note: The three position switch (3G/WISP/AP) does nothing at the moment. You can leave this switch in the default position. 5.2 AirBridge Status Light The green AirBridge Status light will flash about one every 15 seconds. Figure 4 6 IP Addressing (finding the WeatherBridge) 3B There are several different ways to read the IP address of the WeatherBridge (easiest first): Use the Magic IP Finder (preferred) Use a network software scan tool Read the blinking Status/Reset Lights Write IP address to a USB stick (optional) Version 1.0 ©Copyright 2014, Ambient LLC. All Rights Reserved. Page 5 6.1 Magic IP Finder (preferred) If the WeatherBridge Status light is solid green, it has made a connection to the internet. Simply type the following web address into your computer’s web browser, and the MagicIP Finder will find your IP: http://magicip.meteobridge.com The date and time of the last successful connection will be recorded. Here is an example: Meteobridge TL-MR3020 (MAC A0:F3:C1:C9:34:EE) with LAN IP 192.168.0.42 at 2013-02-19 20:25:29. If prompted for the Username and Password, enter: Username: meteobridge Password: meteobridge 6.2 Software Scan Tool (alternate IP finder) The WeatherBridge is programmed from the factory for dynamic addressing (or DHCP). This allows to you to address the unit from any computer on your network without modifying the IP address. However, since it is dynamic, you will have to determine the address that was assigned to the unit. To determine this address, download a free IP scan tool here: http://www.advanced-ip-scanner.com H For Mac and Linux users, visit: http://www.angryip.org/w/Download HTU UT Select the Scan button in the software. After the scan is complete, locate the IP address associated with the Mac Address of the WeatherBridge. The Mac address is printed on a sticker, on the side of the WeatherBridge (upper right hand corner, below the bar code). Version 1.0 ©Copyright 2014, Ambient LLC. All Rights Reserved. Page 6 Figure 5 In the example above, type http://192.168.0.33 into your browser to begin communicating to the MeteoBridge. 6.3 Reading the Blinks from the Status/Reset Light (alternate IP finder) To read the IP address from the Status/Reset light, wait for the Status/Reset LED to stop blinking (when booting up, it will blink slowly, then quickly, then solid on). This process may take several minutes. Press the Status/Reset button, then immediately let go to begin. It is helpful to have a paper and pen handy to write down the coded LED response. The LED will turn off, then start blinking the IP pattern with a combination of medium flashes, separated by long flashes. The medium flashes represent the IP address and the long flash represents the dot separator. This is best understood with an example: Example: IP 192.168.10.77 Legend: M = Medium flash, L = Long Flash, _ = LED is OFF Signal ___M___M_M_M_M_M_M_M_M_M___M_M___L ___M___M_M_M_M_M_M___M_M_M_M_M_M_M_M___L ___M___M_M_M_M_M_M_M_M_M_M___L Version 1.0 ©Copyright 2014, Ambient LLC. All Rights Reserved. Comment 192 168 10 Page 7 ___M_M_M_M_M_M_M___M_M_M_M_M_M_M___ 77 In the example above, type http://192.168.10.77 into your browser to begin communicating to the WeatherBridge. 6.4 Using USB Stick (alternate IP finder) A blank USB stick is optional with this package. If the weather station is connected to the USB port, disconnect the AirBridge cradle and insert the blank USB stick into the WeatherBridge. Press the Status/Reset button, then immediately let go to begin. Wait for the LED to turn back on, then disconnect the USB stick from the WeatherBridge and insert into the USB port on your computer. Your computer should recognize this file and display the directory. The following file will be written to the USB stick: network.log Open this file with any text editor (such as notepad). Sat Jan 5 00:23:16 UTC 2013 MAC: xx:xx:xx:xx:xx:xx LAN IP: 192.168.123.245 In the example above, type http://192.168.123.245 into your browser to begin communicating to the WeatherBridge. 7 Browser Access 4B Enter the IP address found in the previous step into your web browser. If prompted for the Username and Password, enter: Username: meteobridge Password: meteobridge 8 License 5B From the Menu tab, select License, as shown in Figure 6. Record the License Key for warranty purposes: License Key (case sensitive): Version 1.0 ©Copyright 2014, Ambient LLC. All Rights Reserved. Page 8 Figure 6 License Key 9 System From the Menu tab, select System. 9.1 Network Record the Mac Address for warranty purposes, as shown in Figure 8. Note the IP address for future reference. This IP address should not change unless changes to the router are made. MAC Address: IP Address: 9.2 Security (password) The default username and password is meteobridge and meteobridge. There is likely no need to change this, but you can enter a new username and password. Record the changed username and password here for future reference: Version 1.0 ©Copyright 2014, Ambient LLC. All Rights Reserved. Page 9 Username: (default is meteobridge) Password: (default is meteobridge) To make the changes permanent, select Save and Apply. 9.2.1 Remote Login To login remotely, from the System Tab, select the checkbox Allow login from the internet via this URL. Note: It can take up to one hour for this remote login URL to become active. Figure 7 9.3 Localization Enter the appropriate time zone, longitude and latitude, and select Save and Apply. Version 1.0 ©Copyright 2014, Ambient LLC. All Rights Reserved. Page 10 Figure 8 10 Setup Network 6BS From the Menu tab, select Setup Network Version 1.0 ©Copyright 2014, Ambient LLC. All Rights Reserved. Page 11 10.1 Type of Connection and Configuring WiFi The default network connection setting is LAN, DHCP (dynamically assigned IP address). To connect to your wireless network, select the Wireless LAN option and enter the wireless network settings, as shown in Figure 9. To convert from LAN to Wireless LAN, select Save and Apply and Reboot, and disconnect from your router. The IP address may change. Refer to Section 6 to find the new IP address (if required). 10.2 IP Address You can change from DHCP to manually assigning the IP address, as shown in Figure 9 (this is only an example, your network settings will be different). In most cases, you will not need to change the IP address to a static IP on your network. To convert from DHCP to statically assigned IP address, select Save and Apply and Reboot. The IP address can be accessed in a few minutes through your browser. Wait until the status light on the WeatherBridge transitions from blinking rapidly to a solid. 10.3 Restoring the default IP Address In the event the IP address cannot be accessed and the status light is blinking rapidly, plug the WeatherBridge into your router, press and hold the status light until it blinks once, then let go. The WeatherBridge will reboot and wait until the status on the WeatherBridge transitions from blinking rapidly to a solid. 10.4 Restoring to Factory Default To restore the WeatherBridge to factory default, plug the WeatherBridge into your router, press and hold the status light until it blinks five times, then let go. The WeatherBridge will reboot and wait until the status on the WeatherBridge transitions from blinking rapidly to a solid. 10.5 Advanced Network Settings If you are having issues communicating over your Local Area Network (LAN) or Wireless Area Network (WLAN), we recommend reviewing the following guide: http://meteobridge.com/wiki/index.php/Setup_Network#Type_Of_Connection Version 1.0 ©Copyright 2014, Ambient LLC. All Rights Reserved. Page 12 Figure 9 11 Select Station 11.1 Weather Station Type Reference Figure 10. From the Menu tab, choose Select Station. Select MeteoStick and then Save. X 11.2 Frequency Enter your weather station frequency (US or European). Version 1.0 ©Copyright 2014, Ambient LLC. All Rights Reserved. Page 13 11.3 Rain Bucket Gain Enter the rain bucket gain (0.01” for US imperial, 0.2 mm for metric). 11.4 Transmitter ID Enter the transmitter ID (normally 1). 11.5 RF Sensitivity The RF sensitivity setting provides a tradeoff between wireless sensitivity and noise rejection. The default setting is -95 db and should not be modified unless the reception is challenging. 11.6 Local Settings 11.6.1 Station Altitude Enter your station altitude in meters. The WeatherBridge will automatically calculate the sea-level corrected pressure (or relative pressure) from the measured pressure (or absolute pressure). To convert feet to meters: 1 foot = 0.3048 meters Example: I live at 1,000 feet. What is the altitude in meters? Altitude (meters) = 1,000 feet x 0.3048 meters/feet = 304.8 meters. Note: Your console relative pressure may be different than the WeatherBridge calculated pressure because of the difference in the methodology of calculating relative or sea-level corrected pressure. 11.6.2 Pressure Correction It may be necessary to adjust the relative pressure (pressure relative to sea-level) after your station altitude is entered to compensate for any inaccuracies. 11.6.3 Temperature Offset The temperature offset allows you to adjust the outdoor temperature based on a calibrated source. 11.6.4 Rain Multiplier The rain gauge multiplier allows you to adjust the rain gauge based on a calibrated source. 11.6.5 Humidity Stretch The humidity stretch allows you to adjust the humidity range based on a calibrated source. Over time, your humidity sensor will drift due to contamination and may need recalibration. Version 1.0 ©Copyright 2014, Ambient LLC. All Rights Reserved. Page 14 Figure 10 12 Live Data 8 To view the live data from your weather station, select the Live Data tab. To refresh the data, select the refresh button from your web browser. Reference Figure 11 for the typical live data presentation. If you are experiencing wireless reception issues, refer to the guide below, and the Troubleshooting Version 1.0 ©Copyright 2014, Ambient LLC. All Rights Reserved. Page 15 Guide in Section 18. NOTE: It may take up to one minute to receive wireless data as it cycles through the frequency range. 12.1 Best Practices for Wireless Communication Wireless communication is susceptible to interference, distance, walls and metal barriers. We recommend the following best practices for trouble free wireless communication. 1. Electro-Magnetic Interference (EMI). Keep the AirBridge several feet away from computer monitors and TVs. 2. Radio Frequency Interference (RFI). If you have other 915 MHz devices and communication is intermittent, try turning off these other devices for troubleshooting purposes. You may need to relocate the transmitters or receivers to avoid intermittent communication. 3. Line of Sight Rating. This device is rated at 300 feet line of sight (no interference, barriers or walls) but typically you will get 100 feet maximum under most real-world installations, which include passing through barriers or walls. 4. Metal Barriers. Radio frequency will not pass through metal barriers such as aluminum siding. If you have metal siding, align the remote and console through a window to get a clear line of sight. The following is a table of reception loss vs. the transmission medium. Each “wall” or obstruction decreases the transmission range by the factor shown below. Medium Glass (untreated) Plastics Wood Brick Concrete Metal Version 1.0 RF Signal Strength Reduction 5-15% 10-15% 10-40% 10-40% 40-80% 90-100% ©Copyright 2014, Ambient LLC. All Rights Reserved. Page 16 Figure 11 Live Data Version 1.0 ©Copyright 2014, Ambient LLC. All Rights Reserved. Page 17 13 Weather Network To upload the live data from your weather station, select the Weather Network tab. 13.1 Wunderground.com (Weather Underground) To upload data to Wunderground.com, you must first register on the Wunderground.com website. Registration is free. 1. Visit http://www.wunderground.com/ and select Join if you do not have an account. 2. Once registered with Wunderground.com you will need to sign up your station. To get started visit: http://www.wunderground.com/weatherstation/setup.asp 3. Once registered, enter your Station ID, Password and Upload Interval in the WeatherBridge fields. 4. Click on the wunderground.com logo to view your current data. NOTE: It may take up to 30 minutes for your live data to appear on Wunderground.com. Figure 12 13.2 Other Web Hosting Services To add more Weather Networks, select the pull down menu bar to select from the list. Logo Version 1.0 Description Meteo Plug Website www.meteoplug.com ©Copyright 2014, Ambient LLC. All Rights Reserved. Location Germany Page 18 Logo Description AWEKAS Weather Map Reporting System Website www.awekas.at Location Austria WeatherBug Backyard www.weatherbug.com USA WeatherForYou www.pwsweather.com USA UK Met Office wow.metoffice.gov.uk UK Windfinder www.windfinder.com USA Citizen Weather Observation Program www.wxqa.com USA Open Weather Map www.openweathermap.org USA 14 Push Services (Email, Twitter, http, ftp and mysql) To upload the live data via email, twitter, http, ftp and mysql, select the Push Services tab. WeatherBridge provides some additional "push services", which can send weather information via email, twitter, HTTP requests, FTP uploads, mysql queries or by implementing a user defined script. All of these services can be triggered by certain alarm conditions, at a certain time of the day or in periodic intervals ranging from a few seconds to minutes or hours. Configuring push services is done in two steps. Version 1.0 ©Copyright 2014, Ambient LLC. All Rights Reserved. Page 19 When you want to use a email, twitter, mysql or FTP you have to configure the basic authentication for these services fist. Having configured the service, you can then define a specific event that uses of one of the services. For additional information on Push Services, please visit: http://meteobridge.com/wiki/index.php/Push_Services Figure 13 15 AirCam Weather Camera (optional) The WeatherBridge supports the AirCam and uploads the images directly to Wunderground.com. The AirCam is available at AmbientWeather.com: http://www.ambientweather.com/amaircam.html The AirCam connects directly to your network (router or switch) and the WeatherBridge automatically sends the image to Wunderground.com on a schedule. 15.1 Registering your AirCam on Wunderground.com 1. Visit http://www.wunderground.com/ and select Join if you do not have an account. 2. Once registered with Wunderground.com you will need to sign up your AirCam. To get started visit: Version 1.0 ©Copyright 2014, Ambient LLC. All Rights Reserved. Page 20 http://www.wunderground.com/webcams/signup.html 3. Once registered, you will receive a Camera ID. 4. From the WeatherBridge toolbar, select the Select Station tab (Figure 14). 5. Enter the IP address and password defined in the AirCam user manual, and select Initialize Cam and Save. 6. From the WeatherBridge toolbar, select the Weather Network tab (Figure 15). 7. Enter the Camera ID and password from your Wunderground.com account. Figure 14 Figure 15 16 More Information MeteoBridge is a Copyright of smartbedded UG (haftungsbeschränkt), all rights reserved. Please visit www.MeteoBridge.com for online documentation which will give more detail on features and lately added functions. Note: WeatherBridge can only handle one weather station at a time. Parallel use of multiple weather stations is not supported. Questions or comments about this manual? We are always striving to improve our documentation. Please send your comments to [email protected]. 16.1 Copyright Meteostick (hardware and firmware) is copyright of smartbedded UG (a limited liability company in Germany). You are not allowed to make copies of the embedded Meteostick firmware or the hardware unless otherwise agreed to in writing. 16.2 Open Source Obligations While being closed source, Meteostick is related to other Open Source publications: 1. Meteostick hardware is derived from a concept that Jean Claude Wippler (2012) has created as „JeeLink“ and published under Creative Commons license type „cc-by“ (https://creativecommons.org/licenses/by/3.0/). You can find more details about „JeeLink“ here: http://jeelabs.net/projects/hardware/wiki/JeeLink 2. Meteostick firmware makes use of BPM085 Arduino library from Jean Claude Wippler (2009) published under MIT license Version 1.0 ©Copyright 2014, Ambient LLC. All Rights Reserved. Page 21 (http://opensource.org/licenses/mit-license.php). Link to code: https://github.com/jcw/jeelib/blob/master/examples/Ports/bmp085demo/bmp085d emo.ino 3. Meteostick uses parts of the ATSHA204 library provided by Alessandro Chedini (2013) published under MIT license (http://opensource.org/licenses/mit-license.php). Link to code: https://gist.github.com/ghedo/6751045 4. Meteostick firmware uses the standard Arduino libraries provided under LGPL (http://www.gnu.org/copyleft/lesser.html), linked only, without modification. 17 AirBridge Specifications Storage temperature: Operating temperature: Receiver size: Weight: Connector: Antenna: Operating frequencies: 18 -20° to 50° Celsius 0° to 50° Celsius (non condensing) 75mm x 24mm x 10mm (without antenna) 20g (without packaging) USB-A, 2.0, 1.x flexible wire antenna about 90 mm long 868 MHz in Europe, 915 MHz in USA, receiver only Troubleshooting Guide Problem Outdoor sensor array does not communicate to the AirBridge. Switched to WiFi and can no longer access the device. Cannot communicate to the WeatherBridge, both LAN (cabled) and WLAN (wireless). Solution Move the AirBridge as close as possible to the weather station and reset the AirBridge by powering down and up the WeatherBridge. Contact [email protected] (see Section 1 for details) for advanced troubleshooting. The IP address may change. Refer to Section 6 to find the new IP address (if required). Plug the WeatherBridge into your router and perform a factory default (Section 10.4). 19 Certifications smartbedded UG (limited liability) declares compliance of Meteostick in regard to RoHS. All parts used are RoHS compliant. Declaration of Conformity We, smartbedded UG (haftungsbeschränkt) Querweg 35, 24632 Lentföhrden, Germany Declare under our sole responsibility that the product: Product name: Version 1.0 ©Copyright 2014, Ambient LLC. All Rights Reserved. Meteostick Page 22 Trade name: Type of model: Meteostick 1.0 To which this declaration relates is in conformity with the requirements of the following specifications: ANSI C63.4 FCC 47 CFR Part 15, Subpart B, Class B Digital Device. Supplementary information: This device complies with part 15 of the FCC Rules. Operation is subject to the following two conditions: (1) This device may not cause harmful interference, and (2) this device must accept any interference received, including interference that may cause undesired operation. Declaration of Conformity We, smartbedded UG (haftungsbeschränkt) Querweg 35, 24632 Lentföhrden, Germany Declare under our sole responsibility that the product: Product name: Meteostick Trade name: Meteostick Type of model: 1.0 Is in conformity with the applicable requirements of the following documents: Signed by or for the manufacturer : Name (in writing): Anke Pasternak Title: CEO Place and date of issue: Lentföhrden, April 7, 2014 DIRECTIVE 1999/5/EC on radio equipment and telecommunications terminal equipment and the mutual recognition of their conformity DIRECTIVE 2004/108/EC on the approximation of the laws of the Member States relating to electromagnetic compatibility and repealing Directive 89/336/EEC DIRECTIVE 2009/125/EC on establishing a framework for the setting of ecodesign requirements for energy-related products DIRECTIVE 2011/65/EU on the restriction of the use of certain hazardous substances in electrical and electronic equipment I hereby declare that the equipment named above has been designed with the relevant sections of the above referenced specifications. The unit complies with all applicable essential requirements of the directives. Signed by or for the manufacturer : Name (in writing): Anke Pasternak Title: CEO Place and date of issue: Lentföhrden, April\ 7, 2014 20 Liability Disclaimer The electrical and electronic wastes contain hazardous substances. Disposal of electronic waste in wild country and/or in unauthorized grounds strongly damages the environment. Version 1.0 ©Copyright 2014, Ambient LLC. All Rights Reserved. Page 23 Reading the “User manual” is highly recommended. The manufacturer and supplier cannot accept any responsibility for any incorrect readings and any consequences that occur should an inaccurate reading take place. This product is designed for personal use as indication of weather conditions. This product is not to be used for medical purposes or for public information. The specifications of this product may change without prior notice. This product is not a toy. Keep out of the reach of children. No part of this manual may be reproduced without written authorization of the manufacturer. Ambient, LLC WILL NOT ASSUME LIABILITY FOR INCIDENTAL, CONSEQUENTIAL, PUNITIVE, OR OTHER SIMILAR DAMAGES ASSOCIATED WITH THE OPERATION OR MALFUNCTION OF THIS PRODUCT. 21 Warranty Information 13B Ambient, LLC provides a 1-year limited warranty on this product against manufacturing defects in materials and workmanship. This limited warranty begins on the original date of purchase, is valid only on products purchased and only to the original purchaser of this product. To receive warranty service, the purchaser must contact Ambient, LLC for problem determination and service procedures. Warranty service can only be performed by Ambient, LLC. The original dated bill of sale must be presented upon request as proof of purchase to Ambient, LLC. Your Ambient, LLC warranty covers all defects in material and workmanship with the following specified exceptions: (1) damage caused by accident, unreasonable use or neglect (lack of reasonable and necessary maintenance); (2) damage resulting from failure to follow instructions contained in your owner’s manual; (3) damage resulting from the performance of repairs or alterations by someone other than an authorized Ambient, LLC authorized service center; (4) units used for other than home use (5) applications and uses that this product was not intended. This warranty covers only actual defects within the product itself, and does not cover the cost of installation or removal from a fixed installation, normal set-up or adjustments, claims based on misrepresentation by the seller or performance variations resulting from installation-related circumstances. Version 1.0 ©Copyright 2014, Ambient LLC. All Rights Reserved. Page 24