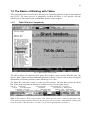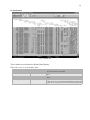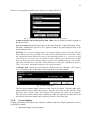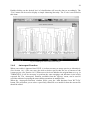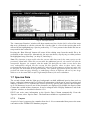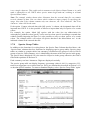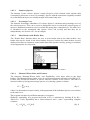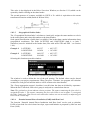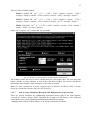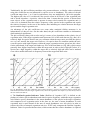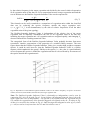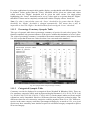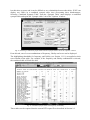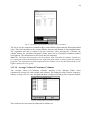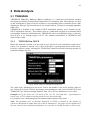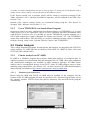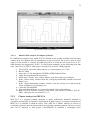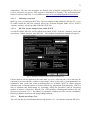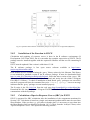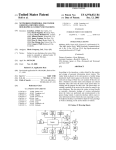
1
JUICE
program for management,
analysis and classification
of ecological data
Tichy, Lubomir1 & Holt, Jason2
Czech Republic
2006
Program manual
1
2
Dept. of Botany, Masaryk Univ. Brno, Kotlarska 2, 611 37 Brno, [email protected]
Box 37, Hinsdale, MT 59241, USA, [email protected]
Table of Contents
1
GETTING STARTED........................................................................................... 1
1.1
Introduction ............................................................................................................................................ 1
1.2
Copyright Information ........................................................................................................................... 1
1.3
Installation............................................................................................................................................... 1
1.3.1
Content of the Installation Package................................................................................................. 1
1.3.2
Computer Configuration ................................................................................................................. 2
1.3.3
Program Settings and INI File......................................................................................................... 2
1.4
Data Import............................................................................................................................................. 3
1.4.1
XML Format ................................................................................................................................... 3
1.4.2
Cornell Condensed (CC!) Format ................................................................................................... 3
1.4.3
Species Lists.................................................................................................................................... 5
1.4.4
Spreadsheet Format ......................................................................................................................... 7
1.4.5
Text Format..................................................................................................................................... 7
1.4.6
Header Data..................................................................................................................................... 8
1.5
The Basics of Working with Tables..................................................................................................... 10
1.5.1
Table Window Components.......................................................................................................... 10
1.5.2
Mouse/Keyboard Functions .......................................................................................................... 11
1.5.2.1
Functions sorted by displayed objects ...................................................................................... 11
1.5.2.2
Mouse Functions Sorted by Similar Functionality ................................................................... 15
1.5.3
Colours .......................................................................................................................................... 16
1.5.4
Separators...................................................................................................................................... 16
1.5.5
Gathering Species or Relevés into Blocks..................................................................................... 16
1.5.6
Relevé Overview Display.............................................................................................................. 18
1.5.7
Editing Species and Header Data .................................................................................................. 18
1.5.8
Screen Options .............................................................................................................................. 19
1.5.9
Defining Scales ............................................................................................................................. 20
1.5.10
Header Data................................................................................................................................... 21
1.5.10.1
Selecting Relevés by Header Data............................................................................................ 22
1.5.11
Searching....................................................................................................................................... 23
1.5.12
The ‘Undo’ Function..................................................................................................................... 23
1.6
Editing Tables ....................................................................................................................................... 24
1.6.1
Merging Species............................................................................................................................ 24
1.6.2
Deleting and Undeleting Species and Relevés .............................................................................. 25
1.6.3
Sorting Species, Species Data and Relevés................................................................................... 25
1.6.3.1
Sorting Species and Relevés..................................................................................................... 25
1.6.3.2
Other Species Sorting Functions .............................................................................................. 26
1.6.3.3
Other Relevé Sorting Functions ............................................................................................... 27
1.6.4
Autorepeat Function...................................................................................................................... 29
1.7
Species Data........................................................................................................................................... 30
1.7.1
Layers............................................................................................................................................ 30
1.7.2
Frequency and Cover Values ........................................................................................................ 31
1.7.3
Sequence and Species Colour........................................................................................................ 31
1.7.4
Transformation of Species Data .................................................................................................... 31
1.7.5
Statistics Summarizing Relevé Data ............................................................................................. 31
1.7.6
Ellenberg Indicator Values............................................................................................................ 31
1.7.7
External Species Data.................................................................................................................... 31
1.7.8
Species Group Tables.................................................................................................................... 33
1.7.9
Species Data Averages .................................................................................................................. 34
1.7.10
Species Data Exports..................................................................................................................... 34
1.8
Short Headers........................................................................................................................................ 34
1.8.1
Identification Numbers.................................................................................................................. 34
1.8.2
Other Short Header Values............................................................................................................ 34
1.8.2.1
Number of Species ................................................................................................................... 35
1.8.2.2
Percentage Cover...................................................................................................................... 35
1.8.2.3
Short Headers with Header Data .............................................................................................. 35
1.8.2.4
Shannon-Wiener Index and Evenness ...................................................................................... 35
1.8.2.5
Geographical Position Index .................................................................................................... 36
1.8.2.6
Potential Annual Direct Irradiation (PADI) And Heat Load .................................................... 36
i
1.8.2.7
Sum, Average, Minimum, Maximum and Multiplication of Species Data ............................. 37
1.8.2.8
Ellenberg Indicator Values ....................................................................................................... 38
1.8.2.9
Importing External Short Header Data ..................................................................................... 38
1.8.3
Colouring Relevés According to Short Header ............................................................................. 39
1.8.4
Short Header Averages, Minima and Maxima .............................................................................. 39
1.8.5
Short Header Sorting..................................................................................................................... 40
1.9
Exporting Data...................................................................................................................................... 40
1.9.1
Saving Files in JUICE ................................................................................................................... 40
1.9.2
The Current Export File ................................................................................................................ 41
1.9.3
Table Export.................................................................................................................................. 41
1.9.4
Synoptic Table Export................................................................................................................... 42
1.9.5
Other Exports into the RTF Export File ........................................................................................ 43
1.9.6
Special Export Formats ................................................................................................................. 43
1.9.7
Export for D-MAP File ................................................................................................................. 43
1.9.8
Species Data Export ...................................................................................................................... 44
1.9.9
Short Header Export...................................................................................................................... 44
1.10
The Fidelity Concept ............................................................................................................................ 45
1.10.1
Fidelity Measures .......................................................................................................................... 45
1.10.2
Fidelity Measurements for Vegetation Units of Unequal Size ...................................................... 48
1.10.3
Selecting Fidelity Measures and Standardization in JUICE.......................................................... 50
1.10.4
Fidelity Tests................................................................................................................................. 51
1.10.5
Tests of Data Structure Using Different Types of Standardization ............................................... 52
1.10.6
Quantitative Fidelity Measures ..................................................................................................... 53
1.11
Synoptic Tables ..................................................................................................................................... 54
1.11.1
Synoptic Table Display ................................................................................................................. 54
1.11.2
Percentage Constancy Synoptic Table .......................................................................................... 55
1.11.3
Categorical Synoptic Table ........................................................................................................... 55
1.11.4
Synoptic Table with Absolute Frequency (‘Absolute Constancy’) ............................................... 56
1.11.5
Fidelity Synoptic Table ................................................................................................................. 57
1.11.6
Synoptic Tables and Cover (Maximum, Average, Median, Modus)............................................. 57
1.11.7
Zlatnik’s Combined Scale ............................................................................................................. 57
1.11.8
Average Cover (Barkman’s Total Cover Value)........................................................................... 58
1.11.9
Combined Synoptic Tables ........................................................................................................... 58
1.11.10
Synoptic Table Export................................................................................................................... 60
1.11.11
Sorting Species in Synoptic Tables ............................................................................................... 60
1.11.12
Analysis of Synoptic Columns Combining with Exporting the Results........................................ 61
1.11.13
Uniqueness of Vegetation Unit ..................................................................................................... 63
1.11.13.1
Theoretical Background....................................................................................................... 63
1.11.13.2
Uniqueness in JUICE........................................................................................................... 63
1.11.14
Average Values of Constancy Columns........................................................................................ 64
1.11.15
Crispness of Classification ............................................................................................................ 65
1.11.15.1
Theoretical Background....................................................................................................... 65
1.11.15.2
Optimal Use of This Function in JUICE.............................................................................. 65
1.11.16
Comparison of Two Synoptic Tables ............................................................................................ 66
1.11.16.1
Theoretical Background....................................................................................................... 67
1.11.16.2
Comparing Two Synoptic Tables within JUICE ................................................................. 67
2
DATA ANALYSIS ............................................................................................. 68
2.1
TWINSPAN........................................................................................................................................... 68
2.1.1
TWINSPAN in JUICE .................................................................................................................. 68
2.1.2
Use of TWINSPAN as a Stand-Alone Program............................................................................ 69
2.2
Cluster Analysis .................................................................................................................................... 69
2.2.1
Cluster Analysis via PC-ORD....................................................................................................... 69
2.2.1.1
Initiation of the Connection...................................................................................................... 69
2.2.1.2
Automation of Cluster Analysis Within JUICE ....................................................................... 70
2.2.1.3
Results and Cluster Tree........................................................................................................... 70
2.2.1.4
Manual Table Analysis and Import of Results ......................................................................... 72
2.2.2
Cluster Analysis via MULVA....................................................................................................... 72
2.2.2.1
Initiating Connection ................................................................................................................ 73
2.2.2.2
MULVA Cluster Analysis from within JUICE ........................................................................ 73
2.2.2.3
Results and Cluster Tree........................................................................................................... 73
ii
2.2.2.4
Manual Table Analysis and Import of Results ......................................................................... 74
It is also possible to analyse the data outside of JUICE and import the results by doing the following:..... 74
2.2.3
Cluster Analysis via SYN-TAX .................................................................................................... 74
2.2.3.1
Manual Table Analysis and Import of Results ......................................................................... 74
2.3
COCKTAIL Method ............................................................................................................................ 74
2.3.1
Co-Occurring Species ................................................................................................................... 76
2.3.2
Interspecific Association ............................................................................................................... 76
2.3.3
Initial Selection of Species into Groups ........................................................................................ 77
2.3.4
Cocktail Groups Definition ........................................................................................................... 78
2.3.5
Cocktail Algorithm for the Definition of Species Groups............................................................. 80
2.3.6
Definition of Relevé Units by the Combination of Cocktail Groups ............................................ 81
2.3.7
Expert System ............................................................................................................................... 82
2.4
Similarity Indices .................................................................................................................................. 84
2.4.1
Description .................................................................................................................................... 85
2.4.2
The use of similarity indices in JUICE (‘Matching’ function)...................................................... 86
2.4.2.1
Procedure description ............................................................................................................... 86
2.4.2.2
Relevé sort by similarity indices .............................................................................................. 86
2.4.2.3
Export of similarity index values.............................................................................................. 87
2.5
Beals Smoothing.................................................................................................................................... 87
2.5.1
The Calculation of Beals Smoothing in the Program .................................................................... 88
2.6
Beta-Diversity........................................................................................................................................ 88
2.6.1
How to Measure Beta-Diversity in JUICE.................................................................................... 88
2.7
Euclidean Distance................................................................................................................................ 89
2.7.1
How Euclidean Distance Is Calculated ......................................................................................... 89
2.8
Species Response Curves...................................................................................................................... 90
2.8.1
General Information about the Function ....................................................................................... 91
2.8.1.1
Models of Species Response Curves ........................................................................................ 91
2.8.1.2
Technical Notes on Particular Modelling Strategies ................................................................ 91
2.8.1.3
How species optimum and tolerance are calculated ................................................................. 92
2.8.2
Installation of the Function in JUICE............................................................................................ 93
2.8.3
Calculation of Species Response Curves (SRC) in JUICE ........................................................... 93
LITERATURE........................................................................................................... 96
iii
Acknowledgements
Acknowledgements. We thank Milan Chytrý as the first tester of new program versions and
designer of many functions. Many thanks to Zoltan Botta-Dukát, Heike Culmsee, Michal
Hájek, Petra Hájková, Rense Haveman, Marcela Havlová, Stephan M. Hennekens, Eszter
Illyes, Florian Jansen, Ilona Knollová, Martin Kočí, Petr Petřík, Honza Roleček, Urban Silc,
Stephen S. Talbot, David Zeleny, Vašek Zouhar and all others who helped to make the
program and this manual better. This study was funded from the grants GACR 206/99/1523,
GACR 206/02/0957, GACR 206/05/0020, MSM 143100010 and MSM 0021622416.
iv
1
1 Getting Started
1.1 Introduction
JUICE is a Microsoft® WINDOWS® application for editing, classifying and analysing large
phytosociological tables. It includes many functions for easy manipulation of table and header
data. The program is optimised for use with TURBOVEG software (Hennekens & Schaminée
2001), which is currently the most widespread database program for storing phytosociological
data in Europe; however, it is also possible to import data into JUICE from a spreadsheet data
format file. In addition to basic functions useful for editing and publishing phytosociological
tables, the program includes various analysis functions (such as Beals smoothing, Ellenberg
indicator values, similarity indices, beta-diversity calculation, interspecific associations, and
analysis of diagnostic, dominant and constant species of synoptic tables) and classification
functions using COCKTAIL (Bruelheide 1996, 2001), TWINSPAN (Hill 1979) or cluster
analysis included in the PC-ORD package (McCune & Mefford 1999). JUICE can create
artificial data for testing. Tables, synoptic tables, headers and different types of analysis
(including fidelities, species groups, indicator values and diagnostic species) can be exported in
four data formats: (1) MS-DOS text, (2) Rich text format for word processors (e.g., Microsoft®
WORD®), (3) spreadsheet format (e.g., Microsoft® EXCEL®) or (4) database format
(Microsoft® ACCESS®). The program directly supports cooperation with the D-MAP mapping
package (Morton 2005) and can create Cornell condensed files for other classification utilities
such as CANOCO (ter Braak & Smilauer 2002). JUICE is continuously being developed (since
1998) by the Working Group for Vegetation Science at the Department of Botany, Masaryk
University, Brno, Czech Republic. Free distribution of the program via internet has been
available since 2001. This manual describes the possibilities of the program version 6.3.66.
Newer versions may differ.
1.2 Copyright Information
JUICE is freeware which can be freely distributed as an original package. The program
download on www.sci.muni.cz/botany/juice.htm is without registration. No official warranty
or support is provided. Questions not covered by this manual or the FAQ can be sent to
[email protected]. In publications or reports containing outputs from the program, the paper
with the basic information on the program (Tichý 2002) should be cited.
1.3 Installation
This chapter explains how to install and initialise JUICE.
1.3.1
Content of the Installation Package
The 4MB installation package can be downloaded from the internet address:
http://www.sci.muni.cz/botany/juice/jc05_ins.htm
There are two hyperlinks – a full installation download and a JUICE.EXE file download. New
users must use the full installation for correct installation of all program components. The
installation package contains these files:
JUICE.EXE – the program file. This file can be replaced directly without new
installation by a newer version of the EXE file.
2
ELENB.TXT – Ellenberg indicator table (Ellenberg et al. 1992) formatted as simple
text. The file covers six main environmental factors (light, temperature, continentality,
humidity, pH/Ca and nitrogens/biomass productivity).
KUBAT.TXT – species check list useful for phytosociologists from the Czech
Republic. The check list has a correct nomenclature published in Kubát et al. (2002).
NEWFLORA.TXT – older species check list acceptable in the Czech Republic,
Slovakia, Austria and Hungary based on unpublished nomenclature. Users from other
countries should export the check list from TURBOVEG. (See Section 1.4.2.)
TWINSPAN.EXE – a modified version of the famous freely distributed classification
program. This version is integrated with JUICE. It can also be run as a stand-alone DOS
program.
At the beginning of the installation, the user will have to specify if the program should check
for older versions and reinstall them. This operation is strongly recommended, but in most cases
it is possible to have several versions of JUICE installed on one computer.
When installation is complete, you may run the program from the icon group ‘JUICE 6.3’.
Note 1: The latest version of the program can be also downloaded as a simple EXE file which
must be copied directly into the existing JUICE directory (usually ‘C:\Program Files\JUICE
6.3’). Update your program frequently. If you install the program on a new computer, please
use the full installation.
Note 2: In a network, we recommend installing JUICE on each computer individually.
Otherwise, there might be conflicts between multiple copies trying to access the same directory
on the host computer. The starting path with INI file and TWINSPAN must stay open for
program outputs.
1.3.2
Computer Configuration
The program is written for the WINDOWS operating system in English/US format. The predefined decimal delimiter must be a period ‘.’. The program will automatically try to convert a
decimal comma to a decimal point when the program starts. A previous selection of the decimal
point is restored after the program termination. Some known problems occur with Asian
formats of the operating system. Therefore, if you encounter problems such as absence of
communication with TWINSPAN or unreadable export files, try setting ‘Regional Settings’ to
English/US.
The program has no special demands on computer hardware. However, listing through large
tables may be slower on older computers.
1.3.3
Program Settings and INI File
JUICE saves the user’s settings and restores them the next time the program is used. The
settings are saved in the JUICE.INI file, which can be found in the same directory as the
program. This file is automatically generated the first time the program is run and it is updated
during table operations. If the file is deleted from the JUICE directory, the program will use
predefined settings.
Note: Each line of the INI file contains a parameter name and a parameter value separated by
a double colon ‘::’, thus it is possible to edit the file manually. However, almost all values can
be managed directly from the program. Manually altering the INI file may cause problems. If
you experience difficulty with the INI file, simply delete it. JUICE will generate a new one in the
correct format.
3
1.4 Data Import
The first step in working with JUICE is to open a table. JUICE does not support direct storage
of phytosociological relevés. Therefore, all relevés must be entered using other software (such
as TURBOVEG) and exported as a table that can be read by JUICE. JUICE accepts several
different file formats:
1.4.1
XML Format
This format is useful for importing source data from the TURBOVEG database program
(Hennekens & Schaminée 2001). The XML file contains full information about species names,
synonyms, cover and header data, and it is not necessary to create any other file with additional
information. The file structure is rather complicated, and manually entering data in this file
format without TURBOVEG is not recommended.
Fig. 1: XML file import.
The XML file contains all header data, but JUICE allows reduced header data information. The
user must select the fields to be imported from the left list box using the ‘Add’ button. All
selected fields appearing in the right list box will be imported.
1.4.2
Cornell Condensed (CC!) Format
The Cornell condensed format file consists of three parts: table data, species abbreviations and
relevé numbers. Several types of CC! files exist – they differ especially in the table data format
defined in the second line of the file. JUICE should accept any of these formats, as long as they
conform to the following convention: the first number of the line gives the relative relevé
number and the remainder of the line consists of pairs in which the first number refers to the
species and the second number to the species’ cover. Cover values may be expressed as
percentages or as categories on an ordinal scale (1-9).
The species abbreviation section contains ten abbreviations per line. Each abbreviation consists
of either 8 characters or 7 characters plus 1 character for the layer number.
The third section of the file is reserved for relevé identification numbers. Each number has 8
characters, and there are 10 numbers per line. A sample CC! file can be downloaded from the
JUICE web page and tested directly in the program.
4
Example:
Juice analysis
T
(I5,5(I5,F8.1))
5
1
1
2.0
2
2.0
3
13.0
4
1.0
5
38.0
1
6
2.0
7
2.0
8
3.0
9
1.0
10
1.0
1
11
3.0
12
3.0
13
3.0
14
3.0
15
1.0
1
16
2.0
17
1.0
18
3.0
19
13.0
20
2.0
1
21
2.0
22
1.0
23
1.0
24
2.0
25
2.0
1
26
2.0
27
2.0
28
2.0
29
2.0
30
13.0
2
1
1.0
5
2.0
10
2.0
16
3.0
21
2.0
2
23
3.0
25
2.0
26
13.0
31
3.0
32
3.0
2
33
2.0
34
2.0
35
13.0
36
1.0
37
13.0
2
38
2.0
39
3.0
40
3.0
41
13.0
42
2.0
2
43
2.0
44
1.0
3
4
3.0
5
3.0
6
2.0
10
2.0
13
2.0
3
16
3.0
18
2.0
21
2.0
23
2.0
25
3.0
3
26
2.0
31
3.0
33
2.0
35
13.0
36
2.0
3
38
3.0
39
3.0
40
2.0
41
38.0
45
2.0
3
46
1.0
47
2.0
48
1.0
49
2.0
50
1.0
3
51
2.0
52
13.0
53
2.0
54
2.0
4
2
1.0
3
2.0
4
2.0
5
38.0
6
2.0
4
10
3.0
13
3.0
20
1.0
23
13.0
25
3.0
4
26
2.0
27
2.0
30
38.0
36
2.0
42
3.0
4
55
2.0
56
2.0
57
3.0
58
2.0
59
2.0
4
60
3.0
61
2.0
62
2.0
63
1.0
64
2.0
4
65
1.0
66
2.0
0000
ACHI#MI6AGRIEUP6ARRHELA6ASTEAME6BRAYPIN6BUPLFAL6CENTSCA6CLINVUL6CORUSAN7CRATMON7
DACYGLO6ELYMREP6FESTRUI6FRAGVES6GENITIN6HIERPIL6HIERSAB6KNAUKIT6MEDIFAL6ORIGVUL6
PIMP#SA6PLAALAN6PRUUFRU6RANUPOA6SALVPRA6SANGMIN6STACREC6TARASEO6VERBC-A6VICITEN6
ALYSALY6AREN#SE6ASPRCYN6CHAARAT6FESTVAL6FRAGVIR6GERASAN6INULENS6KOELMAC6MEDIMIN6
POTEINC6ROSA#CN7TEUCCHA6THLSPER6ARENSER6COLTARB7MEDI*VA6PRUUSPI7ROSAPIM6RUBUCAE6
SCABOCH6SESEOSS6STAC#RE6THYU#PA6ACERCAM7ASTAGLY6CAREMIC6CARIBET4CRATMON4CYTINIG6
ERYNCAM6EUPHPOL6GALUVEU6HELINUM6PICRHIE6ROSARUB4
400179 400180 400181 400182
Header data are imported automatically if header data files have the same name as the CC! file
and have a correct format. (See Section 1.4.6.)
The import process starts with selection of the CC! file. Then the following window appears:
Fig. 2: Cornell condensed file import (1st and 2nd step).
The basic statistics of the selected file are presented under ‘File parameters’. If they are
incorrect, this indicates that the file is not suitable for this type of import. TURBOVEG files are
defined with species abbreviations in the format ‘7+1’ (7 characters encode the species name
and the last character is reserved for the layer number); however, CC! files without layer
identification can be imported by selecting the option ‘8 characters’. The scale is detected
5
automatically, but it can also be selected manually. (TURBOVEG exports only percentage
values.)
The program checks all cover values and tries to convert them to whole numbers from 1 to 95.
If a value cannot be imported automatically, it is necessary to supply the correct conversion.
Double-clicking on a line in the ‘Covers’ list box opens a window for entering the
corresponding value.
Fig. 3: Cornell condensed file import (3rd and 4th step).
The next step is to specify the species list. If the species list was loaded successfully and used
for importing a previous table, the program will automatically use this pre-defined file as the
source of full species names. However, it is possible to use a different species list or import
species as abbreviations.
Header data will be loaded automatically from a pair of header data files with the same name as
the CC! file with suffixes EXP and STR. It is also possible to import a table without header data
or use a different header data file by clicking on the button ‘Append new header files’. The
program allows the use of headers from a different import package (e.g., headers with a
differently defined list of fields). Such headers need not be complete. It is recommended that
you test their compatibility with the ‘Test’ button. The test will identify the number of relevés
with headers.
Note: Connecting table data with headers is only possible if the header data file contains the
‘Relevé number’ field with unique identification numbers.
1.4.3
Species Lists
Although the abbreviations used in Cornell condensed files should uniquely specify the species,
the final presentation of the table usually requires full species names. The program uses a
species list file in simple text format. Such a file can easily be exported from TURBOVEG.
(From the ‘Manage’ menu in TURBOVEG, select ‘Species Lists’ and ‘Edit’. Enter the name of
the species list and select ‘Export’ and ‘Limited List For JUICE’.) It can also be created
manually as a comma-delimited file or a file with a fixed length for each line. Examples are
shown below:
6
Format 1:
----I------I-------------------------------------------------I
1
ABIEALBAbies alba
12251ABIEGRAAbies grandis
2
ABIE-SPAbies species
4
ABITASAAbietinella abietina var. abietina
5
ABITASHAbietinella abietina var. hystricosa
3
ABITABIAbietinella abietina
Each column has the same number of characters in each line. The first line defines three fields with 5, 7 and 50 characters.
Format 2:
1,ABIEALB,Abies alba
12251,ABIEGRA,Abies grandis
2,ABIE-SP,Abies species
4,ABITASA,Abietinella abietina var. abietina
5,ABITASH,Abietinella abietina var. hystricosa
3,ABITABI,Abietinella abietina
Data are in three comma-delimited columns.
Format 3:
ABIEALB,Abies alba
ABIEGRA,Abies grandis
ABIE-SP,Abies species
ABITASA,Abietinella abietina var. abietina
ABITASH,Abietinella abietina var. hystricosa
ABITABI,Abietinella abietina
Data are in two comma-delimited columns.
Note: The species list included in the JUICE installation package is useful only for central
European users who are using TURBOVEG with the standard central European check list.
Users from the Czech Republic can use the included KUBAT#.TXT check list with standard
nomenclature (Kubát et al. 2002). A current version of this check list is available at:
http://www.sci.muni.cz/botany/juice/jc05_che.htm
A new species list file can be defined in the ‘Check List Import’ tab of the ‘Options’ window
(available from the ‘File’ menu). If no species list is defined, the program will open this
window during the import of the CC! file:
Fig. 4: Options (Check List Import).
The button ‘Open new check list file’ allows the user to specify a new species list file. The ‘ID
Number’, ‘Abbreviation’ and ‘Species Name’ boxes are used to define the number of characters
reserved for each field. If the first line of the file defines the length of these fields, the values
appear in the boxes automatically. The file format can be tested by clicking on the ‘Test file
7
structure’ button. ‘Check list encoding’ must be switched on for the NEWFLORA.TXT file.
Other files are not encoded.
1.4.4
Spreadsheet Format
A spreadsheet format file contains the title of the table (first line), the number of relevés, the
relevé numbers and the table itself (species name, layer and cover codes). Cover codes may be
characters from the Braun-Blanquet scale (or any other) or percentage values.
The Import Manager begins by prompting you to select a file. When the file is selected, you are
informed about the title of the table, the character used to delimit columns, layer information
and table size (steps 2 through 5). If the file contains only species names without layer
information, uncheck the box in step 4. In step 5, make sure that the indicated table size is
correct. In step 6, make sure the table corresponds with real data.
The last step is to specify the cover values. If the scale is in Braun-Blanquet codes or percentage
values, simply select the appropriate option. Otherwise, cover values must be specified
manually. All codes which have been found in the table will be displayed in the list on the right
side of the window. Double-click on a code to enter a percentage value for the cover
represented by the code. The program can continue only if all codes are associated with a whole
percentage value.
An example is given below. An example is also available on the JUICE web page.
Table from relevés of the file: paseky.wct
Number of relevés: 5
;; 434111 ; 434112 ; 434113 ; 311728 ; 311725
Calamagrostis villosa;6;5;4;4;5;3
Avenella flexuosa;6;2;2;3;1;2
Vaccinium myrtillus;6;1;1;1;1;+
Rubus idaeus;4;2;2;2;1;.
Maianthemum bifolium;6;2;3;3;.;.
Veratrum album ssp. lobelianum;6;2;2;3;.;.
Oxalis acetosella;6;2;2;3;.;.
Senecio fuchsii;6;1;.;.;1;1
Equisetum sylvaticum;6;2;2;.;.;.
Phegopteris connectilis;6;2;2;.;.;.
Anemone nemorosa;6;2;2;.;.;.
Betula pendula;8;.;r;1;.;.
Picea pungens;4;.;.;.;2;2
Betula pendula;4;.;.;.;1;2
Galium saxatile;6;.;.;.;+;2
Trientalis europaea;6;.;.;.;+;+
Athyrium filix-femina;6;2;.;.;.;.
Deschampsia cespitosa;6;1;.;.;.;.
Luzula luzuloides;6;.;.;.;.;+
The second column represents layer; it is optional. All cover data can be converted into percentage numbers or some
semi-quantitative scale. This format can use full species names or abbreviations.
The spreadsheet format must not contain header data. Header data can be imported separately as
described in Section 1.4.6.
1.4.5
Text Format
For users without TURBOVEG, this is the easiest import format. The table consists of four files
with the same name and different suffixes: TXT, TAB, EXP and STR. (Similar files can also be
exported by JUICE. From the ‘File’ menu, select ‘Export’ and ‘Table’ and choose the ‘TEXT
FILE’ format.)
8
The TXT file consists of three columns (species name, layer number and table data) separated
by at least 5 spaces.
Anemone nemorosa
Athyrium filix-femina
Atrichum undulatum
Avenella flexuosa
Betula pendula
Betula pendula
Calamagrostis arundinacea
Calamagrostis villosa
Carex leporina
Deschampsia cespitosa
Dryopteris dilatata
Epilobium angustifolium
Equisetum sylvaticum
Fagus sylvatica
Fagus sylvatica
6
6
9
6
4
8
6
6
6
6
6
6
6
1
4
22....
2....+
.....+
223123
...12+
.r1...
....1.
544533
....++
1.....
.....+
...+.+
22....
....+.
...1..
The TAB file is optional. Each line contains a unique relevé identification number (in a range
from 1 to 999 999).
434111
434112
434113
311728
311725
311724
The EXP and STR files contain header data. (See Section 1.4.6.)
1.4.6
Header Data
There are three ways to import header data into JUICE:
1. Header data are included automatically in the XML file exported from TURBOVEG.
You can select which fields to import during the import of this file into JUICE as
described in Section 1.4.1.
2. When TURBOVEG exports a CC! file for JUICE, it automatically exports header data
in an STR and an EXP file. The user must select header data fields to export during the
export from TURBOVEG. Header data will import automatically with the CC! file if all
the files have the same name.
3. All header data contained in an STR and EXP file can be imported separately. From the
‘File’ menu, select ‘Import’ and ‘Header Data’. This is useful when (a) you wish to
select different header data fields or (b) you need to add new header data to a
spreadsheet format file or to any table without header data.
9
STR and EXP files are simple text files containing definitions and field values:
An STR file defines table data variable names and their starting character position in each line
of the corresponding EXP file. The first column defines the first character of the field; the
1
6
12
16
18
20
24
28
31
33
36
39
42
45
48
Table number
Relevé number
Year
Month
Day
Author code
Altitude (m)
Aspect (degrees)
Slope (degrees)
Cover total (%)
Cover tree layer (%)
Cover shrub layer (%)
Cover herb layer (%)
Cover moss layer (%)
Mosses identified (y/n)
second column represents the name of the field.
Warning: Each STR file must contain the field ‘Relevé number’ specifying where to find the
relevé’s unique identification number.
An EXP file contains values of fields defined in a corresponding STR file (e.g., relevé
information about the site and environmental factors). All fields must be consistent with the
format specified in the STR file.
1400753199606050001
2400754199606050001
3400756199606050001
4400813199606190001
5402212199706280001
6403158
0139
7403159
0139
8403161
0139
9403162
0139
10403166
0139
11403167
0139
12403168
0139
13403169
0139
14403171
0139
15403174
0139
260
280
250
200
240
5 100
20 90
15 80
10100
20 0
27025 0
27025 0
15810 0
15825 0
2485
0
22510 0
22510 0
22510 0
22515 0
9030 0
0
0
0
0
0
0
0
0
0
0
0
0
0
0
0
0100 20Y
0 90 3Y
0 80 1Y
0100 0Y
0 70 10Y
0 80 0Y
0 70 0Y
0 95 0Y
0 95 0Y
0 90 0Y
0 95 0Y
0 95 0Y
0 95 0Y
0 95 0Y
0 95 0Y
10
1.5 The Basics of Working with Tables
This section describes the most basic functions for organising phytosociological data imported
into JUICE. The entire process is graphically oriented and more or less intuitive, but the
following text will explain some of the hidden features of the program.
1.5.1
Table Window Components
Fig. 5: Main window of the program.
The table window is divided into three parts: short headers, species names and table data. The
Species Data Column can hold additional information about a species such as layer, biological
information or Ellenberg indicator value (Ellenberg et al. 1992).
The Menu Bar, with twelve items, is at the top of the window. The Icon Bar is below the Menu
Bar. Some menu functions are directly accessible as icons. See the figure below.
Open file
Header data
Save file
Find species/relevé
Increase text Layer view
Decrease text Relevé colour
Option Button
Move relevés right
Move species down Sort species
Sort relevés
Move species up Merge species
Reset relevé colour
2nd spec. colour Divide species
Move rel. left Species colour
Reset spec. colour Separators
Relevé colours for fast selection Species colours for fast selection
Note 1: The buttons ‘Reset relevé colour’ and ‘Reset species colour’ have two functions: One
click of the left mouse button will reset the currently selected colour, while double-clicking will
reset all colours. (See Sections 1.5.2 and 1.5.3 for more information on colours.)
11
Note 2: The Option Button opens the ‘Options’ window (also available from the ‘File’ menu).
Its purpose is to provide quick access to the ‘Fidelity’ tab (see Section 1.10.3) but other option
tabs are available (such as the ‘Display parameters’ tab described in Section 1.5.8 below).
The Status Bar at the bottom of the window contains information about the last species selected:
its order in the list, its full species name (to a maximum of 50 characters), its layer number and
its total frequency in the data set. The values ‘Rel. No.’ (the relevé’s relative number in the
imported data set) and ‘Turboveg No.’ (a unique TURBOVEG number in the range 1-999 999)
refer to the most recently selected relevé. The ‘Row’ and ‘Column’ values give the current
position of the cursor in the table.
1.5.2
Mouse/Keyboard Functions
Working with table data requires the use of the mouse in combination with the keyboard.
1.5.2.1
Functions sorted by displayed objects
In tables:
Fig. 6: Table.
12
The three parts of the table (see Section 1.5.1 above) are sensitive to different operations:
When the cursor is in the short headers:
Left Button
Left Button
Click
Double Click
Left Button
Shift + Left Button
Click and Drag
Click
Right Button
Click
Shift + Right Button
Click
Highlight and select relevé.
Display list of species in selected relevé and save
selected relevé in text form to clipboard.
Move currently selected relevé
Make/remove separator line to the right of currently
selected relevé.
Repaint currently selected relevé with current relevé
colour.
Repaint block of relevés with current relevé colour.
(Click on the leftmost relevé to be selected. Hold Shift
and click on the rightmost relevé. The entire relevé
interval will be repainted.)
When the cursor is in the species names:
Left Button
Left Button
Click
Double Click
Left Button
Shift + Left Button
Click and Drag
Click
Right Button
Click
Ctrl + Right Button
Click
Shift + Right Button
Click
Highlight and select species.
Open dialog window for editing species name, layer
and data.
Move currently selected species.
Make/remove separator line below currently selected
species.
Repaint currently selected species with current species
colour.
Repaint currently selected species with current
secondary species colour.
Repaint block of species with current species colour.
(Click on the first species to be selected. Hold Shift
and click on the last species. The entire species
interval will be repainted.)
When the cursor is in the table data:
Left Button
Left Button
Click
Double Click
Right Button
Click
Ctrl + Right Button
Click
Shift + Right Button
Click
Highlight and select species and relevé.
Display list of species in selected relevé and save
selected relevé in text form to clipboard.
Repaint currently selected species with current species
colour.
Repaint currently selected species with current
secondary species colour.
Repaint block of species with current species colour.
(Click on the first species to be selected. Hold Shift
and click on the last species. The entire species
interval will be repainted.)
13
In synoptic tables:
Fig. 7: Synoptic table.
Functions are slightly different in synoptic tables:
When the cursor is in the short headers:
Left Button
Click and Drag
Move currently selected relevé group (column).
When the cursor is in the species names:
Left Button
Left Button
Click
Double Click
Left Button
Shift + Left Button
Click and Drag
Click
Right Button
Click
Ctrl + Right Button
Click
Shift + Right Button
Click
Highlight and select species.
Open dialog window for editing species name, layer
and data.
Move currently selected species.
Make/remove separator line below currently selected
species.
Repaint currently selected species with current species
colour.
Repaint currently selected species with current
secondary species colour.
Repaint block of species with current species colour.
(Click on the first species to be selected. Hold Shift
and click on the last species. The entire species
interval will be repainted.)
14
In header data:
Fig. 8: Header data.
These functions are defined for Header Data Display:
When the cursor is in the header data:
Left Button
Double Click
Shift + Left Button
Click
Right Button
Click
Shift + Right Button
Click
Display list of species in selected relevé and save selected
relevé in text form to clipboard.
Make/remove separator line below currently selected
relevé.
Repaint currently selected relevé with current relevé
colour.
Repaint block of relevés with current relevé colour. (Click
on the top relevé to be selected. Hold Shift and click on the
bottom relevé. The entire relevé interval will be repainted.)
15
1.5.2.2
Mouse Functions Sorted by Similar Functionality
Relevé/species selection:
Left Button
Left Button
Left Button
Click
Click
Click
Table
Synoptic Table
Header Table
Select current relevé and species.
Select current species.
Select current relevé.
Shift + Left Button
Click
Shift + Left Button
Click
Shift + Left Button
Click
Table: Species or
Short Headers
Synoptic Table:
Species
Header Table
Add/remove species or relevé separator of
selected hierarchy.
Add/remove species separator of selected
hierarchy.
Add/remove relevé separator of selected
hierarchy.
Table and Synoptic
Table: Species
Table and Header
Table: Relevé
Table and Synoptic
Table
Table and Synoptic
Table
Repaint indicated species with current species
colour.
Repaint indicated relevé with current relevé
colour.
Repaint indicated species with current secondary
species colour.
Repaint block of species with current species
colour. (Click on the first species to be selected.
Hold Shift and click on the last species. The
entire species interval will be repainted.)
Repaint block of relevés with current relevé
colour. (Click on the first relevé to be selected.
Hold Shift and click on the last relevé. The entire
relevé interval will be repainted.)
Separators:
Colours:
Right Button
Click
Right Button
Click
Ctrl + Right Button Click
Shift + Right Button Click
Shift + Right Button Click
Table and Header
Table
Manually moving species/relevé/relevé group:
Left Button
Click and Drag
Left Button
Click and Drag
Table: Species or
Short Headers
Synoptic Table:
Short Headers
Move currently selected species or relevé.
Move currently selected relevé group.
Editing species name or header data:
Left Button
Double Click
Left Button
Double Click
Table and Synoptic
Table: Species
Table and Header
Table: Header Data
Open dialog window for editing species name,
layer and data.
Open window with function for editing header
data.
16
1.5.3
Colours
As indicated in the previous section, relevés and species can be assigned colours. These colour
codes can then be used for data processing, analysis and classification. Relevés and species
each have eight colours available, which can be selected from the Icon Bar. The basic colour for
relevés is white, while for species it is black. Colours enable organisation or analysis of data in
a selected part of the data set. Colour coding makes selection and manipulation of groups of
relevés or species easier and quicker, and sorted data may have a clearer structure. The mouse
commands for colouring relevés and species are described in Section 1.5.2 above. Colours can
also be assigned according to information in the short headers, as described in Section 1.8.3.
Using colour-coding to gather relevés and species into blocks is explained in Section 1.5.5
below.
1.5.4
Separators
Separators divide a table into sections. This is necessary for defining synoptic tables or species
group tables. Such tables are used to analyse constancy, fidelity and similar measures of a
relevé group’s relation to species or a species group’s relation to relevés.
Separators are placed or removed by holding down the Shift key and clicking on the relevé or
species with the left mouse button. (See Section 1.5.2.) The separator appears on the right side
of the indicated relevé or below the indicated species.
Fig. 9: Separator switches in the Menu bar.
The program includes the option to work with six hierarchical layers of separators. Level 1 can
be used for major groupings, level 2 can be used for subgroupings and so on. When the
hierarchy is turned on, the user can choose how many levels will be displayed. The top level,
level 1, is always on, while the bottom level, level 6, is only on if the user chooses to display all
6 levels. These switches can be found on the Icon Bar or under the ‘Separators’ tab of the
‘Options’ window (which can be opened from the ‘File’ menu).
Note: Moving synoptic columns (see Section 1.5.2) will destroy relevé separator hierarchy. All
separators in different levels will be changed into separators of the top level.
1.5.5
Gathering Species or Relevés into Blocks
Before separators can be used to define species or relevé groups, it is necessary to gather similar
items to the same part of the table. While it is possible to manually drag each individual row or
column to the appropriate place, it is quicker and easier to use colour-coding. This is a two-step
process. The example below illustrates gathering relevés into a block. The process for species is
analogous.
Give the relevés to be gathered a single colour, distinct from the other relevés in the table.
17
Fig. 10: The table with selected relevés.
Gather the relevés using the arrow buttons on the Icon Bar or the ‘Move Relevés’ function in
the ‘Sorting’ menu. Specify whether the relevés are to be gathered to the left or to the right.
(The illustration below shows relevés that have been gathered to the left.)
Fig. 11: The table after moving all selected relevés to the left.
Note that JUICE does not gather all the relevés to the leftmost edge of the table. They are
simply gathered to the leftmost (or rightmost) relevé of the selected colour. To move the block
of relevés to the left, use this trick:
1. Drag the leftmost relevé in the block to the place the block should be.
2. Gather the relevés to the left again.
This will move all the relevés to the left. To move them to the right, move the rightmost relevé
to the desired position and re-gather to the right.
18
If the program seems to not respond to an attempt to gather relevés or species, make sure the
correct colour is selected in the Icon Bar. JUICE only gathers relevés or species of the selected
colour.
JUICE can also group species and relevés automatically without using colours. The ‘Sorting’
menu contains several other options for sorting species and relevés. See Section 1.6.3.
1.5.6
Relevé Overview Display
Each relevé in the table can be displayed in condensed form by double-clicking on it. (See
Section 1.5.2.) Species in the relevé can be sorted by layer, cover, alphabetical order or current
position in the table. When the relevé display is opened or its sorting method is changed, the
relevé is copied into the clipboard memory – the user can paste this information into a text
editor or other program.
Fig. 12: Selected relevé displayed at the right site of the window.
1.5.7
Editing Species and Header Data
JUICE is not database-oriented software for data archiving. All changes are saved only in the
current table without impacting a database source. Therefore, we strongly recommend archiving
phytosociological or ecological data in a database program (e.g., TURBOVEG) and making all
changes in the original data set.
19
However, it is possible to modify some data in an existing JUICE file:
Fig. 13: The window for editing species names, layers and species data.
a) Species names, layers and species data values can be edited by double-clicking on
the species name.
b) Cover values displayed in the table can be edited from the ‘Table Simulation’ menu.
Selecting ‘Add/Remove Species Cover’ opens a window for specifying the value to be
written into the table.
Warning: In cover-value editing mode, the program changes mouse functions. The left
mouse button writes the specified cover value to the indicated position in the table, while
the right mouse button deletes the value in the indicated position (i.e., overwrites it with
cover value 0). It is best to save a backup file before editing cover data because JUICE
does not keep track of the original values, so these cover modifications are irreversible.
After data modification, select the ‘Table Simulation’ menu and ‘Add/Remove Species
Cover’ once more, and mouse functions will return to normal.
c) Header data can be accessed from the Relevé Overview Window. (See Section
1.5.6.) Clicking on the ‘Edit header’ button opens the following window:
Fig. 14: Editing header data.
The two arrow buttons enable selection of the field to be edited. Click the right arrow
button until the desired field name appears. Type the new value into the text box. Then
press the ‘Save’ button. If the ‘Save’ button is not pressed, the value will not change.
The left arrow button initially does nothing, but after the right arrow button has been
pressed, the left arrow button can be used to go back to a previous field.
1.5.8
Screen Options
Display parameters are defined in the ‘Options’ window under the ‘Display parameters’ tab. It
is possible to modify:
1. Displayed length of species names
20
2. Width of species data field
3. Size and style of text
4. Background contrast.
Fig. 15: Options window (Display Parameters)
Note: The width of the Species and Species Data Columns can also be modified using the
markers at the top of the table. Text size can also be modified using the two text size icons on
the Icon Bar.
1.5.9
Defining Scales
All cover data are saved in the form of percentage
numbers. The program accepts integer numbers
from 0 to 100. Each number from 1 to 94 can be
assigned a character, while numbers from 95 to
100 are assigned the same character. The program
has four predefined scales: ‘Braun-Blanquet Old’,
‘Braun-Blanquet Old and New’, ‘Ordinal’ and
Fig. 16: Defined scales
‘Presence/Absence’. All other scales must be
defined by the user. The scale is selected in a
combo box in the ‘Display parameters’ tab of the ‘Options’ window. Selecting ‘User Defined
Scale’ turns on the ‘Modify’ button. Clicking on this button opens the following window:
21
Fig. 17: Window for definition of user defined scale.
Every percentage number must be represented by one character which will be displayed in the
table. This scale is saved in the JUICE.INI file and is loaded each time JUICE is started.
1.5.10
Header Data
Full header data are displayed separately. JUICE must be switched from Standard Display to
Header Data Display by selecting ‘Extended Head’ from the ‘Head’ menu or by clicking on the
Head Icon on the Icon Bar. In Header Data Display mode, each relevé has its own row. The
header data fields are in the same order as in the EXP and STR files. (See Section 1.4.6 for
more information on these files.) All names of fields defined in the STR file are written at the
top of the table. All table data must contain the field ‘Relevé number’, which is a unique
identification number connecting headers with table data.
Fig. 18: Header data display.
22
All screen parameters are defined similarly as in the Standard Display. (See Section 1.5.8.)
Mouse functions are described in Section 1.5.2. If it is necessary to change this data, the
changes should be made in the source data set. However, it is possible to edit this information
within JUICE. See Section 1.5.7.
Note: It is not possible to add a new header field to the header data. To add new information,
define the new field in TURBOVEG and re-export the header data. (See Section 1.4.6.)
1.5.10.1
Selecting Relevés by Header Data
Section 1.5.5 explains how to organise colour-coded relevés into blocks. JUICE includes
functions for colour-coding relevés according to their header data:
1. Select a relevé colour on the Icon Bar.
2. Open the ‘Head’ menu and select ‘Relevé Colour According To The Head’. This
will open the following window:
Fig. 19: Window for colouring relevés by header data.
3. From the list, select the relevant field.
4. In the text box, type the text to be matched.
5. Hit the ‘Continue’ button.
Relevés matching the text are given the indicated colour. The number in the ‘Selected relevés’
field indicates how many relevés match the text.
JUICE provides two text-matching functions. ‘Function LIKE’ requires exact matching of the
text in the box, but it supports wildcard characters. A # symbol represents any character and a *
symbol represents any string of characters. For example, ‘1##’ can be used to select all relevés
at an altitude of 100-199 m because it matches text like ‘132’ and ‘149’ but not ‘711’ (the first
character is not ‘1’) nor ‘1324’ (the text is more than 3 characters long). The text ‘1*’ would
match all numbers beginning with ‘1’ including ‘1’, ‘13’, ‘149’ and ‘1324’.
‘Function InStr’ looks for matches in any part of the selected field. It does not support wildcard
characters. For example, to colour all relevés that mention Germany in their locality, use
‘Function InStr’ with ‘Germany’ in the text box. (Note that this is equivalent to using ‘Function
LIKE’ with ‘*Germany*’ in the text box.) But to select only relevés with localities that begin
with the word ‘Germany’, use ‘Function LIKE’ with ‘Germany*’ in the text box.
23
1.5.11
Searching
Finding a certain species or relevé can be difficult in larger tables. The ‘Find Species’ and ‘Find
Relevé’ functions (available in the ‘Species’ or ‘Relevé’ menu or from the Icon Bar) will
display a text box in the Status Bar below the table. Type in part of the species name and press
the ‘Find Species/Head’ button. The program will find the next species name that begins with
that text and highlight the selected row. Pressing the button again will find and highlight the
next matching species.
Example: The table sorted by layers contains the species ‘Alnus glutinosa’ in three layers (tree,
shrub and juvenile). After the first selection of the ‘Find’ button, the program will display the
part with the selected species in the tree layer, the second selection will move the table to the
species in the shrub layer, the third selection will find ‘Alnus glutinosa’ in the juvenile layer,
and the fourth selection will move the display back to the position with the selected species in
the tree layer.
When JUICE is in Header Data Display (see Section 1.5.10), the text box can be used to search
for relevés that match the text. In this case, a match occurs if the text appears anywhere in the
relevé’s header data. The list will scroll so that the next relevé that matches the indicated text is
highlighted at the top of the list window.
Note: It is also possible to match the text with any part of a species name. The mode of
searching can be changed in the ‘Find Species/Relevés function’ section of the ‘General’ tab in
the ‘Options’ window.
Fig. 20: Options (General).
1.5.12
The ‘Undo’ Function
Some operations (colours, relevé/species positions, separators etc.) are reversible. Often, an
incorrect step can be repaired with the ‘Undo’ function (in the ‘Edit’ menu).
Notes: ‘Undo’ is only supported for one operation. It is not possible to ‘Undo’ multiple
mistakes. In addition, the ‘Undo’ function does not support changes in data structure (species
names, cover codes, deleting relevés and species etc.). We recommend that you create backup
WCT files as frequently as possible.
24
1.6 Editing Tables
Analysis, classification or publication of phytosociological tables requires a clear data set
without residuals or incorrectly identified species and with correct nomenclatorial background.
If the source data set consists of relevés in different scales and taxonomical concepts sampled
by different authors, it is necessary to unify the data. This section describes how to accomplish
these operations.
1.6.1
Merging Species
Species should be merged immediately after importing the table. To merge nominally different
taxa into one taxon, follow these steps:
1. Sort the species list into alphabetical order. (From the ‘Sorting’ menu, select ‘Sort
species alphabetically’ and ‘ALL’.)
2. Choose a secondary species colour. Species of this colour will be merged. To select
the colour, hold down the Ctrl key and click on the colour on the Icon Bar. The box
labelled ‘<Ctrl>’ will display the selected colour.
3. Mark species to be aggregated with this secondary colour. Hold down the Ctrl key
while right clicking on the species name. Make sure no other species are marked
with this colour.
4. From the ‘Species’ menu, select ‘Merge <selected> Species’ or press Ctrl+L.
5. Confirm name and layer of the new aggregated species. All the species contained in
the resulting aggregated species are automatically deleted from the data set.
The cover of the aggregation is calculated under the assumption that covers can overlap and that
they do so independently of each other:
Example: Species 1 – cover 50 %, Species 2 – cover 30 %, Species 3 – cover 20 %. JUICE
starts with 50%, the cover of the first species. Under the independence assumption, the second
species covers 30% of the area covered by Species 1 and 30% of the area not covered by
Species 1. This gives an additional 15% cover (0.5 × 0.3 = 0.15). These two species occupy
together 0.50 + 0.15 = 0.65 = 65 % of the sample plot. Species 3 covers 20% of this covered
area and 20% of the remaining 35%. The area covered only by Species 3 is 7% (0.20 × 0.35 =
0.07). The total area covered by at least one of the three species will be:
0.50 + (1.00 - 0.50) × 0.30 + (1.00 - 0.65) × 0.20 = 0.72 = 72 %.
Note that this is equivalent to calculating the area not covered by any species. Under the
independence assumption this area is:
(1 - 0.50) × (1 - 0.30) × (1 - 0.20) = 0.28 =28%.
This means 72% is covered by at least one of the three species.
This independence assumption is most appropriate when merging different layers for the same
species. When merging distinct species of one layer into an aggregate, it may be more
reasonable to assume the covers are mutually exclusive. In this case the average cover values
computed by JUICE may underestimate the resulting cover; however, other aggregate statistics,
such as presence/absence, remain valid.
Note 1: The default name and layer of the aggregation correspond to the first species in the list.
If you wish to use a different species to provide the default name and layer, simply move that
species to the top of the list. This information can also be entered manually.
25
Note 2: Merged species are removed from the table. However, each merged species can be
returned to the table with the function ‘Undelete Species’ from the ‘Species’ menu. See Section
1.6.2.
1.6.2
Deleting and Undeleting Species and Relevés
To delete species from the table, give them a colour and select ‘Delete <colour> Species’ from
the ‘Species’ menu.
Species which have been deleted from the table or merged into an aggregation can be retrieved
using the ‘Undelete Species’ function from the ‘Species’ menu. This opens a list of deleted
species, which can be sorted by layer, name or time of deletion. Select the species to be restored
and press the ‘Undelete’ button. Multiple species can be selected with Ctrl+click. A block of
species can be selected by clicking on the first species and Shift+clicking on the last species.
Fig. 21: Window for undeleting species.
Relevés can also be deleted. From the ‘Relevé’ menu select ‘Delete <colour> Relevés’.
However, there is no way to restore a deleted relevé.
1.6.3
Sorting Species, Species Data and Relevés
Several types of sorting are available from the ‘Sorting’ menu. In addition to basic species and
relevé sorts, JUICE can also sort according to headers, average Ellenberg indicator values,
clusters calculated in PC-ORD etc.
1.6.3.1
Sorting Species and Relevés
From the ‘Sorting’ menu, choose either ‘Sort Species’ (Ctrl+D) or ‘Sort Relevés’ (Ctrl+U).
These functions sort species by relevés or relevés by species. The sorting hierarchy is according
to (1) frequency, (2) order of relevés (species) and (3) cover. This means that a species which
occurs in more relevés is ranked higher. If two species occur in the same number of relevés, the
one that occurs in the relevé listed first in the table is ranked higher. Two species that have the
same frequency and the same first relevé are ranked according to cover. An analogous system
applies to relevés.
Colours can be used to limit the list of species and relevés to be sorted.
26
Fig. 22: Windows for sorting species and relevés.
Note: The relevé ‘Sorting’ window has a check box for altering the sorting method. When the
box is checked, only frequency matters and the order of relevés with the same number of species
records will not be changed.
1.6.3.2
Other Species Sorting Functions
‘Sort Species Alphabetically’ can sort all species into alphabetical order or it can be restricted
to only sort the species of the selected colour.
‘Sort Species By Species Data’ sorts according to the information stored in the Species Data
Column. (See Section 1.7 for information on how to write data to this column.) This column can
contain many types of information such as layer, Ellenberg indicator value, frequency or any
other biological information about the species. The ‘Species Sorting Parameters’ window has
several options. The sort can be restricted to species of the selected colour or expanded to
include all species. Data can be sorted in alphabetical or numerical order and the order can be
ascending or descending.
Fig. 23: Window with species sorting parameters.
Note: Numbers should be sorted in numerical order (1, 2, 3, 11, 12, 13, 21, 22, 23) while text
strings must be sorted in alphabetical order. If the above numbers are sorted in alphabetical
order, the result is: (1, 11, 12, 13, 2, 21, 22, 23, 3).
‘Sort Species in Synoptic Table’ is available only in Synoptic Table Display mode. The
‘Sorting’ window has several options. Species can be sorted by various criteria such as
constancy, fidelity or average cover. Colour selection can be used to restrict the species
included in the sort. This function is described in more detail in Section 1.11.11.
27
‘Sort Species by Median Cover’ sorts species by the median of all non-zero cover values in
the table. In relatively large and diverse data sets this can be used for deducing the theoretical
abundance of each species under optimal conditions. The median cover value is not displayed
after sorting. To view the median cover value and other species information, select ‘Species
Statistics’ from the ‘Species’ menu. (To return to Standard Display mode, select ‘Species
Statistics’ again.)
‘Sort Species by Average Vegetation Richness’ is similar to the previous function. Average
vegetation richness (AVR) is calculated by averaging the number of species in all relevés in
which the species occurs. AVR is not displayed after sorting. To view AVR and other species
information, select ‘Species Statistics’ from the ‘Species’ menu. (To return to Standard Display
mode, select ‘Species Statistics’ again.)
‘Dependence Sorting’ uses interspecific associations as the main sorting criterion. Interspecific
associations between all possible pairs of species are calculated according to the selected
fidelity index. For each species, the average value of the selected fidelity measure of the most
similar species is calculated, and the data set is subsequently sorted by these average values.
The number of similar species considered can be 1, 3, 5, 10 or the calculation can include all the
species that occur in any relevé with the species in question.
Fig. 24: Sorting species by maximum fidelity values.
Warning 1: Check the estimated time of calculation. After pressing the ‘Continue’ button it is
not possible to cancel the process.
Warning 2: The average fidelity value is written into the species data field. This enables the
user to see the value, but it overwrites any existing species data. JUICE gives no warning
before it does this.
1.6.3.3
Other Relevé Sorting Functions
‘Sort Short Headers’ is useful when important relevé data are stored in the short headers.
Short headers can contain ecological information about the relevé, relevé number, number of
selected species or other information. To write information to the short headers, select ‘Store
Values To Short Headers’ from the ‘Head’ menu. (This information is described in detail in
Section 1.8.2.)
28
Note: Short headers are limited to 6 characters. Numbers should be sorted in numerical order
(1, 2, 3, 11, 12, 13, 21, 22, 23) while text strings should be sorted in alphabetical order. If the
example sequence above is sorted in alphabetical order, the result is: (1, 11, 12, 13, 2, 21, 22,
23, 3).
‘Sort Relevés by Header Data’ allows sorting according to any field in the header data. This
function includes the option to write the initial characters of the selected header data field to the
short headers (so the user can see the values according to which the relevés have been sorted)
and the option to add separators after each group of relevés with identical values.
Fig. 25: Sorting relevés by selected header data.
‘Sort Relevés by Clusters’ is used to display clusters computed by another program – either
PC-ORD or MULVA. With PC-ORD, the cluster information must be saved in a commadelimited file called ‘MATRIX2.CSV’. This file can be imported with the function ‘Sort
Relevés By Clusters (PC-ORD)’. With MULVA, the table should be exported as a MULVA
input file (from the ‘File’ menu, choose ‘Export’ and ‘Mulva Input File’). Once analysed in
MULVA, the resulting file, PRINDA (without suffix), can be loaded with the function ‘Sort
Relevés By Clusters (MULVA)’. The sorting window using PC-ORD outputs is shown here:
Fig. 26: Sorting species by PC-ORD clusters.
29
Double-clicking on the desired level of classification will sort the data set accordingly. The
‘Tree’ button can be used to display a simple clustering hierarchy. The Y-axis is not scaled in
this chart:
Fig. 27: Dendrogram of PC-ORD cluster analysis.
1.6.4
Autorepeat Function
When a new table is imported into JUICE, it is often necessary to merge species to aid analysis.
(See Section 1.6.1.) The user may also wish to delete species that are not of interest to the
current project. (See Section 1.6.2.) When new relevés are added to the original data set (e.g., in
TURBOVEG) it will be necessary to perform the same mergings and deletions in the newly
exported file. The ‘Autorepeat’ function, available from the ‘Species’ menu, can be used to
avoid the tedium of repeating the same editing operations in multiple files.
When the ‘Autorepeat Function’ window opens, press the ‘Add functions from WCT file’
button. This will allow you to select a previously edited file as a model for how the current file
should be edited.
30
Fig. 28: Autorepeat function.
The ‘Autorepeat Function’ window will then contain two lists. On the left is a list of the steps
that were performed to edit the selected file. On the right is a list of the species that were
affected by the highlighted step. Species prefaced by ‘???’ were present in the model file but are
not present in the current file.
Pressing the ‘Run Selected’ button will cause all the editing steps from the model file to be
performed on the current file. Alternatively, the user can choose, step-by-step, to either perform
the highlighted step (‘Run Step’) or skip it (‘Omit Step’).
Note: This function is most useful when the current table has exactly the same species as the
previously edited table. When the current table has additional species, the results will often be
unexpected. Suppose, for example, that the model file had Quercus robur in two layers that
were subsequently merged, but the current file has Quercus robur in three layers. After
performing the merge step from the model file, only two of the instances of Quercus robur will
be merged. The third must be merged manually. The optimal application of this function is to
perform the same merging, deleting, or undeleting criteria in different sub-sets of one large
data set or in the same data set after slight modifications of the source database.
1.7 Species Data
The second column with the light-grey background can hold additional species data (such as
layers, ecological characteristics or biological information) which can be used in sorting and
analysis. (Section 1.6.3.2 explains how to sort species by species data.) Species data can have
up to 50 characters; however not all the characters are displayed. By default, the Species Data
Column has a width of three characters. It can be enlarged in the ‘Display Parameters’ tab of the
‘Options’ window, as described in Section 1.5.8.
JUICE can write some information to the Species Data Column automatically. From the
‘Species’ menu, select ‘Species Data’. The functions available are explained below.
1.7.1
Layers
A species’s layer is expressed as a number from 0 to 9. It is recommended that you use the same
convention as the TURBOVEG database program:
31
0 – not defined; 1 – tree layer (high) ; 2 – tree layer (middle) ; 3 – tree layer (low) ; 4 –
shrub layer (high) ; 5 – shrub layer (low) ; 6 – herb layer (high) ; 7 – juveniles; 8 –
seedlings; 9 – moss layer.
Layer is the most important information about the species. It is displayed automatically at the
bottom Status Bar near the selected species’s name. Layer can be displayed in the Species Data
Column: from the ‘Species’ menu, select ‘Species Data’ and ‘Layer View’ or select the Layer
Icon on the Icon Bar. (See Section 1.5.1.) Layer can be displayed as a number, as text or both.
1.7.2
Frequency and Cover Values
The ‘Species Data’ submenu (from the ‘Species’ menu) has functions for writing ‘Frequency’,
‘Maximum Cover’ or ‘Median Cover’ to the Species Data Column. ‘Frequency’ is the
frequency of species occurrences in the data set. ‘Maximum Cover’ is the species’s maximum
cover value in the data set. ‘Median Cover’ is calculated from all non-zero cover values.
These statistics can also be viewed by selecting ‘Species Statistics’ from the ‘Species’ menu.
(To return to Standard Display, it is necessary to select ‘Species Statistics’ again.)
1.7.3
Sequence and Species Colour
The ‘Sequence’ function writes consecutive numbers into the Species Data Column. The ‘No.
of Species Colour’ function writes each species's current colour to the Species Data Column
according to the following code: 0 – black, 1 – red, 2 – blue, 3 – sea-green, 4 – green, 5 –
yellow, 6 – violet, 7 – grey.
1.7.4
Transformation of Species Data
Numerical values (n) in the Species Data Column can be replaced by their squares (n2), square
roots ( n ) or multiplicative inverses (1/n).
1.7.5
Statistics Summarizing Relevé Data
Short headers can contain data about the relevés such as means of Ellenberg indicator values,
sums of species statistics, Shannon-Wiener indices, potential heat load etc. (See Section 1.8.) A
statistic summarizing the short header data from the relevés in which the species occurs – such
as minimum, maximum, mean or median value – can be written to the Species Data Column.
From the ‘Species’ menu select ‘Species Data’ and ‘Short Header Data’. This gives a menu of
summarizing statistics to choose from.
1.7.6
Ellenberg Indicator Values
Ellenberg indicator values can be written to the Species Data Column: from the ‘Species’ menu
select ‘Species Data’ and ‘Indicator Value’. This opens a menu for selecting whether to display
indicator values for ‘Light’, ‘Moisture’, ‘Continentality’, ‘Temperature’, ‘pH’ or ‘Nutrients’.
Before using this function, it is necessary that the indicator values be defined. More information
on Ellenberg indicator values will be included in later editions of this manual.
1.7.7
External Species Data
Other species data can be imported into JUICE if they are in a suitable format. An example of a
simple text file (denoting ploidy level) accepted by JUICE is show below:
32
...
Aira caryophyllea
Aira praecox
Aira species
Ajuga chamaepitys
Ajuga genevensis
Ajuga pyramidalis
Ajuga reptans
Ajuga species
Alcea biennis
Alcea rosea
Alcea species
Alchemilla alpina
...
2, 4
2
4
4
4
4
2
8
Each line has the same number of characters. Species name and other information occupy the
same position.
From the ‘Species’ menu select ‘Species Data’ and ‘External Species Data’. Enter the name of
the file containing the external data. The following window will appear:
Fig. 29: Window for import of species data from external file.
Species names in the external data file and the current table must have the same nomenclature.
The ‘Parameters for species selection’ and ‘Species information’ bounds must be entered
manually. The first number tells JUICE where to find the first character of the field and the
second number tells JUICE where to find the last character. The scale displayed above the file
excerpt can be used as a guide. For example, the column below the first ‘1’ corresponds to
character number 10 and the column below the first ‘2’ corresponds to character number 20.
Warning 1: Make sure that the range entered under ‘Parameters for species selection’ is large
enough to include the longer species names. Ideally, the ‘Last character’ of the species name
should be the character immediately preceding the first column of data. If JUICE seems not to
be loading in data for species with longer names, this indicates the entered range may be too
small. Of course, specifying too large a range will also cause problems.
Warning 2: To ensure that the external data file will be readable, separate columns with spaces
and not with tabs. (Your text editor should be able to display the file in a fixed-width font, such
as Courier.) Even though a TAB may appear the same as several spaces, JUICE will interpret
33
it as a single character. This could result in nonsense in the Species Data Column or it could
make it impossible to tell JUICE where species names begin and end, resulting in a blank
Species Data Column.
Note: The example window shown above illustrates that the external data file can contain
several columns of data. You can choose which column to import simply by specifying the
range. Note that if the column contains only one character, the ‘First character’ and ‘Last
character’ values will be the same.
If the option ‘Connect selected data with [all] species’ is chosen, the designated data will be
imported into JUICE. It is also possible to choose to import data only for species of a certain
colour.
For example, the option ‘Mark [all] species with the value [arc (an abbreviation for
archeophytes)] with the colour [green]’ can be used to colour species according to external data
without actually importing the data. It is also possible to only re-colour species of a certain
colour. The example above will colour all species that have the abbreviation ‘arc’ in the
indicated column in the external data file.
1.7.8
Species Group Tables
In addition to the functions for writing data to the Species Data Column described above, the
‘Species Data’ submenu has four functions for displaying species group tables. Species group
tables are similar to synoptic tables, but constancy is defined not for groups of relevés, but for
groups of species. Each constancy row is identified by the name of the first species in the group.
The species data is displayed if it is the same for all species in the group; otherwise, the field is
filled with repetitions of the letter X.
Each constancy row has 6 characters. Digits are displayed vertically.
The species group table can display frequency (percentage values 0-100 %), categories (I-V),
total cover (aggregate cover values from 0 to 100 % are calculated as described in Section 1.6.1)
or absolute species numbers. To return to Standard Display, select ‘Species Group Table’ again.
Fig. 30: Species group tables.
34
1.7.9
Species Data Averages
Groups of species defined by separators can have different species data values. If these data are
numerical, it is possible to calculate averages, which can reveal differences between species
groups. To view averages of species data, open the ‘Species’ menu, select ‘Species Data’ and
‘Species Data Averages’.
1.7.10
Species Data Exports
Species data displayed in the Species Data Column can be saved into a simple text file, which
can then be imported into other tables as described in Section 1.7.7. From the ‘Species’ menu,
select ‘Species Data’ and ‘Export Species Data’. For more information, see Section 1.9.8.
1.8 Short Headers
Short headers can contain up to six characters displayed vertically above the table data. Not
limited to identification numbers, this field can contain any brief information about a relevé that
could be useful for relevé identification, classification or sorting. Various functions for
specifying what is displayed in the short headers are found in the ‘Head’ menu. Relevés can be
sorted according their short headers as explained in Section 1.6.3.3.
1.8.1
Identification Numbers
The ‘Head’ menu has functions for displaying any of four different relevé identification
numbers:
•
The ‘Running Number’ of a relevé tells what order it was in when the table was
first imported. This number is displayed by default.
Note: This number is not constant. When relevés are deleted from the table, the
running numbers of the remaining relevés are updated, but the relative order of the
running numbers remains unchanged. For example, if three relevés of lower running
number are deleted, relevés 44 and 45 will be re-numbered 41 and 42. The name
‘running number’ refers to the fact that this is the internal order in which JUICE
processes or ‘runs through’ the relevés.
•
•
•
1.8.2
A relevé’s ‘Turboveg Number’ is a constant, unique relevé identification number
important for TURBOVEG users or other users who have their relevés identified by
special numbers.
When ‘Group Number’ is selected, every relevé in the first group is given the
number 1, every relevé in the second group is given number 2 and so on. (Groups are
defined by separators placed by the user. See Section 1.5.4.) If a relevé is moved to a
different group, its group number will not change until this function is selected
again.
When ‘Sequence Number’ is selected, all relevés are re-numbered in the order they
currently appear. If a relevé is moved, its sequence number will not be updated until
this function is selected again.
Other Short Header Values
Short headers can contain up to six characters of information about the relevé. They can be used
to distinguish relevé groups in the data set and define them with separators or colours (as
described in Section 1.8.3). The functions described below are found in the ‘Head’ menu under
‘Store Values To Short Headers’.
35
1.8.2.1
Number of Species
The function ‘Count <colour> Species’ counts all species of the selected colour (which could
correspond to all mosses or trees, for example). Species with the same name originally recorded
in several different layers are virtually merged and counted only once.
1.8.2.2
Percentage Cover
The function ‘Percentage Abundance Of <colour> Species’ calculates total percentage cover of
the selected species. This can be used to distinguish relevés in which the selected group of
species is dominant from those relevés in which the group plays a marginal role. The total cover
is calculated on the assumption that species covers can overlap and that they do so
independently. See Section 1.6.1 for an example.
1.8.2.3
Short Headers with Header Data
The ‘Header Data’ function allows the user to write header data to the short headers. Any
header data can be stored in the short headers; however, because the short headers can not
display more than six characters, some header data fields (such as locality, geology or remarks)
are not appropriate for conversion.
Fig. 31: Moving first part of selected header field into sort headers.
1.8.2.4
Shannon-Wiener Index and Evenness
The functions ‘Shannon-Wiener Index’ and ‘Equitability’ write these values to the short
headers. The Shannon-Wiener index is one of several measurements of biodiversity (Hill 1973).
It takes into account the number of species and the evenness of the species. The index is
increased either by having more unique species, or by having a greater evenness.
S
H ′ = −∑ pi ln pi ,
(Eq. 1)
i =1
where S is the number of species and pi is the proportion of the individual species cover relative
to the total cover.
The program calculates two different measures of evenness:
Shannon’s equitability (EH) proposed by Pielou (1975) is calculated by dividing H' by H'max.
(Here H'max = lnS.) Equitability has a value between 0 and 1, with 1 representing complete
evenness:
′ = H ′ ln S .
EH = H ′ H max
(Eq. 2)
36
This value is also displayed in the Relevé Overview Window (see Section 1.5.6) which can be
opened by double-clicking on the short header.
The second measure of evenness available in JUICE is Evar which is equivalent to the arctan
transformed Gaussian width (Smith & Wilson 1996):
(Eq. 3)
1.8.2.5
Geographical Position Index
The ‘Geographical Position Index’ calculates a virtual grid, assigns the same number to relevés
in the same square and writes this number to the short headers.
Such spatial stratification of table data is available if the header data contain information about
geographical coordinates. The fields LATITUDE and LONGITUDE (both 6, or both 7
characters) must be included in the header data (files with suffix STR and EXP – see Section
1.4.6).
Example 1:
LATITUDE:
LONGITUDE:
491357
163420
= 49°13'57"
= 16°34'20"
Example 2:
LATITUDE:
LONGITUDE:
0491357
0163420
= 49°13'57"
= 16°34'20"
Selecting this function opens this window:
Fig. 32: Window for calculation of grid cell relative numbers.
The window is used to define the size of the grid spacing. The default values can be altered
according to your project requirements. When you press ‘Continue’, the program will calculate
an index for each grid cell and the indices will be written to the short headers.
The ‘Group aggregation support’ checkbox is useful when the data are divided by separators.
When the box is checked, each relevé group is analysed as a stand-alone data set.
Note: The grid indices do not indicate relative position. The square containing the first relevé is
assigned the index 1. The square containing the first relevé that is not in square 1 is assigned
the index 2 and so on. Thus relevés with consecutive indices are not necessarily in adjacent grid
boxes on the virtual map.
1.8.2.6
Potential Annual Direct Irradiation (PADI) And Heat Load
The function ‘Potential Annual Direct Irradiation And Heat Load’ can be used to calculate
PADI or heat load for relevés based on slope, aspect and latitude as proposed by McCune and
Keon (2002).
37
There are three available models:
Model 1: ln(Rad, MJ · cm–2 · yr–1) = –1.467 + 1.582 * cos(lat) * cos(slo) – 1.500 *
cos(asp) * sin(slo) * sin(lat) - 0.262 * sin(lat) * sin(slo) + 0.607 * sin (asp) * sin(slo)
Model 2: ln(Rad, MJ · cm–2 · yr–1) = –1.236 + 1.350 * cos(lat) * cos(slo) – 1.376 *
cos(asp) * sin(slo) * sin(lat) - 0.331 * sin(lat) * sin(slo) + 0.375 * sin (asp) * sin(slo)
Model 3: Rad (MJ · cm–2 · yr–1) = 0.339 + 0.808 * cos(lat) * cos(slo) - 0.196 * sin(lat) *
sin(slo) - 0.482 * cos (asp) * sin(slo),
where ‘asp’ is aspect, ‘slo’ is slope and ‘lat’ is latitude.
Fig. 33: Calculation of potential direct incident radiation and heat load.
The window allows the user to select a model and test it on sample data. The user may then
choose whether to write radiation or heat load to the short headers. For relevés which lack
information about latitude, slope and aspect, a null value is written.
Note: For more information, read the original paper of McCune and Keon (2002). Latitude
should be included into header data (See the Section 0).
1.8.2.7
Sum, Average, Minimum, Maximum and Multiplication of Species Data
There are several functions for summarizing numerical species data in the short headers.
‘Average of <colour> Species Data’ calculates the average over all species of the indicated
colour in the relevé. Sum, Maximum and Minimum functions are similar.
‘Multiplication Of Species Data Values’ is an average calculated as follows:
38
SD1 ⋅ SD2 ... ⋅ SDn
,
(mean SD) n
(Eq. 4)
where n is the number of species in the relevé, SDi is the species data value for species i and
mean SD is the average of species data values taken over all species in the table.
These functions apply to the species data currently in the Species Data Column. See Section 1.7
for more information about species data, including how to write values to the Species Data
Column. These functions are only useful for analysing numerical species data.
1.8.2.8
Ellenberg Indicator Values
Ellenberg indicator values can be written to the short headers. More information on Ellenberg
indicator values will be included in later versions of this manual.
1.8.2.9
Importing External Short Header Data
External header data can be imported from a text file. From the ‘File’ menu, select ‘Import’ and
‘Short Headers’. The data file must have a column of relevé numbers (6 characters) paired with
a column of short header values (6 characters). Short header files in this format can be exported
from JUICE: from the ‘File’ menu, select ‘Export’ and ‘Short Headers’. (See also Section
1.9.9.)
The ‘Import Short Headers’ window is shown below:
Fig. 34: Window for import of short headers.
The ‘Open’ button opens a browse window for finding the file with appropriate header data.
The colour in the ‘for relevés’ field restricts which short headers will be updated. The ‘Source
positions’ fields are used to specify the beginning and end of the header data in the source file,
while the ‘Destination positions’ specify the position in the short header. In the example above,
2 digits, the fifth and sixth characters after the relevé identification number, will be stored at the
first and second position of the short head. The third through sixth characters of the short head
will not be overwritten.
Note: If you respect the convention of reserving 6 characters for header data, you can combine
several header data values for one relevé. For example, it is possible to use one file to import
class number (2 digits) into the first two characters and another file to import year (4 digits)
into the last four characters of the short header field. This will enable you to sort the table with
classes as the main criterion and year as the secondary criterion.
39
1.8.3
Colouring Relevés According to Short Header
Relevés do not have to be coloured manually. It is possible to colour them according to the data
in the short headers. From the ‘Head’ menu, select ‘Short Header Selection’. This opens the
window shown below. Choose a colour, enter a value and specify whether to mark headers
greater than, less than or equal to the entered value.
Fig. 35: Short header selection window.
Note: Alphabetical comparison should be used with text and numerical with numbers. The
example below shows what happens when numbers are compared alphabetically:
Numerical comparison: 12.345 > 9.8765
Alphabetical comparison: "12.345" < "9.8765"
With numerical comparison, text is interpreted as a number. If the text contains no digits, it has
a value of zero.
1.8.4
Short Header Averages, Minima and Maxima
JUICE can measure the average, minimum or maximum value of the short headers within each
group of relevés. (Groups are defined by separators. See Section 1.5.4.) From the ‘Head’ menu,
select ‘Short Header Averages’. The window shown below will appear. By default, the average
value of the short header across each group is displayed. There are option buttons for displaying
the average, the minimum, or the maximum. The list of values is also copied onto the clipboard.
It can be pasted into a text editor with the command Ctrl+Insert or Ctrl+V.
40
Fig. 36: Averages, minima and maxima from short headers calculated for each constancy column of the table.
1.8.5
Short Header Sorting
It is often desirable to sort relevés according to some criterion. First, the values under
consideration should be written to the short headers as described in Section 1.8.2. Then, from
the ‘Sorting’ menu, select ‘Sort Short Headers’. For more information on sorting, see Section
1.6.3, especially Section 1.6.3.3.
1.9 Exporting Data
JUICE can produce several types of data – phytosociological tables, synoptic tables, ecological
information about relevés or species, etc. To make this information available for use by other
programs, JUICE supports many types of exports.
1.9.1
Saving Files in JUICE
Once the source table data are imported into JUICE, they can be saved in JUICE’s format,
which may include extra parameters. From the ‘File’ menu, select ‘Save’ and enter a name for
the file. Actually, three files are generated when a table is saved: a WCT, an STR and an EXP
file. The WCT file has a special binary structure not suitable for manual editing, but the other
two are simple text files containing header data in the same form as they were imported. See
Section 1.4.6.
Note: Although the ‘File’ menu does not explicitly have a ‘Save As’ option, ‘Save’ actually
works the way ‘Save As’ does in many other programs. A dialog box will open and you will
have the opportunity to either confirm that you want to save the file under its current name or to
enter a new name. Thus it is possible to save an altered file under a different name without
overwriting an older version of the file. Furthermore, before JUICE overwrites an existing file,
it asks for confirmation.
41
1.9.2
The Current Export File
JUICE’s standard export is a rich text format (RTF) file to which subsequent exports are
appended without overwriting previous exports. This is useful for exporting running results
from interspecific associations or COCKTAIL analysis, for example. The file into which JUICE
will export appears at the top of the ‘Export’ menu (available from the ‘File’ menu). Clicking
on this ‘Current File:’ function opens a window where the current export file name can be
changed. If the name is not changed but the ‘Save’ button is pressed, JUICE interprets this as a
command to wipe the export file clean and start over. (JUICE asks for confirmation before
erasing the contents.) Another way to access this window is through the ‘Export’ tab of the
‘Options’ window: clicking on the ‘Change File’ button will open the export file name window.
1.9.3
Table Export
From the ‘File’ menu, select ‘Export’ and ‘Table’. This will open the ‘Table Export’ window,
which has several options, as can be seen in the picture below.
The ‘File format’ box offers several different export formats. The default, ‘MS WORD (SDF)’,
appends the table to the RTF file described in the previous section. All other formats prompt the
user for a file name and export the data to this new file (overwriting any previous file of the
same name).
An ‘MS EXCEL (CD)’ export will generate a stand-alone CSV file accepted by spreadsheet
programs. (See Section 1.4.4.) This table is divided into two parts: table and header.
An ‘MS ACCESS’ export produces three files: SPECIES.TXT, which contains species names,
layers and Ellenberg indicator values (if they have been imported), TABLE.TXT with table data
(species number, relevé number and percentage cover) and HEADER.TXT with all header data.
(These are only the default names; the user can change them.) These files can be imported into a
database program and connected as three tables.
A ‘TEXT FILE’ export saves the file as simple text (TXT). (See Section 1.4.5.)
A ‘CSV HEAD+TABLE’ creates a spreadsheet table. Whereas the ‘MS EXCEL (CD)’ export
has header information at the end, this export has header information at the beginning.
Furthermore, the former format presents header data by listing one relevé’s data per row,
whereas this format lists one field per row with each row containing each relevé’s data value for
that field.
42
Fig. 37: Window for table exports.
It is possible to restrict export to relevés of a certain colour. The ‘Species Exported’ box gives
the option of exporting all species in the table or only those species which appear in the selected
relevés.
Note: Exporting all species can be useful. To export a large table for printing, select a screenfull of relevés at a time and export all species. When the resulting files are printed out, the
species lists will be complete and the printouts can be physically spliced together.
The standard RTF export (‘MS WORD (SDF)’) file can contain separators. There is also the
option (again, only for RTF export) to include only species which appear in at least 2, 3 or 4
relevés, listing the rarer species below the table in condensed form. The length of the species
name can be limited, with a maximum length from 4 to 50 characters.
JUICE remembers original percentage cover values as whole numbers (1-95), but they are
replaced by single characters during export (except for the ‘MS ACCESS’ format, where
percentage numbers are exported). The list in the ‘Table Export’ window contains a list of
percentages (‘Perc. value’) on the left paired with the character to be exported (‘Phyt. code’). To
change an export character, double-click on the corresponding percentage value. Newly defined
scales can be saved for future use by pressing the ‘Save’ button. Later, they can be loaded with
the ‘Load’ button.
1.9.4
Synoptic Table Export
From the ‘File’ menu, select ‘Export’. If JUICE is in Synoptic Table Display mode (see Section
1.11) the ‘Synoptic Table’ export function will be available. This provides two possibilities to:
1. Export the synoptic table into the current RTF export file for presentation or
publication.
2. Export the synoptic table into a Cornell condensed (CC!) file for analysis by another
program such as CANOCO (ter Braak & Smilauer 2002) or PC-ORD (McCune &
Mefford 1999). This option is available only when a ‘Percentage Constancy’
synoptic table is displayed.
43
Option 1 opens the following window, where the parameters of exporting the table may be
modified:
Fig. 38: Window managing synoptic table export.
Synoptic tables may be saved in single or combined form. (See Section 1.11.9.) All data will be
saved similarly to the way they are displayed on the screen.
1.9.5
Other Exports into the RTF Export File
The current RTF export file is opened for running exports of interspecific associations created
during COCKTAIL classification and Matching. More information about COCKTAIL
classification is written in the Chapter 2.3.
1.9.6
Special Export Formats
The ‘Export’ submenu of the ‘File’ menu includes the option to export the table in a variety of
other special formats, enabling the data processed by JUICE to be analysed more precisely. The
program supports table export as a Cornell condensed file, a MULVA input file, SYN-TAX
files or a MATLAB file. A text export of similarity indices of relevés to constancy columns is
available from the menu ‘Analysis’ and ‘Matching’ (See the Chapter 2.4.2.3).
1.9.7
Export for D-MAP File
D-MAP (Morton 2005) is simple GIS software which is very useful for presentation of spatial
data on a national or regional scale. In comparison with sophisticated GIS software, it gives
faster and generally better results because small, clear maps with reduced details for publication
are usually required for publication. JUICE supports easy communication with D-MAP.
The header data must contain LATITUDE and LONGITUDE fields represented as six or seven
characters corresponding to degrees, minutes and seconds (as explained in Section 0).
The D-MAP software must be installed on the computer. The file group setup of D-MAP will
help to create group ‘JUICE <title>’ with manually defined boundaries and parameters.
Distribution data will be stored in the JUICE.DIS file.
Parameters such as frame, grid spacing and symbol size must be stored in the PAR file in
D-MAP.
From JUICE’s ‘Options’ window, select the ‘External Program Paths’ tab and define the
D-MAP path. This will allow you to run D-MAP automatically after export selection.
JUICE can export spatial data for three different parameters for: selected species (to see the
distribution of selected species), a group of selected relevés (to see the spatial distribution of a
vegetation type) or all species in the table.
44
Fig. 39: Example of the distribution map created by D-MAP.
1.9.8
Species Data Export
Species data (see Section 1.7) imported or created manually (see Section 1.5.7) can be saved as
a text file for future use. These data can then be imported into similar tables. The export file has
the following structure (species name, layer and species data value):
Fallopia convolvulus
Lapsana communis
Silene latifolia subsp. alba
Viburnum opulus
Sorbus aucuparia subsp. aucuparia
Ranunculus sceleratus
Populus x canadensis
Epilobium ciliatum
Pinus nigra
1.9.9
6
6
6
4
4
6
1
6
1
arc
arc
arc
nat
nat
nat
neo
neo
neo
Short Header Export
Header data can be exported into a simple text file for later retrieval. See Section 1.8.2.9. The
file contains the relevé number, short header value, group number and a 1 or 0 representing
presence or absence of a separator to the right of the relevé:
400001;
400002;
400003;
400004;
400005;
400006;
400050;
400051;
400052;
400053;
400054;
400055;
40;
46;
53;
58;
40;
48;
52;
38;
53;
52;
73;
56;
1
1
1
2
2
2
3
3
3
4
4
4
;
;
;
;
;
;
;
;
;
;
;
;
0
0
1
0
0
1
0
0
1
0
0
0
45
1.10 The Fidelity Concept
Chytry, M., Tichy, L. & Holt, J.
Statistical fidelity measurements are useful for measuring species concentration in vegetation
units and comparing diagnostic values among species in a particular vegetation unit or among
vegetation units for a particular species. A completely statistical approach to determination of
diagnostic species by measuring fidelity, proposed by Chytrý et al. (2002), is included in
JUICE. The program has 13 different fidelity measures available from the ‘Fidelity measures’
tab of the ‘Options’ window. (See Section 1.10.3.) They are for use in synoptic tables as
described in Section 1.11.
1.10.1
Fidelity Measures
The fidelity measures available in JUICE can consider either binary presence/absence data or
quantitative cover data. For simplicity, only four fidelity measures, using presence/absence data,
will be discussed in this section. Measures that take cover into account will be discussed in
Section 1.10.6. For details on other fidelity measures, refer to Chytrý et al. (2002).
Here the same notation is used as in Bruelheide (1995, 2000) and Chytrý et al. (2002):
N … number of relevés in the data set,
Np … number of relevés in the target vegetation unit,
n … number of occurrences of the species in the data set,
np … number of occurrences of the species in the target vegetation unit.
(To see how these quantities are defined when quantitative cover data are taken into account,
see Section 1.10.6.)
a) The u value for a hypergeometric distribution (Chytrý et al. 2002), further referred to as
uhyp, compares the observed number of occurrences of the species in the vegetation unit (np)
with the expected number of occurrences (μ = n ·Np / N). The fidelity values calculated using
this coefficient are not influenced by species cover or abundance (unless n and np are defined as
in Section 1.10.6). The u value is defined as the deviation of the observed frequency of the
species occurrence in the vegetation unit from the expected frequency, compared with the
standard deviation:
u hyp = (np – μ) / σ hyp .
(Eq. 5)
The measure counts the number of standard deviations between the observed data and the result
expected under the null hypothesis that species occurrences are independent of the target
vegetation unit. Thus uhyp provides a measure of the statistical significance of the observed
relationship. It can take on positive or negative values with the range depending on the number
of relevés in the dataset. The maximum u value, N − 1 , is achieved when Np = n = np. Fidelity
rankings according to uhyp will be identical to rankings according to chi squared or the phi
coefficient.
b) The phi coefficient of association between species and vegetation units (Sokal & Rohlf
1995, Chytrý et al. 2002) is a statistical measure of association between two categories, which
can be used as measure of fidelity. It can be defined as:
Φ=
uhyp
N −1
=
N ⋅ np − n ⋅ N p
n ⋅ N p ⋅ ( N − n) ⋅ ( N − N p )
.
(Eq. 6)
46
Traditionally, the phi coefficient considers only presence/absence, so fidelity values calculated
using this coefficient are not influenced by species cover or abundance. The values of the phi
coefficient range from –1 to 1, but for convenience, they are multiplied by 100 in the program.
The highest phi value of 1 is achieved if the species occurs in all relevés of the vegetation unit
and is absent elsewhere. A positive value lower than 1 means that the species is absent from
some relevés of the vegetation unit or present in some relevés outside the vegetation unit. A
value of 0 is obtained when the relative frequency of the species in the vegetation unit equals
the relative frequency in the rest of the dataset, thus indicating no relation between the target
species and the target vegetation unit.
An advantage of the phi coefficient over some other statistical fidelity measures is its
independence of data set size. On the other hand, the phi coefficient contains no information
about statistical significance.
The phi coefficient (along with u value and χ2) is more or less dependent on the relative size of
vegetation units. If the target vegetation unit represents 10% of the total data set (Fig. 40a), Φ is
relatively high for species that are not very common within the target unit, provided the species
are very rare outside the target unit. However, for species that are common outside the unit,
even the species with high frequency within the target vegetation unit are given low phi values.
On the other hand, if the target unit makes up 50% of the total data set (Fig. 40b), species must
generally have higher frequencies within the target unit in order to have high phi values; if a
species has a high frequency within the target unit, a relatively high phi value can be attained
even with a smaller difference in frequency between the target and other units.
Fig. 40: Dependence of the phi coefficient on the relative frequency of species occurrences within (vertical axis)
and outside (horizontal axis) the target vegetation unit, shown for vegetation units equal to (a) 10% and (b) 50% of
the size of the total data set.
c) The Dufrêne-Legendre Indicator Value (Dufrêne & Legendre 1997) is defined as the
product of relative species abundance and relative species frequency within the target vegetation
unit. Relative species abundance is the mean abundance of the species in the target vegetation
unit compared to all vegetation units in the data set; the sum of mean abundances in each
vegetation unit is used instead of the sum of actual abundances over all relevés in order to
remove the effect of unequal vegetation unit size. JUICE only computes the Dufrêne-Legendre
Indicator Value for presence/absence data, which means that the relative abundance is replaced
47
by the relative frequency in the target vegetation unit divided by the sum of relative frequencies
in all vegetation units of the data set. For a comparison between a target vegetation unit and the
rest of the data set, the Dufrêne-Legendre Indicator Value can be expressed as:
IndVal =
np N p
⋅
np
n p N p + (n − n p ) ( N − N p ) N p
.
(Eq. 7)
This formula can be easily extended to a comparison of vegetation units within the classified
data sets by replacing the species frequency outside the target vegetation unit,
(n − n p ) ( N − N p ) , in the denominator, by the sum of relative frequencies in all the other
vegetation units of the given typology.
The Dufrêne-Legendre Indicator Value is independent of the relative size of the target
vegetation unit. It implicitly standardizes the size of all vegetation units in the data set,
including the target vegetation unit. All vegetation units are weighted equally, and changing Np
does not influence the resulting numerical value.
The categorical form of the Dufrêne-Legendre Indicator Value probably deviates from most
researchers’ intuitive expectations of the properties of a suitable fidelity measure. The next
figure shows that the Dufrêne-Legendre Indicator Value gives a rather high weight to common
species. It could be said, however, that the Dufrêne-Legendre Indicator Value is a fidelity
measure which emphasizes the group’s fidelity to the species, i.e., the value is a good indicator
of how frequent the species is within the vegetation unit but it is less affected by occurrences of
the species outside the vegetation unit.
Fig. 41: Dependence of the Dufrêne-Legendre Indicator Value on the relative frequency of species occurrences
within (vertical axis) and outside (horizontal axis) the target vegetation unit.
Note: The Dufrêne-Legendre Indicator Value’s relationship to independence can be seen by
comparing Fig. 40 (a or b) with Fig. 41. In each figure, the diagonal from the lower left to the
upper right is the case of independence – the species is as frequent inside the vegetation unit as
it is outside the vegetation unit. Note that this diagonal corresponds to the Φ = 0 isoline in Fig.
40 but it is crossed by the isolines in Fig. 41. IndVal assigns this diagonal a value of p/2 (where
p = n/N) as can be seen from where the 0.2 and 0.4 isolines cross it.
48
d) Fisher’s exact test calculates P(f(o) ≥ np), the true probability of obtaining the observed
number of occurrences of the species in the vegetation unit under the null hypothesis of
independence. It may yield very small probability values, including those smaller than 10–100,
which are difficult to cope with in practical work. For this reason, – log10 P(f(o) ≥ np) is a more
practical quantity to use for a measure. Fisher’s exact test is used either as a stand-alone fidelity
measure or as a correction for calculation of missing information on statistical significance if
the fidelity synoptic table with phi coefficient is displayed.
Note: Negative values of fidelity represent information which is not important in the context of
most studies. Negative values are displayed only in the ‘Interspecific Associations’ window.
(More on interspecific associations will be included in later versions of this manual.) They are
hidden in synoptic tables.
1.10.2
Fidelity Measurements for Vegetation Units of Unequal Size
All the fidelity measures included in JUICE, except the Dufrêne-Legendre Indicator Value, are
affected by the relative size of vegetation units. Unfortunately, nearly every classification of
relevés yields vegetation units of different sizes. To remove the dependence of the fidelity
measures on the vegetation unit size, it is better to make a virtual standardization of the target
vegetation unit (Np) to a new value, hereafter called Np′, which is constant for all vegetation
units within the data set, without changing species frequencies within and outside each target
vegetation unit, i.e., the quantities np / Np and (n – np) / (N – Np), respectively. For example, in a
data set with two vegetation units, we can set Np′ = N/2, i.e., equal to half of the total size of
the data set, which enables us to compare the two vegetation units as if they were of the same
size. Thus the resulting fidelity values are less dependent on the sampling effort and data set
structure. Similarly, in a data set with four vegetation units, we can set Np′ = N/4. However, it
is not necessary that the sum of Np′ values for all vegetation units within the data set equal N,
the total size of the data set. For example, in a data set of four vegetation units, we can set Np′
= N/2 and compute a fidelity measure for the first vegetation unit as if this group were 50% of
the total data set size and the other three groups together were also 50%. We can then compute a
fidelity measure for the second vegetation unit as though it were 50% of the total data set size
and so on. Such standardizations make sense in combination with the phi coefficient, but not so
much with uhyp or other statistical fidelity measures because data standardization violates their
relationships to statistical significance.
A scheme of different standardizations of the size of vegetation units is presented in the next
figure. Each line represents a data set, segments are vegetation units labelled A, B, C and D and
segment length corresponds to the number of relevés in each group. The thick part of each
segment represents relevés with occurrence of the given species; the thin part represents relevés
where the species is absent. In figures (b) to (d), the four lines represent the four
standardizations used for calculation of species fidelity to the target vegetation units A, B, C
and D.
49
Fig. 42: A scheme of different standardizations of the size of relevé groups. Each line represents a data set,
segments are groups labelled A, B, C and D and segment length corresponds to the number of relevés in each
group. The thick part of each segment represents relevés that contain the given species, the thin part represents
relevés where the species is absent. In figures (b) to (d), the four lines represent the four standardizations used for
calculation of species fidelity to the target groups A, B, C and D.
Part (a) of the figure shows a simple artificial data set with vegetation units of unequal size. The
phi coefficient depends on the size of the vegetation units. Standardizing the data set removes
this dependence. After the standardizations in Fig. 42c or Fig. 42d, the fidelity measure depends
only on the relative frequencies within each relevé group. The standardized size of the target
vegetation unit can differ from the size of the other vegetation units (Fig. 42c) or be the same as
the other vegetation units (Fig. 42d). The phi values after such standardization are entirely
independent of the size of the vegetation units and can be directly compared across different
vegetation units.
In some cases, however, it may not be desirable to standardize the size of all vegetation units in
the data set. If diagnostic species for a few similar community types are determined using a
large database, it may be useful to perform fidelity calculations with a data set that also includes
relevés from other, unrelated community types (Chytrý et al. 2002). This approach finds
diagnostic species that are of more general validity because they are tested against the
background of other community types in the same geographical area. The additional relevés are
usually treated (theoretically) as a single vegetation unit. Standardization to the size of other
vegetation units would greatly and undesirably reduce its effect. However, its size can be held
constant while the size of the other groups is standardized.
The phi coefficient applied to a data set with vegetation units standardized to equal size is
independent of the actual differences in size of individual vegetation units. However, it depends
on the standardized size of the target vegetation unit (Np′), which may be either equal to the
50
size of the other vegetation units or set to any arbitrary value between 1 and N − 1 . Setting the
standardized size of the target vegetation unit (Np′) to a higher value gives a higher weight to
common species and their frequency in the target vegetation unit. By contrast, setting Np′ to a
lower value gives a higher weight to rare species and to the differences in species frequency
within and outside the target vegetation unit. Changing the Np′ value can thus be used as a tool
for modifying the properties of the phi coefficient with respect to weighting common or rare
species.
The dependence of the phi coefficient on the relative size of the target vegetation unit can be
tested in JUICE. See Section 1.10.3 below and Section 1.11 on synoptic tables.
1.10.3
Selecting Fidelity Measures and Standardization in JUICE
The current fidelity measure is displayed on the Option Button on the left side of the Icon Bar.
(See Section 1.5.1.) Pressing this button opens the ‘Fidelity measures’ tab of the ‘Options’
window.
Fig. 43: Selecting a fidelity measure from the ‘Fidelity measures’ tab of the ‘Options’ window.
The user can select one of thirteen different fidelity measures, which are used to analyse
presence/absence or quantitative data in association with various program functions (such as
fidelity synoptic tables, interspecific associations or the COCKTAIL method).
JUICE versions 6.3.57 and higher have relevé group size standardization as discussed in Section
1.10.2 above. The parameters of standardization can be adjusted in the ‘Fidelity measures’ tab
of the ‘Options’ window.
51
Fig. 44: Selecting a standardization method and ‘Presence/absence’ versus ‘Average cover’ from the ‘Fidelity
measures’ tab of the ‘Options’ window.
Option A is to use the given data without standardization. Option B standardizes the size of the
vegetation unit relative to the rest of the dataset. Option C has two steps: (1) it sets the target
group to the indicated size and then (2) sets all the other groups (or all but the last) to be the
same size as each other. The picture on the right side of the frame graphically represents the
chosen standardization applied to a dataset divided into four vegetation units.
Warning: Because the Dufrêne-Legendre Indicator Value implicitly standardizes the data set, it
is only available with option C. A side-effect is that when the user scrolls through the list of
measures, JUICE automatically switches to option C when ‘Dufrene and Legendre’ is
highlighted. If a different standardization is desired (for a different measure) it must be reselected manually. Similarly, highlighting ‘Dufrene and Legendre’ will cause JUICE to switch
from ‘Average cover’ to ‘Presence/Absence data’.
Note 1: The data standardizations are available only for synoptic tables and related functions;
thus they are only applicable to classified or partly classified datasets. All other functions using
fidelity as a statistical measure (such as COCKTAIL classification and Interspecific
associations) use the original data.
Note 2: You can test the standardization with real data. From a synoptic table with fidelities
(see Section 1.11) open the ‘Fidelity measures’ tab of the ‘Options’ window. Changing the
parameters will change the fidelity values in the synoptic table, and you will have a clear
overview of what happens to your data after standardization.
Checking the Fisher’s exact test check box excludes phi coefficient fidelity values which are not
statistically significant: they are assigned a fidelity of 0. The level of significance can be
chosen.
1.10.4
Fidelity Tests
This function is included for users who would like to test fidelity measures with theoretical
values. From the ‘Help’ menu select ‘Fidelity Measure Test’. This opens the following window:
52
Fig. 45: Window for testing fidelity measures.
The fidelity measures in JUICE depend on four parameters:
N … number of relevés in the data set,
Np … number of relevés in the target vegetation unit,
n … number of occurrences of the species in the data set,
np … number of occurrences of the species in the target vegetation unit.
The program uses the fidelity measure that has been selected from the ‘Fidelity measures’ tab of
the ‘Options’ window. (See Section 1.10.3.) The current measure is displayed in the ‘Test
Fidelity Measure Yourself’ window and on the Option Button on the Icon Bar.
Note 1: Standardization methods for the phi coefficient, available from the ‘Fidelity measures’
tab, do not affect this calculation.
Note 2: The fidelity value is copied onto the clipboard and it can be pasted into other programs.
1.10.5
Tests of Data Structure Using Different Types of Standardization
JUICE also has a function for visualising the effect of data standardization on the phi
coefficient. From the ‘Help’ menu, select ‘Advanced Fidelity Measure Test’.
53
Fig. 46: Window for visualising ‘The influence of data standardisation on fidelity values’.
The window contains a contour diagram depicting the dependence of the fidelity measure (phi
coefficient) on the relative frequency of species occurrences within (vertical axis) and outside
(horizontal axis) the target vegetation unit. This diagram depends on the relative size of the
vegetation unit, a parameter which begins at 10% and can be adjusted by the user. The curves
are phi value isolines of -0.9, -0.8 ... 0.9. Each dot is a species frequency inside and outside the
selected first vegetation unit. The user can select parameters and graphically test each
vegetation unit.
1.10.6
Quantitative Fidelity Measures
JUICE (versions 6.3.66 and higher) can calculate fidelities not only from presence/absence data
but also from quantitative cover values. For quantitative calculation, variables are defined as:
n … sum of all covers of the species in the data set,
np … sum of all covers of the species in the target vegetation unit.
Covers range in the interval [0,1].
The fidelity measure calculations are analogous to those described above in Section 1.10.1.
The choice between presence/absence and quantitative fidelity measurement is available from
the ‘Options’ window. (See Fig. 44.)
Note: Quantitative fidelity measures are only available for synoptic tables. Functions
‘COCKTAIL Groups’ and ‘Interspecific Associations’ are calculated using presence/absence
data.
54
1.11 Synoptic Tables
Synoptic tables summarise the results of any classification of relevés. Therefore, they are one of
the basic results of all phytosociological analyses and studies. They give an overview of
classified vegetation units in the data set and help the researcher understand sophisticated
relations among species in context with environment. Synoptic tables can contain several types
of information which can be used for additional sorting of species and analysis of diagnostic,
constant and dominant species. JUICE supports many different types of synoptic tables, which
can be used separately or in combination.
The columns of the synoptic tables are defined by the separators in the standard table.
Separators are placed or removed by holding down the Shift key and clicking on a relevé with
the left mouse button. (See Section 1.5.4 for more details.) To display a synoptic table, select
the type of table from the ‘Synoptic Table’ menu. To return to Standard Table Display, select
that type of table again.
1.11.1
Synoptic Table Display
The Synoptic Table Display has the same three parts as the Standard Table Display (species,
short headers and synoptic table data – see Section 1.5.1). Mouse functions in the synoptic table
are described in Section 1.5.2. Several menu items are not available in Synoptic Table Display
mode.
Note: Columns in the synoptic table can be moved by clicking and dragging just as you do with
relevés in Standard Table Display mode. This gives a way to move a block of relevés without
using colours. Simply delimit the block with separators, switch to a synoptic table, move the
column, and switch back.
Values that exceed a certain threshold are highlighted. These thresholds can be set in the
‘Synoptic tables’ tab of the ‘Options’ window. It is also possible to select the highlighting
colours as well as to turn the highlighting feature on or off.
Fig. 47: The ‘Synoptic tables’ tab of the ‘Options’ window.
55
For more sophisticated synoptic table graphic display, two thresholds with different colours can
be defined. Values greater than the ‘Lower’ threshold will be given one colour and values
which exceed the ‘Higher’ threshold will be given the other colour. For single-colour
highlighting, the ‘Lower’ threshold can be set to a value equal to or greater than the ‘Higher’
threshold. Colours can be completely switched off with the ‘Display colours’ check box.
Note: If a value is entered that causes the ‘Lower’ threshold to be greater than the ‘Higher’
threshold, the ‘Higher’ threshold is changed automatically. This means that it may be
impossible to lower the ‘Higher’ threshold without first lowering the ‘Lower’ threshold.
1.11.2
Percentage Constancy Synoptic Table
This type of synoptic table shows percentage constancy of species for each relevé group. This
function considers only presence/absence of the species without discrimination of cover values.
The value of percentage constancy is rounded to the nearest natural number in the interval from
0 to 100, except that all non-zero values less than 1 are converted to the number 1.
Fig. 48: Synoptic table with percentage constancy.
1.11.3
Categorical Synoptic Table
Constancy can also be displayed in a categorical form (Westhoff & Whittaker 1980). There are
five constancy categories widely used in phytosociological literature: I (0 %-20 %); II (20 %-40
%); III (40 %-60 %); IV (60 %-80 %); V (80 %-100 %). Such synoptic tables are clearer and all
columns are easily comparable. However, differences between categories are hard to judge. The
differences between two consecutive categories could be anywhere from 1% to 39%. Moreover,
species in the same category could have percentages differing by as much as 19%, so a given
species may have constancy more similar to species in a different category compared to species
in its own category.
56
Fig. 49: Synoptic table with categorical constancy.
1.11.4
Synoptic Table with Absolute Frequency (‘Absolute Constancy’)
In this synoptic table, the total number of relevés in the relevé group is displayed at the top of
each column. The entries in the table are the number of species occurrences in the relevé
groups. The highlighting scheme is the same as for percentage synoptic tables – it corresponds
to relative frequency.
Fig. 50: Synoptic table with absolute constancy.
57
1.11.5
Fidelity Synoptic Table
This table uses the fidelity concept as described in Section 1.10. The fidelity between the
species and the relevé group is displayed. Highlighting thresholds are set in the ‘Fidelity
threshold’ section of the ‘Synoptic tables’ tab of the ‘Options’ menu. (See Section 1.11.1.)
Fidelity can be calculated either from presence/absence or from quantitative cover data. (See
Section 1.10.6.)
Fig 51: Synoptic table with fidelity values.
Note: Negative fidelities are usually less useful for table explanation. Therefore, the program
displays all values of zero or less as dashes.
1.11.6
Synoptic Tables and Cover (Maximum, Average, Median, Modus)
A synoptic table can also be used for presenting cover values. These are selected from the
‘Abundance Value’ submenu of the ‘Synoptic Table’ menu. As an example, suppose a species
has the following cover values in a group of 11 relevés (percentage number with cover code):
1(r)
1(r)
1(r)
2(+)
3(1)
4(2m) 8(2a) 8(2a) 18(2b) 38(3) 63(4).
The maximum cover for this species will be 63, the average will be 13 (rounded), the median
will be 4 and the modus (the most frequent value) will be 1.
These statistics only consider relevés in which the species is present. To find the average cover
over all relevés in the group, use Barkman’s Total Cover (Barkman 1989) as described in
Section 1.11.8 below.
Note: Cover values in a synoptic table are always displayed as percentage numbers.
1.11.7
Zlatnik’s Combined Scale
Another type of table available from the ‘Abundance Value’ submenu is ‘Zlatnik’s Combined
Value’ (Plíva & Průša 1969). Czech foresters use a special synoptic table in which values are
defined according to this table:
58
Fig 52: Information window with Zlatnik’s scale.
These values combine species relative frequencies with maximum cover. To see this table in
JUICE, open the ‘Synoptic Table’ menu, select ‘Sort Species In Synoptic Tables’ and press the
‘?’ button next to ‘Zlatnik’s value’.
1.11.8
Average Cover (Barkman’s Total Cover Value)
The average cover (AC) within a relevé group as defined by Barkman (1989) is:
AC = SUM(% Cover) / number of relevés.
Note: The ‘number of relevés’ includes those with a cover value of zero (i.e., where the species
is absent).
Fig. 53: Synoptic table with average covers.
1.11.9
Combined Synoptic Tables
Standard synoptic tables contain only one important aspect of the data set while others are not
presented. Information such as frequency, fidelity and cover can be presented in multiple tables,
59
but this takes up space and it can be difficult to see relationships between the tables. JUICE can
display two values in a combined synoptic table, thus overcoming these disadvantages.
Selecting ‘Combined Synoptic Table’ from the ‘Synoptic Table’ menu displays a combined
synoptic table and opens the ‘Synoptic tables’ tab of the ‘Options’ window:
Fig. 54: Selecting a combined synoptic table from the ‘Synoptic tables’ tab of the ‘Options’ window.
From this tab, one of seven combinations of frequency, fidelity and cover can be displayed.
The highlighting thresholds for frequency and fidelity (see Section 1.11.1) are applied to their
own columns in the table. For example, if the frequency and fidelity combination is selected,
the combined table will look like this:
Fig. 55: Combined synoptic table with frequency and fidelity.
These tables can be exported into the current RTF export file as described in Section 1.9.
60
Note: In a combined synoptic table, columns of relevés cannot be moved. Other mouse
functions are the same as in regular synoptic tables.
1.11.10 Synoptic Table Export
From the ‘File’ menu select ‘Export’ and ‘Synoptic Table’. For more information, see Section
1.9.4.
1.11.11 Sorting Species in Synoptic Tables
The ‘Sort Species In Synoptic Table’ function is available from the ‘Sorting’ menu or the
‘Synoptic Table’ menu. It is only active during Synoptic Table Display mode. Selecting this
function opens the following window:
Fig. 56: The synoptic table ‘Sorting’ window.
Species can be sorted according to several different measures. The user has the option to sort
the ‘Entire dataset’, the ‘Entire dataset without last column’ or a ‘Single column’. The window
contains a slide bar for selecting which column will be sorted by the ‘Single Column’ sort. The
function can be restricted to sort only species of a certain colour.
The ‘Entire dataset’ sort is a cumulative sorting function:
1. When this function is called, the user is prompted to define a sorting cut-off level.
The default cut-off level for relative frequency and fidelity will be the same as the
‘Lower’ threshold defined in the ‘Synoptic tables’ tab of the ‘Options’ window. (See
Section 1.11.1.) Furthermore, changing this cut-off level for sorting changes the
‘Lower’ threshold for highlighting.
2. Once the cut-off level is defined, the first column is sorted.
3. Species with values higher than the cut-off level are held fixed at the top of the table.
The remaining species are sorted in the second column.
4. The process repeats for each column until the entire table is sorted.
The sorting function ‘Entire dataset without last column’ sorts the table similarly except that the
last column is not sorted.
61
Note: The actual sorting algorithm is more complicated than that described above. Species that
have values above the cut-off level in two columns are moved below the species that exceed the
cut-off level in only one column. These are followed by species that have values above the cutoff level in three columns, four columns and so on. The result will be a table with uniquely
diagnostic (or constant or dominant) species in blocks at the top, followed by blocks of species
which are diagnostic for multiple groups.
1.11.12 Analysis of Synoptic Columns Combining with Exporting the
Results
The program can extract diagnostic, constant and dominant species from each synoptic column.
This function is widely used for analysis of classification results and interpretation of vegetation
clusters.
Fig. 57: Window for detailed analysis of synoptic tables.
From the ‘Synoptic Table’ menu, select ‘Analysis Of Synopt. Columns’. Initially, the three lists
will appear blank. Select the column to analyse (using the slide bar at the bottom) and then
press the ‘Refresh’ button. Three species lists will appear:
‘Diagnostic species’ are those with fidelity higher than the ‘Lower’ fidelity threshold
(defined in the ‘Synoptic tables’ tab of the ‘Options’ menu – see Section 1.11.1).
‘Constant species’ are those with relative frequency higher than the ‘Lower’ frequency
threshold (also defined in the ‘Synoptic tables’ tab). However, only constant species that
are not diagnostic will be included in the list unless the ‘Include diagnostic species’
check box is checked.
‘Dominant species’ are defined as all species that have cover values higher than the
cover threshold. A species appears in this list if its cover exceeds the threshold value in
any relevé of the selected vegetation unit. The list of dominant species can be limited to
62
species that exceed a certain minimum relative frequency as specified in the ‘Minimum
freq.’ box.
Species are displayed with layer number and fidelity or frequency value. If the ‘Show
references’ check box is checked, species that appear in more than one list will be cross-indexed
to the other list or lists (‘Dg’ for diagnostic, ‘C’ for constant and ‘Dm’ for dominant).
Note 1: The display is not updated when a display mode check box or a threshold value is
changed. To enact the desired display changes, press the ‘Refresh’ button.
Note 2: Changing the ‘Fidelity threshold’ or the ‘Frequency threshold’ changes the threshold
throughout the program, just as though it were changed in the ‘Synoptic tables’ tab of the
‘Options’ window.
Species in the lists can be selected with the mouse or keyboard and assigned a selected colour in
the table by pressing the ‘Mark in the table’ button.
Note: Shift+click can be used to select a block of species. In particular, to select an entire list,
click on the top species and then Shift+click on the bottom species. Ctrl+click can be used to
select multiple species which are not in a block or to deselect a currently selected species.
All information can be saved into the current rich text format export file. (See Section 1.9.2.)
Pressing the ‘Export’ button opens the following window:
Fig. 58: Window for ‘Export Of Diagnostic, Constant And Dominant Species’.
The list can be formatted as unsorted, sorted alphabetically or within layers, with or without
frequencies or fidelities, with or without layers and in compact or extended form. The ‘Lower’
threshold values are fixed – they have been defined in the previous window. The ‘Higher’
threshold values (‘Bold text style’) correspond to the values set in the ‘Synoptic tables’ tab.
They may be reset to any value equal to or higher than the lower threshold. (Changing the ‘Bold
text style’ value for diagnostic or constant species in this window has the same effect as
changing the ‘Higher’ fidelity or frequency threshold value in the ‘Synoptic tables’ tab.)
63
Species exceeding these values will be displayed in bold style. The sample species list in the
lower part of the window will not change until the user presses the ‘Preview’ button.
The user can export information for a single cluster (column) with the ‘Export’ button. The
information for the entire data set can be exported by pressing the ‘Export Clusters’ button. All
data are saved into the current RTF export file. (See Section 1.9.2.)
1.11.13 Uniqueness of Vegetation Unit
Uniqueness was used in the paper of Chytry & Tichy (2003) to identify unique vegetation units
in the data set. It expresses whether there are similar vegetation units of the same rank (e.g.,
class or alliance). A vegetation unit is unique if none of its diagnostic species has
simultaneously diagnostic status in other vegetation units, while its uniqueness decreases if it
shares its diagnostic species with other vegetation units.
1.11.13.1 Theoretical Background
Uniqueness is calculated in two steps. First, an Asymmetric Similarity Index between every pair
of vegetation units j and k is calculated as
T jk =
∑ Φ ⋅Φ
∑Φ
ij
i
ik
2
i
,
(Eq. 8)
ij
where Φij is the fidelity of species i to vegetation unit j, Φik is the fidelity of species i to
vegetation unit k and the sums only include species with Φij > 0.05 and Φik > 0.05. This index
ranges in the interval [0, ∞) and yields the highest values for those pairs of vegetation units in
which a large proportion of diagnostic species of vegetation unit j are also diagnostic species of
vegetation unit k. It is an asymmetric similarity measure because in cases of low numbers of
diagnostic species in vegetation unit j and high numbers in k, where most of the diagnostic
species of j are shared with k, the similarity of j to k is high while the similarity of k to j is
moderate. The Similarity Index is calculated separately for all pairs of classes and all pairs of
alliances (suballiances). For every pair j and k, two indices are calculated, one for the similarity
of j to k and the other for the similarity of k to j.
Second, the Uniqueness Index for each vegetation unit is calculated using this formula:
Uj =
1
.
∑k T jk
(Eq. 9)
This Uniqueness Index is low for those vegetation units whose diagnostic species are mostly
shared with other vegetation units.
1.11.13.2 Uniqueness in JUICE
The ‘Uniqueness’ function is available for synoptic tables with fidelities. After selecting
‘Uniqueness’ from the ‘Synoptic Tables’ menu, the following window will appear:
64
Fig. 59: Uniqueness and Asymmetric Similarity Indices calculation.
The list of species compared is limited to those with fidelities higher than the defined threshold
value. This value depends on the selected fidelity measure and method of data standardization.
The vegetation unit can be selected with the scroll bar. After pressing the ‘Calculate one
column’ button, the calculated Uniqueness Index and a list of Asymmetric Similarity Indices
are displayed. This information is also saved onto the clipboard.
Note: The ‘Calculate only uniqueness for all columns’ and ‘Calculate all columns’ buttons are
for copying the indicated information to the clipboard (from which it can be pasted into another
program). The information actually displayed in the window will be the full information for the
highest-numbered relevé group.
1.11.14 Average Values of Constancy Columns
The ‘Average Values Of Constancy Columns’ function of the ‘Synoptic Tables’ menu
calculates the average for each synoptic table column. The displayed values (relative frequency,
fidelity, average cover etc.) are averaged and these averages are displayed in a separate window:
Fig. 60: Average values of constancy columns.
The results can be saved onto the clipboard for further use.
65
1.11.15 Crispness of Classification
Classification methods usually produce results with hierarchically distributed clusters.
Sometimes it is difficult to determine an optimal number of clusters providing the highest
‘separation power’ for species. JUICE includes a function, proposed in the paper of Botta-Dukát
et al. (2005), for identifying the optimal number of clusters.
1.11.15.1 Theoretical Background
The calculation is based on G statistics, which can be easily calculated for contingency tables of
any size (Sokal & Rohlf 1995). Calculated for a 2 × c contingency table (where c is the number
of clusters), the G statistic does not measure the fidelity of a species to individual clusters, but
the species’s capacity to distinguish the clusters within a given partition (the ‘separation power’
of the species). The average of separation powers is called the ‘crispness of the classification’.
The higher the average separation power, the better the clusters can be distinguished by the
diagnostic species, i.e., the better the classification.
The problem is that the expected separation power and consequently the crispness of
classification increase with increasing number of clusters, even if relevés are assigned randomly
to clusters. This effect has to be eliminated before comparing partitions with different numbers
of clusters. In a random classification, separation powers have approximately a chi-squared
distribution with c–1 degrees of freedom (Sokal & Rohlf 1995). According to the central limit
theorem (e.g., Zar 1999: 76–77), if the number of species is high, which is the case in most data
sets, the crispness of classification has approximately a normal distribution with expected value
c–1 and standard deviation 2(c −1) S , where S is the number of species.
The effect of the number of clusters is removed by subtracting this expected value and dividing
the difference between the observed and expected value by the standard deviation. In this way
the crispness values are standardized and can be compared among partitions with different
numbers of clusters. Local maxima of crispness may indicate optimal numbers of clusters.
1.11.15.2 Optimal Use of This Function in JUICE
This function is used to its full power in conjunction with the function ‘Sort Relevés By
Clusters’ (see Section 1.6.3.3):
1. Call the function ‘Sort Relevés By Clusters’. Open the resulting file produced by
PC-ORD (or MULVA) or classify the data set using the ‘Cluster Analysis
(PC-ORD)’ function from the ‘Analysis’ menu. The sorting window will appear
automatically after the analysis. This window is always displayed on top, but the
table remains active.
2. From the ‘Synoptic Table’ menu, select a table with frequency or fidelity values.
Repeated selection of different numbers of clusters will automatically change the
displayed synoptic table.
3. Choose a species colour and use it to select a list of species as a source for
calculation of crispness of classification.
4. Call the ‘Crispness Of Classification’ function from the ‘Synoptic Table’ menu. This
window, which is also always on top of the main window, will appear:
66
Fig. 61: The sorting function and the ‘Crispness Of Classification’ window overlaid on top of a synoptic table.
5. Press the ‘Refresh’ button. The program will calculate the appropriate value for the
selected number of clusters.
6. In the ‘cluster analysis’ window, select a new number of clusters. The synoptic table
will change. Press the ‘Refresh’ button in the ‘Crispness Of Classification’ window
to calculate a new crispness value. (All values are saved onto the clipboard.)
7. Iterate these steps with increasing numbers of clusters.
Note 1: The program can calculate crispness of classification with a limited list of species. It is
recommended, e.g., to exclude rare species (such as those occurring in fewer than 10 relevés)
from this analysis.
Note 2: It is also possible to search for maximum crispness using hierarchical separators. (See
Section 1.5.4.) Varying separator level will change the number of columns in the synoptic table.
(This can be useful, e.g., with results from TWINSPAN classification.)
1.11.16 Comparison of Two Synoptic Tables
If the synoptic table is displayed in the form of percentage frequency or fidelity, it is possible to
compare two synoptic tables and find their total similarity. This function was used in the paper
Knollová et al. (2005) for comparison of several different classifications. The program
calculates a crossing table of Euclidean distances between all pairs of synoptic columns in two
synoptic tables.
Note: Calculation of fidelities can be modified by data standardization, Fisher’s exact test and
selection of presence/absence versus quantitative data as described in Section 1.10.3.
67
1.11.16.1 Theoretical Background
The distance d(TAB1i; TAB2) between the i-th column of one table, TAB1, and all columns of
a second table, TAB2, is calculated according to the formula:
d (TAB1i ; TAB 2) =
min j ( EDij ) ⋅ (nTAB 2 − 1)
(∑ j EDij ) − min j ( EDij )
,
(Eq. 10)
where i and j denote columns of classified resampled data sets TAB1 and TAB2, respectively;
EDij is the Euclidean distance between phi coefficients in columns TAB1i and TAB2j;
min j ( EDij ) is the shortest distance between the column TAB1i and any of the columns TAB2j;
and nTAB2 is the number of columns in the table TAB2. In this way we obtain the distance
between the selected column of table TAB1 and the most similar column of table TAB2,
divided by the average distance between the selected column and all other columns of TAB2.
The distance between the tables TAB1 and TAB2 is computed by averaging the distance values
for individual columns table of TAB1:
d (TAB1; TAB 2) =
∑ d (TAB1 ; TAB 2) .
i
i
(Eq. 11)
nTAB1
This ‘distance’ is actually an asymmetric measure, i.e., the distances d(TAB1; TAB2) and
d(TAB2; TAB1) differ. Therefore the same procedure is applied in the opposite direction:
d (TAB 2 j ; TAB1) =
d (TAB 2; TAB1) =
min i ( EDij ) ⋅ (nTAB1 − 1)
(∑i EDij ) − min i ( EDij )
∑
j
d (TAB 2 j ; TAB1)
nTAB 2
,
.
(Eq. 12)
(Eq. 13)
Finally the symmetric distance D(TAB2; TAB1) between tables TAB2 and TAB1 is calculated
as an average of d(TAB1; TAB2) and d(TAB2; TAB1):
D(TAB 2; TAB1) =
d (TAB1; TAB 2) + d (TAB 2; TAB1)
.
2
(Eq. 14)
This method can be used for calculating the symmetric distances between any two tables.
1.11.16.2 Comparing Two Synoptic Tables within JUICE
To use JUICE to compare two synoptic tables:
1. Load the first table. All records must be unique, without duplicity of either species
name or layer. (Such species must be merged. See Section 1.6.1.)
2. Classify the table and display it in the form of a synoptic table (using either
frequency or fidelity).
3. From the ‘Synoptic Table’ menu, select ‘Compare Two Synoptic Tables’ and ‘Save
Image Of Synoptic Table’ to save the table.
4. Load the second table and display it in the same form as the first one.
5. From the ‘Synoptic Table’ menu, select ‘Compare Two Synoptic Tables’ and ‘Load
Image And Compare’.
The program will display the resulting distance. A crossing table of all Euclidean distances is
saved onto the clipboard.
68
2 Data Analysis
2.1 TWINSPAN
TWINSPAN (Two-Way Indicator Species Analysis) is a numerical classification method
developed specifically for hierarchical classification of community data. The technique is based
on the concept that a group of relevés will have a corresponding group of indicator species that
characterize that type. Species and relevés are sorted based on a reciprocal averaging algorithm
(Hill 1979).
TWINSPAN is included in the standard JUICE installation package and is installed in the
JUICE application directory. This software runs as a stand-alone program in a simulated DOS
environment. Numerical classification by TWINSPAN can be accomplished either (1) directly
from JUICE or (2) through export of a CC! file, manual classification in TWINSPAN and
import of the results.
2.1.1
TWINSPAN in JUICE
Before the function is started, it is necessary to give all relevés to be classified a single relevé
colour. It is possible to classify every relevé in the table by giving them all the same colour.
From the ‘Analysis’ menu, selecting the ‘TWINSPAN’ function opens the following window of
parameter settings (Fig. 62):
Fig. 62: JUICE window for TWINSPAN classification.
The value in the ‘Pseudospecies cut levels’ field is the number of cut levels, and the values in
the ‘Values of cut levels’ field are percentages corresponding to each cut level. Both JUICE and
TURBOVEG use whole percentage numbers from 1% to 95% for definition of cover scales.
Example: In Fig. 62, there are 5 cut levels of 0%, 2%, 5%, 10% and 20%. A pseudospecies
with a cover of 15% would exceed the fourth cut level but not the fifth.
It is possible to set a minimum group size and maximum number of divisions.
Note: The maximum level of divisions displayed in JUICE is limited by the number of
characters displayed in header data (6) so that a maximum of 64 groups can be displayed. If
the user wants a more detailed classification, it is possible to classify the table in three steps:
69
(1) make an initial classification into 64 or fewer groups, (2) mark part of the dataset with a
unique relevé colour, and (3) classify this part of the table once more.
If the ‘Species sorting’ box is checked, species will be sorted by reciprocal averaging. If the
‘Make separators’ box is checked, hierarchical separators will be included in the table. (See
Section 1.5.4.)
Instead of the ‘Species sorting’ option, we recommend sorting using the ‘Sort Species in
Synoptic Table’ function. (See Section 1.11.11.)
2.1.2
Use of TWINSPAN as a Stand-Alone Program
Some users wish to use more sophisticated classification features of TWINSPAN (e.g., to omit
certain species) or to see eigenvalues, species or relevé indicators and other information about
each division. In such a case it is possible to run the TWINSPAN program manually on a
JUICE table exported in Cornell Condensed file format. (See Section 1.9.3.) The TWINSPAN
output files (with suffixes TWI and PUN) are useful for additional sorting, which is available
from the ‘Sorting’ menu: select ‘Sort the Table by Clusters’ and ‘TWINSPAN’.
2.2 Cluster Analysis
Three widely distributed programs for multivariate data analysis are integrated with JUICE for
cluster analysis: PC-ORD (McCune & Mefford 1999), MULVA (Wildi & Orlóci 1996) and
SYN-TAX 2000 (Podani 2001).
2.2.1
Cluster Analysis via PC-ORD
PC-ORD is a Windows program that performs multivariate analysis of ecological data. In
addition to utilities for transforming data and managing files, PC-ORD offers many ordination
and classification techniques not available in major statistical packages. PC-ORD cluster
analysis can be accomplished directly from JUICE. Other PC-ORD analyses must be done
manually using exported files. (See Section 1.9.3.) A demo version of PC-ORD and information
about ordering is available at: http://home.centurytel.net/~mjm/pcordwin.htm.
2.2.1.1
Initiation of the Connection
Before using PC-ORD with JUICE, PC-ORD must be installed on the computer and the
location of the PC-ORD program file must be specified in the ‘External Program Paths’ tab of
the ‘Options’ window. JUICE will use this path for temporary files and will run the program
automatically.
Fig. 63: The ‘External Program Paths’ tab of the ‘Options’ window.
70
2.2.1.2
Automation of Cluster Analysis Within JUICE
Cluster analysis in JUICE is available from the menu ‘Analysis’ and ‘Cluster Analysis’. The
following window (Fig. 64) appears:
Fig. 64: Window for managing PC-ORD cluster analysis.
The user selects relevés to be analysed by PC-ORD by choosing a colour. The ‘Data
transformation’ options are usually used to reduce the weight of higher cover values.
‘Pseudospecies cut levels’ can be used to convert from percentage cover values to an ordinal
scale with a small number of categories. (In the example above, 0% - 4% would be converted to
1, 5% - 24% would be converted to 2, and values of 25% and above would be converted to 3.)
The ‘Floating cut level by Species data value(0-100)’ option converts a cover value to 1 if it is
less than the value in the Species Data Column or 2 if it is equal or greater. This can be used,
e.g., when each species’s median cover has been stored in the Species Data Column to analyze
clusters based only on whether species cover is below the median or not. Such a standardisation
makes smaller cover values of less abundant species comparable with higher cover values of
very abundant species.
The user specifies the number of clusters. This number does not influence the time required to
perform the calculations. The user selects one of 7 distance measures (resemblances) and one
of 8 group linkage methods.
2.2.1.3
Results and Cluster Tree
Cluster analysis begins when the ‘Continue >>>’ button is pressed. The classification process is
managed externally by sending key codes, which makes it sensitive to any use of the keyboard.
The message window with this information remains visible while PC-ORD is running.
When the classification is finished, the table is sorted in the calculated order and the following
results window (Fig. 65) is displayed:
71
Fig. 65: Result of PC-ORD cluster analysis.
The window displays a list of group numbers. Selecting a group and pressing the ‘Create
Clusters’ button (or double-clicking on a group) creates clusters. Clusters will be divided in the
table by separators. Below the list are check boxes for copying cluster numbers into the short
headers and for closing the window after selection of the cluster number. If the short headers are
being used for other information (environmental variable etc.) switch off the ‘Copy cluster No.’
check box.
Note: This window is always on top, enabling it to be used in combination with synoptic tables,
sorts of species in synoptic tables, crispness calculations, etc., which makes cluster analysis
much more useful and clear. The advantage of this approach is clearly demonstrated by a small
example. Display a classified table as a synoptic table with fidelities (e.g., select fidelity
coefficient Phi) and double-click on ‘Gr_2’ in the window. Sort the entire synoptic table by a
selected fidelity cut level (e.g., 40) and look on the list of diagnostic species for each of two
columns. Double-click on ‘Gr_3’ and the number of columns will increase to 3. Sort the entire
synoptic table once more and you can see the diagnostic species for three columns. You can
repeat this many times and test which number of clusters yields a sufficient number of
diagnostic species.
Pressing the ‘Tree’ button displays a dendrogram of hierarchical clustering. The x-axis of the
chart displays relevé groups proportionally according to the group size, and the y-axis indicates
only the cluster hierarchy.
72
Fig. 66: Cluster analysis dendrogram.
2.2.1.4
Manual Table Analysis and Import of Results
PC-ORD cluster analysis from within JUICE is limited by the settings available from the input
window (Fig. 64). Manual data set classification is less convenient, but it can be used in cases
when it is not possible to connect PC-ORD and JUICE or when the user wants to use a PCORD function not supported by JUICE. To classify data manually, do the following (note that
steps 1 and 10 are in JUICE, while steps 2 through 9 are in the PC-ORD program):
From JUICE, export the whole data set or a selected part to a CC! file.
Run PC-ORD.
Import the CC! file through the TWINSPAN/DECORANA filter.
Apply data transformation if necessary.
Select menu ‘Groups’ and ‘Cluster analysis’ and choose the type of analysis.
In the ‘Cluster Setup’ window check the ‘Add group membership variable to Second
Matrix’ box.
7. In the ‘Group membership variable’ window, enter the ‘Group level’ and check the
‘Write all higher-level groupings’ box.
8. Create the Second Matrix.
9. Export the Second Matrix as ‘Comma-Separated-Values (Spreadsheet)’.
10. Back in JUICE, from the ‘Sorting’ menu select ‘Sort relevés by clusters’ and ‘PCORD’. Then proceed as in Section 2.2.1.3.
1.
2.
3.
4.
5.
6.
2.2.2
Cluster Analysis via MULVA
MULVA-5 is a program package designed to apply multivariate statistical methods to
vegetation and site data as a means of investigation in plant ecology. A complete description of
MULVA-5 is available in Wildi & Orlóci 1996. MULVA-5 enables analysis of relevés by
correlating vegetation and site factors and by investigating vegetation patterns. Species or relevé
data can be analysed to find groups (Classification) or establish a meaningful order
73
(Ordination). The user can investigate the floristic and ecological composition of relevés, as
well as occurrence of species. The program is distributed as freeware. The professional fullfeatured version of MULVA 5.1 is available at: http://www.wsl.ch/land/products/mulva/%20.
2.2.2.1
Initiating Connection
MULVA can be connected to JUICE by a process similar to that outlined in Section 2.2.1.1 for
PC-ORD: install the MULVA package and in the ‘External Program Paths’ tab of JUICE's
‘Options’ window, specify the path to the M51.EXE file.
2.2.2.2
MULVA Cluster Analysis from within JUICE
As with PC-ORD, MULVA can be called from within JUICE. From the ‘Analysis’ menu, the
user selects ‘Cluster Analysis’ and ‘MULVA’. The window for parameter settings will appear:
Fig. 67: Parameter settings for cluster analysis with MULVA.
Cluster analysis can be applied to the entire data set or to a selected part. Cover data may be
exported as presence/absence, ordinal or percentage values. In the case of semi-quantitative or
quantitative data, scalar and vector transformations are available. MULVA cluster analysis
calculates only a selected number of clusters without any information about hierarchy. JUICE is
able to eliminate this disadvantage by repeatedly calling the procedure with an increasing
number of clusters. (Check the ‘Interval’ box.) This produces a dendrogram similar to the one
discussed in Section 2.2.1.3. The MULVA parameters window provides several resemblance
functions (distance measures) and group linkage methods.
2.2.2.3
Results and Cluster Tree
The tools for data set classification described in Section 2.2.1.3 can also be used with MULVA.
74
2.2.2.4
Manual Table Analysis and Import of Results
It is also possible to analyse the data outside of JUICE and import the results by doing the
following:
1. Export the data set to a CC! file.
2. Run MULVA.
3. Import the CC! file into MULVA.
4. Apply data transformations.
5. Select the parameters of the cluster analysis and analyse the table.
6. From JUICE’s ‘Sorting’ menu, select ‘Sort relevés by clusters’ and ‘MULVA’.
7. Specify the location of PRINDA, the MULVA output file.
It is then possible to proceed as described in Section 2.2.1.3.
2.2.3
Cluster Analysis via SYN-TAX
The SYN-TAX 2000 package (Podani 1999) also contains programs for data analysis. The
HierClus module calculates hierarchical clustering. This software is commercially distributed
and available, e.g., at http://www.exetersoftware.com/cat/syntax/syntax.html.
2.2.3.1
Manual Table Analysis and Import of Results
At present it is not possible to run SYN-TAX from within JUICE. To manually use SYN-TAX
cluster analysis with JUICE, do the following:
1. From JUICE’s ‘File’ menu, export the table by selecting ‘Export’ and ‘SYN-TAX
input files’.
2. Run SYN-TAX 2000’s HIERCLUS.EXE module.
3. Import the data file into SYN-TAX.
4. Select the type of cluster analysis, data transformation and resemblance function.
5. From SYNTAX’s ‘File’ menu, select ‘Save output files’ to open the ‘Save files’
window. Select switches ‘Tree’ and ‘Sequence of classified objects’.
6. Analyse the table.
7. From JUICE’s ‘Sorting’ menu, select ‘Sort relevés by clusters’ and ‘SYN-TAX
2000’.
8. Open files DENDROGRAM.DEN and SEQUENCE.DAT.
It is then possible to proceed as described in Section 2.2.1.3.
2.3 COCKTAIL Method
Milan Chytrý & Lubomír Tichý
The Cocktail method (Bruelheide 1995, 2000) was designed to simulate the Braun-Blanquet
approach to classification in which classification is based on expert knowledge and not on
unsupervised algorithms such as those used in, e.g., TWINSPAN or cluster analysis computer
programs. With the Cocktail method as implemented in JUICE, an expert makes subjective
choices during the classification process while the program suggests possible solutions and
ensures that particular steps in the classification process are applied consistently throughout the
data set. Delimitations of the resulting vegetation units are explicitly formally described, which
means that new relevés that were not present in the original data set can be unequivocally
classified as belonging or not belonging to a particular vegetation unit.
75
The Cocktail procedure starts by defining groups of species that tend to occur together in
relevés of a large database. Using a large database that covers a broad spectrum of different
habitats and a large geographical area is important for obtaining species groups of more general
validity. Species of the same group usually have similar habitat requirements and
phytogeographical affinities. Cocktail species groups correspond to the concept of sociological
species groups (Doing 1969) and often they are closely related to the groups of diagnostic
species for particular vegetation units as recognized in phytosociological literature. Extraction
of each group starts with one or a few species pre-selected by the researcher. Other species with
the most similar distribution across the relevés of the database are added stepwise to this
starting species or species group. In JUICE, co-occurrence tendency of species is measured by
the phi coefficient of association (Sokal & Rohlf 1995; Chytrý et al. 2002).
Unlike Bruelheide (1995, 2000) who used a fully automated process of species group
optimization, the approach in JUICE allows for more manual control with the aim of arriving at
ecologically more coherent species groups. After selecting a starting group of two or three
species, the user may calculate a fidelity coefficient of association between each species in the
data set and the group of relevés that contains the starting species group. Of the species not
belonging to the species group, the user will usually choose the one with the highest phi
coefficient and will include it in the group as its next member. Sometimes it may be intuitively
more correct to include the species with the second or third highest phi coefficient, particularly
if the species with higher fidelity coefficients have already been included in another species
group or have several times more or fewer occurrences in the data set than the species already
included in the species group. This solution is recommended because groups of species with
large differences in occurrence frequency would not be ecologically coherent: their species
might have roughly identical ecological optima, but much more frequent species usually have
broader ecological ranges.
After including the new species in the species group, the group of relevés must be re-defined
and the fidelity coefficient of association between all species in the data set and the new group
of relevés must be recalculated. If this step causes the species group to disintegrate – i.e., if
some of the species not included in the species group now have a higher fidelity coefficient than
some of the species included – the group must be rejected. By contrast, if the species belonging
to the group have the highest fidelity coefficients, the group can be either accepted or further
optimised by attempting to include additional species until all the remaining candidate species
for inclusion either cause group disintegration or substantially change the ecological coherence
of the group.
For a relevé to be said to contain the species group, it is not necessary for every species in the
group to be present. Bruelheide (1995, 2000) defined the minimum required number of species
of the group as the intersection of expected and observed cumulative distribution functions for
relevés having 0 to k species, k being the number of all species included in the group. However,
our studies showed that this criterion strongly depends on the data set structure and tends to
yield a low minimum number of species if the group consists of species that are rare in the data
set and a high minimum number of species if the group mainly includes common species.
Therefore we propose a simpler criterion, taking half of the species of the group as the
minimum number, e.g., at least 2 of 4 or 3 of 5.
After defining several species groups, the Cocktail method creates definitions of vegetation
units by combinations of species groups using logical operators such as AND, OR and AND
NOT (Bruelheide 1997). For example, a relevé is assigned to vegetation type X if it contains
species group A and at least one of the species groups B or C, and at the same time the species
group D is absent:
76
X = (A AND (B OR C)) AND NOT D.
Note: Species groups may be combined with single species in the same way, if the user uses the
concepts of both dominants and species groups.
2.3.1
Co-Occurring Species
To analyse co-occurring species, the user selects a species (by clicking on the species in the
table) and, from the ‘Analysis’ menu, calls the function ‘Co-occurring Species’. This calculates
the frequency of each species in the relevés containing the selected species and opens the ‘Cooccurring Species’ window (Fig. 68).
Fig. 68: Co-occurring species window.
The selected species is shown in the upper left corner with the number of relevés in which it
occurs below. The list of the most frequently co-occurring species is sorted by decreasing
frequency in the relevés where the selected species occurs. The value shown in the first column
is the percentage of relevés of the selected species also containing the listed species. The next
columns are: species name, layer, species frequency in the data set and frequency of joint
occurrence of current and selected species.
Note: Species listed in the window list may be selected and marked with a colour which will
appear back in the table. The list can be saved into the previously defined RTF file (as
described in Section 1.9.1).
2.3.2
Interspecific Association
Interspecific association between the selected species and each other species in the table is the
basic step of the COCKTAIL method. A fidelity measure (see Section 1.10.1) is calculated for
each pair of species, which gives information on their reciprocal affinity in the data set.
First, select the species to be analysed by clicking on it in the table. Then, from the ‘Analysis’
menu, choose ‘Interspecific Associations’. This opens the ‘Interspecific Associations’ window
shown in Fig. 69. The window shows a list of species positively associated with the selected
species and a list of those negatively associated. The list of positive associations can be
exported to the current RTF export file.
77
Fig. 69: The window for interspecific associations.
Note: Species in either list can be selected and assigned a colour which will appear in the table.
The user can Shift+click or Ctrl+click to select multiple species.
The columns in the lists are: fidelity measure, species name, layer, species frequency in the data
set and frequency of joint occurrence of current and selected species in the data set.
Note: To see the difference between co-occurring species and interspecific association,
consider the following example with Species A as the target species. (The symbol + indicates
presence in a relevé, and a . indicates absence.) All occurrences of Species A co-occur with
Species B and C, giving a co-occurrence of 100% with these species. Species A also has 100%
association with Species C. However, because Species B has occurrences outside the relevés
containing Species A, the association between A and B is less than 100 %. Note also that cooccurrence is not a symmetric relationship: if B is the selected species, A and C have cooccurrences with B of less than 50%.
Species A ++++++++++..........................
Species B ++++++++++++++++++++++++++..........
Species C ++++++++++..........................
2.3.3
Initial Selection of Species into Groups
To create an initial group for COCKTAIL analysis, select an initial species in the table or assign
a colour to several species. Then from the ‘Analysis’ menu select ‘INI Groups’. This opens the
window shown in Fig. 70. The currently selected species or the group of coloured species can
be added to the list on the right by pressing the appropriate button. When the ‘RUN the
analysis’ button is pressed, the function calculates interspecific associations of the first species
in the list with all the other species and adds the most closely associated species to the list. The
number of species considered for addition corresponds to the number in the ‘Nr. of species to be
added’ box. The procedure is repeated for each species in the list, including those which are
newly added. Note that this process terminates, because eventually every most closely
associated species will already be in the list. The ‘Mark in the table’ button causes every species
in the list to be assigned the selected colour back in the table.
78
Fig. 70: The window for creating an initial group of species.
Warning: A high number of species to be added in larger tables can cause a very long cycle
which cannot be interrupted without terminating JUICE. The user is advised to save all work
beforehand.
2.3.4
Cocktail Groups Definition
The function ‘Cocktail Groups’ in the ‘Analysis’ menu searches for optimal combinations of
species that have similar distributions in the data set and can be used as sociological species
groups in vegetation classification. The reciprocal test of species associations is based on
fidelity calculation. A relevé is considered to contain the species group if more than half of
species of the group occur in it.
How to create a species group:
1. Create an initial group of species using either the ‘Interspecific Associations’ or the ‘INI
Groups’ function and give those species a unique colour.
2. Select the ‘Cocktail Groups’ function from the ‘Analysis’ menu to open the window
shown below.
3. Add the starting group to the list box by choosing the correct colour and pressing the
'Add species’ button.
79
Fig. 71: The window for definition of Cocktail groups.
4. The minimum number of species required for a relevé to be said to contain the group
(‘Min. No. Spec./Rel.’) is calculated statistically so that the observed frequency of joint
occurrence of several species exceeds the frequency expected under the null hypothesis
of independent distribution of these species in the dataset. In many cases, however, it is
better to set this minimum value to be half of the species in the group. The minimum
value can be specified manually if the ‘Manual setting’ box is checked.
5. Choose a relevé colour and press the ‘Select relevés as’ button to recolour relevés where
at least the minimum number of species is present (i.e., where the group is present).
6. Press the ‘Fidelity Calculation’ button to calculate fidelity for the coloured group of
relevés. This opens the ‘Interspecific Associations’ window.
Fig. 72: Calculated fidelity for a selected species group which consists of two species. The discontinuity of the
species list indicates that this group must be rejected.
80
7. Select any new species which have a similar distribution.
8. Recolour these species and add them to the list in the COCKTAIL groups window as in
step 3 above.
9. Repeat, beginning with step 4, until the group seems to be optimal for syntaxonomic
classification. This may be when it is similar to a group of diagnostic species
traditionally recognized in the syntaxonomic literature.
An optimized group with relatively high fidelity values (see below) can be saved by writing its
name into the combo box in the upper right corner and pressing the ‘Add group into the table’
button. Pressing the ‘Synoptic col.’ button displays the percentage synoptic column for the
relevés of the selected colour.
Fig. 73: Synoptic column calculated from all selected red relevés. The list contains all species with cover value
higher than 0%.
Species groups can be added directly into the table as a pseudospecies (with ### before the
group name). Thus anything which can be done with species can be done with species groups.
Species groups and proper species can be combined into an aggregate group as explained in
Section 2.3.6.
2.3.5
Cocktail Algorithm for the Definition of Species Groups
The COCKTAIL algorithm (Bruelheide 1995, 2000) was designed for statistical formation of
sociological species groups. It proceeds iteratively as follows:
Step 1. Construct an initial species group. There are two ways to do so.
Step 1a. Starting with preselected relevés (typical of a known vegetation unit) the algorithm
begins by calculating all species fidelities to that vegetation unit and takes the species with the
highest fidelity values as the starting species group.
Step 1b. Start with a user-defined species group based on the literature or previous analysis.
Step 2. The number of species of the species group is calculated for each relevé in the table.
The expected and observed cumulative distribution functions for relevés having 0 to k species
are calculated. The distributions’ intersection defines the required minimum number m of
81
species for a relevé to belong to the vegetation unit. The vegetation unit is defined by all relevés
having m or more species belonging to the species group. If there is no intersection between the
observed and expected cumulative distribution, then the algorithm aborts. This is the case when
species having fewer co-occurrences than expected form the starting group.
Step 3. The occurrences of each species in the vegetation unit are counted and the fidelity is
calculated.
Step 4. For each species in the species group, fidelity value is tested against an (initially) fixed
threshold fidelity. If fidelity exceeds the threshold, the algorithm proceeds to step 5. If not, there
are two possibilities:
Step 4a. If this is the first iteration, it is one of the initially selected species which does not
exceed the threshold. In this case, the group is rejected and the algorithm aborts.
Step 4b. If there has been at least one previous iteration, it means the last species added caused
another species’s fidelity to decrease below the threshold. The species with below-threshold
fidelity is removed, and the algorithm does not try to add this species again until the group has
been changed by adding a further species.
Step 5. All species not belonging to the species group are sorted according to their fidelity
value. If any exceed the threshold fidelity, the algorithm proceeds to step 6. If not, the algorithm
stops. The species group is optimised when all species above the threshold are included.
Step 6. The species group is enlarged by including the (single) species with highest fidelity.
Iteration continues at step 2.
When starting with preselected relevés (belonging to a known syntaxon) the vegetation unit is
optimised in such a way that it is defined by differential species groups, and the final
composition of relevés in the group may be different than at the beginning. Not all syntaxa can
be defined by groups of differential species – some are defined by dominance rather than by
floristic composition.
Note: Step 4a allows the user to assign a lower fidelity threshold, making it more likely that the
species group composition is not changed to such a degree that the initial species no longer
have the highest fidelity. This allows the formation of a number of species groups, some with
lower maximal fidelity than others. Note that if the species in the initial group do not co-occur
with the vegetation type more than expected, the group cannot be optimised.
2.3.6
Definition of Relevé Units by the Combination of Cocktail Groups
The ‘Group Aggregation’ function (of the ‘Analysis’ menu) allows the user to define relevé
groups by combining presence of species groups and dominance of individual species. It uses
species groups created in the table (see Sections 2.3.4 and 2.3.5) and dominant species which
are defined by cover values exceeding a selected threshold. Species groups and dominant
species are combined using the logical operators AND, OR and NOT (which functions as AND
NOT), with the hierarchy defined by parentheses.
82
Fig. 74: The window for selection of relevés containing a combination of species groups and dominants.
Species group names created by the ‘Cocktail analysis’ function begin with the characters ###.
Names of dominant species are not preceded by characters ###, but have suffixes such as UP05
or UP25. For example, UP05 means that the species is considered if its cover in the given relevé
is higher than 5 %. (UP25 means higher than 25 %.)
A sample query is given below:
(<### Ulmus glabra>OR<Carpinus betulusUP25>)AND(<### Mercurialis perennis>
OR<### Urtica dioica>)
Before running the query, its syntax can be checked using the ‘Show definition’ button. This
displays the hierarchy more clearly:
<### Ulmus glabra>
OR
<Carpinus betulusUP25>
AND
<### Mercurialis perennis>
OR
<### Urtica dioica>
Warning: All pairs of logical variables connected by one operator must be put in parentheses.
2.3.7
Expert System
The ‘Expert System’ function of the ‘Analysis’ menu can automatically assign a relevé to a
vegetation type if there is already a classification based on species groups. The classification
algorithm must be included in a TXT file. This file should preferably be created as a product of
the classification in a large data set and must include all required information on aggregated
83
species (1st part), species groups (2nd part) and their combinations into vegetation types (3rd
part). If the user also wants an a posteriori classification of relevés by similarity indices, the file
must contain a synoptic table with constancy columns for all vegetation types (4th part). The file
has a text structure and can be created manually.
In the first part of this file, merged species are defined (species name and layer):
SECTION 1:
Abies alba
Abies
Abies
Abies
Species aggregation
-
0
4
1
0
Acer campestre
Acer campestre
Acer campestre
Acer campestre
-
1
1
2
3
Acer campestre
Acer campestre
Acer campestre
SECTION 1: End
-
4
4
5
alba
alba
alba
The second section defines species groups:
SECTION 2: Species groups
### Serratula tinctoria
Potentilla alba
Betonica officinalis
Serratula tinctoria
Galium boreale ssp. boreale
### Scorzonera parviflora
Juncus gerardii
Scorzonera parviflora
Pulegium vulgare
### Trifolium fragiferum
Lotus tenuis
Melilotus dentatus
Trifolium fragiferum
SECTION 2: End
The third section contains logical formulas with community definitions:
SECTION 3: Group definitions
5
LBB03 Primulo veris-Carpinetum betuli
((<###
Lathyrus
niger>AND<###
Lathyrus
vernus>)AND<###
purpurocaeruleum>)NOT<### Serratula tinctoria>
5
LBD01 Galio odorati-Fagetum sylvaticae
(<Fagus
sylvaticaUP50>AND<###
Galium
odoratum>)NOT<###
perennis>
5
LBD02 Hordelymo europaei-Fagetum sylvaticae
<Fagus sylvaticaUP50>AND<### Mercurialis perennis>
SECTION 3: End
Lithospermum
Mercurialis
84
The first line of each definition contains its hierarchical level (10 characters + space), the code
of the vegetation unit (5 characters + space) and the full name. The second line gives the full
Cocktail definition.
Selecting the ‘Expert System’ function opens the following window:
Fig. 75: The window for automatic classification of relevés with the expert system.
Two buttons allow the user to create Parts 1, 2 and 4 automatically. This requires the password
‘esy04’.
The user must open the expert system source file with the ‘Load ES File’ button. The function
is able to classify any newly imported data set. The buttons ‘Modify Species Names’, ‘Delete
Juveniles’ and ‘Merge Same Spec. Names’ enable unification of the species nomenclature used
for defining species groups. It is possible to classify either a single relevé (causing its species
groups and Cocktail classification to be displayed) or all the relevés of the currently selected
colour (causing the codes of their Cocktail groups to be written to the Short Headers field).
2.4 Similarity Indices
The main purpose of classifying vegetation is to organize ecosystems into groups that are
similar in their floristic composition and structure. Calculating similarity indices between new
relevés (vegetation plots) and constancy columns of vegetation units is a suitable method for
assigning the relevés to these units. It is one of several possible approaches that can be
formalised and included into the computer expert systems used by environmental and nature
reserve managers. This method was firstly described by Hill (1989), who matched relevés to
constancy columns in the tables of the British National Vegetation Classification using an index
of compositional satisfaction, which was derived from the Czekanowski coefficient
(Czekanowski 1913).
85
2.4.1
Description
JUICE supports calculation of three similarity indices. Frequency Index is able to measure the
compositional similarity of relevés, while the other two indices (Positive Fidelity Index and
combined Frequency-Positive Fidelity Index) also include information on diagnostic species,
which is a very important syntaxonomic characteristic.
Frequency Index (FQI). Similarity indices which compare two different relevés without
weighing diagnostic species (such as Jaccard’s, Sørensen’s, Czekanowski, Euclidean distance
and other qualitative similarity indices) give similar results. The modified measure of
compositional satisfaction proposed by Hill (1989) was selected as a representative index of this
type of similarity. Unlike the original measure, the modified FQI considers percentage
frequencies of species occurrences rather than constancy classes. This frequency index is
defined as
⎛
FQI = 100 × ⎜ ∑ FQi
⎝ i∈R ∩C
⎞
∑ FQ ⎟⎠ ,
i∈C
(Eq. 15)
i
where FQi is the frequency (constancy) of species i in a vegetation unit (constancy column of a
synoptic table). Species present in the relevé (sample plot) are indicated as i∈R and species
present in the constancy column as i∈C. In the numerator, frequencies are summed over all
species of the constancy column that are also present in the relevé considered, while in the
denominator, the sum is calculated over all species of the constancy column. The Frequency
Index is defined in an interval [0,100].
The Frequency Index seems to be a simple and useful measure of similarity, but tests on
simulated tables show some situations where it produces results which are in variance with
intuitive expectations. This index cannot distinguish between relevés composed of only species
diagnostic for the vegetation unit and relevés with only widely distributed (hence nondiagnostic) constant species.
Positive Fidelity index (PFDI) is a measure based on the species fidelity concept proposed by
Chytry et al. (2002). The index is calculated in the same way as the Frequency Index. FDi is the
positive fidelity value (phi coefficient) between a particular vegetation unit and a species i
present in the analysed relevé (Chytrý et al. 2002). All negative fidelities are neglected.
⎛
PFDI = 100 × ⎜ ∑ FDi
⎝ i∈R ∩C
⎞
∑ FD ⎟⎠ ,
i∈C
i
where FDi > 0.
(Eq. 16)
The Positive Fidelity index is defined in the interval [0,100]. The index value depends on the
number and diagnostic information (degree of fidelity) of the diagnostic species, thus
overcoming the disadvantage of the Frequency Index, but it discriminates poorly between
relevés composed of widely distibuted constant species that are also found in the target
vegetation unit and relevés that share very few species with the target vegetation unit.
Frequency-Positive Fidelity Index (FPFI) is a combination of the Frequency Index and
Positive Fidelity Index:
FPFI =
1
(FQI + PFDI ).
2
(Eq. 17)
86
The index is defined in an interval [0,100]. For the most part, it retains the advantages and lacks
the disadvantages of both. This index is preferred for assignment of a relevé to a vegetation unit
due to its robustness with respect to the heterogeneity of the data set.
Advanced information about these indices is available in the published paper (Tichy 2005).
2.4.2
The use of similarity indices in JUICE (‘Matching’ function)
Similarity indices may be used to classify relevés which are added to a data set already
containing defined vegetation units.
2.4.2.1
Procedure description
Similarity indices are calculated using the ‘Matching’ function of the ‘Analysis’ menu and one
of the three indices described in Section 2.4.1. This changes the table to Similarity Index
Display mode. To return to Standard Display mode, make the same selection again. Rows
represent relevés and columns are the relevé groups (defined by separators). The entries in the
table are the similarity indices of the relevé to the relevé group.
Fig. 76: Similarity Index Display mode.
The function can be illustrated with a small example. The data set in Fig. 76 is divided into two
parts: columns 1 through 8 were classified by TWINSPAN, while column 9 is the group of new
relevés to be analysed by the Frequency-Positive Fidelity index. The column number with the
maximum value and the quality of this information are displayed in the two rightmost columns
(‘Max.’ and ‘Qual.’). The quality index is the sum of all similarity indices for the relevé divided
by the maximum value. The index has a minimum value of 1 and a maximum value equal to the
number of columns. A value near 1 indicates that the relevé fits well only with one column,
while values near the maximum indicate that the relevé fits equally well (or poorly) with each
column.
2.4.2.2
Relevé sort by similarity indices
In Similarity Index Display mode, the program can sort relevés by similarity indices. From the
‘Analysis’ menu, selecting ‘Matching’ and then ‘Sort Relevés’ opens the window shown in Fig.
77. The user can sort all relevés of the designated colour according to their values in any
column, including the ‘Max.’ and ‘Qual.’ columns. This sort must be within a single column of
87
the synoptic table: selecting a colour which appears in multiple columns of the synoptic table
(i.e., in multiple relevé groups as delimited by the separators) produces an error message.
Pressing the ‘Add value to short head’ writes the indicated value to the short headers of the
selected relevés.
Fig. 77: Sorting window in ‘Matching’ function.
Note: Sorting across synoptic columns is not supported because such a sort will move relevés
into different columns, thus destroying the data on which the sort was based. The expected use
of this function is to sort a group (single column) of new relevés with respect to several groups
of classified relevés. The column to be sorted should be given a unique colour before switching
to Similarity Index Display mode. At present, the colouring functions do not work in Similarity
Index Display mode.
2.4.2.3
Export of similarity index values
The table with similarity index values may be exported by selecting from the ‘Analysis’ menu
‘Matching’ and ‘Matching Export Text File’. The function is available only in Similarity Index
Display mode.
Bug: The function works only in Similarity Index Display mode. Selecting it when the table is in
Standard Display mode causes JUICE to crash.
2.5 Beals Smoothing
Beals smoothing (Beals 1984; McCune 1994) replaces a target species’s presence/absence in
the community data with a probability, pij, of species occurrence in that particular site based on
the joint occurrences of the target species with the species that actually occur in the relevé (site):
pij =
1
Si
N jk
∑N
k∈Ri
,
(Eq. 18)
k
where Si is the number of species in relevé i, Njk is the number of joint occurrences of species j
and k, Nk is the number of occurences of species k and the sum is taken over all species that
actually occur in relevé i (all k in Ri).
88
This transformation is a smoothing operation designed for community data (McCune 1994). As
with any numerical smoothing, it tends to reduce the noise in the data by enhancing the
strongest patterns in the data. Beals smoothing can be a time consuming operation.
2.5.1
The Calculation of Beals Smoothing in the Program
The ‘Beals Smoothing’ function is called
for either the selected relevé or for all
probabilities can be based on all relevés
colour. For Beals smoothing of a single
selection of the relevé.
from the ‘Analysis’ menu. Values can be calculated
relevés of the selected colour. The co-occurrence
in the table or all relevés of the currently selected
relevé, the window shown in Fig. 78 appears after
Fig. 78: Window with results of Beals smoothing for one relevé.
The columns in the list are the Beals smoothing index, the species name and the layer number.
The list is divided into a part with species actually occurring in the selected relevé and a part
with those that do not. The ‘Average value’ is the average of all indices of species occurring in
the selected relevé.
2.6 Beta-Diversity
Traditionally, species diversity is divided into three components – alpha-diversity, which is
defined as local diversity, beta-diversity as a between-habitat diversity and gamma-diversity,
also called regional diversity. Beta-diversity is a measure of difference between two or more
local assemblages. The value is influenced by the turnover of species among habitats (Koleff et
al. 2003). JUICE includes such measures as Whittaker, Sörensen dissimilarity, Jaccard
dissimilarity, Harrison beta and Williams beta calculated from presence/absence data.
2.6.1
How to Measure Beta-Diversity in JUICE
The program can make calculations according to any of the most widely used beta-diversity
measures. Users may call this function from the ‘Analysis’ menu by selecting ‘Total
Inertia/Euclidean Distance/Beta-Diversity’. This opens the following window (Fig. 79):
89
Fig. 79: Calculation of beta diversity and Euclidean distance for a selected part of the data set.
The group of relevés from which beta-diversity is calculated may be selected either by colour or
by separators. The measure is comparable between columns in cases when the number of
relevés in each relevé group is the same. For this reason, the user has the option to limit the
number of relevés selected for analysis. The relevés analysed are selected randomly. The user
can specify the ‘No. of iterations’ of this random selection and calculation. The resulting values
are the averages over all iterations. These are saved to the Clipboard.
Note: The ‘Data Transformation’ field is active only for calculation of Euclidean distance. All
other measures are based on presence/absence data.
2.7 Euclidean Distance
Euclidean distance is the most intuitive and common method of distance measurement between
two sets (two relevés; a relevé and a constancy column etc.). Mathematically, we compute the
differences along each axis, sum the squares of the differences, and take the square root of that
sum:
d=
n
∑ (x − y )
i =1
i
i
2
,
(Eq. 19)
where xi is the cover value of species i in the first relevé, yi is the cover of species i in the second
relevé, and n is the number of species in the table.
2.7.1
How Euclidean Distance Is Calculated
Euclidean Distance is included into two functions: ‘Total Inertia/Euclidean Distance/Beta
Diversity’ (from the ‘Analysis’ menu) and ‘Euclidean Distance from Selected Species’ (from
the ‘Head’ menu, with the ‘Store Values to Short Headers’ function). The first of these
calculates both beta-diversity and Euclidean distance for a selected group of species and the
operating window is the same as in Section 2.6.1. The process averages all Euclidean distances
90
between two pairs of relevés. The list of relevés may be selected by colour or by separators. The
user may standardise each group to the same number of relevés by random selection or by
bootstrap algorithm. It is also possible to repeat the process in more iterations and average the
results. Species covers can be transformed into square roots or binary presence/absence data.
The second function calculates the Euclidean distance between the selected relevé and each
relevé in the data set and sorts the relevés accordingly, thus finding the relevés most similar to
the one selected.
Fig. 80: Calculation of Euclidean distance between the selected relevé and all other relevés in the data set.
Values can be displayed in the window list or written to the Short Headers. Species covers may
be transformed into square roots or binary presence/absence data. All values in the list are
copied to the Clipboard.
Note: The last column of the table in the list box is the current value of the Short Header field.
This field can contain additional environmental data (e.g., pH, conductivity, average
temperature or slope) which may be analysed together with the similarity of species
composition.
2.8 Species Response Curves
David Zelený & Lubomír Tichý
Species response curves are widely used for description of species responses to an ecological
gradient. The response curve allows estimation of species optimum and also niche width
(tolerance), identifying species as generalist or specialist. Most of the widely used statistical
methods assume that species response on a gradient has a symmetrical bell shaped (Gaussian)
curve, even though a number of studies have shown that this type of response occurs in real data
quite rarely. Several methods of dealing with the problem of modelling asymmetric species
response curves were discussed in the study of Oksanen & Minchin (2002a), which was,
together with the detailed technical description in Oksanen & Minchin (2002b), taken as the
basis for the algorithm built into JUICE and the R package software. The R-project macro for
91
modelling species response is still being developed. A more detailed and current description of
the procedure is available at: http://botanika.bf.jcu.cz/david/hof.php .
2.8.1
General Information about the Function
There are various methods of modelling species response curves. Those implemented in JUICE
are discussed here.
2.8.1.1
Models of Species Response Curves
Available methods for modelling response curves in JUICE include:
1) Bell-shaped (Gaussian) curve with traditional symmetrical shape,
2) Generalized linear models (GLM) with polynomial of 1st, 2nd or 3rd
degree,
3) Generalized additive models (GAM) with 3, 4 or 5 degrees of freedom,
4) Huisman-Olff-Fresco models (HOF), a hierarchical set of five models
with increasing complexity.
The bell-shaped curve is considered mainly for reference. The other three options allow flexible
expression of different response curve shapes, each having different constraints, advantages and
disadvantages. GLM models offer curves which are completely described by an equation with a
given number of parameters; however, the shape the curve is quite often inappropriate or
unrealistic. GAM models are more flexible in terms of curve shape, but their equation is nonparametric and not easily expressible. Perhaps the best option from the ecological point of view
is HOF models, which have properties one would expect from species response curves. For
example, they express only unimodal response shape, which is consistent with the assumption
that a species has a single optimum condition along an environmental gradient. (GLM with a
low degree polynomial and GAM with few degrees of freedom cannot really produce bimodal
response shape, but they can easily produce a semi-bimodal shape with inexplicit
interpretation.)
Available information about species is reduced only to presence/absence, even though all
methods can handle percentage data and transformed data. The curves resulting from
presence/absence data are more aesthetic, yielding shapes with a more straightforward
interpretation. Also, removal of information about dominance from species data makes the
interpretation of the resulting response curve more clear. Information about species abundance
(or cover, respectively) is affected by complex factors, including competitive relations, species
morphology and other biotic aspects, which are difficult to interpret, especially when taken in
combination. The presence/absence transformation reduces the influence of these factors
(Austin 2002).
2.8.1.2
Technical Notes on Particular Modelling Strategies
1) The bell-shaped response curve is not based on the classical Gaussian equation, but on a
simplified equivalent polynomial model (ter Braak & Looman, 1986, Oksanen & Minchin,
2002a), which can be easily fit using generalized linear models (with logistic link function for
presence/absence data) and gives results close to a true Gaussian curve.
2) Generalized linear models (GLM) are included in the standard R package. Available models
are linear, quadratic and cubic (polynomials of degree 1, 2 and 3, respectively), as polynomials
of higher degree are not always unimodal. The logit link function is used. Selection of model
92
can be done manually or automatically based on AIC test criteria, selecting the model with the
lowest deviance of data.
3) General additive models (GAM) are included in the ‘mgcv’ library included in the R
package. Models with 3, 4 or 5 degrees of freedom are available. Automatic selection is based
on AIC test criteria.
4) Huisman-Olff-Fresco models (HOF) are a hierarchical set of five models: I – flat with no
response; II – monotone increasing; III – monotone increasing to a plateau; IV – symmetric
unimodal; and V – asymmetric unimodal. Four parameters are estimated using the non-linear
maximum likelihood estimation procedure described in Oksanen & Minchin (2002b) and
further developed by Jari Oksanen in the ‘gravy’ package. However, the ‘gravy’ package gives
ecologically unrealistic responses in some cases, so some corrections have been made in this
implementation.
As with any model, response curves are just a simplification of reality and their shape is
strongly dependent on the available dataset. One major assumption, which may be untrue, is
that the species has only one optimum along the gradient, yielding unimodal response. Bimodal
response could have interesting and meaningful interpretation, but it makes determination of
optimum and species tolerance more complex, and thus should be evaluated individually for
particular species. Therefore, only unimodal or monotone response of species is considered
here.
2.8.1.3
How species optimum and tolerance are calculated
The optimum is the value of gradient where the species has the highest probability of occurrence
based on a particular model. If the response curve is monotone decreasing or increasing, the
optimum is identical to the lowest or highest value of the gradient. In the case of HOF models,
with flat segments of curve (models I and III), the optimum is considered to be the midpoint of
this flat segment. (In the case of model I, the constant-valued curve, the optimum is simply the
midpoint of the available gradient values).
Tolerance is determined similarly to the method used in Schröder et al. (2005). It is that part of
the gradient where the predicted probability of species occurrence is greater than half of the
maximum predicted probability.
93
Fig. 81: Optimum and Tolerance calculated by the species response curve algorithm (Hájek M.).
2.8.2
Installation of the Function in JUICE
Calculation and graphing of response curves is done in the R software environment (R
Development Core Team 2005), but it is run under the complete supervision of JUICE. The R
package must be installed together with the required R libraries and the text file containing R
script.
JUICE must be updated if the version is older than 6.3.108.
The R software package is free open source software available at http://cran.rproject.org/bin/windows/base/.
HOF models in R are calculated using the ‘gravy’ library written by Jari Oksanen. This library
is not included in standard version of the R software package. It must be downloaded from
http://cc.oulu.fi/%7Ejarioksa/softhelp/softalist.html. Select the latest version of the ‘gravy’ ZIP
file in the ‘ZIP files for Windows’ folder. Download and unzip into the folder c:\Program
Files\R\R-2.2.1\library\. To check if installation of both R and ‘gravy’ packages was successful,
run the R program and into the command line write: library (gravy). An error message
indicates that the ‘gravy’ package was not installed properly.
The R script is the file juice1.txt from the web page http://botanika.bf.jcu.cz/david/hof.php.
Download this file into the folder ‘c:\Program Files\R\R-2.2.1\bin’. This file enables JUICE to
communicate with the R package.
2.8.3
Calculation of Species Response Curves (SRC) in JUICE
JUICE is prepared for SRC calculation after the installation of the components mentioned in
Section 2.8.2. Calculation is based on a single environmental gradient which must be saved into
Short Headers. If the user has, e.g., pH values in header data, it is necessary to copy them into
the Short Headers field (as described in Section 1.8.2.3). Then, from the ‘Analysis’ menu, select
‘Species Response Curves’. This opens the following window:
94
Fig. 82: Window for setting parameters of the species response curves calculation.
With the R package, JUICE can calculate (1) SRC for one selected species, (2) SRC for
comparison of several species or (3) SRC for all species. When SRC is calculated for a single
species, several models can be displayed in one graph. If multiple species are being compared,
the graph is displayed using only one selected SRC model (Gaussian, GLM, GAM or HOF).
JUICE runs the R script automatically and the user must wait for results.
The results of calculating SRC for a single species are shown in Fig. 83.
Fig. 83: Window for calculation of species response curve for one species.
The window contains a graph and a table giving optimum, minimum, maximum, interval and
the probability of the optimum value for each model graphed.
95
Note: All table values are saved in the file ‘result_table.csv’ in the directory of the R package
(usually the folder ‘c:\Program Files\R\R-2.2.1\bin’).
Fig. 84: Window for calculation of species response curves for multiple species.
The calculation of SRC for multiple species allows easy comparison of species optima, maxima,
minima and their intervals. The list of species on the right side of the window (see Fig. 84) is
sorted in ascending order according to the selected value.
Note: All values are saved in the file ‘result_table.csv’ in the directory of the R package
(usually the folder ‘c:\Program Files\R\R-2.2.1\bin’) and can be opened, e.g., in a spreadsheet
program for other analyses. The list of species that can be analysed together is limited to 10.
The calculation of SRC for all species in the data set functions similarly. With so many species,
there is no graph and the function produces only a table ‘result_table.csv’ in spreadsheet format.
96
Literature
Austin M.P. 2002. Spatial prediction of species distribution: an interface between ecological
theory and statistical modelling. Ecological Modelling, 157: 101-118.
Barkman J.J. 1989. A critical evaluation of minimum area concepts. Vegetatio 85: 89-104.
Beals E.W. 1984. Bray-Curtis-ordination: an effective strategy for analysis of multivariate
ecological data. Adv. Ecol. Res., 14: 1-55.
Botta-Dukát Z. & Borhidi A. 1999. New objective method for calculating fidelity. Example:
The Illyrian beechwoods. Ann. Bot., 57: 73–90.
Botta-Dukát Z., Chytrý M., Hájková P. & Havlová M. 2005. Vegetation of lowland wet
meadows along a climatic continentality gradient in Central Europe. Preslia, 77: 89–111.
Bruelheide H. 1995. Die Grünlandgesellschaften des Harzes und ihre Standortsbedingungen.
Mit einem Beitrag zum Gliederungsprinzip auf der Basis von statistisch ermittelten
Artengruppen. Diss. Bot. 244: 1-338.
Bruelheide H. 1997. Using formal logic to classify vegetation. Folia Geobot. Phytotax., 32: 4146.
Bruelheide H. 2000. A new measure of fidelity and its application to defining species groups.
J. Veg. Sci., 11: 167-178.
Chytry M. & Tichy L. 2003. Diagnostic, constant and dominant species of vegetation classes
and alliances of the Czech Republic: a statistical revision. Folia Fac. Sci. Nat. Univ.
Masaryk. Brun., Biol., 108:1-231.
Chytrý M., Tichý L., Holt J. & Botta-Dukát Z. 2002. Determination of diagnostic species
with statistical fidelity measures. J. Veg. Sci., 13: 79-90.
Czekanowski J. 1913. Zarys metod statystycznych (Die Grundzuge der statischen Metoden).
Warsaw.
Doing H. 1969. Sociological species groups. Acta Bot. Neerl., 18: 398-400.
Dufrêne M. & Legendre P. 1997. Species assemblages and indicator species: the need for a
flexible asymmetrical approach. Ecol. Monogr., 67: 345-366.
Ellenberg H., Weber H. E., Düll R., Wirth W., Werner W. & Paulissen D. 1992.
Zeigerwerte von Pflanzen in Mitteleuropa. Ed. 2. Scripta Geobot. 18: 1-258.
Hennekens S. & Schaminée J. H. J. 2001. TURBOVEG, a comprehensive data base
management system for vegetation data. J. Veg. Sci., 12: 589-591.
Hill M. O. 1989. Computerised matching of releves and association tables, with an application
to the british national vegetation classification. Vegetatio, 83 (1-2): 187-194.
Hill, M. O. 1973. Diversity and evenness: a unifying notation and its consequences. Ecology,
54: 427-432.
Hill, M. O. 1979. TWINSPAN: a FORTRAN program for arranging multivariate data in an
ordered two-way table by classification of the individuals and attributes. Ecology and
Systematics, Cornell University, Ithaca, New York.
Juhász-Nagy P. 1964. Some theoretical models of cenological fidelity I. Acta Biol. Debrec., 3:
33–43.
97
Knollová I., Chytrý M., Tichý L. & Hájek O. 2005. Stratified resampling of vegetation plot
databases as a bias reduction in classification studies. J. Veg. Sci., 16: 479-486.
Koleff P., Gaston K.J. & Lennon J.J. 2003. Measuring beta diversity for presence-absence
data. Journal of Animal Ecology, 72:367-382.
Kubát K. [ed.]. 2002. Klíč ke květeně České republiky. Academia, Praha.
McCune B. 1994. Improving community analysis with the Beals smoothing function.
Ecoscience, 1: 82-86.
McCune B. & Keon D. 2002. Equations for potential annual direct incident radiation and heat
load. J. Veg. Sci., 13: 603-606.
McCune B. & Mefford M. J. 1999. PC-ORD. Multivariate Analysis of Ecological Data,
Version 4.0. MjM Software Design, Gleneden Beach, Oregon. 237 pp.
Morton A. 2005. DMAP for Windows. Version 7.0. – Alan Morton, Winkfield, Windsor,
Berkshire. Computer program. http://www.dmap.co.uk/welcome.htm.
Oksanen J. & Minchin P.R. 2002a. Continuum theory revisited: what shape are species
responses along ecological gradients? Ecological Modelling, 157: 119-129.
Oksanen J. & Minchin P.R. 2002b. Non-linear maximum likelihood estimation of Beta and
HOF response models. URL: http://cc.oulu.fi/~jarioksa/softhelp/hof3.pdf
Pielou E.C. 1975. Ecological diversity. John Wiley and Sons, Inc. New York, NY.
Plíva K. & Průša E. 1969. Typologické podklady pěstování lesů. Státní zemědělské
nakladatelství, Praha.
Podani J. 2001. SYN-TAX 2000. Computer programs for data analysis in ecology and
systematics. User’s manual. – Scientia Publ., Budapest.
R Development Core Team 2005. R: A language and environment for statistical computing. R
Foundation for Statistical Computing, Vienna, URL http://www.R-project.org.
Schröder H. K., Andersen H. E. & Kiehl K. 2005. Rejecting the mean: Estimating the
response of fen plant species to environmental factors by non-linear quantile regression. J.
Veg. Sci., 16: 373-382.
Smith B. & Wilson J. B. 1996. A consumer's guide to evenness indices. Oikos, 76:70-82.
Sokal R. R. & Rohlf F. J. 1995: Biometry. 3rd edition. W. H. Freeman and Company, New
York.
ter Braak C. J. F. & Smilauer P. 2002. CANOCO reference manual and CanoDraw for
Windows. User’s guide: software for canonical community ordination (version 4.5).
Microcomputer Power, Ithaca, New York.
ter Braak C.J.F. & Looman C.W.N. 1986. Weighted averaging, logistic regression and the
Gaussian response model. Vegetatio, 65: 3-11.
Tichý L. 2002. JUICE, software for vegetation classification. J. Veg. Sci. 13: 451-453.
Tichy L. 2005. New similarity indices for the assignment of relevés to the vegetation units of
an existing phytosociological classification. Plant Ecology, 179:67-72.
Westhoff V. & van der Maarel E. 1980. The Braun-Blanquet approach. – In: Whittaker R. H.
(ed.). Classification of plant communities. – Dr. W. Junk, Hague.
98
Wildi O. & Orlóci L. 1996. Numerical exploration of community patterns. A guide to the use
of MULVA-5. 2nd edition. – SPB Academic Publishing bv, Amsterdam.
Zar J. H. 1999. Biostatistical analysis. 4th edition. – Prentice & Hall, Upper Saddle River.