1
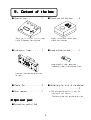
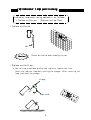
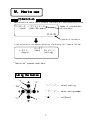
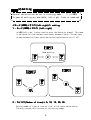
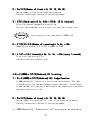
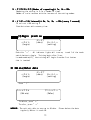
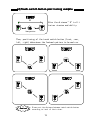
Repeated-drill assisting device
Manual
Ver. 1.1
Repeated-drill assisting device
onigoe
Thank you for buying this product
’s
Repeated-drill assisting device “ONIGOE”is built to improve player’
’ s footwork skill.
response, endurance and focus. It also improves one’
This manual will guide you to use this product safely. Please read all
the instruction carefully before using this device.
※The specification and manual of this product can be change without notice.
CONTENTS
Ⅰ.Precaution ...........................3
Ⅱ.Content of the box ...................4
Ⅲ.Preparation ..........................5
(1)Connecting the device ..................5 (2)Indicator lamp placement ...............6
Ⅳ.How to use ...........................7
(1)Turn on .............................7
(2)Setting .............................8
(3)Begin practice ......................11
Ⅴ.Example .............................12
(1)Setting ............................12
(2)Touch switch button positioning example ...13
Ⅵ.Specification ........................14
Ⅶ . Guarantee and after-service .........15
2
Ⅰ .Precaution
●
Power source
・Please use AA battery
・Insert the battry according to the positive(+) or negative(-)
at backside of control box.
●
Handling
・Do not drop, shock or vibrate the device.
It may damage device.
●
Dismantling
・Do not dismantle the product. We will not be responsible
on damage caused by dismantling the product.
3
Ⅱ.Content of the box
● Control box・・・・・・・1
● Touch switch button・・・2
Touch switch button interval and
light frequency setting box.
Light is turn-off after user
touch this button.
● Indicator lamp・・・・・1
● Lamp holder/stand・・・・1
Lamp stand is user when the
indecator lamp is placed on floor.
Instruct the moving direction
of user.
● Cable 7m・・・・・・・・4
● AA battery for trial of the device
・・・・4
● User manual・・・・・・・1
* The provided AA battery is only for
testing of the
device.
The battery may self-discharge by time.
※ Optional part
● Extention cable(3m)
4
Ⅲ.Preparation
(1)Connecting the parts
Connect cable to jack of “L” terminal at the control box(there are 2
terminal avalable, either one can be used).
1 cable jack is for indicator lamp and the other one is for touch
switch button.
Similarly connect the cable to “R” termnal
Touch switch button connected to “L”terminal is placed at user’s left side
Touch switch button connected to “R”terminal is placed at user’s right side.
Indicator lamp
Control box
Touch switch button
5
(2)Indicator lamp positioning
Indicator lamp positioning method is as follows:
(1)place on the net
(2)place on the floor
(1)place on the net
Net
Caution!
Please be caution when removing the net.
(2)place on the floor
☆ Use the lamp stand when placing the indicator lamp on the floor.
Insert the indictor lamp while pulling the plunger. After inserting the
lamp, push back the plunger.
Plunger
Lamp stand
6
Ⅳ.How to use
(1)Switch on
When the switch of control box is turned-on, the display will show indication as follows.
○○データ ノコリ××データ
(data)
(data XX remain)
Number of recorded data.
XX recordable.
01.01.00
Version of the device
A few second after the above indication, the display will show as follows.
データ↑
←カイシ (data) セッテイ→
(begin)
(setting)
“Switch on”process ends here.
Using the button
”↑”
”→”
”←”
、
”→” : select setting
” Set”
”↑”
、
”↓” : select setting number ”←”
”●”
: set(Enter)
”↓”
7
(2)Setting
Several variation can be set in tranining mode.
1: In MODE,
3 types of setting are available; left-right, front or combined.
<モード
(MODE)
=サユウ
(left-right)
> setting
<モード(MODE)
(MODE)=サユウ
=サユウ(left-right)
(left-right)>
1:モード
(MODE)
=サユウ (left-right)
モード(MODE)
(MODE)=サユウ
In MODE=left-right, trainer need to press the button by himself. This mode
is optimized for side-footwork continously between 2 point. Trainer need
to move between the touch switch button and touch them to turn it off.
Home position
8
2:カイスウ
(Number of times)
= 5、10
、15
、20
、25
カイスウ(Number
times)=
10、
15、
20、
Setting number of times of turn on‘time’of the touch switch button.
Training increase with increase of the setting number.
8
3:ジカン
(Duration)
= 0.1s
、0.2s ∼ 10.0s [0.1s interval]
ジカン(Duration)
(Duration)=
0.1s、
To set the interval between the turn-on time.
To train “quick movement “to the trainer, set the time to lower value.
4:Fジカン
(Diuration)
=ナシ
(null)
、10
%、
20
%、
30
%、
40
%
Fジカン(Diuration)
(Diuration)=ナシ
=ナシ(null)
(null)、
10%、
%、20
20%、
%、30
30%、
%、40
40%
Setting feint time.
Feint function is functioning for “3:Duration = above0.7s”
※ In feint function, a very short duration of turn-on time of the lamp
will take place before the set duration in “3:Duration = “ takes place.
The light will turn on randomly in the duration set in “3:Duration = “,
for duration % length in“4:F Duration =“
5:クリカエシスウ
(Number of repeating times)
= 1x
、2x ∼ 30x
クリカエシスウ(Number
times)=
1x、
Repeating the setting in 2,3,4 for a number of times.
6:インターバル
(Interval)
= 0s
、1s
、2s
、∼ 59s [every 1 second]
インターバル(Interval)
(Interval)=
0s、
1s、
2s、
To set rest time setting 2,3,4.
Provide trainer with recovery time.
<モード
(MODE)
=マエ
(front)
> setting
<モード(MODE)
(MODE)=マエ
=マエ(front)
(front)>
1:モード
(MODE)
=マエ
(front)
モード(MODE)
(MODE)=マエ
=マエ(front)
In MODE=front, trainer will touch the button by himself.
This setting is optimized for front-rear footwork training.
The trainer need to move between the touch switch button
and touch them to turn it off.
9
2:カイスウ
(Number of times)
= 5、10
、15
、20
、25
カイスウ(Number
times)=
10、
15、
20、
Setting number of time of the touch switch button.
Training increase with increase of the setting number.
3:ジカン
(Duration)
= 0.1s
、0.2s ∼ 10.0s
ジカン(Duration)
(Duration)=
0.1s、
[0.1s interval]
To set the interval between the turn-on time.
To train“quick movement
“to the trainer, set the time to lower value.
Caution!
Feint function is not awailable for MODE=front.
5:クリカエシスウ
(Number of repeating)
= 1x,2x, ∼ 30x
クリカエシスウ(Number
repeating)=
Repeating the setting in 2,3,4 for a number of times.
6:インターバル
(Interval)
= 0s
、1s
、2s
、∼ 59s [every 1 second]
インターバル(
Interval)=
0s、
1s、
2s、
To set rest time setting 2,3,4.
Provide trainer with recovery time.
<モード
(MODE)
=コウゴ
(Conbine)(JF
)> setting
<モード(MODE)
(MODE)=コウゴ
=コウゴ(Conbine)
JF)
1:モード
(MODE)
=コウゴ
(Conbine)
(JF
)
:Judge Function
モード(MODE)
(MODE)=コウゴ
=コウゴ(Conbine)
JF)
In MODE=Conbine(JF), trainer will use 2 touch switch button. This mode
is optimized for side-footwork between 2 point contiously. Trainer need
to move between the touch switch button while the lamp turn-on alternately
and touch them to turn it off.
2:カイスウ
(Number of times)
= 5、10
、15
、20
、25
カイスウ(Number
times)=
10、
15、
20、
Setting number of time of turn on ‘time’ of the touch switch button.
Training increase with increase of the setting number.
In MODE=Conbine(JF),”
3:Duration=”
,”
4=“setting are not available.
10
5:クリカエシスウ
(Number of repeating)
= 1x
、2x ∼ 30x
クリカエシスウ(Number
repeating)=
1x、
Repeating the setting in 2 for a number of times.
Number of train increase with the increase of the setting number.
6:インターバル
(Interval)
= 0s
、1s
、2s
、∼ 59s [every 1 second]
インターバル(Interval)
(Interval)=
0s、
1s、
2s、
To set rest time setting 2.
Provide trainer with recovery time.
(3)Begin practice
データ↑
←カイシ (data) セッテイ→
(begin)
(setting)
Push this ”←”. All indicator lights will turn-on, touch 1 of the touch
switch button to begin. Training begin after 3 sec.
In mode=conbine(JF), the training will begin from the first button
that is touched.
※ Delete/Refer data
データ↑
←カイシ (data) セッテイ→
(begin)
(setting)
Press ”↑”
←ショウキョ サンショウ→
(Delete)
(Refer)
To delete, press”←”
To refer, press ”→”
WARNING : The unit only able to save up to 64 data.
regularly before it reach 64.
11
Please delete the data
Ⅴ.Example
(1)Setting
● Professional (set by Malaysia National Badminton Team)
< distance between touch switch button:4.0m >
1:モード(MODE)= サユウ(left-right)
2:カイスウ(Number of times)=20
3:ジカン(Duration)=0.7s
4:F ジカン(F duration)=10%
5:クリカエシスウ(Number of repeating time)=2 6:インターバル(Interval)=5s
[AVERAGE TIME:0.87s] (fastest time recorded in May 2011)
< distance between touch switch button:5.5m >
1:モード(MODE)= サユウ(left-right)
2:カイスウ(Number of times)=10
4:F ジカン(F duration)=10%
3:ジカン(Duration)=0.7s
5:クリカエシスウ(Number of repeating time)=3 6:インターバル(Interval)=5s
[AVERAGE TIME:1.06s] (fastest time recorded in May 2011)
● General
< distance between touch switch button:4.0m >
1:モード(MODE)= サユウ(left-right)
2:カイスウ(Number of times)=10
3:ジカン(Duration)=1.0s
4:F ジカン(F duration)=30%(or40%)
5:クリカエシスウ(Number of repeating time)=2 6:インターバル(Interval)=10s
[AVERAGE TIME:1.21s] (fastest time recorded in May 2011)
● Beginner
< distance between touch switch button:4.0m >
1:モード(MODE)= サユウ(left-right)
2:カイスウ(Number of times)=10
3:ジカン(Duration)=1.2s
4:F ジカン(F duration)=30%(or40%)
5:クリカエシスウ(Number of repeating time)=2 6:インターバル(Interval)=10s
[AVERAGE TIME:1.40s] (fastest time recorded in May 2011)
< Distance travelled >
1:モード(MODE)= マエ(front)
3:ジカン(Duration)=1.0s
5:クリカエシスウ(Number of repeating time)=2 2:カイスウ(Number of times)=10
6:インターバル(Interval)=5s
[AVERAGE TIME:1.30s] (fastest time recorded in May 2011)
12
(2)Touch-switch button positioning example
X
Alter the distance “X” to fit
trainer stamina and ability.
Home position
Then, positioning of the touch switch button (front, rear,
left, right) determines the footwork pattern to be work on.
Caution!
Please set the distance between toutch switch button
according to level of the trainer.
13
Ⅵ.Specification
● Power
source
・4 AA size battery
● Dimension
・Control box
approx. 206mm x 92mm x 162mm
・Indicator lamp
approx. 250mm x 86mm x 56mm
・Touch switch button
approx. 138mm x 102mm x 190mm
● Weight
・Control box without battery approx.1120g
・Indicator lamp approx.320g
・Touch switch button approx.370g
14
Ⅶ.Guarantee and after service
● Guarantee
・Fill in the guarantee form and keep it property.
・The guarantee is valid for 1 year.
● After service
・Please contact us (as stated below) regarding operate and
repair of the device.
Hamanaka Racket Shop Niihama
TEL&FAX : 0897-34-9191
E-Mail:[email protected]
URL:http://www.dokidoki.ne.jp/home2/racket/onigoe.htm
15
Seller : Racket Shop Hamanaka
Niihama:〒 792-0025
Niihama-shi Ichinomiya-cho 2-2-43
TEL&FAX (0897) 34-9191
E-Mail:[email protected]
Matsuyama:〒 790-0805
Matsuyama-shi Nishi Ichiman-cho 8-9
TEL (089) 933-2366
FAX (089) 932-2241
E-Mail: [email protected]
URL: http://www.dokidoki.ne.jp/home2/racket/


![P31-40 お知らせ [PDFファイル/2.28MB]](http://vs1.manualzilla.com/store/data/006565830_2-74f78360479170af505825b7261172a6-150x150.png)