1
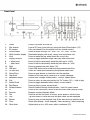
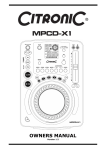
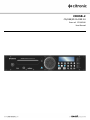
CDUSB-2 CD/USB/SD PLAYER 2U Item ref: 170.663UK User Manual Caution: Please read this manual carefully before operating Damage caused by misuse is not covered by the warranty Introduction Thank you for choosing the CDUSB-2 CD/USB/SD player as part of your playback system. This product has been developed to provide a flexible, high quality audio source for PA, background music and DJ applications. Please read and keep this manual to achieve the best results from the unit and avoid damage from misuse. Package Contents CDUSB-2 CD/USB/SD player 2U IR remote control + batteries Mains lead(s) User manual If you find any accessory is missing or the product has arrived with any problems, please contact your retailer at once. This product contains no user-serviceable parts so make no attempt to try to fix or modify this item yourself as this will invalidate the warranty. We recommend you keep the original package and proof of purchase for any possible replacement or returned demand. Warning To prevent the risk of fire or electric shock, do not expose any of the components to rain or moisture. If liquids are spilled on the housing or disc drawer, stop using immediately, allow unit to dry out and have checked by qualified personnel before further use. Avoid impact or heavy vibration to any of the components. No user serviceable parts inside - refer servicing to qualified service personnel. Safety Ensure that the correct mains lead is used and that the mains voltage is as stated on the unit Avoid ingress of water or particles into any part of the housing Do not place heavy objects on the disc drawer when ejected Placement Keep the console out of direct sunlight and away from heat sources If rack-mounting, ensure that there is adequate support for the weight of the CDUSB-2 and that items racked above it do not place too much pressure to the top of the housing Allow adequate space for the rear connections and avoid leaving controls exposed to possible damage Allow adequate space for the disc drawer to eject at the front of the unit and USB devices to be inserted Cleaning Use a soft dry or slightly damp cloth top clean surfaces of the control panels A soft brush can be used to clear debris from between controls without damaging them To avoid damage, do not use solvents to clean the components A standard cleaning compact disc may be used if the player begins to have difficulty reading discs 170.663UK User Manual Front Panel 1. 2. 3. 4. 5. 6. 7. 8. 9. 10. 11. 12. 13. 14. 15. 16. 17. 18. 19. 20. 21. 22. 23. 24. 25. 26. Power Disc drawer IR receiver Source select Multi-function display Vinyl Single/Continue + pitch bend - pitch bend Pitch USB port SD card slot Open/Close Jog wheel Backward search Cue Folder/Track Play/Pause Forward search In Reverse Out Tap Reloop Time Pitch slider Press in to power the unit up Load a CD here (print side up) using the Open/Close button (13) Infra red detector for the signal from the remote control Press to switch through CD - USB - SD - CD - USB - SD etc. Illuminated display with track, name, time and status info Press to make the jog wheel react like a vinyl disc Press to toggle between single track play and continuous Press & hold to temporarily bend the pitch up to +16% Press & hold to temporarily bend the pitch down to -16% Press to activate the pitch slider (26) Insert USB device here containing compressed audio files Insert SD media here containing compressed audio files Press to eject drawer or load disc into the machine Rotate to find cue points, beat sync or scratch passages Search back through folders/tracks - hold for speed search Press to return to cue point set by the “In” button (20) – hold to play Press to toggle between folder search or track search Press to play or pause current track Search forward through folders/tracks - hold for speed search Press to set a cue point, which is also the start when playing a loop Engages reverse playback effect Press to set the end point of a loop, press again to exit the loop Tap this button in time with and the BPM value will be displayed Press to jump to the playback loop if the start and end points are set Select time display - track elapsed / track remaining / total remaining Adjust pitch up to ±16% when pitch is activated (10) 170.663UK User Manual Rear Panel 27. Fuse holder 28. Fig.8 mains inlet 29. Audio output Holder for 20mm mains fuse 500mA Connect to 100-240Vac power outlet using supplied mains lead Left + Right RCA line output Remote Control The CDUSB-2 is supplied with a handheld infra red remote control. Before use, insert 2 x AAA batteries into the rear compartment, observing the polarity as indicated. Most of the front panel controls are duplicated on the remote control handset. There are also some additional controls as detailed below. 30. 31. 32. 33. 34. 35. Stop Direct access Next track Next folder Previous track Previous folder Press to stop playback of current track Number keys 0 to 9 for direct track number selection Forwards track search. Hold for speed search Forwards folder search Backwards track search. Hold for speed search Backwards folder search 170.663UK User Manual Display 36. 37. 38. 39. 40. 41. 42. 43. 44. 45. 46. 47. 48. CD - USB - SD Track number Play - Pause - Skip Elapsed - Total - Remain Time Progress BPM Folder Cue Single - Continue Loop Pitch ID3 display Current selected audio source Current selected track or total number of tracks when first loaded Current play status (play, pause, forward or reverse symbol) Time display status (elapsed, total elapsed or remaining time) Minutes, seconds and hundredths display Bar graph display showing track progress - flashes 30s before end Beats per minute display Current selected folder or total number of folders when first loaded Indicates when track is at cue point & flashes when cue point is set Single track play or continuous folder play Indicates when loop is active Displays percentage of playback speed when pitch change is active Track name (scrolling) display Operation Connect the fig.8 inlet (28) to a mains supply using the mains lead supplied and connect the audio output (29) to the mixer, recorder or amplifier being used. Press in the power button (1) to power up the unit. To play a CD, press the “Open/Close” button (13) and a drawer will eject from the front panel. Carefully place the CD with print-side-up onto the drawer and press “Open/Close” again to load. When loaded, if CD is not selected, press Source select (4) until “CD” is displayed as the source. Disc information will be displayed. Standard CD audio or compressed digital audio can be played. Press Play/Pause to initiate playback. To play compressed audio files from a USB memory device or SD card, insert the media into the relevant connector on the front panel (11, 12) and press Source select to choose the relevant media. Press Play/Pause to initiate playback and use further controls as detailed in the panel layouts above. The CDUSB-2 can be operated either by front panel controls or the supplied handheld IR remote control. Before use, insert the 2 x AAA batteries into the remote control, observing the correct polarity as indicated inside the rear compartment. 170.663UK User Manual When not in use for long periods, disconnect the CDUSB-2 from the mains supply. Specifications Power supply 100-240Vac, 50/60Hz (fig 8) Power consumption 25W max Anti-shock 20 seconds Pitch bend Up to ±16% USB input v.2.0 320GB max (500GB max self-powered) SD card slot SD cards up to 8GB Output connection L+R RCA Frequency response 20Hz - 20kHz (±2dB) SNR >90dB THD <0.1% Channel separation 81dB Output level 1.1Vrms @10k Ohms Output impedance 1k Ohms Remote : Battery 2 x AAA (supplied) Dimensions 482 x 260 x 94mm Weight 3.35kg Troubleshooting No power & no indicators lighting Ensure that mains is connected properly and supply voltage is correct for the unit. Check power switch, switch at mains outlet and mains plug fuse. Check rear panel fuse. If continually blowing, refer to qualified service personnel Power is on but no playback Check that CD has CD audio or standard compressed digital audio files on it Playback is indicated but no audio output Check rear panel audio connections and attached equipment No pitch control Ensure that the Pitch button is switched on when using the pitch slider Continuous looping Check that Reloop is not active and press Out to exit if necessary No response from remote control Check 2 x AAA batteries in rear of handset and replace if necessary Check that USB or SD media have standard compressed digital audio files on them Check that CD or USB/SD media have playable audio files stored on them Make sure handset is pointed in line of sight to the IR receiver on the front panel Disposal: The “Crossed Wheelie Bin” symbol on the product means that the product is classed as Electrical or Electronic equipment and should not be disposed with other household or commercial waste at the end of its useful life. The goods must be disposed of according to your local council guidelines. Errors and omissions excepted. Copyright© 2013. AVSL Group Ltd. 170.663UK User Manual 170.663UK User Manual