
1
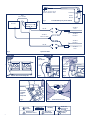
TransDiscal *
Cooled Radiofrequency Kit
Pain Management
Instructions for Use
1
Sterile water injection port
Luer Locks - for connection of
Tube Kit to TransDiscal* Probe
70 ml Mark
Pump
Connector Cable
Burette
Reservoir
Cooled Radiofrequency Sterile Tube Kit
Fig. 1
Generator
Pump Unit
TransDiscal*
Probe
Tube Kit
TransDiscal*
Introducer
TransDiscal*
Y-Connector Cable
TransDiscal*
Introducer
Tube Kit
TransDiscal*
Probe
System Schematic
Fig. 2
Inject sterile
water
into burette
70 mL
Mark
70 mL
Mark
Fig. 3
Burette Placement in Pump Unit
Remove lid
and pour
sterile
water
Fig. 4
Fig. 5
Placement
of Tubing
in the
Pump Unit
Fig. 7
Fig. 6
Single
Use Only
STERILE EO
Attention: See
Instructions for Use
2
Connection of Luer Locks
Rx Only
Keep Away
from Sunlight
Do Not Use
If Package Is
Damaged
Dispose of
Properly
e
Kimberly-Clark* TransDiscal* Cooled Radiofrequency Kit
Pain Management
Federal (U.S.A.) law restricts this device to sale by or on the order of a physician.
Device Description
Kimberly-Clark* TransDiscal* Cooled Radiofrequency Introducer (sterile,
single use): It is to be used with the Kimberly-Clark* TransDiscal* Cooled
Radiofrequency Probes only. The TransDiscal* Introducer provides a path for the
TransDiscal* Probe to the disc.
Kimberly-Clark* TransDiscal* Cooled Radiofrequency Probe (sterile, single
use): It is inserted through a TransDiscal* Introducer into the intervertebral disc.
Sterile water circulates internally to cool the TransDiscal* Probe while it delivers
radiofrequency (RF) energy. Thermocouples in the TransDiscal* Probe measure
cooled electrode temperature throughout the procedure.
Kimberly-Clark* Cooled Radiofrequency Sterile Tube Kit (sterile, single use,
non-body contact): It is used for closed-loop circulation of sterile water through
a TransDiscal* Probe. It includes a burette and tubing.
Indications For Use
The Kimberly-Clark* TransDiscal* Cooled Radiofrequency Kit, in combination with
the Kimberly-Clark* Radiofrequency Generator (PMG-115-TD/PMG-230-TD)
(formerly Baylis Pain Management Generator), is indicated for the coagulation
and decompression of disc material to treat symptomatic patients with
contained herniated discs.
Contraindications
For patients with cardiac pacemakers, a variety of changes can occur during and
after the treatment. In sensing mode the pacemaker may interpret the RF signal
as a heartbeat and may fail to pace the heart. Contact the pacemaker company
to determine if the pacemaker should be converted to a fixed-rate pacing
during the radiofrequency procedure. Evaluate the patient’s pacing system after
the procedure.
Check the compatibility and safety of combinations of other physiological
monitoring and electrical apparatus to be used on the patient in addition to
the RF Generator.
If the patient has a spinal cord, deep brain, or other stimulator, contact
the manufacturer to determine if the stimulator needs to be in the bipolar
stimulation mode or in the OFF position.
This procedure should be reconsidered in patients with any prior neurological
deficit.
The use of general anesthesia is contraindicated. To allow for patient feedback
and response during the procedure, it should be performed under local
anesthesia.
Systemic infection or local infection in area of the procedure.
Blood coagulation disorders or anticoagulant use.
Warnings
The TransDiscal* Kit contains single-use devices. Do not reuse,
reprocess, or resterilize this medical device. Reuse, reprocessing, or
resterilization may 1) adversely affect the known biocompatibility
of the device, 2) compromise the structural integrity of the device,
3) lead to the device not performing as intended, or 4) create a risk
of contamination and cause the transmission of infectious diseases
resulting in a patient injury, illness, or death.
The TransDiscal* Probe must be used with the correct connector
cable. Attempts to use it with other connector cables can result in
electrocution of the patient or operator.
Laboratory staff and patients can undergo significant x-ray exposure
during radiofrequency procedures due to the continuous use of
fluoroscopic imaging. This exposure can result in acute radiation injury
as well as increased risk for somatic and genetic effects Therefore;
adequate measures must be taken to minimize this exposure.
Discontinue use if inaccurate, erratic or sluggish temperature readings
are observed. Use of damaged equipment may cause patient injury.
Do not modify Kimberly-Clark* Equipment. Any modifications may
compromise safety and efficacy of the device.
When the RF Generator is activated, the conducted and radiated
electrical fields may interfere with other electrical medical
equipment.
The RF Generator is capable of delivering significant electrical power.
Patient or operator injury can result from improper handling of the
TransDiscal* Probes, particularly when operating the device.
During power delivery, the patient should not be allowed to come in
contact with grounded metal surfaces.
Do not remove or withdraw the device while energy is being delivered.
Precautions
Do not attempt to use the TransDiscal* Kit before thoroughly reading the
accompanying Instructions for Use and the User’s Manual for the RF Generator.
Apparent low power output or failure of the equipment to function properly at
normal settings may indicate: 1) faulty application of the dispersive electrode
or 2) power failure to an electrical lead. Do not increase power level before
checking for obvious defects or misapplication.
To prevent the risk of ignition, make sure that flammable material is not present
in the room during RF power application.
Only physicians familiar with RF lesion techniques should use the TransDiscal*
Kit components.
It is the physician’s responsibility to determine, assess and communicate to each
individual patient all foreseeable risks of the RF lesion procedure.
The sterile packaging should be visually inspected prior to use to detect any
compromise. Ensure that the packaging has not been damaged. Do not use the
equipment if the packaging has been compromised.
Proper sterile techniques must be used when assembling and filling the Tube
Kit. Do not place the lid down on a non-sterile surface.
Kimberly-Clark* Cooled Radiofrequency Sterile Tube Kit
The Tube Kit is for use with a single TransDiscal* Probe.
Care must be taken to ensure all luer fittings are secure to prevent leaking.
Do not disconnect luer fittings while the pump is running.
Arrange equipment to minimize tubing tripping hazards.
Do NOT perform cooled RF lesion procedures if water is not circulating
through the Tube Kit, water is leaking or air bubbles are seen in the tubing.
Immediately stop the procedure and correct circulation before restarting
the procedure.
Do NOT pinch the tubing of the Tube Kit.
Kimberly-Clark* TransDiscal* Cooled Radiofrequency Introducer
Be careful while handling the TransDiscal* Introducer. The sharp tip can
cause injury to the operator if handled carelessly.
Handle the Introducer safely when it is in use due to electric currents.
Do not remove or withdraw the Introducer while energy is being delivered.
Do not move the Introducer without the stylet fully inserted.
Kimberly-Clark* TransDiscal* Cooled Radiofrequency Probe
The Tube Kit should never be disconnected from the TransDiscal* Probe
when RF delivery is in progress. The lumen of the Tube Kit should not be
obstructed in any way during the procedure, as this will stop cooling of the
TransDiscal* Probe.
Disconnect the TransDiscal* Probe by pulling the connector, not the cable.
Handle the TransDiscal* Probe safely when it is in use due to electric currents
and the hot tip.
While inserting the TransDiscal* Probe through the TransDiscal* Introducer
watch the fluoroscope for any buckling. Do not attempt to further insert the
TransDiscal* Probe if any buckling is observed or significant resistance is felt.
Confirm the placement of the TransDiscal* Probe in the disc with fluoroscopy.
Do not apply RF energy if any segment of the TransDiscal* Probe distal to the
Introducer is outside the intervertebral disc wall.
Do not move the TransDiscal* Introducer when the TransDiscal* Probe is in it.
If repositioning is needed, retract the TransDiscal* Probe from the Introducer
and then reposition the Introducer with the stylet inserted.
The “TransDiscal* Temp” displayed on the RF Generator refers to the cooled
electrode temperature and not the hottest tissue temperature.
The “Peripheral Disc Temp” displayed on the RF Generator refers to the
temperature of the TransDiscal* Probe shaft 3 mm proximal from the
electrode and is cooled slightly. This value is not to be used to assess the
hottest tissue in the disc periphery.
Adverse Events
Potential complications associated with the use of this device include but are
not limited to: infection, nerve damage, increased pain, visceral injury, failure
of technique, paralysis, and death.
3
Product Specifications
The TransDiscal* Probe is comprised of an electrically insulated shaft with a active
tip that functions as an electrode for RF energy delivery, a handle, tubes with luer
locks and a cable with a 5-pin connector.
The TransDiscal* Introducer includes an insulated stainless steel cannula and
a stylet.
The Tube Kit is comprised of a burette and flexible tubing fitted with luer locks
for connection to the TransDiscal* Probe.
The kit components are ethylene oxide sterilized and supplied sterile. The devices
should be stored in a cool, dry environment.
Note: Please contact Kimberly-Clark for a list of all model numbers and sizes.
Inspection Prior To Use
The sterile packaging should be visually inspected prior to use to detect any
compromise. Ensure that the packaging has not been damaged. Do not use the
equipment if the packaging has been compromised.
Equipment Required
Procedures in the disc should be performed in a specialized clinical setting
equipped with a fluoroscopy unit. The equipment required to perform RF
procedures include:
• TransDiscal* Cooled Radiofrequency Probe(s)
• TransDiscal* Cooled Radiofrequency Introducer(s)
• Cooled Radiofrequency Peristaltic Pump Unit and Cable
• Cooled Radiofrequency Sterile Tube Kit(s)
• TransDiscal* Cooled Radiofrequency Y-Connector Cable
• Dispersive Electrode
• Radiofrequency Generator (PMG-115-TD/PMG-230-TD)
Troubleshooting
Instructions For Use (Fig. 2)
The following table is provided to assist the user in diagnosing potential
problems.
Figure 2 is a schematic representation of the connections of the system.
Assemble all the equipment required for the procedure. Set up the
Radiofrequency Generator (PMG-115-TD/PMG-230-TD) and the Pump Unit as
directed in their Instructions for Use. Connect the TransDiscal* Y-Connector Cable
to the RF Generator as described in its Instructions for Use.
Open the package in the sterile field using appropriate sterile techniques. Inspect
the devices visually to make sure there is no damage to them. Do NOT perform
the procedure with any damaged equipment.
Kimberly-Clark* TransDiscal* Cooled Radiofrequency Introducer
1. Carefully insert the Introducer with the stylet in it, into the intervertebral
disc under fluoroscopic guidance.
2. Once the Introducer is in the proper position, carefully remove the stylet
from the Introducer.
3. Repeat steps 1-2 with a second Introducer.
4
Kimberly-Clark* TransDiscal* Cooled Radiofrequency Probe
1. Insert the TransDiscal* Probes in the intervertebral disc through the
Introducers. Never force the TransDiscal* Probe in if significant resistance
is felt.
2. Connect the TransDiscal* Probe to the Tube Kit.
3. Connect the TransDiscal* Probes to the TransDiscal* Y-Connector Cable.
If the option of one TransDiscal* Probe has been enabled in the RF
Generator, connect the TransDiscal* Probe to “TransDiscal* Probe A” side
of the TransDiscal* Y-Connector Cable.
4. Select the Treatment Mode in the RF Generator. Set advanced settings
and the parameters for RF delivery in the RF Generator as described in
its User’s Manual.
5. Perform the procedure as described in the RF Generator User’s Manual.
The procedure comprises pre-cooling, treatment and post-cooling
stages.
6. Temperatures at the tip of the electrode and 3 mm proximal to the
electrode of the TransDiscal* Probe are monitored throughout the
procedure by the RF Generator.
Note: Other than reproduction of their usual back pain or irritation due
to TransDiscal* Probe introduction, monitor the patient for unexpected
symptoms that may indicate, for example, spinal cord or nerve root
irritation. If these indications are suspected discontinue energy delivery.
7. After post-cooling remove the TransDiscal* Probes and the Introducer
and discard as biohazards. If used, remove the Dispersive Electrode
from the patient and discard appropriately. Disconnect the TransDiscal*
Y-Connector Cable from the RF Generator. Follow standard hospital
techniques to handle reusable items.
Kimberly-Clark* Cooled Radiofrequency Sterile Tube Kit (Fig. 1)
1. Place the burette into the burette holder on the side of the Pump Unit.
The side of the burette with 2 or 3 ports indicates the top of the burette.
(Fig. 3)
2. Fill the burette with room temperature sterile water. Use sterile handling
techniques. Fill the burette to the 70 mL mark. Burette can be filled
by injecting sterile water through a port in the lid, or by temporarily
removing the lid and pouring sterile water in.
Warning: BE SURE TO FILL THE BURETTE TO THE 70 mL MARK.
Not filling the burette to the 70 mL mark will result in an
inadequate supply of water for circulation.
Use ONLY sterile room temperature water.
After filling, ensure the lid is snapped back onto the body of the burette
it was removed from. It is important that the lid corresponds to the
original burette body it was removed from; do not mix up the lids.
Inject sterile water into burette (Fig. 4) OR remove lid and pour sterile
water. (Fig. 5)
3. Place the thick-walled tubing coming out of the bottom of the burette
into the pumphead of the Pump Unit (Fig. 6). Place the tubing in
the channels of the L-shaped bracket to ensure that the tubing is not
obstructed while closing the pumphead. Close the lid on the pumphead
to clamp down on the tubing.
4. Remove the caps on the male and female luer locks. Connect the
appropriate luer lock to the corresponding luer lock on the TransDiscal*
Probe (Fig. 7). Do not over tighten the connection.
Caution: Connect one Tube Kit to one TransDiscal* Probe.
5. At the end of the procedure, discard the Tube Kit appropriately.
PROBLEM
TROUBLESHOOTING
No temperature
measurement in
treatment mode
OR
Inaccurate, erratic or
sluggish temperature
reading in treatment
mode
Ensure that all connections are made:
• Probe(s) to Y-Connector Cable
• Y-Connector Cable to the RF Generator
• RF Generator to power outlet
Check for an error message on the RF
Generator.
Visually inspect the Probe or Cable for
damage. Ensure that devices are dry and
at room temperature. If problem persists
discontinue use.
Water does not flow
through TransDiscal*
Probe and Tube Kit.
• Stop the procedure immediately.
• Check the luer lock connections to
ensure the Tube Kit is connected to the
TransDiscal* Probe.
• Check the Pump to ensure the lid is
not open.
• Check RF Generator for any error
messages.
Probe connector does
not fit in Probe plug-in.
• Check that the connector’s keys are lined
up in the proper orientation.
• Ensure that the connectors are clean and
unobstructed.
Damage to insulation
on TransDiscal* Probe or
Introducer.
Do not use. Discard immediately.
PROBLEM
TROUBLESHOOTING
Water is not circulating
through tubing
during TransDiscal*
pre-cooling, ON and
post-cooling states.
• Ensure the Tube Kit is correctly connected
to the Probe.
• Ensure the Tube Kit has been placed in the
pumphead and that it is correctly located
in the L-shaped tube guides.
• Ensure the burette reservoir has been
filled.
• Visually inspect the Tube Kit tubing and
joints for leaks and occlusions.
• Ensure that the float ball in the burette is
floating and not occluding the outflow of
water from the burette.
• Ensure the pump tubing (thick-walled
tubing that is coming directly out of the
bottom port of the burette) is placed in
the pumphead.
Water is not dripping
into the burette.
Check to see if water is running down the wall
of the burette.
Tubing cannot be
placed in the pump.
Open the pumphead lid fully and place the
tubing above the L-shaped guides.
Float is stuck on
bottom port of the
burette.
Close the pumphead lid. Gently shake the
burette to try and loosen the ball from the
bottom of the burette.
Tube Kit cannot be
connected to Probe.
Check to see that male and female luer locks
are properly connected.
Tube Kit breaks, is
leaking or is occluded.
Immediately discard the Tube Kit.
Disclaimer and Exclusion of Other Warranties
There are no warranties of any kind, which extend beyond the description of the
warranties above. Kimberly-Clark disclaims and excludes all warranties, whether
expressed or implied, of merchantability or fitness for a particular use of purpose.
Limitation of Liability for Damages
In any claim or lawsuit for damages arising from alleged breach of warranty,
breach of contract, negligence, product liability or any other legal or equitable
theory, the buyer specifically agrees that Kimberly-Clark shall not be liable for
damages for loss of profits or claims of buyer’s customers for any such damages.
Kimberly-Clark’s sole liability for damages shall be limited to the cost to buyer of
the specified goods sold by Kimberly-Clark to buyer which give rise to the claim
for liability.
The buyer’s use of this product shall be deemed acceptance of the terms and
conditions of these limited warranties, exclusions, disclaimers and limitations of
liability for money damages.
Customer Service and Product Return Information
If you have any problems with or questions about this Kimberly-Clark* Equipment,
contact our technical support personnel:
Kimberly-Clark
1400 Holcomb Bridge Rd.
Roswell, GA 30076-2199
E-mail: [email protected]
U.S. Customers: 800-KCHELPS (800-742-1996)
International Customers: +1-770-587-7200
Notes
In order to return products under limited warranty you must have a return
authorization number before shipping the products back to Kimberly-Clark.
Limited Warranties
Kimberly-Clark warrants that these products are free from defects in original
workmanship and materials. If these products prove to be defective in original
workmanship or original materials, Kimberly-Clark, in its absolute and sole
discretion, will replace or repair any such product, less charges for transportation
and labor costs incidental to inspection, removal or restocking of product.
This limited warranty applies only to original factory delivered products that have
been used for their normal and intended uses. Kimberly-Clark’s limited warranty
shall NOT apply to Kimberly-Clark’s products which have been repaired, altered or
modified in any way and shall NOT apply to Kimberly-Clark’s products which have
been improperly stored or improperly installed, operated or maintained contrary
to Kimberly-Clark’s Instructions. The warranty period for Kimberly-Clark* RF Probes
and RF Generator Connector Cables is 90 days from the date of purchase, unless
otherwise stated.
5


![en:users:manual:0.4.3b:index [Pencil Wiki ]](http://vs1.manualzilla.com/store/data/005878085_1-1fc748767abf1b25ff52dda6bda51fd8-150x150.png)
