1
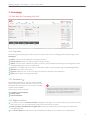
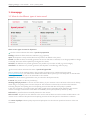
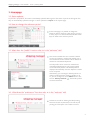
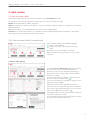
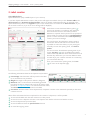
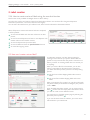
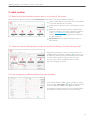
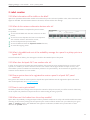
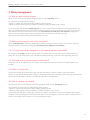
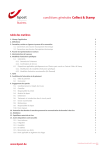
Shipping Manager : user manual I V.1.0 I January 2014
Shipping Manager
User manual
1
Shipping Manager : user manual I V.1.0 I January 2014
Index
1. Homepage
3
1.1. How does the homepage look like?
1.1.1. Top menu
1.1.2. Dashboard
1.1.3. Right-hand menu
1.2. What do the different types of status mean?
1.3. Status updates
1.4. How to change the reference period
1.5. W
hat does the “profile” function refer to in
the “welcome” tab? 1.6. What does the “preferences” function refer to
in the “welcome” tab?
3
3
3
3
4
5
5
2. Label creation
6
2.1. How to create a label
2.1.1. How to create a label in manual mode
A. Home or office delivery A bis. Office delivery: bpack Business B. Delivery to a pickup point
C. Delivery to a parcel machine
D. Delivery abroad
2.1.2. How to create a label using a profile
2.1.3. How to create a series of labels on the basis
of a CSV file
2.1.4. How to create a series of labels using
the one-shot function
2.2. How can I create a return label?
2.3. What do the four selection buttons refer
to at the top of the screen?
2.4. There are several visible products under the
method of delivery. To what do they refer? 2.5. How to register an address that has just been
encoded
2.6. How to use registered addresses
2.7. How to view all the available options for
a parcel
2.8. What does the “reference” field refer to?
2.9. What does the “free message” field refer to?
2.10. What does the “cost centre” field refer to?
2.11. When is it obligatory to indicate the weight?
2.12. What information will be visible on the label?
2.13. What do the various confirmation buttons
refer to?
2.14. What is the additional cost of the availability
message for a parcel in a pickup point
or a bpack 24/7?
2.15. What does the bpack 24/7 user number
refer to?
2.16. Does a receiver have to be registered to receive a parcel in a bpack 24/7
parcel machine?
5
5
6
6
6
7
8
9
9
10
10
11
11
12
12
12
13
13
13
13
13
13
14
14
2.17. Does it cost to print a label?
2.18. Where can I find orders from the
e-shop module?
14
3. Pickup management
15
3.1. How to make a pickup request
3.2. Does a pickup request have to be confirmed?
3.3. Can the pickup list be changed once the
request has been submitted?
3.4. Until when can a pickup request be
submitted?
3.5. What is a pickup list?
3.6. How is a pickup list created?
3.7. Is a pickup request required in order
to obtain a list?
3.8. Up till when can the list be changed?
3.9. What is the value of this list for bpost?
3.10. How can I add parcels to the list?
15
15
4. Parcel search tool
16
4.1. How to verify the location of a parcel 4.2. Where can the search function be found
in the application?
4.3. How to have a detailed view of a parcel
4.4. When is status indication updated in
the application?
4.5. To what do the two tabs in the search
tool refer?
4.6. What time is available for a search?
4.7. Until when can a parcel be searched?
16
14
15
15
15
15
16
16
16
16
16
16
16
17
17
17
5. Administration management
17
5.1. Address management
5.1.1. Where can I find the address book?
5.1.2. How addresses are imported 5.1.3. How to change addresses
5.1.4. How to add new addresses
5.2. Integration of the module to an online shop 5.2.1. To what does integration to an e-commerce
website refer to?
5.2.2. How to integrate the module into
the website 5.3. Self-service reporting 17
17
17
17
17
18
18
18
18
14
14
14
2
Shipping Manager : user manual I V.1.0 I January 2014
1. Homepage
1.1. How does the homepage look like?
1
2
3
4
5
6
7
12
8
13
9
10
11
14
1.1.1. Top menu
The browsing menu provides you with an overview of the status of orders, tracking parcels and latest bpost news;
Homepage:
1
2
3
4
5
6
7
O
rders: overview of the shipments of all related accounts;
P
ick-up request: overview of pick-up requests and pick-up lists;
Admin: overview of the addresses of senders, receivers, pick-up addresses and settings for the integration of the
Shipping Manager front-end in an online shop;
Icon: This icon enables the user to return to the bpost portal to view the whole range of available applications;
W
elcome: view of the user account;
Sign off: enables the user to return to the bpost site and to disconnect the application;
Help: this link opens a new page with FAQs.
1.1.2. Dashboard ( 8 )
The dashboard provides an overview of the complete
status of shipments for the selected customer account
and within the selected period. An overview of pickup
requests is also available.
Three actions can be performed:
9 Creation of a new shipment
10 Pickup request
11 Search a shipment
• If several customer accounts are linked to each other, several
dashboards will appear starting off with a summary dashboard.
• In order to carry out an action, the buttons have to be used
per dashboard, i.e. for a specific customer account.
1.1.3. Right-hand menu
12
13
14
A
n overview of various customer accounts is displayed to the right of the screen. When you click on the account
that interests you, you are automatically redirected to the account concerned.
News from bpost is published on a regular basis to keep you informed about the transport of national and
international parcels.
Our contact details are indicated in order to facilitate accessibility to our customer service department.
3
Shipping Manager : user manual I V.1.0 I January 2014
1. Homepage
1.2. What do the different types of status mean?
1
2
Aan zendingen kunnen twee types statussen worden toegekend :
There are two types of status for shipments:
The first column indicates the status of parcels in preparation
Pending: indicates if all the checks are satisfactory (e.g. payment);
Open: the shipment is ready and the label can be printed to be affixed to the parcel;
Printed: the label has been successfully generated. As soon as this status is reached, it is no longer possible to change
it manually. The status will be updated by the logistic flow status;
On hold: if the label has not yet been generated, it is possible to put orders on hold (e.g. stock outages);
Cancelled: if the label has not yet been generated, the shipment is cancelled (e.g. failure to pay).
1
2
The second column indicates the status of parcels in logistic flow
This is a summary of the tracking status in the e-Tracker, the online tool to track &trace bpost parcels
(www.bpost.be/track). If you wish to have detailed information about a parcel, you can always click on the barcodes
in the application itself in order to be redirected to the e-Tracker.
Created: the label has been generated but not yet scanned in the bpost network;
In transit: the parcel is on the way for delivery;
Awaiting pickup by receiver: in the case of home delivery, if your customer was not at home at the time of delivery,
he/she has go to a pickup point to receive the parcel. The customer is informed by a note left in the letterbox
indicating the place and opening hours of the pickup point and the final date when pickup is possible.
In the case of a delivery to a pickup point (post office, postal point or automatic parcel distributor), the receiver
receives a message to inform him or her about the availability of the parcel (either by email or by SMS);
Delivered: the parcel has been successfully delivered to the receiver;
Back to sender: the parcel was not delivered to the receiver and has been returned to sender. Possible reasons: the
receiver has not collected the parcel from the pickup point has refused the parcel or the address is unknown.
The status of pickups indicates pickup requests and pickup lists for the reference period and account of the user
concerned.
4
Shipping Manager : user manual I V.1.0 I January 2014
1. Homepage
1.3. Status updates
For parcels in preparation, the status is immediately updated. With regard to the status of parcels in the logistic flow,
they are automatically updated overnight or can be updated on request on the request page.
1.4. How to change the reference period
1
1
At
the homepage, it is possible to change the
reference date by choosing a date ranging from one
to thirty days. If no date is indicated, the last fifteen
days are taken as the reference period.
1.5. W
hat does the “profile” function refer to in the “welcome” tab?
2
T his function enables the user to define a default
product for a delivery method and possibly one or
more additional services. Profiles can be defined for
national or international shipments.
2
Several profiles can be created for national and
international shipments but only a single profile
can be defined by default. This default profile is
displayed automatically when the shipment creation
screen is opened.
Alternatively, you can assign a default product to a
delivery method without creating a profile. To do
so, you can configure it via the Admin menu in the
section “Delivery method” ( 3 ). The default product
can then be defined.
3
1.6. W
hat does the “preferences” function refer to in the “welcome” tab?
4
P references is used for defining the label printing
format as format A4 (standard) or format A6 (roll
printing) and the layout of the Orders overview.
2
5
Shipping Manager : user manual I V.1.0 I January 2014
2. Label creation
2.1. How to create a label
On the home page, select the user account and click on the “new shipment” button.
You will arrive on the standard shipment creation page with various methods of creation:
Manual: all the information is filled in separately;
Profile: on the basis of a shortcut (see chapter 1 1.5), you can assign a method of delivery to a product and to related
additional services;
CSV: you can upload up to 1,000 addresses at a time to create shipping labels;
One-Shot: for a national home delivery, it is possible to create multiple shipping labels for addresses in the address
book using the same combination of product and options.
2.1.1. How to create a label in manual mode
Three methods of delivery are available in Belgium:
1
Home
or office delivery;
2
Delivery
to a pickup point (post office or post
point);
3
Delivery
to a parcel machine - bpack 24/7
Deliveries abroad are only possible to home or office
addresses.
1
2
3
A. Home or office delivery
You select home or office delivery ( 4 ). After selecting
the method of delivery, you can still choose the
product you want for your shipment. Depending on
the product chosen, certain options will be available,
included or invisible.
As soon as the method of delivery is selected, you can
fill in the sender and receiver fields ( 5 ).
If this is a new address, it is possible to register it in the
application using an “alias”.
Additional services are also available. These three
options are the most frequently requested from bpost.
If you wish to have additional options, you can request
them via the “plus” selection button ( 6 ).
All available options for the selected method of delivery
and product will then be visible.
Once an additional option has been selected, it will also
be visible on the label creation screen.
4
5
6
6
Shipping Manager : user manual I V.1.0 I January 2014
2. Label creation
A bis. Office delivery:
bpack 24h Business (only available if part of your contract)
If you have a bpack 24h Business contract, this product will appear as standard when you click ‘home or office’. The
‘Basic Insurance’ and ‘Automatic 2nd Presentation’ options are already checked because they are included in the
bpack 24h Business product. The ‘Signature’ option is not checked, but it is included in the ‘Basic Insurance’, so you
do not need to select it (if you do, an error message will be displayed).
Scroll down to enter the desired delivery place ( 1 )
(such as rear entrance or stockroom). Our staff must
have unrestricted access to this delivery location.
Deliveries to a specific desk or person are not permitted.
If this is what you require, choose our ‘Desktop Delivery’
option. For more information about ‘Desktop Delivery’,
contact your account manager.
You can also enter the addressee’s opening times at
the bottom. We will take this into account as much
as possible to ensure the delivery of your parcel goes
smoothly. To enter the opening times, click ‘click to
update’.
1
2
You can now enter the addressee’s opening times. If you
choose ‘fast entry’ ( 2 ) (such as 09:00-17:00 or 09:0012:00/13:30-17:30), the same times will be entered for all
business days. Otherwise, you can enter different times
for each day. If your customer is closed on a certain day,
you can uncheck that day.
Once you’ve entered the opening times, click ‘save’
( 3 ) to return to the shipment page.
3
The following information related to the shipment may be added:
4
5
6
7
Free
message: this information will be printed on the label.
4
5
6
7
Up to 50 characters are permitted;
Weight:
the weight of the parcel is defined in kilograms;
8
9
10
11
12
Reference: this is a code which is automatically generated
but which can also be changed. This code can be used to track
parcels via www.bpost.be/track. If no comment has been made,
this reference field will also be printed on the label;
Cost
centre: this field enables various departments, companies or actions to be mentioned separately on the same
customer account.
When all the information has been completed for the creation of a shipment, it will be possible:
8
9
10
11
12
to
save and add labels with the same reference to other parcels;
to
save the current shipment and start a new shipment with another reference and another receiver;
to save the shipment and print the label;
to save the label and close the parcel creation function
to
cancel the ongoing action.
7
Shipping Manager : user manual I V.1.0 I January 2014
2. Label creation
B. Delivery to a pickup point
You select delivery to a pickup point, i.e. a post office or
a postal point.
By choosing this method of delivery, the options for
notification by e-mail or sending an SMS to the receiver
are automatically included in the cost of the shipment.
The fields must be filled in including the email address,
the telephone number with a language code and the
language in which the notification should be sent to the
receiver.
If a pickup point is selected, a map appears and it will be
possible to configure search parameters.
The following information related to the shipment can be added:
1
2
3
4
Free
message: this information will be printed on the label.
1
2
3
4
Up to 50 characters are permitted;
Weight: the weight of the parcel is defined in kilograms;
5
6
7
8
9
Reference: this is a code which is automatically generated
but which can also be changed. This code can be used to track
parcels via www.bpost.be/track. If no comment has been made,
this reference field will also be printed on the label;
Cost
centre: this field enables various departments, companies or actions to be mentioned separately on the same
customer account.
When all the information has been completed for the creation of a shipment, it will be possible:
5
5
5
5
to save and add labels with the same reference to other parcels;
to
save the current shipment and start a new shipment with another reference and another receiver;
to save the shipment and print the label;
to save the label and close the parcel creation function to cancel the ongoing action.
8
Shipping Manager : user manual I V.1.0 I January 2014
2. Label creation
C. Delivery to a parcel machine
You select delivery to a bpack 24/7 parcel machine.
By choosing this method of delivery, notifications by e-mail
or SMS to the receiver are included in the cost of the
shipment.
Based on the user account, the system fills in the language,
e-mail address, phone number and preferred parcel
machine of the receiver.
The following information related to the shipment can be added:
1
2
3
4
Free
message: this information will be printed on the label.
1
2
3
4
Up to 50 characters are permitted;
Weight:
the weight of the parcel is defined in kilograms;
5
6
7
8
9
Reference: this is a code which is automatically generated
but which can also be changed. This code can be used to track
parcels via www.bpost.be/track. If no comment has been made,
this reference field will also be printed on the label;
Cost
centre: this field enables various departments, companies or actions to be mentioned separately on the same
customer account.
When all the information has been completed for the creation of a shipment, it will be possible:
5
6
7
8
to
save and add labels with the same reference to other parcels;
to
save the current shipment and start a new shipment with another reference and another receiver;
to save the shipment and print the label;
to
save the label and close the parcel creation function to cancel the ongoing action.
D. Delivery abroad
10
You have a shipment to be sent abroad. You only have the
possibility of sending your international parcels for home
or office delivery ( 10 ).
After selecting the method of delivery, you can still choose
the product you want for your shipment. Depending
on the product chosen, certain options will be available,
included or invisible.
As soon as the method of delivery is selected, you can fill in the sender and receiver fields.
If this is a new address, it is possible to register it in the application using an “alias”.
9
Shipping Manager : user manual I V.1.0 I January 2014
2. Label creation
The following information related to the shipment have to
be added:
1
1
2
3
4
5
6
2
Content description: information concerning the contents
3
4
5
6
of the parcel is obligatory for international shipments;
Weight: weight is defined in kilograms;
Reference:
this is a code that is automatically generated
but which can also be changed. This code can be used to
track parcels via www.bpost.be/track. If no comment is
made, the reference field will also be printed on the label;
Parcel
Return Instructions: if the parcel cannot be delivered to the receiver, it can be returned to the sender or even
destroyed;
Parcel value: this value is given in euro and is the commercial value of the parcel contents;
Shipment type: there is a choice between a document, a gift, a commercial sample or other type.
Several items of optional information can also be added:
7
8
Free
message: this concerns information which will be
printed on the label. Up to 50 characters are permitted;
Cost
centre: this concerns a field that mentions the various
departments, companies or actions separately on the
invoice on the same customer account.
7
9
8
10
11
12
13
When all the information has been completed for the creation of a shipment, it will be possible:
9
10
11
12
13
to save and add labels with the same references to other parcels;
to
save the actual shipment and start a new shipment with another reference and another receiver;
to save the shipment and print the label;
to save the label and close the parcel creation function
to
cancel the ongoing action.
2.1.2. How to create a label using a profile
On the upper part of the creation of a shipment screen, there is a list of various available profiles which were created
previously. In the drop-down list, you can select the profile you require. Once the profile has been selected, the method
of delivery, products and options are automatically entered. You can then fill in the address fields and general information
on the parcel.
2.1.3. How to create a series of labels on the basis of a CSV file
A CSV file is an Excel file registered in CSV format. In order to use this method, the format of the columns must comply
with the example for national and international shipments.
On the shipment creation screen, there is a selection
button in the upper right-hand part of the screen to
download CSV files ( 14 ).
14
If the data are not correctly completed, an error message
will highlight the errors so they can be corrected.
10
Shipping Manager : user manual I V.1.0 I January 2014
2. Label creation
2.1.4. H
ow to create a series of labels using the one-shot function
This function is only available for Belgian home or office delivery.
You select the product and options required and the delivery address. You can then fill in the general shipment
information (comments, cost centre, reference and weight).
You can select the address from your address book, which must be indicated as destination address.
When all shipment creation information has been completed,
it will be possible:
1
2
3
4
5
to save and add labels with the same references to other
parcels;
to
save the actual shipment and start a new shipment with
another reference and another receiver;
to save the shipment and print the label;
to save the label and close the parcel creation function
to
cancel the ongoing action.
1
2
3
4
5
2.2. H
ow can I create a return label?
6
7
As a business customer, you have various options for
creating a return label for your parcels. Return labels for
parcels are only invoiced when the parcel is scanned in our
delivery network. So creating a label does not commit you
to anything.
When you create a label for a destination, you can also
ask for a return label so the parcel can be returned to
you. When the label is printed you have two label printing
options.
6
7
The
first line includes shipping labels without return
labels.
The
second line includes shipping labels with return
labels.
When a CSV import file is created, you can also order bpack
Easy Retour labels (for destinations in Belgium). The product
code is “EASY”.
8
Once the labels have been created, you can create a return
label ( 8 ) via the order list. Simply select the label for which
you wish to create a return label and create.
You can do this on the label creation page by selecting the
bpack Easy return product ( 9 ).
If you use the same reference as before, your return items
will be linked to your initial items.
9
11
Shipping Manager : user manual I V.1.0 I January 2014
2. Label creation
2.3. W
hat do the four selection buttons refer to at the top of the screen?
The four selection buttons at the top of the label creation screen refer to the various methods of delivery.
1
2
3
1
2
3
4
4
Home
or office delivery: the parcel is sent to the address
of a private individual or to an office;
Pickup
point: the parcel is sent to a post office or postal
point;
bpack
24/7: these are parcel machines accessible 24/7
anywhere in Belgium. The receiver should be registered
on the t www.bpack247.be website and the parcel
machine where the parcel should be sent and collected
should be indicated;
bpack World : parcel to be sent abroad for home or
office delivery.
2.4. There are several visible products under the method of delivery. To what do they refer?
Depending of the type of contract, several products are
available under the method of delivery ( 5 ). A product can
be defined by default (via the profile) but it is also possible
to select another product using the drop-down list.
The drop-down menu is available for home or office
deliveries in Belgium or abroad.
5
2.5. How to register an address that has just been encoded
6
If the default address is “new” ( 6 ), it is possible to register
it. Just tick the “Save as alias” box ( 7 ) at the bottom of the
screen and allocate an alias to the registered address.
This address is registered from now on in the address book
and available in the drop-down list for future selection.
7
12
Shipping Manager : user manual I V.1.0 I January 2014
2. Label creation
2.6. How to use registered addresses
1
After having uploaded the addresses or registered them
previously, it is possible to consult the addresses in the
“default address” ( 1 ) field. By clicking on the arrow, all
the registered addresses will appear in the drop-down
list and can be selected.
2.7. H
ow to view all the available options for a parcel
When you create a shipment, you choose a method of delivery and a product. You also see a number of pre-selected
options. These are the most frequently used options.
If you wish to see all options, you have to click on the “plus” selection button. The complete list of available options t is
displayed on the screen.
Once an additional option has been selected, it is immediately visible on the generic shipment creation screen.
2.8. What does the “reference” field refer to?
Additionally to the barcode, the reference enables you to find the parcel in the online track & trace p tool e-Tracker
(www.bpost.be/track).
This reference is automatically generated by the Shipping Manager application and can be changed. For example, the
order number or other internal reference can be used for the reference field.
In the case where no free message is defined, this reference field will also be printed on the label.
2.9. What does the “free message” field refer to?
The free message is printed on the parcel label. This field may contain up to 50 characters and can contain various
information.
2.10. What does the “cost centre” field refer to?
The cost centre breaks down the invoice of the user account in sections. This breakdown is done based on a unique
code (campaign code, department, breakdown between companies, etc.).
2.11. W
hen is it obligatory to indicate the weight?
The weight for shipments in Belgium does not have to be indicated. For shipments abroad, the weight field must be
completed.
13
Shipping Manager : user manual I V.1.0 I January 2014
2. Label creation
2.12. What information will be visible on the label?
Apart from operational information needed such as barcodes, product code and symbolic codes, other information will
appear on the label. This information relates to the sender, receiver and the free message.
2.13. W
hat do the various confirmation buttons refer to?
When all the information is completed for parcel creation,
it is possible:
1
2
3
4
5
to save and add labels with the same references to other
parcels;
to
save the current shipment and start a new shipment
with another reference and another receiver;
to
save the shipment and print the label;
to save the label and close the shipment creation function;
to
cancel the ongoing action.
1
2
3
4
5
2.14. What is the additional cost of the availability message for a parcel in a pickup point or a
bpack 24/7?
For both methods of delivery, the message is included in the standard price of the parcel.
2.15. What does the bpack 24/7 user number refer to?
In order to send a parcel to a bpack 24/7 parcel machine, the receiver has to be registered at bpost. In order to send
a parcel to a machine, you have to have the receiver’s user number. This six-figure number is unique for every user
and includes a preferred machine and notification preferences for parcel delivery. At the moment of registration, your
customer receives his/her own user number.
2.16. Does a receiver have to be registered to receive a parcel in a bpack 24/7 parcel
machine?
Every person who wants to receive a parcel in a bpack 24/7 parcel machine must be registered at bpost. This can be
done via the bpack 24/7 site (www.bpack247.be).
2.17. D
oes it cost to print a label?
The label is printed free of charge. Once the parcel is scanned in the bpost network, you will be invoiced. A label may
not be copied. Every label has a unique barcode for online tracking & tracing of parcels.
2.18. Where can I find orders from the e-shop module?
bpost offers the possibility to integrate bpost’s delivery methods module in an e-shop. This module enables automatic
recording of the receiver’s pickup point and speeds up the creation of labels. Orders from your online shop are given
“open” or “pending” status in the dashboard. After payment verification, the label can be printed and it is then
allocated the “printed” status.
14
Shipping Manager : user manual I V.1.0 I January 2014
3. Pickup management
3.1. How to make a pickup request
Select the user account from the homepage and click on the “new pickup” button.
You will arrive on a page with two options:
• Option 1: creation of a pickup list without making a pickup request;
• Option 2: pickup request with the possibility of creating a pickup list linked to the request.
If you choose the second option (pickup request), you must complete several fields such as the pickup address, the
date, the number of parcels, the volume and the weight. From this step, you can confirm your request using the first
three selection buttons at the bottom of the screen (save and new, save and print, save and close). Doing one of
these actions, the pickup request is effective and the driver will come by on the day requested.
Same-day pickup requests must be submitted before 11.30 am.
3.2. D
oes a pickup request have to be confirmed?
When a pickup request is submitted, confirmation is effective from the moment you click on one of the first three
selection buttons at the bottom of the page (save and new, save and print, save and close).
3.3. C
an the pickup list be changed once the request has been submitted?
By clicking on the “pickup” button in the top menu, you arrive in the overview of the various pickup requests or
pickup lists. You can choose the list you would like to change by clicking on the icon at the beginning of the line.
3.4. Until when can a pickup request be submitted?
Pickup requests can be submitted up to 11.30 am on the same day. Pickup on weekends or official holidays is not
possible.
3.5. W
hat is a pickup list?
A pickup list includes all the information that you have encoded for a pickup, a depot or other information.
This list has your general data and data relating to the pickup (address, date, quantity, volume and weight) but also the
parcels that can be linked to this list. You define this parcel list in the application.
3.6. How is a pickup list created?
You select the user account required from the homepage and click on the “new pickup” button.
You will arrive on a page with two management pickup options:
• Option 1: creation of a pickup list without making a pickup request;
• Option 2: pickup request with the possibility to create a list linked to the request.
If you choose the first option (pickup list), you have to complete several fields such as pickup address, date, number
of parcels, volume and weight. The address and the date are the only obligatory fields. The creation of this list has no
impact on the logistic flow of parcels or on any other pickup request.
15
Shipping Manager : user manual I V.1.0 I January 2014
3. Pickup management
3.7. Is a pickup request required in order to obtain a list?
The pickup list can be created without having to be linked to a pickup request. The creation of this list has no impact on
the logistic flow of parcels or on any other pickup request.
3.8. Up till when can the list be changed?
You can change the list as you see fit to see what the current status is for parcels that have been sent.
3.9. What is the value of this list for bpost?
The list in the application has no value for bpost. Once the list is printed, the driver will check the number of parcels,
adjust the report, and sign it accordingly.
3.10. How can I add parcels to the list?
By clicking on the “pickup” button in the top menu, you arrive in the overview of the various pickup requests or pickup
lists. You can choose the list you would like to change by clicking on the icon at the beginning of the line.
4. Parcel search tool
4.1. How to verify the location of a parcel
Using the Shipping Manager tool, you can easily find out whether or not the parcel is on route. There are several search
fields possible using this tool.
By using the search tool, you can apply several filters to find one or more shipments of interest. Once you have selected
a shipment, you can click on the barcode and be directed to the track & trace tool with information about the parcel
concerned.
4.2. Where can the search function be found in the application?
You can select the search function from the homepage at bottom right of a customer account. On this basis, you can
complete one or more fields to carry out your search and find one or more shipments.
4.3. H
ow to have a detailed view of a parcel
After having selected the shipment that you wish to follow, you can click on the barcode link and will be redirected to
the online track & trace tool for a detailed view.
4.4. When is status indication updated in the application?
For parcels being prepared, status indications are immediately updated [open, pending, printed, suspended, and
cancelled].
Regarding the status of the parcels in the logistic flow, they are automatically updated once during the night or can be
updated on request on the order page [created, in transit, awaiting pickup, distributed, and return to sender]. You can
also update the status manually.
16
Shipping Manager : user manual I V.1.0 I January 2014
4. Parcel search tool
4.5. T
o what do the two tabs in the search tool refer?
The first tab offers a search filter with a time limit.
The second tab offers unlimited search based on a barcode or reference.
4.6. What time is available for a search?
In the first tab, searches can be carried out between 1 and 30 days without any time limit.
In the second tab, the time is unlimited.
4.7. U
ntil when can a parcel be searched?
The logistic status of a parcel is available for three months. All the data of the parcels remain available as long as the user
wishes.
5. Administration management
5.1. A
ddress management
5.1.1. Where can I find the address book?
There is an “administration” button at the top menu of the application. If you click on this button, an overview of the
location of accounts which are linked to your connection can be found. By clicking at the beginning of the line, you
arrive at the account parameters.
You will then have the list of addresses of senders, receivers and shipments.
You can delete, change, export and import the addresses contained in the address book.
5.1.2. How addresses are imported
Once in the address book, the user may, using a CSV file (Excel registered under…), import a series of addresses in the
application by adhering to a specific format. Once this has been imported, the system validates the transfer or indicates
any errors during transfer.
5.1.3. How to change addresses
Once in the address book, you can click on the ballpoint icon at the beginning of the line. The address fields will then be
able to be changed. Once a change has been effected, you have to register your action using the “save” button.
5.1.4. How to add new addresses
It is possible to add addresses to the address book in various ways:
• When creating a shipment, it is possible to add a new address by registering it as an “alias”;
• When administrating the address book, you can add a new address one at a time using the “add an address” function;
• When administrating the address book, you can import a list of addresses using a CSV file. A model file is available for
importing data.
17
Shipping Manager : user manual I V.1.0 I January 2014
5. Administration management
5.2. Integration of the module to an online shop
5.2.1. T
o what does integration to an e-commerce website refer to?
Integration enables the user, without leaving the interface of the website, to show customers all the methods of delivery
used by bpost: bpack@Home, standard home delivery; bpack@bpost, delivery to a post office or postal point and bpack
24/7, the parcel machine.
The Administration module enables you to manage the practical aspects linked to delivery of these parcels (printing of
labels, follow-up of parcels, etc.).
5.2.2. How to integrate the module into the website
For further information, consult www.bpost.be/shippingmanager
5.3 Self-service reporting
If you enter your email address here you will receive a general report on all parcels you sent via bpack 24h Business or
bpack Europe Business. You see how many parcels were correctly scanned (or where a problem occurred), how many
parcels were delivered (with separate totals for next day and second day), how many parcels await pickup by the
addressee and how many parcels could not be delivered (because the address does not exist, for instance).
1
To be able to receive this report you must enter
your email address in the appropriate field ( 1 ).
You can then select the desired reporting
frequency (weekly or monthly) and the format
(PDF with graphics or Excel).
Need more information? Contact your Account Manager bpost
Service Center:
02 201 11 11
[email protected]
www.bpost.be/shippingmanager
18
bpost, limited company under public law | Centre Monnaie, 1000 Brussels | VAT BE 0214.596.464 | Legal Entities Register Brussels | Postal Current Account IBAN BE94 0000 0000 1414 | BIC BPOTBEB1