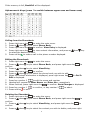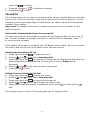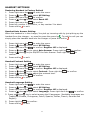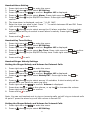
1
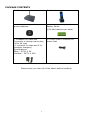
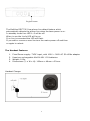
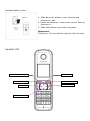
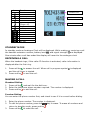
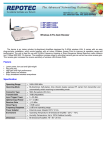
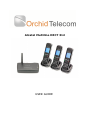
Alcatel Multiline DECT 312 USER GUIDE 1 User Guide Index Contents Installation The Base The Handset Charger Battery Cover Handset Keys LCD Icons Standby Mode Receiving a Call Making a Call Standard Dialling Preview Dialling Call Handling Adjusting the Volume during a call. Redial Making an Internal Call Receiving an Internal Call Receiving an External Call during an Internal Call Calling an Internal Number during an External Call Transferring an External Call Pick up the other handset’s incoming External Call MUTE Speakerphone / Handsfree Phone Book Browsing the Phonebook Saving a Phonebook Alphanumeric Keys Calling from the Phonebook Editing the Phonebook Deleting the Phonebook Caller ID Information Displayed during an Incoming Call View the Incoming Call List Calling from the Incoming Call List Registering a Handset Delete a Handset Line Select Handset Settings Restoring Handset to Factory Default Handset Auto Answer Setting 2 4 5 5 6 6 7 7 8 8 8 8 8 8 9 9 9 9 9 9 9 10 10 10 10 10 11 11 11 11 12 12 12 12 13 13 13 14 14 Handset Contrast Setting Handset Language Setting Handset Alarm Setting Handset Key Tone Setting Handset Ringer Melody Settings Setting the Ringer Melody and Volume for External Calls Setting the Ringer Melody and Volume for Internal Calls Keypad Lock Handset R Key Function BASE STATION SETTING Restoring Base to Factory Default Call Waiting Tone Auto Attendant (DISA) Time and Date Setting Recall / Flash Time Adding Answer Machine or PDQ Handset Menu TROUBLE SHOOTING Feature List Technical Specifications Safety 3 14 14 15 15 15 15 15 16 16 16 16 16 17 17 18 18 19 20 21 21 22 PACKAGE CONTENTS 1 x Base 3 x Handsets 3 x Handset chargers with fixed power adaptors. 3 x Handset Rechargeable Battery Packs. (2 Ni-MH batteries per pack) 1 x Adapter for base with Converter to change mains plug US to UK type (1 converter for base and 3 for handsets chargers) Specifications: Base – DC9V, 0.5A Handset – DC7V, 0.42A 3 x Line Cords to connect the phone lines Please check you have all of the above before installing 4 Installation Installing the Base & Handsets 1. Plug one end of the power adaptor cable into the DC9V slot on the back of the base, and the other end into a mains socket, using one of the US to UK converters. 2. Using the line cords supplied connect your line sockets, ie BT or other (max of 3) to L1, L2 & L3 RJ11 sockets on the rear of the base. If you are connecting to a Broadband line please ensure you have ADSL filters in place between the BT socket and the connecting line cords. 3. Plug the Handset chargers in to mains sockets around the premises no more than 40 meters away from the base. (40M is the recognized range but may be affected by thick stone walls or metal obstructions). 4. The 3 handsets supplied with the base have been pre-registered. If you want to add more handsets to the system (Maximum of 12) go to page 13 ‘registering a handset’ 5. Leave the handsets to charge for 12 hours or overnight before use. The Base Features 1. Serves as the base station for 3 external lines and up to 12 internal extensions. 2. Provides 4 channels for simultaneous use by 4 handsets; up to 3 of which can be external calls if you have the full line capacity connected. 3. Auto Attendant (DISA) available. 4. Digital wireless handsets that provide superior voice quality, no interference, and privacy protection. 5. Power supply: 9VDC input, with 110V~ 220V AC 50~60Hz adapter. 6. Weight: 200g 7. Dimensions: 145x133x29mm 5 Register button The Multiline DECT 312 has phone line detect feature which automatically detects the phone line when the base power is on. In standby mode Line LED 1~3 will be off. When in use the Line’s LED will be on. If no line is connected the LED will flash. If you add or remove a new line turn the mains power off and then on again to reboot. The Handset Features 1. 2. 3. 4. Fixed Power supply: 7VDC input, with 100V ~ 240V AC 50~60Hz adapter. Uses two rechargeable AAA Ni-MH 1.2V batteries. Weight: 100g . Dimensions: (L x W x H): 160mm x 46mm x 22mm. Handset Charger 6 Handset Battery Cover 1. Slide down the battery cover using thumb pressure or nail. 2. Insert the batteries, observe the correct Polarity directions + 2. Slide the battery cover back into place. Important: Charge for 12 hours before using for the first time. Handset LCD INT / Internal call Key Up/Redial Key Left Return / Back Key Right Menu Key End Call / Off Key Call / On Key Down / Phonebook key 7 Icon Function Handset icon Antenna In talk mode Speakerphone Miss call Internal call Non-disturb (Ringer off) Keypad lock Battery Menu OK Back Delete Mic mute Mic ON Handset number Handset time STANDBY MODE In standby mode an Analogue Clock will be displayed. While making or receiving a call the handset extension number, battery level , and signal strength are displayed. One minute after a call has ended the display will revert to the analogue clock RECEIVING A CALL When the handset rings, if the caller ID function is activated, caller information is displayed after the first ring. 1. Press call key to answer the call. When call in progress symbol and the call timer is started. 3. Press end key to end the call. is displayed MAKING A CALL Standard Dialing 1. Press call key , and wait for the dial tone. 2. Enter the telephone phone number required. The number is displayed. 3. Press end key to end the call. Preview Dialing You can enter the phone number first, and check to see if it is correct before dialing. 1. Enter the phone number. The number is displayed. 2. To edit the phone number, press left key to erase. To erase all numbers and return to standby mode, press end key . 3. Press call key to make the call. 8 Call Handling Adjusting the Volume During a call, press up /down current volume is displayed. key to adjust to one of the 4 volume levels. The Redial The thirty most recently dialed numbers are saved to your handset. 1. Press up key to enter the menu. 2. Press up key /down key to select the number you wish to redial, and press key to dial the number. Making an Internal Call 1. In the standby mode, press INT key. INT symbol will be displayed, and you will hear the internal dial tone. 2. Enter the handset number of the extension you wish to call. 3. To end the call, press end key on either one of the handsets. Receiving an Internal Call 1. During an incoming internal call, the receiving handset will begin to ring. Internal symbol flashes, and the caller's handset extension is displayed. 2. Press call key to receive the call. 3. Press end key to end the call. Receiving an External Call during an Internal Call 1. During an incoming external call, both handsets on the internal call will beep. The Call waiting tone function must be ON. (See page 16 ‘Call waiting tone’) 2. Press end key to end the internal call. 3. Press call key to receive the call. The handset that presses call key first will be the receiver of the call. 4. Press end key to end the call. Calling an Internal Number during an External Call 1. During an external call, press INT key to hold the call. 2. Enter the handset number of the extension you wish to call. During your conversation with the internal extension, the external caller will hear on hold music only. 3. Press INT key again to end the internal call and return to the external call. Transferring an External Call 1. During an external call, press INT key to hold the call, the caller will hear on hold music only. 2. Enter the handset number of the internal extension you wish to transfer the call 9 to. 3. If they want to take the call, press end key and the caller will be transferred. If they do not want to take the call or do not answer, press INT key to return to the caller. Pick up the other handset’s incoming External call When the other handset is ringing, you can press key # and then press key up this external call. to pick MUTE If during a conversation with a caller you need to MUTE the microphone/block out sound from your end, Press the INT Key. Press the INT key again to cancel the MUTE. SPEAKERPHONE – to transfer to hands free during a call 1. 2. 3. During the call, press the call key . Speakerphone symbol is displayed. You can place the handset within hearing range and continue the call. Press end key to end the call. PHONEBOOK You can browse the Phonebook to find the number you wish to call. You can save a maximum of thirty contacts. Browsing the Phonebook 1. Press right menu key to enter the menu. 2. Press up /down key to select Phone Book. 3. Press right menu key . View Entry is displayed. 4. Press right menu key to display the first contact. (If no contacts have been entered, EMPTY is displayed.) Press up /down key to view contact information. 5. Press end key to exit. Saving a Phonebook 1. In the contacts list menu, press up /down key to select Add Entry. 2. Press right menu key to confirm. Enter Name : is displayed. Use the keypad to enter the name of the new contact. The supported language is English. (Press left key to delete an incorrect character.) 3. Press right menu key to confirm. Enter No : is displayed. Use the keypad to enter the phone number of the new contact. (Press left key to delete an incorrect character.) 4. Press right menu key to confirm. 5. Press end key to exit. Repeat steps 1 to 5 to save more contacts. You can save a maximum of 30 contacts. 10 If the memory is full, BookFull will be displayed. Alphanumeric Keys (press * to switch between upper case and lower case) Calling from the Phonebook 1. Press right menu key to enter the main menu. 2. Press up /down key to select Phone Book. 3. Press right menu key to confirm. View Entry is displayed. 4. Press right menu key to view contact information, and press up /down to select the desired contact. 5. Press call key to make a call to the phone number displayed. key Editing the Phonebook 1. Press right menu key to enter the menu. 2. Press up /down key to select Phone Book, and press right menu key to confirm. 3. Press up /down key to select View Entry. 4. Press right menu key to confirm. 5. Press up /down key to select the phone book you wish to edit. 6. When the contact information is displayed, press right menu key . 1: Del 2: Edit is displayed. 7. Press key number 2 to edit the name and number. 8. Handset will request to Enter Name: and Enter No.: respectively. 9. When finished, press right menu key to confirm. Save Changes is displayed. 10. Press key number 1 to confirm, or key number 2 to abort. 11. Press end key to exit. Deleting 1. Press 2. Press confirm. 3. Press confirm. 4. Press the Phonebook right menu key to enter the menu. up /down key to select Phone Book, and press right menu key to up /down key to select View Entry, and press right menu key up /down key to select the contact you wish to delete, and press right 11 to menu key to confirm. 5. Press key number 1 to delete the contact. 6. Press end key to exit. CALLER ID The handset allows you to view the incoming caller's phone number before you accept a phone call. The time and date of the call are saved to the internal memory. (If your local phone service provides Caller ID with Name, the caller's name will be displayed instead of the number.) Important: To activate this function, contact your phone service provider for the Caller ID service. Information Displayed during an Incoming Call For each incoming call, the telephone number will be displayed after the first ring. If the number exceeds 14 numbers, the last 14 numbers will be displayed. Press “ * ” to view previous numbers. If the caller's information is withheld, the LCD display will be blank. Only the ring tone will sound, and the call will not be saved to the internal memory. Viewing the Incoming Call List 1. Press right menu key to enter the menu. 2. Press up /down key to select Incoming Call. 3. Press right menu key to view the incoming call list. New entries that have not been viewed will be displayed first. If there are no entries, Empty will be displayed. 4. Press up /down key to view the caller information. 5. Press end key to exit. Calling from the Incoming Call List 1. Press right menu key to enter the menu. 2. Press up /down key to select Incoming Call. 3. Press right menu key to view the incoming call. 4. Press up /down key to find the caller you wish to call. 5. When the contact information is displayed, press call key . Or Press end key exit. The internal memory stores 30 incoming calls and 30 outgoing calls. 12 to REGISTERING A HANDSET Once a handset has been registered, the handset number will be displayed on the right of the LCD display. To register the handset: 1. Press right menu key to enter the menu. 2. Press up /down key to select HS Setting. 3. Press right menu key to confirm. Register HS is displayed. 4. Press and HOLD the REG button on the base, until the SBR Led stops flashing (>10s). 5. While Register HS is displayed, press right menu key to confirm. Then enter the PIN code “0000” (default). , press right menu key to confirm. Please Wait is displayed as the handset searches for the base. (If you enter the PIN incorrectly “RETRY?” will be displayed. Press digit 1 on the key pad and re-enter 0000) 6. After 5 to 10 seconds, the new handset number will appear in the upper right corner of the LCD display. Registration is complete. 7. If ? is displayed, it means registration was not successful. Repeat steps 1-6. 8. To register the other handsets, follow steps 1 to 6. Important Note: The Base unit of the 312 is GAP compatible, therefore you can register any GAP compatible handset to the base and use on the system BUT you will not be able to use all the features available to the other handsets. You will be able to make and receive external calls and receive internal calls but you will not be able to make internal calls or transfer calls DELETE A HANDSET 1. Press right menu key to enter the menu. 2. Press up /down key to select Base Setting. 3. Press right menu key to confirm. Delete HS will be displayed. 4. Press right menu key to confirm. 5. Delete HS 101 is displayed. 6. Press up /down key to select the extension handset number you would like to delete (for example, 101 to 112) 7. Press right menu key to confirm. Delete HS is displayed again. 8. Press end key to exit. LINE SELECT FUNCTION 1. To select line 1, press * 1, (LCD display Line 1) then call key phone number. 2. To select line 2, press * 2, (LCD display Line 2) then call key phone number. 3. To select line 3, press * 3, (LCD display Line 3) then call key phone number. 13 and enter the and enter the and enter the HANDSET SETTINGS Restoring Handset to Factory Default 1. Press right menu key to enter the menu. 2. Press up /down key to select HS Setting. 3. Press right menu key to confirm. 4. Press up /down key to select Reset HS. 5. Press right menu key to confirm. 6. Press key number 1 to confirm, or key number 2 to abort. 7. Press end key to exit. Handset Auto Answer Setting. When the handset is in the charger, You pick up incoming calls by just picking up the handset from the charger – no need to press the green key . To end the call you can simply place the handset back into the charger or press the end key 1. Press right menu key 2. Press up /down key to 3. Press right menu key 4. Press up /down key to 5. Press up /down key to confirm. 6. Press end key to exit. Handset Contrast Setting 1. Press right menu key 2. Press up /down key to 3. Press right menu key 4. Press up /down key to 5. Press up /down key to 6. Press right menu key 7. Press end key to exit. to enter the menu. select HS Setting. to confirm. Register HS is displayed. select Auto Answer. Press right key to confirm. ON/OFF the Auto Answer. Press right key to to enter the menu. select HS Setting. to confirm. Register HS is displayed. select Contrast. Press right key to confirm. adjust the contrast level. to confirm. Handset Language Setting 1. Press right menu key to enter the menu. 2. Press up /down key to select HS Setting. 3. Press right menu key to confirm. Register HS is displayed. 4. Press up /down key to select Language. Press right menu key to confirm. 5. Press up /down key to select among the 8 languages. (Available languages are: Traditional Chinese, Portuguese, Dutch, Spanish, Italian, French, German and English) 6. Press right key to confirm. 7. Press end key to exit. 14 Handset Alarm Setting 1. Press right menu key to enter the menu. 2. Press up /down key to select HS Setting. 3. Press right menu key to confirm. Register HS is displayed. 4. Press up /down key to select Alarm. Press right menu key to confirm. 5. Press up /down key to ON/OFF the Alarm. Press right menu key to confirm. 6. The time alarm is displayed, such as: “11:50 *AM”. 7. Enter the time you want to set. Press “ * ” to switch between AM and PM. Press right menu key to confirm. 8. Press up /down key to select among the 10 alarm melodies. A short melody will be played while you switch to each alarm’s melody. Press right key to confirm. 9. Press end key to exit. Handset Key Tone Setting 1. Press right menu key 2. Press up /down key to 3. Press right menu key 4. Press up /down key to 5. Press up /down key to confirm. 6. Press end key to exit. to enter the menu. select HS Setting. to confirm. Register HS is displayed. select Key Tone. Press right menu key to confirm. ON/OFF the key tone. Press right menu key to Handset Ringer Melody Settings Setting the Ringer Melody and Volume for External Calls 1. Press right menu key to enter the menu. 2. Press up /down key to select HS Setting. 3. Press right menu key to confirm. Register HS is displayed. 4. Press up /down key to select Melody EXT. Press right menu key to confirm. 5. Press up /down key to select among 10 melodies. A short melody will be played while you switch to each ring tone. 6. Press right menu key to confirm. Volume is displayed. 7. Press down key to reduce the volume, or up key to increase the volume. Press right menu key to confirm. 8. Press end key to exit. Note: You can set handsets not to ring on incoming calls yet still ring on internal calls. At point 7 press the down key until the volume is turned Off. Setting the Ringer Melody and Volume for Internal Calls 1. Press right menu key to enter the menu. 2. Press up /down key to select HS Setting. 15 3. Press right menu key to confirm. Register HS is displayed. 4. Press up /down key to select Melody INT. Press right menu key to confirm. 5. Press up /down key to select among 10 melodies. A short melody will be played while you switch to each ring tone. 6. Press right menu key to confirm. Volume is displayed. 7. Press down key to reduce the volume, or up key to increase the volume. Press right menu key to confirm. 8. Press end key to exit. Keypad Lock 1. In the standby mode, long press * for 3 seconds or more to activate the keypad lock. The lock symbol will be displayed in the right corner of the LCD display. 2. Long press * for 3 seconds or more to re-activate the keypad. Handset R Key Function – Redial or Recall 1. In standby mode the R button is for last number redial: press R key, the last dialed phone number will displayed. 2. During an external call the R key is the Recall function, also known as Flash and used for network services or when connected to a PBX extension. (You have to contact your local phone service provider to activate this function.) BASE STATION SETTINGS Restoring Base to Factory Default 1. Press right menu key to enter the menu. 2. Press up /down key to select Base Setting. 3. Press right menu key to confirm. 4. Press up /down key to select Reset Base. 5. Press right menu key to confirm. 6. Press key number 1 to confirm, or key number 2 to abort. 7. Press end key to exit. Call Waiting Tone When there is an incoming call from an external line during a call in progress, the base will send a series of short beeps to the handsets in use. Use this function to turn the call waiting tone on or off. 1. Press right menu key to enter the menu. 2. Press up /down key to select Base Setting. 3. Press right menu key to confirm. 4. Press up /down key to select Call Waiting. 5. Press right menu key to confirm. OFF will be displayed, indicating the call 16 waiting tone is turned off. Press up /down or off. 6. Press right menu key to confirm. 7. Press end key to exit. key to turn the call waiting tone on Auto Attendant FUNCTION (DISA) In Auto Attendant (DISA) Mode incoming callers will get a pre-recorded message inviting them to dial the extension number if known or hold for the operator *. The caller can then dial the extension number they require (101 to 112), If there is no answer within 25 seconds they will be asked to dial 0 for the operator. If this is not answered within another 25 seconds they will be asked to dial 0 for the operator again. If no answer again they will be asked to call back later. * If they hold for the operator the caller will get a message that they are being transferred to the operator (Extension 101). If unanswered within 25 seconds they will be asked to dial 0 for the operator, if still unanswered after another 25 seconds they will be asked to call back later. 1. 2. 3. 4. Press right menu key to enter the menu. Press up /down key to select Base Setting. Press right menu key to confirm. Press up /down key to select DISA Setting. Press right menu key to confirm. 5. Handset will display Please wait, and then display ON. 6. Press up /down key to ON/OFF the Auto Attendant function. Press right menu key to confirm. (Default setting is OFF.) 7. Press end key to exit. When DISA function is off, all handset will ring when there is an incoming call. We recommend that you turn the power off on the base then on again after DISA setting. Time and Date NB If you have caller ID with your service provider, there is NO need to set time and date. This will be done automatically with incoming calls 1. Press right menu key to enter the menu. 2. Press up /down key to select Base Setting. Press right menu key to confirm. 3. Press up /down key to select Set Time. Press right menu key to confirm. 4. MM/DD/YYYY and DD/MM/YYYY two formats are displayed. Press up /down key to select one. Press right menu key to confirm. 5. 12H and 24H two formats are displayed. Press up /down key to select one. 17 6. 7. 8. 9. Press right menu key to confirm. The time and date will be displayed, such as: “01-01-2014 10:10 *AM”.(for example you select MM/DD/YYYY and 12H) Enter in the following order: month, date, year, hour, minute, AM or PM. If the entered number does not match the required item, you will hear a long beep. Press “ * ” to switch between AM and PM. Press right menu key to confirm. Press end key to exit. RECALL (Flash) Time 1. Press right menu key to enter the menu. 2. Press up /down key to select Base Setting. 3. Press right menu key to confirm. 4. Press up /down key to select Flash Time. 5. Press right menu key to confirm. 600 ms will be displayed. Press up /down key to select the flash time you want. There are 100ms/300ms/600ms and 900ms four types. The UK standard is 100ms and in Europe 300ms 6. Press right menu key to confirm. 7. Press end key to exit. Adding an answer machine or PDQ (Credit Card payment) machine. Such machines should be added directly into a line socket – not to the 312 base. Suggest you get a double or triple adaptor. 18 Handset Menu 19 TROUBLESHOOTING Error The handset cannot be used. No dial tone. Caller ID is not working. The battery depletes soon after recharging. Cannot transfer a call. Missing incoming calls or not able to make out going calls ‘Out of Range’ shows on the LCD of a handset Solution Make sure the power cord of the base station is connected to a power source. Make sure the batteries are charged and inserted correctly. Make sure the phone cables are properly connected to the RJ-11 phone jacks. Make sure the handset is registered to the base station. Make sure the power cord of the base station is connected to a power source. Make sure the phone cables are properly connected. Contact your local phone service provider. Wait for the handset to ring at least once before picking up. If the caller has withheld caller ID on their phone, the phone number will not be displayed. Replace the batteries with RECHARGABLE AAA Types Make sure the handset number you have entered is correct. Make sure the target handset has been registered to the same base station. It could be that one of the lines has a fault. Turn the power Off then On at the base, if one of the lines is faulty the Line LED on the base will flash. Go to the main socket for this line and plug a standard phone directly into the socket. If no dial tone report to your line provider. When the line is fixed turn the power Off then On and the line LED should stop flashing. You have gone out of range of the Base. Replace the handset in it’s charger for 1 minute and it will reset. 20 FEATURES 1.8GHz, Digital Enhanced Cordless Technology GAP compliance, compatible with most DECT handsets Base for 3 PSTN lines Expandable up to 12 cordless handsets Supports 4 simultaneous calls Phone line auto searching Caller ID FSK/DTMF available Auto attendant function(DISA) Intercom between extension handsets Call transfer to other handsets LCD display Phonebook with 30 sets dialing memory 30 incoming call logs 30 outgoing call logs Handset speakerphone/handsfree function Adjustable receiver and ringer volume Multi-language (8 languages: English, French, Spanish, Dutch, German, Italian, Portuguese & Chinese) Off hook dialing and Pre-dialing Call timer display Out of range tone 10 Internal ring tone melodies 10 External incoming melodies Low battery tone indicator Keypad lock function Alarm function TECHNICAL SPECIFICATIONS Frequency Frequency modulation Air interface Channel space Carrier frequency offset Output power Charging time Temperature Humidity Dimensions(mm) Power 1880-1895MHz GFSK TDMA/TDD 1.728MHz <±50KHz Max. 250mW Avg. 10mW 12 hrs Normal:15°C~35°C Special:0°C~40°C 0%~90% Base:145x133x29 Handset:160x46x22 Base input:DC9V 0.5A HS charger:DC7V 0.42A HS Battery:Ni-MH 1.2Vx2,600mAh 21 SAFETY If the mains adapter fails, it must be replaced by an identical model. If not connected to the mains power or if there is a mains power failure, telephones that use cordless handsets will not work. You will then be unable to make or receive calls in the event of an emergency. This is why we recommend that you also keep a conventional telephone – one that doesn’t require a power supply – as a backup. Orchid Telecom Ltd hereby declares that the following model conform to the essential requirements and other applicable provisions of European directive 1999/5/EC. Alcatel Multiline DECT AMD312 22