1
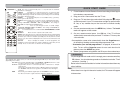
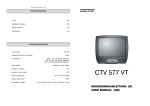
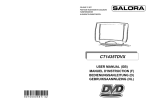
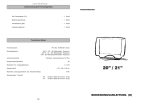
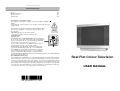
GB/29T/TV4KS/RC-FS/6-575
Television package
TV set
Operating instruction
Remote control
Packing box
-1pc.
-1pc.
-1pc.
-1pc.
Connection to the mains supply:
This appliance is designed to operate from a mains supply of AC230V ~
50HZ.
Check that the voltage marked on the product corresponds with your
supply voltage.
This product is fitted with a 13A plug complying with BS1363.
If this plug is unsuitable or needs to be replaced, please note
The following:
Important: The wires in the mains lead are
coloured in accordance with the following code:
BLUE-NEUTRAL
BROWN-LIVE
For UK use only – Plug fitting details (where applicable):
As the colours of the wires in the mains lead of this appliance
may not correspond with the coloured markings identifying
the terminals in your plug, proceed as follows:
Do not connect any wire to the EARTH terminal which is
marked with the letter E or by the earth symbol.
The BLUE wire is the NEUTRAL and must be connected to
the terminal marked with the letter N or coloured BLACK.
The BROWN wire is the LIVE wire and must be connected
to the terminal marked with the letter L or coloured RED.
Always ensure that the plug cord grip is fastened correctly.
If a 13A (BS1363) fused plug is used it must be fitted with a 5amp fuse conforming to BS1362
and be BSI or ASTA approved.
Non-rewireable mains plug:
If your appliance is supplied with a non-rewireable plug fitted to the mains lead you will find
that it incorporates a fuse, the value of which is indicated either on the base of the plug or
on the fuse carrier. Should the fuse need replacing, you must use an ASTA approved fuse
(conforming to BS1362) of the same rating. If the fuse cover is lost the plug must not be used
until a replacement is obtained from an electrical supplier.If you need to remove the plug,
cut it from the mains lead and dispose of it. Never attempt to re-use this plug or insert it into
a socket outlet, as there is a very great risk of an electric shock.
8010000575/ 762
Real Flat Colour Television
USER MANUAL
Technical specification
TV standard
Diagonal screen size (viewable)
TV channels
Aerial socket
Programs' memory
Maximum sound output
Power requirement
Normal used power
Dimensions / Weight
Contents
PAL I NICAM stereo
68 cm
UHF - E21-E69 (decimetric diapason)
standard 75 Ohm socket
99
2x3 W
AC 170 - 245 V, 50Hz
95 W
29”: 802 x 515 x 592 mm / 43 kg
Quick start guide . . . . . . . . . . . . . . . . . . . . . . . . . . . . . . . . . . . . .3
Operating tips .
.
Switching on .
.
.
.
.
.
.
.
.
.
.
.
.
.
.
.
.
.
.
.
.
.
.
.
.
.
.
.
.
.
.
.
.
.
.
.
.
.
.
.
.
.
4
. 5
Control of TV set by using MENU tables . . . . . . . . . . . . . . . . . . . . . .
.5
Selecting the menu language .
.
.5
.
.
.
.
.
.
.
.
.
.
.
.
.
.
.
.
.
.
.
.
Using Teletext
Adjusting the picture .
.
.
.
.
.
.
.
.
.
.
.
.
.
.
.
.
.
.
.
.
.
.6
Adjusting the sound .
.
.
.
.
.
.
.
.
.
.
.
.
.
.
.
.
.
.
.
.
.
. 6
1. Use the remote control to select a programme with Teletext information.
.
.
.
.
.
.
.
.6
2. Switch on the Teletext by pressing TV/TXT.
3. Using the 0, 1, ..., 9 keys on the remote control enter page number (3 digits). Your TV set
.
.
.
. 7
will search for the indicated Teletext page. After a moment the Teletext page will appear on
Tuning your television set .
.
.
Manual tuning .
.
.
.
.
.
.
.
.
.
.
Automatic switching on and off
.
.
.
.
.
.
.
.
.
.
.
.
.
.
.
.
.
.
.
.
Customizing your stored programmes . . . . . . . . . . . . . . . . . . . . . .
.8
Special functions .
. 9
.
.
.
.
.
Functions of remote control .
.
.
AV modes .
.
.
.
.
.
.
Technical specification .
Using Teletext
TV package .
.
.
.
.
.
.
.
.
.
.
.
.
.
.
.
.
.
.
.
.
.
the TV screen.
. . . . . . . . . . . . . . . . . . . . . .7
.
.
.
.
.
.
.
.
.
.
.
.
.
.
.
.
.
.
.
.
.
.
.
.
.
.
.
.
.
.
.
.
.
.
.
.
.
.
.
.
.
.
.
.
.
.
.
.
.
. 10
.
.
.
.
.
.
.
.
.
.
.
. 11
.
.
.
.
.
.
.
.
.
.
.
.
.
.
.
.
.
.
199
Teletext information
. 9-10
.
.
.
.
Page number
Red
Green
Yellow
Blue
. 11
.
. 12
Page numbers in coloured rectangulars will appear at bottom of the screen. You can select these
pages by pressing corresponding coloured buttons.
4. To return to the normal TV picture, press the TV/TXT key.
Notes:
1. If the TV station does not broadcast Teletext information after switching Teletext on, a
black line the with page number will appear at the top of the screen.
2. The control of Teletext by using other buttons is described in the chapter "Functions of
remote control".
3. Sound level not is adjustable when teletext function is on.
11
Functions of remote control
GB/29T/TV4KS/RC-FS/6-575
STOP Stop key. In Teletext mode press to stop and start the automatic
alternation of sub-pages.
CANCEL
Interrupt key. In Teletext mode press to watch TV while
waiting for a Teletext page to be found. At this time the number of page is
flashing. When page is found, the number stops flashing. Press the interrupt
key again to display the page.
REVEAL
In Teletext mode press to reveal hidden text (e.g. answers).
Press again to hide this text.
INDEX In Teletext mode press to start the search of displayed page again.
P.P
Normalise key. Press to cycle through four sets of picture
settings: "Favourite", "Standard", "Soft" and "Dynamic". The settings of
Favourite are adjusted in the Picture menu.
P.S
Press to cycle through four sets of sounds settings:
“Favourite”,“Standard”,”News” and “Music”. The settings of Favourite are
adjusted in the Audio menu.
I/II
For manual selection of sound standards STEREO/MONO and DUAL
I/DUAL II.
ANALOG
Direct selection of picture and sound control.
SLEEP Sleep Timer key. Press to set the time after which the TV set automatically
switches into standby mode. Each pressing of the key increments the time by
10 minutes up to 2 hours. To disable, repeatedly press the key until the set time
returns to zero. The set time is displayed on the screen for a short time after each
key press.
STATUS
Press to display the number of current programme, the
standard of colours and sound. Press again to display the current time (if it was
entered). Press one more time to switch off the clock display.
AV modes
The required outer signal source you can select by pressing the AV key on the remote control
(depending to the model).
AV1, AV2 Selects video and audio inputs on the SCART1 or SCART2 connectors. Used
for direct connection of VCR, satellite receiver, etc.
Front AV Using the AV connector to connect directly audio- or videotools for example
videocamera.
Please take care that the Scart connector “AV 2” is paralell connected with
the “Front AV” and can not use together to avoid interferences during the
operation.
RGB
Selects red, green and blue signal inputs on the SCART1 connector. Used for
the direct connection of game machines and other equipment.
20
10
21
QUICK START GUIDE
1. Fit the Batteries into the Remote Control according to the diagram
in the battery compartment.
2. Plug your main home aerial into the TV set.
button
3. Plug your TV into the mains and switch ON using the
on the front panel. If your TV screen does not light up, press the P+,
P- key or any number key on the hand unit to cancel standby
mode.
4. On your remote control press the MENU key 3 times. The Install
menu will appear on the screen.
5. On your remote control press the OK key. Your TV will now
automatically tune and store your local TV stations. This may take
a few minutes.
On completion, some units automatically show the Organize menu
for checking, labeling and moving the programmes: see
“ Customise your stored programmes” on page 8, or leave it for
later. To turn off the Organize menu for now and view the full
picture, press the MENU key twice.
6. Select a programme using the P+ and P- keys or the number keys.
! WARNING !
7.If you forget the lock code or dial it wrongly, press remote control key
PP 3 times. You should change code or disable the lock after TV will
switch on ( look 9p. ).
Refer to the instruction booklet for further information about the many
other facilities.
Note:
When there is no signal in the aerial socket, the TV screen will appear
in blue colour.
2
1
3
Special functions
Thank you for purchasing this colour TV set. Please read this instruction carefully. You will learn how
to use the TV set and what to do to prolong its service life.
Operating tips
Safety:
•
•
•
•
•
•
•
•
•
•
•
•
•
•
Do not place anything on the television and ensure a minimum distance 10cm around the
apparatus for sufficient ventilation.
If your television mains lead or plug becomes damaged or requires replacement, switch off
your television, remove the plug from the socket and call a qualified service engineer.
Always situate your television on a solid and steady surface.
Never use a make-shift stand fixed with wood screws.
This television is meant to be used in the home in moderate climates (not in tropical climates)
. Other use might be dangerous.
Do not expose the apparatus to dripping or splashing.
Never let anyone, especially children, push small objects into ventilation slots.
Route the mains lead where it will not be walked on, crushed, chafed, cut or damaged in any
way.
Pull the mains plug out of the wall socket and disconnect the aerial during thunderstorms.
Do not use the television near water, for example near a bath, sink, and pool or in any damp
environment. Do not place objects filled with liquids, such as flower vases, on top of the
television.
If you have spilt liquid into your television, or it fails to operate correctly, switch it off,
disconnect the plug and call a qualified service engineer. Never remove the back cover.
Ensure that the ventiliation is not impeded by covering the ventilation openings with items,
such as newspapers, table-cloths, curtains etc.
Do not place naked flame sources, such as lighted candles on the apparatus.
Take attention to the environmental aspects of battery disposal.
Blue screen when there is no TV signal
1. Press the MENU key on the remote control 4 times. The Setup menu Setup
will appear on the screen. Use the P+ or P- keys to highlight Function Timer
Organize
and then press OK.
Function
2. The Function menu will appear on the screen. Use the P+ or P- keys Language
to highlight Blue Back, and then the V+ or V- keys to switch on (Yes)
or switch off (No) blue background.
Blue Back
Yes
Switch on lock
No
3. Use the P+ or P- keys to highlight Lock, and then the V+ or V- keys Lock
to activate the lock (Yes). The Key - - - note will appear on the screen.
4. Using the 0, 1, ..., 9 keys enter three digit code and memorize it . Leave the Setup menu
by pressing the MENU key 5 times.
5. When lock is activated, and you want to switch on TV, you must enter the code by using
the 0, 1, ..., 9 keys.
6. If you want to cancel the code, you must select the Setup Function menu, then highlight
Lock, and using the V+ or V- keys cancel the lock (No).
Note:
If you forget the lock code or dial it wrongly, press remote control key PP 3 times. You
should change code or disable the lock after TV switches on.
Functions of remote control
POWER
MUTE
TV/TXT
0, 1, ..., 9
MENU
Caution:
Danger of explosion if battery is incorrectly replaced. Replace only with the same or
equivalent type.
Your television is in conformity with the safety requirements of standard EN 60065.
OK
P+, P-
-/-RECALL
V+, V-
Position:
For best results, choose a position where light does not fall directly on the screen and away
from sources of heat. Do not put objects with a magnetic field nearby the television or it could
affect the quality of the colours.
Cleaning:
Switch off and unplug the television and use only a lightly dampened soft cloth to clean it.
Do not use chemically active substances as these may damage the cabinet finish.
Standby:
For convenience your television can be switched to standby with the remote control. To
preserve optimum picture quality (by de-magnetising the picture tube), we advise you to
switch off your television at the on/off switch regularly.
4
SIZE
The key for switching TV to standby. Switches your TV partly off. The green
indicator on front panel turns to red. If you want to switch TV on, you must pres
the P+, P-, 0, 1, ..., 9 keys and with POWER key on the remote control or the P+,
P- keys on front panel.
Switches the sound off. Pres the key again or V+, V- to restore the sound.
Teletext key. Press it to select Teletext. Press again to restore TV picture.
Using the 0, 1,..., 9 keys, the required programs or Teletext pages are selected.
MENU key. Press it to select MENU. If you want to switch the menu off, press
this key one or two times more.
Enter key. Press to enter menu selections.
Programme selection keys. Selects the next or the previous stored programme.
Also used to highlight the function you wish to use within menu.
The keys of the next or the previous page in Teletext mode.
Selection of one-figure or two-figure programme number.
A key for return to the previous programme.
Volume keys. Adjust sound volume. Also adjust the settings of menu.
Coloured keys RED, GREEN, YELLOW, BLUE keys are used for quick access
to Teletext topics (depends on Teletext properties).
Page expand key. In Teletext mode, press to enlarge top half of the page. Press
again to enlarge the bottom half. Press again to return to normal size.
MIX
Teletext/picture mix key. In Teletext mode press to show TV picture and
Teletext together. Press again to return to Teletext.
AV
AV modes' key. By pressing this key the AV1, AV2, RGB, TV are
selected in series (more details in chapter "AV modes" ).
SUBCODE Sub-page key. In Teletext mode press to select sub-pages. Some pages may be
multiple in Teletext. The sub-page key allows accessing any of these pages
directly. Press sub-page key and enter four digits for the page you need, e.g. page
2 would be entered as 0002. When the sub-page has been found it will be
displayed. Press the sub-page key again to return to normal page sequence.
9
Switching on
6. Press the MENU key twice to return to normal TV picture.
1. Remove the battery cover from the remote control unit and install two AAA type batteries
according to the diagram inside the battery compartment. Replace the battery cover.
2. Connect your aerial to the TV set.
3. Connect your TV to a 230 VAC power socket.
switch on the front panel. The red light will be illuminated. If
4. Switch on your TV with the
the screen does not light up, press a button P- or P+ on the front of the television set or any
of the keys P-, P+, 0, 1, ..., 9 and with POWER key on the remote control.
Note:
1. If you make a mistake or do not need automatic switching anymore, you can cancel it by
selecting Time in Setup menu and pressing OK on the remote control.
2. To switch on and off TV set automatically it must be switched by using the POWER key
on the remote control. If you switch off the TV set by using the button in the front panel, you
will need to re-enter the time.
Notes:
front panel button, the set switches to the
1. After switching the television set on by using
same mode it was before switching off by this button. If TV set was switched off by using
the remote control key POWER, it switches to standby and the indicator on the front panel
turns red.
2. After switching television set from standby to operating status, the red indicator goes dim.
Customizing your stored programmes
You can change succession of stored programmes, give titles to the programmes (Label), select
standards of colour systems' (Colour) and sound (RF Std), hide programmes in list (Skip).
Control of TV set by using MENU tables
1. Press the MENU key on the remote control 4 times. The Setup menu will appear on the
screen. Use the P+ or P- keys to highlight Organize.
2. Press OK. The Organize menu will appear on the screen.
Moving programs.
3. With the Organize menu on the screen, use the P+ or P- to select Pr-, and V+ or V- to select the number of programme which you wish
to move. Press the remote control key PP. The colour of the line will
change to blue.
4. Use the V+ or V- keys to select the destination programme number.
Then press the remote control key PP and the programme will be
moved into the new location.
Changing parameters of signal.
5. Use the P+ or P- to select the parameter you wish to change: Label
(programme title), Colour (colour system), RF Std. (sound standard),
Skip (prog. hiding).
6. Label: Use the V+ to select the position of character being added, and
use the P+ or P- to select the character from A-Z, +, -, space, 0 -9.
The title can be up to four characters long.
After selecting the first character, use the V+ to pass to the next
position, or use the V- to pass to the previous position, and then use
the P+ or P- to select the second character of title, etc.
7. Colour: Use the V+ or V- to select the colour system: Auto, PAL. It
is recommended to select Auto.
8. RF Std.: Use the V+ or V- to select the sound standard: I. The wrong
setting causes no sound.
9. Skip: Use the V+ or V- to select Yes or No. If Yes is selected, your
TV set will skip that programme when you step through the programme
numbers using the P+ or P- keys. You will be able to select this
programme only by using keys 0, 1, ..., 9.
10. Press the MENU key twice to return to full TV picture.
Your television set is controlled by using MENU tables Picture,
Sound, Install, Setup. These tables appear on the screen after
pressing remote control button MENU one or more times. The
television set parameters and their values are arranged in these
MENU tables.
The line of table with required parameter you can select by using the
remote control keys P+ or P-, and to change this parameter by using
keys V+ or V-. MENU tables from the TV screen disappears after
pressing the remote control key MENU one or several times or about
after 5 seconds after the last action in these tables.
Setup
Timer
Organize
Function
Language
Pr
Label
Colour
RF Std
Skip
01
---AUTO
I
No
Note:
The selected line in table is highlighted in red.
English
Franšais
Deutsch
Italiano
Norsk
Svenska
Nederlands
Español
PORTUGUÊS
Dansk
Suomi
Greek
Selecting the menu language
The selection of language is the following:
1. Press the MENU key on the remote control 4 times. The menu Setup
will appear on the screen.
Setup
Timer
Organize
Function
Language
2. Use the P+ or P- to select Language.
3. Press OK. The table with languages will appear on the screen.
4. Use the P+ or P- to select the language you require.
5. Press the MENU key two times to switch off the Setup menu.
8
Setup
Timer
Organize
Function
Language
5
English
Franšais
Deutsch
Italiano
Norsk
Svenska
Nederlands
Español
PORTUGUÊS
Dansk
Suomi
Greek
Notes:
Adjusting the picture
Press the MENU key on the remote control. The Picture menu will
appear on the screen. The required picture parameter you can select
by using remote control keys P+, P-, and to change value of this
parameter by using keys V+, V-.
Picture
Brightness
Contrast
Colour
Sharpness
2. Volume: buttons V+ or V- allow regulation of volume level.
Manual tuning
The manual tuning is only necessary if:
a) you want to fine tune a particular programme,
b) the signal of programme is weak.
The manual tuning of TV you should perform in this way:
Adjusting the sound
1. Press the MENU key on the remote control two times. The menu
Audio will appear on the screen. The required sound parameter you
can select by using remote control keys P+, P-, and to change value
of this parameter by using keys V+, V-.
1. For better picture quality your VCR or satellite receiver should be connected to SCART
socket on your TV set.
2. If you do not use the SCART socket, for receiving VCR signal via aerial socket a programme
with number 99 is recommended.
Audio
Volume
Balance
Equalizer
Loudness
Surround
1. Press the MENU key on the remote control 3 times. The menu Install will appear on the
screen.
2. With the Install menu on the screen, using the remote control key P+ Install
or P-, highlight Manual Tune.
Auto Tune
3. Press V+ or V- keys to start searching in the direction required. Each Manual Tune
time a programme is found the search will stop. Repeat until the Fine Tune
Store
programme you require is found. This programme must be stored into
a memory.
4. With Install menu on the screen, using the P+ or P- keys, highlight
Program Pr-Store.
Store
5. Press OK. The Install menu with highlighted Store will appear on the
screen.
6. Using the P+ or P- keys on the remote control highlight Program Pr--.
7. Using the V+ or V- keys on the remote control select required programme number (for
example, Program Pr.10).
8. Using the P+ or P- keys on remote control highlight Store and press OK. The OK will appear
on the screen to confirm a successful store.
3. Balance: buttons V+ or V- allow regulation of balance.
4. Equalizer: select the Equalizer parameter and press button OK.
The Equalizer frequency table shows up. Using buttons P+ or Pselect the frequency, using buttons V+ and V- adjust the frequency
level.Press the MENU key to return to Audio menu.
Equalizer
6,6 KHZ
3,3 KHZ
1,0 KHZ
330 HZ
100 HZ
5. Loudness: using button OK turn the function On or Off.
6. Surround: using button OK choose the Surround option (Movie
or Music), also turn the function off (Off).
Note:
For tuning and storing other programs, you should press the MENU key and repeat steps
from 2 to 8.
Tuning your television set
Automatic switching on and off
You can tune your television set in two ways: automatically or manually. The automatic tuning is
completed in the following way:
1. Press MENU key 3 times. The Install menu will appear on the screen.
2. Using the remote control keys P+ or P- select line Auto Tune.
3. Press OK. Your TV will now automatically tune and store all your local
TV stations. This will take a few minutes. On completion of automatic
tuning the first programme is automatically shown on the screen and
you can select the desired programme by using the remote control
buttons P+, P-, 0, 1, ..., 9 or front panel buttons P+, P-.
4. For labelling, moving or hiding of tuned programmes you can use the
menu Organize. Usage of this menu is described in page 8.
6
Install
Auto Tune
Manual Tune
Fine Tune
Store
1. Press the MENU key on the remote control 4 times. The menu Setup
will appear on the screen. Using the P+ and P- keys, highlight Timer.
2. Press OK. The menu Time will appear on the screen. Using the V+
and V- keys enter the correct time. The hours (00 to 23) are set by
using V-, and the minutes (0 to 59) - by using V+.
3. Using the P+ or P- keys, highlight On Timer, and using the V- and
V+ keys enter the time, at which you want TV set to switch ON from
standby.
4. Using the P+ or P- keys, highlight Off Timer, and using the V- and
V+ keys enter the time, at which you want TV set to switch to standby
from ON.
5. Using the P+ or P- keys, highlight On Timer Pr--, and using the Vand V+ keys enter the number of programme which you want TV to
turn on.
7
Setup
Timer
Organize
Function
Language
Time
On Timer
Off Timer
On Timer Pr
--:---:---:---