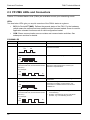
1
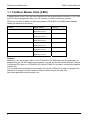
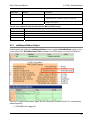
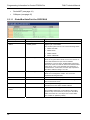
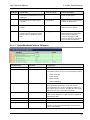
programmable logic controller FMU Technical Manual BEFORE BEGINNING Liability and Copyright for the Hardware This manual and everything described in it are copyrighted. You may not copy this manual, in whole or part, without written consent of Panasonic Electric Works Europe AG (PEWEU). PEWEU pursues a policy of continuous improvement of the design and performance of its products. Therefore we reserve the right to change the manual/product without notice. In no event will PEWEU be liable for direct, special, incidental, or consequential damage resulting from any defect in the product or its documentation, even if advised of the possibility of such damages. We invite your comments on this manual. Please email us at: [email protected]. Please direct support matters and technical questions to your local Panasonic representative. LIMITED WARRANTY If physical defects caused by distribution are found, PEWEU will replace/repair the product free of charge. Exceptions include: • When physical defects are due to different usage/treatment of the product other than described in the manual. • When physical defects are due to defective equipment other than the distributed product. • When physical defects are due to modifications/repairs by someone other than PEWEU. • When physical defects are due to natural disasters. © MS-DOS and Windows are registered trademarks of Microsoft Corporation. © IBM Personal Computer AT is a registered trademark of the International Business Machines Corporation. Important Symbols One or more of the following symbols may be used in this documentation: Warning! • ! The warning triangle indicates especially important safety instructions. If they are not adhered to, the results could be fatal or critical injury. CAUTION Indicates that you should proceed with caution. Failure to do so may result in injury or significant damage to instruments or their contents, e.g. data. NOTE Contains important additional information. EXAMPLE Contains an illustrative example of the previous text section. 1. 2. 3. Procedure Indicates that a step-by-step procedure follows. REFERENCE Indicates where you can find additional information on the subject at hand. KEY POINTS Summarizes key points in a concise manner. SHORTCUTS Provides helpful keyboard shortcuts. EXPLANATION Provides brief explanation of a function, e.g. why or when you should use it. next page Indicates that the text will be continued on the next page. FMU Technical Manual Table of Contents Table of Contents 1. 2. 3. Features and Restrictions......................................................1 1.1 Fieldbus Master Units (FMU) ..................................................................... 2 1.2 Expansion Restrictions and Current Limitations ........................................ 3 1.2.1 Expansion Restrictions for the FP2 FMU ...................................................3 1.2.2 Expansion Restrictions for the FPΣ FMU...................................................3 1.2.3 Limitations on Current Consumption ..........................................................3 Parts and Functions ...............................................................5 2.1 FP2 FMU.................................................................................................... 6 2.2 FPΣ FMU ................................................................................................... 8 2.3 FP-FMU LEDs and Connectors ............................................................... 10 2.3.1 FP-PROFIBUS DP ...................................................................................11 2.3.2 FP-DeviceNet ...........................................................................................12 2.3.3 FP-CANopen ............................................................................................13 Specifications .......................................................................15 3.1 FMU General Specifications .................................................................... 16 3.2 FP-PROFIBUS DP Communication Specifications.................................. 17 3.3 FP-DeviceNet Communication Specifications ......................................... 18 3.4 FP-CANopen Communication Specifications .......................................... 19 v Table of Contents 4. Installation and Wiring......................................................... 21 4.1 Installation of the FP2/FPΣ Unit............................................................... 22 4.2 Mounting Methods ................................................................................... 26 4.3 Cable Selection ....................................................................................... 27 4.4 Wiring of the FP-FMU Connectors .......................................................... 28 4.5 5. 4.4.1 PROFIBUS DP Wiring ..............................................................................28 4.4.2 DeviceNet Wiring......................................................................................28 4.4.3 CANopen Wiring.......................................................................................30 Wiring of the FPΣ FMU............................................................................ 31 Programming Information for Control FPWIN Pro ............ 33 5.1 General Information................................................................................. 34 5.2 GetPointer Function................................................................................. 35 5.3 FMU_DataExchange ............................................................................... 36 5.3.1 dutNetworkStatus Output .........................................................................37 5.3.1.1 GlobalBusStateField for PROFIBUS ...............................................38 5.3.1.2 GlobalBusStateField for DeviceNet.................................................41 5.3.1.3 GlobalBusStateField for CANopen..................................................45 5.3.2 Slaves_abIsConfigured Output ................................................................48 5.3.2.1 Sl_cfg for PROFIBUS......................................................................48 5.3.2.2 Sl_cfg for DeviceNet........................................................................48 5.3.2.3 Sl_cfg for CANopen.........................................................................49 5.3.3 Slaves_abIsConnected Output.................................................................49 5.3.3.1 Sl_state for PROFIBUS...................................................................49 5.3.3.2 Sl_state for DeviceNet.....................................................................50 5.3.3.3 Sl_state for CANopen......................................................................50 5.3.4 vi FMU Technical Manual Slaves_abHasDiagnostic Output..............................................................50 5.3.4.1 Sl_diag for PROFIBUS....................................................................51 5.3.4.2 Sl_diag for DeviceNet......................................................................52 FMU Technical Manual Table of Contents 5.3.4.3 Sl_diag for CANopen.......................................................................52 5.4 6. 7. 5.3.5 SlaveDiagnostic_bIsDone Output ............................................................53 5.3.6 SlaveDiagnostic_iHasError Output...........................................................53 5.3.7 SlaveDiagnostic_awData Output..............................................................54 5.3.7.1 DiagData for PROFIBUS.................................................................55 5.3.7.2 DiagData for DeviceNet...................................................................56 5.3.7.3 DiagData for CANopen....................................................................58 FMU_GetUnitInfo ..................................................................................... 60 Outline Dimensions ..............................................................61 6.1 Outline Dimensions of the FP2 FMU ....................................................... 62 6.2 Outline Dimensions of the FPΣ FMU ....................................................... 63 Index ......................................................................................65 vii Chapter 1 Features and Restrictions Features and Restrictions FMU Technical Manual 1.1 Fieldbus Master Units (FMU) Fieldbus Master Units (FMU) are used together with the programmable controllers FP2/FP2SH and FPΣ. By exchanging the FMU, you can connect to various networking systems. FMUs are currently available for three bus systems: PROFIBUS, DeviceNet and CANopen. Others are planned for the future. Name Specifications Part no. FP2 PROFIBUS Master PROFIBUS DP Master FP2-DPV1-M Expansion for FP2 FP2 DeviceNet Master DeviceNet Master FP2-DEV-M Expansion for FP2 FP2 CANopen Master CANopen Master FP2-CAN-M Expansion for FP2 FPΣ PROFIBUS Master PROFIBUS DP Master FPG-DPV1-M Expansion for FPΣ FPΣ DeviceNet Master DeviceNet Master FPG-DEV-M Expansion for FPΣ FPΣ CANopen Master CANopen Master FPG-CAN-M Expansion for FPΣ Software Make sure you use at least version 5.3 of FPWIN Pro, into which the functions necessary for programming the FP-FMU blocks are integrated. You will require the add-on software "Control Configurator FM" (part no. AFPS35510) for Control FPWIN Pro in order to configure the fieldbus master units. You can download convenient function blocks for Control FPWIN Pro to help you program the FMUs free of charge from the Panasonic Electric Works Europe AG Web site: http://www.panasonic-electric-works.com. 2 FMU Technical Manual 1.2 Expansion Restrictions and Current Limitations 1.2 Expansion Restrictions and Current Limitations 1.2.1 Expansion Restrictions for the FP2 FMU The number of FP2-FMUs is restricted by the size of the FP2 backplane. 1.2.2 Expansion Restrictions for the FPΣ FMU The FPΣ FMUs are connected to the left side of the control unit via the FPΣ expansion connector. Up to 2 expansion units can be connected to the left side of the control unit. 1.2.3 Limitations on Current Consumption The 5V DC power used to drive the internal circuit of each unit is supplied from the power supply unit of the FP2 through the internal bus of the backplane or from the FPΣ control unit through the expansion connector. Pay attention to the combination of units so that the rated capacity of the power supply is not exceeded. 3 Chapter 2 Parts and Functions Parts and Functions FMU Technical Manual 2.1 FP2 FMU FP2 PROFIBUS DP Master Unit FP2-DPV1-M (AFP27971) FP2 DeviceNet Master Unit FP2-DEV-M (AFP27972) DEV-M DPV1-M COM. (RS485) FP2 Fieldbus Master Units, front view 6 CAN-M MNS COM SYS COM PROFIBUS FP2 CANopen Master Unit FP2-CAN-M (AFP27973) DeviceNet SYS COM CANopen FMU Technical Manual 2.1 FP2 FMU 1 2 3 4 5 FP2 Fieldbus Master Units, back view, side view on backplane 1 Backplane 2 DIN rail attachment lever 3 DIN standard rail attachment 4 Connector to the slot on the backplane 5 Expansion hook 7 Parts and Functions FMU Technical Manual 2.2 FPΣ FMU FPΣ DeviceNet Master Unit FPG-DEV-M (AFPG7972) FPΣ Fieldbus Master Units, front view 8 MNS SYS FPG-DEV-M COM SYS CANopen Master DeviceNet Master FPG-DPV1-M PROFIBUS Master FPΣ CANopen Master Unit FPG-CAN-M (AFPG7973) COM SYS FPG-CAN-M FPΣ PROFIBUS DP Master Unit FPG-DPV1-M (AFPG7971) FMU Technical Manual 2.2 FPΣ FMU 1 2 3 4 5 FPΣ Fieldbus Master Unit, side views FPΣ expansion connector Used to connect the unit to the control unit or other expansion units. 1 2 DIN standard rail attachment DIN rail attachment lever Used for easy attachment to a DIN rail. The lever is also used for installation on the FP0 slim 30 type mounting plate (part no. AFP0811). 3 Expansion hook Used to secure an expansion unit. The hook is also used for installation on the FP0 flat type mounting plate (part no. AFP0804). 4 Function earth connector At least one of the 2 pins must be connected to function earth to achieve proper EMC behavior. 5 The FPΣ-FMU is connected to the left side of the control unit via the FPΣ expansion connector. 9 Parts and Functions FMU Technical Manual 2.3 FP-FMU LEDs and Connectors Various FP Fieldbus Master Units (FMUs) are available to meet your networking needs. LEDs Two dual-color LEDs give you a quick overview of the FMU's status at a glance: • SYS (for DeviceNET MNS). Defines the general status of the FMU. For the hardware, yellow means the self-test has been passed and the firmware loaded. Green is used for application oriented functions such as valid configuration loaded. • COM. Shows communication errors or status and communication activities. See subsequent sections for details. SYS/MNS LED Color State Indication Off No power. Yellow Flashing (1Hz). ON FMU is in bootloader mode and is waiting for firmware download. ON 0.0 0.5 1.0 1.5 2.0 (s) Flashing (5Hz). Firmware download in progress. ON OFF 0.0 1.0 2.0 (s) Acyclic flashing. (3 times fast at 5Hz, 8 times between 0.5Hz and 1Hz.) Hardware or severe runtime error detected. FMU or firmware needs replacement. Contact your Panasonic representative. For example: ON . . . 8x OFF 0.0 Green 1.0 2.0 3.0 (s) ON. FMU has established at least one configured fieldbus connection. Flashing (5Hz). No error in configuration found. The FMU is online and ready for fieldbus communication, but connection to a fieldbus device has not been established. ON OFF 0.0 1.0 2.0 (s) Acyclic flashing. (3 times fast at 5Hz, 8 times between 0.5Hz and 1Hz.) For example: ON OFF 0.0 10 . . . 8x 1.0 2.0 3.0 (s) • Power up. Configuration missing and FMU needs commissioning. • Runtime. Firmware has found a critical link problem, e.g. host watchdog timeout. FMU Technical Manual 2.3 FP-FMU LEDs and Connectors 2.3.1 FP-PROFIBUS DP SYS LED (see page 10) COM LED Color State Indication Yellow ON. FMU is holding the PROFIBUS token and is able to transmit PROFIBUS telegrams. Acyclic flashing. FMU is sharing the PROFIBUS token with other master devices in the PROFIBUS network. (Between 0.5Hz and 100Hz.) Red OFF. FMU is not configured or has not received permission to hold the token in the PROFIBUS network. ON. FMU has detected a communication problem with at least one PROFIBUS slave device. Connection timeout. PROFIBUS connector, DB9F, 9-pin Sub-D female Connector 9 6 5 1 Pin Signal Description 1 - - 2 - - 3 B Line Positive RxD/TxD, RS485 level 4 RTS Request to send 5 GND Bus ground (isolated) 6 +5V bus output (see note) +5V termination power (isolated) 7 - - 8 A Line Negative RxD/TxD, RS485 level 9 Housing - - Cable shield • FPΣ: Internally connected to the function earth connector of the FMU. • FP2: Internally connected to the earth terminal of the power unit. NOTE Any current drawn from pin 6, the +5V bus output pin, will affect the total power consumption. 11 Parts and Functions FMU Technical Manual 2.3.2 FP-DeviceNet MNS LED (see page 10) COM LED Color State Green ON Indication FMU is operational and online, connections established. • FMU is allocated to another master. • FMU has established a connection to a slave. FMU is operational and online, no connection established. Flashing (1Hz) ON ON • Configuration missing. • FMU has passed the duplicate MAC ID check but has not 0.0 0.5 1.0 1.5 2.0 (s) Red ON established connection to another device. FMU cannot access the network. • BUS off because of severe CAN faults. • Duplicate MAC ID detected. OFF FMU is not online. ⎯ • Duplicate MAC ID test not completed. • Power may not be supplied. DeviceNet Connector Connector 5 Pin Signal Description 1 V- Negative bus supply voltage (see note) 2 CAN_L CAN low bus line 3 SHIELD Cable shield 4 CAN_H CAN high bus line 5 V+ Positive bus supply voltage (see note) 1 NOTE Mandatory 24V bus power. 12 FMU Technical Manual 2.3 FP-FMU LEDs and Connectors 2.3.3 FP-CANopen SYS LED (see page 10) COM LED Color State Indication Yellow ON FMU is currently sending a CAN telegram. OFF FMU has finished sending a CAN telegram. ON FMU has detected a communication problem with at least one CANopen node device. Connection timout. Red CANopen Interface Connector Pin Signal Description 2 CAN_L CAN low bus line (dominant low) 3 CAN_GND Negative bus power supply input CAN_H CAN high bus line (dominant high) 1 6 9 1 4 5 5 6 7 8 9 13 Chapter 3 Specifications Specifications FMU Technical Manual 3.1 FMU General Specifications Item Description Operating temperature 0 to +55°C/32 to +131°F Storage temperature -20 to +70°C/-4 to +158°F Operating humidity 30 to 85% RH (non-condensing) Storage humidity 30 to 85% RH (non-condensing) Vibration resistance 10 to 55Hz, 1 cycle/min: double amplitude of 0.75mm/0.030in., 10 min. on 3 axes Shock resistance Shock of 98m/s2 or more, 4 times on 3 axes Operation condition Free from corrosive gases and excessive dust Current consumption (5V) FP2-DPV1-M: 450mA FP2-CAN-M: 450mA FP2-DEV-M: 150mA Current consumption (24V) FPΣ-DPV1-M: 135mA Weight FP2-DPV1-M: 118g FPΣ-CAN-M: 135mA FPΣ-DEV-M: 45mA FP2-CAN-M: 118g FP2-DEV-M: 118g FPΣ-DPV1-M: 95g FPΣ-CAN-M: 95g FPΣ-DEV-M: 95g 16 FMU Technical Manual 3.2 FP-PROFIBUS DP Communication Specifications 3.2 FP-PROFIBUS DP Communication Specifications The following table lists limits for communication when using the FP-PROFIBUS DP FMU. Item Limit No. DP slaves 127 ( address range 0-126) Address 127 = broadcast address Address 126 = slave with changeable default address Address 0 = Master class 2 default address No. of process data per slave 244 input and 244 output bytes Max. number of process data 3584 bytes input, 3584 bytes output Max. number of diagnostic bytes per slave 100 Max. number of configuration data bytes per slave 244 Max. number of parameter data bytes per slave 244 Max. number of modules per modular slave 244 Baud rates supported 9.6kBaud, 19.2kBaud, 31.25kBaud, 45.45kBaud, 93.75kBaud, 187.5kBaud, 500kBaud, 1.5MBaud, 3MBaud, 6MBaud, 12MBaud Min. DP scan cycle time 350μs 17 Specifications FMU Technical Manual 3.3 FP-DeviceNet Communication Specifications Item Limit No. of slaves 63 No. of bytes for I/O data 7168 (input 3584, output 3584) Baud rates supported 150kBaud, 250kBaud, 500kBaud Additional features • Polling, bit-strobe • Cyclic, COS (change of state) • UCMM via groups 1, 2, 3 • Predefined connection set 18 FMU Technical Manual 3.4 FP-CANopen Communication Specifications 3.4 FP-CANopen Communication Specifications Technical compliance to specification DS 301 version 4.01 Services supported Services not supported Physical layer Bootup protocol, no reaction to bootup events of a node. CAN frame types 11 bits Optional high resolution synchronization protocol Read/Write PDO protocol Optional SDO block up/download protocol Trigger for PDO transmission, event driven and remotly requested, transmission modes synchronous and asynchronous. Timer triggered PDO transmission PDO mapping in accordance with DS 301, V3.0 and V4.01 Dynamic SDO establishment Emergency message collection Multiplexed PDOs, MPDO protocol NMT functionality, supporting Reset_Communication, Start_Remote_Node, Stop_Remote_Node and Enter_Preoperational. Reading identity object of a node for identification SYNC protocol TIME protocol Node guarding protocol Verify configuration boot-up process Optional heartbeat protocol Boot-up process in accordance with DS 302, NMT master SDO up/download protocol Coexistence of a second NMT master Simple boot-up process, reading object 1000H for identifying Modular devices Synchronous counter for SYNC protocol Limits of the implementation The following device-specific limitations apply to the CANopen implementation. Item EC1-based product Max. size for complete dynamic configuration via message interface 59000 bytes Max. size for node parameter data set via message interface 9600 bytes Max. number of PDOs per node (send and receive) 64 Max. number of receive PDOs per node (master sends PDO to node) 32 Max. number of transmit PDOs requested via RTR per node (node sends PDO to master) 20 Max. SDO configuration per node 9000 bytes I/O area size for CANopen network for each direction 3584 bytes Baud rates supported 10kBaud, 20kBaud, 50kBaud, 100kBaud, 125kBaud 250kBaud, 500kBaud, 800kBaud, 1MBaud The following limitations apply to the CANopen specification. Item EC1-based product Max. number of devices in CANopen network 127 Max. data count per PDO 8 bytes 19 Specifications FMU Technical Manual PDO data sent from a node will not be cleared in the receive process data interface of the CANopen master if the node disappears from the network. Additional features for the CANopen master 20 • 127 nodes • 7168 bytes I/O data • Min. boot-up • COB ID distribution: default/via SDO • Emergency message • Node/life guarding, heartbeat • Event trigger • PDO: cyclic, acyclic, asynchronous • Remote request Chapter 4 Installation and Wiring Installation and Wiring FMU Technical Manual 4.1 Installation of the FP2/FPΣ Unit ! Warning! Read the following notes carefully before installing the unit! Failure to follow these instructions could lead to fire or damage the equipment. Installation environment • Be sure to install the unit in locations designed for electrical equipment, e.g. in a closed metal cabinet such as a switch cabinet. Avoid installing the unit in the following locations: • Ambient temperatures outside the range of 0°C to 55°C/32°F to 131°F • Ambient humidity outside the range of 30% to 85% RH (at 25°C, non-condensing) • Sudden temperature changes causing condensation • Inflammable or corrosive gases • Excessive airborne dust, metal particles or salts • Benzine, paint thinner, alcohol or other organic solvents or strong alkaline solutions such as ammonia or caustic soda • Excessive vibration or shock • Direct sunlight • Water or oil in any form including spray or mist Static electricity • Before touching the unit or equiprment, always touch some grounded metal to discharge any static electricity you may have generated (especially in dry locations). The discharge of static electricity can damage parts and equipment. Avoid noise interference from the following sources: • Influence from power transmission lines, high voltage equipment, power cables, power equipment, radio transmitters, or any other equipment that would generate high switching surges. • If noise occurs in the power supply line even after the above countermeasures are taken, it is recommended to supply power through an insulation transformer, noise filter, or the like. Cleaning • 22 Do not use thinner based cleaners because they deform the unit case and fade the FMU Technical Manual 4.1 Installation of the FP2/FPΣ Unit colors. Measures regarding heat discharge • Always install the CPU orientated with the TOOL port facing outward on the bottom in order to prevent the generation of heat. • Do NOT install the CPU as shown below. Upside-down Air duct blocked Input and output connectors face down Input and output connectors on top Horizontal installation of the unit • Do not install the unit above devices which generate heat such as heaters, transformers 23 Installation and Wiring FMU Technical Manual or large scale resistors. Installation space • Leave at least 50mm/1.97in. of space between the wiring ducts of the unit and other devices to allow heat radiation and unit replacement. 50 mm/1.97 in. or more 50 mm/1.97 in. or more • Maintain a minimum of 100mm/3.937in. between devices to avoid adverse affects from noise and heat when installing a device or panel door to the front of the unit. 24 Other device PLC unit 100 mm/ 3.937 in. or more Panel door FMU Technical Manual • 4.1 Installation of the FP2/FPΣ Unit For the FP2/FP2SH, keep the first 170mm from the PLC front surface clear of objects to allow the connecting of programming tools. For the FPΣ, the distance should be at least 130mm. Approx. 110mm CPU FP PC cable 170mm or more 25 Installation and Wiring FMU Technical Manual 4.2 Mounting Methods FPΣ-FMU You can attach up to 4 expansion units, including the FPΣ-FMU (max. FMUs = 2), to the left side of the FPΣ CPU. You can mount all units on a DIN rail. REFERENCE For more information, please refer to the FPΣ User's Manual. FP2-FMU Install the FP2-FMU on the FP2 backplane. You can mount the backplane on a DIN rail. REFERENCE For more information, please refer to the FP2 Hardware Manual. 26 FMU Technical Manual 4.3 Cable Selection 4.3 Cable Selection Select a cable suitable for the network used. PROFIBUS Use a standard PROFIBUS cable and a standard 9-pin Sub-D PROFIBUS connector. CANopen Use a standard CANopen cable and a standard 9-pin Sub-D CANopen connector. DeviceNet Use a standard DeviceNet cable. The round cable contains five wires: one twisted pair (red and black) for 24V DC power, one twisted pair (blue and white) for signal, and a drain wire (bare). You can find proposals for standard cables on the Open DeviceNet Vendor Association's Web site (ODVA): http://www.odva.org. (http://www.odva.org/default.aspx?tabid=84) 27 Installation and Wiring FMU Technical Manual 4.4 Wiring of the FP-FMU Connectors 4.4.1 PROFIBUS DP Wiring Use a standard PROFIBUS cable and standard 9-pin Sub-D male PROFIBUS connectors. 4.4.2 DeviceNet Wiring Open style connector/suitable wire DeviceNet has a standard open style connector. If additional connectors are needed, use the standard CAN 5-poles open style connectors manufactured by Phoenix Contact. No. of contacts 5 Phoenix Contact product ID Model no. Product no. MSTB 2,5/ 5-ST-5,08 ABGY AU 1849037 Terminal block for DeviceNet For a suitable wire, please refer to cable selection (see page 27). Wiring method Attach a plug-in, open style connector to a cable. 1. 2. 3. Procedure 1. Strip 65mm (2.6in.) to 75mm (3in.) of the outer jacket from the end of the cable, leaving no more than 6.4mm (0.25in.) of the braided shield exposed. Braided shield 6.4mm Jacket 65.0mm 28 FMU Technical Manual 4.4 Wiring of the FP-FMU Connectors 2. Wrap the end of the cable with 38mm (1.5in.) of shrink wrap, covering part of the exposed conductors and part of the trunk line insulation. Shrink wrap 38mm Jacket 3. Strip 8.1mm (0.32in.) of the insulation from the end of each of the insulated conductors. Jacket Shrink wrap 8.1mm 4. Insert each conductor into the appropriate clamping cavity of the open style connector or the screw terminal on the device, according to the color of the cable insulation: Wire color Wire identity White CAN_H Usage Signal Blue CAN_L Signal Bare Drain Shield Black V- Power Red V+ Power 5. Tighten the clamping screws to secure each conductor. The male contacts of the device connector must match the female contacts of the connector. NOTES • When removing the wire's insulation, be careful not to scratch the core wire. • Do not twist the wires to connect them. • Do not solder the wires to connect them. The solder may break due to vibration. 29 Installation and Wiring FMU Technical Manual • After wiring, make sure stress is not applied to the wire. • In the terminal block socket, make sure to clamp the wire in place by turning the tightening screw clockwise. OK 4.4.3 CANopen Wiring Use a standard CANopen cable and standard 9-pin Sub-D female CANopen connectors. 30 FMU Technical Manual 4.5 Wiring of the FPΣ FMU 4.5 Wiring of the FPΣ FMU The FPΣ-FMU has a screw terminal on its lower side to connect to function earth. Use the following items for wiring. Accessory terminal block If additional connectors are needed, use the connector manufactured by Phoenix Contact. No. of contacts Phoenix Contact product ID 2 Model no. Product no. MC 1.5/2-ST-3.5 18 40 36 6 Suitable wire No. of wires Size Cross-sectional area 1 AWG 28-16 0.14-1.5 mm² NOTE Either fixed or flexible wires can be used to connect the function earth. Fixed wires with a diameter>0.14mm² and flexible wires with a wire end ferrule can be used. Wiring method CAUTION • When removing the wire’s insulation, be careful not to scratch the core wire. • Do not twist the wires to connect them. • Do not solder the wires to connect them. The solder may break from vibrations. • After wiring, make sure stress is not applied to the wire. 31 Installation and Wiring 1. 2. 3. FMU Technical Manual Procedure 1. Remove a portion of the wire’s insulation. 7mm 2. Insert the wire into the screw terminal. 3. Clamp the wire in place by turning the tightening screw clockwise. OK 32 Chapter 5 Programming Information for Control FPWIN Pro Programming Information for Control FPWIN Pro FMU Technical Manual 5.1 General Information Make sure you use at least version 5.3 of FPWIN Pro, which includes the functions necessary for programming the FP-FMUs. The function blocks described in this section are used to configure the various FMUs and to start communication with the specific network. The functions and function blocks can be used for either the FP2-FMU or FPΣ-FMU unit. You can download the function blocks free of charge from the Panasonic Electric Works Europe AG Web site. 34 FMU Technical Manual 5.2 GetPointer Function 5.2 GetPointer Function The GetPointer function outputs the size, area and offset of the input variable and writes it to the output variable of the type POINTER. Connect the output of this function directly to the respective input of the function block. REFERENCE For more information about the GetPointer function, please refer to the FPWIN Pro online help. 35 Programming Information for Control FPWIN Pro FMU Technical Manual 5.3 FMU_DataExchange The FMU_DataExchange function block is used to start communication with the network. It has to be supplied with information about the input and output size, and network-specific data. Just leave the pins unconnected that you do not require. PLC types: available for FP2/FP2SH and FPΣ. Variables of this function block have to be of one of the following data types: Inputs Data type Input Function INT iUnitSlotNumber Installation position of the FMU. INT NetworkType Use: • FMU_ProfibusDP • FMU_DeviceNet • FMU_CANopen Defined in the library as VAR_GLOBAL_CONSTANT. BOOL DataExchange_bRun If true, network communication runs. POINTER DataExchange_pInputData Pointer to the input's process data table. POINTER DataExchange_pOutputData Pointer to the output's process data table. BOOL SlaveDiagnostic_bStart If rising edge, slave diagnostic starts on time. INT SlaveDiagnostic_iNumber Node number for diagnostic. BOOL bMasterReset If true, the unit is in reset stage. Data type Output Function BOOL Unit_blsReady ON if unit is ready. INT Unit_ErrorNumber Unit is in error. DUT dutNetworkStatus Depends on the network (see "dutNetworkStatus Output" on page 37). BOOL[128] Slaves_abIsConfigured Depends on the network (see "Slaves_abIsConfigured Output" on page 48). BOOL[128] Slaves_abIsConnected Depends on the network (see "Slaves_abIsConnected Output" on page 49). BOOL[128] Slaves_abHasDiagnostic Depends on the network (see "Slaves_abHasDiagnostic Output" on page 50). Outputs 36 FMU Technical Manual 5.3 FMU_DataExchange Data type Output Function BOOL SlaveDiagnostic_bIsDone ON if done. INT SlaveDiagnostic_iHasError Depends on the network (see "SlaveDiagnostic_iHasError Output" on page 53). WORD[4] SlaveDiagnostic_awData Depends on the network (see "SlaveDiagnostic_awData Output" on page 54). List of error codes for the function block FMU_DataExchange Error code Indication 16#0000 No error. 16#0001 Input data variable is too big. 16#0002 Output data variable is too big. 16#0003 Unit not available. 5.3.1 dutNetworkStatus Output Connected to the output pin dutNetworkStatus is the variable GlobalBusState, which in turn is part of the DUT GlobalBusStateField included in the FMU library for Control FPWIN Pro. This DUT is used for all network types, but the information stored in the DUT is nevertheless network-specific: • PROFIBUS (see page 38) 37 Programming Information for Control FPWIN Pro • DeviceNET (see page 41) • CANopen (see page 45) FMU Technical Manual 5.3.1.1 GlobalBusStateField for PROFIBUS Identifier part Identifier Explanation Global bits GlobBit_Status Lower byte of the WORD. Details follow the table. Status GlobBit_Status Higher byte of the WORD. The master system can be in one of the following states: • 16#00: OFFLINE • 16#40: STOP • 16#80: CLEAR • 16#C0: OPERATE Error remote address ErrRemAddr_ErrEvent Lower byte of the WORD. Some of the global bits indicate errors in the network or in the FMU itself that require a more detailed explanation. In these cases, "ErrRemAddr" represents the source of the error and can arise from either the FMU itself (value = 255), or be detected and reported by a network device. In this case, the lower byte represents the station address. Range: 0 to 125. Error event ErrRemAddr_ErrEvent Higher byte of the WORD. Each error is assigned a number. The errors are explained following the table. Bus error count BusErrorCnt Counts severe bus errors, e.g. bus short circuits. Timeout count TimeOutCount Counts the number of rejected PROFIBUS telegrams due to severe bus errors. Current master address MoreInformation Lower byte of ARRAY [0] of WORD. Master protocol chip online MoreInformation Higher byte of ARRAY [0] of WORD. Contains the current active master address. This variable reflects the current status of the master protocol chip. If the value is 0, the chip is in the offline state; if the value is 1, the chip is on the online state. The variable is updated cyclically. 38 FMU Technical Manual 5.3 FMU_DataExchange Global bits The bit field serves as collective display of global notifications. Errors can either occur at the FMU itself or at the slaves. To distinguish between the different errors, the variable part ErrRemAddr contains the error location (bus address), while the variable part ErrEvent lists the corresponding error number. If more than one error is determined, the error location will always show the lowest faulty bus address. Bit: 7 Bit 6 5 4 3 2 1 0 Explanation 0 Control error. Parameterization error. 1 Auto-clear error. FMU stopped communication to all slaves and reached the auto-clear end state. 2 Non-exchange error. At least one slave has not reached the data exchange state, hence no process data can be exchanged. 3 Fatal error. Due to severe bus error, no further bus communication is possible. 4 Event error. The FMU has detected bus short circuits. The number of detected events are fixed in the BusErrorCnt variable. The bit is set when the first event is detected. 5 Host not ready notification. If the bit is set, the host program ist NOT ready to communicate. 6 Timeout error. The FMU has detected an overstepped timout supervision time due to rejected PROFIBUS telegramms. It indicates bus short circuits while the master interrupts the communication.The number of detected timeouts are fixed in the TimeOutCount variable.The bit is set when the first timeout is detected. 7 Reserved. Errors The following error numbers are valid for the error event if "Error remote address" is 255. ErrEvent Explanation Source of error Recommendation 0 No errors 50 User interface task not found. FMU Contact technical support. 51 No global data field. FMU Contact technical support. 52 Fieldbus data link task not found. FMU Contact technical support. 53 PLC task not found. FMU Contact technical support. 54 Non-existent master parameters. FMU Download database again. 55 Faulty master parameter value. Project planning Contact technical support. 56 Non-existent slave parameters. Project planning Download database again. 57 Faulty slave parameter value in data file. Project planning Contact technical support. 58 Double slave address. Project planning Check projected addresses. 59 Projected send process data offset of participant's address outside allowable range of 0-255. Project planning Check projected addresses. 60 Projected receive process data offset of participant's address outside allowable range of 0-255. Project planning Check projected addresses. 61 Slaves' data areas overlapping for send process data. Project planning Check projected addresses. 62 Slaves' data areas overlapping for Project planning Check projected addresses. 39 Programming Information for Control FPWIN Pro ErrEvent Explanation FMU Technical Manual Source of error Recommendation receive process data. 63 Unknown process data handshake. Warm start Check warm start parameters. 64 Free RAM exceeded. FMU Contact technical support. 65 Faulty slave parameter data sets. Project planning Contact technical support. 202 No segment for treatment free. FMU Contact technical support. 212 Faulty reading of database. FMU Download database again. 213 Structure surrender to operating system faulty. FMU Contact technical support. 220 Software watchdog error. Host Check host program. 221 No data acknowledgement in process data handshake mode 0. Host Host program did not acknowledge the last handshake in time. 222 Master in auto-clear mode. Slave Auto-clear mode was activated because one slave was missing during runtime. 225 No further segments. FMU Contact technical support. The following error numbers are valid for the error event if "Error remote address" is not equal to 255. ErrEvent 40 Explanation Source of error Recommendation 2 Station reports overflow. Master telegram Check length of configured slave configuration or parameter data. 3 Request function of master not activated in the station. Master telegram Check slave if PROFIBUS DP norm compatible.. 9 No answer even though slave must respond. Slave Check configuration data of the station and compare it with the physical I/O data length. 17 No response from station. Slave Check bus cable. Check bus address of slave. 18 Master not in the logical token ring. FMU Check master's fieldbus data link address or the highest station address of other master systems. Check bus cable for short circuits. 21 Faulty parameter in request. Master telegram Contact technical support. FMU Technical Manual 5.3 FMU_DataExchange 5.3.1.2 GlobalBusStateField for DeviceNet Identifier part Identifier Explanation Global bits GlobBit_Status Lower byte of the WORD. Details follow the table. Status GlobBit_Status Higher byte of the WORD. The master system can be in one of the following states: • 16#00: OFFLINE • 16#40: STOP • 16#80: CLEAR • 16#C0: OPERATE Error remote address ErrRemAddr_ErrEvent Lower byte of the WORD. If the global bits "control error, auto-clear error or non-exchange error" are set, this variable indicates the address of the device. If the error occurs in the FMU, the value is 255. Otherwise the faulty device address = MAC ID is stored. Error event ErrRemAddr_ErrEvent Higher byte of the WORD. Each error is assigned a number. The errors are explained following the table. Bus error count BusErrorCnt This variable is incremented whenever the error frame counter of the Philips CAN chip used has reached the warning limit due to disturbed bus communication. Timeout count TimeOutCount This variable is incremented when the CAN chip reports that it is no longer involved in bus activities because the bus error frame counter has been exceeded. The chip must be reinitialized, which is done automatically by the FMU. Server status MoreInformation Lower byte of ARRAY [0] of WORD. The FMU is able to be a I/O server and master simultaneously. The status of the server poll I/O connection and the explicit connection can be read from this variable. • Bit 0 = current status of the server explicit connection. • Bit 1 = current status of the server poll I/O connection. • Bits 2-7 are reserved. 41 Programming Information for Control FPWIN Pro FMU Technical Manual Global bits The bit field serves as collective display of global notifications. Errors can either occur at the FMU itself or at the slaves. To distinguish between the different errors, the variable part ErrRemAddr contains the error location (address = MAC ID), while the variable part ErrEvent lists the corresponding error number. If more than one error is detected, the error location will always show the device with the lowest MAC ID. Bit: 7 Bit 6 5 4 3 2 1 0 Explanation 0 Control error. Parameterization error. 1 Auto-clear error. FMU stopped communication to all slaves and reached the auto-clear end state. 2 Non-exchange error. At least one slave has not reached the data exchange state, hence no process data can be exchanged. 3 Fatal error. Due to severe bus error, no further bus communication is possible. 4 Event error. The FMU has detected bus short circuits. The number of detected events are fixed in the BusErrorCnt variable. The bit is set when the first event is detected. 5 Host not ready notification. If the bit is set, the host program ist NOT ready to communicate. 6 Duplicate MAC ID detected. The FMU has detected another device in the network with the same MAC ID. 7 Duplicate MAC ID check in progress. As long this bit is set, the FMU is checking for duplicate MAC IDs. Errors The following error numbers are valid for the error event if "Error remote address" is 255. ErrEvent 42 Explanation Source of error 52 Unknown process data handshake mode configured. Configuration. 53 Baud rate out of range. Configuration. 54 FMU MAC ID address out of range. Configuration. 57 Duplicate FMU MAC ID address detected in the network Configuration or network. 58 No device entry found in the current configuration database. Download error in the current database. 210 No database found in the system. Configuration not downloaded. FMU is not configured by Control Configurator FM. 212 Failure reading the database. 220 User watchdog failed. Application. 221 No data acknowledgement from user. Application. 223 Master has stopped bus communication due to CAN-based bus off error. In the Control Configurator FM for the bus parameters under "Error handling", "Auto Clear" is activated. Network error. 226 Master firmware downloaded to slave EC1 device. User error. Recommendation Contact technical support. Contact technical support. FMU Technical Manual 5.3 FMU_DataExchange The following error numbers are valid for the error event if "Error remote address" is not equal to 255. ErrEvent Explanation Source of error Recommendation 0 No errors. 1 Device guarding failed after device was operational. Device Check if device is still running. 30 Device access timeout. Device Device does not respond. Check the baud rate and MAC ID. 32 Device rejects access with unknown error code. Device Use single-device diagnostic to get reject code. 35 Device response in allocation phase with connection error. Device Use single-device diagnostic to get additional reject code. 36 Connection produced (process data input length from the FMU's point-of-view) is different from the one configured. Device/configuration Use single-device diagnostic to get true produced connection size. 37 Size of connection consumed (process data output length from the FMU's point-of-view) is different from the one configured. Device/configuration Use single-device diagnostic to get true consumed connection size. 38 Device service response telegram unknown and not handled. Device/configuration Use single-device diagnostic to get true consumed connection size. 39 Connection already requested. Device Connection will be automatically released. 40 Number of CAN message data bytes read in the produced or consumed connection size response unequal to 4. Device Device cannot operate with the FMU and norm description. 41 Predefined master-slave connection already exits. Device/FMU Connection will be automatically released. 42 Length in polling device response unequal to produced connection size. Device 43 Sequence error in device polling response. Device Two initial segments in multiplexed transfer were received. 44 Fragment error in device polling response. Device Fragmentation counter during multiplexed transfer differs from the one expected. 45 Sequence error in device polling response. Device Middle or last segment was received before the first segment. 46 Length in bit strobe device response unequal to produced connection size. Device 47 Sequence error in device COS or cyclic response. Device Two initial segments in multiplexed transfer were received. 48 Fragment error in device COS or cyclic response. Device Fragmentation counter during multiplexed transfer differs from the one expected. 49 Sequence error in device COS or cyclic response. Device Middle or last segment was received before the first segment. 43 Programming Information for Control FPWIN Pro ErrEvent FMU Technical Manual Explanation Source of error 50 Length in COS or cyclic device response unequal to produced connection size. Device 51 UCMM group not supported. Device Change the UCMM group. 52 Device keying failed: vendor ID mismatch. Device/configuration Check vendor ID configured with device's vendor ID. 53 Device keying failed: device type mismatch. Device/configuration Check device type configured with device's device type. 54 Device keying failed: product code mismatch. Device/configuration Check product code configured with device's product code. 55 Device keying failed: revision mismatch. Device/configuration Check revision configured with device's revision. 59 Double device address configured in current configuration. Configuration Each device in DeviceNet must have its own MAC ID. 60 Whole size indicator of one device data set is corrupt. Configuration Download error in the current database. Contact technical support. 61 Size of the additional table for predefined master-slave connections is corrupt. Configuration Download error in the current database. Contact technical support. 62 Size of predefined master-slave I/O configuration table is corrupt. Configuration Download error in the current database. Contact technical support. 63 Predefined master-slave I/O configuration does not correspond to the additional table. Configuration Number of I/O units and the number of configured offset addresses are different. 64 Size indicator of parameter data table is corrupt. Configuration Value of size indicator too small. 65 Number of inputs declared in the additional table does not correspond to the number in the I/O configuration table. Configuration Each entry in the I/O configuration must have only one entry in the additional table. 66 Number of outputs declared in the additional table does not correspond to the number in the I/O configuration table. Configuration Each entry in the I/O configuration must have only one entry in the additional table. 67 Unknown data type in I/O configuration detected. Configuration Data types supported: Data type of a defined I/O unit in a connection does not correspond with the defined data size. Configuration 68 Recommendation BOOL, BYTE, WORD, DWORD and STRING only. The following types and size are valid: • BOOLEAN = 1 byte • Unit 8 = 1 byte • Unit 16 = 2 bytes • Unit 32 = 4 bytes 69 44 Output address configured for one unit exceeds the possible address range of 3584 bytes. Configuration The process data image is limited to 3584 bytes. FMU Technical Manual ErrEvent 5.3 FMU_DataExchange Explanation Source of error Recommendation 70 Input address configured for one unit exceeds the possible address range of 3584 bytes. Configuration The process data image is limited to 3584 bytes. 71 One predefined connection type is unknown. Configuration Support of cyclic, polled, change of state, bit strobed only. 72 Multiple connections defined in parallel. Configuration Supports only one type of connection to one device. 73 The value configured for the expected packet rate value configured is less than the value for production inhibit time. Configuration The value for the expected packet rate must be larger than the production inhibit time. In Control Configurator FM, check the settings for the slave's poll connection configuration. 5.3.1.3 GlobalBusStateField for CANopen Identifier part Identifier Explanation Global bits GlobBit_Status Lower byte of the WORD. Details follow the table. Status GlobBit_Status Higher byte of the WORD. The master system can be in one of the following states: • 16#00: OFFLINE • 16#40: STOP • 16#80: CLEAR • 16#C0: OPERATE Error remote address ErrRemAddr_ErrEvent Lower byte of the WORD. If the global bits "control error, auto-clear error or non-exchange error" are set, indicates the address of the node. If the error occurs in the FMU, the value is 255. Otherwise the faulty node address is stored. Error event ErrRemAddr_ErrEvent Higher byte of the WORD. Each error is assigned a number, which are explained following the table. Bus error count BusErrorCnt Counts how many times bus error limits are exceeded. Timeout count TimeOutCount Counts the number of CAN chip reinitializations. Message Time Out MoreInformation ARRAY [0] of WORD. Number of cancelled CAN messages because partner did not acknowledge. 45 Programming Information for Control FPWIN Pro FMU Technical Manual Identifier part Identifier Explanation Receive message overflow MoreInformation ARRAY [1] of WORD. Number of receive message overflows indicated from the CAN chip. Global bits The bit field serves as collective display of global notifications. Errors can either occur at the FMU itself or at the nodes. To distinguish between the different errors, the variable part ErrRemAddr contains the error location (address), while the variable part ErrEvent lists the corresponding error number. If more than one error is determined, the error location will always show the lowest faulty bus address. Bit: 7 Bit 6 5 4 3 2 1 0 Explanation 0 Control error. Parameterization error. 1 Auto-clear error. FMU stopped communication to all nodes and reached the auto-clear end state. 2 Non-exchange error. At least one node has not reached the data exchange state, hence no process data can be exchanged. 3 Fatal error. Due to severe internal error, no further bus communication is possible. 4 Event error. The FMU has detected transmission errors. The number of detected events are fixed in the BusErrorCnt variable. The bit is set when the first event is detected. 5 Host not ready notification. If the bit is set, the host program ist NOT ready to communicate. 6 Timeout error. The FMU has detected an overstepped timeout supervision time of at least one CAN message to be sent. The transmission of this message was aborted. The data is lost. It indicated that no other CAN device was connected or could not acknowledge the message sent. The number of timeouts detected are stored in the message timeout variable. The bit is set when the first timeout is detected. 7 Reserved. Errors The following error numbers are valid for the error event if "Error remote address" is 255. ErrEvent 46 Explanation Source of error Recommendation Unknown handshake mode was configured. Initialization If you use the function block, please use the default handshake settings. 56 Baud rate out of range. Project planning Contact technical support. 60 Double node address was configured. Project planning Contact technical support. 63 Invalid parameter for SYNC mode. Project planning In Control Configurator FM under bus parameters, check the SYNC Master settings. 210 No database. Project planning Download database again. 212 Faulty reading of a database. Device Download database again. 0 No errors 52 FMU Technical Manual ErrEvent 220 5.3 FMU_DataExchange Explanation Source of error Recommendation Host watchdog error. Host program Check user program or watchdog timer. The following error numbers are valid for the error event if "Error remote address" is not equal to 255. ErrEvent Explanation Source of error Recommendation 30 Guarding failed. Node Check whether node is connected. 31 Node has changed its state and is no longer operational. Node Reset node. 32 Sequence error in guarding protocol. Node Reset node. 33 No response to a configured remote frame PDO. Node Check whether node can handle remote frames. 34 No response of the node while being configured. Node Check whether node is connected and operational. 35 The node profile number configured in the master differs from the actual node profile number. Project planning Check the supported profile number of the node: I/O, encoder, etc. 36 The device type configured in the master differs from the actual node device type. Project planning Check the supported services of the node. 37 Unknown SDO response received. Node Node not compatible with CiA protocol specification. 38 Length indicator of received SDO message does not equal 8. Node Node not compatible with CiA protocol specification. 39 Node not handled. Node stopped. Device Activated auto-clear mode or host is not ready. 47 Programming Information for Control FPWIN Pro FMU Technical Manual 5.3.2 Slaves_abIsConfigured Output Connected to the output pin Slaves_ablsConfigured is a variable of the type ARRAY [0...127] of BOOL. In this example, the identifier is SI_cfg. This variable is used for all network types, but the information stored in the variable is nevertheless network-specific: • Sl_cfg for PROFIBUS (see page 48) • Sl_cfg for DeviceNet (see page 48) • Sl_cfg for CANopen (see page 49) 5.3.2.1 Sl_cfg for PROFIBUS This variable is an ARRAY [0...127] of BOOL, i.e. a field of 8 words, and contains the parametrization state of each FMU slave. The bit for the corresponding slave is logical: • 1 = the slave is configured in the FMU. • 0 = the slave is not configured in the FMU. 5.3.2.2 Sl_cfg for DeviceNet This variable is an ARRAY [0...127] of BOOL, i.e. a field of 8 words, and contains the parametrization state of each FMU slave. For DeviceNet, bits 0 to 63 are available. The bit for the corresponding slave is logical: 48 • 1 = the slave is configured in the FMU. • 0 = the slave is not configured in the FMU. FMU Technical Manual 5.3 FMU_DataExchange 5.3.2.3 Sl_cfg for CANopen This variable is an ARRAY [0...127] of BOOL, i.e. a field of 8 words, and contains the parametrization state of each FMU node. The bit for the corresponding node is logical: • 1 = the node is configured in the FMU. • 0 = the node is not configured in the FMU. 5.3.3 Slaves_abIsConnected Output Connected to the output pin Slaves_ablsConnected is a variable of the type ARRAY [0...127] of BOOL. In this example, the identifier is SI_state. This variable is used for all network types, but the information stored in the variable is nevertheless network-specific: • SI_state for PROFIBUS (see page 49) • SI_state for DeviceNET (see page 50) • SI_state for CANopen (see page 50) 5.3.3.1 Sl_state for PROFIBUS This variable is an ARRAY [0...127] of BOOL, i.e. a field of 8 words, and contains the parametrization state of each FMU slave. The bit of the corresponding slave is logical: • 1 = the slave and the master are exchanging I/O data. • 0 = the slave and the master are not exchanging I/O data. The values in the variable Sl_state are only valid if the master is in the OPERATE state. 49 Programming Information for Control FPWIN Pro FMU Technical Manual 5.3.3.2 Sl_state for DeviceNet This variable is an ARRAY [0...127] of BOOL, i.e. a field of 8 words, and contains the parametrization state of each FMU slave. The lower 4 words, ARRAY [0...63] of BOOL, store the state for the device's explicit connection. The bit of the corresponding device is logical: • 1 = the device's explicit connection is in the established state • 0 = the device's explicit connection is not in the established state The values in the variable Sl_state are only valid if the master is in the OPERATE state. The higher 4 words, ARRAY [64...127] of BOOL, store the state for the device's I/O connection. The bit of the corresponding device is logical: • 1 = the device's I/O connection is in the established state • 0 = the device's I/O connection is not in the established state 5.3.3.3 Sl_state for CANopen This variable is an ARRAY [0...127] of BOOL, i.e. a field of 8 words, and contains the parametrization state of each FMU node. The bit of the corresponding node is logical: • 1 = node is operating; node guarding reports no error • 0 = node is not operating because it is not configured or an error has occurred The values in the variable Sl_state are only valid if the master is in the OPERATE state. 5.3.4 Slaves_abHasDiagnostic Output The inputs and outputs found on the lower half of the function block help you diagnose problems. 50 FMU Technical Manual 5.3 FMU_DataExchange Connected to the output pin Slaves_abHasDiagnostic is a variable of the type ARRAY [0...127] of BOOL. In this example, the identifier is SI_diag. This variable is used for all network types, but the information stored in the variable is nevertheless network-specific: • Sl_diag for PROFIBUS (see page 51) • Sl_diag for DeviceNET (see page 52) • Sl_diag for CANopen (see page 51) 5.3.4.1 Sl_diag for PROFIBUS This variable is an ARRAY [0...127] of BOOL, i.e. a field of 8 words, and contains the diagnostic bit for each FMU slave. The bit of the corresponding slave station is logical: • 1 = latest received slave diagnostic data is available in the internal diagnostic buffer. If the bit is set to 1, you can enter the corresponding slave station number at the input Slave_Diagnostic_iNumber, and FPWIN Pro will tell you what the error is. • 0 = since the last diagnostic buffer read access of the host, no values have changed in this buffer. The values in the variable Sl_state are only valid if the master is in the OPERATE state. 51 Programming Information for Control FPWIN Pro FMU Technical Manual The following table shows the relationship between the SI_state bit and the SI_diag bit. Sl_diag = 0 Sl_diag = 1 SI_state = 0 SI_state = 1 • No data I/O exchange between master and slave. Perhaps this slave is not configured or not responsive. • Slave is present on the bus. • The master and the corresponding slave are not exchanging I/O data. • Slave is present on the bus. • The master holds newly received diagnostic data in the internal diagnostic buffer. • Data I/O exchange between master and slave. • The master and the corresponding slave are exchanging I/O data. • The master holds newly received diagnostic data in the internal diagnostic buffer. 5.3.4.2 Sl_diag for DeviceNet This variable is an ARRAY [0...127] of BOOL, i.e. a field of 8 words, and contains the diagnostic bit of each device. For DeviceNet, bits 0 to 63 are available. The of the corresponding device is logical: • 1 = newly received diagnostic values are available in the internal diagnostic buffer or one of the diagnostics bit of the device has changed. If the bit is set to 1, you can enter the corresponding slave station number at the input Slave_Diagnostic_iNumber, and FPWIN Pro will tell you what the error is. • 0 = since the last diagnostic buffer read access of the host, no values have changed in the internal diagnostic buffer. The values in the variable Sl_state are only valid if the master is in the OPERATE state. The following table shows the relationship between the SI_state bit and the SI_diag bit. Sl_diag = 0 Sl_diag = 1 SI_state = 0 SI_state = 1 • Device not operative, no process data exchange between FMU and device. • Device is present on the network, device guarding active. • Device is not configured. • Process data exchange between FMU • Device is not operating, device guarding failed or configuration fault detected. • Device is present on the bus, device guarging is active, process data exchange. • New diagnostic data provided by the FMU in the internal diagnostic buffer to be read by host. and device happening as configured. • New diagnostic data provided by the FMU in the internal diagnostic buffer to be read by host. 5.3.4.3 Sl_diag for CANopen This variable is an ARRAY [0...127] of BOOL, i.e. a field of 8 words, and contains the diagnostic bit of each node. The bit of the corresponding node is logical: • 52 1 = newly received emergency message are available in the internal diagnostic buffer or one of the diagnostics bit of the node has changed. If the bit is set to 1, you can enter the corresponding node number at the input Slave_Diagnostic_iNumber, and FPWIN Pro FMU Technical Manual 5.3 FMU_DataExchange will tell you what the error is. • 0 = since the last diagnostic buffer read access of the host, no values have changed in this buffer. The values in the variable Sl_state are only valid if the master is in the OPERATE state. The following table shows the relationship between the SI_state bit and the SI_diag bit. Sl_diag = 0 SI_state = 0 SI_state = 1 • Node not in operation, no data I/O exchange between master and node. Perhaps this slave is not configured. • Node is present on the bus; node guarding is active. • PDO exchange between master and node is happening as configured. Sl_diag = 1 • Node is not operating; node guarding failed. • Node is present on the bus, node guarding is active, PDO exchange. • The master holds newly received • The master holds newly received diagnostic data in the internal diagnostic buffer. diagnostic data in the internal diagnostic buffer. 5.3.5 SlaveDiagnostic_bIsDone Output The inputs and outputs found on the lower half of the function block help you diagnose problems. Connected to the output pin SlavesDiagnostic_bIsDone is a variable of the type BOOL. • 1 = diagnosis of the slave (node) complete. • 0 = diagnosis of the slave (node) not complete. As long as the bit is set to 0, check at SlaveDiagnostic_iHasError (see "SlaveDiagnostic_iHasError Output" on page 53) to find out where the error is. 5.3.6 SlaveDiagnostic_iHasError Output The inputs and outputs found on the lower half of the function block help you diagnose problems. 53 Programming Information for Control FPWIN Pro FMU Technical Manual Connected to the output pin SlavesDiagnostic_iHasError is a variable of the type INTEGER. The integer stores the error code. Error Indication Network 0 No error. All 17 No response from slave. PROFIBU S Source Recommendation Slave • Check network wiring. • Check bus address of slave. • Check baud rate setting. 18 Master not in logical token ring. PROFIBU S Network in general • Check master DP address or highest-station address of other masters. 161 Remote address requested out of range. All Master Check slave/node address in request message. • Examine bus wiring for short circuits. 5.3.7 SlaveDiagnostic_awData Output The inputs and outputs found on the lower half of the function block help you diagnose problems. Connected to the output pin SlaveDiagnostic_awData is a variable of the type ARRAY [0...3] of WORD. In this example, the identifier is DiagData. This variable is used for all network types, but the information stored in the variable is nevertheless network-specific: 54 FMU Technical Manual 5.3 FMU_DataExchange • DiagData for PROFIBUS (see page 55) • DiagData for DeviceNET (see page 56) • DiagData for CANopen (see page 58) 5.3.7.1 DiagData for PROFIBUS The ARRAYs of WORD contain the following diagnostic information. ARRAY [0]: slave status For ARRAY [0], slave status is stored as logical bits. Word Higher byte Bit: 15 Bit 14 13 12 11 Lower byte 10 9 8 7 6 5 4 3 2 1 0 Description 0 Slave not responding. 1 Slave not ready. 2 Slave parameterized improperly. 3 Extended diagnostic area in ARRAY [3] of WORD used. 4 Unknown command detected by slave. 5 Inplausible response from slave. 6 Last parameter telegram faulty. 7 Slave parameterized by another master. 8 Slave must be parameterized. 9 Get diagnostic from slave until the bit is set to OFF (16#0000). 10 1 11 Watchdog activated. 12 Freeze command activated. 13 Sync command activated. 14 Reserved by system. 15 Slave not projected. ARRAY [1]: addtional slave status For ARRAY [1], the lower byte contains additional slave status information. The higher byte contains the master address for the master that parameterized the slave. Bit 0-6 7 8-15 Description Reserved by system. The slave has more doagnostic data available than it can send. The higher byte contains the master address for the master that parameterized the slave. If a slave is not parameterized, the value is 255. 55 Programming Information for Control FPWIN Pro FMU Technical Manual ARRAY [2]: slave ID number In ARRAY [2], the slave reports its ID number. ARRAY [3]: extended diagnostic buffer ARRAY [3] is an extended diagnostic buffer. The values therein are fixed in the manual of the slave station or can be found in the PROFIBUS specifications. 5.3.7.2 DiagData for DeviceNet The ARRAYs of WORD contain the following diagnostic information. ARRAY [0], lower byte: device status For ARRAY [0], the lower byte stores device status as logical bits. Word Higher byte Bit: 15 Bit 14 13 12 11 Lower byte 10 9 8 7 6 5 4 3 2 1 0 Description 0 Device not responding. 1 Reserved by system. 2 Device had denied access to at least one configured attribute to write in. 3 Difference between device produced and consumed connection size to the resulting configured ones. 4-6 7 Reserved by system. Device is deactivated in current configuration and not handled. ARRAY [0], higher byte: state of device For each device, the FMU has a "state machine handler". For ARRAY [0], the higher byte stores values that correspond to a state in the device. Value 56 Description 0 State machine enter. 1 Device inactive, not handled. 2 Own MAC ID, state waiting for all incoming duplicate MAC ID requests. 3 Initialize internal predefined master slaves structures. 4 Allocated predefined master slave connection set request. 5 Wait for predefined master slave allocation connection response. 6 Release predefined master slave connection set request. 7 Wait for predefined master slave release connection response. 8 Initialize internal I/O configured structures. 9 Allocate configured I/O connection request. 10 Wait for I/O allocation response. 11 Release I/O connection request. FMU Technical Manual Value 5.3 FMU_DataExchange Description 12 Wait for I/O connection release response. 13 Read consumed connection size. 14 Wait for read consumed connection size response. 15 Compare consumed connection size with internal configured one. 16 Read produced connection size. 17 Wait for read produced connection size response. 18 Compare produced connection size with internal configured one. 19 Configure the I/O connection structures and register it. 20 Set expected packet rate. 21 Wait for set expected packet rate response. 22 I/O poll request 1st time. 23 Wait for I/O poll response. 24 I/O poll request 2nd time. 25 Wait for I/O poll response. 26 I/O poll request 3rd time. 27 Wait for I/O poll response. 28 Heart beat timeout to the device. 30 Open unconnected explicit connection request 1st time. 31 Wait for unconnected explicit connection response. 32 Open unconnected explicit connection request 2nd time. 33 Wait for unconnected explicit connection response. 34 Close unconnected connection request. 35 Wait for close unconnected connection response 36 Release all established connections request. 37 Wait for connection release response. 38 Open user unconnected explicit connection request. 39 Wait for user explicit connection response. 40 User predefined master slave allocate connection request 41 Wait for user allocation response. 42 User close unconnected connection request. 43 Wait for user close unconnected response. 44 Get or set user defined attribute request. 45 Wait for user defined get or set attribute response. 46 Send or wait fragmented get or set attribute. ARRAY [1], lower byte: online error The lower byte of ARRAY [1] contains the actual online error of the device station is stored. See the table Err_Event of the global bus status field for possible entries (see page 41). ARRAY [1], higher byte: general error codes The higher byte ARRAY [1] provides more detailed general error codes if the value for Err_Event (see page 41) is 35. 57 Programming Information for Control FPWIN Pro Value FMU Technical Manual Description 2 Resources unavailable. 8 Service not supported. 9 Invalid attribute value. 11 Already in request mode. 12 Object state conflict. 14 Attribute cannot be set. 15 Privilege violation. 16 Device state conflict. 17 Reply data too large. 19 Not enough data. 20 Attribute not supported. 21 Too much data. 22 Object does not exist. ARRAY [2], lower byte: additional code The lower byte of ARRAY [2] contains additional code. This additional error information is only valid if value listed for general error codes in the higher byte of ARRAY [1] is not equal to 0. The value for the "additional code is filled transparently, just as with the general error codes, with the additional error code of each incoming error response message of the device. ARRAY [2], higher byte and ARRAY [3], lower byte: timeout information The higher byte of ARRAY [2] and the lower byte of ARRAY [3] contain timeout information. If a device is supervised by the expected packet rate of a connection and times out, the timer will be incremented. The actual value gives an overview of how good the transmission quality to this device is and how often a timeout has happened. After a device times out, the FMU always tries to reestablish the connection immediately. 5.3.7.3 DiagData for CANopen The ARRAYs of WORD contain the following diagnostic information. ARRAY [0], lower byte: node status For ARRAY [0], the lower byte stores node status as logical bits. Word Higher byte Bit: 15 Bit 58 14 13 12 11 Lower byte 10 9 8 7 6 5 4 Description 0 Node not responding. 1 Emergency buffer overflow. 2 Difference between master and node configuration data. 3 2 1 0 FMU Technical Manual Bit 3 4-6 7 5.3 FMU_DataExchange Description Node guarding protocol for this node is active. Reserved by system. Node is deactivated and not handled by the master. ARRAY [0], higher byte and ARRAY [1], lower byte: extended information These two bytes are read out from the node during startup. In the draft CiA specification, this word is declared as extended information of the node type. For example, whether the node supports digital input or outputs, etc. is fixed in this word. ARRAY [1], higher byte and ARRAY [2], lower byte: profile number These two bytes are read out from the node during startup. Several predefined profile numbers exist, each described in its own specification manual. Here is an extract: • Device profile for I/O modules: 401, 16#0191. • Device profile for drives and motion control: 402, 16#0192. • Device profile for encode: 406, 16#0196. ARRAY [2], higher byte: node state If the node guarding protocol is active for this node, node status register read is written into this variable. The following values are defined in the CANopen specification. Value Description 1 Disconnected. 2 Connecting. 3 Preparing. 4 Prepared. 5 Operational. 127 Pre-operational. ARRAY [3], lower byte: current error In this byte the actual online error of this node station is held down. See the table containing "Err_Event" of the global bus status field (see page 45) for possible entries. ARRAY [3], higher byte: number of emergency messages saved This byte contains the number of emergency messages saved in the following data area. ARRAY [4...23]: emergency messages In this area the emergency messages are saved. 59 Programming Information for Control FPWIN Pro FMU Technical Manual 5.4 FMU_GetUnitInfo The FMU_GetUnitInfo function block is used to obtain information about the specified unit in the network. PLC types: available for FP2/FP2SH and FPΣ. Variables of this function block have to be of one of the following data types: Pin Data type Input/Output Function INT iUnitSlotNumber Installation position of the unit. DUT dutUnitInfo The DUT attached consists of several variables of the data type STRING that contain information about the unit specifed. Connected to the output pin dutUnitInfo is the variable ModuleInfo, which in turn is part of the DUT UnitInfo included in the FMU library for Control FPWIN Pro. This DUT is used for all network types 60 Chapter 6 Outline Dimensions Outline Dimensions FMU Technical Manual 6.1 Outline Dimensions of the FP2 FMU Front 27.7mm DEV-M DPV1-M DeviceNet 100mm PROFIBUS Side 93.0mm 80.4mm 62 CAN-M MNS COM SYS COM SYS COM CANopen FMU Technical Manual 6.2 Outline Dimensions of the FPΣ FMU 6.2 Outline Dimensions of the FPΣ FMU Front 30.0mm SYS COM SYS FPG-CAN-M MNS FPG-DEV-M COM SYS CANopen Master DeviceNet Master FPG-DPV1-M PROFIBUS Master Side 4.5mm 90.0mm 60.0mm 3.5mm 63 Index B BEFORE BEGINNING • i C Cable Selection • 27 Specifications • 18 FP-FMU LEDs and Connectors • 10 FP-PROFIBUS DP • 11 FP-PROFIBUS DP Communication Specifications • 17 FPΣ FMU • 8 G CANopen Wiring • 30 General Information • 34 Control Configurator FM • 2 GetPointer • 35 D GetPointer Function • 35 GlobalBusStateField for CANopen • 45 DeviceNet Wiring • 28 GlobalBusStateField for DeviceNet • 41 DiagData for CANopen • 58 GlobalBusStateField for PROFIBUS • 38 DiagData for DeviceNet • 56 DiagData for PROFIBUS • 55 dutNetworkStatus Output • 37 E I Important Symbols • iii Installation and Wiring • 21 Installation of the FP2/FPΣ Unit • 22 Expansion Restrictions and Current Limitations • 3 L Expansion Restrictions for the FP2 FMU • 3 Limitations on Current Consumption • 3 Expansion Restrictions for the FPΣ FMU • 3 M F Mounting Methods • 26 Features and Restrictions • 1 Fieldbus Master Units (FMU) • 2 O FMU General Specifications • 16 Outline Dimensions • 61 FMU_DataExchange • 36 Outline Dimensions of the FP2 FMU • 62 FMU_GetUnitInfo • 60 Outline Dimensions of the FPΣ FMU • 63 FP2 FMU • 6 FP-CANopen • 13 FP-CANopen Communication Specifications • 19 FP-DeviceNet • 12 FP-DeviceNet Communication P Parts and Functions • 5 PROFIBUS DP Wiring • 28 Programming Information for Control FPWIN Pro • 33 65 Index R Record of Changes • 67 S Sl_cfg for CANopen • 49 Sl_cfg for DeviceNet • 48 Sl_cfg for PROFIBUS • 48 Sl_diag for CANopen • 52 Sl_diag for DeviceNet • 52 Sl_diag for PROFIBUS • 51 Sl_state for CANopen • 50 Sl_state for DeviceNet • 50 Sl_state for PROFIBUS • 49 SlaveDiagnostic_awData Output • 54 SlaveDiagnostic_bIsDone Output • 53 SlaveDiagnostic_iHasError Output • 53 Slaves_abHasDiagnostic Output • 50 Slaves_abIsConfigured Output • 48 Slaves_abIsConnected Output • 49 Specifications • 15 SYS LED • 10 U UnitInfo DUT • 60 W Wiring of the FP-FMU Connectors • 28 Wiring of the FPΣ FMU • 31 66 FMU Technical Manual Record of Changes Manual No. Date Description of changes ACGM0161V10EN July 2008 First edition Global Network North America Europe Asia Pacific China Japan Panasonic Electric Works Global Sales Companies Europe Headquarters Panasonic Electric Works Europe AG Austria Panasonic Electric Works Austria GmbH Germany PEW Electronic Materials Europe GmbH Panasonic Electric Works Sales Western Europe B.V. Panasonic Electric Works Czech s.r.o. Panasonic Electric Works Sales Western Europe B.V. Panasonic Electric Works Deutschland GmbH Hungary Panasonic Electric Works Europe AG Ireland Italy Panasonic Electric Works UK Ltd. Panasonic Electric Works Italia s.r.l. Benelux Czech Republic France PEW Building Materials Europe s.r.l. Nordic Countries Panasonic Electric Works Nordic AB PEW Fire & Security Technology Europe AB Poland Panasonic Electric Works Polska sp. z o.o. Portugal Panasonic Electric Works España S.A. Spain Panasonic Electric Works España S.A. Switzerland Panasonic Electric Works Schweiz AG United Kingdom Panasonic Electric Works UK Ltd. Rudolf-Diesel-Ring 2, 83607 Holzkirchen, Tel. +49(0)8024648-0, Fax +49(0)8024648-111, www.panasonic-electric-works.com Rep. of PEWDE, Josef Madersperger Str. 2, 2362 Biedermannsdorf, Tel. +43(0)223626846, Fax +43(0)223646133, www.panasonic-electric-works.at Ennshafenstraße 9, 4470 Enns, Tel. +43(0)7223883, Fax +43(0)722388333, www.panasonic-electronic-materials.com De Rijn 4, (Postbus 211), 5684 PJ Best, (5680 AE Best), Netherlands, Tel. +31(0)499372727, Fax +31(0)499372185, www.panasonic-electric-works.nl Prumtyslová 1, 34815 Planá, Tel. (+420-)374799990, Fax (+420-)374799999, www.panasonic-electric-works.cz French Branch Office, B.P. 44, 91371 Verrières le Buisson CEDEX, Tél. +33(0)16013 5757, Fax +33(0)1 6013 5758, www.panasonic-electric-works.fr Rudolf-Diesel-Ring 2, 83607 Holzkirchen, Tel. +49(0)8024648-0, Fax +49(0)8024648-555, www.panasonic-electric-works.de Magyarországi Közvetlen Kereskedelmi Képviselet, 1117 Budapest, Neumann János u. 1., Tel. +36(0)14829258, Fax +36(0)14829259, www.panasonic-electric-works.hu Dublin, Tel. +353(0)14600969, Fax +353(0)14601131, www.panasonic-electric-works.co.uk Via del Commercio 3-5 (Z.I. Ferlina), 37012 Bussolengo (VR), Tel. +390456752711, Fax +390456700444, www.panasonic-electric-works.it Piazza della Repubblica 24, 20154 Milano (MI), Tel. +39022900-5391, Fax +39022900-3466, www.panasonic-building-materials.com Sjöängsvägen 10, 19272 Sollentuna, Sweden, Tel. +4659476680, Fax +46859476690, www.panasonic-electric-works.se Citadellsvägen 23, 21118 Malmö, Tel. +46406977000, Fax +46406977099, www.panasonic-fire-security.com Przedstawicielstwo w Polsce, Al. Krakowska 4/6, 02-284 Warszawa, Tel. +48 22 338-11-33, Fax +48 22 338-12-00, www.panasonic-electric-works.pl Portuguese Branch Office, Avda Adelino Amaro da Costa 728 R/C J, 2750-277 Cascais, Tel. +351 214812520, Fax +351 214812529 Barajas Park, San Severo 20, 28042 Madrid, Tel. +34 91 3293875, Fax +34 91 3292976, www.panasonic-electric-works.es Grundstrasse 8, 6343 Rotkreuz, Tel. +41(0)417997050, Fax +41(0)417997055, www.panasonic-electric-works.ch Sunrise Parkway, Linford Wood, Milton Keynes, MK14 6 LF, Tel. +44(0) 1908 231555, +44(0) 1908 231599, www.panasonic-electric-works.co.uk North & South America USA PEW Corporation of America 629 Central Avenue, New Providence, N.J. 07974, Tel. +1-908-464-3550, Fax +1-908-464-8513, www.pewa.panasonic.com Asia Pacific / China / Japan China Panasonic Electric Works (China) Co., Ltd. Hong Kong Japan Panasonic Electric Works (Hong Kong) Co., Ltd. Matsushita Electric Works, Ltd. Singapore Panasonic Electric Works Asia Pacific Pte. Ltd. 101 Thomson Road, #25-03/05, United Square, Singapore 307591, Tel. +65-6255-5473, Fax +65-6253-5689 2013, Beijing Fortune, Building No. 5, Dong San Huan Bei Lu, Chaoyang District, Beijing Tel. +86-10-6590-8646, Fax :+ 86-10-6590-8647, www.cmew.com.cn RM1205-9, 12/F, Tower 2, The Gateway, 25 Canton Road, Tsimshatsui, Kowloon, Hong Kong, Tel. +852 2956-3118, Fax +852 2956-0398, www.panasonic.hk 1048 Kadoma, Kadoma-shi, Osaka 571-8686, Japan, Tel. +81-6-6908-1050, Fax +81-6-6908-5781 www.mew.co.jp/e-acg/ Copyright © 2008. All rights reserved. Specifications are subject to change without notice. Printed in Europe. ACGM0161V1.0EN 07/2008