1
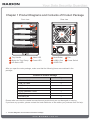
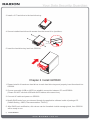
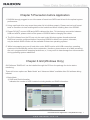
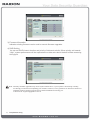
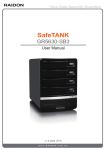
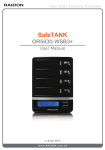
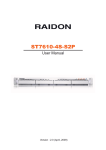
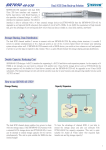
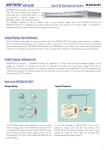
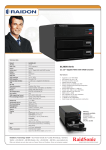
SafeTANK
GR5630-SB3
User Manual
v.1.0 (April, 2011)
Index
Chapter 1 Product Diagrams and Contents of Product Package.....
Chapter 2 Message Indication of LED and Buzzer...............................
Chapter 3 Hardware Installation.................................................................
Chapter 4 Install GR5630.............................................................................
Chapter 5 Precaution before Application.................................................
Chapter 6 GUI(Windows Only)...................................................................
4
5
5
6
7
7
Chapter 1 Product Diagrams and Contents of Product Package
Front view
1 Tray Handle
2 Button for Tray Clamp
3 HD Status LED
Rear view
4 Alarm LED
5 Power LED
1 Mute Button
2 USB3.0 Port
3 eSATA Port
4 Fan
5 Power Switch
After you open the outer package, make sure that the following items are contained in the
package:
Contents of Product Package
Item
Qty.
GR5630-SB3 Device
1
USB 3.0 Cable
1
eSATA Cable
1
AC Power Cable
1
Quick Installation Guide
1
CD(GUI)
1
Accessory Kit
1
Please make sure that the related accessories and product body are not damaged or missing.
If you have any question, please contact the local distributor or the retailer you purchase from for help.
4
Product Diagrams and Contents of Product Package
Chapter 2 Message Indication of LED and Buzzer
Status Description
Power On
No Hard Drives
Alarm LED
Power LED
HD Status LED
Buzzer
▬
Blue light
Blue light
▬
▬
Blue light
▬
▬
Red light
Blue light
Red light
Sound
Rebuilding
▬
Blue light
Target : Red / Blue
Blink Alternatively
▬
Access
▬
Blue light
Blue / Blink
▬
Fan Failure (Stop working)
Red light
Blue light
▬
Sound
Overheat (Over 55°C)
Red light
Blue light
▬
Sound
Hard Drive Failure
Source : Blue / Blink
Chapter 3 Hardware Installation
1. Press the eject button to release the hard drive clamp.
2. Horizontally pull out the hard drive tray.
Message Indication of LED and Buzzer / Hardware Installation 5
3. Install a 3.5” hard drive to the hard drive tray.
4. Secure installed hard drive with screws from the screw kit in 4 positions.
5. Insert the hard drive tray back into GR5630.
Chapter 4 Install GR5630
1. Please install 4 of brand new hard drives to each hard drive trays and properly insert them back into
GR5630.
2. Choose one cable (USB or eSATA) to establish connection between PC and GR5630.
(Please DO NOT use both USB and eSATA cables at the same time.)
3. Connect AC cable and power on GR5630.
4. Modify RAID levels from your demand through the application software inside of package CD.
(Default Setting : JBOD, Recommendation : RAID 5)
5. After RAID level modification, disk volume can be formatted via disk managing tools, then GR5630
will be ready to use.
6
Install GR5630
Chapter 5 Precaution before Application
1. RAIDON strongly suggest to use 4 the same of brand new SATA hard drives for the optimal system
performance.
2. Using used hard drive may cause the system fail to initialize properly. Please use low level format
tools or file editors to clear existing data on the hard drives before installing them into GR5630.
3. Please DO NOT connect USB and eSATA cables at the time. To interchange connection between
USB and eSATA, please switch off the power of GR5630 before changing the cables.
4. The GUI software from the CD can only be used under Windows system therefore desired
RAID level must be configured before connecting GR5630 to Mac/Linux system, otherwise,
only the default JBOD function will be available to these two operating systems.
5. While hot swapping any one of hard drive under JBOD function with USB connection, operating
systems will automatically perform drive redetection, therefore, please ensure all of data accessing
are not in progress before swapping hard drives, or, it may result in data damage from disconnection
during operating system redetection.
Chapter 6 GUI(Windows Only)
GUI Software “RAIDGuid” can be installed through the CD from the package for device status
monitoring.
There will be two options as “Basic Mode” and “Advanced Mode” available after GUI software being
initiated.
1. Basic Mode
1) RAID and Disk Information
Indicates the number of HDD installed including details and RAID information.
Precaution before Application / GUI(Windows Only) 7
2) Event Log Viewer
Indicates all information of every events occurred.
3) Basic RAID Configuration
You can reconfigure or delete the RAID mode from this interface. Also you may select the
password option to prevent the RAID configuration being deleted by accident.
The password must be entered for deleting RAID configuration in the future.
GR5630-SB3 provides four RAID level applications. If you do not set the RAID mode, you will see four
independent HDDs with JBOD function.
• RAID 0 => Available capacity based on the least capacity HDD multiplies the number of HDD
installed.
• RAID 1 => Available capacity is equal to the least capacity HDD.
• LARGE => Available capacity is the total capacity of HDD installed.
• RAID 5 => Available capacity based on the least capacity HDD multiplies the number of 1 HDD
subtracted from total HDD installed.
Note : 1. RAID functions only apply when 2 or more HDDs are installed.
2. RAID 1 – Available when 2~3 HDDs are installed.
3. RAID 5 – Available when at least 3 HDDs are installed.
8
GUI(Windows Only)
RAID Configuration
2. Advanced Mode
1) E-Mail Notification and Event settings
Configure the events for notification by send the related information to designated mailbox through
email.
2) Advanced RAID Configuration
You can reconfigure or delete the RAID mode from this interface. Also you may select the
password option to prevent the RAID configuration being deleted by accident.
The password must be entered for deleting RAID configuration in the future.
GUI(Windows Only) 9
3) Firmware Information
Indicates existing firmware version and to execute firmware upgrades.
4) RAID Setting
You can set RAID timeout duration and priority of data auto-rebuild. When priority set towards
“High”, system performance will be emphasized on data auto-rebuild instead of data accessing
throughput.
Note : Arbitrary firmware upgrades may cause system malfunction. If your system is functioning normally,
we strongly recommend not updating your firmware version. For any questions on firmware versions or
upgrades, please contact technical service staff of RAIDON Technology Inc.
or email us at: [email protected]
10
GUI(Windows Only)