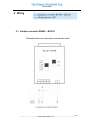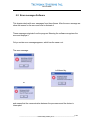
1
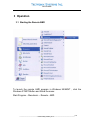
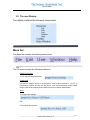
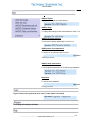
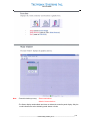
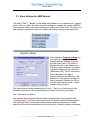
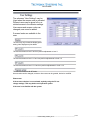
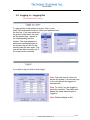
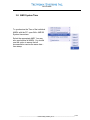
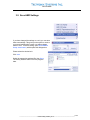
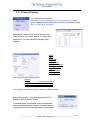
Remote AMD Operator Manual Remote AMD_Oct2005_rev1.0 Remote AMD SOFTWARE Remote AMD® V1.0.3 User manual (English) Project: Project name: Order / Project NO.: _____________________________________________________________________________________1-2 Remote AMD_Oct2005_rev1.0 Remote AMD Index 1 . Introduction ---------------------------------------------------- 1-4 Licensing agreement ------------------------------------------- 1-4 2 . General Information ---------------------------------------- 2-5 3 . Operations ----------------------------------------------------- 3-6 3.1 Starting the remote AMD ------------------------------ 3-6 3.2 The user display ----------------------------------------- 3-7 - Menu bar -------------------------------------------o File ----------------------------------o Edit ----------------------------------o Users -------------------------------o Window ----------------------------o Help ---------------------------------- 3-7 3-7 3-8 3.-8 3-8 3-8 3.3 Base Settings for AMD Remote -------------------- 3-10 - 3.4 3.5 3.6 3.7 3.8 3.9 3.10 3.11 3.12 3.13 Program settings ---------------------------------Communications ---------------------------------Device names ------------------------------------User settings --------------------------------------o Display -----------------------------o OP Level1 -------------------------o OP Level2 -------------------------o OP Level3 -------------------------o Program setup -------------------- 3-10 3-11 3-11 3-12 3-12 3-12 3-12 3-12 3-12 Logging in -Logging out -----------------------------The AMD Displays -----------------------------------The AMD Setup ---------------------------------------AMD Parameter printout ----------------------------AMD System time ------------------------------------Save AMD Settings ---------------------------------Load AMD Settings ---------------------------------Protocol printing --------------------------------------Editing protocols --------------------------------------Shut down Remote AMD ---------------------------- 3-14 3.15 3-16 3-17 3-18 3-19 3-20 3-21 3-22 3-24 4 . Wiring ------------------------------------------------------------ 5-25 4.1 Interface converter RS485 – RS232 --------------4.2 Metal Detector- PC ------------------------------------ 5-25 5.26 5 . Troubleshooting ---------------------------------------------- 5-27 5.1 Error Messages from the controller ---------------- 5-27 5.2 Error Messages , software --------------------------- 5-28 5.3 Whom to contact ---------------------------------------- 5-30 _____________________________________________________________________________________1-3 Remote AMD_Oct2005_rev1.0 Remote AMD 1 Introduction Dear Customer, Thank you for purchasing the Tectronix Remote AMD software. This Program allows you to operate, control and exchange data with several Tectronix Mesu-02 Metal detectors through a Network from your PC. Record keeping for MIS is greatly simplified, since reject events and faults including a time/date stamp are recorded in the PCs memory and may be printed out with the PC's printer. This software enables you to access and manipulate your metal detector remotely from anywhere with your PC. Also all events will be permanently stored on your hard drive. Please read this manual carefully Copyright The information and data given in this document can be amended without notice. Without explicit written permission by TECTRONIX SYSTEMS INC it is prohibited to copy or to transfer any part of this document. It does not matter how and through which electronic or written media it occurs. 2005 TECTRONIX SYSTEMS INC All rights reserved. ® ® Windows and Access are registered trademarks of Microsoft ® ® ® Pentium is a registered trademark of Intel _____________________________________________________________________________________1-4 Remote AMD_Oct2005_rev1.0 Remote AMD 2 General Information Minimum hardware requirements: Processor: Intel Pentium und compatible> 166Mhz Memory: 16Mb RAM Free Disc space: approx.. 10Mb System compatible with: Win 95B/C;98;NT SP 6; WIN2000; XP RS485 cable (Stock Lengths available : 100/200/300 foot lengths) 1X Stranded twisted Pair, 22AWG, overall shield, and an impedance of 50 to 55 ohms (Custom Lengths Available up to 1500 ft.) ATEN ,RS232/RS485 Converter TECTRONIX part no. IC-485SI Please de-activate your screensaver while operating the Remote AMD. Screensavers can take up enormous amounts of memory During high data transmission rates the processor may be overloaded, which can lead to data transmission errors, since the information will only be partially, or not transmitted at all. Please also note that the following base adjustments need to be made to establish communication between your PC and the AMD In Operating level 3: The System Data for the controller has to be set as follows: -Each controller needs a distinct address. No address may be duplicated. -The processor uses # 63 as a default value, therefore no unit may be given the address # 63! Addresses higher than # 63 cannot be used. -Please make a note of the address, since it needs to be entered into the system together with a name at a later time. -We have found that it is better to use a location or a self-explanatory name instead of an abstract number, since it is easier to relate the detector to its location or use. -In this level it is possible to check and change the time and date. -This is not important for the communication, but if the wrong date is in the system, the wrong date will be transmitted If you should require help, please note the version number before calling. This information is vital for our technicians. You obtain the version number from the menu Help-Info. _____________________________________________________________________________________2-5 Remote AMD_Oct2005_rev1.0 Remote AMD 3 Operation 3.1 Starting the Remote AMD To launch the remote AMD program in Windows 95/98/NT , click the Windows START-Button and follow the menu: Start-Program – Mesutronic – Remote - AMD _____________________________________________________________________________________3-6 Remote AMD_Oct2005_rev1.0 Remote AMD 3.2 The user Display The display contains the following components: Menu bar The Menu bar contains the following menu points: The File menu contains the following submenus: PRINT PROTOCOL To sort and print detection events Printer setup You need to assign a printer to the program in order to print protocols. If your PC is connected to a printer you may use this printer. If you use a networked printer, please assign a path to the network printer Please consult your network administrator. Setup To change base settings Exit To shut down the program. _____________________________________________________________________________________3-7 Remote AMD_Oct2005_rev1.0 Remote AMD . AMD 02 Displav Displays the face panel of each detector AMD 02 Setup To change the settings of each metal detector Levels 1-2-3 AMD 02 Parameter printout To print out the system parameters in Level 1-2-3 AMD Systems clock adjustment To set one or all systems to the PC's time Operation AMD System time AMD 02 Setup save/restore To save adjusted parameters or to load saved parameters Datenbase To edit the event database Operation Editing protocols To gain access to the systems by user code ( if code option is activated) Operation Logging in - Logging out To arrange the display windows. _____________________________________________________________________________________3-8 Remote AMD_Oct2005_rev1.0 Remote AMD Note - From this window you may: - Reset metal alarms - Monitor Communications - The Green display remains blank and does not imitate the controller panel display. Only the round indicators are active indicating metal alarms or faults. _____________________________________________________________________________________3-9 Remote AMD_Oct2005_rev1.0 Remote AMD 3.3 Base Settings for AMD Remote The Menu "File"-> "Setup" or the Setup Icon leads you to a window with 5 register cards. Here you affect the most important settings to operate the remote AMD=PC. Each changed setting has to be confirmed by clicking the confirm field. This stores the new setting to memory and will be the default value when starting a new application. In the submenu Program settings you may adjust the language of the program and the Address of the unit you are working with. The address identifies the unit in the Systems bus. With the present software it is possible to digitally address up to 64 detectors (Addresses 0-63). The PC uses one of these addresses to be able to communicate with the detectors. This address is 63 as a default setting, but can be changed. Please note: Do not use the same address twice, to avoid communication conflicts. The other devices can be addressed from 0 to 62 . The access code may also be activated in this menu. Check the menubox to activate the access code option. See "User setup" for details. This assures that only authorized personnel has access and can change the data. "Cleaning time" is the time frame during which the detector ignores all metal signals. This setting is used to avoid rejects and erroneous data during cleanup. All metal detectors will be de-activated every day during this time, unless the setting is changed. _____________________________________________________________________________________3-10 Remote AMD_Oct2005_rev1.0 Remote AMD The Submenu Communication allows you to configure the port settings and the system bus. The communication menu selects the port where data transfer takes place ( Normally COM 2) This is also the default setting The Baudrate determines the data transfer rate to the bus. It has to be the same for all units operated under this system. Do not change the settings for Parity, Databits and Stopbits.. Changing these settings will terminate communication between the devices The submenu "Device Names" allows the user to name the detectors. The ID has to be the same as the detector number. Each device can have a Name assigned to it. We recommend using self-explanatory names The units and their respective numbers can be listed at random on the display. _____________________________________________________________________________________3-11 Remote AMD_Oct2005_rev1.0 Remote AMD The submenu “User Settings” may be Used when the access code is activated Different users can be given full or restricted access to the detector settings. User names and access codes can changed, new users be added. 5 access levels are available to the user: The user may only access the display panel setting. New displays may be added. The user has access to level I and can perform adjustment to level 1 The user has access to level 1+2 and can perform adjustments to level 1+2 The user has access to level 1-2-3 and can perform adjustments to level 1-2-3 The user has access to all OP levels. Access codes can be changed, access to other users can be granted, denied or modified. Please note: If the access code box is not activated, anybody using the PC can change settings. This may lead to an inoperative system if the user is not familiar with the system. _____________________________________________________________________________________3-12 Remote AMD_Oct2005_rev1.0 Remote AMD The submenu Print settings This is to set the time intervals for the printouts. If no time frame is set the printout has to be activated manually. Operation Protocol printing The contents of the box marked "Customer" will be printed as a footnote _____________________________________________________________________________________3-13 Remote AMD_Oct2005_rev1.0 Remote AMD 3.4 Logging in – Logging Out (Only if access code is active) To gain access to the system as a user, click on your name This activates the text box. Enter your password into the text box. If the user name and the access code match, the user will be granted user1 access to the corresponding part the system. If the user attempts to access an unauthorized part of the system, the text box for the access code will open again. The user will be able to access only if the correct code is entered. If you wish to log out click on user logout. Note: Only one user at a time can access the system. If a new user logs in, the old user will be logged out automatically Note: To verify if you are logged in, check the user box. The check mark beside the name indicates who is logged in. Note: Default settings on left. _____________________________________________________________________________________3-14 Remote AMD_Oct2005_rev1.0 Remote AMD 3.5 The AMD Displays To show a display on your PC screen: Click Edit on the submenu AMD 02 Display. Now all registered units appear. Select the desired unit or select all. _____________________________________________________________________________________3-15 Remote AMD_Oct2005_rev1.0 Remote AMD 3.6 The AMD Setup Adjust the detectors from your pc: AMD02 Display Click Edit> AMD 02 Setup. Select the unit you wish to modify. You will need the access code if the access code option is activated This opens the submenus Level 1-3 _____________________________________________________________________________________3-16 Remote AMD_Oct2005_rev1.0 Remote AMD 3.7 AMD Parameter Printout You may print out the parameters of level 13 for each AMD. Click on Edit > AMD 02 Parameter Printout Select the unit This opens a window that displays the printout. Click on print for a printout _____________________________________________________________________________________3-17 Remote AMD_Oct2005_rev1.0 Remote AMD 3.8 AMD System Time To synchronize the Time of the individual AMD's with the PC, open Edit> AMD 02 System time setzen. Select the appropriate AMD. You may also synchronize all AMD's. You should use this option to assure that all documentation carries the same date time stamp _____________________________________________________________________________________3-18 Remote AMD_Oct2005_rev1.0 Remote AMD 3.9 Save AMD Settings If you have changed the settings on a unit, you can store these new settings. This gives you the option to revert to your saved settings after a reset or a setting change made in error. To save a setting, open Edit->AMD 02 Setup save/restore, which opens this dialogue box: Please select the desired unit Click save Select the appropriate path and file, then Save, The factory uses the same file for the program data. _____________________________________________________________________________________3-19 Remote AMD_Oct2005_rev1.0 Remote AMD 3.10 Load AMD Settings Saved setups can be uploaded with the PC to avoid manual setting of the unit. Go to Edit>AMD Setup save/restore Select the appropriate AMD from the dialogue box, click load This opens the default installation file. Select the correct setting ( saved settings have the ending .sav ) and confirm with open . The saved settings will now be uploaded to the AMD. This option is useful when the same settings apply to several units. _____________________________________________________________________________________3-20 Remote AMD_Oct2005_rev1.0 Remote AMD 3.11 Protocol Printing For a manual protocol printout Click the Protocol printout icon or File->Print Protocol, which opens a dialogue box with filter and sort options. The default settings are ,”no Filter” and ,”unsorted” Meaning all events will be printed, but you may select to have only certain events or certain units printed out. You may select the following filter options: Metal Fault Power On Power Off Detector Test Parameter Change Protocol request Test OK Product change Learning Angle You may select these sorting options: - Unsorted - by date - by device - by type ascending/descending ascending/descending ascending/descending You may also select a time name for which you desire a report After affirming with OK the dialogue box asks if a detailed report is desired or not. A detailed report is preferable, since it contains all required information and is easier to understand, as long as the amount of data required is not excessive. _____________________________________________________________________________________3-21 Remote AMD_Oct2005_rev1.0 Remote AMD 3.12 Editing protocols Data is stored in the Database. We recommend to the data base frequently to avoid over flow of data clear Go to Edit and select Database->Messages. ( Database-> Texts cannot be accessed. It is only accessible to the technician. If the access code is activated, the user has to have access privileges to "adjustments ". The window protocol data shows all data on the left. If you select a data point, more information such as date, time quality and quantity of the event is displayed on the right. The long dialogue box below the 2 windows displays the transmission code in hexadecimal writing, and is only of importance for the technician. Below is a navigation bar with the following options: _____________________________________________________________________________________3-22 Remote AMD_Oct2005_rev1.0 Remote AMD In addition you may select from the following options: Note: We recommend clearing the database from time to time. This aids the user in finding a certain event among the rest. Adjustment data and settings are not affected. _____________________________________________________________________________________3-23 Remote AMD_Oct2005_rev1.0 Remote AMD 3.13 Shut down Remote AMD To close the program, click the “close" icon on the taskbar. _____________________________________________________________________________________3-24 Remote AMD_Oct2005_rev1.0 Remote AMD 4 Wiring 4.1 Interface converter RS485 – RS 232 25 channel socket to be connected to serial interface on PC _____________________________________________________________________________________4-25 Remote AMD_Oct2005_rev1.0 Remote AMD 4.2 Metal Detectors - PC _____________________________________________________________________________________4-26 Remote AMD_Oct2005_rev1.0 Remote AMD 5 Troubleshooting 5.1 Error Messages from the controller The following Screens show some Error messages and Warnings of the controller. This data is not processed or evaluated. It is only displayed. The software does not affect or process the error messages. Please contact Tectronix Systems’ Technical support for the meaning of the messages. _____________________________________________________________________________________5-27 Remote AMD_Oct2005_rev1.0 Remote AMD 5.2 Error messages Software This chapter deals with error messages from the software. After the error message we show the reason for the error and how to eliminate it These messages originate from the program. Meaning the software recognizes the error and displays it. Only a certain error message appears, which has the same root: The error message: is followed by: or and means that the communication between the processors and the device is interrupted. _____________________________________________________________________________________5-28 Remote AMD_Oct2005_rev1.0 Remote AMD Please check all cables and connections • Check all connections for good contact. • If some devices are recognized, others not, follow the path to the source of the error and check the connections at this part. • Confirm that the addresses between software and unit match. Correct if necessary. • Check that each unit has its individual address. Check that there is no multiplication of addresses in the controller and in the program • Another source of error can be the configuration on the port. Check both port settings (Com x) Check that both devices have the same baudrate (preferable 19200). • Check the address of the Pc. • Check that the addresses are between 0 and 63. If you have eliminated these sources of errors, the hardware may be faulty. _____________________________________________________________________________________5-29 Remote AMD_Oct2005_rev1.0 Remote AMD 5.3 Whom to Contact If you still experience difficulties or require additional information, please contact us during normal office hours. ( 8:00am to 4:30pm Pacific Standard Time, except weekends and holydays ) Tectronix Systems Inc. 9 – 18812 96th Ave. Surrey, British Columbia, Canada V4N 3R1 Phone: (604) 607-6028 Fax: (604)607-6026 E-Mail: [email protected] Web site: www.metal-shark.com User manual Remote AMD Status: May 2006 _____________________________________________________________________________________5-30 Remote AMD_Oct2005_rev1.0