1
TR4W User Manual [English Version]
Version 3.01
April 17, 2012
1
TR4W User Manual [English Version]
Contributors
Larry Tyree, N6TR
“Doc” Evans, N7DR
Dmitriy Gulyaev UA4WLI.
Howard Hoyt, N4AF
Editor
Tod Olson, K0TO
2
TABLE OF CONTENTS
TABLE OF CONTENTS ................................................................................................................... 3 LIST OF FIGURES ............................................................................................................................ 6 1 Introduction ............................................................................................................................. 7 1.1 Typographical Conventions .................................................................................................... 11 1.1.1 Configuration Statements .................................................................................................................. 11 1.1.2 File names ................................................................................................................................................ 11 1.1.3 Window Names ...................................................................................................................................... 11 1.1.4 Special Keys and Short Cut or Hot Keys. ..................................................................................... 12 1.1.5 Function Keys ......................................................................................................................................... 12 1.2 System Requirements ............................................................................................................... 12 1.3 Files used by the Program ....................................................................................................... 14 1.4 Folders used by the Program ................................................................................................. 14 1.5 Program Installation ................................................................................................................. 15 1.6 Program Startup Screens ......................................................................................................... 16 1.7 Program Windows -‐-‐ Names and Colors ............................................................................ 19 1.8 Configuring TR4W for your station ...................................................................................... 20 1.8.1 Configuring the Radio ......................................................................................................................... 20 1.8.2 Configuring the Station Control ...................................................................................................... 22 1.8.3 Configuring the Computer-‐Sound Interface .............................................................................. 23 1.8.4 Testing the Configuration Setup ..................................................................................................... 23 2 Beginning Operating ............................................................................................................ 24 2.1 First QSO in CQ Mode ................................................................................................................. 24 2.2 First QSO in S&P Mode .............................................................................................................. 27 2.3 Regular Operation ...................................................................................................................... 31 2.3.1 Selecting a Supported Contest ......................................................................................................... 31 2.3.2 Custom Messages .................................................................................................................................. 32 2.3.3 Sending Messages to the Rig ............................................................................................................ 37 1.1.1 Other Kenwood transceivers CAT commands ....................................................................... 37 2.3.4 Personalized Greetings ....................................................................................................................... 41 3 Alarms and Notes .................................................................................................................. 43 4 Special Operating Modes .................................................................................................... 44 4.1 Using the Bandmap .................................................................................................................... 44 4.2 SO2R -‐Two Radio Mode ............................................................................................................ 48 4.2.1 SO2R -‐ Configuration ........................................................................................................................... 48 4.2.2 SO2R – BASIC OPERATION ............................................................................................................... 49 4.2.3 SO2R – Advanced Operation ............................................................................................................ 51 4.3 Using the DXCluster ................................................................................................................... 54 4.4 Multi Operation ........................................................................................................................... 56 3
4.5 RTTY Operation .......................................................................................................................... 62 4.6 Recording and Using DVP Contest Messages audio ........................................................ 65 4.6.1 Audio file format .................................................................................................................................... 65 4.6.2 The location of audio files ................................................................................................................. 65 4.6.3 Using the DVP ......................................................................................................................................... 66 4.6.4 Record and edit sound files .............................................................................................................. 68 4.6.5 Automatic generation of DVP audio messages. ........................................................................ 69 4.6.6 The process of working on the air ................................................................................................. 70 4.7 VHF/UHF ........................................................................................................................................ 71 4.8 Farnsworth CW ............................................................................................................................ 71 4.9 Recording Contests ................................................................... Error! Bookmark not defined. 4.10 Foot Switch ................................................................................................................................. 75 4.11 Rotator Control ......................................................................................................................... 77 4.12 Country List Changes .............................................................................................................. 78 4.13 Creating a non-‐supported Contest Configuration ......................................................... 79 4.13.1 Selecting Contest Parameters ....................................................................................................... 79 4.13.1.1 4.13.1.2 4.13.1.3 4.13.1.4 4.14 2 3 4.15 Multiplier Types ........................................................................................................................................... 79 QSO Point Methods ..................................................................................................................................... 79 Exchanges ....................................................................................................................................................... 79 Initial Exchanges .......................................................................................................................................... 81 TRMASTER Database .............................................................................................................. 82 Right click on MASTER.DTA ...................................................................................................................... 82 Choose “SAVE AS” and save to TR4W directory .............................................................................. 82 Entering a Hand Log .............................................................................................................. 105 5 Post-‐Contest Reports & Log Utilities ............................................................................ 105 5.1 Reports ......................................................................................................................................... 105 5.2 Export Files ................................................................................................................................. 108 5.2.1 ADIF File ................................................................................................................................................. 109 5.2.2 Cabrillo File ........................................................................................................................................... 109 5.2.3 Initial Exchanges List ........................................................................................................................ 109 6 Main Window ....................................................................................................................... 109 6.1 Menus and Sub Menus of Main Window ........................................................................... 110 6.1.1.1 File Menu ......................................................................................................................................................... 110 6.1.1.2 Settings Menu ................................................................................................................................................ 112 6.1.1.3 Window Menu ............................................................................................................................................... 112 6.1.1.4 Alt-‐ Menu ......................................................................................................................................................... 113 6.1.1.5 Ctrl-‐ Menu ....................................................................................................................................................... 114 6.1.1.6 Commands Menu ......................................................................................................................................... 115 6.1.1.7 Tools Menu ..................................................................................................................................................... 115 6.1.1.8 Net Menu ......................................................................................................................................................... 115 6.1.1.9 Help Menu ...................................................................................................................................................... 116 7 Appendix B. Suggested Interface Circuits .................................................................. 117 7.1 CW Interface ............................................................................................................................... 117 7.1.1 CAT Control .......................................................................................................................................... 117 7.1.2 Serial Port keying and PTT control ............................................................................................ 117 7.1.3 Parallel Port [LPT] keying and PTT control .......................................................................... 118 8 Appendix C. ........................................................................................................................... 122 8.1 Alt+ keys ..................................................................................................................................... 122 8.2 Ctrl+ keys .................................................................................................................................... 123 4
8.3 8.4 8.5 8.6 8.7 8.8 8.9 Additional Ctrl + keys .............................................................................................................. 124 Shift+Ctrl Keys ........................................................................................................................... 124 Ctrl+Alt+ Keys ............................................................................................................................ 124 Special Keys ................................................................................................................................ 125 Supported Transceivers ......................................................................................................... 126 Supported Contests .................................................................................................................. 128 Sub Window default colors. ................................................................................................... 133 10 Appendix A. Configuration Statements ....................................................................... 133 5
LIST OF FIGURES
Figure -‐1 ......................................................................................................................................................... 12 Figure -‐2 ......................................................................................................................................................... 13 Figure -‐3 ......................................................................................................................................................... 14 Figure -‐4 ......................................................................................................................................................... 14 Figure -‐5 ......................................................................................................................................................... 15 Figure -‐6 ......................................................................................................................................................... 16 Figure -‐7a Figure -‐9b .......................................................................................................................... 16 Figure -‐8 ......................................................................................................................................................... 17
6
1 Introduction
The TR4W web site information gives only an outline of the many, many options for
computer, radio, station and operator interaction during a contest. Like other very
sophisticated contest programs such as N1MM, TR Log, NA, CT, etc. there are many ways
to set up the interactions between operator, station equipment and the program to achieve
maximum satisfaction with the contest logging, scoring and post contest reporting. Any of
the mentioned programs requires much study of alternatives and experimenting to get the
7
best configuration for a particular operator. TR4W is almost identical in use to TR Log [a
DOS program] but it has the advantage that it will run on all of the newer Windows
Operating System platforms. [Windows XP, Windows Vista and Windows 7].
TR4W is a high performance software package suitable for contests, DXpeditions or day-today operation. Some of its features are:
1. Unsurpassed flexibility lets you tailor the program to your personal operating taste.
2. Over 140 contests supported by the program - others can be added easily.
3. Capacity for more than 50,000 QSOs.
4. Simple operation with intelligent [ENTER] key – TR4W knows what you want to do.
5. CW keying via Serial Port, LPT Port, or Winkey. CW speed from 1 to 99 WPM
6. Paddle input via LPT lets the program act as your keyer. Touching a paddle aborts
computer-generated CW.
7. Support for PTT with programmable delay to ensure that antenna relays are coldswitched.
8. Support of Winkeyer USB
9. Automatic super check partial and possible call checking.
10. Expanded .DTA database format supports names, QTH, grid, SS check and other
information.
11. Band map with color-coded aging information.
12. Built in telnet DXCluster interface with automatic insertion of spots into band map.
13. Provision for responding to tail ending stations on CW.
14. Dynamic speed and weight control adjustments during sending of stored CW
messages.
15. Support for RTTY using MMTTY engine.
16. Support for working rover stations in VHF/UHF contests. All amateur bands from
160 to Light supported.
8
17. Beam headings and sunrise/sunset times displayed for countries as you work them.
18. WAE QTC support for both inside and outside Europe.
19. POST program used to create summary sheets, maintain .DTA database, reports and
QSL labels
20. Remembers exchange information from band to band.
21. Radio interface for Elecraft, Icom, Japan Radio, Kenwood, Ten-Tec and Yaesu rigs.
Can use Serial Port [COM] or USB to Serial adapters.
22. Support of networked multiple rigs; client server model with TCP/IP protocol.
23. Footswitch input via an LPT port can be used for several different operating
functions.
24. Antenna Band decoder output using LPT port.
25. Antenna rotators control
26. Integrated two-radio support [SO2R].
27. Built in “on-the-fly” MP3 recording of contests.
28. Supports log backup using USB drive or selected HDD folder.
29. Uses standard CTY.DAT file for country and beam heading information.
30. Powerful domestic templates allow easy updates and addition of new contests.
31. Programmable list of remaining country multipliers.
32. User programmable window and sub-window colors.
Through the use of a configuration file ( TR4W.INI ), the program can be tailored to meet
your specific requirements. Most of the operating parameters used in the program can be
modified using the Configuration Statements window. Appendix A lists all the parameters
that may be programmed. Many of them can be changed while the program is running using
the handy <Ctrl-J> command to open the Configuration Statements window.
The TRMASTER.DTA database allows you to recall the name, QTH and other information
for stations that you have worked before. When the name feature is enabled on CW, the
program greets people as you work them and you can have it send GM, GA, GE or another
appropriate greeting depending on the country of the station.
Care has been taken to create an efficient way to search and pounce {S &P} on CW. When
you are in the search and pounce mode, typing a call and then pressing [ENTER] will either
send your call (if it is a new station) or tell you that it is a dupe. Pressing [ENTER] again
after copying the exchange will send your exchange and log the contact. (It is worth reading
9
that last sentence again, slowly, to make sure that you understand how easy it is to make a
QSO in TR4W.)
Other useful tools for efficient search and pounce operation include a color coded band map
and the way that the program highlights duplicate callsigns when using the partial call or
super check partial features.
The program is also very efficient when running stations. A contact can be completed by
typing a call, pressing [ENTER], waiting for the station to send their exchange (e.g., 599 and
a zone which is already automatically entered for you by the program), and then pressing
[ENTER] to log the contact and send a QSL message. That is a total of just six keystrokes
for a four- character callsign. Some operators even eliminate the first [ENTER], because the
program can start sending the call after you have typed a programmable number of characters
from the call, and it will start the exchange when it has caught up to your typing. {See AUTO
SEND CHARACTER COUNT and AUTO CALL TERMINATE in the TR4W Reference
Manual for details}. And just to make things insanely easy, you can even use a footswitch
instead of the [ENTER] key.
A band map can be displayed, showing stations for which you have recently performed dupe
checks. The display shows the calls sorted in frequency for the band on which you are active,
and color-coded to show the time that has elapsed since they were last checked. Spots
received via the DXCluster interface will also be shown on the band map. Additionally, you
have a choice of two different QSL messages that can be sent while the contact is being
logged.
When working a station, you will automatically be shown the bands on which you need a
QSO or multiplier from the station. This is very useful when you might want to move the
station to other bands. You also are continuously shown a list of missing multipliers for your
current band and mode. For domestic multipliers, a complete list of remaining multipliers is
shown. When the contest uses country multipliers, a programmable list of more than 90
countries can be shown. The multiplier status of countries not displayed can be checked
explicitly by simply performing a dupe check. You can switch between displays showing
remaining zones, domestic multipliers and countries with a single keystroke.
As you enter a callsign, matching partial calls from the dupe sheet will be displayed
automatically. After entering the call, a list of other stations with similar calls is displayed.
These calls may be easily selected if you discover that one of them is the correct call.
Exchange parameters such as domestic QTH, age, power, name, ITU Society and field day
class are stored and recalled automatically when working the station on another band. ITU
and CQ zones are automatically entered for you in contests that include them as part of the
exchange.
With just the standard configuration settings {the default settings} the program allows
operators to be effective in contests even without very complex stations. In fact, it is not
necessary to control the radio with the program to have it function as a very efficient contest
10
logging program that logs contacts, keeps track of duplicate QSO’s, scores the contest as you
are working and provides excellent post contest reporting and log submission routines for use
after the contest is completed.
With practice the user will improve their facility with the program and at the same time
increase their proficiency as a contester. As you read this manual you will encounter many
tables and figures that accompany the text describing how to use various features of the
program. The smaller TR4W Reference Manual shows the tables and figures, lists the
supported radios and contests and lists all of the Configuration Statements in a table plus has
definitions and discussion for each of the Configuration Statements.
If you are new to TR4W at this point you probably will expect that it will be quite difficult to
set up and start using TR4W. Fortunately, that is far from the actual situation. The good news
is that unless you choose to do something ‘extraordinary’ you can set things up and start
using the program very quickly.
Then, as time permits, you can read the sections describing various ways to use the program,
study the information in the Reference Manual, ask questions of other users and try some of
the alternatives for yourself. In the end you can select the things you need for your type of
contest operation and save that configuration. Once that is done you will need only ‘tweak’
things when you feel like doing something different or when you work a new contest. The
rest of the time you will be able to ‘load and go’ using your personal configuration for each
contest.
Don’t expect to be an expert during the first contest season of using this program, or any
logging program for that matter. It takes time to get the feel of the program and then make
the small adjustments that you think will work best for you. With time you will find that it
can do everything that you might imagine you want to do as you operate. If not, you can
always suggest ‘improvements’ to the program author via the TR4W user reflector that is
found on [email protected] .
1.1 Typographical Conventions
1.1.1 Configuration Statements
These statements are in all capitals and are bold. For example:
TWO RADIO MODE = TRUE
1.1.2 File names
These names are in all capitals, bold, italicized and have a “ . “ followed by an
extension [extent]. For example:
TR4W.INI
1.1.3 Window Names
These names have each word in the name capitalized, bold and italicized. They generally
11
have the word ‘window’, ‘sub-window’ or ‘box’ following the actual name of the
window, sub window or box. Sub-windows and boxes are located inside windows.
Examples of these names are:
Possible Calls window, Call window, Exchange window
Operating Mode box
1.1.4 Special Keys and Short Cut or Hot Keys.
The special keys are the control, shift, alternate, end, return, delete, insert. In the text they
are written as [CTRL], [SHIFT], [ALT], [END], [RETURN], [INS], [DEL], [TAB].
The terms ‘short cut key’ and ‘hot key’ are used interchangeably. They are represented
by < Key1 + Key2> or <Key1 + Key2 + Key3> where Key1 is [CTRL], [ALT] or
[SHIFT]. The ‘+’ indicates that these keys are to be pressed at the same time, with Key1
to be pressed slightly ahead of Key2. For cases where there are three keys, the first two
should be pressed slightly before pressing the last key. In the three key case, Key1 will
generally be [SHIFT] and Key2 will be [CTRL] or [ALT].
Examples are <Ctrl+A> , <Alt+M> , <Ctrl+Shift+1>
1.1.5 Function Keys
These are represented as:
<F3> for function key F3 held down alone.
<Ctrl+F3> for [CTRL] and the function key F3 held down at the same time.
<Alt +F3> for [ALT] and the function key F3 held down at the same time.
1.2 System Requirements
Supported Operating Systems
Windows 98SE, 2000, XP, Vista, Windows 7
Memory Requirements
16 MB of memory, more is desirable
CPU Requirements
200 MHz CPU clock; faster is desirable – especially if using DVP recording
of contests.
COM, LPT, USB, internet and sound requirements
One COM port per Radio controlled by program.
One LPT port per radio if Band selection is done by program.
One Com port for rotator control if used.
One Com port for Network if used (probably already active for internet
access)
USB to COM adapters can be used. USB to LPT adapters can be used but
not all of these adapters will control all of the LPT lines.
12
Internet connection required for DX Cluster use.
Internal sound card or USB sound card required for DVP messages and
DVP recording.
The sound card should allow line-in [or mic] and line-out [or speaker]
The computer speaker used for CW monitor ouput.
13
1.3 Files used by the Program
File (extension)
TR4W.INI
*. cfg.
*. TRW
*. RST
*. DOM
tr4w.pos
bandmap.bin
trcluster.dat
dxcluster_alert_list.txt.
cty.dat
cursor.bmp
commands_help_xxx.ini
Winkeyer.bin
luconsz.ttf
Application
Command Statement settings which
are applied to all contests (text)
Contest configuration file (text)
TR4W Log file (binary)
TR4W restart file (binary)
File of internal factors . (text(
Window position data (binary)
Spots for stations (binary)
DX cluster internet addresses (text}
Call signs monitored in DX Cluster
(text)
Country prefixes and geographic
parameters (text)
Graphic image specified by CUSTOM
CARET statement
Command Statement help
xxx in the file name – specifies the
language. (text)
Winkeyer configuration (binary)
If present slashed zeros in program
Change .ttf to .tt to disable
1.4 Folders used by the Program
Folder
[SETTINGS]
[DOM]
[DXCLUSTER]
[SERVER]
[DVP]
[FULLCALLSIGNS]
[FULLSERIALNUMBERS]
[LETTERSANDNUMBERS]
Application
TR4W.INI AND TR4W.POS
Multiplier files (text)
Dxcluster –xxxx.txt (text)
Tr4wserver.exe
.wav files and FULLCALLSIGNS,
FULLSERIALNUMBERS and
LETTERSANDNUMBERS
call.wav files
serial.wav files
number.wav & letter.wav files
14
1.5 Program Installation
To get started go to the TR4W homepage at: http://www.tr4w.com/ and download the
most current version of the program.
Click on “DOWNLOAD” to bring up a list of TR4W versions for several languages.
Select the latest release in the language that you wish to use. This manual is written for
users of the English version but may be useful to those using TR4W in other languages,
As of this writing the current English TR4W version release is 4.242. Click on
“tr4w_setup_4_242.zip” to initiate a download of a compressed (zip) file which you
should save. When the download is completed and saved, extract the file and you will
see a window like this:
Figure 0-1
Click on next to continue the installation.
When click on next you will be asked where you want to store the TR4W
program. Windows suggests that you store it in the Program Files folder but it
will be better to store it on the hard drive in its own folder. Make the destination
folder be C:\TR4W\ rather than C:\Program Files (x86)\TR4W\ . That will make it
easier to aces to make text file changes when you want to do so.
15
Click on the Install button and the program will install. When the installation is
completed a TR4W icon will appear on your desktop (see below). Clicking on the
icon starts the program.
Figure 0-2
1.6 Program Startup Screens
The window below is the one that will appear each time you start. You will be
asked to enter your call and select a contest to initiate. After the first time you
use the program the window on the left will contain additional folders; one for
each contest that you have selected previously. Once you have made and
started using a particular contest selection then next time you start TR4W you
can simply double click on the Contest Folder you wish to use. The program will
start that contest using the configuration settings that you had previously entered
when you last used it.
16
Figure 0-3
To make a new contest selection fill in your call and select a contest from the
pull down list in the CONTEST box. If you are starting TR4W for the very first
time we suggest that you start by selecting General QSO in the pull down list.
Then select the desired value for each of the CATEGORY boxes in the lower left
part of the window. If everything has been entered correctly you will be able to
click on the OK and the program will open two windows: the Main Window and
the Function Keys Window.
Main Window
17
Figure 0-4
Function Keys window
Figure 0-5
The Main Window name shows the version number of TR4W that is running
and the name of the contest that has been selected together with the year and
the call sign entered into the MY CALL box of the initial window.
Inside the Main Window is a number of sub-windows or boxes. Some of these
boxes already have values and others are greyed out or blank. They are waiting
for additional configuration statements or contest activity at which time they will
have values placed into them by the program.
The cursor in located in the Call sub-window. The Band box shows 160CW, the
Date box shows 30-11-11 [DD-MM-YY] , the Clock box shows 05:53 [UTC] and
the QSO Number box shows 1. These values are shown just below the bottom
of the Editable Log sub-window. These are the values that will be logged into
that sub-window when a QSO is completed.
Near the center bottom of the Main Window we see the PTT box is OFF, the
MODE box shows CW meters, the Operating Mode box shows CQ.
Although Radio 1 is shown the box above it shows no frequency. That tells us
that TR4W has not yet been interfaced with a radio. However, we could use the
program to log QSO’s even though we did not have a control interface
established between the computer and the radio.
The cursor is in the Call window and we simply type the call we wish to enter
and then press the [ENTER] or [RETURN] key. The cursor will move to the
Exchange window. Next we can enter a name and QTH [state, prefix, city, etc]
with a space separating name and QTH. Then press ENTER to have it logged.
18
We can change the Band by using <Alt+B> or <Alt+V> and we can change the
transmitting Mode by using <Alt+M>. We can delete the last log entry by hitting
<Alt+Y>. If we delete it by mistake then we can restore it using <Ctrl+Y>. These
commands and others are found in the sub-menus under the Alt- and Ctrlheadings of the Main Window menu.
1.7 Program Windows -- Names and Colors
19
1.8 Configuring TR4W for your station
To set up TR4W to interface with your radio we will open the Settings menu
heading and show the sub menus.
Settings menus
Figure 0-6
The Settings menu has several choices of sub menus. The ‘CAT and CW Keying ‘sub menu
has been selected because we wish to set up the control of a radio by the program. That sub
menu has two alternative choices: ‘Radio 1’ or ‘Radio 2’
1.8.1
Configuring the Radio
We start by selecting the Radio 1 sub-menu and clicking on it to bring up the window that is
used to select the radio type set the COM port and the hand shaking between the computer
and the radio. Every box which has a small, downward pointing triangle contains a list of
choices for that particular box. By clicking on the triangle you will be shown the choices and
you can click on one of them to select your choice for that box.
Before selecting values
Figure 0-7a
After selecting values
Figure 0-9b
The Figure 10a shows the initial settings when the program is opened for the first time and
no Radio configurations have been selected.
The first time a change is made from any of the default values a corresponding Configuration
Statement will be created and stored in the TR4W.INI file. Successive changes of that entry
will modify that Configuration Statement. In Figure 1.10b shown above when the RADIO
20
ONE TYPE box was changed from ‘NONE’ to ‘FT1000MP’ the following Configuration
Statement was generated and stored in TR4W.INI.
RADIO ONE TYPE = FT1000MP
The other changes between Figures 1.10a and 1.10b produce the following Configuration
Statements which are also stored in TR4W.INI
RADIO ONE CONTROL PORT = SERIAL ONE
RADIO ONE CAT RTS = OFF
RADIO ONE CAT DTR = OFF
RADIO ONE BAUD RATE = 4800
KEYER RADIO ONE OUTPUT PORT = LPT1
RADIO ONE NAME = Right
The next time that you start the program these saved Configuration Statements will be read
during startup and their values rather than the default values will be used. You will not need
to changes these Configuration Statements values until you change the radio type or control
port or the keying port.
In the example above Figure 1.10b shows that Serial Port 2 was selected to communicate
with the radio. The FT1000MP value was selected from the pull down Type list. The RTS
and DTR lines are not used to communicate between the radio and the computer so they were
set to OFF. Radio 1 will be keyed using LPT1 which means there are no Serial Port lines
used in controlling PTT or keying the radio. Therefore the RTS and DTR lines are set to
OFF. We have changed the Radio One Name from ‘Radio 1’ to ‘Right” to indicate its
position on the operating desk. We could have picked any other text we wished instead of
‘Right”.
When we have finished making configuration selections we click on the ‘Apply’ button and
Configuration Statement entries are made into the TR4W.INI file which is stored in the
[SETTINGS] folder that is in the [TR4W] folder located on the hard drive.
At this point there is very little information that has been placed into the TR4W.INI file.
However, if we open the [SETTINGS] folder which is inside the [TR4W] folder and then
open TR4W.INI using Notepad or a similar text editor we will see:
Figure 0-8
21
The [COMMANDS] and [Radio] lines are comments. Comments are enclosed in [ ] .
The next line,
LATEST CONFIG FILE = D:\TR4W\2011 GENERAL QSO K0TO\GENERAL
QSO.CFG
was created when we selected the Contest earlier. The current year and the MY CALL entry
were added to the name of the contest and used to create a new folder with that name. This
new folders contains the GENERAL QSO.CFG file. By putting this line in TR4W the
program knows which folder is being used for the contest you desire to operate. If we locate
the [2011 General QSO K0TO] folder, which is in the [TR4W] folder, and then open the
GENERAL QSO.CFG file inside it with notepad we will see:
Figure 1.12
These are Configuration Statements that were created when we place the Call we wanted to
use in the contest in the MY CALL box, made the CONTEST selection and then filled in the
CATEGORY boxes when we were viewing the window shown in Figure 1.4 as we started
the TR4W program.
1.8.2
Configuring the Station Control
In the previous Section we configured the program to be able to communicate with the radio
to read and control the settings of the radio. In this section we will configure the program to
control when the radio transmits and control the sending of CW and SSB <DVP> messages.
To configure the station control from the computer we go back to the SETTINGS menu and
then select the LPT sub menu. That will bring up the LPT window.
22
Figure 1.13
The default LPT1, LPT2, LPT3 BASE ADDRESSES are the standard ones and should not
need to be changed. In this example there is no Foot Switch, no Paddle Port, and the Band
data is not being supplied by the LPT1 port lines to other station equipment so no entry
changes are made for those choices.
The station is this example uses a Top Ten DXDoubler for controlling the microphone and
key connections to the radios in the station. When changing from Radio 1 to Radio 2 a relay
in the DXDoubler unit needs to be activated. This is done using one of the LPT control lines.
The Relay Control Port is specified as 1 which means that LPT Port 1 will supply the signal
that will tell the Top Ten unit when to change the radio inputs. If there was only one radio
there would be no need to select radios and this entry would be NONE.
Clearly, there are many options because contemporary Radio Contest stations may have very
elaborate station control that is managed by the computer as the contest activity happens.
1.8.3
Configuring the Computer-Sound Interface
1.8.4
Testing the Configuration Setup
23
2 Beginning Operating
The TR4W Main Window, Figures 1.7 and 1.8, shows a lot of information which you
can use to keep you abreast of your status within the contest. This information is
presented within the Main Window in a collection of sub windows and boxes. To see the
names of all of the sub windows and boxes you can examine Figures 1.7 and 1.8
preceding or look in the TR4W Reference Manual. In the sections following we show
the names and locations of the sub windows that are of primary interest when you are
either using the CQ operating mode or using the Search and Pounce [.S & P] operating
mode.
2.1 First QSO in CQ Mode
TR4W has two operating modes; CQ operating mode and Search and Pounce [S & P]. What
this means in practice is that the responses of the TR4W program will be different to the
things you type depending on which of the modes it is in at the time you do the typing.
Initially this may sound confusing but, fortunately, the learning curve for becoming
accustomed to the two modes is neither steep nor long. You can count on being able to
handle most of the things you wish do in either mode without much effort. Almost certainly
as you begin to use the program you will find that something you wish to do will cause you
frustration because it does not seem to be part of the regular pattern of operation in that
mode.
An example of this might be the first time that you make a logging entry error and you
realize is incorrect just after you type [ENTER] to record it in the log. Naturally, if you make
no typing errors and you never miss something that is being sent to you by the station you are
working, you will never experience such a situation. For the rest of us there is a quick
procedure for making a correction to a previous entry – particularly one of the last five or so
log entries. For now, let’s assume we are members of the ‘golden log’ group and have never
made an error in our logging entries. Later we will consider what to do if somehow it is
imperative that we change a log entry before it becomes permanent.
24
The screen below is one for a CQ WWDX CW contest. The name of the contest is on the top
line of
CW Speed UTC Time
Call
Exchange
Figure1.14
Op Mode
the Main Window together with the TR4W version number. This is typically the window that
will appear whenever you start TR4W in a contest. This is the CQ operating mode. You can
see that displayed in the Op Mode sub window. Also shown on startup is the CW Speed and
the UTC time. The cursor is initially at the left edge of the Call window.
Let’s log an imaginary QSO in CQ Mode. The first thing you need to do is to call CQ.
For now, assume that this is a CW contest. How do you call CQ? Easy! Just press [ENTER].
You should hear the following transmission coming from your PC’s speaker at 35 wpm:
CQ TEST K0TO K0TO TEST
<The call sign sent will be your call sign, not K0TO >
If you have your radio configured so that it is controlled by the computer and the keying is
also controlled by the computer and the radio is turned on you should see that the radio is
being keyed and that is the message being sent.
Now, pretend that someone has come back to your CQ. For now, let us assume that the
station is G4AMJ. Type this callsign on the keyboard and as you do you will see the letters
and numbers appear in the Call window. If you make a mistake, just use the backspace key
on the keyboard to erase the most recent letter, then enter the correct letter. As soon as you
have finished typing the callsign, press [ENTER]. Now you should hear the following from
the PC speaker: [and being sent by the radio if it is configured correctly and is turned on].
25
G4AMJ 5NN 03
Note: The 03 is the Zone that was entered when the CQ WWDX contest was selected. You
may see it by <CTRL+J> MY ZONE parameter.
As soon as you pressed the [Enter] key, the Exchange window will have entered into it
TR4W’s guess at what the station will send you (without the RST, which is assumed to be
599). In this case it will be a zone that has been selected based upon the country prefix.
Figure 1.15
Additional information will have been entered into several different sub windows and boxes
based upon the callsign you just typed. The name ‘England’ has been loaded into the QTH
box. The Multiplier Needs sub-window and the QSO Needs sub-window have been
activated. The MULT box has been loaded and the color changed to show this is a needed
multiplier. The QSO Matrix sub-window has the QSO’s, DX Mults and Zones rows
identified. The OP Mode box is now showing SP to indicate that we are no longer in CQ
Mode but rather in Exchange mode. The PTT box is showing OFF to indicate you are not
transmitting at the moment. The LOG Entries sub-window is still blank because we have not
logged the contact yet. But on the left side, just below that sub-window we see the entries
that will be logged when we are finished. From left to right we see the band, date, time and
number. [40CW, Dec 31, 2011, 11:12 UTC, 1 ] . The Call window has the call and the
Exchange window shows the zone that TR4W thinks this station will be sending.
After the computer has finished sending, pretend that you have received an exchange from
the station you are working. If the information is different from what the computer has
guessed it to be, then simply replace the guess with the received information. If you made a
mistake with the other station’s call, you can enter the correct call in the Exchange window
and the program will automatically correct the other station’s call before logging the QSO. If
the received information matches the guess, you need do nothing. Now press [ENTER],
26
which will cause the computer to send a brief message to end the QSO. That’s all there is to
it. The QSO is complete and has been logged. It has been written to your disk, and it also
appears on the line above the Call Window, a section of the screen called the “editable log”.
The editable log is important. It shows the last few QSOs. Every time that you make a new
QSO, the editable log scrolls upward by one line, and the topmost QSO disappears off the
screen. If you need to change the contents of a QSO that has scrolled off the top of the
screen, you may press <ALT-L> to bring up the search facility. If the searched for call is
found, you may then edit the exchange or correct the call.
Other things that happen once your QSO is complete are that the Exchange Window
disappears and the cursor returns to the left edge of the Call Window. You will also notice
that several other windows on the screen now display updated information, to reflect the
QSO you just made.
But what are you waiting for? The cursor is sitting there blinking, waiting for you to make
another QSO. Quick! Time is awasting. Somebody will steal your frequency if you don’t
hurry. Call CQ again by pressing [ENTER]. And now you’re off, running stations for the first
time with TR4W.
2.2 First QSO in S&P Mode
What if you want to call a station instead of calling CQ? That’s what S&P Mode is for. To
put yourself in S&P Mode, simply press the <Tab> key. The Exchange window appears (if
you are using a color monitor, this window will be in a different color than it has in CQ
Mode, to remind you that you are in S&P Mode), as shown in Figure 2.23. Also, the OP
MODE Window will switch from CQ to SP. Notice that your cursor has not yet moved
from the Call Window (since TR4W does not yet know whom you intend to call).
27
Now, let’s pretend that you have just come across a needed multiplier. Enter his callsign and
then hit [ENTER] . As soon as you press the [ENTER] key, TR4W will instantly check to see
if the station is a dupe. If it is not a dupe, TR4W will call the station for you, and the cursor
moves down to the Exchange window.
Just as in CQ Mode, you now type the exchange (if it’s necessary; as before, the default RST
is 599 and TR4W can usually enter the correct exchange information in the Exchange
Window for you), followed by [ENTER].
If you happen to have a valid TRMASTER.DTA file in your path, you will see activity in the
line below the Call Window as you enter the call. The meaning of what is happening will be
explained later, although you may find it interesting to watch carefully to see if you can
decide for yourself just what TR4W is telling you.
28
The default installation does not install a TRMASTER.DTA file, so this activity will not
normally be visible. Reference the TRMASTER basic and advanced sections for more
information.
If the station is a dupe, TR4W will not call the station; also, the program will clearly display
the word DUPE on the screen.
The exchange will be sent and, as it is being transmitted, the QSO is logged.
To return to CQ Mode from S&P Mode, you may press either <Esc> or <Shift-Tab> .
In general, the <Esc> key is used to perform an emergency halt to whatever task TR4W is
currently performing. With only a couple of exceptions, if TR4W is sending a CW or DVP
message, pressing <Esc> once will instantly abort the transmission. The two exceptions are:
if you are performing some other action inside TR4W at the same time that the message is
being sent (such as changing the CW memories or setting the alarm.
Sometimes, you will want to switch to S&P Mode and send your call, all in a single
operation. This typically happens when you are scanning the band and have found a place
you want to drop your call (perhaps to call someone). You can do this by simply pressing the
space bar. This also works if you are in CQ Mode and there are no characters in the Call
window. If you know the callsign of the station you are calling, you can type it into the Call
Window while your call is being sent. After you type it in, you should type alt-Z. This will
move the cursor down to the Exchange Window
(Unless ); the default, though, is TRUE.
Now enter any initial exchange information you receive (e.g., name and QTH). Note that if
you have a rig interfaced to the computer, you can cause TR4W to switch automatically to
S&P Mode as soon as you begin to scan the band by using the AUTO S&P ENABLE
command.
As we have seen, when TR4W begins to run, it reads a configuration file (usually
<contest_name>.CFG contained therein to set many of its internal parameters. You can
make changes to the configuration file, either within TR4W itself or by using an editor like
29
Notepad.
In this way you can personalize the operation of TR4W so that it works in a way that suits
you.
Note: TR4W uses configuration files. The global file is TR4W.CFG in the main TR4W
directory and <contest_name>.CFG in the contest directory below \TR4W.
Detailed information on how to make these changes is provided in chapter 5.
The <CTRL-J> key is used to display and control many of the program’s operating
parameters, including most of those that are initialized by the configuration files. If you
change a parameter with the <Ctrl-J> command, TR4W will ask if you want to make that
change in the configuration file, so that it will be remembered the next time that you start
TR4W.
Almost all the parameters that can be changed in the configuration file will be given a default
reasonable value if TR4W finds no specific entry for that parameter in the file. You may
examine a configuration file by using an editor to view the TR4W.CFG in your \TR4W
directory or <contest_name>.CFG in the contest_name directory (For example . “CQ-WWCW.CFG”- also accessible by FILE then OPEN LOG DIRECTORY.
30
2.3 Regular Operation
2.3.1
Selecting a Supported Contest
Contest selection occurs at TR4W initialization. You have two options.
1. Select an contest (directory) that already exists on your PC
2. Select a new contest
In the case of option (1), you will be presented with the following dialog:
Note that the LAST active configuration is listed at the bottom. You may just select this to go
back to the last contest entered.
It is extremely important that attention be paid to all prompts on this initial dialog. It governs
HOW your Cabrillo log will be generated !
When you select a contest, you will be presented with the configuration file name found in
the contest directory. Normally you can just select it and TR4W will initialize.
Option (2) will start the new contest dialog. This occurs when you make a selection with the
CONTEST radio button.
31
It is important to note the checkboxes. In this case “I AM IN NORTH AMERICA”. Failure
to check it will not produce the follow on dialog that requests your state. This will not
produce the correct Cabrillo ! Likewise the CATEGORY fields are what will be filled into
your Cabrillo headers.
TR4W will now check for an extant directory for the contest and warn you that you are going
to overlay the existing config file if you proceed. Normally, you can safely overlay the config
file and proceed to initialize TR4W.
2.3.2
Custom Messages
32
TR4W will use default messages for a contest but it usually makes sense to customize
messages.
You may customize messages with a text editor by editing your local contest messages in
<CONTEST_NAME.CFG> file. Where CONTEST_NAME is one of the TR4W
CONTESTs.
Normally, customization is just done from within TR4W by pressing <ALT+P>
Messages are broken down by their function:
• CQ
• Exchange
• Other
Special characters in messages are summarized as follows: A complete list of message characters follows:
Symbol
#
@
$
%
:
~
\
|
[
]
_
^
}
)
(
>
+
<
=
!
Function
Passes the number of QSO. May be accompanied by + or - and a single integer to change the
number
Sends the callsign entered in the callsign box
Sends greetings and name if known (ie, GM JOHN). Adds a space at the end of message
Passes the name of the database name (add a space at the end, if there is a name)
Sends the characters from the keyboard until you press ENTER or ESCAPE
Transmits the appropriate greetings with no name (GM, GA or GE) based on callsign
Sends call sign used in the competition (as determined by MY CALL =)
Passes the name that has been copied to the exchange window (RST QTH NAME Exchange)
Expects the number to be entered to use as RST - and give it to CW
Repeats the complete RST, as the team was transferred to [
Space (used at the beginning or end of your message, as gaps in the *. CFG ignored)
Half of the space in any location messages
Transmits a prefix or suffix callsign only corrected
Sends call sign in the last QSO editable window
Passes the name obtained in the previous Sprint QSO (at the bottom of the editable window)
Clears the detuning RIT - be associated with the radio interface and works with Kenwood and Yaesu
transceivers some
End of message (AR)
End of (SK)
The double dash (BT)
QRL? (SN)
33
&
Wait (AS)
Lets code up a cq message. <ALT+P> as above.
Now press <C> to view present CQ message settings:
We presently have F1 assigned to “CQTEST \ \ TEST” where “\” represents MYCALL as
set on the initial CONTEST dialog.
So lets try to change the F1 CQ message to insert a half space between CQ and TEST.
You can press enter whilst F1 line is selected or double click on it.
Select the line with your mouse and change “CQTEST” TO “CQ^TEST”
34
Note the “OK” button is now selectable. Before selecting it, give the F1 CQ key a caption by
typing in “CQ”
Now select “OK”. And X out of the Program message window.
Assuming you have your function keys displayed you should see the new caption.
TIP: Hotkey = <CTRL+SHIFT+2>
One more example. We want to change the defaults for the QSL message so that our RIT is
reset.
Again <ALT+P> to enter the MEMORY PROGRAM FUNCTION window. But this time
we will choose (O)ther.
35
Now select “QSL CW MESSAGE”
and add the “RESET RIT” command (>)
Note that (O)ther programmed messages do not have a caption, so select “OK” and X out.
Note: Not all transceivers support the ‘reset rit’ command.
Please note that messages must be entered in UPPER CASE.
More message customization is covered in the SO2R Advanced and TRMASTER.DTA
Advanced sections.
36
2.3.3
Sending Messages to the Rig
If your radio is connected through an interface to the computer, then using the control
characters <03> and <04> can send commands. Use the following sequence:
; To pass "string" on the active radio
<03>SRS=string<04>
; Pass "string" on non-active radio<
<03> SRSI = string <04>
; Pass "string" to radio 1
<03>SRS1=string<04>
; Pass "string" to radio 2
<03>SRS2=string<04>
For example, for most Kenwood transceivers FL ... switch filters.
<03>SRS=FL010009;<04>
switch the narrowband filter. If you program a command while the program is using <ALT+P>, then
to enter control characters using <CTRL+P>. The hexadecimal value <CTRL+C> = 3, <CTRL+D> =
4. The program takes a sequence of commands between the two characters and <CTRL+C>
<CTRL+D>. So it will not execute commands that contain the code 4 - it will be perceived as the end
of the command sequence. For example, the message
CQ CW MEMORY AltF8 = <03>SRS1=xxx<01><04><04>
will be interpreted as SRS1 = xxx <01>.
1.1.1
Other Kenwood transceivers CAT commands
Reconstructed above. Is equivalent to pressing the UP button on the microphone
;UP
37
<03>SRS=UP;<04>
Reconstructed below. Equivalent to pressing DOWN on the microphone
;DOWN
<03> SRS = DN; <04>
Filter width 8.83 MHz - 500 Hz and 445 kHz filter width - 500 Hz
;FILTER 1 = 0.5kHz, FILTER 2 = 0.5kHz
<03>SRS=FL009009;<04>
Filter width 8.83 MHz - 2.4 kHz, 445 kHz filter width - 500 Hz
;FILTER 1 = 2.4kHz, FILTER 2 = 0.5kHz
<03>SRS=FL007009;<04>
Filter width 8.83 MHz - 2.4 kHz filter width 445 kHz - 2.4 kHz
;FILTER 1 = 2.4kHz, FILTER 2 = 2.4kHz
<03>SRS=FL007007;<04>
Select VFO A mode
;VFO A MODE
<03>SRS=FR0;<04>
Select VFO B mode
;VFO B MODE
<03>SRS=FR1;<04>
Select MEMORY mode
;MEMORY MODE
<03>SRS=FR2;<04>
To include FINE STEP On
;FINE STEP ON
<03>SRS=FS1;<04>
Отключить FINE STEP Off
;FINE STEP OFF
<03>SRS=FS0;<04>
Transceiver block
;LOCK ON
<03>SRS=LK1;<04>
Unlock the transceiver
;LOCK OFF
38
<03>SRS=LK0;<04>
Set the memory channel 2
;SET MEMORY CHANEL 2
<03>SRS=FR2;MC 02;<04>
Set the memory channel 75
;SET MEMORY CHANEL 75
<03>SRS=FR2;MC 75;<04>
Set the type of radiation LSB
;SET LSB MODE
<03>SRS=MD1;<04>
Set the type of radiation USB
;SET USB MODE
<03>SRS=MD2;<04>
Set the operating mode CW
;SET CW MODE
<03>SRS=MD3;<04>
Set the type of radiation FM
;SET FM MODE
<03>SRS=MD4;<04>
Set the type of radiation AM
;SET AM MODE
<03>SRS=MD5;<04>
Set the type of radiation FSK
; SET FSK MODE
<03>SRS=MD6;<04>
Set the operating mode CW-R
;SET CW-R MODE
<03>SRS=MD7;<04>
Set the operating mode FSK-R
Set; FSK MODE-R
<03>SRS=MD9;<04>
Insert AIP
;AIP ON
39
<03>SRS=MX1;<04>
Disable AIP
;AIP OFF
<03>SRS=MX0;<04>
Set the minimum PITCH
;LOW PITCH
<03> SRS = PT00; <04>
Set the maximum PITCH
;HIGH PITCH
<03> SRS = PT08; <04>
PITCH value changes discretely and can have 9 values - from 00 to 08.
Clear frequency RIT / XIT (works w/ K3 also)
;CLEAR RIT/XIT
<03>SRS=RC;<04>
Increase the frequency of RIT / XIT (K3 Also)
;RIT/XIT UP
<03>SRS=RU;<04>
Reduce the frequency of RIT / XIT (K3 Also)
;RIT/XIT DOWN
<03>SRS=RD;<04>
Set the display mode of SWR
;DISPLAY SWR
<03>SRS=RM1;<04>
Set the display mode of ALC
;DISPLAY ALC
<03>SRS=RM3;<04>
Set the display mode dB
;DISPLAY dB
<03>SRS=RM6;<04>
Turn RIT
;RIT ON
<03>SRS=RT1;<04>
Disable RIT
40
;RIT OFF
<03>SRS=RT0;<04>
Turn the transceiver on the transfer
;TX ON
<03>SRS=TX;<04>
Turn the transceiver to receive
;RX ON
<03>SRS=RX;<04>
Reproduction of synthesized voice
;GENERATION OF SYNTHESIZED VOICE
<03> SRS = VR; <04>
Include XIT
;XIT ON
<03>SRS=XT1;<04>
Disable XIT
;XIT OFF
<03>SRS=XT0;<04>
2.3.4
Personalized Greetings
Messages can be programmed so as to include the names of station operators and appropriate
greetings:
Symbol
%
~
$
Function
name (must be customized in TRMASTER)
GM, GA, GE (depends on the local time correspondent)
GM and name
If the name specified CLUB, this name is ignored. Greetings may also depend on local time
and the individual values determined from the file HELLO.DAT . It should be a simple text
file from the working directory TR4W as follows: the abbreviation of the country - a gap - a
greeting, such as:
DL MOIN
EA GRS
EU ZDR
F BJR
The HELLO
LA HEI
OH HEI
OK AHOJ
OM AHOJ
SM HELLO
AU ZDR
UR ZDR
VK GDAY
41
More data on TRMASTER customization may be found in the TRMASTER Advanced
section.
42
3 Alarms and Notes
TR4W tracks how many minutes have passed since your last QSO. By setting <CTRL+J>
WAKE UP TIME OUT = X where “X” is the number of minutes elapsed, TR4W will
sound a beep every minute until you work another station.
NOTES
The NOTE facility allows entry of notes into the log via <CTRL-N>.
At the end of the contest notes can be read by selecting EXPORT then NOTES. This will
produce a screen listing NOTES with the option to write it to NOTES.TXT in the current
contest directory. In the heat of a contest, this can be very useful for noting conditions or a
busted call.
43
4 Special Operating Modes
4.1 Using the Bandmap
The bandmap is central to identifying calls and their frequencies on a band. The
entries in the bandmap are from the DXCluster spots or from entries made by
the contest operator as he tunes across the band.
Bandmap may be activated via <CTRL+J> BAND MAP ENABLE = TRUE.
The Bandmap window may be toggled via < Ctrl+Shift+` >. By default, it shows
the stations on the current band and mode.
By pressing the right mouse button in the window the Bandmap menu appears.
Additional commands allow you to change the options:
•
•
•
•
•
•
•
ALL BANDS BAND MAP - display spots on all bands.
BAND MAP ALL MODES - display all types of modulation (CW and SSB).
BAND MAP DISPLAY CQ - display the last run frequency.
BAND MAP Dupe DISPLAY - display repeats (dupes).
SELECTED SPOT DELETE - to delete the selected spot.
REMOVE ALL SPOTS - remove all the spots.
SEND INACTIVE RIG TO THE FREQUENCY (SO2R), set the inactive radio to the
frequency of the spot. At ranges up to 144 MHz, the program allocates two modes - CW
and SSB, determining the value of the frequency (above SSB, following CW) with
respect to a "high" point. By default, set SSB to the following frequencies (in Hz):
Band
160 m
80 m
40 m
30 m
20 m
17 m
15 m
12 m
10 m
6m
2m
Freq (Hz)
1840000
3700000
7100000
10150000
14100000
18110000
21200000
24930000
28300000
50100000
144200000
The frequencies can be changed using CUTOFF FREQUENCY BAND MAP .
Some transceivers (e.g .Kenwood) do not support the change of VFO B, when
44
using the VFO frequency setting.
If the local computer is connected via Telnet to one of the DX Clusters via the
internet, spots should appear in the band map window. Spots are automatically
sorted by frequency left to right, up to down. At the top of the column - the most
low-frequency, at the bottom – the highest. When filling in the leftmost column,
subsequent columns will appear to the right of the first.
Each spot in this window contains information about the frequency and callsign
of the station. If you have not worked the station and it is a new multiplier the
letter " M " will be displayed. If the call is already in your log for a given mode,
then the letter " D "- Dupe will display. If the station is operating split frequency
(SPLIT) - an icon " + " is shown.
You may navigate the band map in two ways:
•
•
Using the mouse, moving the cursor to the desired call and clicking the left mouse
button.
By pressing <Ctrl + End> and moving with the keyboard arrow keys (left, right, up,
down).
Information on the spot that currently has the "focus" [selecyed] is displayed in
the band map window information line located at the bottom of the Main
Window. This line is displayed from left to right as follows:
•
•
•
•
•
•
Call spotted
Time elapsed since the spot
The country of the call.
Station sending the spot
Any comments sent with the spot
The total number of spots in the band map
As spots age they change color. The most recent spots are highlighted in white
letters on a contrasting black background. Then they gradually "fade" becoming
first blue, then black on white, then gray and finally disappear altogether. The
duration that a spot will show in the band map window is by a Configuration
Statement.
BAND MAP DECAY TIME = MM, where MM is the number of minutes.
Double-clicking on the spot (or pressing ENTER, when the spot has the "focus")
sets the active radio to the frequency of spot (assuming that the radio is
connected to the program via the CAT interface) and enters the call sign of the
spotted station in the CALL window of the Main Window. By default the map
shows all call signs, including dupes.
45
You may disable the dupe display via <CTRL+J> BAND MAP Dupe DISPLAY
= FALSE.
If the bandmap exceeds the screen, changing the frequency of the transceiver or
when you move the map cursor keys, will scroll automatically scroll the
bandmap.
Bandmap works best when the transceiver is connected through an interface
with the computer (CAT) so that the program can read the frequency at which
the radio is tuned. If you want/need to not exploit CAT, the program will ask for
the frequency every time you add a new call. If you do not use CAT set
<CTRL+J> ASK FOR FREQUENCIES = TRUE.
When you are in S&P mode, and tune in a station that is already in the
bandmap, the call will load into the CALL window. Usually you have to be within
200 hertz of this point, this value can be adjusted via <CTRL+J> BAND MAP
GUARD BAND=NNN [HZ].
The callsign will be displayed in the callsign window, you can update your
information simply by pressing the spacebar.
If you set the command <CTRL+J> BAND MAP CALL WINDOW ENABLE =
FALSE or do not have a CAT connection, this feature will be disabled. But you
may still update the timestamp for a callsign by pressing <Ctrl+Y>.
If you are tuned to a station callsign that is already in the bandmap and the
callsign is displayed, the keys <CTRL+DEL> will remove the entry from the
bandmap.
If you're tuned to a station which is not on the map and you do not want to work
the station now, you can enter his call and press the space bar. His call will be
entered into the bandmap for future reference. When tuning parts of a band, the
bandmap will
automatically switch to the frequency range where you are tuning.
When a callsign is first listed, it will be white on black, and a minute later turns
yellow and then gradually changes to the background color . After 60 minutes (or
values BAND MAP DECAY TIME ) it fades away. This helps to quickly visually
keep track of how much of the map you have recently visited.
You can change the frequency of the radio to the frequency of a particular
bandmap entry by using the <Control+End>, to place the cursor in the
bandmap. Then using the cursor keys, select the desired callsign.
Press [ENTER] and the active radio VFO will be set to the frequency of the
selected callsign. If the callsign spot had QSX information, the transceiver will be
placed in a split-frequency mode and will be ready to transmit on the split
frequency.
46
When the cursor is in the bandmap window, there are several additional
keyboard commands:
•
•
•
•
•
•
•
•
<Control+End> moves the cursor into the bandmap window.
The UP,DOWN,LEFT, RIGHT arrow keys move the cursor when it is in the window.
[ENTER] sets the active radio VFO to the selected spot frequency & loads the callsign
into the Call Window
<DELETE> deletes the callsign entry that is selected.
<ESCAPE> moves the cursor out of the bandmap window
< D > toggles Dupe display
< M > toggles all Mode
< B > toggles all Bands
If you are checking for a second spot (by pressing the <SPACE>) for the station
which is already in the bandmap, the previous call will be removed and new call
will be added to the map.
If you qso another station on the same frequency, the new call will overwrite the
old callsign.
A record of the frequency of a CQ will also be added to the bandmap in the form
of CQ / #, where # is the latest issue CQ. If you exit, the bandmap is saved in file
BANDMAP.BIN in the current contest directory . This means that the bandmap
will not be lost, if you want to stop and restart the program.
Note some bandmap fonts are not advisable because of their width (example: Verdana),
potentially causing the bandmap display to scroll.
SPOTTING
When connected to DX Cluster, spotting may be accomplished via pressing the
tilde key (normally extreme upper left of the keyboard).
Note that you may check “contest name in comment’ to automatically comment
the
Spot.
47
4.2 SO2R -Two Radio Mode
4.2.1
SO2R - Configuration
To enable full two radio support, ensure that TWO RADIO MODE is set to TRUE, This can
be set in your configuration (CTRL+J) via TWO RADIO MODE. Additionally ensure that
ALT-D ENABLE is set TRUE.
For SO2R to work properly, TR4W should correctly display the frequency of BOTH radios
(reference basic SETUP section and figure below).
Hotkeys:
CTRL-Alt-1 = Radio 1 setup
CTRL-Alt-2 = Radio 2 setup
CTRL-W
= Winkey setup
You may verify proper SO2R hardware setup by pressing <ALT-R>.
This should allow you to switch radios and be evidenced by the active radio display going
gray and the inactive no longer grayed out (reference figure so2r-1)
IMPORTANT; The radio display shown in the figures identifies which radio has the focus
Figure SO2R-1 Focus on Radio1 then on Radio2 (below)
48
4.2.2
SO2R – BASIC OPERATION
Basic SO2R is built into TR4W. It can be deployed by using the conventional dupe check
feature of ALT-D-- except with <CTRL+J> TWO RADIO MODE set to TRUE in your
CONFIG file and TR4W displaying correct frequencies from both radios.
On the run/active radio, dupe checking is achieved by entering a call or pressing the space
bar after call entry. For S&P/inactive radio press <Alt+D>
Dupe check will now display a dialog box looking like the screen below.
While CQ’ing on the run radio, when you tune across a call on the S&P radio, if you enter
the callsign via <ALT-D>, not only will the call be dupe-checked but, if not a dupe, you will
receive confirmation the call is good to work on the S&P radio ! (see the screen below).
49
NOTE: Additionally bandmap entries will automatically load into the Alt-D window.
When you are ready (timing is everything), press the spacebar and TRlog will halt your run
CQ and simultaneously call the station on the S&P rig for you.
Tip: whether “DE” is sent is controlled by your <CTRL+J> DE ENABLE
What happen next depends on whether the station comes back to you.
If he does not you can either wait (easiest) on the S&P freq whilst continuing to CQ on run,
or move on. To continue to CQ, press escape to terminate focus on the S&P and press enter.
TIP: the moment you Alt-D the call, TR4W will build a bandmap entry for you.
This makes coming back to the station later a LOT easier!
TIP: SO2R bandmap works the same as SO1R—with the following exception: you
must be aware of which radio presently has the focus when you click on a bandmap
spot. Just clicking on the spot will send the ACTIVE focus radio to the spot. If that is
not what you wish, you may right click on the spot and choose “Send inactive rig to
the frequency”. Alternatively you can execute SWAPRADIO before clicking on the
spot (described in Advanced SO2R).
Now assume you are waiting to call a new station (S&P radio) and CQ’ing on run and the
timing is right for another spacebar try- OR that you got the station when you called the first
time.
Tip: Timing should optimally be that you just finished a CQ and the S&P target has
just paused for a caller. Reality check-you may need to ‘break’ your CQ.
This time he came back to you! Once you enter his exchange,
pressing enter will not only log and send your exchange on the S&P radio but switch you
back to the run radio and send a CQ as defined by CQ Memory Key F1.
50
Tip: Program Memory Key F2 to your exchange, If you are not confident the station
will qsl your exchange, do not press enter, press F2- which you can repeat as needed.
However in the Advanced section we will discuss how to press enter and program for
A potential repeat request. Why ? Because you may need to keep CQ active on the
run frequency to hold it !
TIP: RE: F2 repeat. Check <CTRL+J> AUTO QSO NUMBER DECREMENT if
the contest involves a serial number. Normally change this to TRUE.
4.2.3
SO2R – Advanced Operation
This section documents programming SO2R function- specifically, setting up
F-keys [Function Key Memories] to control radio selection, focus, mode, and messages.
Tip: Those function key settings which are NOT contest specific can be stored in the
folder COMMONMESSAGES.INI which should be created in the main TR4W
folder.
One of the advantages of programming SO2R Function Keys is the degree of granularity it
affords the user. On the other hand, TR4W is designed to permit minimal keystrokes. This
means using basic SO2R when it will suffice but having advanced SO2R available in your
SO2R arsenal.
Perhaps the most common scenario is calling a new station on the S&P, getting a comeback,
receiving a long exchange, and wanting to hold your run frequency on the run radio.
<Ctrl+A> to the rescue !
Since we need to QSL the exchange, it makes sense to keep focus on the S&P radio. Solution
? <Ctrl+A> can send CQ on the run (inactive) radio but NOT switch to it. So lets get started
!
Firstly note there are two ways to program the F keys. You can enter the codes as CTRL-A,
CTRL-B, CTRL-C, CTRL-D or use <03><04><05><06> (for simplicity, we will use the
latter). If you use the CTRL-X method, you must first hold down the control key and press
‘p’ then ctrl-x, where x is the control character selected. This should apply to all control
programming. So that CW message speed up would be ctrl-p ctrl-f, as an example.
To send the CQ on the inactive radio (typically copying long exchange on S&P radio) you
can simply do a <CTRL-P> to enter Function key programming, then specify ‘C’ to specify
a CQ function. Now choose an un-occupied key and double click on it. To the right of
“MESSAGE” type <01>CQ \ and then press TAB to move the cursor to the “Caption”
entry.
Note: Mode set of CQMODE or SAPMODE was not set here. If the function key command
will change mode, mode set is mandatory. Additionally, you must ensure that you are setting
the right function key. Did you want (C)Q, (E)xchange, or (O)ther ?
51
Now give the Function Key a meaningful title, something like “CQ R2”, and select “OK”.
Tip: <SHIFT+CTRL+2> toggles the Function Keys display
Note: this is germane to TR4W messages, not SO2R but is worth repeating: ENTER THE
ACTUAL MESSAGE IN UPPER CASE. So, in this case, “CQ” needs to be upper case.
When you test this you should see that a CQ is sent on your other radio but the radio
selection (see figures in SO2R setup) did not switch focus.
Ok, I tried a CQ from the inactive radio and got a caller, but I am receiving an exchange.
Now what ??
Typically the caller will dump his call in again, your job is to QSL the active radio exchange
and answer the caller on the inactive radio. Note in your head the callsign calling, then press
enter to QSL the active exchange, press the Function Key that executes SWAPRADIOS,
enter his call, and press ENTER. It takes practice but is doable for a good typist. It is also
advisable to have a Function Key set to “?”
Well, what if I call a guy on the S&P, he gives me his exchange, I give him mine, basic so2r
initiates a CQ on the run radio --BUT the S&P station needs a repeat ??
Although this scenario was all basic so2r, the remedy is best handled with a programmed
Function Key. Set an unused function key to <01>5nn # and label it something like 'Exch
R2'. Recall that your Function Keys should be displayed <CTRL+SHIFT+2> so this makes
things easier.
Pressing this Function Key will now halt your CQ and send the repeat exchange on the
inactive radio.
Assuming he now QSL's, you want to return to CQ on the RUN-radio.
Since your focus remained on run, just press enter.
--YES, you can just F2 the S&P exchange to start with. This way you are set to repeat. The
only problem is the possibility of losing your run frequency (partly depends on length of the
exchange).
Before we move on to the special case of Sprint contests, let’s cover EXCHANGERADIOS.
Few of us have a totally balanced installation. That is to say there will times when you want
the OTHER radio to be your run radio or S&P radio. The Command Codes string
<03>EXCHANGERADIOS<04>
does just that. You should see your radios switch bands with each other!
TR4W does not formally support dueling CQ’s. Want it ?
<03>SWAPRADIOS<04>CQ \
52
Assign that to a free F key and launch the CQ. When it ends immediately press the F key
again to launch your CQ on the other radio.
Sprint contests are a special challenge as they tend to be high speed, with short exchanges,
and a QSY rule that nullifies bandmap usage. TR4W addresses them in several ways; firstly
dupesheets for both radios were added so the operator can visually determine if a station is a
dupe on either radio without typing in a call- a faster form of Alt-D.
But if not in the dupesheet, how to call without the Alt-D spacebar ?
<03>SWAPRADIOS<04><03>SAPMODE<04>\ will swap radios, place you in S&P
mode, and send your call in one keystroke!
Normally, after you are called by another station you are required to qsy. But an alternative is
to generate a CQ on the inactive radio:
<03>SWAPRADIOS<04><03>CQMODE<04>CQ \
Tip:When programming keys you must be aware of initiating mode and final mode.
Eg, The above would not work if you are in S&P but wrote the sequence to a CQ
Memory Key. Likewise the Mode setting must be appropriate to whether you want to
end up in S&P or CQ mode.
TR4W is set to present a message warning that Sprint QSY rules apply. Additionally TR4W
will switch modes automatically in accordance with sprint rules. REF: <CTRL+J> SPRINT
QSY RULE
SO2R takes a lot of practice but can pay dividends !
TIP: Weekly NCCC sprints every Thursday are perfect for honing SO2R skills!
Advanced SO2R Command Codes String examples
Action Taken
Send CQ on R2; Focus stays on R1
Send MyCall on R2; Focus stays
on R1
Repeat Exchange on R2
Swap; set Op Mode and send
MyCall
Swap; set Op Mode and send CQ
Swap Radios with no Op Mode
Change
Exchange Radios; transfer all
settings
Command Codes string
<01>CQ \
<01><03><SAPMODE><04>\
<01>5NN #
<03>SWAPRADIOS<04><03>SAPMODE<04>\
<03>SWAPRADIOS<04><03>CQMODE<04>CQ
<03>SWAPRADIOS<04>
<03>EXCHANGE RADIOS<04>
53
Action Taken
Command Codes string
Send CQ on R2; Focus stays on R1 <01>CQ \
Dueling CQs
<03>SWAPRADIOS<04>CQ TEST \
4.3 Using the DXCluster
The DX Cluster window is opened through the menu Windows> DX Cluster.
The composition window consists of:
The drop-down list with the addresses of DX Cluster
Command Line
Toolbar
A window that displays the information sent and received from the server
Button sending commands
54
Buttons in the toolbar:
Connect
Connect to the server at the address given in the address bar.
Disconnect Disable the already established connection.
"Freeze" window that displays information from the cluster. In this case, when a new spot, a
Freeze
window with the spots will not scroll down, something would display the last spot.
Clear
Clear the window with the spots.
Clicking this button pops up a menu of commands that can be sent to the server. The default list
contains three commands: HELP, SHOW / USERS, SHOW / WWV and SHOW / FILTER. If desired,
Commands the list can be added to their team.To do this in the program directory, you must create and
register CLUSTER_COMMANDS.TXT the commands. Each team must start a new line. This file
may contain no more than 100 teams.
Send a command to the server sh / fdx 50 that displays the last 50 spots. Depending on the
50
cluster can be derived at least 50 spots.
To connect to the cluster, select the server (cluster node) from the drop-down list (the
default server sk3w.se) and click Connect. This will connect you to the selected
server. To start working with a cluster - to receive information and send your need to
log in, ie authenticate. Login is needed to tell the server your call. Simply enter your
callsign into the command line 2 (by default the program will automatically default to
the
value
of
the
command
there <CTRL+J>
MY
CALL),
and
click
the Sendbutton (5). When this authentication process is complete, and you will receive
information from the cluster.
Note:To automatically login, set the <CTRL-J> CONNECTION COMMAND Window Configuration
command to your call. After that, the authentication will happen automatically.
Information on the air any station (spot) will be displayed in a window around the following
form:
DX de HA2RX: 14025.0 9G5TT Vy strong.
0841Z JN87
This line suggests that at this point at a frequency of 14025.0 kHz radio works 9G5TT. This
was reported by a radio amateur with callsign in HA2RX 0841 UTC. Also, as a comment, he
indicated that 9G5TT heard very loudly.
To access Reverse Beacon Network, <CTRL+J> TELNET SERVER should be set to
telnet.reversebeacon.net:7000 (or you can just select it off the dropdown list (1) above)
55
4.4 Multi Operation
Reference NETWORKING
56
5.5 Network Operation
TR4W network operation is based on the use of the built-in program
TR4WSERVER . This program, uses a TCP connection to relay all incoming
messages on the network to TR4W clients. The program TR4WSERVER.EXE is
included with TR4W, and located in a directory TR4W \ SERVER . The
maximum number of concurrent computers on the network is 26.
There may be only one server on the network. The server can run on a single
computer as LOCALHOST - on a computer that is also running the program
TR4W . Identifying computers in a network is determined by the CTRL-J
COMPUTER ID parameter. This parameter must be a unique ID for each TR4W
PC. For example, “A” or “B”.
First of all, one of the computers must be running TR4WSERVER.EXE. After
starting, TR4WSERVER immediately goes into the server, waiting for client
connections. Server settings reside in TR4WSERVER.INI.
To configure for Networking use CTRL-J and specify the following:
•
•
•
•
COMPUTER ID
COMPUTER NAME
SERVER ADDRESS (IP address of computer, use IPCONFIG from CMD Prompt to
determine)
SERVER PORT
After opening the windows Network program TR4W automatically connects to
the server TR4WSERVER .
57
When attempting to connect, as well as any breakage of the connection the
program will automatically try to connect to the server every 5 seconds. When
you close the Network already existing connections will be terminated. All
information displayed in the window Network, comes from a server over a TCP
connection, even if the server is started locally.
Each computer must now run WINDOWS/NETWORK to successfully connect.
In case of unsuccessful attempts to connect:
•
•
•
•
•
Check the command parameters SERVER ADDRESS and SERVER PORT and ensure
the server port is not blocked by a firewall.
Make sure that the COMPUTER ID is a unique value on each PC.
Ensure that the program TR4WSERVER is running.
Make sure you can ping the server address. You can use the menu item Tools > Ping
[SERVER ADDRESS] . When you click this item will ping the address specified in the
command SERVER ADDRESS .
Make sure that the port is not blocked by firewall.
The Network connection window provides the following information about each
station in the network:
•
•
•
•
•
•
•
•
•
identifier ( ID COMPUTER )
network name TR4W ( COMPUTER NAME )
current range and type of modulation
current frequency
mode - CW or SSB
status of the work - CQ or S&P
state PTT - ON or OFF
number of connections
current call sign in the window CALLSIGN WINDOW
If you change one of these parameters, in any station, this information will be
58
passed immediately to all computers on the network.
When you connect your fastest computer the cluster, spots will be relayed to all
computers on the network.
In operation, the program TR4WSERVER.EXE besides relaying information,
saves to file SERVERLOG.TRW in the \SERVER directory under \TR4W .
RECOVERY
When you first bring the network up you should find everything is synch’d.
But assume a PC failure.
You may always select NET pulldown item “Compare and synchronize logs”.
If the client and server logs do not match, the following dialog will pop up:
You may either clear all logs to begin over, or Exit. Exit will produce the following
59
sync
Dialog:
Select “GET SERVER LOG”:
You will now see the Server log and can copy it to your local log via “CREATE AND
USE NEW LOG”
Create and use new log does the following:
The current log file will be renamed to LOGBACKUP_#.TRW (where # is
consecutive nr)
•
The current RESTART file will be renamed to the name of RESTART_#_BACKUP.RST
60
•
•
File SERVERLOG.TMP will be renamed to the current log file (TRW)
Rescore will recalculate score of the new log file
You should now be synchronized again.
TIME SYNCHRONIZATION
Net pulldown SYNCHRONIZE TIME ON ALL COMPUTERS or hotkey <CTRLALT-T> will send the UTC time on the invoking PC to all PC’s on the network.
NUMBER LOCKOUT
You may lock serial numbers by adding the following section to the PC’s
TR4WSERVER.INI file which must reside in the windows directory.
[tr4wserver]
SERIAL NUMBER LOCKOUT = 1
Note:
If SERIAL NUMBER LOCKOUT=1 in tr4wserver.exe settings then locked numbers will be
displayed with the "L" suffix in "QSO NUMBER" window. You should exploit serial number
lockout when operating a multi station and not using separate serial numbers by band.
It is critical you test the multi (TR4WServer) setup carefully.
Try removing each PC from the network and make qsos on the other PCs while
removed. Power down the PC holding TR4WSERVER, make qsos on the other
PCs, and test how you can resync to recover your logs.
61
4.5 RTTY Operation
1. Download and install special version of TR4W (with _mmtty suffix) from
http://www.tr4w.com/download/mmtty/
2. Download and install MMTTY in the TR4W folder. Install add-ons if
necessary.
Start the MMTTY program and set the correct settings for the type of
operation that you plan; AFSK or FSK. You will select the Serial Port that you
want to use for FSK control and also to provide the PTT line control. The
audio from the radio should go to the sound card line in jack. Test the MMTTY
settings prior to starting TR4W to be sure that you can copy the signals you
are able to hear on your radio. You may need to read the MMTTY manual to
get everything adjusted. You should also test the transmission settings of
MMTTY.
The best way to assure that MMTTY is operating correctly is to set it up and
62
make on the air tests and contacts. Once it is functional you are ready to
proceed to starting the TR4W MMTTY version.
3. Run TR4W, select or create new contest (e.g CQ-WW-RTTY). There are very
few RTTY contests that have been established as supported contests so you
can expect that you may need to modify an existing RTTY contest to become
the pattern for the RTTY contest you wish to participate in. See Section 4.13
Creating a non-supported Contest.
4. In <Ctrl+J> window set value of MMTTY ENGINE - full filename of mmtty.exe
(with
path).
MMTTY ENGINE = path [MMTTY.EXE in TR4W]
4. Open "Windows" -> "MMTTY" in TR4W.
The special MMTTY version of TR4W is compiled with the following settings:
LEADING ZERO CHARACTER = 0
SHORT 0
=0
SHORT 1
=1
SHORT 9
=9
DIGITAL MODE ENABLE = TRUE
The MMTTY window shows the text that is copied by the program . Callsigns
appear in BOLD FACE. A callsign can be captured from the MMTTY window
and loaded into the CALL window by using a special Message Command,
MM_GRABLASTCALL.
TR4W loads this command into function key F11 for bot CQ and S&P modes.
Use F11 function key to grab the latest callsign from MMTTY window:
EX CW MEMORY F11
CQ CW MEMORY F11
= <03>MM_GRABLASTCALL<04>
= <03>MM_GRABLASTCALL<04>
5. To add Carriage Return and Line Feed in a message use <0D><0A>.
For example:
CQ CW MEMORY F1=<0D><0A>CQ \ \<0D><0A>
This will force a Line Feed and a Carriage Return before and after the CQ
MyCall MyCall is sent.
6. New function key message commands for this version are:
<03>MM_GRABLASTCALL<04>
<03>MM_CLEAR_THE_TX_BUFFER<04>
63
<03>MM_SWITCH_TO_TX<04>
<03>MM_SWITCH_TO_RX_IMMEDIATELY<04>
<03>MM_SWITCH_TO_RX_AFTER_THE_TRANSMISSION_IS_COMPLETED
<04>
64
4.6 Recording and Using DVP Contest Messages audio
TR4W has a built in DVP feature. This feature uses prerecorded *.WAV files to
generate audio which can be used as an alternative to microphone input to the radio.
The DVP audio output is available from the Line Out jack of the audio card. The
routing of the audio from the Line Out jack to the radio is the responsibility of the
user. A circuit that will accept both microphone input and computer generated audio
and route them to the microphone input of the radio is required. Users build their
own circuit or buy a commercial unit that will do this. It is crucial that these audio
circuits not be affected by RF and not introduce hum or distortion to the audio going
into the radio.
The audio files that will be ‘played’ by TR4W are selected by Configuration
Statements located in the *.CFG file. Some of these statements are invoked by
Function Keys, others are declared in the Configuration Statements and invoked as
a part of the contest logging sequence of TR4W. The contest logging sequence
audio files have default names which can be changed if desired.
The audio files are stored in the DVP folder which is located in the TR4W folder.
This is discussed in more detail later in this section.
When using the DVP on a computer running Vista TR4W program should be run
in Administrator mode.
4.6.1 Audio file format
The audio files must be in WAVE (PCM) format and have the extension *.WAV.
The main parameters that determine the quality of the sound file are the
sampling frequency (number of samples per second) and the sample size
(number of bits used to encode one sample). For high-quality playback of the file
on the air, these two parameters should be set to at least 22,000 Hz and 16 bits,
respectively. The length of audio files should not exceed 30 seconds.
4.6.2 The location of audio files
The default folder in which to place the sound files is the folder named DVP
which is located in the TR4W folder. The DVP folder is created automatically
when you install the program. The program looks in this folder for the files you
specify to be played. If desired the folder looked for by the program can be
changed by modifying the Configuration Statement
DVP PATH =
For example, to work in an international competition, you can use the default
65
folder, DVP, in which the files will reside with messages in English. When
operating in Russian contests you can create a folder named DVPRUS in the
TR4W directory. Then, to tell the program where to find the Russian contest files
you use <Ctrl+J> to open the Configuration Statement window. Then locate the
DVP PATH = and modify it to read
DVP PATH = DVPRUS.
The recorded Russian audio files must be placed in the DVPRUS folder and that
folder must be in the TR4W folder.
If you have a multiple operator station operating in a contest you can have each
operator create their own audio files and then change the DVP Path = statement
when each different person is operating. Each person’s audio files should be
stored in a folder with their name inside the TR4W folder
4.6.3
Using the DVP
To enable DVP playing of messages you must set the Configuration Statement
DVP ENABLE = to TRUE. In SSB Mode when that Configuration Statement is
DVP ENABLE = FALSE
the DVP Status window displays ‘DVP DIS’ showing that the DVP function is
disabled.
When DVP ENABLE = TRUE and no DVP Message is being sent the DVP
Status window displays DVP OFF. When DVP ENABLE = TRUE and a
message is being sent the window displays DVP ON.
The default audio files corresponding to each Function Key are shown in the
table below.
CQ Mode
F1 CQF1.WAV
F2 CQF2.WAV
F3 CQF3.WAV
F4 CQF4.WAV
F5 CQF5.WAV
F6 CQF6.WAV
F7 CQF7.WAV
F8 CQF8.WAV
F9 CQF9.WAV
F10 CQF10.WAV
F11 CQF11.WAV
F12 CQF12.WAV
S & P Mode
MYCALL.WAV
S & P SSB XCHANGE
EXF3.WAV
EXF4.WAV
EXF5.WAV
EXF6.WAV
EXF7.WAV
EXF8.WAV
EXF9.WAV
EXF10.WAV
EXF11.WAV
EXF12.WAV
66
Contest Logging Message
/
SSB S & P Exchange
QSL SSB MESSAGE
CQ SSB EXCHANGE
Audio file name
MyCall.WAV
SAPEXCHNG
QSL.WAV
CQEXCHNG.WAV
The default
audio files
for the
Contest Logging messages are
In CQ Mode pressing the F4 key will play the file CQF4.WAV. In S & P Mode
pressing the F4 key will play the file EXF4.WAV.
You can change the message audio file associated with a specific function key
the way you change the message text string associated with a specific function
key when operating in CW. Type <Alt+P> to open the Program Messages
window. Select C, E or O to access the function key group you wish to change.
Once you are in the desired group select the function key and change the name
in the function window to the desired audio file name. Remember, all audio files
must have a .WAV extension as a part of the filename to be recognized as a
DVP file.
You can set up the function key audio messages so that more than one file is
played when the key is pressed. This allows you to record message fragments
and then concatenate them into a single message. To do this you separate the
names of each of the audio files by one space. For example if you have audio
files named CQ.WAV, CONTEST.WAV and MYCALL.WAV which have only
one word in each file you can string them together to get “CQ CONTEST CQ
CONTEST K0TO CONTEST” for use as a CQ.
When you enter them into the CQ Mode F1 function key window a statement will
be stored in the *.CFG file that looks like thisCQ SSB MEMORY F1 = CQ.WAV CONTEST.WAV CQ.WAV CONTEST.WAV
MYCALL.WAV CONTEST.WAV
In this case, when you press F1 the audio files CQ.WAV, CONTEST.WAV,
CQ.WAV, CONTEST.WAV. MYCALL.WAV and CONTEST.WAV will be played
one after the other with no time separation between them. For this particular set
of files that would be confusing to hear. It is desirable to add some amount of
time between each of the words. To do that we insert an “*” between the
filenames. Each “*” is a delay of 20 milliseconds. If our entry for function key F1
67
is
CQ.WAV ** CONTEST.WAV ** CQ.WAV ** CONTEST.WAV **
MYCALL.WAV ** CONTEST.WAV then the Configuration Statement would be
created as :
CQ SSB MEMORY F1 = CQ.WAV ** CONTEST.WAV ** CQ.WAV **
CONTEST.WAV ** MYCALL.WAV ** CONTEST.WAV
Which will be understood much easier when played.
This ability to concantenate files allows us to record small parts of messages
one at a time and then merge them into the desired message. It also allows one
to do some other things that take advantage of the DVP program’s ability to
string together audio files into a desired audio message. We will talk about this a
little later.
4.6.4 Record and edit sound files
Creating, playing and editing WAVE (PCM) files for your computer requires a
program that performs these actions. It must be capable accepting the filename
as an input and then playing that file using a sound card. There are many such
programs, but a recommended one is the free program, Audacity. It can be
downloaded from http://audacity.sourceforge.net/ .
Once you have downloaded and installed Audacity or a similar program you
must tell TR4W its name and where it is located. To do this type <Ctrl+J> to
enter the Configuration Statements window and set the statement DVP
RECORDER. This value must specify the drive, the folder and the name of the
program that you have installed on your computer to handle DVP recording,
editing and playback. For example, the likely placement of the Audacity program
is on the C: drive and in the Program Files folder and in the sub folder Audacity.
You would make the following entry for that case:
DVP RECORDER = C: \ Program Files \ Audacity \ audacity.exe
Save the Configuration Statement change and exit from the Configuration
Commands window.
Now open the window for editing function key messages by typing <Alt-P>> <C
or E or O>>. Then click on the function key you want to create, play or edit. If the
filename.WAV already exists and is stored in the DVP folder, press <Alt+E>
[EDIT] and the program specified in command DVP RECORDER will be opened
and the filename.WAV file will be loaded into the Audacity program and the
program will be ready to run. This allows you to you to listen, write or edit the file
specified by the function key. If this filename.WAV does not already exist,
pressing <Alt+E> will produce the statement " This file does not exist. Create an
empty file for Editing? ". If you type ‘yes’ an empty file with a duration of zero
seconds will be created in the directory specified by the DVP Path Configuration
68
Statement
DVP PATH =
(the default value is DVP)
You can now record, edit and display this file using the program you specified.
4.6.5
Automatic generation of DVP audio messages.
During a contest the program itself can generate a message from previously
recorded words. You can have TR4W use your logging entries to generate the
message for the calling station. To do this, it must generate and play a callsign
and exchange for that station. The callsign sent will be the one you enter into the
CALL window. If you have a serial number in the exchange it will be generated
from the logged serial number. The balance of the exchange will need to be prerecorded. To enable automatic generation of audio messages you set the
Configuration Command
USE RECORDED SIGNS = TRUE
Then you create 37 audio message files, each of which has one letter of the
alphabet or one digit from 0 to 9 pre-recorded. Generally the letters should be
pronounced phonetically to help the listener.
For example, the A. WAV file might be ‘Alpha’ (letter A), the B. WAV file would
be ‘Bravo’ (letter B), etc. Similarly, 1.WAV file would be the digit ‘One’., etc. For
the slash in a callsign create a file named _.WAV.
These files are stored in the folder LETTERSANDNUMBERS, which is a sub
folder of the folder specified by the command
DVP PATH = (default is DVP ).
In addition full callsigns and numbers can be played if the full call sign and
number was previously recorded and stored with filenames which correspond to
the callsigns and numbers stored in them
For example files with the call sign must have a name filename.WAV such as
UA4WLI.WAV. Files with serial numbers must have a filename.WAV such that
there will be a 1.WAV, 2.WAV .. 11.WAV, 12.WAV etc.
Tip: Remember you can concatenate the files so you could have 98.WAV be
formed from concatenating 9.WAV with 8.WAV. It still will take a long time to
record all the files if you expect to work over 1000 Q’s in a contest
The files with the call sign should be placed in the folder FULLCALLSIGNS .
69
Files
with
serial
numbers
should
be
placed
in
the
folder
FULLSERIALNUMBERS. As was the case with the LETTERSANDNUMBERS
folder, these folders should be located in the directory specified in the
Configuration Statement
DVP PATH = (default DVP ).
Below is a sample of the Configuration Statements needed to produce
automatically generated exchanges.
The Configuration Statements must be located in the CONTESTNAME.CFG
file.
CONTEST = CQ-WW-SSB
USE RECORDED SIGNS = TRUE
CQ SSB MEMORY F1 = CQF1.WAV
QSL SSB MESSAGE = QSL.WAV
CQ SSB EXCHANGE = CQEXCHNG.WAV
CQEXCHNG.WAV «Five Nine One Six»
QSL.WAV «Thanks United Alpha Four Wiskey Lima Italy Contest»
CQF1.WAV «United Alpha Four Wiskey Lima Italy Contest»
Note that except for the words “Thanks” and “Contest” the last three statements
are composed of elements that were recorded previously are then stored in the
LETTERSANDNUMBERS folder. The words are separated only by spaces,
there are no “*” delays built into the message which will cause it to sound natural
if the recorded files have been recorded to sound continuous and have no pre or
post audio silence. Getting these files to produce natural phonetics such as you
might generate in speaking the calls requires a lot of practice with the recording
and much editing.
4.6.6
The process of working on the air
operation
Send CQ by pressing Function Key F1
Audio sent
CQF1.WAV «United Alpha Four Whiskey
Lima Italy Contest»
Types YU1QQ in Call & presses ENTER
Y.WAV U.WAV 1.WAV Q.WAV Q.WAV
«Yankee Uniform One Quebec Quebec»
CQEXCHANGE.WAV «QSL, Five Nine
One Five»
The exchange is sent after the call above
YU1QQ provides his exchange
When his exchange is entered press
Enter to log the QSO
QSL.WAV «Thanks United Alpha Four
Whiskey Lima Italy Contest»
70
4.7 VHF/UHF Several features of TR-LOG have been tailored for the VHF/UHF contest operator. TR-LOG
allows you to work rovers as they change grid squares. Rover stations are logged with the
suffix /R added to their call. When you work a rover for the second time on a given
band/mode, you will be shown a list of grid squares for which you already have QSOs. If the
grid square you enter into the exchange field is different, you will receive full QSO points for
the QSO. If it is a duplicate grid, you will receive zero QSO points for the contact.
When working the station in a new grid square, you can simply type the new information
over the initial exchange entry that TR-LOG automatically enters from the earlier QSO.
When operating on VHF/UHF, TR4W adds FM as a supported mode. This allows you to
separate FM QSOs from SSB ones. FM QSOs are treated just like SSB QSOs for dupe and
multiplier checking. Use the <Alt+M> hot key command to switch to/from FM.
You can disable the HF bands by setting the Configuration Statement
HF BAND ENABLE = FALSE.
This is the default for VHF/UHF contests. TR-LOG allows operation on all VHF/UHF
bands, including light.
4.8 Farnsworth CW
TR4W allows you to send CW with Farnsworth spacing when sending messages or sending
the contents of a file using the SENDCW command.
Farnsworth CW adds additional space between characters in order to achieve slower CW
speeds, while using a constant speed for the characters themselves (typically 18 WPM). This
is useful for training purposes and in some situations on the air.
The Configuration Statement FARNSWORTH ENABLE controls whether or not Farnsworth
spacing is used. The Configuration Statement FARNSWORTH SPEED controls the code
speed at which the Farnsworth feature is enabled. As you decrease your code speed below
this rate, you will find more and more space added between CW characters. The characters
will be sent at the displayed code speed, so your
actual code speed will be less than that displayed. The default value for FARNSWORTH
SPEED is 25 WPM. If you want the Farnsworth effect to be more pronounced, increase this
value.
You can dynamically control both of these parameters during the process of sending CW
from a memory or file by using the Configuration Statements listed in the table below
71
Command Ctrl + [2 Ctrl + [3 Action
Toggle FARNSWORTH ENABLE value
Set Farnsworth speed to 25 WPM
Ctrl + [4 Set Farnsworth speed to 35 WPM
Ctrl + [5 Set Farnsworth speed to 45 WPM
Ctrl + [6 Set Farnsworth speed to 55 WPM
Ctrl + [7 Set Farnsworth speed to 75 WPM
Ctrl + [8 Set Farnsworth speed to 95 WPM
These commands can be entered when editing a CW message with the
<Alt+P> hot key command. by pressing ctrl-P then ctrl-[ (or Alt-027 on the keypad),
and then pressing the integer shown (2 through 8).
For example, if you wanted to send code characters at 18 WPM, you would set the code
speed to 18 WPM, then adjust the Farnsworth speed to result in the desired code speed. The
higher the Farnsworth speed, the slower your CW speed will be.
These commands may also be embedded in a text file that is being sent
with the TR SENDCW command
**** NOTE ****
The ctrl-[ character is the “escape” character, its ASCII code value is 27 [ this is 1B in
hexadecimal]. It may not be easy to produce this character on some non-English
keyboards. On all keyboards, however, you should be able to produce the correct
character by pressing the sequence “027” with the keypad keys while keeping the Alt
key pressed.
4.9 Recording Contests
TR4W can record the contest activity using audio input to the sound card from the radio.
This recording is done using a compressed audio format, MP3, and the files are saved with
the extent .mp3.
The recording function is based on the use of the .dll library routine ‘lame_enc.dll’. This
library should be located in the TR4W folder or in the Windows \ System32 folder. This .dll
Library can be downloaded from http://tr4w.com/otherfiles. Save the file in the TR4W
directory.
72
You must provide the interface between the radio and the sound card. There are some
commercial units that are available and you can use the UU2JJ interface shown in the
Appendix references if you wish to build your own. The basic job of the interface is to
eliminate ground loops that would cause hum and to match the impedances of audio output
from the radio to the impedance of the audio input to the sound card in the computer. You
may also wish to adjust the audio level between the output and input in the interface circuit.
In special [fortunate] cases, you may be able to connect the audio output of the transceiver
directly to the input of your sound card. But in general you should anticipate that you will
want to adjust the signal levels and impedances using transformers and potentiometers to
avoid over driving or under driving the sound card audio input and reduce hum.
To start recording use the Main Window menu WINDOWS and select MP3 Recorder or
press the hot key combination <Shift+Ctrl+0>. That will bring up the MP3 Recorder window
This window shows the following elements:
Enable Button - enables / disables the MP3 recording mode.
Window Elapsed Time - displays the duration of the current MP3 audio file.
Window Level - shows the relative level of the input signal.
There are several Configuration Statements that determine the operation of the DVP
recorder.
ENABLE MP3 RECORDER = (default is FALSE)
MP3 RECORDER BITRATE = (default = 8)
RECORDER MP3 SAMPLE RATE = (default=8000)
MP3 PATH = path to folder which will store recorded MP3 files
MP3 RECORDER DURATION = (EACH QSO, EACH HOUR, NON-STOP)
In general the bitrate and sample rates can be left at the default values.
The method of starting the MP3 recording is determined by the Configuration Statement
ENABLE MP3 RECORDER = (default is FALSE)
If the Value is TRUE, recording will start immediately after you open the MP3 Recorder
window. When the Value is FALSE you must click the Enable Button to start the recording
MP3 PATH = specifies the folder in which the MP3 files will be stored.
If you wish, you can set the path to a folder for MP3, other than the default folder.
73
MP3 RECORDER BITRATE = (default = 8)
RECORDER MP3 SAMPLE RATE = (default=8000).
The above Configuration Statement determines the fidelity of the recording. The recording
bit rate should be at least 8 to record CW signals and at least 32 to record SSB signals. The
difference in bit rates means that SSB recordings will be 4 times as large as CW signal
recordings for the same period of recording.
The length of a recording snippet is governed by a Command Statement. Only one of the
options shown can be selected at one time but you can change the option during a contest.
MP3 RECORDER DURATION = (EACH QSO, EACH HOUR, NON-STOP)
EACH QSO writes a new file for each logged contact. The file is named using the format
“YYYYMMDD_HHMMSS_BANDm_CALLSIGN. MP3”
where:
YYYYMMDD - date of the QSO,
HHMMSS – logged time of the QSO
BANDm – band in meters,
callsign – station worked.
EACH HOUR writes a new file for each operated hour. A new file will be created each hour
. The file is named using the format TEMP_HH_DD. MP3 where
HH - hour recording starts,
DD - day of the month.
If you operate a couple minutes in the hour and do not exit the program when you take a
break, the file will continue recording and be filled with silence until you start operating
again. If you exit the program you will need to restart the recording process when you restart
the program.
NON-STOP writes one file for the entire contest. If you take a break and exit the program
the recording file is closed and when you return you will need to restart the recording
process. A new file name will be created for this new time segment. The file is named using
the format TEMP_HH_DD. MP3 where
HH - hour recording starts,
DD - day of the month.
You can listen to the recorded files using any program that can play .mp3 files.
AUDACITY.EXE can play such files so it can be used to review the recorded contest. You
may wish to convert the files to other formats such as .wav file which can be sent to people
74
as email attachments and can generally be read without a special program. Such files will be
larger than the compressed mp3 files however.
4.10 Foot Switch
A foot switch can be interfaced to your computer and used to help make TR4W more
efficient. The foot switch connects to a parallel port as shown in Appendix B. Some
computers might require a pull-up resistor similar to the one used for the paddle input. The
foot switch needs to be a normally open switch that closes when pressed. The program debounces the switch, so you should not see action occur when releasing the switch.
The Configuration Statement FOOT SWITCH MODE will determine what will happen
when you press the foot switch. The supported modes are listed below. You can change the
FOOT SWITCH MODE value by using <Ctrl+J> to open the Configuration Statements
window then selecting that statement and assigning one of values shown in the table
following. Only one Value can be selected at a time.
75
Foot Switch Mode Values CONTROLENTER Acts as if the ctrl-‐[ENTER] key was pressed, advancing the QSO one step without sending any CW. When you try to send CW the PTT signal will be CW GRANT asserted, but no CW will be transmitted until you depress the footswitch. Disables all actions associated with the foot switch. DISABLED Executes the alt-‐D command when the foot switch is DUPECHECK pressed. Acts just as if you had pressed the F1 key. F1 Returns you to the last frequency on which you LAST CQ FREQ called CQ. Advances you to the frequency of the next (i.e., NEXTBANDMAP higher frequency) entry in the band map for the current band and mode and which you have not yet worked. Also puts you into S&P Mode. Advances you to the frequency of the next (i.e., NEXTDISPLAYEDBANDMAP higher frequency) displayed entry in the band map that you have not yet worked, regardless of the band and mode of that entry. Also puts you into S&P Mode. Advances you to the frequency of the next (i.e., NEXTMULTBANDMAP higher frequency) displayed entry that is a needed multiplier in the band map for the current band and mode. Also puts you into S&P Mode. NEXTMULTDISPLAYEDBANDMAP Advances you to the frequency of the next (i.e., higher frequency) displayed entry that is a needed multiplier in the band map, regardless of the band and mode of that entry. Also puts you into S&P Mode. The normal mode makes the foot switch behave just NORMAL as if it was connected to the PTT of the active transmitter. This allows you to use TR4W to route your foot switch to the proper radio. In this mode, the foot switch is used to advance the QSO NORMAL normal QSO process one step. This means that hitting the footswitch will behave just as if you pressed the [ENTER] key. Same as QSO NORMAL, except when finishing a CQ QSO QUICK Mode QSO, when the QUICK QSL MESSAGE will be sent in place of the QSL MESSAGE. Acts just as if you pressed the alt-‐R key. SWAP RADIOS Acts just as if the START SENDING NOW KEY was START SENDING pressed. This will start sending the characters in the Call Window, and allows you to continue entering characters until you press [ENTER]. 76
4.11 Rotator Control
Rotator control is useful for a remote site operation. To exploit this feature you need a
separate port and a rotator controller.
<CTRL+J> ROTATOR PORT must be set to # 1-6 signifying the serial port used.
<CTRL+J> ROTATOR TYPE may be set to supported types of DCU1, ORION or
YAESU.
Upon entering a call, TR4W provides the azimuth setting for the station in the BEAM
HEADING window.
Replace the call with the three digit beam heading and press <CTRL+P> to send the new
heading to the rotator controller over the ROTATOR PORT.
77
4.12 Country List Changes
Country file CTY.DAT resides in the main \TR4W directory.
Proper identification of a country is dependent on the contents of this file.
Typically it is updated when you install a new release. However it can be
manually updated at any time:
•
•
•
•
Navigate to http://www.country-files.com/cty/index.htm
Right click on TR4W
Choose “SAVE LINK AS”
Save the CTY.DAT file to your TR4W directory
78
4.13 Creating a non-supported Contest Configuration
TR4W presently supports 140 contests but can be configured for additional contests.
Before attempting to customize, navigate to http://tr4w.com/configurationfiles/index.html
to check if there is already a configuration file built for you (move this file into your
specific contest directory.
4.13.1 Selecting Contest Parameters
The CONTEST statement in <contest name>.CFG tells TR4W what parameters to use. Keep
it near the top of your <contest name>.CFG file. When customizing you may want to use
CONTEST=GENERAL QSO and then set CONTEST NAME = <my contest name>.
4.13.1.1 Multiplier Types
Specify whether multipliers are by band: MULT BY BAND=TRUE or FALSE whether DX
multipliers are used in the contest: DX MULTIPLIER= where valid parameters are:
(NONE, ARRL DXCC WITH NO USA OR CANADA, ARRL DXCC WITH NO ARRL SECTIONS, ARRL
DXCC WITH NO USA CANADA KH6 OR KL7, ARRL DXCC WITH NO I OR IS0, ARRL DXCC WITH NO
JT, ARRL DXCC, CQ DXCC, CQ DXCC WITH NO USA OR CANADA, CQ DXCC WITH NO HB9, CQ
DXCC WITH NO OK, CQ EUROPEAN COUNTRIES, CQ UBA EUROPEAN COUNTRIES, CQ NON
EUROPEAN COUNTRIES, NORTH AMERICAN ARRL DXCC WITH NO USA CANADA OR KL7, NON
SOUTH AMERICAN COUNTRIES, PACC COUNTRIES AND PREFIXES, CQ NON EUROPEAN
COUNTRIES AND WAE, BLACK SEA COUNTRIES)
Default value: NONE
4.13.1.2 QSO Point Methods
Specifies how many points per qso. For example, if each qso is one point, then QSO POINT
METHOD = ONE POINT PER QSO.
4.13.1.3 Exchanges
Exchange format is controlled via <CTRL-J>EXCHANGE RECEIVED valid data is:
CHECK AND CHAPTER OR QTH EXCHANGE
CLASS DOMESTIC OR DX QTH (ARRL-FD)
KIDS DAY EXCHANGE (KIDS DAY)
NAME AND POSSIBLE GRID SQUARE (GRID LOC)
NAME DOMESTIC OR DX QTH (MINNESOTA QSO PARTY, NAQP-CW, NAQP-SSB,
COLORADO QSO PARTY)
NAME QTH AND POSSIBLE TEN TEN NUMBER (TEN TEN)
79
NONE
NZ FIELD DAY (NZ FIELD DAY)
QSO NUMBER AND AGE (SRR-JR)
QSO NUMBER AND COORDINATES SUM (AS-CHAMP-CW, AS-CHAMP-SSB)
QSO NUMBER AND GEO COORDINATES (RAEM)
QSO NUMBER AND GRID (RF-CUP-CW, RF-CUP-SSB)
QSO NUMBER AND NAME (EU SPRINT)
QSO NUMBER AND POSSIBLE DOMESTIC QTH
QSO NUMBER AND PREVIOUS QSO NUMBER (RADIO-YOC)
QSO NUMBER AND ZONE (RF-CHAMP-CW, RF-CHAMP-SSB, R4N-CHAMP, R9WUW9WK-MEMORIAL)
QSO NUMBER DOMESTIC OR DX QTH (CALIFORNIA QSO PARTY)
QSO NUMBER DOMESTIC QTH (URAL-CUP, MICHIGAN QSO PARTY, R4W-CHAMP,
UKRAINE CHAMPIONSHIP)
QSO NUMBER NAME CHAPTER AND QTH (QCWA, QCWA GOLDEN)
QSO NUMBER NAME DOMESTIC OR DX QTH (INTERNET SPRINT, NA-SPRINT-CW, NASPRINT-SSB, NCCC-SPRINT, LQP)
QSO NUMBER PRECEDENCE CHECK SECTION (ARRL-SS-CW, ARRL-SS-SSB)
RST AGE AND POSSIBLE SK (RADIO-MEMORY)
RST AGE (ALL-ASIAN-DX-CW, ALL-ASIAN-DX-SSB, RADIO-ONY)
RST ALL JA PREFECTURE AND PRECEDENCE (ALL JA)
RST AND CONTINENT (SOUTH AMERICAN WW)
RST AND GRID (WWL)
RST AND OR GRID (STEW-PERRY)
RST AND POSTAL CODE (ROPOCO)
RST DOMESTIC OR DX QTH (7QP, ARRL-160, FCG-FQP, NEQP, SALMON RUN, TEXAS
QSO PARTY)
RST DOMESTIC QTH OR QSO NUMBER (ARRL-10, CIS, HA DX, RDAC, RSGB 1.8,
RDXC, SP DX, UN DX, KING-OF-SPAIN-CW, KING-OF-SPAIN-SSB)
RST DOMESTIC QTH (ARRL-VHF-QSO, ARRL-VHF-SS, CQ VHF, KCJ, TOEC, WISCONSIN
QSO PARTY, NEW YORK QSO PARTY, TENNESSEE QSO PARTY)
RST LONG JA PREFECTURE (JA LONG PREFECT)
RST NAME QTH (GENERAL QSO)
RST POSSIBLE DOMESTIC QTH AND POWER (ARCI)
RST POWER (ARRL-DX-CW, ARRL-DX-SSB)
RST PREFECTURE
RST QSO NUMBER AND DOMESTIC QTH (NRAU-BALTIC-CW, NRAU-BALTIC-SSB,
OHIO QSO PARTY, RADIO-160)
RST QSO NUMBER AND GRID SQUARE (EUROPEAN VHF, RADIO-VHF-FD)
RST QSO NUMBER AND POSSIBLE DOMESTIC QTH (HELVETIA, RSGB-IOTA, UBACW, UBA-SSB, TAC)
RST QSO NUMBER AND RANDOM CHARACTERS (XMAS)
RST QSO NUMBER OR DOMESTIC QTH (ARI, ALRS-UA1DZ-CUP, OK-OM DX, PACC,
RAC CANADA WINTER, UKRAINIAN, DARC-XMAS, WAG, YO DX, ARKTIKA-SPRING)
RST QSO NUMBER (AP-SPRINT, BALTIC, CQ-M, CQ-WPX-CW, CQ-WPX-SSB, CROATIAN,
MINITEST, OCEANIA-DX-CW, OCEANIA-DX-SSB, REGION 1 FIELD DAY, REGION 1 FIELD
DAY-RCC-CW, REGION 1 FIELD DAY-RCC-SSB, SAC-CW, SAC-SSB, UCG, DARC-WAEDCCW, DARC-WAEDC-SSB)
RST QTH NAME AND FISTS NUMBER OR POWER (FISTS)
RST QTH (COUNTY HUNTER)
RST ZONE AND POSSIBLE DOMESTIC QTH
RST ZONE OR DOMESTIC QTH (CQ-160-CW, CQ-160-SSB, LZ DX)
RST ZONE OR SOCIETY (IARU-HF, OZCHR-TEAMS, OZCHR, WW PMC, WRTC)
RST ZONE (CQ-WW-CW, CQ-WW-SSB, EUROPEAN HFC, GACW-WWSA-CW, GAGARINCUP, JIDX-CW, JIDX-SSB, MONGOLIAN DX, KVP, YUDX)
UNKNOWN (DUMMY CONTEST)
Typically EXCHANGE RECEIVED resides in <contest name>.CFG configuration
file and is set by default for a known contest.
80
4.13.1.4 Initial Exchanges
The INITIAL EXCHANGE (filename INITIAL.EX) controls prefill data loaded into the
EXCHANGE WINDOW of TR4W. NOTE: Unlike TRMASTER POST file input, the
INITIAL.EX file is space delimited -not fixed column.
INITIAL EXCHANGE is not controlled by the CUSTOM INTIAL EXCHANGE STRING
or CUSTOM USER STRING. Rather, it is set by INITIAL EXCHANGE FILENAME
pointing to its location in the contest directory.
What resides in the INITIAL EXCHANGE file dictates what will be prefilled into the
exchange field.
If a given callsign resides in both TRMASTER.DTA and INITIAL.EX, INITIAL.EX
receives precedence over TRMASTER.DTA.
At completion of a contest, selection of EXPORT/INITIAL EXCHANGE LIST will result
in writing a sorted CUSTOM.INITIAL.EX file to the contest directory that includes both any
extant INITIAL.EX file used in the contest PLUS a list of the stations/exchanges from the
just concluded contest.
NOTE: The INITIAL EXCHANGE FILENAME controls what is read in for INITIAL
EXCHANGE. It can be set to, for example, CUSTOM INITIAL.EX
An example of Initial Exchange creation may be found at the end of the TRMASTER
Advanced Usage section.
81
4.14 TRMASTER Database
Basic Usage:
TRMASTER.DTA contains the callsigns of known contest active stations and is presently
maintained by WA1Z. TRMASTER.DTA is NOT shipped with TR4W.as it is not maintained
by any single logging program.
The master file (what TR4W calls TRMASTER) is closely connected to the System Check
Partial function used by practically every logging program. The seasoned operator tends to
observe the SCP window while a call is entered. If the SCP does not show a match, it is
doubly important to check that the “unique” call is valid, since this can lead to a penalty
when the contest sponsor initiates log checking.
To download and install:
1 Navigate to http://www.supercheckpartial.com/
2 Right click on MASTER.DTA
3 Choose “SAVE AS” and save to TR4W directory
2 Ensure the FILENAME is TRMASTER.DTA –NOT MASTER.DTA
Note: a customized TRMASTER.DTA may be stored in the contest directory under \TR4W. This allows
customized TRMASTER.DTA files specific to individual contests.
When you next bring up TR4W, ensure the System Check Partial window is active. It is
selectable from WINDOWS/SCP or toggled via hotkey <SHIFT+CTRL+3>
Now when you enter a callsign the SCP window will show whether there is a know callsign
matching what was entered. The automatic callsign partial check will commence when you
have entered the number of characters specified by <CTRL+J> SCP MINIMUM
LETTERS. For example, with SCP MINIMUM LETTERS = 3, “G3U” is entered. SCP
looks for any match for G3U and finds/displays none. As you enter the next letter of the call (
“F”) the following will be presented, indicating there are two calls matching “G3UF” in
TRMASTER.DTA
82
83
TRMASTER ADVANCED USAGE
TRMASTER.DTA may also be customized. The TRMASTER.DTA d/b may be either placed
in a contest directory and read specific to the contest or in the TR4W directory for global
reference.
Customization permits either display or prefill of a wealth of data by callsign. To customize
TRMASTER.DTA (the TR4W SCP file) you will need to download the TRLOG POST.EXE
program.A copy may be obtained by navigating to http://trlog.com/free.shtml, right clicking
on http://www.trlog.com/post672a.zip and saving to a directory, perhaps \TRLOG.Now you
may extract POST.EXE and POST.OVR
A partial list of what you might want to exploit TR POST to build into TRMASTER.DTA
(by callsign) is : •
•
•
•
•
•
•
•
•
•
•
•
Name max char = 12 Old Call – up to (12) char ARRL Section (5) CQ Zone (2) FOC Number (5) Grid (6) ITU Zone (5) Sweepstakes check (2) QTH (10) Code Speed (2) Ten Ten Number (6) User Defined 1-‐5 (12)
Before actually doing a build it might be worth mentioning that although TRMASTER.DTA
can both display and prefill data into TR4W, in most cases prefill can be more easily
accomplished by exploiting an INITIAL EXCHANGE file. For that reason, emphasis will be
placed on display of data.
Note: prefill is where the EXCHANGE data is actually inserted into the exchange
field of TR4W, whilst DISPLAY refers to insertion of data into the USER INFO
WINDOW or the NAME WINDOW (both being sub-windows of the Main Window of
TR4W).
Also note that POST will not run under Win7 X64. It must be run in Windows 32 bit.
We now start POST.EXE which looks like this:
84
We now will enter “UEFF” which will directly take us to the dialog for adding a file to
TRMASTER.DTA:
This provides a prompt for the file name and whether it is a TR log file. We will respond
with
“myfile.txt” and “n” which produces this screen:
This panel is the “heart” of customizing TRMASTER.DTA.
Notice the column indicator below the first line that POST located in the file. The column
85
indicator is showing the column numbers of the data. We now want to enter the beginning
column for callsigns- in this case it is “1” so we will enter that and press [ENTER].
Post now requests the column number that data we wish to display in TR4W is located in.
The column display shows the NAME begins in column 8 so we will type “8” and press
[ENTER].
Post now asks whether we want to skip any lines. For example a log file might have Cabrillo
header information which you want to skip. In our case we will enter “0” for none.
Post now prompts for the TYPE of data that will be customized into TRMASTER.DTA. We
86
will respond that it is NAME by entering “7”
In a more complex scenario, our file could contain many types of fields we wish to add to
TRMASTER.DTA. This provides us the opportunity to process extra fields.
In this simple case, we respond that we only want to add the names so we respond “n” to the
option of processing more fields. We are next asked about setting overwrite flags, answer “y”
to better understand this setting:
87
This shows that (N)ame is set to FALSE. What this means is if there is an existing entry for
the call being processed, it would be skipped. Without changing this to TRUE, EXISTING
data will not be overwritten. In this case we will change this to TRUE. This states that, as an
example, if AA3B was already in the database as “ALAN” it will be overwritten to “BUD”.
For something like Sweepstakes SECTION it is probably advisable to set (A) to TRUE if you
are using current data. Eg, a stations QTH is somewhat dynamic, could have changed and we
want the latest data written. OTH, if using an older log as input, this may NOT be
appropriate.
As soon as “n” is pressed, the screen changes:
88
We may now press the [ENTER] key to begin processing the file. This will show the new
size of the TRMASTER.DTA file created.
Additionally, TRMASTER.ASC was generated –which gives you an opportunity to explore
the TRMASTER database file in a text processor such as NOTEPAD.
Now, navigate to your TR4W directory and RENAME TRMASTER.DTA to
TRMASTER.DTA.BAK and copy the new TRMASTER.DTA into the \TR4W directory. (If
something went wrong we will still have the original TRMASTER)
Now when we start TR4W (and there is not a TRMASTER.DTA in our specific contest
directory), the TRMASTER.DTA file in \TR4W is read into memory and upon entering a
callsign that was customized into the database we see:
You will note the NAME appears in both the USER INFO and NAME windows
because we had <CTRL+J> USER INFO SHOWN=NAME set. Please also note
that TR4W displays an error message if TRMASTER.DTA cannot be located.
It is worth noting that you could program an FKey to say “HI %” or you could
program your CQ EXCHANGE KEY to do something like “% # B \ 52 ID” and then
set
<CTRL+J> SAY HI RATE CUTOFF to a value to limit greetings. Or (default) just display
the name so you can respond in kind, should the situation warrant.
OK, we will now move to a new scenario. This time we want to process a Sweepstakes log,
reading the CHECK and SECTION into TRMASTER.DTA. Building on the previous
scenario some similar steps will be skipped.
NOTE: TR4W logs are NOT in TR log format
We now start POST back up and again specify “ueff”. We give POST the location of the
contest log and also will assume the log is not a TR log.
89
Since the header information has not been removed, we need to edit the file from another
window with an editor that will show columns (Notepad++ is recommended). Now we can
see calls begin in CC 56 and data begins in CC74:
We also tell POST to skip the first 13 rows of Cabrillo header data.
Ok, that is the hard(er) way. An alternative is to edit the file with, say, Notepad, delete the
first 13 lines and SAVE AS “MY2004.TXT”. Now we can let POST do the work by pointing
it to the new file that exists without the header. Just be sure not to save your file to it’s
existing name if you wish to preserve the Cabrillo headers !
Either way we are now here (note the # entries skipped- 13 indicates this had headers)
90
Here is the easier to understand the log (w/o header):
We have told POST to read column 74 which is the CHECK field.
We choose “3” for Check , and are asked if we want to process more. This time we say
(y)es.
Post now knows to provide the column display again:
We again provide the column for callsign “56” but this time we want to process the
SECTION:
91
So we enter “77” and press [ENTER]. We are again prompted for entries to ignore. Since this
is the version of the log with headers removed, we specify “0” and press [ENTER].
Post now prompts for the FIELD which is “1”
This time we are done processing CHECK and SECTION and thus can tell POST we are
done:
92
We now say “y”es to checking the overwrite flags:
And can change (A)RRL Section and Chec(k) as appropriate. Normally you want to change
these to TRUE to guarantee, if an entry exists it WILL be overwritten.
At this point the database is updated and we are ready to rename the old TRMASTER.DTA
and move the new database in for testing.
Note that the “x” (3 times) entered to exit POST are skipped in this scenario, but you
will need to do that – or simply press the top right corner “X”.
This time we are going to copy the TRMASTER.DTA file into our SWEEPSTAKES
directory.
This is because the customized data is specific to the SS.
When we bring up TR4W and enter N6RC, here is what happens:
93
Nada ! Hmm, perhaps it is time to examine our settings ?
Aha, the problem is <CTRL+J> USER INFO SHOWN is still set to NAME.
For maximum flexibility, we set it to CUSTOM. We now must specify <CTRL+J>
CUSTOM USER STRING where we type in “CHECK SECTION” :
You should now observe the User Info Window contains “61 SCV”.
What if we want to prefill ??
Ensure that <CTRL+J> INITIAL EXCHANGE is set to CUSTOM. Now set <CTRL+J>
CUSTOM INITIAL EXCHANGE STRING by double clicking it and entering “CHECK
SECTION” and saving:
94
That did it! Note that we still are set to display in the USER INFO Window also.
Tip: you should already be aware you can “add” to the exchange field corrections like “1a 60eb” after “61
scv” to update the exchange (when the d/b is wrong). Likewise with <CTRL+J> CALLSIGN UPDATE
ENABLE=TRUE we could type “1a 60eb n6ac” into the exchange field to correct not only the exchange but
the call also.
Tip: Ensure <CTRL+J> SCP MINIMUM LETTERS is NOT set to zero.
Now we will show a scenario where we used TR4W as our general logging program and
want to propagate TRMASTER.DTA with the names of the stations we have qso’d. We will
choose the simple case where only signal report and NAME were logged. Otherwise you will
need to use something like a spreadsheet to select out call and names, or at least ensure they
are consistently in the same columns.
So the first step will be to export our GENERAL QSO log to INITIAL.EX:
95
Now using an editor select all but the header and <CTRL+C> it onto your clipboard
memory. From START enter “notepad.exe” and when it initializes, press <CTRL+V> to
paste the data in. Now save the data wherever your POST is located.
You can now write the data into TRMASTER.DTA and copy it into your \TR4W directory.
Note that TR4W must not be initialized as he enqueues TRMASTER.DTA and you cannot
overwrite it when TR4W is up.
Now with <CTRL+J> INITIAL EXCHANGE=CUSTOM and <CTRL+J> CUSTOM
USER STRING=NAME you should see the stations name display when you enter their call:
96
Hopefully, this illustrates some of the power of the TRMASTER.DTA customization.
One caution: POST is looking for data in columns you specify. This implies the data being
read by POST must be in fixed columns. Not a problem for contest logs but something to be
careful about regarding ascii files that delimit by x’20’ spaces or x'09' tabs – like perhaps a
club roster.
Tip: Using Open Source spreadsheet LibreOffice, you can read in variable column data then
SAVE AS with ‘Edit filter settings’ checked. This will produce the following dialog where
you can specify fixed columns:
97
For our next scenario, we will try to load the TRMASTER.DTA database with a club roster.
We navigate to http://cwops.org/roster.html and view the complete current roster for
CWOPS. The roster appears to be in some sort of table. Firstly we right click on the roster,
choose SAVE AS,
98
and save the roster as CWops Roster.htm in the directory where POST is located.
Now open CWops Roster.htm with your spreadsheet program. We will choose Free Open
Source Software LIBREOFFICE:
Ok, you should now see the roster, something like above.
What we now want to do is remove the headers (much like we did with logs).
Hold down your <CTRL> key and click on 1-11 so they are all highlighted.
(whilst holding down <CTRL> I ‘pulled’ my mouse pointer from 1 to 11 producing below):
With the area still highlighted, do a < CTRL + - > (holding down ctrl press ‘+’ and ‘-‘)
99
Let’s get rid of the cells in column ‘A’ (whilst holding down <CTRL> click on header ‘A’
and press <CTRL + ->
While again holding down the <CTRL> key drag your mouse across the row 1 columns A
and B so that they highlight. Do not release the <CTRL> key, rather drag it down column B
all the way to the bottom of your screen and let the spreadsheet scroll to the bottom of the
table:
100
Good! We have now selected all CALLS and NAMES. Now you can <CTRL+C> to COPY
the data onto your system clipboard. Now go to Windows START/RUN and enter “notepad”
to bring up the system editor. Once notepad is up, <CTRL+V> will paste the data into the
editor.
Now you can “SAVE AS” the listing as, say “CWOPS.TXT” to the directory where you
placed POST.
101
Note that source formatting may be lost during copy/paste. Scroll down to ensure longer
(usually portable) calls are still aligned ok.
Also note that you may be able to avoid dragging the cursor. In LibreOffice you can select
DATA and DEFINE RANGE. Ensure the range at the bottom is correct, select OK and you
are ready to copy/paste.
TIP: Because POST requires fixed columns, an easy way to convert a file is to open it in a
spreadsheet and copy/paste the contents out. You will need to scroll the results to guarantee
you do not have calls that ‘overflow’ their allotted space (like portables).
You can now load TRMASTER.DTA database with the complete/current listing of CWOPS
names.
NOTE: unlike INITIAL.EX format, POST can handle intervening extraneous data, so you
could create an ascii table with extra data you did not remove between columns POST will
read.
Since we have the CWops spreadsheet still open, why not build something that would
PREFILL the exchange for CWops contest ? (NAME #). Here we drag the cursor over all
four fields:
<CTRL+C> will now load the data into our clipboard and we can paste to file using Notepad
and <CTRL+V> as before. We then save the file as CWO.TXT into the directory where
POST resides.
This illustrates how POST does not care about intervening data (LAST NAME column), so
the capture can include extraneous data- as long as it is always in the same fixed column. Use
the above procedures to build TRMASTER to PREFILL NAME and #.
But what if you want to build an INITIAL.ex INITIAL EXCHANGE file ??
This time we click on column C header and press <CTRL + -> (3 keys CTRL,+,-) to remove
102
the column:
We will do the same with column D, leaving us with CALL, NAME, and #. We can now
Copy/Paste the data into a file we will name INITIAL.EX and save the file to our TR4W
CWops contest directory. Now bring up TR4W and <CTR+J>INITIAL EXCHANGE
FILENAME When you double click it you will be prompted to browse for the initial.ex file
to use.”
Note: INITIAL.EX will prefill what it contains for a given call, so ensure you capture
data you want plugged into the EXCHANGE field of TR4W.
Double click on the entry and point it to the location of your INITIAL.EX in the CWops
directory.
Below is an example of exchange being built directly from the INITIAL.EX file.
NOTE: INITIAL.EX will override TRMASTER.DTA when both contain the same call and
both are activated via their respective <CTRL-J> settings.
103
104
4.15 Entering a Hand Log
When entering a log after the contest you may set <CTRL+J> AUTO TIME
INCREMENT to increment the time x minutes after each logged qso.
You may also wish to set <CTRL+J> AUTO DUPE ENABLE=FALSE to allow entry of
dupes.
You probably also want to set <CTRL+J> INCREMENT TIME ENABLE=TRUE to
allow time increment via the ALT key.
5 Post-Contest Reports & Log Utilities
5.1 Reports
TR4W can generate a number of useful reports:
•
All callsigns
•
Bandchanges
•
Continent list
•
First callsign worked in each country
•
First callsign worked in each zone
•
QSOs by country by band
•
Score by hour
•
Summary
105
All callsigns produces a sorted list of calls worked by # times worked:
An Example would be:
2012 CWOPS N4AF
Unique callsigns: 63
3 QSOs:
----------------1.
VE3KI
2 QSOs:
----------------1.
2.
3.
4.
AA3B
AC4CA
AD4EB
DL1NKS
etc thru 1 QSOs.
Bandchanges
Lists the # of changes:
1.
2.
3.
4.
5.
6.
7.
8.
9.
10.
11.
12.
Band
Band
Band
Band
Band
Band
Band
Band
Band
Band
Band
Band
change
change
change
change
change
change
change
change
change
change
change
change
from
from
from
from
from
from
from
from
from
from
from
from
40CW
80CW
40CW
80CW
40CW
80CW
40CW
80CW
40CW
80CW
40CW
80CW
to
to
to
to
to
to
to
to
to
to
to
to
80CW
40CW
80CW
40CW
80CW
40CW
80CW
40CW
80CW
40CW
80CW
40CW
at
at
at
at
at
at
at
at
at
at
at
at
03:15.
03:15.
03:16.
03:17.
03:18.
03:18.
03:21.
03:26.
03:27.
03:27.
03:28.
03:52.
*
*
*
*
*
There were 5 second radio QSOs made.
Where the asterisk denotes second radio band change.
Continent List
Will list a matrix of continents vs bands:
Continent List
=
=
=
=
=
=
=
=
=
160
--0
0
0
0
0
0
0
0
0
80
--31
3
0
0
7
0
0
0
1
40
--35
2
0
0
10
0
1
0
1
20
--0
0
0
0
0
0
0
0
0
15
--0
0
0
0
0
0
0
0
0
10
--0
0
0
0
0
0
0
0
0
ALL
--66
5
0
0
17
0
1
0
2
Unknown calls =
Total calls =
0
0
0
42
0
49
0
0
0
0
0
0
0
91
USA
Canada
NA
SA
Euro
African
Asian
Japan
Ocean
calls
calls
calls
calls
calls
calls
calls
calls
calls
106
The summary report may be copy/pasted into the 3830 submittal page to alleviate recalling
qso by band, mult by band, final score type information.
First Callsign worked in each country produces another matrix by band:
COUNTRIES WORKED - WITH CALL OF FIRST STATION WORKED
2012 CWOPS N4AF
Prefix
160
------ -------4X
DL
G
K
KH6
OK
SM
UA
UR
VE
80
-------DL1NKS
G3VTT
WW9R
K9FD/KH6
OK1RR
SM6CNN
RW3PK
UR5MM
VE3KI
40
-----4X4FC
DL1NKS
20
----
15
----
10
----
W1UU
K9FD/KH6
OK1RR
SM6CNN
UA4CNJ
UR5MM
VX2AWR
Likewise First callsign worked in each zone produces a matrix of zone vs band.
QSO's by country by band produces information on country stats by band:
2012 CWOPS N4AF
QSOs MADE IN EACH COUNTRY
Country
Prefix
--------1 Israel
4X
2 Germany DL
3 England G
4 US
K
5 Hawaii
KH6
6 Czech
OK
7 Sweden
SM
8 Euro Rus UA
9 Ukraine UR
10 Canada VE
160
80
40
---- ---- ---1
1
1
1
31
35
1
1
2
1
1
2
1
2
1
4
3
2
20
---
15
---
10
-
Total Percent
1
2
1
66
2
3
3
3
5
5
1.10
2.20
1.10
72.53
2.20
3.30
3.30
3.30
5.49
5.49
Score by hour can produce running totals by hour:
CWOPS N4AF
HR
160
80
CUM TOTAL SCORE
-------- --------------- ----3
--42/14
90/62 0.006 M
4
----91/63 0.006 M
D1
0/0
42/14
91/63
40
20
15
10
HR TOT
-------
-------
-------
48/48
---
---
---
90/62
1/1
---
---
---
1/1
49/49
0/0
0/0
------- ------
0/0
107
TO
0/0
91/63
42/14
49/49
0/0
0/0
0/0
Here Day1 and Total are the same.
Summary gives a nice overview that is suitable for cut/paste to 3830:
CWOPS SUMMARY SHEET
CONTEST:
START DATE:
CALLSIGN USED:
LOCATOR:
CATEGORY-ASSISTED:
CATEGORY-BAND:
CATEGORY-MODE:
CATEGORY-OPERATOR:
CATEGORY-POWER:
CLUB:
NAME:
ADDRESS:
ADDRESS-CITY:
ADDRESS-STATE-PROVINCE:
ADDRESS-POSTALCODE:
ADDRESS-COUNTRY:
EMAIL:
OPERATING TIME:
CQ COUNTER:
RUN/SEARCH:
UNIQUE CALLSIGNS:
CWOPS
29-12-11
N4AF
FM15
NON-ASSISTED
ALL
CW
SINGLE-OP
HIGH
Potomac Valley Radio Club
Howard Hoyt
549 Bluebird Trail
Blounts Creek
NC
27814
USA
[email protected]
01:00:00
0
91/0 Qs
63
BAND
Raw QSOs
Valid QSOs
Points Prefixes
__________________________________________________________
80CW
42
41
41
14
40CW
49
49
49
49
__________________________________________________________
Totals
91
90
90
63
Final Score = 5670 points.
5.2 Export Files
108
5.2.1 ADIF File
Amateur Data Interchange Format can be imported at any time into TR4W to recreate the
log. It’s more global function is to move log data BETWEEN programs. For example to
export data from TR4W for import to Logger32 or LOTW processing. It is a good practice to
export your log to a unique named ADIF file at the conclusion of a contest. TR4W export
will normally be to the specific contest directory under name of <your call.ADI>. It is worth
noting the ONLY way to re-load contest information back into TR4W, at a later date, is via
IMPORT of the ADIF.
5.2.2 Cabrillo File
Cabrillo serves as the interface between the logging program and the contest sponsor. The
Cabrillo file will be what you email to the contest sponsor.
At contest conclusion the log should always be renamed to a unique Cabrillo name.
TR4W will export to the specific contest directory using filename <your call.LOG> but you
may wish to give it a more unique name. You also must ensure that, upon export, you fill out
the STATION INFORMATION accurately as it serves as Cabrillo header data used by the
contest robot to validate your entry and most of the fields are required.
5.2.3 Initial Exchanges List
TR4W will export a listing of calls and exchange data that may be used as PREFILL data in
future logs submitted for the same contest. If there is no specific-to-callsign data (for
example, only serial number), TR4W will only export a header. If an INITIAL.EX file
already existed, TR4W will export a file named CUSTOM INITIAL.EX which contains
BOTH the original initial.ex data and new data extracted from the log.
Upon next running of the contest, if you want prefills, point <CTRL+J>INITIAL
EXCHANGE FILENAME to the newly created CUSTOM.INITIAL.EX file.
6 Main Window
The window below is the Main Window. It is what appears when you start the program and
select the name of a contest.
109
The Main Window has a number of sub-windows located within it. Some of these subwindows already have values and others are blank waiting for additional configuration
statements to be set or for some activity to be initiated by the user.
In this Main Window the Band is 160 meters, the Mode is CW, the Date is 11-30-2011 [Nov
30, 2011]. The CW speed set as 35 WPM. The Time is 05:53:38 UTC. Although Radio 1 is
shown, there is no frequency associated with it. That tells us that the program has not yet
been interfaced with a radio.
We can use the program to log contacts [QSO’s] even though we do not have any interface
established between the computer and the radio. We can change the Band by using
<ALT+B> or <ALT+V> and we can change the Mode by using <ALT+M>. These and
other operations are listed under the Menu items of the Main Window which are described in
the section following.
6.1 Menus and Sub Menus of Main Window
6.1.1.1 File Menu
110
111
6.1.1.2 Settings Menu
6.1.1.3 Window Menu
112
6.1.1.4 Alt- Menu
113
6.1.1.5 Ctrl- Menu
114
6.1.1.6 Commands Menu
6.1.1.7 Tools Menu
6.1.1.8 Net Menu
115
6.1.1.9 Help Menu
116
7 Appendix B. Suggested Interface Circuits
7.1 CW Interface
7.1.1 CAT Control
Table B.1: TNC/Radio/Network Wiring
DB-9 Pin
Signal
3
Serial output from CPU
2
Serial input to CPU
5
Ground
DB-25 Pin
2
3
7
7.1.2 Serial Port keying and PTT control
DB-25 Pin
20
4
7
Table B.2: Serial Port Keying and PTT Interface
DB-9 Pin
Signal
4
CW key output (use circuit
A)
7
PTT out (use another
circuit A)
5
Ground
Some TNCs or radio interfaces may require one or both of the following jumpers to work
properly (these jumpers are not necessary on the computer side of the serial interface
cable):
DB-25: Connect pin 6 to 8; connect pin 4 to 5;
DB-9: Connect pin 1 to 6; connect pin 4 to 7.
It has also been reported that some rigs (notably the Kenwood TS-870)
require that the CTS and RTS lines be carried between the rig and the computer. On a
DB25, these are pins 4 and 5; on a DB9 they are pins 7 and 8.
Figure B.1:
Circuit A; Use this for serial port CW and PTT
117
7.1.3 Parallel Port [LPT] keying and PTT control
Table B.3: Parallel Port Interface
DB-25 Pin
1
2
3
4
5
6
7
8
9
12
13
14
15
16
17
18
25
Signal
Strobe. Goes to emitter of all Circuit B transistors
Band Data output bit 0 (*)
Band Data output bit 1 (*)
Band Data output bit 2 (*)
Band Data output bit 3 (*)
Paddle Dit contact input.
Connect a 10K pull up resistor between this pin and pin 14
Paddle Dah contact input.
Connect a 10K pull up resistor between this pin and pin 14
+5 V pull up. (**)
Connect to Paddle and Footswitch inputs using 10K resistor.
Alternatively, the Pin 14 voltage can be used to control an external
relay to switch between two transmitters.
Foot switch input.
Connect a 10K pull up resistor between this pin and pin 14
PTT output. Use separate circuit B; goes to 1K resistor
CW output. Use separate circuit B; goes to 1K resistor
Ground for CW and PTT (connect to rig)
Ground for paddle
(*) See RADIO ONE BAND OUTPUT PORT .These lines supply information for band
decoding used to select filters and/or antennas.
(**) See RELAY CONTROL PORT . This line is used to select between Radio 1 and
Radio 2
(***)See FOOT SWITCH PORT
118
Figure B.2:
Circuit B; Use this for parallel port CW and PTT
The next two pages contain details of an adapter from N0SS (SK). Thanks to N0SS for the
bitmap files used to generate these two pages.
119
Parallel Port CW and PTT Keying Adapter and Paddle Input for Internal Keyer from N0SS
120
121
8 Appendix C.
8.1 Alt+ keys
Alt- Sub menu
Shortcut Keys
Alt + A
Alt + B
Alt + C
Alt + D
Alt + E
Alt + F
Alt + G
Alt + H
Alt + I
Alt + J
Alt + K
Alt + L
Alt + M
Alt + N
Alt + O
Alt + P
Alt + Q
Alt + R
Alt + S
Alt + T
Alt + V
Alt + W
Alt + X
Alt + Y
Alt + Z
Alt + Alt + =
Description
Set Alarm
Band Up
Resume Auto-CQ
Check Dupes
Edit
Backup log to disk
Switch Multiplier View
User's Guide
Increment number
Config Com Window
Disable CW
Search Log
Set Mode
Set Transmit Frequency
Set Reminder
Program Messages
Setup Auto CQ
Toggle Radios
Set CW Speed
Set Time
Band Down
Clear Call Window
Exit program
Delete last entry
The exchange number
Toggle Auto-CQ
Toggle sidetone
122
8.2 Ctrl+ keys
Shortcut Keys
Ctrl- Sub menu
Ctrl + A
Ctrl + B
Ctrl + C
Ctrl + D
Ctrl + I
Ctrl + J
Ctrl + K
Ctrl
Ctrl
Ctrl
Ctrl
Ctrl
Ctrl
Ctrl
Ctrl
Ctrl
Ctrl
+
+
+
+
+
+
+
+
+
+
L
N
O
P
Q
R
S
U
Y
-
Ctrl + End
Ctrl + Enter
Ctrl + Home
Ctrl +]
Ctrl + Ins
Description
Transfer from the
keyboard
Communicate with
Packet port
Clear the table of
multipliers
Reduce Auto QSL
Interval
Increase Auto QSL
Interval
Configuration
commands window
Clear the list of
repetitions
View / Edit log
Create note
Show missing Mults
possible call signs
QTC functions
Restore last entry
SH / DX [call sign]
Show packet spots
Refresh band map
Alternate CQ on two
radios
Cursor in the band
map window
QSO enter with no
sending
Cursor in the window
DX Cluster
Open CT1BOH window
Toglge insert/delete
123
8.3 Additional Ctrl + keys
Shortcut Keys
Ctrl
Ctrl
Ctrl
Ctrl
Ctrl
Description
+1
+2
+3
+4
+5
Number of QSO
Call
Speed CW
Range
Ctrl +6
Ctrl
Ctrl
Ctrl
Ctrl
Ctrl
+7
+8
+9
+ PgDn
+ PgUp
Clear the table of multipliers
Reduce Auto QSL Interval
Cursor in the map window range
Reduce CW speed to idle radio
Increase CW speed to idle radio
8.4 Shift+Ctrl Keys
Shortcut Keys
Description
Shift + '
Send a message
Shift + Ctrl + `
Map of the range
Shift + Ctrl +0
Open MP3 recorder
Shift + Ctrl +1
Sheet repeats
Shift + Ctrl +2
Function keys
Shift + Ctrl +3
TRMASTER.DTA
Shift + Ctrl +4
By default
Shift + Ctrl +5
Radio 1
Shift + Ctrl +6
Radio 2
Shift + Ctrl +7
Intercom
Shift + Ctrl +8
Shift + Ctrl +9
Send a report to
GETSCORES.ORG
Station
Shift + Tab
CQ mode
8.5 Ctrl+Alt+ Keys
Shortcut Keys
Description
Ctrl + Alt +1
Radio 1
Ctrl + Alt +2
Radio 2
Ctrl + Alt + M
Tiling
Ctrl + Alt + S
Ctrl + Alt + T
Compare and synchronize the
logs
Time Synchronization
Ctrl + Alt + W
Reset the Alarm
124
8.6 Special Keys
Shortcut Keys
Description
Del
Delete the selected spot
Enter
Enter QSO and transmit
Esc
Exit S & P mode
Ins
Toggle insert/replace
Pause
PgDn
The focus in the main program
window
Reduce CW speed
PgUp
Increase CW speed
Tab
Enter S & P mode
`
Send spot to cluster
125
8.7 Supported Transceivers
#
Transceiver
Polling
PTT VIA
COMMANDS
Baud
Rate
Radio
Address
1
K2
OK
OK
4800
-
2
K3
OK
OK
4800
-
3
TS850
OK
OK
4800
-
4
FT100
OK
OK
4800
-
5
FT450
OK
OK
4800
-
6
FT736R
-
-
4800
-
7
FT747GX
OK
OK
4800
-
8
FT767
OK
-
4800
-
9
FT817
OK
OK
4800
-
10
FT840
OK
OK
4800
-
11
FT847
OK
OK
4800
-
12
FT857
OK
-
4800
-
13
FT890
OK
OK
4800
-
14
FT897
OK
-
4800
-
15
FT900
OK
OK
4800
-
16
FT920
OK
-
4800
-
17
FT950
OK
OK
4800
-
18
FT990
OK
OK
4800
-
19
FT1000
OK
OK
4800
-
20
FT1000MP
OK
OK
4800
-
21
FT2000
OK
OK
4800
-
22
FTDX9000
OK
OK
4800
-
23
IC706
OK
-
1200
48
24
IC706II
OK
-
1200
4E
25
IC706IIG
OK
-
1200
58
26
IC707
OK
-
1200
3E
27
IC718
OK
-
1200
5E
28
IC725
OK
-
1200
28
29
IC726
OK
-
1200
30
30
IC728
OK
-
1200
38
31
IC729
OK
-
1200
3A
32
IC735
OK
-
1200
04
33
IC736
OK
-
1200
40
34
IC737
OK
-
1200
3C
35
IC738
OK
-
1200
44
36
IC746
OK
-
1200
56
37
IC746PRO
OK
-
1200
66
38
IC756
OK
-
1200
50
39
IC756PRO
OK
-
9600
5C
40
IC756PROII
OK
-
9600
64
41
IC756PROIII
OK
-
9600
6E
42
IC761
OK
-
9600
1E
126
#
Transceiver
Polling
PTT VIA
COMMANDS
Baud
Rate
43
IC765
OK
-
44
IC775
OK
-
45
IC781
OK
-
9600
26
46
IC910H
OK
-
9600
60
47
IC970D
OK
-
9600
2E
48
IC7000
OK
-
9600
70
49
IC7600
OK
-
9600
7A
50
IC7700
OK
-
51
IC7800
OK
-
52
OMNI6
OK
-
53
ORION
-
OK
9600
19 200
19 200
Radio
Address
2C
46
74
9600
6A
9600
04
57 600
-
127
8.8 Supported Contests
#
CONTEST
QSO
BY
BAND
QSO
BY
MODE
MULT
BY
BAND
MULT
BY
MODE
EXCHANGE RECEIVED
1
7QP
TRUE
TRUE
FALSE
FALSE
RST DOMESTIC OR DX
QTH
2
ALL JA
TRUE
FALSE
TRUE
FALSE
RST ALL JA PREFECTURE
AND PRECEDENCE
3
TRUE
FALSE
TRUE
FALSE
RST AGE
TRUE
FALSE
TRUE
FALSE
RST AGE
TRUE
TRUE
TRUE
FALSE
RST QSO NUMBER OR
DOMESTIC QTH
6
7
ALL-ASIAN-DXCW
ALL-ASIAN-DXSSB
ALRS-UA1DZCUP
AP-SPRINT
ARCI
TRUE
TRUE
FALSE
FALSE
FALSE
TRUE
FALSE
FALSE
RST QSO NUMBER
RST POSSIBLE
DOMESTIC QTH AND
POWER
8
ARI
TRUE
TRUE
TRUE
FALSE
RST QSO NUMBER OR
DOMESTIC QTH
9
ARKTIKA-SPRING
TRUE
TRUE
TRUE
FALSE
RST QSO NUMBER OR
DOMESTIC QTH
10
ARRL-10
FALSE
TRUE
FALSE
TRUE
RST DOMESTIC QTH OR
QSO NUMBER
11
ARRL-160
FALSE
FALSE
FALSE
FALSE
RST DOMESTIC OR DX
QTH
12
13
14
ARRL-DX-CW
ARRL-DX-SSB
ARRL-FD
TRUE
TRUE
TRUE
FALSE
FALSE
TRUE
TRUE
TRUE
FALSE
FALSE
FALSE
FALSE
RST POWER
RST POWER
CLASS DOMESTIC OR DX
QTH
15
ARRL-SS-CW
FALSE
FALSE
FALSE
FALSE
QSO NUMBER
PRECEDENCE CHECK
SECTION
16
ARRL-SS-SSB
FALSE
FALSE
FALSE
FALSE
QSO NUMBER
PRECEDENCE CHECK
SECTION
17
18
19
ARRL-VHF-QSO
ARRL-VHF-SS
AS-CHAMP-CW
TRUE
TRUE
TRUE
FALSE
FALSE
FALSE
TRUE
TRUE
FALSE
FALSE
FALSE
FALSE
RST DOMESTIC QTH
RST DOMESTIC QTH
QSO NUMBER AND
COORDINATES SUM
20
AS-CHAMP-SSB
TRUE
FALSE
FALSE
FALSE
QSO NUMBER AND
COORDINATES SUM
21
22
23
BALTIC
BLACK SEA CUP
CALIFORNIA QSO
PARTY
CIS
FALSE
TRUE
TRUE
TRUE
TRUE
TRUE
FALSE
TRUE
FALSE
FALSE
FALSE
FALSE
RST QSO NUMBER
RST ZONE OR SOCIETY
QSO NUMBER DOMESTIC
OR DX QTH
TRUE
FALSE
TRUE
FALSE
RST DOMESTIC QTH OR
QSO NUMBER
COLORADO QSO
PARTY
TRUE
TRUE
FALSE
TRUE
NAME DOMESTIC OR DX
QTH
4
5
24
25
128
#
CONTEST
QSO
BY
BAND
QSO
BY
MODE
MULT
BY
BAND
MULT
BY
MODE
EXCHANGE RECEIVED
26
FALSE
FALSE
FALSE
FALSE
RST QTH
27
COUNTY
HUNTER
CQ-160-CW
FALSE
FALSE
FALSE
FALSE
RST ZONE OR DOMESTIC
QTH
28
CQ-160-SSB
FALSE
FALSE
FALSE
FALSE
RST ZONE OR DOMESTIC
QTH
29
30
31
32
33
34
35
36
CQ-M
CQ-VHF
CQ-WPX-CW
CQ-WPX-SSB
CQ-WW-CW
CQ-WW-SSB
CROATIAN
DARC-10M
TRUE
TRUE
TRUE
TRUE
TRUE
TRUE
TRUE
FALSE
TRUE
FALSE
FALSE
FALSE
FALSE
FALSE
FALSE
TRUE
TRUE
TRUE
FALSE
FALSE
TRUE
TRUE
TRUE
FALSE
FALSE
FALSE
FALSE
FALSE
FALSE
FALSE
FALSE
FALSE
RST QSO NUMBER
RST DOMESTIC QTH
RST QSO NUMBER
RST QSO NUMBER
RST ZONE
RST ZONE
RST QSO NUMBER
RST QSO NUMBER OR
DOMESTIC QTH
37
TRUE
FALSE
TRUE
FALSE
RST QSO NUMBER
TRUE
FALSE
TRUE
FALSE
RST QSO NUMBER
39
DARC-WAEDCCW
DARC-WAEDCSSB
DARC-XMAS
TRUE
TRUE
TRUE
FALSE
RST QSO NUMBER OR
DOMESTIC QTH
40
41
42
EU SPRINT
EUROPEAN HFC
EUROPEAN VHF
TRUE
TRUE
TRUE
FALSE
TRUE
FALSE
FALSE
TRUE
TRUE
FALSE
FALSE
FALSE
QSO NUMBER AND NAME
RST ZONE
RST QSO NUMBER AND
GRID SQUARE
43
FCG-FQP
TRUE
TRUE
FALSE
TRUE
RST DOMESTIC OR DX
QTH
44
FISTS
TRUE
FALSE
FALSE
FALSE
RST QTH NAME AND
FISTS NUMBER OR
POWER
45
TRUE
FALSE
TRUE
FALSE
RST ZONE
46
47
48
GACW-WWSACW
GAGARIN-CUP
GENERAL QSO
GRID LOC
TRUE
TRUE
TRUE
FALSE
TRUE
TRUE
TRUE
FALSE
TRUE
FALSE
FALSE
FALSE
RST ZONE
RST NAME QTH
NAME AND POSSIBLE
GRID SQUARE
49
HA DX
TRUE
TRUE
TRUE
FALSE
RST DOMESTIC QTH OR
QSO NUMBER
50
HELVETIA
TRUE
FALSE
TRUE
FALSE
RST QSO NUMBER AND
POSSIBLE DOMESTIC
QTH
51
52
IARU-HF
INTERNET
SPRINT
JA LONG
PREFECT
JIDX-CW
JIDX-SSB
KCJ
TRUE
TRUE
TRUE
FALSE
TRUE
FALSE
FALSE
FALSE
RST ZONE OR SOCIETY
QSO NUMBER NAME
DOMESTIC OR DX QTH
FALSE
TRUE
FALSE
FALSE
RST LONG JA
PREFECTURE
TRUE
TRUE
TRUE
FALSE
FALSE
FALSE
TRUE
TRUE
TRUE
FALSE
FALSE
FALSE
RST ZONE
RST ZONE
RST DOMESTIC QTH
38
53
54
55
56
129
#
CONTEST
QSO
BY
BAND
QSO
BY
MODE
MULT
BY
BAND
MULT
BY
MODE
EXCHANGE RECEIVED
57
58
FALSE
TRUE
FALSE
FALSE
FALSE
TRUE
FALSE
FALSE
KIDS DAY EXCHANGE
RST DOMESTIC QTH OR
QSO NUMBER
TRUE
FALSE
TRUE
FALSE
RST DOMESTIC QTH OR
QSO NUMBER
60
61
KIDS DAY
KING-OF-SPAINCW
KING-OF-SPAINSSB
KVP
LQP
FALSE
TRUE
TRUE
FALSE
TRUE
FALSE
TRUE
FALSE
RST ZONE
QSO NUMBER NAME
DOMESTIC OR DX QTH
62
LZ DX
TRUE
TRUE
TRUE
FALSE
RST ZONE OR DOMESTIC
QTH
63
TRUE
TRUE
FALSE
TRUE
QSO NUMBER DOMESTIC
QTH
FALSE
TRUE
FALSE
TRUE
FALSE
FALSE
FALSE
FALSE
RST QSO NUMBER
NAME DOMESTIC OR DX
QTH
66
67
MICHIGAN QSO
PARTY
MINITEST
MINNESOTA QSO
PARTY
MONGOLIAN DX
NAQP-CW
TRUE
TRUE
TRUE
FALSE
TRUE
TRUE
FALSE
FALSE
RST ZONE
NAME DOMESTIC OR DX
QTH
68
NAQP-SSB
TRUE
FALSE
TRUE
FALSE
NAME DOMESTIC OR DX
QTH
69
NA-SPRINT-CW
TRUE
FALSE
FALSE
FALSE
QSO NUMBER NAME
DOMESTIC OR DX QTH
70
NA-SPRINT-SSB
TRUE
FALSE
FALSE
FALSE
QSO NUMBER NAME
DOMESTIC OR DX QTH
71
NCCC-SPRINT
TRUE
FALSE
TRUE
FALSE
QSO NUMBER NAME
DOMESTIC OR DX QTH
72
NEQP
TRUE
TRUE
FALSE
FALSE
RST DOMESTIC OR DX
QTH
73
TRUE
TRUE
FALSE
FALSE
RST DOMESTIC QTH
TRUE
FALSE
TRUE
FALSE
RST QSO NUMBER AND
DOMESTIC QTH
TRUE
FALSE
TRUE
FALSE
RST QSO NUMBER AND
DOMESTIC QTH
TRUE
TRUE
TRUE
TRUE
TRUE
TRUE
TRUE
TRUE
TRUE
TRUE
TRUE
TRUE
NZ FIELD DAY
RST QSO NUMBER
RST QSO NUMBER
TRUE
TRUE
FALSE
TRUE
RST QSO NUMBER AND
DOMESTIC QTH
80
NEW YORK QSO
PARTY
NRAU-BALTICCW
NRAU-BALTICSSB
NZ FIELD DAY
OCEANIA-DX-CW
OCEANIA-DXSSB
OHIO QSO
PARTY
OK-OM DX
TRUE
FALSE
TRUE
FALSE
RST QSO NUMBER OR
DOMESTIC QTH
81
82
83
OZCHR
OZCHR-TEAMS
PACC
TRUE
TRUE
TRUE
TRUE
TRUE
FALSE
TRUE
TRUE
TRUE
FALSE
FALSE
FALSE
RST ZONE OR SOCIETY
RST ZONE OR SOCIETY
RST QSO NUMBER OR
DOMESTIC QTH
84
QCWA GOLDEN
FALSE
FALSE
FALSE
FALSE
QSO NUMBER NAME
CHAPTER AND QTH
59
64
65
74
75
76
77
78
79
130
#
CONTEST
QSO
BY
BAND
QSO
BY
MODE
MULT
BY
BAND
MULT
BY
MODE
EXCHANGE RECEIVED
85
QCWA
TRUE
TRUE
FALSE
FALSE
QSO NUMBER NAME
CHAPTER AND QTH
86
87
R4N-CHAMP
R4W-CHAMP
TRUE
TRUE
TRUE
FALSE
TRUE
FALSE
TRUE
FALSE
QSO NUMBER AND ZONE
QSO NUMBER DOMESTIC
QTH
88
TRUE
FALSE
FALSE
FALSE
QSO NUMBER AND ZONE
TRUE
TRUE
TRUE
TRUE
RST QSO NUMBER OR
DOMESTIC QTH
90
R9W-UW9WKMEMORIAL
RAC CANADA
WINTER
RADIO-160
FALSE
TRUE
FALSE
FALSE
RST QSO NUMBER AND
DOMESTIC QTH
91
RADIO-MEMORY
TRUE
TRUE
FALSE
FALSE
RST AGE AND POSSIBLE
SK
92
93
RADIO-ONY
RADIO-VHF-FD
TRUE
TRUE
TRUE
TRUE
FALSE
FALSE
FALSE
FALSE
RST AGE
RST QSO NUMBER AND
GRID SQUARE
94
RADIO-YOC
TRUE
FALSE
FALSE
FALSE
QSO NUMBER AND
PREVIOUS QSO NUMBER
95
RAEM
TRUE
FALSE
FALSE
FALSE
QSO NUMBER AND GEO
COORDINATES
96
RDAC
TRUE
TRUE
TRUE
FALSE
RST DOMESTIC QTH OR
QSO NUMBER
97
RDXC
TRUE
TRUE
TRUE
FALSE
RST DOMESTIC QTH OR
QSO NUMBER
98
REF-CW
TRUE
FALSE
TRUE
FALSE
RST AND QSO NUMBER
OR FRENCH DEPARTMENT
99
REF-SSB
TRUE
FALSE
TRUE
FALSE
RST AND QSO NUMBER
OR FRENCH DEPARTMENT
100
TRUE
TRUE
TRUE
FALSE
RST QSO NUMBER
TRUE
FALSE
TRUE
FALSE
RST QSO NUMBER
TRUE
FALSE
TRUE
FALSE
RST QSO NUMBER
103
104
105
106
107
108
REGION 1 FIELD
DAY
REGION 1 FIELD
DAY-RCC-CW
REGION 1 FIELD
DAY-RCC-SSB
RF-CHAMP-CW
RF-CHAMP-SSB
RF-CUP-CW
RF-CUP-SSB
ROPOCO
RSGB-160
TRUE
TRUE
TRUE
TRUE
TRUE
FALSE
FALSE
FALSE
FALSE
FALSE
FALSE
FALSE
TRUE
TRUE
TRUE
TRUE
FALSE
FALSE
FALSE
FALSE
FALSE
FALSE
FALSE
FALSE
QSO NUMBER AND ZONE
QSO NUMBER AND ZONE
QSO NUMBER AND GRID
QSO NUMBER AND GRID
RST AND POSTAL CODE
RST DOMESTIC QTH OR
QSO NUMBER
109
RSGB-IOTA
TRUE
TRUE
TRUE
TRUE
RST QSO NUMBER AND
POSSIBLE DOMESTIC
QTH
110
111
SAC-CW
SAC-SSB
TRUE
TRUE
FALSE
FALSE
TRUE
TRUE
FALSE
FALSE
RST QSO NUMBER
RST QSO NUMBER
89
101
102
131
#
CONTEST
QSO
BY
BAND
QSO
BY
MODE
MULT
BY
BAND
MULT
BY
MODE
EXCHANGE RECEIVED
112
SALMON RUN
TRUE
TRUE
FALSE
FALSE
RST DOMESTIC OR DX
QTH
113
TRUE
TRUE
TRUE
FALSE
RST AND CONTINENT
114
SOUTH
AMERICAN WW
SP DX
TRUE
TRUE
TRUE
FALSE
RST DOMESTIC QTH OR
QSO NUMBER
115
116
117
SRR-JR
STEW-PERRY
TAC
TRUE
FALSE
FALSE
FALSE
FALSE
FALSE
FALSE
FALSE
FALSE
FALSE
FALSE
FALSE
QSO NUMBER AND AGE
RST AND OR GRID
RST QSO NUMBER AND
POSSIBLE DOMESTIC
QTH
118
TEN TEN
TRUE
TRUE
FALSE
FALSE
NAME QTH AND
POSSIBLE TEN TEN
NUMBER
119
TRUE
TRUE
TRUE
FALSE
RST DOMESTIC QTH
TRUE
TRUE
FALSE
FALSE
RST DOMESTIC OR DX
QTH
121
122
TENNESSEE
QSO PARTY
TEXAS QSO
PARTY
TOEC
UBA-DX-CW
TRUE
TRUE
FALSE
FALSE
TRUE
TRUE
FALSE
FALSE
RST DOMESTIC QTH
RST QSO NUMBER AND
POSSIBLE DOMESTIC
QTH
123
UBA-DX-SSB
TRUE
FALSE
TRUE
FALSE
RST QSO NUMBER AND
POSSIBLE DOMESTIC
QTH
124
125
TRUE
TRUE
FALSE
FALSE
TRUE
TRUE
FALSE
FALSE
RST QSO NUMBER
QSO NUMBER DOMESTIC
QTH
126
UCG
UKRAINE
CHAMPIONSHIP
UKRAINIAN
TRUE
TRUE
TRUE
FALSE
RST QSO NUMBER OR
DOMESTIC QTH
127
UN DX
TRUE
TRUE
TRUE
FALSE
RST DOMESTIC QTH OR
QSO NUMBER
128
URAL-CUP
TRUE
TRUE
TRUE
FALSE
QSO NUMBER DOMESTIC
QTH
129
WAG
TRUE
TRUE
TRUE
FALSE
RST QSO NUMBER OR
DOMESTIC QTH
130
TRUE
TRUE
FALSE
FALSE
RST DOMESTIC QTH
131
132
133
134
WISCONSIN QSO
PARTY
WRTC
WW PMC
WWL
XMAS
TRUE
TRUE
TRUE
TRUE
TRUE
TRUE
TRUE
FALSE
TRUE
TRUE
TRUE
TRUE
FALSE
TRUE
FALSE
FALSE
RST ZONE OR SOCIETY
RST ZONE OR SOCIETY
RST AND GRID
RST QSO NUMBER AND
RANDOM CHARACTERS
135
YO DX
TRUE
TRUE
TRUE
FALSE
RST QSO NUMBER OR
DOMESTIC QTH
136
YUDX
TRUE
FALSE
TRUE
FALSE
RST ZONE
120
132
8.9 Sub Window default colors.
Window
Back
ground
Color
View
Window
Back
ground
Color
View
ARROW
BTNFACE
RED
2
MULT INFO
WHITE
BLACK
1
BAND MODE
BTNFACE
BLACK
1
MULT
YELLOW
BLACK
1
NAME
BTNFACE
BLACK
2
BEAM
HEADING
1
BTNFACE
BLACK
CALL
WHITE
BLACK
1
ON AIR TIME
BTNFACE
BLACK
2
CLOCK
BTNFACE
BLACK
1
OP MODE
BTNFACE
BLACK
1
CODE SPEED
BTNFACE
BLACK
1
PADDLE
BTNFACE
BLACK
2
COMPUTER ID
BTNFACE
BLACK
2
BTNFACE
BLACK
COUNTRY
NAME
BTNFACE
BLACK
POSSIBLE
CALL
PREVIOUS
QSOS
BTNFACE
BLACK
CQ COUNTER
BTNFACE
BLACK
1
PTT
BTNFACE
BLACK
1
CQ TOTAL
BTNFACE
BLACK
1
QSO B4
RED
WHITE
2
OPERATOR
BTNFACE
BLACK
2
QSO
INFORMATION
WHITE
BLACK
DATE
BTNFACE
BLACK
1
QSO NUMBER
WHITE
BLACK
DUPE CALL
INFO
BTNFACE
BLACK
2
BTNFACE
BLACK
EDITABLE LOG
WHITE
BLACK
BTNFACE
BLACK
EXCHANGE
WHITE
BLACK
BTNFACE
BLACK
FOOT SWITCH
BTNFACE
BLACK
BTNFACE
BLACK
FULL TIME
BTNFACE
BLACK
QUICK
COMMAND
RADIO ONE
FREQ
RADIO ONE
NAME
RADIO TWO
FREQ
RADIO TWO
NAME
BTNFACE
BLACK
HOUR RATE
BTNFACE
BLACK
2
RATE
BTNFACE
BLACK
1
INSERT
BTNFACE
BLACK
1
S&P COUNTER
BTNFACE
BLACK
1
LAST QSO
TIME
BTNFACE
BLACK
TEN MINUTES
BTNFACE
BLACK
LOCAL TIME
BTNFACE
BLACK
TOTAL SCORE
BTNFACE
BLACK
GRID
LOCATOR
BTNFACE
BLACK
USER INFO
BTNFACE
BLACK
MASTER
BLUE
WHITE
WHOLE
SCREEN
BTNFACE
BLACK
WINKEYER
BTNFACE
BLACK
1
1
1
2
1
2
1
1
2
2
2
1
1
2
1
1
2
2
2
1
2
1&2
2
10 Appendix A. Configuration Statements
See TR4W Reference Manual
133
134
135


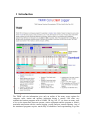

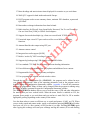
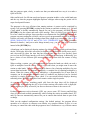
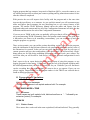

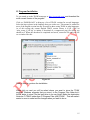
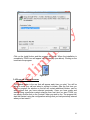

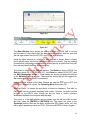


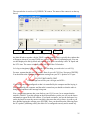

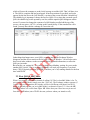

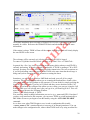

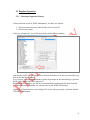
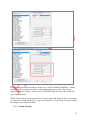
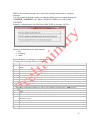

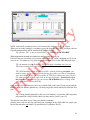

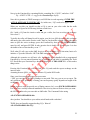
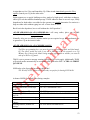
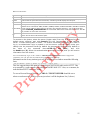

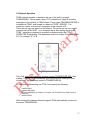
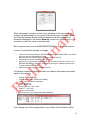
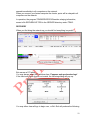
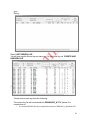


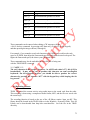


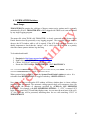


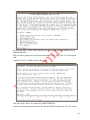
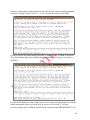
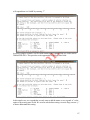
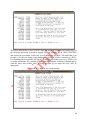
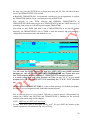
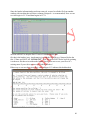
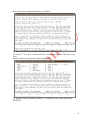


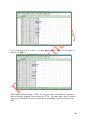

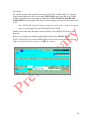


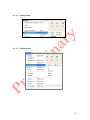
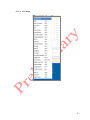

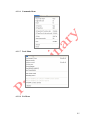


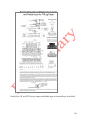


![TR4W User Manual [English Version]](http://vs1.manualzilla.com/store/data/005728234_1-e27c4fea1c6d513d6e0fdc1451ef66f1-150x150.png)
![TR4W User Manual [English Version]](http://vs1.manualzilla.com/store/data/005798737_1-5ae60a1fb1429eafa2ca68266ac47e3b-150x150.png)