1
INTREPID User Manual
Library | Help | Top
Configuring and using INTREPID (R04)
1
| Back |
Configuring and using INTREPID (R04)
Top
In this chapter:
•
Configuring INTREPID under Windows
•
Configuring INTREPID under Solaris and SunOS
•
Accessing INTREPID data from both UNIX and Windows
•
Space for temporary files
•
Diagnostic reporting options
•
INTREPID Memory limits and tiling
•
Modifying configuration files
•
Accessing INTREPID datasets and tools using other software
•
Accessing data created by other software
•
Customising the Project Manager menus
Configuring INTREPID under Windows
Parent topic:
Configuring and
using
INTREPID (R04)
These notes assume that you are installing INTREPID to the directory
c:\intrepid. Adjust the paths given here according to your installation drive and
directory.
In this section:
•
Windows System settings
•
Program Manager launch
Windows System settings
Parent topic:
Configuring
INTREPID
under Windows
INTREPID obtains its settings from install.cfg. in the INTREPID config
directory. See INTREPID system parameters and install.cfg (R07).
Program Manager launch
Parent topic:
Configuring
INTREPID
under Windows
The INTREPID installer puts an entry for INTREPID in the Start menu and an icon
on the desktop.
You can set up any shortcut or icon that executes
install_path\bin\jfmanager.exe
(where install_path is the location of your INTREPID installation, for example,
c:\Program Files\intrepid).
If you include the INTREPID installation path in the PATH environment variable of
your computer or shell, you can start INTREPID using the command
jfmanager.exe from a command window. See "Including the INTREPID
installation folder in PATH" in INTREPID system parameters and install.cfg
(R07).
If you want to use the Old Project Manager, use the instructions above with the
application file fmanager.exe.
Library | Help | Top
© 2012 Intrepid Geophysics
| Back |
INTREPID User Manual
Library | Help | Top
Configuring and using INTREPID (R04)
2
| Back |
Configuring INTREPID under Solaris and SunOS
Parent topic:
Configuring and
using
INTREPID (R04)
You can find the system parameters associated with these operating systems in
install.cfg. See INTREPID system parameters and install.cfg (R07) for
details.
In this section:
•
System parameters
•
Virtual memory
•
Number of files (Solaris)
System parameters
Parent topic:
Configuring
INTREPID
under Solaris
and SunOS
You must set the system parameter LD_LIBRARY_PATH to point to the dynamic
libraries install_path/bin/ (where install_path is the location of your
INTREPID installation.
Virtual memory
Parent topic:
Configuring
INTREPID
under Solaris
and SunOS
You may need to adjust the virtual memory settings for these computers
Solaris virtual memory
Use the commands
mkfile 100m swap1
swapon swap1
SunOS virtual memory
Use the commands
mkfile 100m swap1
swapon –a swap1
Number of files (Solaris)
Parent topic:
Configuring
INTREPID
under Solaris
and SunOS
Library | Help | Top
By default Solaris allows only 64 open files. When working with an INTREPID
dataset this translates to 32 vector dataset fields. INTREPID can reserve and reuse
the last two file 'channels' if you have more than 32 fields. Alternatively, request
your systems administrator to increase the number of files to, say, 256.
© 2012 Intrepid Geophysics
| Back |
INTREPID User Manual
Library | Help | Top
Configuring and using INTREPID (R04)
3
| Back |
Accessing INTREPID data from both UNIX and Windows
Parent topic:
Configuring and
using
INTREPID (R04)
INTREPID automatically converts data when you are accessing it from both UNIX
and Windows environments. You will, however, need to attend to some aspects of
drive, path and file names.
When using INTREPID interactively you will naturally use the notation appropriate
to the system you are using. When using INTREPID in batch mode you will need to
modify the task (.job) or hard copy (.map) specification files to allow for drive names
vs letters.
Drive names vs drive letters Under UNIX, disc drives have names similar to
directory names, whereas under Windows disc drives have a single letter followed
by a colon. You must modify your task specification files and hard copy
specification files or use variables accordingly for each system. See "Compatibility
between Windows and UNIX" in INTREPID task specification (.job) files (R06)
and "Compatibility of MAPCOMP between Windows and Unix" in MAPCOMP
Map Specification Language (R20) for further instructions.
Case sensitivity UNIX traditionally has long case sensitive drive, directory and file
names. Windows supports long directory and file names but it uses them case
insensitively. You will reduce any problems arising from this difference by
establishing an upper and lower case convention for your data.
INTREPID itself is only partially case-insensitive, so we recommend that you do
establish the convention.
Forward slash and backslash INTREPID will automatically interpret path names
in task (.job) or hard copy (.map) specification files no matter which platform
you are using and no matter whether you use / or \.
LSB / MSB automatic conversion INTREPID will seamlessly convert data
between different methods of floating point number representation (least
significant byte first (LSB) vs most significant byte first (MSB)) under different
operating systems.
Access to UNIX features from Windows (Hint) If you are regularly accessing
INTREPID datasets or importing data across a network where you are using a
Windows computer and the data resides on a UNIX system, you will find that
INTREPID accesses the data seamlessly. You may, however, wish to use some
UNIX features not normally available under Windows. In this case you may find
software package such as Cygwin or MKS Toolkit useful.
MKS Toolkit:
Library | Help | Top
•
Provides access to common UNIX utilities such as vi, grep and awk under
Windows
•
Enables you to write UNIX shell scripts, eg: Korn and C-shell
•
Enables you to mount SCSI tape devices and extract data from tar format tapes.
© 2012 Intrepid Geophysics
| Back |
INTREPID User Manual
Library | Help | Top
Configuring and using INTREPID (R04)
4
| Back |
Space for temporary files
Parent topic:
Configuring and
using
INTREPID (R04)
Make sure you have sufficient disc space on your computer for temporary files. See
"Temporary directories" in INTREPID database, file and data structures (R05) and
section "install.cfg" in INTREPID database, file and data structures (R05)) for more
information.
Diagnostic reporting options
Parent topic:
Configuring and
using
INTREPID (R04)
INTREPID reports its progress whilst processing your data.
Under UNIX the report text appears in the background window (stdout) of the
INTREPID task. You can redirect the report to a text file by launching the tool with
a command and adding a redirection specification. For example (redirecting to
intrepid.log):
gridding.exe > intrepid.log
Under Windows INTREPID automatically saves the report to a file called
nt.username.log in the install_path/tmp directory, where install_path is
the location of your INTREPID installation and username is your Windows user
name. You can configure this file to go into a different directory, eg: your working
directory.
Each time you execute a task INTREPID will append the report to
nt.username.log file. If you delete or rename nt.username.log, INTREPID will
start a new nt.username.log.
For more information about starting INTREPID see "How to start INTREPID—
Overview" in Introduction to INTREPID (R02).
Library | Help | Top
© 2012 Intrepid Geophysics
| Back |
INTREPID User Manual
Library | Help | Top
Configuring and using INTREPID (R04)
5
| Back |
INTREPID Memory limits and tiling
Parent topic:
Configuring and
using
INTREPID (R04)
You can find the system parameters associated with these products or operation
modes in install.cfg. See INTREPID system parameters and install.cfg
(R07) for details.
When you are processing grid datasets, INTREPID stores the whole grid in memory
wherever possible. If the grid is too large to fit in memory, INTREPID processes a
section at a time. This process is called tiling.
INTREPID has a criterion for deciding whether tiling is necessary. If the number of
grid cells is greater than the value of the system parameter INTREPID_MEMORY,
then INTREPID will use tiling.
Grid size limits for tiling
INTREPID requires approximately 25 bytes of memory for each grid cell. We
recommend that you set the INTREPID_MEMORY (maximum numbers of grid cells
to process without tiling) to be 2/3 to 3/4 of your computers available RAM (in Mb).
You should set the value of the tiling variables so that, while the CPU is kept busy,
the computer should not thrash the hard disc drive with heavy virtual memory
demands. You can use your system activity monitor to observe swap space usage vs
CPU usage. For optimum performance, adjust the tiling variables to keep the CPU as
close to 100% as possible.
Modifying configuration files
Parent topic:
Configuring and
using
INTREPID (R04)
You may wish to modify configuration (.cfg) files or the Project Manager menu file
according to your requirements. See "Configuration (.cfg) files, menu and
.intrepidlock" in INTREPID database, file and data structures (R05) for full
details about configuration files. Some settings in these files can prevent INTREPID
working if they are incorrect. Please contact our technical support service before
modifying them if you are at all unsure about the implications of changing them.
Accessing INTREPID datasets and tools using other software
Parent topic:
Configuring and
using
INTREPID (R04)
You can access INTREPID datasets and tools using other software.
In this section:
•
Geosoft Oasis Montaj access to INTREPID tools
•
ERMapper access to datasets
•
ArcView, MapInfo and ERMapper access to datasets—INTREPIDlynx
•
Print Map output in ARC/INFO format
•
ModelVision
Geosoft Oasis Montaj access to INTREPID tools
Parent topic:
Accessing
INTREPID
datasets and
tools using other
software
Library | Help | Top
See "Geosoft Oasis montaj access to INTREPID tools" in Introduction to INTREPID
(R02) for instructions.
© 2012 Intrepid Geophysics
| Back |
INTREPID User Manual
Library | Help | Top
Configuring and using INTREPID (R04)
6
| Back |
ERMapper access to datasets
Parent topic:
Accessing
INTREPID
datasets and
tools using other
software
ERMapper and INTREPID grid datasets have identical formats. Provided you have
configured ERMapper with the datum and projection of the grid, it can display any
INTREPID grid dataset.
ArcView, MapInfo and ERMapper access to datasets—INTREPIDlynx
Parent topic:
Accessing
INTREPID
datasets and
tools using other
software
You can access INTREPID vector and grid datasets (and INTREPID tools) using
ArcView, MapInfo and ERMapper through INTREPIDlynx.. See INTREPIDLynx—
access for ArcView, MapInfo and ERMapper (T29) for full details.
Print Map output in ARC/INFO format
Parent topic:
Accessing
INTREPID
datasets and
tools using other
software
The INTREPID Map Print tool can generate format vector files for contours and
flight path plots in ARC/INFO format. See "The devices.cfg file" in Map
composition configuration files (R21).
ModelVision
Parent topic:
Accessing
INTREPID
datasets and
tools using other
software
If you wish to access INTREPID datasets using ModelVision, consult the ModelVision
documentation or contact Encom technical support for assistance.
Accessing data created by other software
Parent topic:
Configuring and
using
INTREPID (R04)
Using INTREPID you can:
•
•
Library | Help | Top
Directly open and directly write to data files in a number of formats. This is
different to importing data into an INTREPID dataset, because the INTREPID
tool opens the data directly and saves it back into its native format. See:
•
"Direct access by INTREPID" in INTREPID direct access, import and export
formats (R11)
•
Direct access to relational databases (R16)
Import and export data between INTREPID datasets and a wide variety of data
formats. See:
•
"Import and export formats" in INTREPID direct access, import and export
formats (R11)
•
Importing to INTREPID datasets (T05)
•
Exporting from INTREPID datasets (T07)
© 2012 Intrepid Geophysics
| Back |
INTREPID User Manual
Library | Help | Top
Configuring and using INTREPID (R04)
7
| Back |
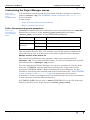
Customising the Project Manager menus
Parent topic:
Configuring and
using
INTREPID (R04)
You can find the system parameters associated with these products or operation
modes in install.cfg. See INTREPID system parameters and install.cfg
(R07) for details.
In this section:
•
Paths, filenames and system parameters
•
How to customise the menus
Paths, filenames and system parameters
Parent topic:
Customising the
Project Manager
menus
INTREPID constructs the Project Manager menus from information in a menu file.
Menus files are located in the install_path/config directory (where
install_path is the location of your INTREPID installation).
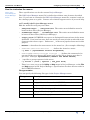
Tool
Platform
File Name
Project Manager
All
fmanager.cfg
Old Project
Manager
Windows
menunt
UNIX
menu
You can modify the menu files. For example, you can add startup commands for
other software on your system for easy access while using the Project Manager.
Multiple versions of the menus file
The current Project Manager only supports a single menu specification file,
fmanager.cfg. If you want multiple versions, you need to maintain them yourself
and rename them to fmanager.cfg yourself.
If yu are using the Old Project Manager, you can have a number of versions of the
menu file. INTREPID uses the menu file according to the value of the system
parameter INTREPID_MENU. Before launching the Project Manager, set this
variable to contain the name and full path of the required menu file. (See INTREPID
system parameters and install.cfg (R07) for instructions about system
parameters.) Contact our support service for detailed help if you want to edit menus
or have alternate menus for different purposes.
If INTREPID_MENU has no value (= NULL) INTREPID will use the file with name
shown in the table above, in the directory install_path/config.
Library | Help | Top
© 2012 Intrepid Geophysics
| Back |
INTREPID User Manual
Library | Help | Top
Configuring and using INTREPID (R04)
8
| Back |
How to customise the menus
Parent topic:
Customising the
Project Manager
menus
These specifications are for the current Project Manager.
The Old Project Manager menu file is similar but without some features described
here. If you want to customise the Old Project Manager menu file, examine it and use
the existing syntax as a guide. Contact our technical support service if you need help.
>> To modify the Project Manager menu
Edit the menu file using any text editor.
•
Subsystem Begin .. Subsystem End The entire menu definition must be
between these lines (Project Manager).
•
FileManager Begin .. FileManager End The entire menu definition must
be between these lines (Old Project Manager).
•
Single_words INTREPID uses spaces to distinguish between items in the menu
definition. If an item has more than one word you must join the words with some
character other than a space. Underscore '_' is the most popular character for this
purpose.
•
MenuBar = describes the menu names in the menu bar. (See examples following)
•
menuname={menuitem menuitem ...} defines the items in a menu
e.g., Edit = {SpreadSheet Profile FlightPath}
•
menuitem={*command filetype filetype ...} defines the command to be
executed if the user chooses this menu item and the file or dataset type that it
processes. Example: SpreadSheet={*dbedit.exe GRIDS VECTOR}
•
| specifies a group separator in the menu
e.g., Filter = {Line | Spatial | Pre_post Grid}
•
There is no user access to the Utility or Help menu in Project Manager, or the File
and Help menus in Old Project Manager. Specifications for these menus reside in
the INTREPID software.
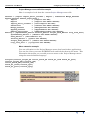
File type notation
You can specify the following file types in the Project Manager menu
Library | Help | Top
File type
Description
ANY
Any file
GRIDS
Any grid dataset format that INTREPID can read or write
VECTOR
Any vector dataset format that INTREPID can read or write
INTREPIDJOB
Task specification (.job) files
INTREPIDMAP
Map specification (.map) files in MAPCOMP language
3DMODEL
3D GeoModeller projects
© 2012 Intrepid Geophysics
| Back |
INTREPID User Manual
Library | Help | Top
Configuring and using INTREPID (R04)
9
| Back |
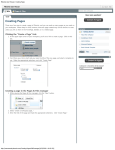
Project Manager menu definition sample
Here is a sample of code from the current Project Manager menu file
Dataset = {Import Import_Ascii_Columns | Export | Subsection Merge_Dataset
Append_Dataset Remove_Duplicates }
Import
= {*import.exe ANY}
Export
= {*export.exe GRIDS VECTOR}
Import_Ascii_Columns = {*asciiimport.exe ANY}
Subsection
= {*subset.exe GRIDS VECTOR}
Merge_Dataset
= {*MergeFields.exe VECTOR}
Append_Dataset
= {*AppendTable.exe VECTOR}
Remove_Duplicates
= {*RemoveDuplicates.exe VECTOR}
Editing = {Spreadsheet_Editor Profile_Editor Flight_Path_Editor Clip_Line_Tool}
Spreadsheet_Editor = {*dbedit.exe GRIDS VECTOR}
Text_Editor = {*AsciiEditor.sh}
Profile_Editor = {*pedit.exe VECTOR}
Flight_Path_Editor = {*fedit.exe GRIDS VECTOR}
Clip_Line_Tool = {*jclipline.exe VECTOR}
Menu extension example
You can add options to the Project Manager menu that launch other applications.
You can also create your own INTREPID tools and include them in the menu. This
illustration shows how you can add your own menu to the Project Manager menu
using the menu definition language.
Scripts={Contour_flight_A4 Colour_Stack_A4 Stack_A1_land Stack_A1_port}
Contour_flight_A4={*launch_cf4}
Colour_Stack_A4={*launch_cs4}
Stack_A1_land={*launch_sp1l}
Stack_A1_port={*launch_sp1p}
Library | Help | Top
© 2012 Intrepid Geophysics
| Back |