1
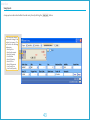
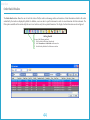
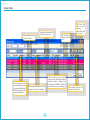
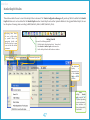
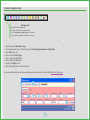
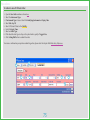
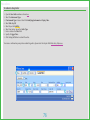
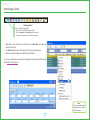
Contents
Edited by Foxit PDF Editor
Copyright (c) by Foxit Software Company, 2004
For Evaluation Only.
Introduction
5
About Exchange™
6
Using this Manual
7
Documentation Updates and Feedback
8 Index of Concepts
Getting Started
9 Interface
Digital User Manual (PDF)
10 Order Entry Window
The Login Screen
11
Keyboard Shortcuts
34
Client Codes, Snap Quote Symbols
35
Concepts
36
37
38
40
Instrument Type, Underlying Instrument, Order Type, Side, Price, Size, Validity
41
Changing the Password
12
Sync, Own/Cli, Client Code, Client Name, Disclosed Size, Expiry Date/Time, Quick Lots
42
Editing a User Environment
13
Snap Quote
43
Basic Interface Operation
Locking the Workstation
14 Order Book Window
16
44
Filters and Field Settings
45
Default Fields
46
Table Settings
18
Composite Fields
22
Market Depth Window
47
Gradient Color
23
My Trades Window
48
Save as Default
24
Filters
Contract Selector Window
25 Market Watch Window
Profiles
27
LastSeenProfile
Workspaces
Preferences Window
28
31
Order Entry Preferences
33
50
Market Watch Window Right-Click Menu
51
Default Fields
52
29 Message Log Window
30 Snap Quote Window
General Preferences
49
Net Position Window
Default Fields
53
54
55
56
Contents
Time and Sales Window
57
The Ticker
58
Ticker Settings
Contract Information Window
Default Fields
Contract List Window
Default Fields
Most Active Contracts window
Default Most Active Contracts Fields
Top Gainers and Losers window
Default Fields
59
60
61
62
63
64
65
66
67
Manage Users Window
68
Margin Watch Window
69
Procedures
70
Order Entry Preferences
71
Submitting Orders
72
To Submit a Regular Order
73
To Submit a Good Till Time Order
74
To Submit a Good Till Date Order
75
To Submit a Stop Order
76
Amending an Order
77
Cancelling an Order
78
Edited by Foxit PDF Editor
Copyright (c) by Foxit Software Company, 2004
For Evaluation Only.
Mass Order Cancellation
Appendices
Document Change Control
79
82
83
Introduction
Indian Commodity Exchange Trader User Manual
About Exchange™
Edited by Foxit PDF Editor
Copyright (c) by Foxit Software Company, 2004
For Evaluation Only.
Introduction to Indian Commodity Exchange Trader
The Indian Commodity Exchange Trader Front End provides a user-friendly interface for market participants to submit and manage their order
interest, and to view market data such as order books, market statistics and time and sales information. It also contains features to help enhance the
efficiencyoftheusersuchastheabilitytosaveprofilesandtocustomizethecontentandformatofwindows.
The Indian Commodity Exchange Trader front-end offers different functionality depending on the type of user. The two types of users are identified
as a Standard
Trader and a Trading Administrator Trader roles
. are specified
in the Exchange
Manager front-end when creating a user. This manual
describes functionality applicable to both types of users.
6
Using this Manual
by Foxit PDF Editor
Indian Edited
Commodity
Exchange Trader User Manual
Copyright (c) by Foxit Software Company, 2004
For Evaluation Only.
This manual is divided into four sections:
Getting Started
This section deals with setting up, basic operation and customization of the Indian Commodity Exchange Trader Application.
Concepts
TheConceptssectiondefinesallconceptsusedwithintheIndian Commodity Exchange Trader Application and this manual. Concepts are displayed
in this manual with a yellow underline like this . Descriptions for any concept highlighted in this manner may be found in the Concepts Section.
Interface
The Interface section is a detailed description of the Indian Commodity Exchange Trader Application interface.
Procedures
Thefinalsectionofthismanualcontainsdetailedstep-by-stepinstructionsforusingtheIndian Commodity Exchange Trader Application.
7
Documentation Updates and Feedback
This User Manual is intended for use with the recommended version of the Indian Commodity Exchange Trader front-end. Updates to this
manual will be made available with each Indian Commodity Exchange Trader release.
For feedback, comments and suggestions please contact ICEX customer support at
8
[email protected]
Getting Started
Getting Started
Digital User Manual (PDF)
by Foxit PDF Editor
Indian Edited
Commodity
Trader
Copyright
(c) by FoxitExchange
Software Company,
2004 User Manual
For Evaluation Only.
This document is set for optimized reading using Adobe® Reader® version 8.0 or newer.
Viewing the document using an alternative media reader could be possible. However some of the features used in this document might not be supported. Click
to download the latest version of Adobe®Reader®.
Navigating the Document using Adobe® Reader®
The Page Navigation tool bar opens by default.
To move through the document, do one of the following:
• Click the Previous Page or Next Page on the tool bar.
• Choose View Æ Go To Æ [Location]. Location choices are First Page, Previous Page, Next Page, Last Page, Previous View, or Next View.
• Choose View Æ Go To Æ Page, and then type the page number in the Go To Page dialog box.
• Press the Page Up and Page Down keys.
Using Bookmarks
Bookmarks provide a table of contents and represent the chapters and sections in a document. Bookmarks appear in the navigation panel.
• Click the Bookmarks button, or choose View Æ Navigation Panels Æ Bookmarks.
• To jump to a topic, click the bookmark. Click the plus (+) or minus (-) sign to expand or collapse the bookmark contents.
Searching this Manual
Current page
Magnification
number
The Find option will allow you to search for a particular word or
phrase within the document.
• To Find, Select Ctrl + F or choose Edit Æ Find
Once the search is completed, the relevant word/phrase will be
highlighted within the document. If there is more than one instance
of the search criteria within the document, the Find Previous / Find
Previous Page View
Next buttons
will appear on the navigation tool bar and will Previous Page/
/ Next Page View
Next Page
allow you to browse each instance of the search criteria.
Search for a particular
word/phrase
Reference Links
Certainsectionsofthedocumentrefertoanotherchapterorsectionfordetaileddescriptionofcertainfields.Thesereferencelinkscanbeidentifiedbyan
underline like this.
Clicking the
Arrow on the bottom right hand corner of each page will allow the user to jump back to the Contents page.
10
Getting Started
The Login Screen
by Foxit PDF Editor
Indian Edited
Commodity
Trader
Copyright
(c) by FoxitExchange
Software Company,
2004 User Manual
For Evaluation Only.
Upon running the Indian Commodity Exchange Trader front-end, the user is first
presented
with
the login screen.
A user environment must be selected prior to login.
1. Click the Login Options button to expand the pane and display additional options. (The default view is shown on the left).
2. Click on Select System.
3. Select an environment from the list of available systems.
To proceed with login:
4. Enter the Member ID.
5. Enter the User ID.
6. Enter the Password.
7. Click the Login button.
The user will then be presented with the main application screen.
Load Profile option
8. Checking the Load Profileoptionwillenabletheuser’slastseenprofiletoloadonlogin.
Current front-end version
2
1
4
5
6
Systems list
3
8
7
11
Getting Started
by Foxit PDF Editor
Indian Edited
Commodity
Trader
Copyright
(c) by FoxitExchange
Software Company,
2004 User Manual
Changing the Password
For Evaluation Only.
The user’s current password can be changed using the following steps:
Before login,
1. Enter your New Password.
2. Type your new password in the Confirm Password field.
Login using the user-name and current password as shown here.
The new password will be active from the next user login.
1
2
12
Getting Started
Indian Commodity Exchange Trader User Manual
Editing a User Environment
1.
2.
3.
4.
5.
6.
7.
8.
9.
Select Edit Systems.
Select a system from the Select System list. To Enter a new system, select < New Entry > from the Select System list.
Ifconfiguringanewsystem,enteranameforthesystem.
If required change the Description.
If required edit the SReg Port.
If required edit the MDMC SIDs.
If required edit the FLB port.
If required edit the FLB IP.
Click the Edit button to save changes.
1
6
2
7
3
8
4
5
9
13
Getting Started
Basic Interface Operation
by Foxit PDF Editor
Indian Edited
Commodity
Trader
Copyright
(c) by FoxitExchange
Software Company,
2004 User Manual
For Evaluation Only.
This chapter deals with basic operation of the Indian Commodity Exchange Trader Application.
Window Manipulation
The Indian Commodity Exchange Trader Application is designed to be similar in operation to a standard Microsoft Windows® user interface
and shares many common features, such as:
Window Operations
1. The Minimize button - Clicking this button minimizes the
selected window.
2. The Maximize button - Clicking this button maximizes the
windowtofilltheentireworkspace.
3. The Close button - This button closes the current window.
4. Window re-sizing - Some windows may be re-sized by
“grabbing” the edge of the window with the mouse pointer
and dragging to the desired size. Any window that causes the
mouse pointer to change to a double-headed arrow (as shown
here ÙÚ ) can be re-sized.
5. Moving a window - Any window may be moved by clicking on
the title bar and moving the window to its new location.
1
6
Window Controls and Field Behavior
6. Spin buttons - Clicking on a Spin button can increase or decrease the selected control
by the default Order Quantity or Price Tick for the symbol.
will display a list of all available values for
7. Drop-down list - Clicking on the arrow
the selected control. You may then select from this list by clicking on the desired
value.
14
7
5
2
3
Getting Started
8. Scroll Bars-Ascrollbarallowsyoutonavigatealistwhichistoolarge to fit in
the display area. The user can scroll through the list by clicking and dragging the
scroller or by clicking on the scroll buttons.
9. Tabs - Some windows such as the Market Depth window (shown right) uses Tabs
to group controls by relevance. Tabs are also used to select symbols on windows
with a Symbol Selection bar.
10. Columns - Some windows contain information displayed in tabular form. This
information may be sorted in ascending order by clicking on a Column Header.
Clicking a second time will sort the column in descending order. The third time
reverts the column to its original status. An arrow symbol denotes the sort order
as follows:
•
Red arrow - ascending order
•
Blue arrow - descending order
9
The selected Tab
10
8
8
15
Getting Started
by Foxit PDF Editor
Indian Edited
Commodity
Trader
Copyright
(c) by FoxitExchange
Software Company,
2004 User Manual
Locking the Workstation
For Evaluation Only.
The user has the option of locking/unlocking the workstation.
1. Select the Lock Workstation option under File on the menu bar.
2. The workstation will now be locked and the user will be presented
with the Workstation is Locked prompt.
3. To unlock the workstation, enter the password - this is the same password used at login.
4. Click OK.
1
2
3
4
16
Getting Started
Common Right-Click Options
by Foxit PDF Editor
Indian Edited
Commodity
Trader
Copyright
(c) by FoxitExchange
Software Company,
2004 User Manual
For Evaluation Only.
The following right-click options appear on all windows in the Indian Commodity Exchange Trader application, apart from the Workspace
Manager and Preferences windows.
• Hide Title Bar
• Float Window
• Make Independent of Workspace
• Attach to Current Workspace
The following additional options may be available.
• Shrink
• Contract Selector
• Enable/Disable Auto Scroll
Toggles title bar visibility, allowing the
window to be locked in place.
Selecting this option will open the
Contract Selector window, which allows
users to add or remove Instruments.
Enables/disables the
Auto Scroll function.
Selecting this option will allow the
window to behave independently of
the Trader Workstation.
Allows the window to be visible
independent of the selected workspace.
Attaches the window to the
currently selected workspace.
17
Getting Started
Table Settings
by Foxit PDF Editor
Indian Edited
Commodity
Trader
Copyright
(c) by FoxitExchange
Software Company,
2004 User Manual
For Evaluation Only.
Table Settings allows the user to change the appearance of a window (For example, customize the display fields, text colour and font) by changing the display
properties of that window. (This feature is unavailable for the Order Entry, Snap Quote, Contract Information, Preferences, Workspace Manager, Top Gainers
andLosersandMostActiveContractswindows.)Theusercanalsoselectthecolumns/fieldstobedisplayed,changetheappearanceofthecolumnsandthe
information that will be displayed in them. Selecting the Table Settings option from the right-click menu of a window opens the Table Settings window. A
sample Table Settings window is shown below.
18
Getting Started
Indian Commodity Exchange Trader User Manual
The Table Settingswindowconsistsofaleftpanelandarightpanel.Theleftpaneldisplaysmessagesandfieldsrelevanttotheselectedwindow.Fieldsthat
are presently displayed on the window are in bold.
Theright-sidepaneldisplaysfieldsthatarepresentlyshownonthewindow.AfieldcanbeeitherStandardorComposite.Acompositefieldisacombination
ofseveralstandardfields.Eachfieldisidentifiedbya:
•
Field Name–Thiscontainsthenameofthefieldwhichtheuserselectsfromtheleftpanel.Thiscannotbeedited.
•
Column Name–Nameofthefielddisplayedonthewindow.ThismayormaynotbethesameastheField Name.Doubleclickacolumnnameofafieldto
change it.
•
Type–SpecifiesifthefieldisStandard or Composite.Thisfieldisnoteditable.
•
Alignment–Specifiesfieldalignment.Theusercanchangethealignmentbyselectingthisoptionforafieldandselectingtherequiredalignmentfromthe
list provided. The user can also change the alignment by selecting the alignment buttons.
•
Width – The width of the column in pixels.
•
Max Decimal – The maximum number of decimal
places permitted for a value. Selected by means of a
drop-down menu with integers from 0 to 9.
•
Min Decimal – The minimum number of decimal places
permitted for a value. Selected by means of a dropdown menu with integers from 0 to 9.
•
Show Zero–Specifieswhetherthevalue0shouldbe
displayedonafield.Theusercanchoosetohavethe
relevantfieldleftblankwhenthefieldvalueiszero.
Select TRUE/FALSE from the drop-down menu to
specifyifthevalue0shouldbedisplayedorifthefield
istobeleftblank.Thisoptionisonlyvalidforfields
which have integer values.
19
Getting Started
by Foxit PDF Editor
Indian Edited
Commodity
Trader
Copyright
(c) by FoxitExchange
Software Company,
2004 User Manual
For Evaluation Only.
To select a field for displaying on a window
Toselectafield,double-clickonitintheleftpanel.Selectedfieldswillbedisplayedinthepanelontheright.Usingthispanel,theusercanchangethe
propertiesjustdescribed.Double-clickafieldtochangeit.
Show Header Checkbox –
Will show/hide the headings
of each column.
To remove a field from a window
1. Selectthefieldtoberemovedinthepanelontheright.
2. Press the Deletekeyonthekeyboardordouble-clickthefield.
To change the displayed font color of a field
1. Selectthefieldtochangethefontcolorfromtherightpanel.
and select the required
2. Click the Font Color arrow button
font color.
To change the displayed background color of a field
1. Selectthefieldyouwishtomodifyfromtherightpanel.
2. Click the Selected Columns arrow button
quired color.
and select the re-
To change the background color of the window
Click the Background Color arrow button
required color.
and select the
To change the font
. This button will
1. Click the Font button
display the name and size of the current font being used.
2. The font window will be displayed. You may change the Font,
Font Style and Size.
3. Click the OK button.
To change the selection color
Click the Selection Color arrow button
color.
and select the required
20
Draw Grid Checkbox – Will
show/hide gridlines around
each cell in the table.
Getting Started
The Show Rect Selector Checkbox
by Foxit PDF Editor
Indian Edited
Commodity
Trader
Copyright
(c) by FoxitExchange
Software Company,
2004 User Manual
For Evaluation Only.
Show
Rect
Selector
Checkbox – Will show/hide a
grey box adjacent to each row
(shown below) in the table for
easier selection
21
Getting Started
Composite Fields
Edited by Foxit PDF Editor
Copyright (c) by Foxit Software Company, 2004
For Evaluation Only.
Thefieldtypeidentifiesafieldasstandard or composite.Acompositefieldisacombinationofseveralstandardfields,createdbydraggingstandardfieldsonto
the window as described below.
To create a Composite Field
Click the
button on the Table Settings window. The Set
Composite Field window (shown right) is displayed.
1. Enter a name for the column.
2. Ifacolumnnameisnotentered,thecompositefieldappears
as the column name.
3. SelectafieldtoaddfromtheleftpaneloftheTable Settings
window.
4. Drag and drop this field on to the Set Composite Field
window.
5. To add text (characters, etc.) after a field, simply enter it
into the Free Text box and click Add.
6. SelectanotherfieldtoaddfromtheleftpaneloftheTable
Settings window.
7. Drag and drop this field on to the Set Composite Field
window.
8. Repeat steps 4 – 7 until the required composite field is
created.
9. Click OK.
Thecompositefieldcreatedisdisplayedintherightpanelof
the Table Settings window.
To edit a Composite Field
1. Selectanexistingcompositefieldtoeditfromtherightpanelbyclickingonit,highlightingitsrow.
2. Click the
button on the Table Settings window. The Set Composite Field window (shown right)
isdisplayed.Thefieldmaythenbeedited.
To remove a Composite Field
1. SelectthecompositefieldtoremovefromtherightpaneloftheTable Settings window.
2. Press the Deletekeyonthekeyboardordouble-clickthefield.
22
Getting Started
by Foxit PDF Editor
Indian Edited
Commodity
Trader
Copyright
(c) by FoxitExchange
Software Company,
2004 User Manual
Gradient Color
For Evaluation Only.
The user can create a linear gradient color for the table.
To set a Gradient Color
Example scenario: Set a two color gradient from
green to red.
1. Check the Enable Gradient Color box.
2. Select TWO COLOR as the Gradient Type.
3. Select the Starting Color.
4. Select the Ending Color.
5. Select the Text Color.
6. Set the Amount of Color Change slider
according to the number of steps to be shown
in the gradient.
7. Set the No of Different Colors slider according
to the number of colors to be shown in the
gradient.
1
3
9
4
5
6
The Repeat Colors Option
8. Checking the Repeat Colors box will make the
gradient repeat itself.
The Preview Option
The Preview pane will allow the user to preview
color options for individual rows and panes.
9. Select a row in the preview pane.
10. Change the row color and the font color.
11. Use the Reset button to revert to the original
settings.
10
2
7
11
8
23
Getting Started
by Foxit PDF Editor
Indian Edited
Commodity
Trader
Copyright
(c) by FoxitExchange
Software Company,
2004 User Manual
Save as Default
For Evaluation Only.
Oncetheuserhasfinalizedthetablesettingsforawindow,itcanbesavedasthedefaultsettingforthattypeofwindow.Thelayoutofanynewinstancesof
this window type would follow the default settings.
1. Click on the window icon on
1
the title bar
2. Select the Save as default option
2
1
Deleting Default Configurations
Theusercandeletethedefaultconfigurationsfor
all windows using the following steps.
1. Click on Profile in the menu bar
2. Select the Delete User Default Config option
3. Click Yesontheconfirmationprompt
2
3
24
Getting Started
Contract Selector Window
by Foxit PDF Editor
Indian Edited
Commodity
Trader
Copyright
(c) by FoxitExchange
Software Company,
2004 User Manual
For Evaluation Only.
As the number of tradeable symbols is quite large, the Contract Selector is a quick means of locating required symbols. It can be invoked through the rightclick menus in the Order Entry, Order Book, My Trades, Market Depth, Time and Sales and Snap Quote windows. Alternatively, a hotkey for the Contract
SelectorwindowcanbespecifiedintheUser Preferences window.
25
Getting Started
by Foxit PDF Editor
Indian Edited
Commodity
Trader
Copyright
(c) by FoxitExchange
Software Company,
2004 User Manual
For Evaluation Only.
Applies filter criteria
Removes all filters.
Restricts the symbol list
based on the criteria given
(wild cards such as “?”,
and “*” can be used).
Filters by Underlying Instrument.
Filters by Expiry Date.
The following options are available for
the selected symbol via the right-click
menu:
Open a new Order Entry window
Open the Market Depth window
Open the My Trades window
The windows will be populated based
on data for that instrument.
26
Getting Started
Profiles
by Foxit PDF Editor
Indian Edited
Commodity
Trader
Copyright
(c) by FoxitExchange
Software Company,
2004 User Manual
For Evaluation Only.
The Indian Commodity Exchange Trader application allows
the user
to configure
the
layout of the
interface
and
save layouts
for
future
use as profiles
using
Window
Profiles
Loading, saving
and deleting profiles
is achieved
which can be accessed through the menu bar. The user is able to have multiple
user profiles
per user login.
These
profiles
allow the user to create
and
save specific
window layouts for
later access.
The
saved
layouts
include
the
instruments selected for each window.
Selecting either of the
three options; Load Profile,
Save Profile, Delete Profile,
launches
the
relevant
window for that function
as shown here for the Save
Profile function.
Save Profile window
Enter a name for the
profile to be saved
Click ‘Save’ to save
current profile
27
Getting Started
by Foxit PDF Editor
Indian Edited
Commodity
Trader
Copyright
(c) by FoxitExchange
Software Company,
2004 User Manual
Last Seen Profile
For Evaluation Only.
Theuserhastheoptiontoautomaticallysavetheprofileonexit.Thiswillsavethelastseenprofile.AtthenextinstancetheuserlogsintotheTraderfrontend,thelastseenprofilewillload.Theuserthenhastheoptiontoloadanypreviouslysavedprofile.
Toconfigurethelastseenprofile:
Getting Started
To open the Preferences window:
1. Click the Preferences button on the toolbar.
2. Select the Preferences option under Settings on the menu bar.
1. Select the General tab.
2. Check the Save profile on exit option.
3. Click Save & Close.
1
2
Note:
In order for the last seen profile to load at the
next login, the Load Profile option to has to
be checked in the Login Screen. Please refer
the chapter titled Login for further details.
3
28
Getting Started
Workspaces
by Foxit PDF Editor
Indian Edited
Commodity
Trader
Copyright
(c) by FoxitExchange
Software Company,
2004 User Manual
For Evaluation Only.
The Indian Commodity Exchange Trader front-end supports multiple workspaces. A workspace is an option to increase screen real-estate, by configuring
the Trader application
or workspaces,
In each workspace,
to consist of multiple
pages
each one of them containing
various windows.
the layout ofwindowscanbeconfigureddifferently.TheusercanconfigureworkspacesusingtheWorkspace Manager window.
Getting Started
To open the Workspace Manager:
1. Click the Workspace Manager button on the tool bar.
2. Select Settings > Workspace Manager on the menu bar
3. UsethehotkeydefinedinthePreferenceswindow
To create a new workspace
1.
2.
3.
4.
In the Workspace Manager window, enter a name for the New Workspace (<10 characters).
Click Create.
The new workspace will appear as a new button.
To delete a workspace, simply select the workspace and click the
button
1
2
3
To duplicate a workspace
The user can copy the layout in one workspace to another workspace as shown below:
1. In the Workspace Manager window, select an existing workspace.
2. Select the source workspace (to clone from)
3. Click Duplicate.
2
29
3
1
4
Getting Started
Preferences Window
by Foxit PDF Editor
Indian Edited
Commodity
Trader
Copyright
(c) by FoxitExchange
Software Company,
2004 User Manual
For Evaluation Only.
The User Preferenceswindowisusedtofine-tunethefunctionalityofotherwindowsintheIndian Commodity Exchange Trader application. This
window
can also
windows
and window-specific
functionality.
Only one preference
window
can be
be used
to define
hot keys
for accessing
opened
and it
is independent of workspaces.
Getting Started
Use one of the following methods:
1. Click the User Preferences Button (shown here)
2. Select Settings > Preferences
3. Use the hotkey defined in the Preferences window
Preferences are grouped
into the following sections:
• General
• Order Entry
• Keyboard shortcuts
• Client Codes
• Snap Quote Symbols
30
Getting Started
by Foxit PDF Editor
Indian Edited
Commodity
Trader
Copyright
(c) by FoxitExchange
Software Company,
2004 User Manual
For Evaluation Only.
General Preferences
ThistabenablestheusertoconfiguregeneralpreferencesthataffectthebehavioroftheTraderapplication.
UndertheGeneraltabtheusercanconfigurethefollowing;
Application
Allows the user to change the following general settings across all windows:
• Disable application close button
• Minimize to tray
• Saveprofileonexit
• Display connection strength
• Display ticker
• Hide title bar
• Icons only in main tool bar
• Global font
Market Watch
Allows the user to configure these aspects of the Market Watch
window:
• Market Up Color
• Market Down Color
Market Depth
AllowstheusertoconfiguretheMarket Depthwindowbyspecifying;
• Open with snap quote (enable / disable)
• Number of price points
Order Book
AllowstheusertoconfiguretheOrder Bookwindowbyspecifying;
• New records added to the Top (enable / disable)
• Auto-scroll (enable / disable)
• DefaultStatus(All/Cancelled/Filled/Open/Pfilled/Rejected)
• Colors of Orders (Buy Pending / Sell Pending / Other)
31
Getting Started
Snap Quote
AllowstheusertoconfiguretheSnap Quotewindowbyspecifying;
• Number of Rows
• Number of Columns
by Foxit PDF Editor
Indian Edited
Commodity
Trader
Copyright
(c) by FoxitExchange
Software Company,
2004 User Manual
For Evaluation Only.
My Trades
Allowstheusertoconfigurethe My Trades windowbyspecifying;
• Auto-scroll (enable / disable)
• New rows added to the top (enable / disable)
Most Active Contracts/Top gainers and losers
Allowstheusertospecify;
• Number of most active contracts
• Number of top gainers or losers
Note:
The Auto Scroll option can also be enabled
and disabled by right-clicking on individual windows and selecting the option from
the displayed menu.
32
Getting Started
Order Entry Preferences
by Foxit PDF Editor
Indian Edited
Commodity
Trader
Copyright
(c) by FoxitExchange
Software Company,
2004 User Manual
For Evaluation Only.
This tab allows the user to change settings related to order entry
Order Confirmation
• New Order
• Order Amendment
• Market Order
• Order Cancellation
• ClientCodeModification
Quick Lots
• SetstheuserdefinedquantitiesforeachQuick Lots button
Other
• Default Order Quantity
• Own/Client orders by default
• Default Order Type
• Buy form color
• Sell form color
• Close on Submission
Alert Parameters
Allows the user to specify parameters for the following:
• Quantity Alert (in market lots)
• Price Alert (percentage of LTP)
• Value Alert (Quantity x Price)
33
Getting Started
by Foxit PDF Editor
Indian Edited
Commodity
Trader
Copyright
(c by
(c)
byFoxit
FoxitExchange
Software
SoftwareCompany,
Company,
2004
2004 User Manual
For Evaluation
Evaluanly. Only.
Keyboard Shortcuts
Thistaballowsuserstochangethedefaultshortcutkeyswhichallowthemtoaccessgeneralapplicationwindowsandperformcertainwindow-specific
functions.
To specify a hot key for a window or a functionality:
1. Selecttheclassificationfromthedrop-downselector.
2. Select the function.
3. Click in the Key column and press ‘Ctrl’ + <key> on the keyboard (eg: Ctrl+D).
4. Click the Save button.
5. Clicking the Restore Defaults button will reset all shortcut keys to the default values.
6. Select a function and click the Delete button to clear the Keyfield.
General
• Shortcutkeyscanbedefinedforopeningthemainwindowsoftheapplication.
Application
• Allowstheusertodefineshortcutkeysforbasicapplicationoperations.
Active Window
• Shortcutkeyscanbedefinedtoaccesstheattributesofthecurrentlyactivewindow.
1
2
3
6
Market Depth
• AllowstheusertodefineshortcutkeysforMarket Depth window functions.
Market Watch
• AllowstheusertodefineshortcutkeysforMarket Watch window functions.
New Order
• AllowstheusertodefineshortcutkeysforNew Order window functions.
Order Book
• AllowstheusertodefineshortcutkeysforOrder Book window functions.
5
34
4
Getting Started
by Foxit PDF Editor
Indian Edited
Commodity
Trader
Copyright
(c) by FoxitExchange
Software Company,
2004 User Manual
For Evaluation Only.
Client Codes, Snap Quote Symbols
Client Codes
4
3
ThistaballowsuserstodefinefrequentlyusedClientCodesandmakethemappearinthe
drop-down list on the Order Entry window. The Client Namefieldcanalsobeupdatedhere
sothatthefieldisfilledwhentherelevantClientCodeisselected.
To add a new Client Code:
1. Fill the Client CodefieldandentertheClient Name.
2. Click the Add button.
To delete a Client Code:
3. Select the Client Code to be deleted
4. Click the Delete button.
6
1
2
5
7
9
8
Snap Quote Symbols
This adds instruments to be displayed on the Snap Quote window.
To add a symbol:
5. Click the Add Symbol button.
6. This will display the Contract Selector window. Select the required instrument from this window. For more information on
the Contract Selector window, click here.
To delete a symbol:
7. Select the symbol to be deleted by clicking on it
8. Click the Delete button
9
35
9. Click the Save button to save all changes.
Concepts
Concepts
Index of Concepts
Indian Commodity Exchange Trader User Manual
Edited by Foxit PDF Editor
Copyright (c) by Foxit Software Company, 2004
For Evaluation Only.
This section lists and describes concepts used in the International Multi-Commodity Exchange Trader Application.
Concept
MBO (Market By Order)
Description
Publishes the following real-time data for each order:
•
•
•
•
MBP (Market By Price)
Displays the following real-time data for each price point:
•
•
•
•
•
TIF (Time In Force)/Validity
Instrument
Price
Number of contracts (i.e. – quantity)
Side
Instrument
Price
Number of contracts (i.e. – quantity)
Number of order (i.e. splits)
Side
Thetypesofvaliditieswhichcanbespecifiedforanorder.Theseare:
Day - Day orders
GTC - Good Till Cancel orders
GTD - Good Till Date orders
GTT - Good Till Time orders
IOC - Immediate or Cancel orders
Day (Day orders)
Day orders expire at the end of trading on the day on which they are submitted.
GTC (Good Till Cancel orders)
GTC orders are valid until cancelled by the user.
GTD (Good Till Date orders)
GTDordersexpireattheendoftradingonthedayspecifiedbytheuser.
GTT (Good Till Time orders)
Theseordersexpireduringthetradingdayatatimespecifiedbytheuser.
IOC (Immediate or Cancel orders)
An order for which the maximum possible quantity will be filled on receipt, with the remainder expiring
immediately.
37
Interface
Note:
Please bear in mind that any screen captures that
you may view in this User Manual may display
assumed Trader names, symbols, prices etc.
Interface
Order Entry Window
by Foxit PDF Editor
Indian Edited
Commodity
Exchange Trader User Manual
Copyright (c) by Foxit Software Company, 2004
For Evaluation Only.
The Order Entry window is the primary order entry window for all users of the Indian Commodity Exchange Trader workstation.
Itconsistsoftwomainviews;i.e.theSummaryView(shownbelow)andtheAdvancedOptionsView.Allbasicorderentryoptionswillbeavailableinthe
Summary View.
Before an instrument is selected, the Order Entry windowdefaultstoagreywindowwithinactivefields.Onceaninstrumenthasbeenselected,thecontents
ofthefieldscanbeeditedandthewindowwillchangecolourbasedontheSide selected.
Getting Started
Use one of the following methods:
1. Click the New Order button (shown here)
2. Select Transactions > Order Entry on the menu bar
3. UsethehotkeydefinedinthePreferenceswindow
40
Note:
• Double-clicking on any of the
following in the Market Watch
window will populate the window
based on the price source clicked:
(a) Best bid price
(b) Best bid size
(c) Best offer price
(d) Best offer size
(e) Any other column in the window
(which will associate the window
with the last traded price)
• Double-clicking on any of the
following on the Snap Quotes
window will populate the window
based on the price source clicked:
(a) Best bid price
(b) Best offer price
(c) Last trade price
Interface
Instrument Type, Underlying Instrument, Order Type, Side, Price, Size, Validity
The user may select the required
Underlying Instrument from this
drop-down list. After selecting the
instrument (and Expiry Date, if
applicable), press the Enter key to
accept and open a new tab. Other
fields will be inactive and cannot
be edited until an instrument has
been selected.
Expiry Date of
the instrument
The Side selection drop-down contains the
values Buy and Sell. Clicking the drop-down at
any time will enable the user to switch between
modes. Depending on the side selected, the
window will change color. The default color is
blue for BUY and red for SELL. For more details
refer the section on Order Entry Preferences in the
chapter on User Preferences.
The user may select the
Instrument type from
this drop-down list.
The Order Type drop-down list
contains the following values:
• Limit
• Market
• Stop
• Stop limit
If the value Market or Stop
is selected, the price field is
disabled.
This control allows the
user to specify the Order
Size by typing the quantity
directly into the text box or
by using the spin buttons.
This drop-down menu
allows the user to specify
the Validity (TIF) of an
order.
Use the Price Entry control
to enter or modify the price for
a new order by typing the price
directly into the Price Entry
textbox or by using the Price
Entry spin buttons.
41
Available Options for Validity
1. Day (Day Orders) - Day orders will expire at the end of trading on the
day they are submitted
2. Good Till Cancel (GTC) - GTC orders will be valid until cancelled by
you.
3. Good Till Date (GTD) - GTD orders will expire at the end of trading on
the day specified by you
4. Good Till Time (GTT) - GTT orders will expire during the trading day
at a time specified by you
5. Immediate or Cancel (IOC) - An order that will be filled as much as
possible on receipt with the remainder immediately expiring
Interface
Sync, Own/Cli, Client Code, Client Name, Disclosed Size, Expiry Date/Time, Quick Lots
Synchronizes the window with a price source.
For example, selecting this check box while the
Buy side is selected synchronizes the window
with the Best Offer price for that symbol.
The Client Name appears automatically if
the relevant Client Code has been entered in
the Client Codes section of the Preferences
window. This field cannot be edited.
The Client Code can be specified here,
either by selecting the pre-defined Client
Code from the drop-down list (see User
Preferences - Client Codes), or by entering
it here. The contents of this field must be
alphanumeric.
Identifies the ‘Owner’ /
‘Client’ of the order – when
submitting orders on behalf
of traders within a group
(node) or within the firm.
Quick Lots are used to facilitate predefined
lots selected for order entry. The lots assigned
to each button can be configured by the user
(see Order Entry Preferences). The row of
buttons simply replaces the size/visible size
entities for the order. To update the fields,
select the field and then click the relevant
Quick Lots button.
42
The Disclosed Size
indicates the quantity to
be visible out of the total
order quantity.
The Expiry Date/Time field will
only be enabled when the Validity
(TIF) selected is GTD or GTT. The
format will be DD:MM:YY for GTD
and HH:MM:SS for GTT.
This option enables
the user to view
the recent orders
placed that have not
reached the Exchange,
although they have left
the Trader front-end.
The orders displayed
are not limited to the
selected instrument.
Interface
by Foxit PDF Editor
Indian Edited
Commodity
Exchange Trader User Manual
Copyright (c) by Foxit Software Company, 2004
Snap Quote
For Evaluation Only.
A snap quote can be invoked within the order entry form by clicking the
button.
The snap quote displays
information relating to the
selected instrument. This
will include the following
information:
• Best Buy Price
• Best Buy Movement
• Best Buy Quantity
• Net Direction
• Best Sell Quantity
• Best Sell Price
• Best Sell Movement
• Last Traded Price
• Last Traded Quantity
43
Interface
Order Book Window
Indian Commodity Exchange Trader User Manual
The Order Book window allows the user to track the status of his/her orders and manage orders and executions. Order information related to all orders
submittedbythetraderaredisplayedbydefault.Inaddition,ausercanselectaspecificinstrumentinordertoviewinformationforthatinstrument.The
filteroptionsavailableinthiswindowhelptheusertosortandviewonlytherequiredinformation.Thedisplayoforderinformationcanbeconfigured.
Getting Started
Use one of the following methods:
1. Click the Order Book button (shown here)
2. Select Transactions > Order Book on the menu bar
3. UsethehotkeydefinedinthePreferenceswindow
44
Interface
by Foxit PDF Editor
Indian Edited
Commodity
Exchange Trader User Manual
Copyright (c) by Foxit Software Company, 2004
For Evaluation Only.
Filters and Field Settings
The user has the option of
filtering the orders shown
in the Order Book. If an
instrument is not selected,
filters are applied to all
Instruments.
Instrument type
(defaults to Future)
Specifying these allows
the user to filter orders
by symbol. Select the
appropriate details and
press the Enter key to open
a new tab for the selected
instrument.
Underlying Instrument
Click the Apply button to filter
orders by selected criteria.
Instrument Expiry Date
The Side filter allows the user to
view the Order Book for either buy or
sell orders. Selecting the All option
will show orders for both sides.
The Clear button removes
all filters apart from the
Symbol/Instrument filter.
Cancels the
selected order
Modifies the order
Fields may be rearranged by dragging and
dropping their column headers to a new
position. Fields may also be added or removed
using the Table Settings window which can
be accessed via the right-click menu.
The displayed orders can also be sorted
according to any attribute by clicking on the
column header.
Filters by the ID
of the trader who
entered the order
Filters by Client Code
Filters by Order ID
45
Using the Status filter, orders can be filtered
according to the following criteria:
All – Retrieves all orders for the day of the selected
instrument
Pending - Retrieves the Open (including pending,
partially filled and modified) orders of the selected
instrument
Executed - Retrieves the Filled orders of the selected
instrument
Canceled - Retrieves the Cancelled and Expired orders
of the selected instrument (includes Expired orders)
Rejected - Retrieves the Rejected orders of the selected
instrument
Interface
by Foxit PDF Editor
Indian Edited
Commodity
Exchange Trader User Manual
Copyright (c) by Foxit Software Company, 2004
For Evaluation Only.
Default Fields
Shows whether the order
is a Buy or Sell order.
The current state of the
order submitted. The status
can be one of the following:
Filled, PFill, Open, Rejected,
Cancelled and Expired.
The portion of the order that
has not yet been executed.
The total quantity that has met with
execution. (Total Qty - Pending Qty)
46
The Client Code for
which the order was
placed
Shows the date & time the order
was received by the backend system
(includes seconds) – Displayed as
‘Time and Date” HH:MM:SS – DD/MM/
YY (date format as per user settings).
The Order Type
will be one of the
following:
Market, Limit, Stop,
or Stop Limit.
Any available reason for the
current state of the order.
Interface
Market Depth Window
by Foxit PDF Editor
Indian Edited
Commodity
Exchange Trader User Manual
Copyright (c) by Foxit Software Company, 2004
For Evaluation Only.
This window enables the user to view the book depth of an instrument. The Trader Configuration ManagerwillpermitanyfieldtobeaddedtotheMarket
DepthdefinitionsoitcanbeselectedfortheMarket Depth window. Market Depth can be either Spatial or Multicast. Using Spatial Market Depth, the user
has the option of viewing orders according to MBO (Market By Order) or MBP (Market By Price).
Specifying these allows
the user to filter orders
by symbol. Select the
appropriate details and
press the Enter key to open
a new tab for the selected
instrument.
Instrument type
Underlying Instrument
Getting Started
Use one of the following methods:
1. Click the Market Depth window button (shown here)
2. Select Market > Market Depth on the menu bar
3. UsethehotkeydefinedinthePreferenceswindow
Instrument Expiry Date
The dashboard
displays
a
summarized view
of the Market
Watch window
statistics.
Note:
Multiple
Market
Depth windows can
be opened depending
on user requirements.
These windows will
behave independently
of each other.
47
Interface
My Trades Window
by Foxit PDF Editor
Indian Edited
Commodity
Exchange Trader User Manual
Copyright (c) by Foxit Software Company, 2004
For Evaluation Only.
This window will enable the user to view trades affected by the orders placed by him and to modify the Client Code if needed.
For users with Trading Administrator status, this will show all trades for the member.
Getting Started
Use one of the following methods:
1. Click the My Trades button (shown here)
2. Select Transactions > My Trades on the menu bar
3. UsethehotkeydefinedinthePreferenceswindow
48
Interface
by Foxit PDF Editor
Indian Edited
Commodity
Exchange Trader User Manual
Copyright (c) by Foxit Software Company, 2004
For Evaluation Only.
Filters
Symbol - The available
underlying instruments if the
Instrument Type is Future.
The available expiry dates
for the selected underlying
instrument. This field is
disabled if the instrument
type is not future.
Filters by Order
ID - the reference
attached to the
order that caused
the trade.
To filter by status, the following options are available:
All - Retrieves all trades for the day of the selected
instrument.
Modified - Retrieves trades for the selected instrument
which have been modified.
Instrument
Type
Filters by
Side of the
traded order Buy/Sell
Filters by the Client
Code assigned to the
client for the firm.
Filters by the
Trade ID assigned to
the trade.
Filters by
Trader ID
Allows the
user to amend
Client Codes if
required.
49
Applies
filters
Clears
all filters
Interface
Market Watch Window
by Foxit PDF Editor
Indian Edited
Commodity
Exchange Trader User Manual
Copyright (c) by Foxit Software Company, 2004
For Evaluation Only.
The Market Watch window displays market information for selected instruments. It allows the creation of multiple portfolios of instruments. Upon loading
aportfolio,theinstrumentslistedwillbesortedaccordingtothesequencedefinedintheportfolio.
Getting Started
Use one of the following methods:
1. Click the Market Watch button (shown here)
2. Select Market > Market Watch on the menu bar
3. UsethehotkeydefinedinthePreferenceswindow
Allows users to jump to the selected
instrument in the All tab, or select instruments
to be viewed when a new tab is open.
Instrument type
Underlying Instrument
The user can select the
portfolio to be loaded from the
drop-down selector
Instrument Expiry Date
50
Interface
by Foxit PDF Editor
Indian Edited
Commodity
Exchange Trader User Manual
Copyright (c) by Foxit Software Company, 2004
Market Watch Window Right-Click Menu
For Evaluation Only.
To create a new portfolio, select the Add New Tab option from the right-click menu and add the required instruments to this tab by selecting them from
the drop-down boxes or by right-clicking and selecting the Contract Selector option from the right-click menu. After all required instruments have been
selected, choose the Save As Portfolio option on the right-click menu.
The Order Book, Snap Quote, My Trades, Market Depth and Net Position windows for an underlying instrument can be invoked by selecting the desired
window from the right-click menu in the Market Watch window.
Opens Net Position
window for selected
symbol
Removes selected
symbol from tab
Opens the Buy/
Sell side of the Order
Entry window for the
selected instrument.
Saves changes
to Portfolio
Opens a new tab.
Hides
the
titlebar, locking the
window in place.
Opens
the
Contract Selector
window for the
selected symbol
Removes all
symbols from
the active tab
S a v e s
instruments
in active tab
as Portfolio.
Saves displayed data
in a text file.
Changes
Portfolio name
Deletes Portfolio
Opens the Order
Book/ Snap Quote/
Market Depth or
My Trades window
for the selected
instrument.
Resizes
columns to
fit content.
Opens the Table
Settings window for
Market Watch.
51
Interface
Default Fields
Underlying instrument for
futures and the symbol name
for any other instrument type
Expiry date of the relevant
instrument.
Value at the best price
point on the Buy side.
Value at the best price
point on the offer side.
Value of the last trade.
The price quote parameter of
the instrument
Cumulative quantity at
the best Buy price
Cumulative executed quantity
Cumulative quantity at
the best Sell price
The value of the
contract for the
day. (The sum of
traded qty * price
of each trade for the
instrument for the
day * multiplier)
The open interest
in the market
Highest trade price of the
contract since its inception
The first trade price of the
instrument for the day
Lowest trade price of
the contract since its
inception
The last traded price of the
instrument for the day
Percentage change of the
contract’s Last Traded Price
and Previous Day’s Close
Previous day’s closing price
52
The
volume
average price
Number of trades performed
weighted
Interface
Message Log Window
Indian Commodity Exchange Trader User Manual
Markets require the ability to disseminate information to trading participants. The Message Log window contains all the messages that are communicated to
the trader workstation from the exchange. These are:
1.
Market messages
2.
Orderconfirmations(includingneworder,cancelandmodifyconfirmations)
3.
Tradeconfirmations(includingtrademodifications)
4.
System messages
5.
Surveillance messages
6.
Announcements (News and targeted messages)
Getting Started
Use one of the following methods:
1. Click the Message Log Button (shown here)
2. Select Market > Message Log on the menu bar
3. UsethehotkeydefinedinthePreferenceswindow
Displays
the message
type
Recipient
of message
Message subject
The message containing
information
on
the
activity
Number of messages
53
The time the message
was sent to/from the
Trader front-end from/to
the exchange
Sender
of message
Interface
Snap Quote Window
by Foxit PDF Editor
Indian Edited
Commodity
Exchange Trader User Manual
Copyright (c) by Foxit Software Company, 2004
For Evaluation Only.
The Snap Quotewindowdisplaysmarketinformationforaninstrument.Itdisplaysacollectionoffieldsthatshowsmarketdataforaparticularinstrument.
ItallowstheusertofocusonselectedinstrumentsdefinedintheSnap Quote Symbols preferences window. Multiple snap quotes will be arranged in a matrix
formbasedonthenumberofrowsandcolumnsdefinedbytheuserinthePreferences window. In addition, if the user wishes to change the instrument
assigned to a particular box, this can be done by selecting the instrument using the Contract Selector.
Getting Started
Use one of the following methods:
1. Click the Snap Quote button (shown here)
2. Select Market > Snap Quote on the menu bar
3. UsethehotkeydefinedinthePreferenceswindow
Instrument Name
Best Bid
Net Direction
Best Offer
Bid Movement Indicator
Offer Movement Indicator
Offer Movement
Bid Movement
Last traded price
Last traded quantity
54
Interface
Net Position Window
by Foxit PDF Editor
Indian Edited
Commodity
Exchange Trader User Manual
Copyright (c) by Foxit Software Company, 2004
For Evaluation Only.
The Net Position window is used to view the trader’s net position and his client’s net position details in a common window. Trading Administrators will be
abletoviewthenetpositionsforallclientsofthefirm.
TheNetPositionwindowdefaultstoablankscreenbutispopulatedwiththerelevantdataonselectionoffiltercriteria.
To view information for a particular symbol, select the instrument from the drop-down lists and click the Query button. For details on a client’s net position,
type the relevant Client Code in the box and click Query.
Getting Started
Filter by symbol
Use one of the following methods:
1. Click the Net Position button (shown here)
2. Select Transactions > Net Position on the menu bar
3. UsethehotkeydefinedinthePreferenceswindow
Firm ID
Instrument type
Underlying Instrument
Expiry Date
55
Filters by Client Code
Applies
filter criteria
Clears
all filters
Interface
by Foxit PDF Editor
Indian Edited
Commodity
Exchange Trader User Manual
Copyright (c) by Foxit Software Company, 2004
Default Fields
For Evaluation Only.
The code which the
client is registered
under, used by the
trader
to
identify
individual clients.
Average
Price of Total
Buy Quantity
Quantity
bought
Quantity
sold
Average
Price of Total
Sell Quantity
The value of
the position
Total quantity
bought – Total
quantity sold
As calculated
by the risk
system
Position Value
divided by Net
Quantity
Totals applicable
to current filter
criteria
56
L a s t
t r a d e d
price of the
contract
M T M
Position
Value
Interface
Time and Sales Window
by Foxit PDF Editor
Indian Edited
Commodity
Exchange Trader User Manual
Copyright (c) by Foxit Software Company, 2004
For Evaluation Only.
The Time and Sales window allows the user to view all trades that took place in the exchange for any selected instrument, irrespective of which trader
initiated them.
Getting Started
Use one of the following methods:
1. Click the Time and Sales Button (shown here)
2. Select Transactions > Time and Sales on the menu bar
3. UsethehotkeydefinedinthePreferenceswindow
Filters orders by symbol. Select the required
details and press the Enter key to open a new
tab for the selected instrument.
Instrument type
Underlying Instrument
Instrument Expiry Date
The Price tick
established after
the trade
Time of the transaction
including seconds (hh:mm:ss)
Traded price
The order quantity
57
Underlying
instrument for
futures and the
symbol
name
for any other
instrument type
Interface
The Ticker
by Foxit PDF Editor
Indian Edited
Commodity
Exchange Trader User Manual
Copyright (c) by Foxit Software Company, 2004
For Evaluation Only.
The Ticker bar provides real time last sale information of instruments traded on the exchange.
The user has to have the Display Ticker option enabled in the Preferences window >General Tab in order for the Ticker bar to be displayed in the
workspace.
The ticker will display the following information per trade:
• Name of the instrument that the trade took place for
• Whether the trade tick direction is up or down (indicated by an arrow)
• Quantity and Price of the trade
• Net change between this trade and the previous trade
The trade information will
scroll from left to right.
Instrument filter. By
default, the ticker bar will
subscribe to all the preferred
instruments.
The font colour will also reflect
the price tick of the trade; Red
– Minus or zero minus, Green –
Plus or Zero plus
The Ticker Speed can be set via
the right-click menu. The Ticker
Speed menu will contain the
following pre-set options:
• Fast
• Medium
• Slow
• Natural
58
Interface
by Foxit PDF Editor
Indian Edited
Commodity
Exchange Trader User Manual
Copyright (c) by Foxit Software Company, 2004
Ticker Settings
For Evaluation Only.
This window allows the user to edit the basic display settings for the ticker.
Select the fields to be
displayed in the ticker
Define ticker colours
59
Interface
Contract Information Window
by Foxit PDF Editor
Indian Edited
Commodity
Exchange Trader User Manual
Copyright (c) by Foxit Software Company, 2004
For Evaluation Only.
This window provides the means where a trader may view all the information relating to a contract selected by him.
Getting Started
Use one of the following methods:
1. Click the Contract Information button (shown here)
2. Select Contract > Contract Information from the menu bar
3. UsethehotkeydefinedinthePreferenceswindow
60
Interface
by Foxit PDF Editor
Indian Edited
Commodity
Exchange Trader User Manual
Copyright (c) by Foxit Software Company, 2004
Default Fields
Symbol field - displays the underlying instruments
available in the system when the instrument type is
future. Else, displays all available instruments for the
selected instrument type.
For Evaluation Only.
Displays expiry dates available in the system
for the chosen underlying instrument.
Type of instrument;
future or strategy
Will be displayed as “Ex “ followed
by The Delivery Base of the instrument
(eg: Ex Mumbai).
The underlyer of
the instrument
The expiry date of the instrument
The trading lot of the instrument,
followed by the trading unit of the
instrument (eg: 10 KG)
The tick defined as the first entry in
the tick structure of the instrument
The quantity against which
prices are quoted, followed by the
trading unit of the instrument.
The additional margin defined
for the instrument
The initial margin defined for
the instrument
Maximum Order Size
Daily Price range defined
for the instrument
61
Interface
Contract List Window
by Foxit PDF Editor
Indian Edited
Commodity
Exchange Trader User Manual
Copyright (c) by Foxit Software Company, 2004
For Evaluation Only.
The Contract List window contains the same details found in the Contract Information window, but for all the instruments at the same time. This allows a
user to carry out comparisons across instruments with reference to instrument-related details.
Getting Started
Use one of the following methods:
1. Click the Contract List button (shown here)
2. Select Contract > Contract List from the menu bar
3. UsethehotkeydefinedinthePreferenceswindow
62
Interface
Indian Commodity Exchange Trader User Manual
Default Fields
The underlying
of the instrument
The instrument ID
Displays the expiry
date of the relevant
instrument
Buy side (long)
margin for the
instrument
Sell side (short)
margin for the
instrument
The initial
m a r g i n
defined for the
instrument
The
first
trading date of
the instrument
Displays “Ex” followed
by the Delivery Base of
the instrument (e.g.: Ex
Mumbai).
Special margin
for
regulatory
purposes
The last
t r a d i n g
date of the
instrument
The
additional
margin defined for
the instrument
The quantity against which
prices are quoted, followed by the
trading unit of the instrument
The trading lot
of the instrument,
followed by the
trading unit of the
instrument
63
Daily Price Range for the
instrument – computed based on
the previous day’s closing price
and the price band values for the
instrument. Shown in the format
XXX.XX – YYY.YY
Life-time price
banding applicable
to that instrument
Interface
Most Active Contracts window
Indian Commodity Exchange Trader User Manual
ThiswindowwilldisplaythetopcontractsintermsofValue.ThenumberofcontractswillbelimitedtothenumberspecifiedinthePreferenceswindow.
Getting Started
Use one of the following methods:
1. Click the Most Active Contracts button (shown here)
2. Select Contract > Most Active Contracts from the menu bar
3. Select Market > Most Active Contracts from the menu bar
4. UsethehotkeydefinedintheUserPreferenceswindow
64
Interface
Indian Commodity Exchange Trader User Manual
Default Most Active Contracts Fields
Captures the underlying
symbol for futures and the
instrument name for instrument
types other than futures.
Type of Instrument
Displays the expiry dates of the future
contracts for the stated underlying
symbol. Will not hold any values if the
Instrument type is not future
Cumulative executed
quantity
65
Value of
the last trade
The value for
the day
Interface
Top Gainers and Losers window
Indian Commodity Exchange Trader User Manual
Thiswindowwilldisplaythetopcontractsintermsofpercentagechangefromclosing.Thenumberofcontractswillbelimitedtothenumberspecifiedin
the Preferences window.
The window will update the gainers and losers automatically as trading takes place.
Getting Started
Use one of the following methods:
1. Click the Top Gainers and Losers button (shown here)
2. Select Contract > Top Gainers and Losers from the menu bar
3. Select Market > Top Gainers and Losers from the menu bar
4. UsethehotkeydefinedinthePreferenceswindow
66
Interface
by Foxit PDF Editor
Indian Edited
Commodity
Exchange Trader User Manual
Copyright (c) by Foxit Software Company, 2004
Default Fields
For Evaluation Only.
The
percentage
change from closing
The
underlying
symbol for futures
Displays the expiry dates of the future
contracts of the stated underlying
symbol. Will not hold any values if the
Instrument type is not future
The previous
closing price
67
day’s
Value of
the last trade
Interface
Manage Users Window
Indian Commodity Exchange Trader User Manual
The Manage Users section consists of windows for managing users and a section for viewing user information and attaching contract baskets to users.
Standard Traders will be restricted to seeing only their entry, and cannot access to the administrative functions.
TradingAdministrativeuserswillseealltradersundertheirfirmandbeabletocarryoutadministrativefunctions
Getting Started
Use one of the following methods:
1. Click the Manage Users button (shown here)
2. Select Control and Surveillance > Manage Users from the menu bar
3. UsethehotkeydefinedinthePreferenceswindow
For a Standard Trader, the
administrative functions
will be disabled
A Trading Administrator
will be able to view all
trades under their firm.
68
Interface
Margin Watch Window
by Foxit PDF Editor
Indian Edited
Commodity
Exchange Trader User Manual
Copyright (c) by Foxit Software Company, 2004
For Evaluation Only.
ThiswindowisonlyaccessibletoTradingAdministrators.TheTradingAdministrationuserwillbeabletoseethedifferentmarginvaluesforhisfirmusing
this window.
Getting Started
Use one of the following methods:
1. Click the Margin Watch button (shown here)
2. UsethehotkeydefinedinthePreferenceswindow
Margin Limit
Spread Benefit
Initial Margin
Long Margin
Delivery
Margin
Short
Margin
Margin
Utilized %
Regulatory
Margin
Margin
Utilized
69
Total
Margin
Liability
MTM
Limit
MTM Loss
MTM %
Additional
Margin
ML %
Procedures
Procedures
by Foxit PDF Editor
Indian Edited
Commodity
Exchange Trader User Manual
Copyright (c) by Foxit Software Company, 2004
For Evaluation Only.
Order Entry Preferences
The user can submit orders via the Order Entrywindow.Thefront-endusesvaluesspecifiedbytheuserinthePreferences window to populate the Order
Entry window.
1. Open the Preferences window as shown here.
2. Select the Order Entry tab in the Preferences window.
3. Select the Order Confirmation options - this feature allows the
user to chose whether the system initiates a confirmation
prompt at the time of executing the following procedures:
• Submitting orders
• Amending orders
• Submitting a Market Order
• Order Cancellation
• ClientCodeModification
4. Set the lot sizes for Quick Lots.
5. Specifyotherdefaultvaluesforfields.
6. Click Save.
2
4
3
5
6
71
Submitting Orders
The following chapter describes in detail the procedure followed to submit the following types of orders:
•
•
•
•
Submitting a Regular Order
Submitting a Good Till Time Order
Submitting a Good Till Date Order
Submitting a Stop Order
Procedures
To Submit a Regular Order
Getting Started
Use one of the following methods:
1. Click the New Order button (shown here)
2. Select Transactions > Order Entry on the menu bar
3. UsethehotkeydefinedinthePreferenceswindow
1.
2.
3.
4.
5.
6.
7.
8.
Select the required Instrument Type
If Instrument Type is Future: Select the appropriate Underlying Instrument and Expiry Date
Select Side: Buy or Sell
Select Limit as the Order Type.
Enter a value in the Pricefield.
Enter a value in the Sizefield.
Specify the Validity as DAY.
Click the Buy/Sell button to submit the order.
Toreceiveaconfirmationpromptwhensubmittingorders,pleasereferthechaptertitledOrder Entry Preferences.
2
1
4
3
5
6
7
8
73
Procedures
To Submit a Good Till Time Order
1.
2.
3.
4.
5.
6.
7.
8.
9.
Open the New Order window as shown here.
Select the Instrument Type
If Instrument Type is Future: Select the Underlying Instrument and Expiry Date
Select Side: Buy/Sell
Select GTT (Good till Time) as the Validity.
Enter the Expiry Time.
Select an Order Type.
If the selected order type is a Stop or Stop Limit order, specify a Trigger Price.
Click the Buy/Sell button to submit the order.
Toreceiveaconfirmationpromptwhensubmittingorders,pleasereferthechaptertitledOrder Entry Preferences.
3
2
7
4
5
8
6
9
74
Procedures
To Submit a Good Till Date Order
1.
2.
3.
4.
5.
6.
7.
8.
9.
Open the New Order window as shown here.
Select the Instrument Type
If Instrument Type is Future: Select the Underlying Instrument and Expiry Date
Select Side: Buy/Sell
Select GTD (Good till Date) as the Validity.
Enter the Expiry Time.
Select an Order Type.
If the selected order type is a Stop or Stop Limit order, specify a Trigger Price.
Click the Buy/Sell button to submit the order.
Toreceiveaconfirmationpromptwhensubmittingorders,pleasereferthechaptertitledOrder Entry Preferences.
3
2
4
7
5
8
6
9
75
Procedures
To Submit a Stop Order
1.
2.
3.
4.
5.
6.
7.
8.
9.
Open the New Order window as shown here.
Select the Instrument Type
If Instrument Type is Future: Select the Underlying Instrument and Expiry Date.
Select Side: Buy/Sell
Select Day as the Validity.
Select Stop Limit or Stop as the Order Type.
Enter a value in the Pricefield.
Specify a Trigger Price.
Click the Buy/Sell button to submit the order.
Toreceiveaconfirmationpromptwhensubmittingorders,pleasereferthechaptertitledOrder Entry Preferences.
3
2
6
4
5
7
8
9
76
Procedures
Amending an Order
by Foxit PDF Editor
Indian Edited
Commodity
Exchange Trader User Manual
Copyright (c) by Foxit Software Company, 2004
For Evaluation Only.
Getting Started
Use one of the following methods:
1. Click the Order Book button (shown here)
2. Select Transactions > Order Book on the menu bar
3. UsethehotkeydefinedinthePreferenceswindow
1. Right-click on the order to be amended in the Order Book and select the
Amend Order option.
2. The Order Entry window will be displayed for the particular order.
3. Make the required changes and click the Buy/Sell button.
Toreceiveaconfirmationpromptwhenamendingorders,pleasereferthechapter
titled Order Entry Preferences.
1
2
3
77
Note:
Orders can also be amended
through the Order Book in
the same manner.
Procedures
Cancelling an Order
by Foxit PDF Editor
Indian Edited
Commodity
Exchange Trader User Manual
Copyright (c) by Foxit Software Company, 2004
For Evaluation Only.
Getting Started
Use one of the following methods:
1. Click the Order Book button (shown here)
2. Select Transactions > Order Book on the menu bar
3. UsethehotkeydefinedinthePreferenceswindow
1. Right-click on the order to be cancelled in the Order Book.
2. Select the Cancel Order option from the right-click menu.
3. The Order Status of that order will change to Cancelled.
Toreceiveaconfirmationpromptwhencancellingorders,pleasereferthe
chapter titled Order Entry Preferences.
1
2
3
Note:
Orders can also be cancelled
through the Order Book in
the same manner.
78
Procedures
by Foxit PDF Editor
Indian Edited
Commodity
Exchange Trader User Manual
Copyright (c) by Foxit Software Company, 2004
Mass Order Cancellation
For Evaluation Only.
Getting Started
Use one of the following methods:
1. Click the Order Book button (shown here)
2. Select Transactions > Order Book on the menu bar
3. UsethehotkeydefinedinthePreferenceswindow
1. Right-click on any order in the Order Book.
2. Select the Cancel All option.
In Trader view, the sub-menu will display the following mass cancellation options:
• Owner
• Instrument
In Trader Admin view, the following additional options are
displayed:
• Client
• Trader
• Member
3. Select the required option.
4. All orders under the selection will be cancelled.
2
To receive a confirmation prompt when cancelling orders,
please refer the chapter titled Order Entry Preferences.
1
79
3
Procedures
Additional Functionality
by Foxit PDF Editor
Indian Edited
Commodity
Exchange Trader User Manual
Copyright (c) by Foxit Software Company, 2004
For Evaluation Only.
Save to a Text File
Thisoptionallowstheusertosavethecontentsofawindowtoatextfile.Thisfeatureisavailableforthefollowingwindows:
• Order Book
• My Trades
• Market Watch
• Time and Sales
• Manage Users
1. Right-clickonafieldandselecttheSave as a text file option.
2. In the Save As window, specify the File name and location and click Save.
3. The progress bar will indicate the status. Click OK oncefinalized.
2
1
3
80
Procedures
by Foxit PDF Editor
Indian Edited
Commodity
Exchange Trader User Manual
Copyright (c) by Foxit Software Company, 2004
For Evaluation Only.
View the Order History
This option allows the user to view the order history for a trade via a sub-window, which displays the history sorted based on time of the execution report.
1. Right-click on an order and select the Order History option.
2. The Order History window will be displayed for that particular order.
1
2
81