1
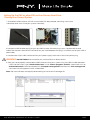
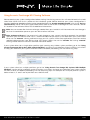
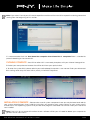
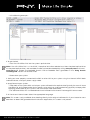
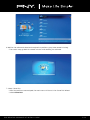
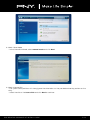
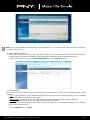
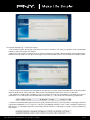
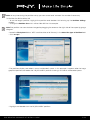
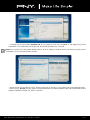
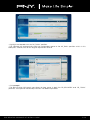
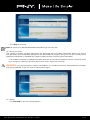
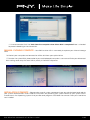
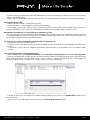
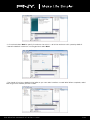
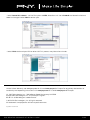
PNY DESKTOP UPGRADE KIT
- Install Guide -
PNY Desktop Upgrade Kit Installation Guide*
The PNY Solid State Drive (PNY SSD) is the latest solution in storage technology that provides significant benefits
versus traditional hard drives. SSDs offer improved operations across your entire system in terms of superior
performance, improved boot times, faster application loading, longer battery life and greater shock resistance.
The PNY Upgrade Kit offers you the easy to use Acronis® TrueImage HD data migration software*, which provides a
complete system cloning of your existing hard drive onto your new storage device (SSD or HDD, not included). All
necessary accessory is provided to perform the switch including a 3,5’’ to 2,5’’ internal bay for desktop installation,
a SATA 3 data cable, and a bootable Acronis miniDVD.
This device complies with Part 15 FCC Rules. Operation is subject to the following two conditions: (1) This device
may not cause harmful interference. (2) This device must accept any interference received, including interference
that may cause undesired operations. This equipment has been tested and found to comply with the limits for
a Class B digital device, pursuant to Part 15 of the FCC rules. These limits are designed to provide reasonable
protection against harmful interference in a residential installation. This equipment generates, uses and can
radiate radio frequency energy and, if not installed and used in accordance with the instructions, may cause
harmful interference to radio communications.
However, there is no guarantee that interference will not occur in a particular installation. If this equipment does
cause harmful interference to radio or television reception, which can be determined by turning the equipment
off and on, the user is encouraged to try and correct the interference by one or more of the following:
• Reorient or relocate the receiving antenna.
• Increase the separation between the equipment and receiver.
• Connect the equipment into an outlet on a circuit, different from the outlet that the receiver is connected.
Contents
What’s Inside ............................................................................................................................................................ 3
Before You Begin....................................................................................................................................................... 3
Important Considerations:....................................................................................................................................... 3
System Requirements............................................................................................................................................... 4
Preparing Your System ............................................................................................................................................. 4
Installation Overview ............................................................................................................................................... 4
Setting Up the PNY or other SSD as Your Primary Boot Drive – Cloning Your Current System............................... 5
Using Acronis® TrueImage HD Cloning Software .................................................................................................. 6
Using Acronis TrueImage HD – Systems With a Single Partition ............................................................................. 7
Using Acronis TrueImage HD – Systems With Multiple Partitions ..........................................................................10
Appendix: Preparing Your System After Install – Windows XP/Vista/7 Users........................................................ 21
Troubleshooting...................................................................................................................................................... 21
*The PNY Desktop Upgrade Kit Install Guide provides instructions for the Cloning utility only. Imaging or cloning of RAID and
Spanned disk arrays is not supported by the software provided. Please refer to the Acronis “Help” menu, which can be found
in the software application to learn more about other software features that may be available, but not applicable to this
product bundle.
PNY DESKTOP UPGRADE KIT INSTALL GUIDE
P.02
What’s Inside
• Utilities Disk (bootable)
Includes:
• Acronis TrueImage HD cloning software
• PNY Desktop Kit Installation Guide PDF (this guide)
• Acronis TrueImage User’s Manual PDF
• 3.5’’ desktop drive bay adapter and drive mounting screws
• Screwdriver
Note : It may help to print this manual for easy reference before starting the hardware change.
Visit www.pny.com for US and www.pny.eu for Europe.
Before You Begin
• Please read and understand this guide before starting the installation
• You may also want to print this Guide for easy reference before starting the upgrade process
• If possible create (or purchase) a set of recovery disks for your system.(Consult your manufacturer’s manual
for instructions)
• Backup your hard disk or at minimum, your important files
Important Considerations :
• To install a SSD in a desktop system, you may need the included 3.5’’ drive bay adapter.
• PNY or other SSDs are intended as replacements for traditional hard drives and solid state drives; please
consult your system manual or manufacturer for instructions on installing a new hard drive or SSD. This
procedure will vary by system manufacturer and model.
• PNY or other SSDs are most of the time, shipped unformatted without any operating system, programs, or
data installed. Please be sure that you have the necessary installation disks for your existing OS and programs.
• If you are replacing your boot drive, it is recommended that you “clone” the existing boot drive onto your PNY
or other SSD before you do anything else. This requires the included Solid State Drive Utilities disk.
• If the amount of used storage on your current hard drive exceeds the available space on your new PNY
or other SSD, it is recommended that you back-up the data from your current hard drive, using the “manual”
cloning method to copy your OS, system utilities and applications from your current hard drive to the PNY or
other SSD. You can then restore selected data from your HDD drive or backup storage device onto your new
PNY or other SSD.
• As with any computer upgrade, please ensure you are properly grounded and free of static electricity before
continuing. This can be achieved by wearing an anti-static wrist strap, using grounded components such as
work pads, and using a clear workspace free of electrical devices.
• PNY is not responsible for lost or missing data or damage to your system resulting from installation of the PNY
or other SSD or the cloning process.
• If you are not familiar or comfortable with the installation process for your new drive, it is highly recommended
that you visit your local computer retailer or service center for assistance.
Note : It is also possible to restore a system from its hard drive to your PNY or other SSD from a backup created
using 3rd party backup products. Given the variety of backup products available, it is beyond the scope of
this manual to detail this process. Please refer to your backup software’s manual for details.
PNY DESKTOP UPGRADE KIT INSTALL GUIDE
P.03
System Requirements
• Mouse or other pointing device (recommended)
Software :
• Windows XP SP3
• Windows XP Professional x64 Edition SP2
• Windows Vista SP2 (all editions)
• Windows 7 SP1 (all editions)
Note: Mac users should refer to the Apple website for information on the Time Machine application (sold
separately) that performs many of the functionalities of the Acronis TrueImage HD software with regards to
system back up and restore.
Note: The Solid State Drive Utility Disk may be a “mini-DVD”. Slot-load Optical drives are not compatible with
mini-DVDs, please prepare accordingly by downloading the files and carefully following instructions.
Note: If you do not have a DVD optical drive, please contact us through PNY websites : www.pny.com for US
and www.pny.eu for Europe.
• DVD-RW Optical Drive (required for booting to Acronis® True Image HD)
• System Memory: 512 MB RAM
• Processor: Pentium 1 GHz or faster
• Screen resolution: 1280 x 1024
• Minimum screen resolution: 1024 x 768
Preparing Your System
Turn off and disconnect your computer from its main power source prior to installation : disconnect the power
cord and/or extension cord from the electrical outlet.
Installation overview
The PNY Desktop Upgrade Kit allows you to replace your existing primary drive or boot device, using Acronis®
TrueImage HD and the SATA III data cable.
The process described herebelow will allow you to copy or clone your Operating System, files and programs from
your existing storage drive to the new SSD. Please ensure the total data size of your system does not exceed the
capacity of your new SSD.
PNY DESKTOP UPGRADE KIT INSTALL GUIDE
P.04
Setting Up the PNY or other SSD as Your Primary Boot Drive
Cloning Your Current System
1. Assemble the PNY or other SSD with the included 3.5’’ bay adapter, mounting screws and
screwdriver, and insert it into your system’s drive bay.
2. Locate the SATA III data port (7-pin) on your PNY or other SSD and plug in your supplied SATA III data
cable. Then locate a free SATA III connector on your motherboard and plug n the other end of your SATA III
data cable.
3. Locate a free 15-pin SATA connector from your power supply and insert it to the SSD power plug.
WARNING: DO NOT TOUCH the connector pins and contacts on either device
4. Verify you have properly connected the PNY or other SSD to your system using the SATA III cable provided.
• From the Start menu, type “administrative tools” in the “Search programs and files” search box, click on
“administrative tools” and then double-click “Computer management” and then click “Disk management”
• Your new SSD will appear as DiskX unallocated.
Note: The new SSD does not require pre-formatting to use Acronis TrueImage HD
PNY DESKTOP UPGRADE KIT INSTALL GUIDE
P.05
Using Acronis® TrueImage HD Cloning Software
Please examine your system configuration before starting the cloning process. You will need to boot to the Solid
State Drive Utilities Disk for this portion of the installation guide. Please examine your system configuration. If
required, additional bootable media can be generated from the “Create bootable media” utility in the “Backup
and Recovery” tab of the Acronis application. Please refer to the Acronis TrueImage HD User’s Manual, section
8.1 located in the Software Utilities Disk for additional information.
Note: You can remove files that are no longer needed from your hard disk until the amount of used storage is
less than the available space on your new PNY or other SSD drive.
Note: (advanced Users) If the amount of used storage on your current hard drive exceeds the available
space on your new PNY or other SSD, it is recommended that you back-up the data from your current hard
drive, use the “manual” cloning method to copy your OS, system utilities and applications, and then restore
selected data onto your new PNY or other SSD. Acronis allows the user to “exclude” files during “manual”
cloning. Please refer to the Acronis Software manual for details.
If your system drive has a single drive partition (not counting any hidden system partition) go to the “Using
Acronis TrueImage HD, Systems With a Single Partition” section of the installation guide. It contains instructions
to copy your data from your system drive to the PNY SSD before proceeding with the remaining steps.
If your system drive has multiple partitions go to the “Using Acronis True Image HD, Systems With Multiple
Partitions” section of the installation guide. It contains instructions to clone your data from your System drive to
the PNY or other SSD before proceeding with the remaining steps. An example of a multiple partition system is
below where C:, E: and F: are all partitions on a SINGLE drive.
PNY DESKTOP UPGRADE KIT INSTALL GUIDE
P.06
Using Acronis® TrueImage HD – Systems With a Single Partition
The following Acronis TrueImage HD guide will cover the “automatic” cloning method. This is a viable option when
the available capacity of the SSD is greater than the size of the data contained in the single drive partition to
be cloned. For a SSD that is less than or equal to the size of the data being replaced, please refer to the Acronis
TrueImage User’s Manual.
1. Verify you have properly connected the PNY or other SSD to your system using the SATA III cable provided.
• From the Start menu, type “administrative tools” in the “Search programs and files” search box, click on
“administrative tools” and then double-click “Computer management” and then click “Disk management”
• Insert the SSD Utility Disk in your optical drive.
• Restart your system to launch the Acronis TrueImage HD cloning software.
• If required, set the system BIOS so that your system will boot to the optical drive. Typically, the user will have
the option to set the boot order during power up by pressing a designated key (typically escape) after
applying power. Refer to your system’s user manual for more information.
2. Wait for the software to load and analyze the partitions (may take several minutes).
• The screen may go dark for several minutes while loading the software.
PNY DESKTOP UPGRADE KIT INSTALL GUIDE
P.07
3. Select the Clone Mode
• In the Clone Disk Wizard select automatic mode
Note: If the program finds two disks, one partitioned and another unpartitioned, it will automatically recognize
the partitioned disk as the source disk and the unpartitioned disk as the destination disk. In such case, the
next steps will be bypassed and you will be taken to the cloning Summary screen.
Note: For excluding specific items and folders, please refer section 8.4.7 in the Acronis User Guide.
4. Cloning Summary
The cloning summary window graphically (as rectangle bars) illustrates information about the source disk
(partitions and unallocated space) and destination disk layout. Along with the disk number, some additional
information is provided: disk capacity, label, partition and file system information.
• Click Proceed to start disk cloning.
• Click Cancel to cancel the procedure and start over from the beginning.
PNY DESKTOP UPGRADE KIT INSTALL GUIDE
P.08
Note: If you select Cancel you will have to repartition and format the new SSD or repeat the cloning procedure
starting from the beginning of this section.
It is recommended that the “Shut down the computer when Clone Disk is completed” box is checked to
prevent rebooting to the cloned disk.
CLONING COMPLETE
– Your PNY or other SSD is now ready to replace with your internal storage drive.
5. Restart your computer and remove the utilities disk from your optical drive.
6. To enter the system BIOS, please refer to your motherboard/computer’s user manual. Enter your Advanced
BIOS settings and setup the new SSD as priority in the BOOT sequence.
INSTALLATION COMPLETE
– Please make sure all system components are securely fastened and refer to
your system manufacturer’s User Guide for instructions on powering your system. Power up your system and it
should launch the Operating System. All of your files and programs should be the same as when your hard drive
was installed.
Note: If you wish to use some of the other Acronis software utilities you will need to reboot your computer to
go back to the main menu.
PNY DESKTOP UPGRADE KIT INSTALL GUIDE
P.09
Using acronis® trueImage HD – Systems With multiple Partitions
Note: It is strongly recommended that you remove any trial versions of Acronis software prior to using this
bootable disk version.
Note: If the amount of used storage on your current hard drive exceeds the available space on your new PNY
or other SSD, it is recommended that you back-up the data from your current hard drive, use the “manual”
cloning method to copy your OS, system utilities and applications, and then restore selected data onto your
new PNY or other SSD. You can also remove files from your hard disk until the amount of used storage is less
than the available space on your new PNY or other SSD drive.
Systems often consist of multiple drive partitions. The additional drive partitions could, for example, consist of
a RECOVERY partition and, if present, a TOOLS partition. The following procedure details the steps in cloning a
typical system with both of these partitions.
If you choose to do an automatic clone of the system drive, often both the RECOVERY and TOOLS partitions that
are automatically generated do not leave space to avoid the Windows “you are running out of disk space on…”
notification. While this notification can be turned off in Windows, it is not recommended.The extra space allocated,
as provided in the default drive image, may be required for a system recovery or to run system diagnostics.
The following procedure assumes the SSD is in the “Out of Box” condition, has not been pre-formatted, that you
have installed the SSD in the internal2,5’’ bay and have connected the supplied SATA III data cable an available
SATA port on your motherboard.
The procedure also assumes that the SSD capacity is 240GB, but is also relevant for other capacities, once you
have ensured there is adequate SSD capacity to clone the system drive.
The procedure assumes the user has an optical drive available.
Note: The following steps are also useful in cloning other assigned partitions on the main HDD.
1. Turn on your PC system. Note the size for each partition on your HDD by going to your system’s Computer
management screen.
•“Windows XP, Vista or 7 users: from the Start menu, type in the “Search Programs and files” search Box,
click on Administrative Tools, Double-click on Computer Management and then click on Disk Management.
The Computer Management window displays all internal drives (HDD or SSD) and external drives (portable
hard drives, USB drives, flash memory cards, etc.) in your system. It is recommended that you remove all
external storage devices.
• Note the File System and Capacity required for each partition (in this example HP_RECOVERY and HP_
TOOLS) and write down the values for use later. Also write down the hidden “System” partition capacity, if
present. These partitions will be cloned onto your new PNY or other SSD, and the remaining space can be
used for the C:/ partition which is your main storage partition.
PNY DESKTOP UPGRADE KIT INSTALL GUIDE
P.10
•In the following example :
2. To get started:
• Insert the SSD Utilities Disk into the system’s optical drive.
Note: If the SSD Utilities Disk is a “mini-DVD”, the optical disk drive selected must be a tray-load optical drive.
If a tray-load optical drive is not available, the file can be downloaded by visiting www.pny.com for US and
www.pny.eu for Europe. The bootable Acronis CDR or Bootable Flash generated in the “Using Acronis
TrueImage HD” section can also be used.
• Power down your system.
3. Verify you have properly connected the PNY or other SSD to your system using the internal SATA III data
cable enclosure., and your power supply cable .
4. Apply Power to your System.
•If required, set the system BIOS so that your system will boot to the optical drive. Typically, the user will have
the option to set the boot order during power up by pressing a designated key (typically escape) after
applying power. Refer to your system’s user manual for more information.
•The Software Utilities Disk is a bootable disk and will boot to the Acronis TrueImage HD home screen.
5. At the Acronis Home Screen Select the appropriate language.
Note: This screen is only available when booting directly to the original software disk. If you choose to use a
boot flash or boot CDR generated from the Acronis application, this screen is not present.
PNY DESKTOP UPGRADE KIT INSTALL GUIDE
P.11
6. Wait for the software to load and analyze the partitions (may take several minutes).
• The screen may go dark for several minutes while loading the software.
7. Select Clone Disk.
•After the partitions are analyzed, the main menu will launch the Clone Disk Wizard.
•Select Clone Disk.
PNY DESKTOP UPGRADE KIT INSTALL GUIDE
P.12
8. Select Clone Mode
• In the Clone Disk Wizard, select manual mode and click Next.
9. Select a Source Disk
•The system drive partitions will show (ignore the drive letters as they are determined by position on the
disk).
•Select the disk as the Source Disk and click Next to continue.
PNY DESKTOP UPGRADE KIT INSTALL GUIDE
P.13
Note: If the SSD has been pre-formatted, it will also appear in this window, so be sure to ignore it and select
the correct Source Disk.
10. Select a Destination Disk.
•After selecting the Source Disk, select the PNY or other SSD as the destination where the disk information
will be copied. The previously selected source becomes grayed-out and disabled for selection.
•Select the PNY or other SSD as the Destination Disk and click Next to continue.
11. Move Method.
When you select the manual cloning mode, Acronis TrueImage HD will offer you the following data move
methods:
•As is - a new partition will be created for every old one with the same size and type, file system and label.
The unused space will become unallocated.
•Proportional - the new disk space will be proportionally distributed between cloned partitions.
•Manual - you will specify a new size and other parameters yourself.
The manual transfer method enables you to resize partitions on the new disk. By default, the program
resizes them proportionally.
•Select manual and click Next.
PNY DESKTOP UPGRADE KIT INSTALL GUIDE
P.14
12. Manual Partitioning - Clone Disk Layout
• The window displays rectangles indicating the source hard disk, including its partitions and unallocated
space, as well as the new disk layout.
• Along with the hard disk number, you can see disk capacity, the label, volume and file system information.
Different volume types, including primary, logical and unallocated space are marked with different colors.
• The disk layout will need to be changed to ensure there is empty space available for the HP_RECOVERY
partition and the HP_TOOLS partition. Notice that the available capacity on the SSD is 223.6GB.
• The partitions need to be modified, using the capacities that you recorded at the beginning of this
procedure. In this example, they were based on the main ( C: ) disk and had the following capacities:
• In order to have available capacity for the HP_RECOVERY and the HP_TOOLS partitions, the largest partition
should be modified first. In this case, it is the NTFS (unlabeled) partition, which shows a default capacity of
206.9GB. This is the default partition calculation, but left alone, it is too large. Change it using the following
calculation:
PNY DESKTOP UPGRADE KIT INSTALL GUIDE
P.15
Note: At any time during the partition setup, you can cancel and “re-tweak” the number if necessary.
13. Partition the PNY or other SSD
• To set the largest partition, highlight the partition and double click to bring up the Partition Settings
window.
• Change the Partition Size which will be “203.4GB” for this example.
Note:The partition size can also be changed by dragging the arrow on the right side of the capacity gauge
diagram.
• Leave the File System field as “NTFS” and the drive set to “Primary” in the Select the type of Partition field.
• Click accept.
• The partition display now reflects some “unallocated” space, in this example it appears after the large
graphical partition, but before the “HP_RECOVERY” partition showing 3.515 GB of unallocated space.
• Highlight and double-click the “HP_RECOVERY” partition.
PNY DESKTOP UPGRADE KIT INSTALL GUIDE
P.16
• Change the HP_RECOVERY Partition size to the capacity that was recorded at the beginning of the
procedure. In this example, the original HP_RECOVERY partition was 14.93GB.
Note: Ensure that the “Free Space Before” field is set to “0” (Zero) in order to place the remaining free space
available in the “Free Space After” position.
• Leave the File System field as “NTFS” and the drive set to “Primary” in the Select the type of Partition field.
• After clicking “Accept” the disk layout should resemble the screenshot below. Now the unallocated space
appears before the FAT32 “HP_TOOLS” partition.
PNY DESKTOP UPGRADE KIT INSTALL GUIDE
P.17
•Highlight and double-click the “HP_TOOLS” partition.
•The software will automatically add the unallocated space to the HP_TOOLS partition which in this
example is 4.95GB, close to our original requirement of 5GB.
•Click accept.
•The PNY or other SSD layout now allows for free space in both the “HP_RECOVERY” and “HP_ TOOLS”
partitions. The layout of the desktop hard disk has been duplicated.
PNY DESKTOP UPGRADE KIT INSTALL GUIDE
P.18
• Click Next to continue.
Note: All space must be allocated before proceeding to the next step.
14. Cloning Summary
The Cloning Summary window graphically (as rectangle bars) illustrates information about the source
disk (partitions and unallocated space) and the destination disk layout. Along with the disk number, some
additional information is provided: disk capacity, label, partition and file system information.
• The windows compares the before and after partitions of the SSD and provides the last chance to make
any changes by selecting Cancel to return to the main screen and start over.
WARNING: Clicking any previous step on the sidebar in this window will reset all size and location changes
that you’ve selected, so you will have to specify them again.
15. Cloning
•Click Proceed to start the cloning process
PNY DESKTOP UPGRADE KIT INSTALL GUIDE
P.19
•It is recommended that the “Shut down the computer when Clone Disk is completed” box is checked
to prevent rebooting to the cloned disk.
MANUAL CLONING COMPLETE
drive.
– Your PNY or other SSD is now ready to replace your internal storage
16. Restart your computer and remove the utilities disk from your optical drive.
17. To enter the system BIOS, please refer to your motherboard/computer’s user manual. Enter your Advanced
BIOS settings and setup the new SSD as priority in the BOOT sequence.
INSTALLATION COMPLETE
– Please make sure all system components are securely fastened and refer to
your system manufacturer’s User Guide for instructions on powering your system. Power up your system and it
should launch the Operating System. All of your files and programs should be the same as when your hard drive
was installed.
PNY DESKTOP UPGRADE KIT INSTALL GUIDE
P.20
Note: If you wish to use some of the other Acronis software utilities you will need to reboot your computer to
go back to the main menu.
Note: Proceed to “Appendix: Preparing Your System After Install – Windows XP/Vista/7 Users” to optimize
your system to the SSD”
Note: It may be necessary, after installation of the cloned SSD to modify the drive letters to be equal to the
drive letters of the original system to maintain recovery or tools functionality. Please refer to your operating
system help menu for instructions on modifying drive letters.
Appendix: Preparing Your System after install – Windows XP/Vista/7 Users
After successfully installing your SSD in a Windows XP or Vista/7 environment, it is recommended that you perform
these additional steps to optimize your system to take advantage of your SSD features:
• Disable Sleep Mode
• Disable Defragmentation
• Disable Indexing (If SSD is primary Drive)
WARNING: Failure to prepare Windows XP/Vista/7 operating systems to use SSDs may result in decreased
SSD performance and reduced system responsiveness.
1. Disable Sleep Mode, Use Hibernation if Necessary
• Open the Windows Command Prompt:
• Windows XP: Go to the Start menu and type cmd.exe in the Run field
• Windows Vista: Go to the Start menu and type cmd in the Search field and then click cmd.exe in the
Search Results field
• In the Command Prompt type: powercfg /hibernate on (include the spaces between the letters)
• In the Control Panel click Power Options and click the link that says Change when the computer sleeps
• Select Never for the Sleep Settings
• Click on Change advanced power settings
• If you expand the Sleep setting, you can change when your computer sleeps to Never. Turning off Allow
hybrid sleep will let you choose Hibernate from the start menu if you’d like to be able to do it manually
2. Disable Disk Defragmentation
• Go to the Start menu, right click on the Computer icon, and select manage to enter Computer
management
• Under Services and applications, go to Services, right click Disk Defragmenter and select Properties
• Change the Startup type to Disabled and select OK
3. Disable Indexing (If SSD is the Primary Drive)
• Go to my Computer, right click the PNY or other SSD, and select Properties
• At the bottom of the window, uncheck allow Indexing Service to index this disk for fast file searching
• To disable the indexing of file attributes, go back to the “Services” section of Computer management (as
described above), but this time, right click Windows Search and select Properties
• Change the Startup Type to Disabled
TROUBLESHOOTING
Note: If you are having trouble with your installation and the topics below do not address or resolve the issue,
please contact PNY Support : www.pny.com for US and www.pny.eu for Europe.
The system does not boot to the Acronis TrueImage HD home screen and instead boots to Windows or fails
to boot at all
• Restart the computer. While the system is restarting, run the system setup program BIOS. The system BIOS
can be activated by pressing a special key such as ESC, F1, F12 or DELETE. (Consult your computer system’s
documentation for the correct key.)
• While in the system BIOS, change the boot priority/order so that CD-ROM is the first boot device.
PNY DESKTOP UPGRADE KIT INSTALL GUIDE
P.21
• Save the settings and exit BIOS. (For more detailed instructions on configuring the BIOS, consult your computer
system’s documentation.)
• Restart the computer. When the computer restarts, it should now boot to the Acronis TrueImage HD page.
BIOS cannot detect SSD
• Make sure each cable is connected correctly.
• Assure that AHCI is not enabled in the BIOS (if supported).
• If the cables and jumper settings are ok, make sure the BIOS settings are correct. Please refer to the user’s
manual provided by your system or motherboard manufacturer for details about the BIOS setup.
BIOS detects the SSD, but it is not visible to an operating system
• Assure that the SSD was partitioned and formatted correctly. Depending on the operating systems, partitions
can be generated by Fdisk or during the OS installation. Please refer to the user’s manual that came with the
OS, for details about partitioning and formatting.
An error occurs when restarting the computer after installing the OS
• Disable AHCI mode in the BIOS setup.
• Install the latest SATA device driver (usually available on your computer or motherboard manufacturer’s
website).
– For newer systems you may need to upgrade the manufacturer’s chipset drivers, which include the SATA
drivers
The system fails to detect and format the SSD
• From the Start menu, go to administrative tools, select Computer management and then Disk management.
• The Disk Management window displays all internal drives (HDD or SSD) and external drives (portable hard
drives, USB drives, flash memory cards, etc.) in your system. It is recommended that you remove/eject all
external storage devices in order to accurately view your system partition(s).
• The PNY or other SSD will display the usable storage capacity and show up as Unallocated, noted by the
black banding.
• Right click on the Unallocated space to launch the New Simple Volume wizard.
PNY DESKTOP UPGRADE KIT INSTALL GUIDE
P.22
• In the wizard select Next to specify the volume size which is set to the maximum disk space by default.
• Leave the default maximum unchanged and select Next.
• The wizard will assign a default drive letter, or you can select another unused letter. When complete, select
Next to go to the Format partition screen.
PNY DESKTOP UPGRADE KIT INSTALL GUIDE
P.23
• Select format this volume... set the File System to NTFS, Allocation unit size to Default and leave the Volume
Label unchanged. Select Next to review your.
• Select Finish to format your PNY or other SSD. This process may take a few minutes.
Limited 3 Year Warranty, see www.pny.com for US and www.pny.eu for Europe. For regulatory declaration of
conformity and operating instructions visit www.pny.com for US and www.pny.eu for Europe.
US : PNY Technologies, Inc., 100 Jefferson Road, Parsippany, NJ 07054
Europe: PNY Technologies, Inc. 9, rue Joseph Cugnot
BP 40 181-33708 Mérignac cedex France
© 2013 PNY Technologies®, Inc. All rights reserved.
All trademarks are properties of their respective owners.
Updated - Feb 13 2013
PNY DESKTOP UPGRADE KIT INSTALL GUIDE
P.24