1
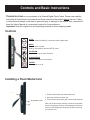
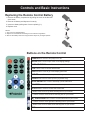
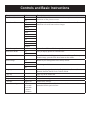
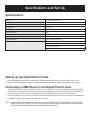
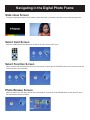
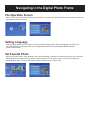
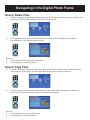
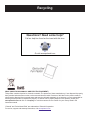
Digital Photo Frame
User’s Manual
Questions?
Need some help?
This manual should help you
understand your new product.
If you still have questions, call our
help line found on the
insert with this icon:
Or visit
www.polaroid.com/support
Controls and Basic Instructions
CONGRATULATIONS on your purchase of a Polaroid Digital Photo Frame. Please read carefully
and follow all instructions in the manual and those marked on the product before first use. Failing
to follow these warnings could result in personal injury or damage to the device. Also, remember to
keep this User’s Manual in a convenient location for future reference.
Important: Save the original box and all packing material for future shipping needs.
Controls
AUTO:
Press it means exit.Hold for 2 seconds to start a Slide show.
MENU:
Press to enter or select.
Hold for 2 seconds to enter the SETUP menu.
UP ARROW
Press to move up or select Previous.
DOWN ARROW
Press to move down or select Next.
POWER:
Turns power on or off.
Installing a Flash Media Card
USB Port
MS/SD/MMC Card
Power
1. Find the slot that fits your flash media card.
2. Insert the card in the correct slot.
3. To remove the card, simply pull it out from the card slot.
Note: Do not remove any memory card from its slot while
pictures are playing. Doing so could damage the frame or
memory card. Always turn the power off before removing
the memory card.
Controls and Basic Instructions
Replacing the Remote Control Battery
1. Remove the battery compartment by pulling the cover in the direction
of the arrow.
2. Remove old battery and dispose of correctly.
3. Insert new battery taking note of correct polarity (+/-).
4. Replace cover.
Caution:
1. Only use a 3V CR2025 battery.
2. Dispose of used batteries according to local ordinance regulations.
3. Remove the battery when not using the Flash Player for prolonged periods.
Buttons on the Remote Control
POWER button: Press to turn player on or off.
SETUP button: Press to open menu for changing settings.
CARD SELECTION button: Press to choose a different memory card.
FILE button: Press to choose different files.
PHOTO button: Press to go to and display photo files.
ROTATE button: Press to rotate photos 90 degrees clockwise on screen.
ZOOM button: Press to zoom up to 4x (on photos only).
SLIDE SHOW button: Press to start/stop a photo slide show.
FAVORITE button: Press to choose the favorite photo.
16:9/4:3 button: Press to choose the screen ratio.
! button: Press to move up when selecting files on your screen.
" button: Press to move left when selecting files on your screen.
#$ PLAY/PAUSE button: Press to confirm selections on your screen.
% button: Press to move right when selecting files on your screen.
& button: Press to move down when selecting files on your screen.
EXIT button: Press to exit your current object.
Controls and Basic Instructions
Setup menu
Sub-menus
Description
Separate windows
On
Off
Off
Fade
Shutter
Cross Combo
Mask
Brick
Dissolve
Bar
Expansion
Silk
Random
5 ~ 30 seconds
On
Off
Creates additional frames to view more than one picture at a time with a
maximum of four pictures at once.
Slide show effect
Slide show speed
Slide show shuffle
Set favorite or select
Reset settings
Full screen
Yes
No
On
Off
Language
Copy file
Delete file
Brightness/contrast
Color/tint
Auto slide setting
Degree bar
Degree bar
Off
30 seconds
60 seconds
5 minutes
15 minutes
Each picture in a slide show will be shown one after another. Choose a
transition to be used between those images.
Choose from different slide show speeds.
Lets you display photos in a random order.
A small check mark will appear on the thumbnail image. To view your
favorite image, press the slide show button on the remote.
Resets all your settings back to the factory default.
View images at full screen.
Select the language of your choice: English, Italian, German, French,
Spanish, Russian, Dutch, Greek, Turkish, Polish.
Copy files to the media card.
Delete files.
Adjusts these settings.
Adjusts these settings.
Automatically turns on a slide show when the frame or remote is
untouched for this period of time.
SpeciÞcations and Set Up
SpeciÞcations
Unit
Unit Size
Weight
Resolution
Brightness
Contrast Ratio
Card Type
Input
Auto Start Mode
Photo Playback Mode
8" Digital Photo Frame
290mm x 220mm x 40mm
1.2 kg
800 x 480
300cd/m2
300:1
SD, MMC, MS
Mini USB
Auto slide show (JPEG)
1. Rotate, zoom in
2. Auto slide show
3. Interval time setup
4. Transition setup
Setting up the Digital Photo Frame
1. Plug the appropriate end of the AC adapter into a power outlet and the other end into the Digital Photo Frame.
2. After you’ve stored content on a flash media card (not included), insert the card into the proper slot (see page 2).
Connecting a USB Device to the Digital Photo Frame
1. The Digital Picture Frame has a built-in mini-USB port. If you would like to connect the USB device (such as a USB
flash drive) to the Digital Picture Frame with a full-size port, please use the USB Connection Cable” included with the
digital picture frame. This included cable has a male mini-size USB port and a female full-size USB port.
2. It is recommended that you turn off your USB device and the Digital Picture Frame before connecting the USB device.
3. This Digital Picture Frame cannot be connected to a computer.
NOTE: DO NOT TAKE THE MEMORY CARD OUT OF THE SLOT WHILE THE PICTURES ARE STILL PLAYING OR
WHEN THE POWER IS STILL ON. THIS COULD DAMAGE THE FRAME OR THE MEMORY CARD. ALWAYS
TURN THE POWER OFF BEFORE REMOVING THE MEMORY CARD.
Navigating in the Digital Photo Frame
Slide show Screen
Turning the digital photo frame on will initiate a photo slide show, provided the inserted memory card has photo files.
Select Card Screen
Press the CARD SELECTION button on the remote to return “Select card” menu:
Select Function Screen
Select a source disk, then press the OK key on the product, or press the PLAY/PAUSE button on the remote to enter the
“Select Function” menu as below:
Photo Browse Screen
Select the Photo icon, then press the OK key on the product, or press the PLAY/PAUSE button on the remote to enter
the Photo Browse Screen as below:
Navigating in the Digital Photo Frame
File Operation Screen
Select the File icon, then press the OK key on the product, or press the PLAY/PAUSE button on the remote to enter the
File Operation Screen as below:
Setting Language
Press the Setup button on the remote to access the setting language menu, select the language you wish to use.
The menu language will change in this order: English>Italian>German>French>Spanish>Russian>Dutch>
Greek>Turkish>Polish.
Set Favorite Photo
Using your remote control, select the photo view mode, depending on whether you want to set a photo as your favorite.
Select the photo you want to set as a favorite. Press set favorite on the remote control. You may select photos by
repeating these steps. To enter a slide show, press the slide show key on the remote.
Navigating in the Digital Photo Frame
How to Delete Files
a)
In Select Card Screen or Select Function Screen, press the SETUP button on the remote control, the setting menu
will pop-up. Select Delete File will delete all the photo in the current card.
b)
In File Operation Screen, press the SETUP button on the remote control, the setting menu will pop-up.
Select Delete File, it will delete the photo you select.
Select file:
A.
In File Operation Screen, press the Favorite button
B.
In the Setting menu, select Set Favorite
How to Copy Files
a)
In Select Card Screen or Select Function Screen, press the SETUP button on the remote control, the setting
menu will pop-up. Select Copy File, it will copy all photo on the current card to the other card.
b)
In the File Operation Screen, press the SETUP button on the remote control, the setting menu will pop-up.
Select Copy File, it will copy the photo which you selected to the other card.
Select file:
C.
In File Operation Screen, the Favorite button
D.
In the Setting menu, select Set Favorite
Recycling
Questions? Need some help?
Call our help line found on the insert with this icon:
Or visit www.polaroid.com
WEEE (WASTE ELECTRONICAL AND ELECTRIC EQUIPMENT)
This product contains electrical or electronic materials. The presence of these materials may, if not disposed of properly,
have potential adverse effects on the environment and human health. Presence of this label on the product means it
should not be disposed of as unsorted waste and must be collected separately. As a consumer, you are responsible for
ensuring that this product is disposed of properly. To find out how to properly dispose of this product, please go to
www.polaroid.com and click on ÒCompanyÓ or call the customer service number for your country listed in the
instruction manual.
“Polaroid” and “Polaroid and Pixel” are trademarks of Polaroid Corporation.
For service, support and warranty information, visit www.polaroid.com