1
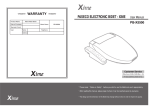
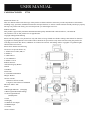
USER MANUAL
CAR BLACK BOX
E730
Instructions before use
This user manual will describe the usage of this product in details and at the same time provide comprehensive information
including usage, operation, installation instructions and specification, etc. Please read the manual carefully and keep it properly.
We hope our product will satisfy your need and provide you with longterm services.
Product Guarantee
This product is approved by ISO9001:2000 International Quality Standard and certified with FCC, CE and SGS.
Our customers can use this product free of apprehension.
Copyright infringement Warning
Please note this product is for personal use only. The forms of usage should not offend or infringe international or domestic
copyright laws and regulations. All recorded videos should be for personal use only. Please note that using this product for
recording of occasions like shows, exhibitions or commercial activities will infringe others' copyrights or legislation rights.
Check Product Accessories
Please check whether the following
accessories are present before use,
1. Vehicle Power Cable (4M) x1
2. Holder x1
3. USB Cable x1
4. User Manual x1
5. Holder Coverx2
Product Structure
1.Menu/Emergency Button
2.Mode
3.UP/Mute
4.Down/EV
5..Left/LED on/off Button
6.Right / Button
7.Power On/Off ;
Short Press Power On/Off ;
Long Press Forced Power Off Button
8.Record / Photo / OK
9.GPS
10.Red Light Indicator (Charging)
11.Blue Light Indicator(Recording)
12.Green Light Indicator
(GPS)Optiona
13.Lens
14.fill light]
15.USB Port/AV Output
16.HDMI Output
17.Car DV
18.TF Card Slot
Transmit the video to LCD TV
You can also transmit the video from the drive recorder to your LCDTV at home to playback the data or adjust the setting.
The steps areas follows:
1. Your video equipment should have AV IN or HDMI ports.
2. Connect AV cable or HDMI cable (optional purchase) to the video equipment and the drive recorder.
3. Connect the home use transformer (optional purchase) to the drive recorder and the house power socket.
4. Adjust the channel of the video equipment to AV or HDMI.
5. Installation completed.
Photo size
Photos resolution can be configured during capture. Higher value means higher resolution and better picture quality.
MENU Button Menu【Photo size】
【3M(2048X1536)】
【5M(2592X1944)】
【8M(3264X2488)】
Menu Operation
Press "Menu" Button active the Menu selection, "OK " button Enter sub-menu and confirm the selection left and right or up and
down button
to select the item .
Video Clip Mode:
Resolution
Video resolution can be configured during recording. Higher value means higher resolution and better picture quality, and the
storage
capacity consumption will be relatively higher.FPS is Frame Per Second during recording. Higher FPS means smoother video.
MENU Button 【Video resolution】
【1920x1080 30P】
【1280x720 60P】 【1280x720 30P】
【640x480 30P】
Date Stamp
Through this function, you can select whether to show time and License plate number and GPS rate information during
recording..
MENU Button 【Stamp】
【On】/【Off】
Record Time
Setting Recycle record can, under limited memory card, repeatedly use the new data to overwrite the old data, in order to
achieve noninterrupted recording result.MENU Button【Record Time】
【2 minute】/【5 minutes】/【10 minutes】/【NO】
*Setting Value. It means saving data every 5 minutes, relatively each cycle will overwrite 5 minutes of old data.
Motion detect
In the view range , if there is any object move, it is detected and trig the car dv begin to record automatically.
MENU Button【Motion detect】
【Off】
【5s】
【10s】
【30s】
【60s】
G-Sensor
When there is a collision, with the help of the changes in XYZ curves, G Sensor or Gravity Sensor can determine the direction
of the collision
and simultaneously set the recorded data to protection mode, and the data will not be overwritten by circulated recording.
Adjust the
sensitivity parameter of XYZ axles. so the drive recorder will not automatically set the data to protection mode.
MENU Button【G-Sensor】
【High】
【Normal】
【Low】【Off】
Contrast
Use to record and take photo, the measurement of different brightness level between the brightness light and the darkness dark
in area of
light & Dark The more the scope, the more the contrast, and vise versa
MENU Button【Contrast】
【Normal】/【Hard】/【Soft】
Sharpness
Use to adjust the image sharpness. when not enough, it can be adjusted more clearer
MENU Button【Sharpness】
【Standard】/【Hard】/【Soft】
Brightness
Adjust the brightness of view when record and take photo,
MENU Button【Brightness】
【Normal】/【High】/【Low】
Saturation
Use to adjust purity of bright degree or color of image, the bigger the color composition, the bigger the saturation, the smaller
decolorization
composition the smaller the saturation
MENU Button【Saturation】
【Normal】/【High】/【Low】
WB
Used to set different white balance when record and take photo, the object color change due to the light color, there is the
different color
temperature of photos taken under the different light situation
MENU Button【WB】【Auto】/【Incandescent】/【D4000】/【D5000】/【Sunny】/【Cloudy】
Volume
Mute Mic and speak On/Off
MENU 【Volume】
【0】/【1】/【2】/【3】/【4】/【5】/【6】/【7】
Language
Use this setting to adjust the menu to your preferred language.
MENU Button【Language】 【English】
【简体中文】/【繁體中文】/【Pусский】/【Korean】/【日本語】
Press OK Button to process
Light Freq
Select 50Hz if the power voltage of the country is 220V. Select 60Hz if the power voltage is 110V.
MENU Button Menu【Light Freq】
【50Hz】/【60Hz】
TV Out
This setting can be adjusted when you use AV cable or HDMI cable to transmit the video to the monitor. Select local video
specifications
NTSC or PAL to solve the problem of flicking pictures owing to inappropriate video format.
MENU Button Menu【TV out】
【NTSC】/【PAL】
Date & Time
Adjust the current date and time. (Drive recorder with GPS feature will automatically sync the standard date and time after
positioning, no
setting is required).
MENU Button Menu【Date& Time】Press "OK” key to enter setting Press, select Year, Month, Day, Time, Minute.
GPS
Setting GPS can choose to activate or disable GPS function.
MENU Button【System Setup】Menu【GPS】
【ON】/【OFF】
At video clip mode , you can enable /disable GPS functional , press "right/GPS" button will enable or disable GPS function .
If the GPS switch is on , the GPS icon and LED will flash when GPS searching the GPS information , after fixed the
GPS information , the GPS icon and LED will fix ON
Beep
Used to voice output of on/off on the button
MENU Button【Beep】
【On】/【Off】
LED
Select On or Off, you can control button LED display.
MENU Button【LED】
【On】/【Off】
TimeZone
Set the time zone to the local code can be automatically synchronized to GPS time
MENU 【TimeZone】
【-12】/【-11】/【-10】/【-9】/【-8】/【-7】/【-6】/【-5】
【-4】/【-3】/【-2】/【-1】/
【0】/【+1】/【+2】/【+3】/【+4】/【+5】/【+6】/【+7】/【+8】/【+9】/【+10】/【+11】/【+12】
License plate
After you set up your own license plate number, this number can be attached to the recorded video.
Screen save
The DVR time no operating, the screen automatically turns off, press any key to open
MENU 【Screen save】 Off/3 Min /5 Min
Auto Power Off
DVR is powered on but there is no record of the case, will shut down automatically after some time
MENU 【auto power off】 Off/3 Min /5 Min/10 min
Format
This function will delete all data in the memory card including protected data. When the memory card is used for a long time,
too
much data will reduce the access efficiency. This function will optimize the access speed of the memory card.
MENU Button【Format 】
【No】
【Yes】 Press OK Button to process
Default Setting
This function will reset all settings on the drive recorder to default factory settings.
MENU Button【Default Setting】
【No】
【Yes】
Version
View the firmware version of the drive recorder.
MENU Button【Version】
The version number during factory shipment will be considered as the original version.
Preview
Left Previous Clip; Right Next Clip ; OK Play Video
Play
EV
If “EV” is adjusted to + side, you can avoid under-exposure, or dark objects as shooting against a bright background.
If “EV” is adjusted to – side, then you can avoid over exposure, or bright objects as shooting against a dark background or at
night.
At video clip mode , press "down/EV" button change the EV setting , the EV value will be change loop .
【EV】
【-2.0】/【-1.7】/【-1.3】/【-1.0】/【-0.7】/【-0.3】/【0】/【+0.3】/【+0.7】/【+1.0】/【+1.7】/【+2.0】
Mute
At video clip mode , you can disable the audio functional using press "Up/Mute" key .
Playback
Press "Mode" swicht to play back mode .
Thumbnail View
Left/Right/Up/Down to select video files
"OK" Buttion ------- Play Video
"Menu" button ------Delete files/ Copy to nandFlash
Delete files :Delete the single video clip currently selected.
Connecting to PC
Step 1 : Insert the memory card into drive recorder , and take out the short USB cable provided.
Step 2 : Connect the USB cable with the drive recorder, and connect the other end to the USB port of PC. The red light will
start blinking.
Step 3 : Press and hold the USB switch on the host device for 2~3 seconds to change to USB mode, now the red and blue lights
will start blinking simultaneously.
Step 4 : The computer will show a removable disk, you can use this disk for data access in the memory card.