Transcript
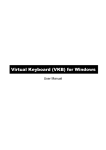
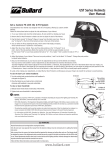
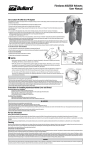
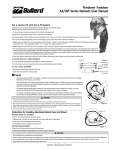
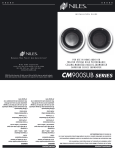
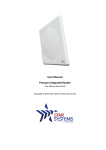
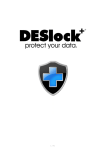
DLSIN
DLA012SUSJ3 / DLA012NAS
2014-04-18
The Device at a Glance
2 Bay NAS / Enclosure
3.5” SATA HDD
Disk Installation
The products of DLA012NAS/DLA612USJ3 are 2 Bays external
enclosures with gigabit network storage station (DLA012NAS)
and high data transfer speed-6Gbps (DLA612USJ3). DLA012NAS
supports USB3.0, LAN and RAID 0/1 system; DLA612USJ3 supports
USB3.0 and eSATA. Both are high quality aluminum for optimized
heat dissipation and the cooling fan can be change by the user
directly. It though the high speed for connect with PC or notebook.
Patented design of tool-free and HDD easy to install definitely
offers a convenient and economical way for your storage.
Supports up to 2 x 3.5” SATA HDDs
Supports SATA III 6Gbps speed
Built-in SMTP server and SMSC server functions (DLA012NAS only)
Versatile interface includes LAN and USB 3.0 client (can be
connected to PC as an USB3.0 external enclosure) (DLA012NAS only)
Gigabit network storage station (DLA012NAS only)
Combines with RAID 0/1 (DLA012NAS only)
Tray-less design, easy to install
Silent cooling fan can help heat dissipation
Connect to PC
Configure RAID
Connect the include LAN cable form your computer LAN port
on the NAS/Enclousre.
If using USB connect the USB cable form an USB port on
your computer system to the NAS/Enclosure.
4
6
DLA612USJ3
1. Front Cover
2. LED Indicator
3. Power Button
Power Cord
4. FAN Cover
5. eSATA
6. DC-IN Port
7. USB 3.0 Port
USB3.0 Cable
Please backup data before setting RAID, all the data
in HDD will be eliminated in the operation.
Set RAID Mode
1. Turn off the unit, by Pushing the Power button on the
front panel.
2. Set the RAID switch to the RAID mode of your choice.
3. Press and hold the set “RAID button” as you power on the
enclosure by pressing the “Power button”.
4. Once the enclosure has turned on, release the set “RAID
button”.
5. Your desired RAID configuration is now set.
Note: When changing RAID configurations, follow the above
steps to set the unit back to STANDARD (JBOD),
before setting to a different configuration.
DLA012NAS
DLA612USJ3
USB3.0 cable x 1
eSATA cable x 1
Power adaptor x 1
User manual x 1
8. LAN Port
9. Reset Button
10. RAID Button
DLA012NAS
LAN cable x 1
Power adaptor x 1
User manual x 1
10
Turn on the unit, by Pushing the Power button on the front
panel. Note: Ensure the Power switch on the rear of the
unit is in the ‘On’ Position.
Switch the RAID button
to the one you want.
6
DLA012NAS
DLA612USJ3
User Quick Guide
Clear Existing RAID
Before deleting an existing RAID make sure to backup your
data as they will be lost afterwards.
1. Switch off the device.
2. Toggle the RAID switch on the device's backside to
“Clear RAID”.
3. Press “Set” and "Power" on the device simultaneously.
4. The device will beep and the existing RAID is erased.
Rebuild
The new HDD must provide at least the same capacity as the
replaced one. Do not change the RAID mode prior to the
rebuilding. Do not change the HDD order before commencing
the rebuild process.
1. Switch off the device.
2. Change the defective HDD.
3. Power on the device, the rebuild procedure will start
automatically even when the device is disconnected
from your PC.
Remove Defective RAID HDD
In case a HDD inside a RAID Array gets defective, the front LEDs
for HDD activity will cease and the device will beep until the set
"RAID button" is pressed.
In a RAID 1,3,5 and 10 array the data can be restored by rebuilding
the array.
Rebuild Operation
Legal Disclaimer
(1) After turn off the power and change damaged HDD, it will start
rebuild operation when turn on the power again.
The new HDD capacity should be larger or equal to the old one.
For potential loss of data, especially due to inappropriate handling,
the company assumes no liability.
All named products and descriptions are trademarks and/or registered
rademarks of the respective manufacturers and are accepted as
protected. As a continuing policy of product improvement at the
company, the design and specifications are subject to change without
prior notice. National product specifications may vary.
Red Flash - inrebuild operation
Blue Light - rebuild complete
Blue Light
Ope r a tion
H D D D a m a ge d...
Beep
LE D-HDD Acces s
O FF
C om ple te
Red Flash
Data from an existing RAID 0 or Combined mode are lost. Change
the defective HDD and delete the RAI array.
When on RAID 1,
RAID 3,RAID 5,
RAID 10 mode
When on RAID 0,
Combine mode
When on clear
RAID mode
(2) Even when disconnect with PC, the Rebuild operation will continue.
Do not change RAID mode when rebuild the HDD, otherwise the
Rebuild operation could not be completed.
Do not change the HDD order when rebuild the HDD, otherwise
the Rebuild operation could not be completed.
About this Quick Guide
This Quick Guide covers all interfaces and combinations for the
DLA612SUSJ3/DLA012NAS. Images and descriptions might therefore
slightly vary between this manual and actual product you have.