1
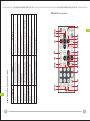
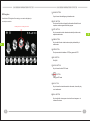
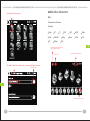
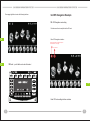
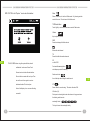
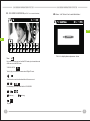
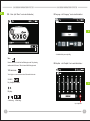
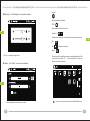
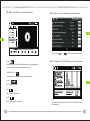
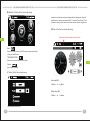
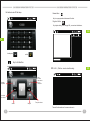
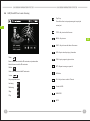
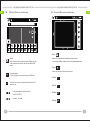
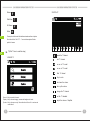
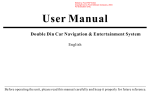
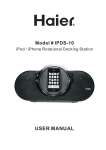
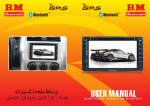
CAR AUDIO SYSTEM
USER MANUAL
CONTENT
9-0- Connection introduction
1-0
MAIN FUNCTION SETUP
P.1
2-0
REMOTE CONTROL INSRTUCTION
P.3
3-0
MAIN MENU INTRODUCTION
P.7
3-1
RADIO
P.8
3-2
DVD
P.10
3-3
MUSIC
P.12
3-4
MOVIE
P.14
3-5
BLUETOOTH
P.16
3-6
A2DP
P.20
3-7
PHOTO
P.21
3-8
TV
P.22
3-9
USB
P.24
3-10
E-BOOK
P.26
AUX
P.27
3-12
GPS
P.28
3-11
4-0
4-1
SYSTEM SETUP MENU INTRODUCTION
NAVIGATION SETTING P.28
P.28
4-2
TIME
P.29
4-3
CAR SETTING
P.31
4-4
GPS MONITOR
P.31
4-5
BACKLIGHI
P.32
4-6
RADAR
P.32
4-7
LANGUAGE
P.33
4-8
AMPLIFIER
P.33
4-9
RADIO AREA
P.34
4-10
VOLUME
P.35
4-11
SYSTEM
P.36
5-0
5-1
GPS NAVIGATION EXAMPLE
NAVIGATION ROUTE SETTING P.37
5-2
P.37
P.40
NAVIGATION
6-0
FAQ
P.41
7-0
TROUBLE SHOOTING
P.42
8-0
AUDIO KNOWLEDGE
P.44
9-0
CONNECTION INTRODUCTION
P.45
1
Line NO
1
2
3
4
5
6
7
8
COLOR
pink
FUNCTION
Line NO
Handbreak and video off control line
brown
Reversing radar Screenline ACC
empty
empty
red
ACC ignition wire
bule
auto antenna control line
orange
Back light control line
yellow
battery
black
GND
1
2
3
4
5
6
7
8
Line NO
Line/COLOR
A1
A2
A3
A4
A5
A6
A7
A8
B1
B2
Grey/white
Brow/white
Black/white
/
Black/yellow
Grey/red
Brown/red
Black/red
Black/yellow
grey/yellow
FUNCTION
Line NO
B3
SPK-Left real
B4
B5
IIN
B6
GND
Backup video input C1
Spkout R
C2
SPK-Right real
C3
R-CH INPUT
C4
Video-In1
C5
Video-In2
C6
SPK-L
COLOR
purple
FUNCTION
RIGHT REAR LOUDSPEAKER
Purple/black RIGHT REAR LOUDSPEAKER
Grey
RIGHT FRONT LOUDSPEAKER
Grey//black RIGHT FRONT LOUDSPEAKER
white
LEFT FRONT LOUDSPEAKER
white/black
LEFT FRONT LOUDSPEAKER
Green
LEFT REAR LOUDSPEAKER
green/black
LEFT REAR LOUDSPEAKER
Line/COLOR
/
/
FUNCTION
GND
/
Brown/yellow
Video-In1
black/yellow
Video-In 2
/
/
/
Black
SRO cathode
/
Bule
remote input
Green
SRO 1
Grey
SRO2
45
8-0- AUDIO KNOWLEDGE
1-0 .MAIN FUNCTION SETUP
DVD BASIC KNOWLEDGES
sign knowledge of dvd
12cm diameter Feature
longest time to play
1.GPS NAVIGATION SETUP:
First insert the right sd card. Enter the setting icon of the menu and choose
Double-decked(dvd-9)
monolayer (dvd-10)
Double-decked(dvd-18)
242 Minute
266 Minute
484Minute
the GPS file path setting. Push “folder” icon and choose the right map file.
Then back to the menu and enter GPS mode
bosseyed, monolayer (dvd)
mpge2
74 Minute
cdda
74 Minute
bosseyed, monolayer
2.TOUCH SCREEN CALIBRATE:
Enter the System icon and choose touch screen calibrate. Press “+” icon of
SIGN KNOWLEDGE OF DVD DISC
Sign
the screen with touch pen. Pls let the touch pen follow it . It will display ok
signification
after calibrating.
Show the sound orbit number of disc record, at most eight sound
orbit in one disc
3.GPS NAVIGTIAON STATUS:
Show the disc can offer with multiple subtitle display.
Show the view angle number of shooting image(at most nine angles)
Links the GPS navigation status to show the the status of GPS’ s signal.
4.LANGUAGE:
Key to choose OSD's Language. Just double click your flag !
Show the selected image scene ratio. “LB” letter box “PB” camera
leans scan. The left picture mean can transfer form the 16:9 image
mail box
1-0
5.VOLUME:
Key to choose the volume of unit
T he sign disc playing zone code
Area1: Usa, Canada, Island On Pacific Ocean East
Area2: Japan, Western Europe, North Europe, Egypt, Southern
Africa, Middle East Nation
Area3: Taywan, Hongkong, South Korea, Thailand
Area4: Australia, New Zealand, South Asia,
Island On Pacific Ocean South, Oceania
Area5: Russia, India, Mongolia, East Europe, Central Asia,
North Korea, North Africa,
Area6: China
6.TIME:
Key to choose Time of unit. After adjust , press ok !
8-0
44
1
2
Close the PCB function
Tune the set grades’ clock function
Use the CD compatible with the unit
]Keep the side with label when enter the CD
The grade is exceed the locked function set
The exetent code is not compatible
CD put on the contrary
CD can not up to snuff
There are no repeat and search
The function of the PCB is in circulating
function when play VCD
Exit the CD in the unit then enter a new one
There is no CD in the unit
CD can not enter
Set position and speed limit
Press the JECT for 5seconds to reset the read CD device
11.RADAR:
Nonlice operation
Key to car setting
Wrong or no motion
10.CAR SETTING:
Information is more than the contents that
can be display
Latin America
Information is more than the contents that
can be display
Key to set Amplifier :standard. Jazz, Class, Pop
Display wrong play
information
8.AMPLIFIER:
Clean or replale the CD Instead the CD or choice a new storage file
1-0
CD was pollued or damaged
File or notes damaged
There are two model backlight for user choice: day mode & night mode.
Appear stop page in playing
progress
Solution
There are 6 radio area: Europe, Japan ,USA, Russia, China,
cause
SHOOTING
9.RADIO AREA:
Problems
7-0- TROUBLE
7.BACKLIGHT:
7-0
43
42
The picture not normal
No picture
Automatic reset when the
unit close
Low tone, distortion severity
Novoice output or voice
output small
Unable to use the remote
No power
General
Problems
7-0- TROUBLE
7-0
Speaker
large
Current DVD system set is correspondThe Video
line from main unit is connected properly
Wrong connect thrum with brake line
Not in brake state
Wrong line correct between ACC&B+
Don’t use bad disc
Speaker and the unit not
have the same power impedanceSpeaker turnoff
Wrong line connect Too low voice
fault
Voice balance setting warp too
Speaker has a ground line connect part
Battery has done,
Wrong battery set
automatism protect Caused by nonlicet operation
Power voltage is over the rating rang, system
The unit power or auto battery fuse is blown.
The unit power or auto battery fuse is blown.
Power voltage is over the rating range, system
Automatiion protect caused by nonlicet operation
cause
SHOOTING
Press the Reset key to
Tune system Video setting
Check and connect correctly
Check brake line and connect correctly
Stop car in safe state and keep in brake state
Check and connect line correctly
Use real disc
Replace correct speaker
Check speaker line
check and correct line
Increase the voice Replace speaker
Tune the balance
set to middle place
Speaker line keep insulative
Replace new battery, Reset battery
Replace correct fuse, Tune voltage, Press the Reset key to reset
the system
Replace correct fuse Tune voltage
reset the system
Solution
2-0- REMOTE control introduction
3
1
2
5
23
13
14
2-0
4
6
8
11
7
10
20
9
21
22
17
12
20
19
16
15
18
24
25
3
1.POWER
6-0-Frequently Asked
Questions
Press this button to turn on the palyer when the player is off;press this
button To turn off the player when the player is on.System show the car
Reason : no install bus pod or not install the bus pod properly
after cut ACC.
Solution : configure the bus pod properly
2.SRC
Key to switch the working mode; radio--dvd-removable; media--Aux in
2-0
1.Question: Failure to open the unit
logo,date and time at power off mode.The unit is turn off completely
-Menu circular option.
2.Question: Failure to enter the GPS navigation
Reason :Not setting the gps navigation route correctly
Solution : reset the gps navigation route
3.play/stop
Key to play/stop at media working mode.
4. Mute button
3.Question: No BT function
Reason : No mobile telephone connection
Solution : Enter the BT setup and check the machine name and code
Key to hang-off when call in at BT mode and switch the mute ,non-mute.
5.BAND button
Key to switch the wavelength at radio mode,FM1-FM2-FM3-AM1-AM2,
circular option
Key to swith the video format, NTSC-PAL-AUTO,circular option.
6. TITLE button
Key to return the title menu.
7. SUB-T button
Key to choose the letter when at media mode.
8. SETUP button
Press this button to enter DVD setup ,press again to exit the dvd setup.
9. ROOT button
Access disc main menu
4.Question: Failure of touch screen
Reason : Touch screen deflected
Solution : recalibrate the touch screen
5.Question: Failure of specific speaker
Reason : Incorrect audio setup
Solution: configure speaker properly
6.Question: Failure of the Reverse Radar ‘s alarm
Reason : Reverse Radar ‘s alarm setup is not correct.
Solution: Enter the reverse radar’s alarm setup and reconfigure
7.Question: Failure of navigation’s signal
Reason : Not insert the GPS antenna or not configure
the GPS antenna correctly
6-0
Solution : Insert the GPS antenna properly
10. ZOOM BUTTON
Zoom in button:2,3,4,1/2,1/3,1/4close.circular option.
4
41
11. ANGLE BUTTON
5-2. Navigation
Key to choose the watching angle at media mode.
After finish the GPS Navigation Route setting,you can start the Navigation,pls
see the picture as below:
Click Navigation Icon to enter Navigation interface.
12. INFO BUTTON
Short press this button to display the information like the title and
sequence number segment about the program.
13. RPT BUTTON
Key to scan and store the channels automatically at radio mode ;
repeat at media mode.
2-0
14. RDM BUTTON
Key to switch the rdm at radio mode and play stochastically at
media mode.
5-2
15. GPS BUTTON
Short press enter the interface of GPS,long press exit GPS
16. ESC BUTTON
Entry/Exit
17. AUDIO BUTTON
Key to choose Audio at DVD mode.
18.
BUTTON
Hang up at BT mode
19. NO. BUTTON
Key to choose the stored channels at radio mode; choose the play
no at media mode.
20.VOL+/-BUTTON
Key to adjust the volume,press - to reduce the volume,press + to
increase the volume.
40
5
/
21.
Doule click marked icon,and enter the inferface as below.
button:
Choose".exe"file
Radio mode
/
Key to scan the radio and will stop when finding the channels.
Media play mode
Press
last song
next song。
TV mode
2-0
last channel
next channel
EXE
22. SEL buttion :
Key to enter the EQ setup.
23.
enter
Up/down/left/right/ENT
Menu interface
Key to choose the icon and press ENT to play.
Double click “.exe” file or first choose ".exe"and click "ok",then you finish the
navigation route setting.
Mp3 mode
Key to choose the playing song.
Press this icon to return the menu and finish the navigation route setup
DVD setup
Press up/down/left/right and then press ENT.
24. AS/PS BUTTON
Automatically scan/automatically search stations
5-1
BUTTON
25.
Answer the tel at BT mode
6
39
3-0 Main
Click navigaiton file path setting icon。
Menu Introduction
Menu
This system has 16 fuctions.
16 fuctions:
Radio
BT
IPOD
E-BOOK
SD
Setting
DVD
TV
Music
GPS
A2DP
Photo
Movie
USB
AUX
CDC
3-0
Press this button enter system setup menu
detail introduction in other page
turn off the unit
Click this button to adjust the volume
This route is setted ok at factory;if not, pls press right folder icon to set
Double click the icon
5-1
This button can page the right menu
38
7
Press page-right button to enter the following interface:
5-0 - GPS
Navigation Example
5-1. GPS Navigation route setting
Fist make sure there is map files into the SD card.
3-0
Enter GPS navigation interface :
Press this button enter the system setup menu
detail introduction in other page
turn off the unit
3-1
3-1 Radio( push 'radio'icon to enter this mode )
5-1
Enter GPS route setting interface as below:
8
37
4-11. SYSTEM(click "System '' icon to enter this interface)
Menu
Return to the menu, but don't exit Radio mode. Only choosing another
mode of the menu. The unit can exit the Radio mode.
TURN back button
Touch it lightly to turn back the main menu and exit Radio mode.
Volume
Key to adjust the volume
AMS
Search and storage the Radio channel
Browse the radio channel
TA
Search the traffic information channels
AF
4-11
TOUCH SCREEN:when using this system first time,should
calibrate the touch screen.Press Touch
on-off of RDS
Fast rewind/forwarding button
radio frequency rewind /forwarding
Screen icon to enter the calibrate interface.
Press+in the true center with touch pen.Then
Radio scan button
the unit will stop when finding the radio channel
3-1
icon+will move to four angles in counter–
clockwise direction.Pls let touch pen
ST
Stereo /Mono for user choosing . This action will work at FM.
follow+.It will display ok as soon as calibrating
NO button(1~6)
successful.
Short press is choosing the stored radio channels. Long press stores
the listening radio channels
wavelength button
The key to choose the wavelength directly
36
9
3-2. DVD INTERFACE OPERATION(click "DVD '' icon to enter this interface)
4-10. Volume(click "Volume '' icon to enter this interface)
4-10
3-2
Click +/- to adjust system acquiescence volume
Menu
Key to return the menu and can’t exit the DVD mode, only enter another mode
of the menu to exit the DVD mode.
TURN BACK BUTON
Touch it lightly to turn back main menu and exit Digital TV mode。
click the touch screen to decide show button of the screen or not.
/
Fast forwarding and rewind button like this ::X2/X4/X8/X20.
/
Last song ,
Nest song
Play/stop
10
35
Fl : click up and down triangle to adjust
Fr : click up and down triangle to adjust
Sl : click up and down triangle to adjust
4-8
Press this button to stop and press again to replay the content just.
Press mean stop and play the first song。
PGM
Sr : click up and down triangle to adjust
Program the playing order of CD according user like.
TRE : click up and down triangle to adjust
TITLE
BAS : click up and down triangle to adjust
Key to return the title menu
System supply four EQ modes :standard/JAZZ / classical / popular
3-2
MENU
Key to menu play function in cd mode
4-9.Radio Area(click "Radio Area’' icon to enter this interface)
SUB-T
Key to choose the letter of the screen in media mode.
REPEAT
Pepeat
4-9
R/L
Key to choose audio in CD mode.
OSD
Key to show the playing information in CD mode.
Limk to key pad for choosing the setlist.
Show the information of CD/DVD
Up/down/left/right/ok
User can choose radio Area according the place, click the right and left
triangle to adjust. This unit can supply six places: Japan/China /American /
Key to choose songs and setup in Mp3 mode.
Latin American/ EURO/West EURO
34
11
3-3
3-3.
Music (click "Music '' icon to enter this interface)
4-7. Language(click "Language '' icon to enter this interface)
4-7
En glish
Just double click your county’s flag
Menu
Return to the menu, but still don't exit Music paly mode. Only choosing
another model of the menu. The unit can exit the Music play mode.
4-8. Amplifier (click "Amplifier '' icon to enter this interface)
TURN back button
Touch it lightly to turn back main menu and exit Removeable Music mode.
VOLUME1
Key to adjust the volume
4-8
Play/stop.
/
<<Last song ,>>Next song
Key to Mega Bass
12
33
4-5. Backlight (click "Backlight'' icon to enter this interface)
Volume 2
Repeat play/Random playback
MUTE
Key to switch the mute and non-mute.
4-5
Volume 2
Leftside is to decrease the volume, right side is to increase the volume.
3-3
DEL
Key
to delete the chosen files
Folder
Click - or + can adjust the light of dvd.
4-6. Radar (click "Radar '' icon to enter this interface)
Choose movie file to enter file interface and makesure there is Mp3 files
in the sd card. Dould Click '' ST…..'' icon and choose MP3 . Then push
OK start and listen to the music
4-6
Set the position and speed limit as your need.
32
Up/down:key to move the cursor when at Multi-folders mode.
13
3-4 .
Movie(click "Movie '' icon to enter this interface)
4-3. Car setting (click "Car setting’' icon to enter this interface )
4-3
3-4
User can click
MENU
or
to adjust according their need.
4-4. G P S Monitor(click “G P S Monitor” icon to enter this interface)
Return to the menu, but still don't exit Movie mode. Only choosing another
model of the menu. The unit can exit the Movie mode.
TURN BACK BUTON
Touch it lightly to turn back main menu and exit Movie mode.
Volume1
4-4
Key to adjust the volume
DEL
Key to delete the chosen files
MUTE
Key to switch the mute or non-mute。
This picture show the information about GPS. Click ''GPS RESET'' icon
can Check again
14
31
After the setting of clock then click OK.If you still want date setting
pls click this button
to enter date setting interface
Volume 2
Leftside is to decrease the volume, right side is to increase the volume play
Month
Year
Play/stop
/
Press
last program
press
next program
/
3-4
Key to fast rewind/ forwarding button
Full screen /interface watch choice
Folder
4-2
day
Choose movie file to enter file interface and makesure there are movie
files in the sd card. Choose the file you like and double click it or choose
(all files) . Then push ok .
Month setup
Click the icon of right and left triangles to adjust
Year setup
Click the icon of right and left triangles to adjust
Day setup
Choose the day as you want
CLOCK/DATE interface:
This two icon is for switching clock and date’s setup . The system will acquiesce
30
15
3-5. Bluetooth (Click the BT icon to enter this setup)
Insert the sd card with map and press navigation file path setting icon to enter this
mode.Press the folder icon and double click RT.....icon twice.Then choose RT..exe
and press ok icon of top left corner to return back.User can start the navigition now.
4-2. Time(Click Time icon to enter this setup)
Date and time format:month/day/year, hour/minute
3-5
Menu
Return to the menu and not exit the BT mode,only enter another mode
of menu can exit BT mode.
TURN BACK BUTON
Return to the menu and exit the BT work mode.
4-2
Volume
Key to adjust the volume。
BT button (Click BT icon to enter this setup)
Hour setup(HR):
Click the + or - to adjust
Minute setup (HR):
Click the + or - to adjust。
User can setup as his/her like.
16
29
3-12
3-12. Navigation(Page37)
Pair code (Enter the mobilephone pair setup)
4-0- System setup menu introduction
Press the first icon of top left corner to
enter system Setup:
Pair Record Button
(Remarks:Not all the units have these above funtions in the pictures)
4-1
Enter the paired phone interface and the paired phone can reconnect after Chosen
4-1. Navigation setup(Click navigation GPS file path setting icon to
enter this setup)
6-7
3-5
Connect
cut
delete
Choose this:only see the information of dvd when pull the Handbreak,
not choose this : the screen will always show this information.
28
17
Dail button to enter BT dial setup.
Browse button
Key to turn page upward and downward of the letter.
Page-turn Button
Key to eject a dialog, enter the page NO. you want and checkboxes。
3-10
3-5
backspaces
redial
Key to dial interface
3-11. AUX
3-11
(Click Aux icon to enter this setup)
Switch
the answer
mode between
dvd and
mobilephone
Number
keyboard
turn down
the volume
Turn up the volume
answer
Hang off
There will be information on the screen when aux in
18
27
3-10. E-book(Click E-book icon to enter this setup)
3-10
Call call back missed call call in
3-5
Phone book
Menu
Links to enter full screen
Return to the menu and can’t exit the E-book mode,only enter another mode
of menu to exit the E-book.
Return
Key to return the menu and exit the E-book mode.
Folder
Choose E-book folder to enter folder interface and makesure there is E-book
file In the sd card.Double click st.....icon and choosethe file you like or push
to choose all the files. then push ok to start the reading.
Delete button
call
Check the phonebook
of SIM(GSP) card
First choose the file ,then push this button to delete it.
Check phonebook of mobilephone
26
Refresh phonebook
19
3-6.
A2DP(Click A2DP icon to enter this setup)
Play /Stop
Press this buttion to stop and press again to replay the
content just.
3-6
TITLE—Key to return the title menu
MENU---Key to menu
3-9
SUB-T—Key to choose the letter of the screen
OSD—Key to show the playing information
Menu
PGM—key to program’s play and clear
Return to menu and can’t exit the BT music mode, only enter another
Mode of the menu to exit the BT music mode.
Return
Return to the menu and exit the BT music mode.
RPT—Repeat one song or repeat all
NO.Button
Volume
Key to adjust the volume
R/L—Key to choose audio in CD mode
Last song
Next song
Content of USB
Stop
Play
AMPLIFIER
MUTE
20
25
3-9
3-9.
USB(Click USB icon to enter this setup)
3-7.
3-7
Photo (click Photo icon to enter this setup)
Menu
MENU
Key to return the menu and can’t exit the USB mode. Only
enter another mode of menu, the unit can exit the USB
mode.
Return to the menu and can’t exit the picture browse mode,
only enter another.Mode of the menu to exit the picture browse mode.
Return
Return to the menu and exit the picture browse mode.
Turn back button
Touch it lightly to turn main menu and exit USB mode.
Last file
Click the touch screen to decide show the button of the
screen or not.
Fast forwarding and rewind button like
this:X2/X4/X8/X20
Last item
24
Next item
Next file
Rotation
Enlarge
21
Reduce
2.DIGITAL TV
Slide Show
Full Screen
Folder
3-7
3-8
Choose picture file to enter file interface and makesure there is picture
files in the sd Card. Click '' ST…..'' icon and choose picture file then
push ok to browse
3-8. TV(Click TV icon to enter this setup)
1.ANALOG TV
search the TV channel
last TV channel
no-use in TV model
no-use in TV model
Next TV channel
Key to mute
turn down the volume
turn up the volume
storage the TV channel
Search---Key to search tv channel.
Display --- Key to choose langage, screen and background’s color.
System --- Key to choose country. Information about the unit’s tv version and
reset default.
22
set the TV standard
adjust the volume of Amplifier
23