1
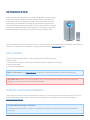
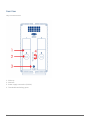
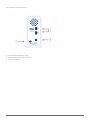
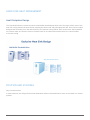
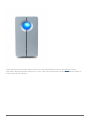
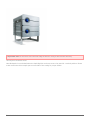
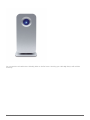
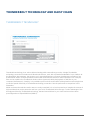
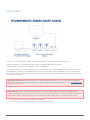
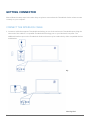
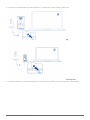
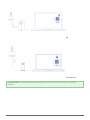
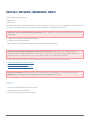
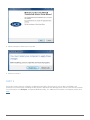
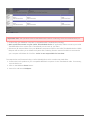
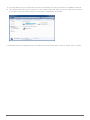
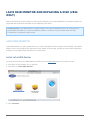
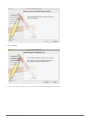
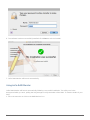
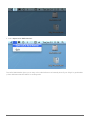
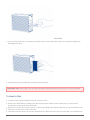
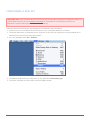
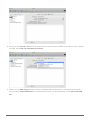
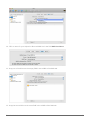
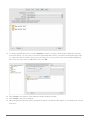
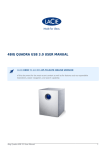
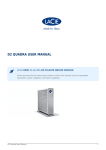
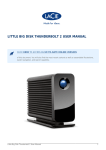
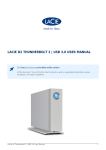
THUNDERBOLT SERIES USER MANUAL
CLICK HERE TO ACCESS AN UP-TO-DATE ONLINE VERSION
of this document for the most recent content as well as for features such as expandable
illustrations, easier navigation, and search capability.
Thunderbolt Series User Manual
1
INTRODUCTION
Welcome to the User Manual for the LaCie Thunderbolt™* Series. LaCie's
Thunderbolt Series storage enclosures feature transfer rates with the
potential to reach up to 10Gb/s! Plug them into a Macintosh computer
that supports Thunderbolt technology for the ultimate in performance
with High Definition video and graphics. This exciting new line of storage
is ideal for professional editors, photographers, and graphic artists that
demand extraordinary performance both in the office and the field.
This manual will guide you through the process of connecting your Thunderbolt Series enclosure and explain its
features. For questions on installation or usage, please consult the Getting Help page.
BOX CONTENT
■
■
■
■
■
LaCie 2big Thunderbolt Series / LaCie Little Big Disk Thunderbolt Series
Power supply
Drive stand for upright use (the 2big Thunderbolt Series is shipped on its stand)
Quick Install Guide
CD with documentation
Note on the cable: Visit www.lacie.com for details on cables that support Thunderbolt technology.
Important info: Please save your packaging. In the event that the drive should need to be repaired or
serviced, it must be returned in its original packaging.
MINIMUM SYSTEM REQUIREMENTS
Your system must meet certain requirements in order for your LaCie product to function properly. For a list of
these requirements, please refer to the product packaging or consult the product support web page at
www.lacie.com/support/.
Thunderbolt technology connection:
Thunderbolt Series enclosures must be connected to a Macintosh computer that supports Thunderbolt
technology.
Thunderbolt Series User Manual
2
* Thunderbolt and the Thunderbolt logo are trademarks of Intel Corporation in the U.S. and/or other countries.
Thunderbolt Series User Manual
3
VIEWS OF THE DRIVE
Front View
2big Thunderbolt Series
1. Activity LED and power button
Thunderbolt Series User Manual
4
Little Big Disk Thunderbolt Series
1. Activity LED and power button
2. Removable stand
Thunderbolt Series User Manual
5
Rear View
2big Thunderbolt Series
1. Disk tray
2. Disk lock
3. Power supply connection (12V 4A)
4. Thunderbolt technology ports
Thunderbolt Series User Manual
6
Little Big Disk Thunderbolt Series
1. Thunderbolt technology ports
2. Power supply connection (12V 3A)
3. Chain lock option
Thunderbolt Series User Manual
7
HARD DISK HEAT MANAGEMENT
Heat Dissipation Design
The Thunderbolt Series enclosures feature metal bodies that dissipate drive heat. The large surface area of the
heat sink casing absorbs all internal heat, keeping the drives safe and prolonging their life. Since LaCie's unique
design draws heat away from the internal drives, the external casing will be warm to the touch after extended
use. Please make sure that the vent on the back bezel is not obstructed and that there is a natural airflow
across the casing.
POSITION AND STACKING
2big Thunderbolt Series
In most instances, the 2big enclosure heat dissipation will be maximized when it rests on the stand in a vertical
position.
Thunderbolt Series User Manual
8
Users interested in placing two 2big enclosures in a specially designed rack may visit LaCie for further
information. When placing the enclosures in a rack, LaCie recommends that you allow for adequate airflow so
that the units do not overheat.
Thunderbolt Series User Manual
9
Important info: Do not stack more than two 2big enclosures. Doing so will void the warranty.
Little Big Disk Thunderbolt Series
Heat dissipation is maximized when the Little Big Disk enclosure rests on its stand in a vertical position. Please
make certain that it has ample space on all sides of the casing for proper airflow.
Thunderbolt Series User Manual
10
Do not stack the unit with other Little Big Disks or similar items. Stacking your Little Big Disk(s) will void the
warranty.
Thunderbolt Series User Manual
11
RECEIVING POWER/LED POWER BUTTON
RECEIVING POWER
To receive power, Thunderbolt Series enclosures must be:
1. Connected directly to a Macintosh computer that is compatible with Thunderbolt technology
2. Connected to a power source via the included power supply
MULTI-FUNCTIONAL LED/POWER BUTTON
LED States - 2big Thunderbolt Series
LED Behavior State
The product is in active mode.
Off
The product is: turned off; not receiving power; not connected to a Macintosh computer that
supports Thunderbolt technology; experiencing system failure; or, experiencing electronic
board failure. See below for information on powering down the drives within the enclosure. If
the device is connected to a power supply and turned on but the LED remains off, contact
LaCie Customer Support.
LED States - Little Big Disk Thunderbolt Series
LED Behavior State
The product is in active mode, working properly and waiting for data access.
The product is starting up. The LED will become solid blue once it has initialized.
Disk access
Off
The product is: turned off; not receiving power; not connected to a Macintosh computer that supports
Thunderbolt technology; experiencing system failure; or, experiencing electronic board failure. See
below for information on powering down the drives within the enclosure. If the device is connected to
a power supply and turned on but the LED remains off, contact LaCie Customer Support.
Thunderbolt Series User Manual
12
Power Button
The LED button may be used to conserve energy if you do not expect to use the disks for an extended period of
time. To reduce power consumption:
1. Unmount the partition(s) (see Unmounting Your Drive)
2. Press the LED button
The enclosure will stop sending power to the disks. Please note that the enclosure will maintain the daisy chain
with other Thunderbolt devices even when the drives have been powered down.
To power on the drives, press the LED button. The partition(s) will appear on the desktop.
Thunderbolt Series User Manual
13
THUNDERBOLT TECHNOLOGY AND DAISY CHAIN
THUNDERBOLT TECHNOLOGY
Thunderbolt technology is an active cable technology with extraordinary promise. A single Thunderbolt
technology connection includes two bi-directional streams, each with a potential bandwidth of up to 10Gb/s. As
the illustration demonstrates, the streams run in opposite directions to support simultaneous operations: one
bi-directional stream for data operations and another bi-directional stream for video operations. For example,
files can be copied to the Thunderbolt Series volume (upstream) while playing back an HD film on your
computer (downstream). Certainly, it is possible to perform both actions with existing interface technologies but
not at the speeds offered by a Thunderbolt technology connection. See the performance comparison in the
illustration.
While maximum theoretical transfer rates are rarely sustained, it is no less impressive to imagine the amount of
high-end data that can be passed to and from your LaCie Thunderbolt Series storage. To take advantage of the
throughput offered by Thunderbolt technology, the two internal drives in your LaCie enclosure have been
preconfigured as a Striped RAID Set (RAID 0).
Thunderbolt Series User Manual
14
DAISY CHAIN
The back of your Thunderbolt Series enclosure features two Thunderbolt technology ports for:
■
■
Direct connection to a Thunderbolt technology compatible Macintosh computer
Daisy chaining Thunderbolt compatible devices and displays
Connect the cable to one of the interface ports on the back of your LaCie Thunderbolt Series enclosure and to
your Macintosh computer. The additional port may be used to daisy chain compatible computer peripherals,
such as hard drives, monitors, and much more. A single Thunderbolt technology line can have seven devices,
including the computer.
Important cable info: When connecting your Thunderbolt Series enclosure to a computer or compatible
devices, please use cables specifically constructed to support Thunderbolt technology. Go to www.lacie.com
for further information.
Important info: The Thunderbolt Series enclosure must be connected to a Macintosh computer that
supports Thunderbolt technology. While the ports on the back of the device can easily seat Mini DisplayPort
cable ends for daisy chaining displays, the Thunderbolt Series storage will only work when connected:
■
To a computer that supports Thunderbolt technology.
■
To a computer with a cable that supports Thunderbolt technology.
Thunderbolt Series User Manual
15
GETTING CONNECTED
Please follow the setup steps in the order they are given to ensure that the Thunderbolt Series volume mounts
correctly on your computer.
CONNECT THE INTERFACE CABLE
1. Connect a cable that supports Thunderbolt technology to one of the enclosure's Thunderbolt ports. Plug the
other end of the cable to a compatible Thunderbolt technology port on your Macintosh computer. The
additional interface port on the Thunderbolt Series enclosure may be used to daisy chain compatible devices
and displays.
2big
Little Big Disk
Thunderbolt Series User Manual
16
2. Connect the included external power supply to an outlet and to the enclosure power port.
2big
Little Big Disk
3. The device will turn on automatically when it receives power and the volume will mount on the desktop.
Thunderbolt Series User Manual
17
2big
Little Big Disk
Technical note: A single Thunderbolt technology daisy chain can have seven devices, including the
computer.
Thunderbolt Series User Manual
18
UNMOUNTING THE THUNDERBOLT SERIES VOLUME
In order to avoid file system corruption, it is important to unmount the volume(s) before turning off the
enclosure or disconnecting the interface cable. See Unmounting Your Drive for details.
Thunderbolt Series User Manual
19
INSTALL DRIVERS (WINDOWS ONLY)
Supported operating systems:
■
■
Windows 7
Windows 8
Windows users must install a special driver on their computers in order to use the Thunderbolt connection. Once
the driver is installed, users can prepare the disks and RAID for a Windows environment.
Important info regarding RAID and Windows: RAID 0 and RAID 1 are available on the following versions
of Windows:
■
■
Windows 7 Professional/Enterprise/Ultimate
Windows 8 and Windows 8 Pro
RAID cannot be configured using Windows 7 Standard and Home editions.
Important info regarding RAID and double-byte characters: RAID cannot be configured using a
computer with double-byte characters in its name. This is often the case when using Chinese, Korean, and
Japanese fonts. To configure RAID, use a name that contains only single-byte characters.
To download the installer for the LaCie Thunderbolt driver, please select your product below:
■
■
■
LaCie Little Big Disk Thunderbolt Series
LaCie 2big Thunderbolt Series
LaCie eSATA Hub Thunderbolt Series
Order of operations: Please follow the order of operations as listed below. You must install the drivers
BEFORE connecting the LaCie Thunderbolt device to your Windows computer.
PART 1
1. Unzip the installer downloaded from LaCie.
2. Double-click the executable file.
3. Follow the steps to complete the wizard.
Thunderbolt Series User Manual
20
4. When prompted, restart your computer.
5. Move on to Part 2.
PART 2
Since this LaCie product is originally configured in the HFS+ file format (for use on Mac) and RAID 0, all
partitions must be erased, including the EFI partition. Windows Disk Management cannot erase the EFI partition
so you'll need to run Diskpart, a separate Windows utility. For additional information on Diskpart, please click
here.
Thunderbolt Series User Manual
21
Important info: The operation below is data destructive. Before continuing, LaCie recommends that you:
■
■
■
Confirm that your Windows computer is compatible with Thunderbolt technology.
Back up all files stored on your LaCie Thunderbolt device (if applicable). Please connect your LaCie
Thunderbolt device to a Mac with a Thunderbolt port to back up your data.
Disconnect all external disks from your Windows computer except for the LaCie Thunderbolt device. While
Diskpart will not allow you to delete the System disk, selecting another external hard drive connected to
your computer will delete all of its files. LaCie is not responsible for lost data.
The steps below are illustrated using a LaCie Little Big Disk, which contains two hard disks.
1. Connect the LaCie product to your compatible Windows computer via the Thunderbolt cable. If necessary,
turn the device on.
2. Click on the Windows Start button.
3. Search for and launch Diskpart.
Thunderbolt Series User Manual
22
4. In the Diskpart prompt, type list disk.
5. Since the RAID was configured on a Mac, the LaCie disk partitions appear as Foreign (Disks in non-RAID
configurations may appear as Online rather than Foreign). In this example, the first Foreign hard drive is
Disk 1. The disk numbers will be different on Windows computers with more than one internal hard drive.
Please make certain to locate the disk number(s) for your LaCie device then type select disk n. n is the
number for the first LaCie hard drive, 1 in the screenshot below.
Thunderbolt Series User Manual
23
6. Diskpart will confirm that your hard disk has been selected.
7. To delete all paritions on the hard disk, type clean.
8. Diskpart will confirm that your hard disk is clean, meaning that the partitions have been deleted.
Thunderbolt Series User Manual
24
9. Repeat steps 5-8 for the remaining hard disks in your LaCie Thunderbolt device.
10. Once all the HFS+ partitions have been deleted, close Diskpart then move on to Part 3.
PART 3
If you successfully completed Part 2, then your LaCie Thunderbolt storage currently has no RAID set up. In Part 3,
you'll set up a RAID array using Windows Disk Management.
1. Right-click on Computer and choose Manage. From the Manage menu, select Disk Management.
2. A prompt may ask you to initialize new disks. This is normal following the use of Diskpart. Click OK.
Thunderbolt Series User Manual
25
3. Each of your LaCie Thunderbolt device's disks will be represented with a row in the lower part of the window.
They should be labelled as Unallocated. Right-click on the first disk's row and select New Striped
Volume (RAID 0) or New Mirrored Volume (RAID 1).
4. The New Striped Volume wizard or the New Mirrored Volume wizard will open. Click Next >.
5. Select the disk(s) you wish to add to the array and click the Add > button. Click Next > once all disks have
been added.
Thunderbolt Series User Manual
26
6. Assign the volume a drive letter, then click Next >.
7. Name the volume and assign a file system (usually NTFS), then click Next >. To expedite the RAID
configuration, keep the box checked next to Perform a quick format.
8. Review the summary in the next window then click Finish to format the hard disks.
Thunderbolt Series User Manual
27
9. A prompt will ask you to confirm the conversion of the disks from basic to dynamic. Click Yes to continue.
10. The volume will mount on your computer. If you created a mirrored (RAID 1) volume, it will take some time
for the OS to sync the drives. However, the volume is immediately accessible.
* Thunderbolt and the Thunderbolt logo are trademarks of Intel Corporation in the U.S. and/or other countries.
Thunderbolt Series User Manual
28
UNMOUNTING YOUR DRIVE
Thunderbolt technology devices are plug and play, allowing you to connect and disconnect them while the
computer is running. To prevent potential disk problems, it is important to properly eject the Thunderbolt
storage volume(s).
1. Drag the Thunderbolt storage volume(s) to the Trash. The Trash will turn into an Eject arrow. (The volume
icon pictured is a generic Mac device icon. Your drives may be represented by different icons.)
2. When the volume icon disappears from the desktop, the Thunderbolt Series enclosure can be disconnected
from the computer or you can press the LED to conserve energy.
LED button: The Thunderbolt enclosure will power down the disks when the front LED button is pushed. Please
note that Thunderbolt devices daisy-chained to the enclosure will continue to work. See Receiving Power/LED
Power Button.
Thunderbolt Series User Manual
29
LACIE RAID MONITOR AND REPLACING A DISK (2BIG
ONLY)
Please note that this section pertains to the 2big Thunderbolt only. LaCie RAID Monitor and replacing disks are
supported with enclosures that allow for hot-swapping hard drives.
Technical note: LaCie RAID Monitor is a great utility for the 2big Thunderbolt when it is configured for a
Striped RAID Set (RAID 0) or a Mirrored RAID Set (RAID 1). It will not survey the disks when the 2big
Thunderbolt is configured in JBOD mode.
LACIE RAID MONITOR
LaCie RAID Monitor is a utility optimized for your LaCie Thunderbolt Series storage. Once installed, LaCie RAID
Monitor runs in the background to keep tabs on the health of the storage. Should one of the drives experience
problems, LaCie RAID Monitor will alert you to take action.
Install LaCie RAID Monitor
If you do not have the LaCie RAID Monitor installer, go to the Downloads page for the latest version.
1. Click twice on the installer. It is a .dmg file.
2. Click twice on LaCie RAID Monitor.
3. Click Continue.
Thunderbolt Series User Manual
30
4. Click Install.
5. Your computer may ask you to enter the Administrator password to continue.
Thunderbolt Series User Manual
31
6. The software has been successfully installed. Click Close to exit the installer.
7. LaCie RAID Monitor will launch automatically.
Using LaCie RAID Monitor
LaCie RAID Monitor will launch automatically following a successful installation. The utility runs in the
background while you work, polling the 2big storage to verify the health of the RAID. To view the health of your
2big:
1. Go to the menu bar to click on the RAID Monitor icon.
Thunderbolt Series User Manual
32
2. Select Open LaCie RAID Monitor.
The LaCie RAID Monitor gives you an easy color-coded reference to instantly know if your 2big is in good health:
■
Green indicates that the RAID is in working order.
Thunderbolt Series User Manual
33
■
Red indicates a problem with one or both disks in the RAID.
Thunderbolt Series User Manual
34
Early Warning
You do not have to launch LaCie RAID Monitor to receive an alert regarding the health of the RAID. Should one
or both disks encounter problems, the LaCie RAID Monitor icon in the menu bar will blink with an exclamation
mark inside a triangle.
If you receive the alert, open LaCie RAID Monitor to view the source of the problem.
Thunderbolt Series User Manual
35
Important info: If you wish to remove LaCie RAID Monitor from your computer, please run the Uninstaller.
Dragging the program icon to the Trash will not completely remove the utility from your computer.
REPLACING A DISK (2BIG)
Important info: While all Thunderbolt Series users should contact LaCie Customer Support if disk failure is
suspected, this section pertains to the 2big only due to the type of enclosure.
In the event that an individual hard disk fails in the LaCie 2big Thunderbolt Series, please contact your LaCie
reseller or LaCie Customer Support. Failed hard drives within the 2big Thunderbolt Series enclosure should only
be replaced by a compatible LaCie disk with equal capacity.
Once you have received your replacement disk, follow the steps below for proper installation.
Caution: After continuous use of the LaCie 2big Thunderbolt Series, drives may be hot. Please use caution
when removing the disks.
TO REMOVE A DISK
1. Confirm that the 2big Thunderbolt Series enclosure is off.
2. Please make certain that you are properly grounded to avoid electrostatic discharge.
3. The drive tray may be locked. To unlock it, insert the round end of the included 2-in-1 tool into the slot on the
drive lock. Turn the lock until the slot is vertical.
Thunderbolt Series User Manual
36
2-in-1 Tool
1. Draw out the drive tray by inserting your finger into the space behind the drive tray handle and pulling to
disengage the drive.
2. Grasp the drive tray handle and carefully extract the drive.
Important info: LaCie highly recommends replacing the disk that has been removed as soon as possible.
To Insert a Disk
1. Confirm that the 2big Thunderbolt Series enclosure is off.
2. Remove the failed disk according to the instructions above. Please make certain that you are properly
grounded to avoid electrostatic discharge.
3. Remove the screws from the drive tray to replace the failed drive with the disk that you received from LaCie.
4. Fasten the screws back on the drive tray.
5. Carefully insert the drive tray into the empty disk bay. When the drive tray is almost flush, you will feel a bit
Thunderbolt Series User Manual
37
of resistance. Press the drive tray handle firmly until the drive snaps into place and it is in line with the back
pane of the 2big Thunderbolt Series.
6. Use the 2-in-1 tool to fasten the drive lock. The drive is locked when the line is in a horizontal position.
Rebuilding a RAID Set
Striped RAID Set (RAID 0)
Once the replacement disk is installed in the 2big enclosure, go to Formatting for instructions on building a
Striped RAID Set.
Mirrored RAID Set (RAID 1)
The 2big Thunderbolt Series RAID is configured using Mac Disk Utility. Please visit the Apple® Support page for
instructions on how to recover from a hard drive failure on a mirrored array (Apple Support).
Important info: LaCie recommends that you do not remove one or both disks in a healthy Mirrored RAID
Set. Removing a healthy drive may force you to rebuild the Mirrored RAID.
Thunderbolt Series User Manual
38
FORMATTING
The two drives within the 2big Thunderbolt Series and the Little Big Disk Thunderbolt Series are pre-formatted
as HFS+ Journaled for your Macintosh computer. Further, the disks have been preconfigured as a Striped RAID
Set (RAID 0) for optimal performance.
Important info:
RAID:
You have the option to adjust the RAID configuration as a Mirrored RAID Set for data protection using the
Mac OS X Disk Utility. Please note that a Mirrored RAID Set copies the same files to each disk, affecting the
transfer rate speed and reducing the available disk capacity by half.
STRIPED RAID SET (RAID 0)
A Striped RAID Set pairs the two drives within the enclosure for enhanced transfer rates. Data is stored across
both disks in a striped pair, allowing them to share the demands of reading and writing files. Unlike a Mirrored
Striped Set (RAID 1), the available capacities of each disk are added together for maximum storage availability.
With its improved read/write seek rates and maximum storage capacity, a Striped RAID Set is a great
complement to the extraordinary performance already offered by the Thunderbolt technology. Data is easy to
access since a stripe creates one logical volume that mounts on the desktop.
One disadvantage of a Striped RAID Set is the lack of built-in data security. In the event that one disk fails, all
the files become inaccessible since parts of each string of data are written across the striped pair. Therefore,
LaCie highly recommends backing up data stored on a Striped RAID Set at least once a day. You can back up
the data to your computer’s internal disk or another hard drive with sufficient capacity.
MIRRORED RAID SET (RAID 1)
In a Mirrored RAID Set, the two physical disks are mirrored together so that one single logical volume mounts on
the desktop. Please note that the combined storage will not exceed the available capacity of the lowest-capacity
single disk. All data is saved simultaneously on each disk which means that files will not be lost if one drive
should fail.
Important info: LaCie recommends that you do not remove one or both disks in a healthy Mirrored RAID
Set. Removing a healthy drive may force you to rebuild the Mirrored RAID. For further information on
rebuilding a Mirrored RAID Set using Apple Disk Utility, please go to Apple Support.
Thunderbolt Series User Manual
39
CONFIGURING A RAID SET
Important info: LaCie Thunderbolt Series enclosures are plug and play storage pre-configured in RAID 0. To
use the disks out of the box, see Getting Connected for information on connecting your device to a
Macintosh computer that supports Thunderbolt technology.
Follow the directions below when reformatting the Thunderbolt Series hard drives.
1. Connect the LaCie Thunderbolt Series enclosure to your compatible Macintosh computer.
2. The drives will appear on the desktop as a single icon if they are still configured as a Striped RAID Set or
individual icons if they have been reformatted.
3. Go to the pulldown menu Go > Utilities.
4. The Utilities window will open. Click twice on the application Disk Utility.app.
5. The drives are listed on the left side of the Disk Utility window.
Thunderbolt Series User Manual
40
6. Click on one of the LaCie drives to see the action tabs. Click the RAID tab.
7. The RAID tab includes three important settings: RAID Set Name, Format, and RAID Type.
Thunderbolt Series User Manual
41
8. Clicking on the Format pulldown menu shows the file system formats available for the drives when creating
the RAID. Select Mac OS Extended (Journaled).
9. Clicking on the RAID Type pulldown shows the available RAID configurations. LaCie highly recommends
that you select Striped RAID Set for enhanced performance. For data protection, choose Mirrored RAID
Set.
Thunderbolt Series User Manual
42
10. Fill in a name for your Striped or Mirrored RAID Set in the field RAID Set Name.
11. Drag one of the drives to the empty field in the middle of the RAID tab.
12. Drag the second drive to the same field in the middle of the RAID tab.
Thunderbolt Series User Manual
43
13. To change the RAID Block Size, click the Options… button on bottom of the window. While this example
shows the default, you may want to choose a higher RAID Block Size if you will be working with larger files
(i.e. high-end video and audio). Please see your software's user manual for the recommended RAID Block
Size. Once you have chosen a RAID Block Size, click OK.
14. Click Create on the bottom of the window to begin building the RAID.
15. Click Create in the pop-up window.
16. Please be patient while Disk Utility configures the RAID. The RAID Set will appear on the desktop as a single
drive icon.
Thunderbolt Series User Manual
44
Thunderbolt Series User Manual
45
GETTING HELP
If you are having problems with your LaCie product, consult the table below for a list of available resources.
Order Source
Description
Location
1
Quick
Install
Guide
Concise steps to
follow for getting your Either a printed leaflet or accessory box and included in the
product up and
product box, or download PDF from the product page
running
2
Support
Pages
Includes interactive
troubleshooting
topics for most
common problems
www.lacie.com/support/, select your product, then click the
“Troubleshooting” tab
3
User
Manual
Includes common
troubleshooting
topics
See Troubleshooting Topics below
4
Customer
Support
Create an account on
lacie.com, register
your product, and fill
out a support ticket
Create an account here:
www.lacie.com/us/mystuff/login.htm?logout&rtn=mystuff
Note: LaCie is dedicated to providing high quality products that enrich the lives of our customers. To help
LaCie offer the best customer support, we encourage you to create an account and register your product at
www.lacie.com/us/mystuff/login.htm? logout&rtn=mystuff. You can give us important feedback as well as
receive updated information on your LaCie device.
Thunderbolt Series User Manual
46
TROUBLESHOOTING TOPICS
Note: Interactive troubleshooting, a highly effective way to resolve problems with your product, is available
from www.lacie.com/support/. Select your product, then click the “Troubleshooting” tab.
Problem: I do not see my Thunderbolt Series disks.
Q: Are there other Thunderbolt technology devices connected to the same port?
A: Disconnect any other Thunderbolt devices and see if the Thunderbolt Series volume appears on the desktop.
Q: Does the icon/Do the icons for the Thunderbolt Series volume(s) appear on the desktop
A: The drive icon(s) for the Thunderbolt Series storage should appear on your desktop. Please confirm that the
Finder preference for displaying external disks on the desktop is selected at Finder > Preferences > General.
Q: Is the Thunderbolt Series enclosure connected to a Macintosh computer that supports Thunderbolt technology?
A: The connection type for Thunderbolt technology on the Mac is the Mini DisplayPort. While earlier Macintosh
computers include one or more Mini DisplayPorts, they are only used to connect one or more monitors. Please
note that legacy Macs with Mini DisplayPorts do not support Thunderbolt technology peripherals such as the
LaCie Thunderbolt Series storage.
Q: Did you follow the correct installation steps?
A: Review the installation steps (Getting Connected). Please make certain that both ends of the Thunderbolt
technology cable are firmly connected to the ports and that the device is receiving power via the included
power supply.
Q: I connected the Thunderbolt Series enclosure to my new Mac with an older Mini DisplyPort cable that I use for my
monitors. Why can't I see the Thunderbolt Series volume(s) on the desktop?
A: The Thunderbolt Series storage requires cables specifically constructed for Thunderbolt technology. Go to
www.lacie.com for more information on cables that support Thunderbolt technology.
Q: I connected a cable that supports Thunderbolt technology to my new Mac but the Thunderbolt Series enclosure does: (a.)
not power on and/or (b.) not receive sufficient power.
A: The Thunderbolt Series enclosure must receive power via the included power supply. See Getting Connected.
Q: Are both ends of the Thunderbolt technology cable securely attached?
A:
■
■
Only use a cable that supports Thunderbolt technology on a Mac.
Check both ends of the Thunderbolt technology cable to make sure they are fully seated in their respective
Thunderbolt Series User Manual
47
■
■
ports.
Try disconnecting the Thunderbolt technology cable then wait 10 seconds before reconnecting it.
If the drive is still not recognized, restart your computer and try again.
Problem: I'm receiving file transfer error messages and Time Machine does not
work.
Q: Did you get an "Error -50" message while copying to the storage?
A: When copying files or folders from a computer to a FAT 32 volume, certain characters cannot be copied.
These characters include, but are not limited to:
?<>/\:
Since it does not offer optimal performance, LaCie does not recommend using the FAT 32 file system with
Thunderbolt Series storage. Please consider formatting the drive as HFS+ Journaled with a Striped or Mirrored
RAID Set. See Formatting. Additionally, Time Machine is only compatible with disks formatted in HFS+ or
HFS+Journaled. Reformat the drive for Time Machine compatibility
Q: Did you get an error message telling you that the drive has been disconnected when coming out of sleep mode?
A: Ignore this message. The drive will remount to the desktop.
Problem: The disk space does not seem right.
Q: I just threw a lot of files into the Trash from my Thunderbolt Series storage. Why don't I see more space to copy new files?
A: Disk space will not be reclaimed until the file is erased. To remove the files forever:
■
■
Click the Trash icon in the Dock.
A Finder window will open. Click Empty in the upper right.
Q: Why is the volume capacity less than advertised on the Thunderbolt Series storage (hard drives only)?
A: After formatting, the available capacity of a drive will show less than advertised on the box. The difference is
based upon how capacity is viewed by the operating system. For example, a hard drive that can store
500,000,000,000 bytes is divided by 1,000,000,000 to equal 500GB. This is the actual capacity listed on the
manufacturer’s box. The operating system uses slightly different math, dividing 500,000,000,000 by
1,073,741,824 to equal 466GB.
Problem: I have to rebuild the Mirrored RAID Set.
Q: I just received my replacement drive from LaCie. How do I rebuild my Mirrored RAID Set?
A: Please see Apple Support for instructions on rebuilding a Mirrored RAID Set.
Thunderbolt Series User Manual
48
Thunderbolt Series User Manual
49
PRECAUTIONS
Caution: It is essential that you use only the power supply that shipped with your product, since it is a
shielded-type power cord that meets FCC emission limits as well as to prevent interference to the nearby
radio and television reception.
Caution: Modifications not authorized by the manufacturer may void the user's authority to operate this
device.
Important info: Any loss, corruption or destruction of data while using a LaCie drive is the sole
responsibility of the user, and under no circumstances will LaCie be held liable for the recovery or
restoration of this data. To help prevent the loss of your data, LaCie highly recommends that you keep TWO
copies of your data; one copy on your external hard disk, for instance, and a second copy either on your
internal hard disk, another external hard disk or some other form of removable storage media. If you would
like more information on backup, please refer to our website.
Important info: 1TB (Terabyte) = 1,000GB. 1GB = 1000MB. 1MB = 1,000,000 Bytes. Total accessible
capacity varies depending upon operating environment (typically up to 10% less per TB).
HEALTH AND SAFETY PRECAUTIONS
■
■
■
■
Only qualified persons are authorized to carry out maintenance on this device.
Read this User Manual carefully and follow the correct procedure when setting up the device.
Do not open a disk drive or attempt to disassemble or modify it. Never insert any metallic object into the drive
to avoid any risk of electrical shock, fire, short-circuiting or dangerous emissions. The disk drive shipped with
your LaCie hard drive contains no user-serviceable parts. If it appears to be malfunctioning, have it inspected
by a qualified LaCie Technical Support representative.
Never expose your device to rain, or use it near water, or in damp or wet conditions. Never place objects
containing liquids on the LaCie hard drive, as they may spill into its openings. Doing so increases the risk of
electrical shock, short-circuiting, fire or personal injury.
GENERAL USE PRECAUTIONS
■
■
Power requirements 100-240 V~, 50-60 Hz, (supply voltage fluctuations not exceeding ± 10% of the nominal
and transient over-voltages according to over-voltage category II).
Do not expose the LaCie hard drive to temperatures outside the range of 5º C to 30º C (41º F to 86º F); or to
operational humidity beyond 10-80%, non-condensing, or non-operating humidity beyond 10-90%,
non-condensing. Doing so may damage the LaCie hard drive or disfigure its casing. Avoid placing your LaCie
Thunderbolt Series User Manual
50
■
■
■
■
■
■
■
■
hard drive near a source of heat or exposing it to sunlight (even through a window). Inversely, placing your
LaCie hard drive in an environment that is too cold may damage the unit.
Rated cooling for altitudes up to 2000 meters.
If your drive features a power cable, always unplug it from the electrical outlet if there is a risk of lightning or if
it will be unused for an extended period of time. Otherwise, there is an increased risk of electrical shock,
short-circuiting or fire.
Use only the power supply shipped with the device (if applicable).
Do not use the LaCie hard drive near other electrical appliances such as televisions, radios or speakers. Doing
so may cause interference which will adversely affect the operation of the other products.
Do not place the LaCie hard drive near sources of magnetic interference, such as computer displays,
televisions or speakers. Magnetic interference can affect the operation and stability of your LaCie hard drive.
Never use excessive force on your LaCie hard drive. If you detect a problem, consult the troubleshooting
section in this manual.
Protect your LaCie hard drive from excessive exposure to dust during use or storage. Dust can build up inside
the device, increasing the risk of damage or malfunction.
Never use benzene, paint thinners, detergent or other chemical products to clean the outside of the LaCie
hard drive. Such products will disfigure and discolor the casing. Instead, use a soft, dry cloth to wipe the
device.
Thunderbolt Series User Manual
51
WARRANTY INFORMATION
LaCie offers first-rate service and support through our generous three-tiered warranty policy. Our 1-, 2-, 3-, and
5-year policies include comprehensive, complimentary web-based resources, expert in-house technical support,
and worldwide repair and/or replacement coverage. To benefit from this warranty, please contact LaCie Support
at www.lacie.com/us/support where you can find online support and contact information. You may also contact
representatives at the original point of purchase who will be able to help guide you.
Standard warranties vary depending on the product. To verify your product’s warranty status and to see which
standard warranty is included with your product, type in your product’s serial number at
www.lacie.com/us/support. If no warranty is listed under your product’s name, this means that the warranty has
expired.
WARRANTY UPGRADES
If you wish to extend your warranty coverage, you can purchase Silver, Gold, or Platinum Care or Advanced
Exchange. For details, see www.lacie.com/warranties.
LEGAL INFORMATION
A standard LaCie limited warranty is included with all products. Please read the terms and conditions below.
LaCie Limited Warranty Policy
LaCie (“LaCie”) warrants, to the original purchaser, that this equipment shall be free of defects in materials and
workmanship for a period of one (1), two (2), three (3), or five (5) years, depending on the model, from LaCie's
date of original shipment when the equipment is used normally and is properly serviced when needed. If you
discover a defect covered by the warranty set forth above, your sole and exclusive remedy will be for LaCie, in
its sole discretion to (i) repair or replace the product at no charge to you; or, if a repaired unit or replacement
product is not available, (ii) to refund the current market value of your product. You acknowledge and agree
that replacement product, at the sole option of LaCie, may be a new product or a remanufactured product. In
order to receive the remedy set forth above, you must return the product during the warranty period and
include with each returned product (i) a copy of your original purchase invoice to verify your warranty; (ii) a
Return Material Authorization number; (iii) your name, address and telephone number; (iv) a copy of the bill of
sale bearing the appropriate LaCie serial numbers as proof of date of original retail purchase; and (v) a
description of the problem. The customer must pay all transportation costs for a returned product. The product
will need to be returned to LaCie within the country of original retail purchase. This warranty applies only to
hardware products; LaCie software, media, and manuals are licensed and warranted pursuant to separate
written agreement. This warranty does not apply if the product has been misused or has been damaged by
accident, abuse, misuse, or misapplication; if it has been modified without permission of LaCie; or if any LaCie
serial number has been removed or defaced. If a customer has purchased a LaCie Advance Care Option (ACO)
to go with this equipment, the ACO shall be valid for three (3) years from activation.
Thunderbolt Series User Manual
52
EXCEPT FOR THE LIMITED WARRANTY SET FORTH ABOVE, ALL PRODUCTS ARE SOLD “AS IS” AND LACIE
EXPRESSLY DISCLAIMS ALL WARRANTIES OF ANY KIND, WHETHER EXPRESS, IMPLIED OR STATUTORY,
INCLUDING THE IMPLIED WARRANTIES OF MERCHANTABILITY, NONINFRINGEMENT AND FITNESS FOR A
PARTICULAR PURPOSE. WITHOUT FURTHER LIMITING THE GENERALITY OF THE FOREGOING, DOES NOT
WARRANT (1) THE PERFORMANCE OR RESULTS OBTAINED FROM USING THIS PRODUCT, (2) THAT THE PRODUCT
IS APPROPRIATE FOR THE CUSTOMER'S PURPOSES, (3) THE MANUAL IS ERROR FREE, OR (4) THAT NO DATA WILL
BE LOST WHILE USING THE PRODUCT. THE ENTIRE RISK AS TO THE RESULTS AND PERFORMANCE IS ASSUMED
BY THE CUSTOMER. THE WARRANTY AND REMEDIES SET FORTH ABOVE ARE EXCLUSIVE AND IN LIEU OF ALL
OTHERS, ORAL OR WRITTEN, EXPRESS OR IMPLIED.
EXCLUSIONS AND LIMITATIONS
This Limited Warranty applies only to hardware products manufactured by or for LaCie that can be identified by
the “LaCie” trademark, trade name, or logo affixed to them. The Limited Warranty does not apply to any
non-LaCie hardware products or any software, even if packaged or sold with LaCie hardware. Manufacturers,
suppliers, or publishers, other than LaCie, may provide their own warranties to the end user purchaser, but
LaCie, in so far as permitted by law, provides their products “as is”. Software distributed by LaCie with or
without the LaCie brand name (including, but not limited to system software) is not covered under this Limited
Warranty. Refer to the licensing agreement accompanying the software for details of your rights with respect to
its use.
LaCie does not warrant that the operation of the product will be uninterrupted or error-free. LaCie is not
responsible for damage arising from failure to follow instructions relating to the product's use. This warranty
does not apply: (a) to consumable parts, unless damage has occurred due to a defect in materials or
workmanship; (b) to cosmetic damage, including but not limited to scratches, dents and broken plastic on ports;
© to damage caused by use with non-LaCie products; (d) to damage caused by accident, abuse, misuse, flood,
fire, earthquake or other external causes; (e) to damage caused by operating the product outside the permitted
or intended uses described by LaCie; (f) to damage caused by service (including upgrades and expansions)
performed by anyone who is not a representative of LaCie or a LaCie Authorized Service Provider; (g) to a
product or part that has been modified to alter functionality or capability without the written permission of LaCie;
or (h) if any LaCie serial number on the product has been removed or defaced.
No LaCie dealer, agent, or employee is authorized to make any modification, extension, or addition to this
warranty.
Any loss, corruption or destruction of data while using a LaCie drive is the sole responsibility of the user, and
under no circumstances will LaCie be held liable for the recovery or restoration of this data. To help prevent the
loss of your data, LaCie highly recommends that you keep TWO copies of your data; one copy on your external
hard disk, for instance, and a second copy either on your internal hard disk, another external hard disk or some
other form of removable storage media. LaCie offers a complete line of CD and DVD drives. If you would like
more information on backup, please refer to our website.
LACIE IS NOT RESPONSIBLE FOR SPECIAL, INCIDENTAL, OR CONSEQUENTIAL DAMAGES RESULTING FROM ANY
BREACH OF WARRANTY, OR UNDER ANY LEGAL THEORY, INCLUDING LOST PROFITS, DOWNTIME, GOODWILL,
DAMAGE TO OR REPLACEMENT OF EQUIPMENT AND PROPERTY, AND ANY COSTS OF RECOVERING,
REPROGRAMMING, OR REPRODUCING ANY PROGRAM OR DATA STORED IN OR USED WITH LACIE PRODUCTS
EVEN IF IT HAS BEEN ADVISED OF THE POSSIBILITY OF SUCH DAMAGES.
Some states do not allow the exclusion or limitation of implied warranties or liability for incidental or
consequential damages, so the above limitation or exclusion may not apply to you. This warranty gives you
specific legal rights, and you may have other rights, which vary from state to state.
Your opening of your package, your use of the product, or your return of the enclosed Registration Card
acknowledges that you have read and agree to the terms of this Agreement. You further agree that it is the
complete and exclusive state of the agreement between us and supersedes any proposal or prior agreement,
oral or written, and any other communications between us relating to the subject matter of this Agreement.
Thunderbolt Series User Manual
53
Read carefully all information related to warranty and precautions of use of your new LaCie product in the user
manual.
For products purchased in the United States, you may contact LaCie at 22985 NW Evergreen Parkway, Hillsboro,
Oregon 97124. Email: [email protected]. Website: www.lacie.com. Customer service: 503-844-4503.
Service DOA
On rare occasions, a newly purchased LaCie product may be delivered in non-working order. We are working to
avoid these issues, but unfortunately, these situations may arise from time to time. Within the 15 calendar days
of purchase, should you experience an issue with your new LaCie product, we ask you to return the product to
the place where it was originally bought. You will be required to give a proof of purchase.
Customer Warning
Please be sure to back up your data before returning your drive to LaCie for repair. LaCie cannot under any
circumstances guarantee the integrity of data remaining on a returned drive. We make no provisions for data
recovery and cannot be held liable for any data loss on drives or media returned to LaCie.
All products returned to LaCie must be securely packaged in their original box and shipped with postage prepaid,
except for Products registered under the Advance Care Option.
NOTE TO AUSTRALIAN CUSTOMERS
Our goods come with guarantees that cannot be excluded under the Australian Consumer Law. You are entitled
to a replacement or refund for a major failure and for compensation for any other reasonably foreseeable loss or
damage. You are also entitled to have the goods repaired or replaced if the goods fail to be of acceptable
quality and the failure does not amount to a major failure.
Contact us:
LaCie Australia, 458 Gardeners Road Alexandria, NSW 2015 AUSTRALIA.
Phone: 02 8063 3711
Email: [email protected]
For fast technical support, create a support ticket after registering your product at www.lacie.com/au/register.
Thunderbolt Series User Manual
54
LEGAL INFORMATION
COPYRIGHTS
Copyright © 2013 LaCie. All rights reserved. No part of this publication may be reproduced, stored in a retrieval
system, or transmitted in any form or by any means, electronic, mechanical, photocopying, recording or
otherwise, without the prior written consent of LaCie.
CHANGES
The material in this document is for information only and subject to change without notice. While reasonable
efforts have been made in the preparation of this document to assure its accuracy, LaCie assumes no liability
resulting from errors or omissions in this document, or from the use of the information contained herein. LaCie
reserves the right to make changes or revisions in the product design or the product manual without reservation
and without obligation to notify any person of such revisions and changes.
FEDERAL COMMUNICATION COMMISSION INTERFERENCE STATEMENT
This equipment has been tested and found to comply with the limits for a Class B digital device, pursuant to Part
15 of the FCC Rules. These limits are designed to provide reasonable protection against harmful interference in
a residential installation. This equipment generates, uses and can radiate radio frequency energy and, if not
installed and used in accordance with the instructions, may cause harmful interference to radio communications.
However, there is no guarantee that interference will not occur in a particular installation. If this equipment does
cause harmful interference to radio or television reception, which can be determined by turning the equipment
off and on, the user is encouraged to try to correct the interference by one of the following measures:
1.
2.
3.
4.
Reorient or relocate the receiving antenna.
Increase the separation between the equipment and receiver.
Connect the equipment into an outlet on a circuit different from that to which the receiver is connected.
Consult the dealer or an experienced radio/TV technician for help.
FCC Caution: Any changes or modifications not expressly approved by the party responsible for compliance
could void the user's authority to operate this equipment.
This device complies with Part 15 of the FCC Rules. Operation is subject to the following two conditions: (1) This
device may not cause harmful interference, and (2) this device must accept any interference received, including
interference that may cause undesired operation.
Important info: FCC Radiation Exposure Statement: This equipment complies with FCC radiation
exposure limits set forth for an uncontrolled environment. This equipment should be installed and operated
with minimum distance 20 cm between the radiator & your body.
This transmitter must not be co-located or operating in conjunction with any other antenna or transmitter.
The availability of some specific channels and/or operational frequency bands are country dependent and are
Thunderbolt Series User Manual
55
firmware programmed at the factory to match the intended destination. The firmware setting is not accessible
by the end user.
WEEE
This symbol on the product or on its packaging indicates that this product must not be disposed of
with your other household waste. Instead, it is your responsibility to dispose of your waste
equipment by handing it over to a designed collection point for the recycling of waste electrical and
electronic equipment. The separate collection and recycling of your waste equipment at the time of
disposal will help to conserve natural resources and ensure that it is recycled in a manner that
protects human health and the environment. For more information about where you can drop off your waste
equipment for recycling, please contact your local city office, your household waste disposal service, or the shop
where you purchased the product.
MANUFACTURER'S DECLARATION FOR CE CERTIFICATION
We, LaCie, solemnly declare that this product conforms to the following European standards:
Electromagnetic Compatibility Directive (2004/108/EC); Low-Voltage Directive: 2006/95/EC
TRADEMARKS
Apple, Mac, Time Machine, and Macintosh are registered trademarks of Apple Computer, Inc. Microsoft,
Windows XP, Windows Vista, and Windows 7 are registered trademarks of Microsoft Corporation. Other
trademarks mentioned in this manual are the property of their respective owners.
CANADA COMPLIANCE STATEMENT
This Class B digital apparatus meets all requirements of the Canadian Interference-Causing Equipment
Regulations.
JAPAN COMPLIANCE STATEMENT
This is a Class B product based on the standard of the Voluntary Control Council for Interference from
Information Technology Equipment (VCCI). If this is used near a radio/TV receiver, it may cause radio
interference. Install the equipment according to the manual. This statement does not apply to the LaCie
CloudBox.
Thunderbolt Series User Manual
56