1
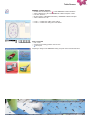
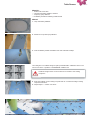
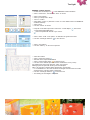
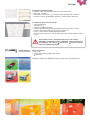
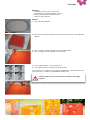
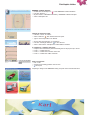
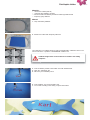
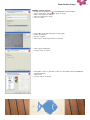
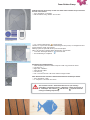
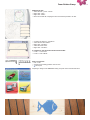
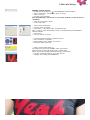
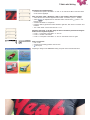
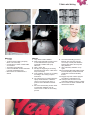
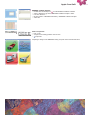
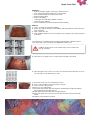
BERNINA CutWork Book
Projects
PC-Software for Windows XP ® / Windows Vista™ / Windows® 7
www.bernina.com
Projects
2
Table Runner
3-4
Tea Light
5-7
Fish Napkin Holder
8-9
Foam-Rubber Stamp
10-13
T-Shirt with Writing
14-16
Apple-Core Quilt
17-18
Tips & Tricks
19-20
Quick Reference Guide
21
Export your Design
22
All Projects are for your personal use only; they are not for commercial use.
Copyright © 2009 BERNINA International AG
2
Table Runner
BERNINA CutWork Software
• Double-click the desktop icon
to start BERNINA CutWork Software.
• Select «tablerunner» file in the «BERNINA CutWork Samples» folder.
• Left-click «Browse...».
• My Documents > BERNINA Embroidery > BERNINA CutWork Samples.
• Select «tablerunner» file.
• Level 1 > contains the outline of the scallop.
• Level 2 > contains the cutting line of the fishes.
Print out preview
• File > Print.
• Sequence and cutting positions can be seen.
•
File export.
Preparing a design for the BERNINA sewing computer or the bernette 340 Deco.
3
Table Runner
Materials:
•
•
•
•
15x90cm felt, 3mm thick
4 sheets embroidery stabiliser, 30x35cm
Temporary spray adhesive
Embroidery thread and matching bobbin thread
Method:
1. Hoop embroidery stabiliser.
2. Attach felt on top with spray adhesive.
3. Insert embroidery needle and bobbin case and embroider scallops.
The cutting line in a CutWork design is split up and indicated in 4 different colours. The
colours refer to the 4 positions of the BERNINA CutWork Tool.
Cut
CutWork
designs must not be rotated once loaded to the sewing
computer!
com
4. Insert the CutWork Tool in sewing computer and cut out motif according to sewing
4
computer instructions.
5. Repeat steps 3 + 4 three more times.
4
Tea Light
BERNINA CutWork Software
• Double-click the desktop icon
to start BERNINA CutWork Software.
• Select «Create new», then left-click «Next» to confirm.
•
•
•
•
Select «New graphic».
Select your hoop under «Hoop».
«Next» to confirm.
Select fabric «Cotton 2» (Note that «Cotton 2» is the default value in the BERNINA
CutWork Software).
• Select colour.
• Left-click «Finish» to confirm.
• Keep left mouse-button pressed to select icon «Create ellipse»
«Create trapezoid/parallelogram».
•
Draw a trapezoid with the aid of your mouse.
. Then select
• Select «Slant» under «Tool options» to determine the grade of the slant.
• Left-click «Rectangle selection»
to close the tool.
• Select «Tool options».
• Left-click «Mirror y» to mirror the Trapezoid.
• Select the Toolbar.
• Select «Create star shape» .
• Add stars to the trapezoid as desired.
• Select «Create outline shape»
to draw the moon.
• Left-click on the desired spot in the screen and draw the moon (curves).
For straight lines and corners keep the «Shift» key pressed.
Meeting up the last point with the first point closed object.
Note: If an open line is wished, finish with the right mouse-button.
• In a small distance to the outer line draw two straight stitch lines that are a little
shorter than the outer line (sides of trapezoid).
• Left-click «Rectangle selection»
to close the tool.
• The drawing for the tealight is completed.
5
Tea Light
Developing the CutWork design
• Keep the «Shift» key pressed to select the moon and the stars.
• Right-click «Combine».
• Left-click the Cutwork icon
to show the levels and Discard in «Sequence».
• The pair of scissors symbol in the «Sequence» window means cutting line.
In «Sequence» three levels are shown:
• Select the trapezoid.
• Left-click icon
.
• Sequence the levels (or layers).
• Keep the left mouse-button pressed and drag the trapezoid outline to level 3.
• Drag the moon and the stars to level 2 (all in «Sequence»).
• Level 1 contains the two stitched trapezoid side lines.
• Save the project under File > save as. Select a file name and the storage location on
your pc.
The contents of level 1 will be dealt with first on your sewing-/
embroidery system before level 2. «Sequence» shows the process of
em
the worksteps: The scissors
and the circle
symbols stand for
cut
cutting or stitching respectively.
Print out a preview
• File > Print.
• Sequence and cutting positions can be seen.
•
File export.
Preparing a design for the BERNINA sewing computer or the bernette 340 Deco.
6
Tea Light
Materials:
•
•
•
•
2 rectangles of felt, 15x20cm, 3-4mm thick
1 rectangle firm embroidery stabiliser, 30x35cm
Matching sewing thread and bobbin thread
Temporary spray adhesive
Method:
1. Hoop embroidery stabiliser.
2. Stick both felt rectangles together with spray adhesive and attach to the embroidery
stabiliser.
3. Insert embroidery needle and bobbin case with bobbin thread.
4. Open «tea light» file and embroider the 2 side seams.
5. Insert CutWork Needle – remove bobbin case.
6. Cut tea light according to sewing computer instructions.
The cutting line in a CutWork design is split up and indicated in 4 different colours. The
colours refer to the 4 positions of the BERNINA CutWork Tool.
Cut
CutWork
designs must not be rotated once loaded to the sewing
computer!
com
7
Fish Napkin Holder
BERNINA CutWork Software
• Double-click the desktop icon
to start BERNINA CutWork Software.
• Left-click «Browse...».
• My Documents > BERNINA Embroidery > BERNINA CutWork Samples.
• Select «fishnapkin» file.
Change the name in the fish:
• Left-click «Lukas» to select it.
• Select «Edit text» , then left-click the work space.
• Type a name and position it as desired.
• Choose text size and font in «Tool options».
• Left-click «Rectangle selection»
to close the tool.
• Select «Satin Serial» and adjust the outline width as desired.
In «Sequence», sequence the layers
• Keep the left mouse-button pressed and drag the text layer (level 3) to level 1.
• Level 1 > contains the text.
• Level 2 > contains the inner lines of the fish.
• Level 3 > contains the outline of the fish.
Print out a preview
• File > Print.
• Sequence and cutting positions can be seen.
•
File export.
Preparing a design for the BERNINA sewing computer or the bernette 340 Deco.
8
Fish Napkin Holder
Materials:
•
•
•
•
1 sheet foam rubber (DIN A5)
1 rectangle firm stabiliser, 30x35cm
Colourful machine-embroidery thread and matching bobbin thread
Temporary spray adhesive
Method:
1. Hoop embroidery stabiliser.
2. Attach foam rubber with temporary adhesive.
The cutting line in a CutWork design is split up and indicated in 4 different colours. The
colours refer to the 4 positions of the BERNINA CutWork Tool.
Cut
CutWork
designs must not be rotated once loaded to the sewing
computer!
com
3. Insert embroidery needle; insert bobbin case with bobbin thread.
4. Open the «fishnakpin» file.
5. Stitch out your embroidery name.
6. Insert CutWork Tool; remove bobbin case.
7. Cut out fish according to the sewing computer instructions.
9
Foam-Rubber Stamp
BERNINA CutWork Software
• Double-click the desktop icon
to start BERNINA CutWork Software.
• Select «Create new», then left-click «Next» to confirm.
• Select «Get image from webcam».
• Select your hoop under «Hoop».
• «Next» to confirm.
•
•
•
•
Draw outline of fish with a black pen on white paper.
Position the webcam.
Left-click «Capture».
Select «Save» and storage location on computer.
• Select «Open as Backdrop».
• Left-click «Next» to confirm.
• Select fabric «Cotton 2» (Note that «Cotton 2» is the default value in the BERNINA
CutWork Software).
• Select colour.
• Left-click «Finish» to confirm.
10
Foam-Rubber Stamp
Artwork does not fit into hoop. In this case either select another hoop or decrease
the size of the artwork.
• View > Backdrop > Properties.
• Edit the artwork using «Rotate» and «Scale».
• Use «Create outline shape»
to draw the fish.
Left-click on a spot in the screen to start drawing the fish (curves). For straight lines and
corners keep the «Shift» key pressed.
Meeting up the last point with the first point closed object.
Note: If an open line is wished, finish with the right mouse-button.
• «Left-click «Rectangle selection»
to close the tool.
• The fish drawing is completed.
Developing the CutWork design
• Select everything within the outline; keep the «Shift» key pressed to do this.
• Left-click icon
.
• Right-click «Combine».
• Select the fish outline.
• Left-click icon
.
• File > Save as > choose a file name and the storage location.
Note: Deactivate the selection if wished. Deactivate the backdrop if wished.
• View > Backdrop > Hide.
• In «Sequence», two levels are shown.
The contents of level 1 will be dealt with first on your sewing-/
embroidery system before level 2. «Sequence» shows the process of
em
the worksteps: The scissors
and the circle
symbols stand for
cut
cutting or stitching respectively.
11
Foam-Rubber Stamp
Duplicate the fish
• Select the fish – press «Ctrl+A».
• Right-click «Copy».
• Right-click «Paste».
• Move the second fish, keeping the left mouse button pressed to do this.
•
•
•
•
•
Combine the layers in «Sequence».
Select the two fish outlines.
Right-click «Combine».
Select the inner areas.
Right-click «Combine».
In «Sequence» the two levels should now be visible
• Level 1 > Inner areas.
• Level 2 > Fish outlines.
Print out a preview
• File > Print.
• Sequence and cutting positions can be seen.
•
File export.
Preparing a design for the BERNINA sewing computer or the bernette 340 Deco.
12
Foam-Rubber Stamp
Materials:
•
•
•
•
•
1 foam-rubber sheet (DIN A5)
1 sheet firm embroidery stabiliser, 30x35cm
Temporary spray adhesive
1 piece of wood, approx. 10x12x3cm
Wood glue
Method:
1. Hoop embroidery stabiliser.
2. Attach foam rubber with spray adhesive.
3. Insert CutWork Tool in sewing computer and cut out motif according to sewing
computer instructions.
The cutting line in a CutWork design is split up and indicated in 4 different colours. The
colours refer to the 4 positions of the BERNINA CutWork Tool.
Cut
CutWork
designs must not be rotated once loaded to the sewing
computer!
com
4. Stick cut-out motif to piece of wood in mirror image with wood glue.
13
T-Shirt with Writing
BERNINA CutWork Software
• Double-click the desktop icon
to start BERNINA CutWork Software.
• Select «Create new», then left-click «Next» to confirm.
• Select «From file».
• Left-click
and select file.
Note: Find an image in the Internet or use a photo (.JPG file) to open the file as a
«backdrop».
• Select your hoop under «Hoop».
• Confirm with «Next».
• Select «Open as Backdrop».
• Left-click «Next» to confirm.
• Select fabric: «T-shirt knit2» under «Embroidery Light».
Note: «Cotton 2» under «Embroidery Smooth» is the default value in the BERNINA
CutWork Software.
• Select colour.
• Left-click «Finish» to confirm.
•
•
•
•
Rescale the artwork (enlarge or decrease its size).
View > Backdrop > Properties.
Edit the artwork using «Rotate» and «Scale».
Rotate the writing in the hoop.
• Select «Create outline shape»
For straight lines and corners keep the «Shift» key pressed.
Meeting up the last point with the first point > closed object.
Note: If an open line is wished, finish with the right mouse-button.
• Left-click «Rectangle selection»
to close the tool.
• A graphic of the writing has been created.
14
T-Shirt with Writing
Developing the CutWork design
• Draw the inner parts of the letters «e» and «a» in order to be able to sew them back
on the reverse-appliqué.
Note: Left-click «View > Backdrop > Hide» in the toolbar to hide the backdrop.
• Select the two inner circles. Right-click and select «Combine» (Level 1 - Outline).
• Select
to duplicate the two selected circles, then left-click
(Level 2 – cutting line only).
• Combine the levels in «Sequence».
• Keep the shift key pressed to select all letters, right-click, then select «Combine» and
left-click.
• Tick «Satin serial» and set the offset to 1.1mm.
Sequence the levels. To do this, keep the left mouse-button pressed and drag the
levels into the required sequence.
• Level 1 > Inner parts of the letters «e» and «a».
• Level 2 > Outline of the letters.
• Level 3 > Inner parts of the letters «e» and «a» that will be sewn on again.
Print out a preview
• File > Print.
• Sequence and cutting positions can be seen.
•
File export.
Preparing a design for the BERNINA sewing computer or the bernette 340 Deco.
15
T-Shirt with Writing
Materials:
• 1 T-Shirt
• 15x30cm backing fabric (red jersey
fabric or an old T-shirt)
• 3 rectangles firm water-soluble stabiliser, 30x35cm
• Temporary spray adhesive
• Colour-coordinated machine-embroidery thread and bobbin thread
• Rhinestones for embellishment, if
wished
Method:
1. Hoop water-soluble stabiliser.
2. Mark height and width of writing on the
T-Shirt and attach this spot to the
embroidery stabiliser with spray
adhesive.
3. Open «Yeah» file.
4. Re-align the beginning of the writing
with the placement of the T-Shirt in the
hoop if necessary.
5. Insert CutWork Tool and cut out writing
according to the sewing computer
instructions.
6. The cutting line in a CutWork design is
split up and indicated in 4 different
colours. The colours refer to the 4
positions of the BERNINA CutWork
Tool.
7. We recommend sticking another sheet
of embroidery stabiliser onto the
surface to be cut after the 2nd cutting
process.
8. Once the embroidery process is
finished, click open the hoop (do
not un-hoop T-Shirt) and attach the
backing fabric below the hoop with
spray adhesive.
9. Stick embroidery stabiliser on top
again.
10. Insert bobbin filled with bobbin thread;
insert embroidery needle and thread
needle with machine-embroidery
thread.
11. Engage hoop and continue program.
The writing is embroidered out.
12. Unhoop T-Shirt and rinse out the
embroidery stabiliser in plenty of water.
13. Once T-Shirt has dried, embellish with
rhinestones if wished.
16
Apple-Core Quilt
BERNINA CutWork Software
• Double-click the desktop icon to start BERNINA CutWork Software.
• Select «Applecore» file in the «BERNINA CutWork Samples» folder.
• Left-click «Browse...».
• My Documents > BERNINA Embroidery > BERNINA CutWork Samples.
• Select file.
Print out a preview
• File > Print.
• Sequence and cutting positions can be seen.
•
Export file.
Preparing a design for the BERNINA sewing computer or the bernette 340 Deco.
17
Apple-Core Quilt
Materials:
•
•
•
•
•
•
•
•
49 fabric rectangles (approx. 20x14cm) in different colours
15cm matching patchwork fabric for the narrow border
50cm patchwork fabric for the wide outer border
90x90cm backing fabric
90x90cm thin batting
7 rectangles firm embroidery stabiliser, 30x35cm
Temporary spray adhesive
Colour-coordinated machine-embroidery thread for quilting
Method:
1. Hoop 1 rectangle of embroidery stabiliser.
2. Attach up to 8 layers of fabric on the stabiliser with spray adhesive. Stick down each
layer separately!
3. Open «apple core» file.
4. Insert CutWork Needle and cut out 49 apple cores according to the sewing computer
instructions.
The cutting line in a CutWork design is split up and indicated in 4 different colours.
The colours refer to the 4 positions of the BERNINA CutWork Tool.
CutW
CutWork
designs must not be rotated again once loaded to the
sewing computer!
sew
5. Place the cut
5
cut-out
out apple cores on a layout cloth according to the sketch
sketch.
6. Stitch the apple cores in rows. The curves must be held in place with pins as you do
this. Sew with a seam allowance of 0.75cm.
7. Assemble row by row. Pin as described in step 6.
8. Even out the workpiece thus produced into a square.
9. Sew on a 3.5cm narrow border.
10. Sew on a 12cm wide border.
11. Place quilt and backing right sides together, sandwiching the batting in between.
Stitch together and turn right-side-out.
12. Hold quilt in place with safety pins or basting stitches.
13. Quilt each apple core for 2mm next to the seam line with machine-embroidery
thread.
14. Quilt the narrow border in the ditch.
18
Tips & Tricks
1. Always use sturdy, firm embroidery stabiliser when cutting with the CutWork Tool.
2. The fabric should be very well taut in the hoop (drumhead effect).
3. When cutting thin, lightweight, plain-weave or satin-weave fabrics, we recommend to
use spray starch (even several times). This ensures a neat cut.
4. Hoop highly stiff embroidery stabiliser as an underlay. Baste the fabric to the
stabiliser or stick it on using spray adhesive if the fabric cannot or should not be
hooped.
5. The automatic staystitch (only on BERNINA 830) is a great aid when working with
certain materials or applications (staystitching fixes the fabric).
6. Use water-soluble stabilisers (e.g. Soluweb) for eyelet embroidery. The cut-out areas
are covered with a sufficiently large piece of water-soluble stabiliser and basted
around the embroidery design.
7. We recommend to activate the «Running before» function before cutting out a series
of forms.
8. Cutting offset: Make sure that the cutting line is at least 0.8mm from the pre-stitched
line, or the thread might be cut. To do this, set the offset setting of the cutting line to
-0.8mm.
19
Tips & Tricks
9. «Net Fill»: A «net filling» also requires correct setting of the offset value. The net
filling should overlap the cut-out area by at least 1mm in order to ensure that the
filling will be stitched as far as onto the fabric edge and the needle won't stitch into
the void. Furthermore, we recommend to use water-soluble stabiliser as with eyelet
embroidery.
10. We recommend to use double-sided, self-adhesive stabiliser for making appliqués
(e.g. Double-Stick by Steam-a-Seam).
11. Take care not to position the cut-out objects in a CutWork design too close to each
other. The cut-outs have a stability-reducing effect on the fabric.
12. If the CutWork design includes several cut-outs, use the «Combine» function to pool
them. This reduces the number of colour changes considerably.
13. Designs that have been edited in the CutWork software must not be rotated again
afterwards! After exporting the design, the positions of the CutWork Tool are fixedly
set and will be lost if the design is rotated again on importing it to the sewing
computer.
20
Quick Reference Guide
Software Manual
The English User Manual (Start/All Programs/BERNINA CutWork/BERNINA CutWork
Manual) is in Adobe PDF format, so that it can be read on-screen or be printed. To
execute/run the manual files, you must have the Adobe Acrobat Reader® installed. In
case you do not have it installed, please download it from the following link an install the
Adobe Acrobat Reader®.
http://get.adobe.com/reader/
Options
Repeat last transform
Group
Ungroup
Combine
Break apart
Convert to curves
To front one
To back one
To front of design
To back of design
Ctrl+T
Ctrl+R
Ctrl+G
Ctrl+U
Ctrl+L
Ctrl+K
Ctrl+Q
Ctrl+PgUp
Ctrl+PgDn
Ctrl+Home
Ctrl+End
New
Ctrl+N
Edit palette
Ctrl+Shift+L
Edit shape nodes
F10
Open
Ctrl+O
100% zoom
Shift+1
Freehand
F5
Save
Ctrl+S
Help
Shift+F1
Bezier
Shift+F5
Save as document
Ctrl+Shift+S
Zoom in
Rectangle
F6
Export to CutWork
Zoom previous
F3
Trapezoid
Shift+F6
Print
Ctrl+P
Zoom all
F4
Ellipse
F7
Export to Image
Ctrl+Shift+E
Change Hoop
Ctrl+H
Pie
Shift+F7
Export to SVG
Hand Tool (pan)
H
Polygon
Y
Copy
Ctrl+Insert
Measure
F9
Star
S
Paste
Shift+Insert
Ruler
Ctrl+Shift+R
Slow redraw
Shift+F11
Undo
Ctrl+Z
Grid
Draw
Ctrl+1
Redo
Ctrl+Shift+Z
Text
F8
Stitch
Ctrl+2
Select fabric
Ctrl+F
21
Export your Design
Preparing a design for the BERNINA sewing computer or
the bernette 340 Deco:
1.
2.
3.
4.
5.
Left-click «Export» in the «Standard» toolbar.
«BERNINA Device Selection» opens.
Select the respective button.
Find detailed help under Onscreen BERNINA CutWork Manual.
(Start > all Programs > BERNINA CutWork > BERNINA CutWork Manual).
For example:
• Plug in your BERNINA USB Key into the USB Port.
• Click USB button.
• Design will be saved onto your BERNINA USB Key.
• Install the embroidery module and CutWork Tool on sewing-/embroidery computer.
Connect BERNINA USB Key to sewing-/embroidery computer.
Sprachanhang EN zu 033349.51.04
22