1
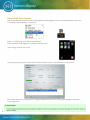
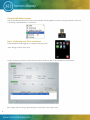
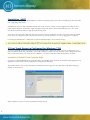
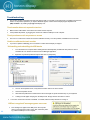
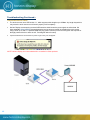
1
Contents:
•
•
•
•
•
•
•
•
•
Set-Up Instructions
Installation for Windows 7
Installation for Windows Vista/XP
Installation for MAC
Troubleshooting Tips
Cleaning Instructions
Warranty
Regulatory Compliance
How to Get Support
pg. 2
pg. 3-4
pg. 5-8
pg. 9-10
pg. 11-12
pg. 13
pg. 13
pg. 14
pg. 14
Set Up Instructions
Connecting the Cables and Turning On the Horizon Display Optical Touch Monitor
•
Connect the cables and power on in the following order:
1. Connect the video cable from the computer to the
monitor.
2. Connect the USB cable from the monitor to your
computer.
3. Connect the power cable to the computer and turn on.
4. Connect the power cable to the monitor and turn on.
The computer will automatically detect the touch monitor as new USB hardware.
For a video demonstration, please visit www.HorizonDisplay.com/Support
2
Installation (Windows 7)
PulseIR system is a plug and play HID-USB Device which automatically manages device drivers, eliminating any manual
installation or upgrading of the drivers.
Connecting the PulseIR unit to a USB connector will automatically display the following message on the bottom taskbar.
The Windows 7 OS displays the newly detected PulseIR system is a pointing device as shown below.
You are done! Windows 7 will recognize touch and multi-touch gestures.
Installation of Extended Utility for PulseIR Touch System.
Download and install this utility application. This application contains useful tools for configuring and testing the PulseIR
system.
The installer will start once you have accepted the manufacturer's license agreement. Go ahead and accept default settings by
clicking on "Next" button.
When completed, restart your system by clicking the "Finish" button.
3
Using PulseIR Utility Programs
Once the PulseIR Utility Program is installed, launch PulseIR Controller application by either selecting from Windows start menu
or by clicking on PulseIR shortcut as shown below.
Step 1: Configuring your PC for multi-touch
Launch PulseIR Controller Application to display the following screen.
Select "Setting" Function on the screen.
On the pop-up panel, click on the touchscreen device listed at the bottom, then set the radio buttons as shown below.
Select "Apply". Wait for the warning sign not to unplug the USB connector, then close the pop-up by clicking the switch button
on lower right corner.
4
Installation (Windows Vista/XP)
PulseIR system is a plug and play HID-USB Device which automatically manages device drivers, eliminating any manual installation or upgrading of the drivers.
Connecting the PulseIR unit to a USB connector will automatically display the following message on the bottom taskbar.
Upon connection to a USB port, PulseIR system undergoes an initialization sequence. DO NOT touch the screen for 3 seconds.
The Window OS displays the newly detected PulseIR system as a mouse device as shown below.
Installation of Extended Utility for PulseIR Touch System.
The utility application may be downloaded from IDS website (http://www.idspulse.com/support). This application contains
useful tools for calibrating and testing the PulseIR system. Please download and run the installation file for Windows XP and
Vista OS – the application supports both 32 and 64 bit systems.
The installer will start once you have accepted the manufacturer's license agreement. Go ahead and accept default settings by
clicking on "Next" button.
When completed, restart your system by clicking the "Finish" button.
5
Using PulseIR Utility Programs
Once the PulseIR Utility Program is installed, launch PulseIR Controller application by either selecting from Windows start menu
or by clicking on PulseIR shortcut as shown below.
Step 1: Configuring your PC for multi-touch
Launch PulseIR Controller Application to display the following screen.
Select "Setting" Function on the screen.
On the pop-up panel, click on the touchscreen device listed at the bottom, then set the radio buttons as shown below.
Select "Apply" then close the pop-up by clicking the switch button on lower right corner.
6
Step 2: Calibration
PulseIR Touch Screens work out of the box, and do not need calibration if you align the edges of the overlay with the monitor.
However, we do offer a tool for manually calibrate the touch screen with the monitor screen if the alignment is difficult.
Use Calibration program to calibrate the screen relative to the monitor whenever the screen is repositioned
relative to the monitor.
Click on the Calibration tile on the Controller screen.
On the pop-up panel, first select the touchscreen by selecting it from the device list
at the bottom of the screen, then click "Calibration" button.
When the screen turns black and red targets appear, carefully touch (and if necessary move) the screen until the arrow coincides
with the center of the target.. Do this for each of the four points.
7
Click "Apply" button on the control panel.
Next, select the "Area" button on the calibration control panel, and drag your finger from the upper left corner to lower right
corner of the screen. This defines the touch sensitive area of the screen.
Then select "Apply" button to update the new settings.
Click on the switch button on lower right corner to complete the calibration step.
Step 3. Testing the Configuration
The Touchscreen is now ready. To test the drawing capability, click on the "Draw" tile in the Controller Panel.
This is a simple program that displays the line along with a start and end point of the touch.
Included with the PulseIR utility installation is a test application that you can access from your
start menu.
This simple test program displays all touch points that PulseIR sensors detect
along with their ghost images. Notice also how the size of the touch surface
changes as you change the area of the touch. Programmers can use this information to create applications while eliminating the ghost images.
Done
This ends the quick overview of how to set up your PulseIR system.
8
Installation (MAC)
PulseIR system is a plug and play HID-USB Device which automatically manages device drivers, eliminating any manual installation or upgrading of the drivers.
PulseIR touch screens are fully compatible with Mac OS system. However, software tools and applications for Mac OS is currently under development. In particular, Apple will support multi-touch gestures with its MacOS MacOS X 10.7 Lion. Until
then, MacOS systems are limited to single-point Mouse-Only mode.
To use the touch screen with a Mac OS system, the touch screen must be configured for a Mac. If you have received a PulseIR
touch screen pre-configured for Mac OS mode from the factory, the unit will work as soon as it is plugged into a USB port.
Connecting the PulseIR unit to a USB connector will automatically display a "device found" message.
If Your Touch Screen is Configured for Windows 7 OS
If you have a PulseIR touch screen configured for the default Windows 7 multi-touch mode, you must reconfigure the touch
screen for Mac OS mode using a Windows 7 system. This currently is possible only while the touch screen is plugged into a Windows system. First connect your touch screen to a Windows (7 or Vista) system, then follow the steps below to do this.
Installation of PulseIR Touch Controller Utility
If you have not installed PulseIR Touch Controller utility tool form IDS, please download and install this utility application. This
application contains useful tools for configuring and testing the PulseIR system.
The installer will start once you have accepted the manufacturer's license agreement. Go ahead and accept default settings by
clicking on "Next" button.
When completed, restart your system by clicking the "Finish" button.
9
Using PulseIR Utility Programs
Once the PulseIR Utility Program is installed, launch PulseIR Controller application by either selecting from Windows start menu
or by clicking on PulseIR shortcut as shown below.
Step 1: Configuring your PC for multi-touch
Launch PulseIR Controller Application to display the following screen.
Select "Setting" Function on the screen.
On the pop-up panel, click on the touchscreen device listed at the bottom, then set the radio buttons as shown below.
Select "Apply".
Wait for the warning sign not to unplug the USB connector goes away. Then close the pop-up by clicking the switch button on
lower right corner.
10
Your touch screen will now function properly with a Mac OS. Re-connect the touch screen into your Mac OS system and the
touch screen should now function normally.
Troubleshooting
This section provides some diagnostic tests and solutions that you can apply in the event there is a problem with the touch
monitor. If the problem persists or you require additional support, contact Horizon Display support department at
(888) 737-4674 or by emailing [email protected].
•
Touch monitor does not respond to touches
•
Make sure the USB cable is connected to the monitor and the computer.
•
If the problem still persists, try plugging the monitor into a different USB port on the computer.
Touch produces erratic responses on screen
This can occur if the touch monitor has not been calibrated correctly. To fix the problem, recalibrate the touch monitor.
•
Unable to calibrate the touch monitor
If you have a problem calibrating your touch monitor contact Horizon Display for support.
•
“Uninstalling and reinstalling the USB device
1.
From the Start menu computer select: Settings/Control Panel/System (in traditional view) and then click on
Hardware tab. You should now enter the Device Manager application.
2.
Right click on [USB Composite Device] and then click on [Properties].
3.
Once on the Properties screen, verify that the location refers to the touch monitor.
4.
Close the Properties screen.
5.
With USB Composite Device selected in the Device manager list, press the Delete key on your keyboard.
6.
A dialog box will appear verifying the uninstall process. Simply click the OK button to confirm.
Your touch monitor has now been uninstalled. To reinstall, follow the setup instructions on Page 5
•
USB not recognized” message appears on screen
•
11
This message can appear if the USB port on the computer
does not recognize the monitor. This is often resolved by utilizing a different USB port on the computer.
Troubleshooting Continued...
USB Extension and Limits
•
The touch screens use a USB version 1.1, which supports cable lengths up to 15 feet. Any length beyond this
may cause the touch screen to not function properly or fail completely.
•
Horizon Display recommends a powered USB extender which boosts the power signal as well as data. We
have tested the Gefen USB200 (powered extender) and we were successful in extending the touch screen
using CAT5E up to 300 ft. A powered USB hub (any generic will work) on the Receiving Unit was required for
the high powered device to work as well. See diagram below for setup.
•
If powered devices are not used then a “power surge on hub port” will appear.
NOTE: Horizon Display is not associated with or a reseller for Gefen products.
12
Cleaning Instructions
•
Recommended cleaning solution consists of a 70% or higher isopropyl alcohol in conjunction with a fine micro-fiber cloth.
DO NOT spray/pour alcohol directly to screen; apply to cloth first.
•
Wipe lightly in one direction. Do not buff aggressively or wipe in a circular motion.
•
If you plan on cleaning your display daily, distilled water should be used in place of alcohol. Limit alcohol use to spot
cleaning or for once a month disinfecting.
Warranty Information
Damaged Goods
In the event of damage to this Product or packaging you should immediately advise the shipper and the reseller who sold you the product.
Retain all original packaging. Future shipment of this product in incorrect packaging may void your warranty.
Limited Warranty
1) Horizon Display a division of Horizon Technology, LLC (hereinafter 'Horizon Display'), warrants its products to be free from defects in material
and workmanship during the warranty period and subject to the conditions set forth below. Horizon Display warrants its products as to form, fit
and function, not specific application and to meet the performance and testing parameters defined in the product's associated customer quotation, purchase order and/or contract between Horizon Display and customer. If a product proves to be defective in material or workmanship
during the warranty period, Horizon Display, at its sole discretion will repair or replace the product with a similar product provided that a Horizon
Display return materials authorization number (RMA) was issued prior to the return of the product. Replacement parts and or units may include
remanufactured or product refurbished to manufacturers specifications. The replacement unit will be covered by the balance of the time remaining on the original limited warranty. Warranty period can be found in your original invoice.
2) Horizon Display provides a limited warranty on all custom integrated solutions including; integrated computer products, integrated storage
solutions and integrated display solutions as well as all distributed products including storage and display products. Warranty terms are for
repair at Horizon Display's Integration facility in Lake Forest, CA. Freight expense from the customer to the repair depot will be the liability of
the customer. The freight expense to return the product back to the customer will be the liability of Horizon Display. The warranty period begins
upon the ship date reflected on Horizon Display's invoice. The balance of the original warranty as detailed in section 1 will cover repairs and or
replacements made under the warranty.
3) This warranty is limited to the original purchaser of the product and is not transferable As detailed in section 1, repairs and replacements will
be covered by the balance of the time remaining on the original limited warranty. The original Horizon Display invoice must accompany all warranty requests. Horizon Display shall be under no liability at all under this warranty if the total price for the product has not been paid.
4) Warranty period can be found in your original invoice.
5.) Definition of DOA (dead on arrival) - Horizon restricts the DOA period to not exceed 10 days from receipt by customer. This grace period
allows ample time to test product and verify it has been delivered in the condition quoted. If the product fails at any time within this period, Horizon Display is liable for freight charges to return product and for shipping the replacement/repaired product. If at any time the product is installed, mounted, or altered, the DOA period ends.
6) Horizon Display’s Liability is limited to the cost of repair or replacement of the product. Horizon Display shall not be liable for damage to other
property caused by any defects in the product, damages based upon inconvenience, loss of use of the product, loss of time, loss of profits, loss
of business opportunity, loss of goodwill, interference with business relationships, or other commercial loss; even if advised of the possibility
of such damages. Any other damages, whether incidental, consequential, or otherwise, whether arising from or based upon breach of warranty,
breach of contract, tort, including negligence, indemnity or any other cause or basis whatsoever limits Horizon’s liability. In no case shall Horizon Display’s liability exceed the original selling price of the products covered under the warranty.
13
How to get Service?
Please contact Horizon Display at (888)737-4674 or email ([email protected]), Monday-Friday 9-5PM (PST) for support.
While on the phone with the technician, every attempt will be made to resolve your issue. If the issue cannot be resolved, the
Horizon Display technician will provide additional instructions as to how to get the unit back to original operation. This may include shipping the unit back to Horizon Display’s Factory Service Center in Lake Forest, CA. If a technician must be dispatched
and the unit fails because of issues related to software, operating system, and/or operator error related the client may be billed
for time and travel expenses. If a product is being retuned to Horizon Display an RMA and instructions will be provided.
Regulatory Compliance Information
Federal Communication Commission (FCC) Statement
This equipment has been tested and found to comply with the limits for a class A digital device, pursuant to part 15 of the FCC
Rules. These limits are designed to provide reasonable protection against harmful interference when the equipment is operated
in a commercial environment. This equipment generates, uses, and can radiate radio frequency energy and, if not installed and
used in accordance with the instruction manual, may cause harmful interference to radio communications. Operation of this
equipment in a residential area is likely to cause harmful interference in which case the user will be required to correct the
interference at his own expense.
This device complies with Part 15 of the FCC Rules. Operation is subject to the following two conditions: (1) this device may not
cause harmful interference, and (2) this device must accept any interference received, including interference that may cause
undesired operation.
Changes or modifications not expressly approved by the party responsible for compliance could void the user’s authority to
operate the equipment.
For Customer Support please contact Horizon Display at
(888) 737-4674
[email protected]
Or visit us at
www.horizondisplay.com/support
14
Horizon Display
1 Rancho Circle
Lake Forest, CA 92630
(949) 595-8244