1
I
IC
user
100%
Recycled
manual
)
Paper,
./
100% recycleq paper.
the possibilities
FNGLISH
Thank you for purchasing this Samsung
product. Please register your product at
www,samsung.com/register
1-800-SAMSUNG
(7 26-7864,
SMH1816
XAA 03942A
EN.indd
1
2011-06-10
5:33:21
IMPORTANT
SAFETYSYMBOLS
ANDPRECAUTIONS
What the icons
manual mean:
Congratulations on your new Samsung
microwave oven, This manual contains important
information on the installation, use and care of
your appliance, Please take time to read this
manual to take full advantage of your microwave
oven s many benefits and features,
PRECAUTIONS
TOAVOID
POSSIBLEEXPOSURE
TO
EXCESSIVE
MICROWAVE
ENERGY
A. Do not attempt to operate this oven with the door
open since open-door operation can result in harmful
exposure to microwave energy. It is important not to
defeat or tamper with the safety interlocks.
B. Do not place any object between the oven front
face and the door or allow soil or cleaner residue to
accumulate on the sealing surface.
C. Do not operate the oven if it is damaged. It is
particularly important that the oven door close
properly and that there is no damage to the:
1. Door (bent),
2. Hinges and latches, (broken or loosened),
3. Door seals and sealing surface.
D. Only properly qualified service personnel should adjust
or repair the oven. Do not attempt to adjust or repair
the oven yourself.
in this
user
Hazards or unsafe practices
WARNING
z_
CAUTION
WHATYOUNEEDTOKNOW
ABOUTSAFETYINSTRUCTIONS
Warnings and Important Safety Instructions in this manual
do not cover all possible conditions and situations that
may occur. It is your responsibility to use common sense,
caution, and care when installing, maintaining, and
operating your microwave oven.
and signs
,A
CAUTION
may result in severe
injury or death.
that
personal
Hazards or unsafe practices that
may result in minor personal
injury or property
damage.
To reduce the risk of fire,
explosion,
electric shock, or
personal injury when using your
microwave oven, follow these
basic safety precautions.
Do NOT attempt.
Do NOT disassemble.
Do NOT touch.
Follow directions
explicitly.
Unplug the power plug from the wall
socket.
Make sure the machine is grounded
orevent electric shock.
to
Call the service center for help.
Note
These warning signs are here toprevent
injury to you and others. Please follow them
explicitly. After reading this section, keep it
in a safe place for future reference.
SAVETHESEINSTRUCTIONS
2__safety
SMH1816
informat
XAA 03942A
EN.indd
on
2
2011-06-10
5:33:22
iMPORTANT
SAFETY
iNSTRUCTiONS
17. To reduce the risk of fire in the oven cavity.
ao Do not overcook food. Carefully attend appliance
when paper, plastic, or other combustible materials
are placed inside the oven to facilitate cooking.
When using any electrical appliance, basic safety
precautions should be followed, including the following:
b. Remove wire twist-ties from paper or plastic bags
before placing the bags in the oven.
co If materials inside the oven
door closed, turn the oven
power cord, or shut off the
circuit breaker panel. If the
may spread.
A',, WARNING
WARNING
1.
2.
3.
4.
5.
To reduce risk of burns, electric shock, fire, personal
injury or exposure to excessive microwave energy:
Read all safety instructions before using the
appliance.
Read and follow the specific "Precautions to avoid
possible exposure to excessive microwave energy" on
this page.
This appliance must be grounded. Connect only to
properly grounded outlets. See Important "Grounding
instructions" on page 4 of this manual.
Install or locate this appliance only in accordance with
the provided installation instructions.
Some products such as whole eggs and sealed
containers (for example, closed glass jars) can
explode if heated rapidly. Never heat them in a
microwave overs.
6. Use this appliance only for its intended use as
described in the manual. Do not put corrosive
chemicals or vapors in or ors this appliance. This type
of overs is specifically designed to heat, cook, or dry
food. It is not designed for industrial or laboratory use.
7. As with any appliance, close supervision is necessary
when it is used by children.
8. Do not operate this appliance if it has a damaged cord
or plug, if it is not working properly, or if it has beers
damaged or dropped.
9. This appliance should be repaired or serviced only
by qualified service personnel. Contact the nearest
authorized service facility for examination, repair, or
adjustment.
10. Do not cover or block any openings on the appliance.
11. Do not tamper with or make any adjustments or
repairs to the door.
12. Do not store this appliance outdoors. Do not use this
product near water, for example, near a kitchen sink,
in a wet basement, near a swimming pool, or similar
locations.
ignite, keep the oven
off, and disconnect the
power at the fuse or
door is opened, the fire
d. Do not use the cavity for storage purposes. Do not
leave paper products, cooking utensils, or food in
the cavity when not in use.
18. Liquids, such as water, milk, coffee, or tea can
be overheated beyond the boiling point without
appearing to be boiling. Visible bubbling or boiling
when the container is removed from the microwave
oven is not always present. THIS COULD RESULT
IN VERY HOT LIQUIDS SUDDENLY BOILING OVER
WHEN THE CONTAINER IS DISTURBED OR A
SPOON OR OTHER UTENSIL IS INSERTED INTO
THE LIQUID. To reduce the risk of injury:
ao Do not overheat liquid.
b. Stir liquid both before and halfway through heating
it.
co Do not use straight-sided containers with narrow
necks.
do After heating, allow the container to stand in the
microwave oven for a short time before removing
the container.
e. Use extreme care when inserting a spoon or other
utensil into the container.
/k CAUTION
CAUTION
1. Clean Ventilating Hoods Frequently - Grease should
not be allowed to accumulate on hood of filter.
2. When flaming foods under the hood, turn the fan on.
3. Use care when cleaning the vent-hood filter. Corrosive
cleaning agents, such as lye-based oven cleaner, may
damage the filter.
13. Do not immerse the cord or plug in water.
14. Keep the cord away from heated surfaces. (including
the back of the oven).
15. Do not let the cord hang over edge of table or
counter.
16. When cleaning surfaces of the door and oven that
come together when the door closes, use only mild,
nonabrasive soaps, or detergents applied with a
sponge or soft cloth. Unplug the plug before cleaning.
SAVETHESEINSTRUCTMONS
safety
SMH1816
XAA 03942A
EN.indd
3
informat
on __3
2011-06-10
5:33:22
GROUNDING
INSTRUCTIONS
This appliance must be grounded. In the event of an
electrical short circuit, grounding reduces the risk of
electric shock by providing an escape wire for the
electrical current. This appliance is equipped with a cord
that includes a grounding wire and a grounding plug.
The plug must be plugged into an outlet that is properly
installed and grounded.
WARNING
WARNING
Improper use of the grounding plug can result in a risk of
electric shock.
,, Plug into a grounded 3 prong outlet. Do not remove
the third (grounding) prong. Do not use an adaptor or
otherwise defeat the grounding plug.
,, Consult a qualified electrician or service person if you
do not understand the grounding instructions or if you
are not sure if the appliance is properly grounded.
,, We do not recommend using an extension cord with
this appliance. If the power-supply cord is too short,
have a qualified electrician or serviceman install an
outlet near the appliance. However, if it is necessary
to use an extension cord, read and follow the "Use of
Extension Cords" section below.
Use of Extension Cords
A short power-supply cord is provided to reduce the risk
of your becoming entangled in or tripping over a longer
cord. Longer cord sets or extension cords are available
and you can use them if you exercise care. If you use a
long cord or extension cord:
1, The marked electrical rating of the cord set or
extension cord should be at least as great as the
electrical rating of the appliance.
2, The extension cord must be a grounding-type 3-wire
cord and it must be plugged into a 3-slot outlet.
3, The longer cord should be arranged so that it will not
drape over the counter top or tabletop where it can
be pulled on by children or tripped over accidentally.
If you use an extension cord, the interior light may
flicker and the speed of the blower may vary when the
microwave oven is on. Cooking times may be longer
too.
WARNING
CRITICAL
INSTALLATION
WARNINGS
The installation of this appliance must be performed
by a qualified technician or service company.
,, Failing to have a qualified technician install
the oven may result in electric shock, fire, an
explosion, problems with the product, or injury.
Unpack the oven, remove all packaging material and
examine the oven for any damage such as dents
on the interior or exterior of the oven, broken door
latches, cracks in the door, or a door that is not lined
up correctly. If there is any damage, do not operate
the oven and notify your dealer immediately.
Make sure to install your oven in a location with
adequate space.
Remove all foreign substances such as dust or water
® from
the power plug terminals and contact points
using a dry cloth on a regular basis.
,, Unplug the power plug and clean it with a dry
cloth.
Failing to do so may result in electric shock or fire.
Plug the power cord into a properly grounded
3 pronged outlet. Your oven should be the only
appliance connected to this circuit.
,, Sharing a wall socket with other appliances, using
a power strip, or extending the power cord may
result in electric shock or fire.
,, Do not use an electric transformer. It may result in
electric shock or fire.
,, Ensure that the voltage, frequency and current
provided match the product's specifications.
Failing to do so may result in electric shock or fire.
Keep all packaging materials out of the reach of
children. Children may use them for play.
appliance must be properly grounded. Read
@This
and follow the specific "Grounding instructions"
found in the beginning of this Section. Do not ground
the appliance to a gas pipe, plastic water pipe, or
telephone line.
This may result in electric shock, fire, an
explosion, or problems with the product
,, Never plug the power cord into a socket that is
not grounded correctly and make sure that it is in
accordance with local and national codes.
Do not cut or remove the third (ground) prong from
the power cord under any circumstances.
Connect the oven to a 20A circuit. If you connect the
oven to a 15A circuit, make sure that circuit breaker
is operable.
not install this appliance in a humid, oily, or dusty
@Do
location, or in a location exposed to direct sunlight or
water (rain drops).
This may result in electric shock or fire.
Plug the power plug into the wall socket firmly. Do
not use a damaged power plug, damaged power
cord, or loose wall socket.
This may result in electric shock or fire.
Do not mount over a sink.
Do not pull or excessively bend the power cord.
Do not twist or tie the power cord.
Do not hook the power cord over a metal object,
place a heavy object on the power cord, insert the
power cord between objects, or push the power
cord into the space behind the appliance.
This may result in electric shock or fire.
Do not pull the power cord when you unplug the
oven.
,, Unplug the oven by pulling the plug only.
Failing to do so may result in electric shock or fire.
SAVETHESEINSTRUCTIONS
4
SMH1816
safety
informaton
XAA 03942A
EN.indd
4
2011-06-10
5:33:22
When the power plug or power cord is damaged,
contact your nearest service center for a
replacement or repair.
INSTALLATION
CAUTIONS
CAUTION
_
_
WARNING
Position
the oven so that the plug is easily
accessible.
* Failing to do so may result in electric shock or fire
due to electric leakage.
nplug the oven when it is not being used for long
periods of time or during a thunder/lightning storm.
* Failing to do so may result in electric shock or
fire.
CRITICAL USAGE
WARNINGS
If the microwave appliance is flooded please contact
your nearest service center : Failing to do so may
result in electric shock or fire.
Read and follow the specific "Precautions to Avoid
Possible Exposure to Excessive Microwave Energy",
found in the beginning of this Section.
If the microwave generates a strange noise, a
burning smell or smoke, unplug it immediately and
contact your nearest service center.
* Failing to do so may result in electric shock or fire.
In the event of a gas leak (propane gas, LP gas,
etc.), ventilate the room immediately. Do not touch
the microwave, power cord, or plug.
,, Do not use a ventilating fan.
* A spark may result in an explosion or fire.
Take care that the door or any of the other parts do
not come into contact with the body while cooking or
just after cooking.
* Failing to do so may result in burns.
In the event of a grease fire on the surface units
below the oven, smother the flaming pan on the
surface unit by covering the pan completely with a
lid, a cookie sheet or a flat tray.
Never leave surface units beneath your oven
unattended at high heat settings. Boil over cause
smoking and greasy spillovers that may ignite and
spread if the vent fan is operating. To minimize
automatic fan operation, use adequate sized
cookware and use high heat on surface units only
when necessary.
If materials inside the oven should ignite, keep the
oven door closed, turn the oven off and disconnect
the power cord, or shut off power at the fuse or
circuit breaker panel. If the door is opened, the fire
may spread.
,, Always observe Safety Precautions when using
your oven. Never try to repair the oven on your
own there is dangerous voltage inside. If the
oven needs to be repaired, contact an authorized
service center near you.
Do not attempt to repair, disassemble, or modify the
appliance yourself.
,, Because a high voltage current enters the product
chassis during operation, opening the chassis can
result in electric shock or fire.
* You may be exposed to electromagnetic waves.
* When the oven requires repair, contact your
nearest service center.
any foreign substance such as water enters the
@ Ifmicrowave,
unplug it and contact your nearest
service center.
* Failing to do so may result in electric shock or fire.
Do not touch the power plug with wet hands.
,, This may result in electric shock.
Do not turn the appliance off by unplugging the
power plug while the appliance is in operation.
,, Plugging the power plug into the wall socket again
may cause a spark and result in electric shock or
fire.
Keep all packaging materials well out of the reach of
children. Packaging materials can be dangerous to
children.
,, If a child places a bag over its head, the child can
suffocate
Do not let children or any person with reduced
physical, sensory or mental capabilities use this
appliance unsupervised.
Make sure that the appliance is out of the reach of
children.
* Failing to do so may result in electric shock, burns
or injury.
Do not touch the inside of the appliance immediately
after cooking. The inside of the appliance will be hot.
,, The heat on the inside of the oven can cause
burns.
Do not put aluminum foil (except as specifically
directed in this manual), metal objects (such as
containers, forks, etc.) or containers with golden or
silver rims into the microwave.
,, These objects can cause sparks or a fire.
Do not use or place flammable sprays or objects
near the oven.
,, Heat from the microwave can cause flammable
sprays to explode or burn.
* Failing to do so may result in electric shock or
injury.
Do not tamper with or make any adjustments or
repairs to the door. Under no circumstances should
you remove the outer cabinet.
Do not store or use the oven outdoors.
SAVETHESEINSTRUCTMONS
safety
SMH1816
XAA 03942A
EN.indd
5
informat
on ....5
2011-06-10
5:33:23
USAGE CAUTIONS
®
Do not defrost frozen beverages in narrow-necked
@bottles.
The containers can break.
Do not scratch the glass of the oven door with a
sharp object.
,, This may result in the glass being damaged or
broken.
If the surface of the microwave is cracked, turn it off.
Failing to do so may result in electric shock.
Dishes and containers can become hot. Handle with
care.
Hot foods and steam can cause burns. Carefully
remove container coverings, directing steam away
from your hands and face.
Remove lids from baby food before heating. After
heating baby food, stir well to distribute the heat
evenly. Always test the temperature by tasting
before feeding the baby. The glass jar or surface of
the food may appear to be cooler than the food in
the interior, which can be so hot that it will burn the
infant's mouth.
Make sure all cookware used in the oven is suitable
for microwaving.
Use microwavable cookware in strict compliance
with such manufacturer's recommendations.
not stand on top of the microwave or place
@Do
objects (such as laundry, oven covers, lighted
candles, lighted cigarettes, dishes, chemicals, metal
objects, etc.) on the appliance.
,, Items, such as a cloth, may get caught in the
door.
This may result in electric shock, fire, problems
with the product, or injury.
Do not operate the appliance with wet hands.
This may result in electric shock.
Do not spray volatile material such as insecticide
onto the surface of the appliance.
,, As well as being harmful to humans, it may also
result in electric shock, fire or problems with the
product.
Do not place the appliance over a fragile object such
as a sink or glass object.
,, This may result in damage to the sink or glass
object.
Do not put your face or body close to the appliance
while cooking or when opening the door just after
cooking.
,, Take care that children do not come too close to
the appliance.
,, Failing to do so may result in children burning
themselves.
Do not store anything directly on top of the appliance
when it is in operation.
Do not use sealed containers. Remove seals and
lids before use. Sealed containers can explode due
to buildup of pressure even after oven has been
turned off.
WARNING
CRITICAL CLEANING
INSTRUCTIONS
Do not clean the appliance by spraying water directly
onto it.
Do not use benzene, thinner or alcohol to clean the
appliance.
This may result in discoloration, deformation,
damage, electric shock or fire.
Before cleaning or performing maintenance, unplug
the appliance from the wall socket and remove food
waste from the door and cooking compartment.
Failing to do so may result in electric shock or fire.
Take care not to hurt yourself when cleaning the
appliance (external/internal)
You may hurt yourself on the sharp edges of the
appliance.
Do not clean the appliance with a steam cleaner.
This may result in corrosion.
Keep the inside of the oven clean. Food particles or
spattered oils stuck to the oven walls or floor can
cause paint damage and reduce the efficiency of the
oven.
Do not place food or heavy objects over the door
when opening the door.
The food or object may fall and this may result in
burns or injury.
Do not abruptly cool the door, the inside of the
appliance, or the dish by pouring water over it during
or just after cooking.
,, This may result in damage to the appliance. The
steam or water spray may result in burns or injury.
Do not try to preheat the oven or operate it while
empty.
Do not cook without the glass tray in place on the
oven floor. Food will not cook properly without the
tray.
SAVETHESEINSTRUCTI0NS
6
SMH1816
safety
informaton
XAA 03942A
EN.indd
6
2011-06-10
5:33:23
conbnt
SETTING UP YOUR MICROWAVE
',,,_,s
8
8
8
9
10
10
10
10
OVEN
COOKING GUIDE
17
18
18
19
19
19
19
Checking the parts
Warranty and service information
Setting up your microwave oven
Checking the control panel
Turning on the power for the first
time
Setting the time
Child Lock
My Settings
CLEANING
OVEN
USING YOUR MICROWAVE
10
10
10
10
10
11
11
11
11
12
12
13
13
14
14
15
15
16
16
AND MAiNTAiNING YOUR MICROWAVE
OVEN
Kitchen Timer button
Add 30 sec. button
Vent buttons (4 Speed & On/Off)
Vent Delay Off button
Light Hi/Lo/Off button
Set Timer button
Turntable On/Off button
Metal shelf
Eco Mode
Sensor Cooking buttons
Sensor Reheat button
Auto Defrost button
1 Pound Defrost button
Soften/Melt button
Kids Meals button
Snacks button
Microwave Cooking Times &
Power Levels
Custom Cook button
Warm & Hold
General microwave tips
Cooking meat
Cooking poultry
Cooking seafood
Cooking eggs
Cooking vegetables
Recipes
20
20
21
21
21
21
21
22
Cleaning the exterior
Cleaning the interior
Cleaning the turntable and roller
rings
Storing and repairing your
microwave oven
Replacing the cooktop/night light
Replacing the oven light
Cleaning the grease filter
Replacing the charcoal filter
TROUBLESHOOTING
APPENDIX
WARRANTY
COOKWARE GUIDE
16 Microwave-safe
utensils
contents 7
SMH1816
XAA 03942A
EN.indd
7
2011-06-10
5:33:23
WARRANTY AND SERVICE
INFORMATION
P
Be sure to follow these hqstructions closely so
that your new microwave oven works properly,
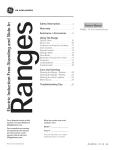
CHECKING
THE PARTS
Carefully unpack your microwave oven, and make
sure you've received all the parts shown below. If your
microwave oven was damaged during shipping, or if you
do not have all the parts, contact Samsung Customer
Service. (Refer to the "Warranty and service information"
on page 8.)
To help us to serve you better, please complete the
enclosed registration card and promptly return it by mail.
If the registration card is missing, you can call Samsung
Electronics, Inc., at
1-800-SAMSUNG (726=7864) or register online at
www.samsung.com/global/register.
When contacting Samsung, please )rovide the specific
model and serial number information which is usually
located on the back or bottom of the product. Please
record these numbers in the spaces provided below,
along with the other requested information. Keep this
information in a safe place as a permanent record of
your purchase to aid in identification in case of theft or
loss. Also keep a copy of your sales receipt as a proof of
purchase if warranty service is needed.
MODEL NUMBER
SERIAL NUMBER
DATE PURCHASED
PURCHASED
Microwave
oven (SMH1816)
Warranty service can only be performed by a Samsung
Authorized Service Center. If you should require warranty
service, provide the above information with a copy of your
sales receipt to the Samsung Authorized Service Center.
For service assistance and the location of the nearest
service center, please call 1-800- SAMSUNG (726-7864).
SETTING
OVEN
Shelf
Glass Tray
Roller Guide Ring
FROM
UP YOUR MICROWAVE
1, Open the door by pulling the handle on the right side
of the door.
2, Wipe the inside of the oven with a damp cloth.
Grease Filters
(2ea)
Charcoal
Hardware kit
(Screws &
Brackets)
filter
Manuals
(User &
Installation)
Exhaust adaptor
3=
Install the pre-assembled ring into the indentation at
the center of the microwave oven.
4.
Place the glass tray securely in the center of the preassembled roller ring.
Templates
(Top & Wall)
Registration
Card
8 setting up your new m orowave oven
SMH1816
XAA 03942A
EN.indd
8
2011-06-10
5:33:24
÷
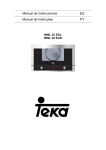
CHECKING
THE CONTROL
PANEL
Display I
See page 121
ISee page 15
Cookn 9 P_es_ts
I
I
|
See page 14 m
See page 13 1
ISee page 14
tSee page 16
_See page 10
1
2
4
5
tSee page 16
7
9
See page 15 m
ISee page 10
See page 10-11 m
Y
tSee page 10
sett ng up your new m crowave oven 9
SMH 1816_XAA_03942A_EN.indd
9
÷
2011-06-10
5:33:24
TURNING ON THE POWER FOR THE
FIRST TIME
r
The first time you plug the power cord into an outlet, the
display turns on after four seconds with: t_' FASE _f_i-/};S
CL©C_ AMii'?SZ-7-77AXE
OF I?/tY
will also occur after a power interruption
@This
SETTING
THE TIME
Your microwave oven is equipped with a built-in clock.
Set the clock when first installing your microwave oven
and after a power failure. The time is displayed whenever
the microwave oven is not being used.
1. Press the Clock button.
2, The display will show FN7%_ 77DX_O/I?AY.
3, Use the number buttons to enter the current time.
You need to press at least three numbers to set
the clock. For example, if the current time is 5:00,
press 5, 0, 0. The display will show: 500.
4. Press the Enter/Start button.
5. The display will show Alex7OUCt 71t>/Y,7OUCt I/.
6, Use the number button to select AM / PM.
7. Press the Enter/Start
button.
8, A colon appears indicating that the time is set.
To check the time while cooking, press the Clock
button.
CHILD
LOCK
The Child Lock function allows you to lock the buttons so
that the microwave oven cannot be operated accidentally.
The oven can be locked at any time.
Activating/Deactivating
If you want to activate or deactivate the child lock
function, press the Hold 3 sec button for 3 seconds.
The display will show ('Hi/D i ©C/< ON when the oven is
locked and then redisplays the time.
Cooking has iqever been easier than with your
iqew Samsung microwave oven,
The following section describes everything you
iqeed to know about using your microwave oven,
KITCHEN TIMER BUTTON
This microwave allows you to use your microwave oven
as a timer. Use the Kitchen Timer for timing up to 99
minutes, 99 seconds.
1. Press the Kitchen Timer button.
2. Use the number buttons to set the length of time
you want the timer to run.
3. Press the Enter/Start button
4. The display counts down and beeps when the time
has elapsed.
5. To cancel timer setting: Press Stop/Clear
once.
button
ADD 30 SEC. BUTTON
This simplified control saves you time, letting you quickly
start cooking at 100% power.
1, Press the Add 30 sec, button for each 30 seconds
you wish the food to be cooked for. For example,
press it twice to cook it for one minute, and then
press the Enter/Start button to start cooking.
2, Add 30 sec. to a cooking program already in
progress by pressing the Add 30 sec, button for
every additional 30 seconds you want to add.
MY SETTINGS
VENT BUTTONS
You can customize your new microwave oven to suit your
preferences. To customize:
1. Press the My Settings button.
2, Press the number button that corresponds to the
function you want to customize.
3, Press the number that corresponds to the option you
want.
The functions, options, and corresponding number buttons
are listed in the table below.
The vent removes steam and other vapors from the
cooking surface. You can manually select the vent setting.
:
i
1
Weight mode selected
2
Sound on/off control
3
Clock display control
4
Display
5
Remind end signal
6
Demo mode
7
Daylight Saving time
1
2
1
2
1
2
Lbs.
Kg.
Sound ON
Sound OFF
12HR
24HR
1
2
3
1
2
Slow speed
Normal speed
Fast speed
ON
OFF
1
2
1
2
ON
OFF
ON
OFF
(4 SPEED & ON/OFF)
1. Press the Vent 4 Speed button to set the speed
level.
2. Press the Vent On/Off button to turn the vent on.
3. Press the Vent On/Off button again to turn the
vent off.
VENT DELAY OFF BUTTON
Press the Delay Off button once to turn the fan off after
a certain number of minutes. The number of minutes
depend on how many time you press the button.
re
iiiii i:
st;;;1
1
LIGHT Hi/LO/OFF
2
3
4
5
s
5
10
30
BUTTON
The Light button allows you to select a light setting for
your microwave.
s)
1
High
2Lo
w
3
Off
10 setting up your new microwave oven
SMH1816
XAA 03942A
EN.indd
10
2011-06-10
5:33:24
SET TIMER BUTTON
The shelf gives you the option to reheat more
than one dish at the same time.
You can set the microwave so the light turns on and off
automatically at a preset time. The hght comes on at the
same time every day until reset.
1. Press the Set Timer button.
2. Use the Number button to set the light on time.
3. Press the Enter/Start button.
4. Use the Number button to select AM or PM.
5. Press the Enter/Start button.
6. Use the Number button to set the off time.
7. Press the Enter/Start button.
8. Use the Number button to select AM or PM.
9. Press the Enter/Start button.
ii ¸
yT•: !•i•ySVi(iii/•_•:
xi
Press the Set Timer button and "0" button to
cancel the Set Timer.
TURNTABLE
ON/OFF
BUTTON
For best cooking results, leave the turntable on. However,
for large dishes tt can be turned off.
Press the Turntable On/Off button to turn the turntable
on or off.
The turntable may become too hot to touch. Use
....... pot holders to touch the turntable during and after
cooking.
Reheating
food
To reheat food on 2 levels or to reheat food on the lower
level:
Multiply the reheating time by 11/2.
Switch places halfway through the reheating process.
M ETAL SH ELF
Use the metal shelf to cook more than one item at the
same time.
/k
CAUTION
Do not use a microwave browning dish on the
shelf. The shelf could overheat.
Do not use the oven with the shelf on the
microwave floor. This could damage the
microwave.
Use pot holders when handling the shelf as it
may be hot.
Do not use the metal shelf when cooking
popcorn.
Food cooks best on the turntable.
/
J
b¸
ECO MODE
For best results
•
Eco Mode reduces standby power usage.
When you press the ECO MODE button once, the
display will go out and the microwave shifts to the mode
which minimizes power usage.
To cancel the ECO MODE, press the ECO MODE
button once again, or press any other button.
:_ xxxe ¸:::I•I[ilYU¸:U:i
Uneven results
usng your m orowave oven 11
SMH1816
XAA 03942A
EN.indd
11
2011-06-10
5:33:25
SENSOR COOKING
BUTTONS
The Sensor Cooking buttons let you cook favorite foods using preset power levels and times at the touch of a button.
If the food is not thoroughly cooked or reheated when you use the auto cook feature, complete the cooking process by
selecting a power level and cooking the food for an additional amount of time.
Z_
Do not use the Sensor Cooking
....... food will overcook.
Sensor
cooking
utensils
buttons continuously. The oven must cool for 5 minutes between uses or the
& covers
To obtain good cooking results using these functions, follow the directions for selecting the appropriate containers and
covers in the Cookware section on page 16.
Z_
Always use microwave-safe containers and cover with a lid or plastic wrap. When using plastic wrap, turn back
....... one corner to allow steam to escape.
ik
Fill containers at least half full.
CAUTION
®
®
®
Foods that require stirring or rotating should be stirred or turned at the end of the Sensor Cook cycle, when the
time has started to count down on the display.
Do not use the Auto Sensor cooking feature continuously. Wait 5 minutes before selecting another sensor cooking
operation.
To avoid poor results, do not use the Auto Sensor when the room ambient temperature is too high or too low.
Sensor
cooking
table
3.0 - 3.5 oz.
Popcorn
1 package
Cook
Use only one microwave popcorn bag at a time. Be careful when removing
the heated bag from the oven and opening it. Let the oven cool for at least 5
minutes before using it again.
Beverage
8 oz.
Use a measuring cup or mug and do not cover. Place the beverage in the
oven. After heating, stir well. Let the oven cool for at least 5 minutes before
using it again.
Chicken
breast
8 to 16 oz.
Place the chicken breasts on a microwave safe plate and cover with plastic
wrap. Cook to an internal temperature of 170 °F. Let stand for 5 minutes.
Frozen
breakfast
4 to 8 oz.
Frozen
dinner
8 to 14 oz.
Follow the package instructions for covering and letting stand. Use this
button for frozen sandwiches, breakfast entrees, pancakes, waffles, etc. Let
the oven cool for at least 5 minutes before using it again.
Remove the food from its wrapping and follow the instructions on the box
for covering and letting stand. Let the oven cool for at least 5 minutes before
using it again.
Place the fresh vegetables in a microwave-safe ceramic, glass or plastic dish
Fresh
vegetables
1 to 4 cups
Frozen
vegetables
1 to 4
servings
Veggies
1 to6
Potato
potatoes,
Pizza
1 to 3 slices
SENSOR
and add 2-4 tbs. water. Cover with a lid or vented plastic wrap while cooking
and stir before letting stand. Let the oven cool for at least 5 minutes before
using it again.
Place the frozen vegetables in a microwave-safe ceramic, glass or plastic dish
and add 2-4 tbs. water. Cover with a lid or vented plastic wrap to cook. stir
before letting stand for 3-5 minutes. Let the oven cool for at least 5 minutes
before using it again.
Pierce each potato several times with a fork. Place on the turntable in a
spoke-like fashion. After cooking, let the potatoes stand for 3-5 minutes. Let
the oven cool for at least 5 minutes before using it again.
Place 1-3 pizza slices on a microwave-safe plate with the wide ends of the
slices towards the outside edge of the plate. Do not let the slices overlap. Do
not cover. Let the oven cool for at least 5 minutes before using it again.
REHEAT BUTTON
Heating leftovers and precooked foods is easy with your new microwave. By actually sensing the humidity that
escapes as the food is heated, the oven's heating time is automatically adjusted depending on the type and amount of
precooked food.
[_
All food must ah'eady be precooked. Plates of food and casseroles should be stored at refrigerator temperature.
Press the Sensor Reheat button and Enter/Start button to begin reheating your precooked food. The display
will show RS//E/IT and the oven will start. If you want to check the current time at any time while reheating, press
the Clock button.
12 usng your microwave oven
SMH1816
XAA 03942A
EN.indd
12
2011-06-10
5:33:25
Sensor
reheating
table
Follow the instructions below when reheating different types of food.
Dinner plate
1 serving
(1 plate)
Use only precooked, refrigerated foods.
Cover the plate with vented plastic wrap or waxed paper tucked under the plate. If the
food is not as hot as you would like after using the Sensor Reheat function, continue
heating using additional time and power.
Contents:
3-4 oz. meat, poultry or fish (up to 6 oz. with bone)
1/2cup starch (potatoes, pasta, rice, etc.)
1/2cup vegetables (about 3 - 4 oz.)
1 to4
servings
Cover the plate with a lid or vented plastic wrap. If the food is not as hot as you would
like after using the "Sensor Reheat" function, continue heating using additional time and
power. Stir the food once before serving.
Contents:
Casserole, refrigerated foods.
Pasta: canned spaghetti and ravioli
Casserole
Pasta
AUTO DEFROST
BUTTON
To thaw frozen foods, enter the weight of the food, and the microwave automatically sets the defrosting time, power
level and standing time. Press Enter/Start button to start defrosting.
1. Press the Auto Defrost
button. The display shows: f-NT_.._?V',LFi(7t
77
2. Press the number buttons to directly enter the weight of the food.
3. Press Enter/Start button.
4. The oven will beep and the display will read 7UiTN 77/F/-©©D O/_fT_?twice during the defrosting process. Open
the oven door, and turn the food over.
Auto defrosting
table
Follow the instructions below when defrosting different types of food.
Roast Beef,
Pork
2.5-6.0 Ibs.
Start with the food placed fat side down. After each stage, turn the food over and shield
any warm portions with narrow strips of aluminum foil. Let stand, covered for 10-20
minutes.
Steaks,
Chops,
Fish
0.5-3.0 Ibs.
After each stage, rearrange the food. If there are any warm or thawed portions of food,
shield them with narrow, flat pieces of aluminum foil. Remove any pieces of food that are
nearly defrosted. Let stand, covered for 5-10 minutes.
Ground
Meat
0.5-3.0 Ibs.
After each stage, remove any pieces of food that are nearly defrosted. Let stand, covered
with foil for 5-10 minutes.
Whole
Chicken
2.5-6.0 Ibs.
Remove giblets before freezing poultry. Start defrosting with the breast side down. After
the first stage, turn the chicken over and shield any warm portions with narrow strips of
aluminum foil. After the second stage, again shield any warm portions with narrow strips
of aluminum foil. Let stand, covered for 30-60 minutes in the refrigerator.
Chicken
Pieces
0.5-3.0 Ibs.
After each stage, rearrange or remove any pieces of food that are nearly defrosted. Let
stand for 10-20 minutes.
®
Check the food when you hear the oven signal. After the final stage, small sections may still be icy; let them stand
to continue the thawing process. The food is not defrosted until all ice crystals have thawed. Shielding roasts and
pieces of steak using small pieces of foil prevents the edges from being cooked before the center of the food has
defrosted. Use narrow, flat, smooth strips of aluminum foil to cover edges and thinner sections of the food.
1 POUND
DEFROST BUTTON
To thaw frozen 1.0 Ibs foods, press this button, and the microwave automatically sets the defrosting time, power level
and standing time.
1. Press the 1 Pound Defrost button. The display shows: 1.O/ B.
2. Press the Enter/Start button to start defrosting.
3. The oven will beep and the display will read 7UiTN 77/F/-©©D O/_fT_?twice during the defrosting process. Open
the oven door, and turn the food over.
4. If you do not turn the food over when 77.XTM/77/_-/-©©©O//_.._?is displayed, the oven will pause until you press the
Enter/Start button.
usng
SMH1816
XAA 03942A
EN.indd
13
your microwave
oven
13
2011-06-10
5:33:26
SOFTEN/M
ELT BUTTON
1. Press the Soften/Melt
button. The display will show: ,_;S_'
Fd:_7-M_-NUJ 70 4. (Refer to the Soften/Melt table).
Press the button repeatedly to cycle through the available items.
2. Press the number 1 or 2 buttons to select the amount. Only number 1 (serving) is available for the Melt Chocolate
and Soften Cream Cheese options. (Refer to the Soften/Melt table for the serving size).
3. Press the Start button to begin cooking.
Soften / Melt table
1
1
1 stick (serving)
2
2 sticks (serving)
Remove the wrapping and cut the butter in half vertically.
Place the butter in a dish and cover with wax paper.
Stir well after finishing and let stand for 1-2 minutes.
Melt butter
2
Melt chocolate
1
1 cup chips
or 1 square
Place the chocolate chips or squares in a microwave-safe container.
When the oven beeps, stir the chocolate and restart the oven.
Stir and let stand for 1 minute.
3
Soften butter
1
1 stick
(1/4 Ibs.)
Remove wrapping and cut butter in half vertically.
Place butter in dish, cover with wax paper.
4
Soften cream
cheese
1
1 Package (8-oz)
Unwrap the cream cheese and place on a microwave-safe container.
Cut in half vertically. Let stand for 2 minutes.
KIDS MEALS BUTTON
1. Press the Kids Meals button. The display will show ,_S_'F_:_7/'./_-NUJ 70 4. (Refer to the Kids meals table). Press
the button repeatedly to cycle through the available items.
2. Press the number 1 or 2 buttons to select the amount. (Refer to the Kids meals table for the serving size.)
3. Press the Start button to begin cooking.
Kids meals table
1
2
4
1 serving
Place a paper towel on a plate and arrange the nuggets in a spoke-like
fashion on the paper towel.
Do not cover. Let stand for 1 minute after heating.
2
2 servings
[_
1
1 serving
2
2 servings
_
1
1 sandwich
2
2 sandwiches
Place the frozen sandwich in a susceptor "crisping sleeve" (which is in the
package) and place on a microwave-safe plate.
Remove from the "crisping sleeve".
Let stand for 2 minutes after heating.
1
2 hot dogs
Pierce the hot dogs and place them on a plate.
When the oven beeps, add the buns and restart the oven.
Chicken
nuggets (frozen)
French fries
(frozen)
Frozen
sandwiches (in
3
1
crisping sleeve)
9-oz package
size
Hot dogs
2
4 hot dogs
efer to the package directions for the serving size and the amount of
food.
Place two paper towels on a microwave-safe plate and arrange the French
fries on the towels without letting them overlap.
Blot the fries with additional paper towels after removing from the oven. Let
stand for 1 minute.
Refer to the directions on the packaging for the serving size and the
amount of food.
Let stand for 1 minute after heating.
r_
For the best texture, the buns should be added to the hot dogs when
the oven beeps.
14 usn9 your microwave oven
SMH1816
XAA 03942A
EN.indd
14
2011-06-10
5:33:25
SNACKS
BUTTON
1. Press the Snacks button. The display will show ,_/--_'/-_:_7-/'.//_-NU
7 70 4. (Refer to the snack bar table). Press the
button repeatedly to cycle through the available items.
2. Press the number 1 or 2 buttons to select the serving size. Only number 1 (serving) is available for Nachos. (Refer
to the snack bar table for the serving size).
3. Press the Start button to begin cooking.
Snack bar table
Cheese sticks
(frozen)
1
2
1
5-6 pcs
2
7-10 pcs
1
5-6 oz.
2
7-8 oz.
Chicken wings
Place the cheese sticks on a plate in a spoke-like fashion. Do not cover.
Let stand for 1 to 2 minutes after heating.
Use precooked, refrigerated chicken wings.
Place the chicken wings around the plate in a spoke-like fashion and cover
with wax paper.
Let stand for 1 to 2 minutes.
Place the nachos on a plate without letting them overlap. Sprinkle cheese
evenly over them.
3
Nachos
4
1 serving
Contents:
2 cups tortilla chips
1/3 cup grated cheese
1
1 cooked
potato
2
2 cooked
potatoes
Cut the cooked potato into 4 even wedges. Scoop or cut out the potato flesh,
leaving about a 14 in. of skin.
Place the skins in a spoke-like fashion around the plate.
Sprinkle with bacon, onions and cheese.
Do not cover.
Let stand 1 to 2 minutes.
Potato skins
MICROWAVE
COOKING
TIMES & POWER LEVELS
Your oven allows you to set two different cooking stages, each with its own time length and power level. The power level lets you
control the heating intensity from Warm (1) to High (10).
One-stage
cooking
For simple one-stage cooking, you only need to set the cooking time. The power level is automatically set to High. If you
want to set the power level to any other level, use the Power Level button.
1. Use the number buttons to set a cooking time. You can enter a time from one second right up to 99 minutes and
99 seconds. To select a time greater than one minute, enter the seconds too. (For example, to set a cooking time
of 20 minutes, enter 2, O, O, 0.)
2. If you want to set the power level to a level other than High, press the Power Level button and use the number
buttons to enter the power level. The display will show: _/_W_S S71x/R7OR SN7_.._?
N_7 Si_I#I;EO00_?'MiC 77_/E.
3. Press the Start button to begin cooking. If you want to change the power level, press the Stop/Clear
before you press the Start button, and enter all the instructions again.
(_
button
ome recipes
cooking
stages.require different cooking stages at different temperatures. Your microwave allows you to set multiple
Multi-stage
cooking
1. Follow steps 1 and 2 from the "One-stage cooking" section. The display will show: _0_\'_,<},_77/R7OR SN7_.._?
NEXT $7710EOOO/<?/WC77,A./_.
2. Press the Power Level button.
3. Use the number buttons to set a second cooking time.
4. Press the Power Level button, then use the number buttons to set the power level for the second cooking
stage. The display shows the selected power level and then displays Pf_i%'S $77/R7 OR SNT_.._?
NE}{7 S77/GE
OOO/<iNG 77AXe.
5. Press the Start button to begin cooking, or repeat steps 2 and 3 to set a cooking time and power level for a third
cooking stage. When finished, press the Start button.
[_To
set the Power Level to 10, press the Power Level button twice.
using your microwave
SMH1816
XAA 03942A
EN.indd
15
oven
_15
2011-06-10
5:33:26
Power Levels
The 10 power levels allow you to choose the optimal
power level for your cooking needs.
1
Warm
Simmer
3
Low
Defrost
8
Medium high
Reheat
4
Medium low
9
Saut@
5
Medium
10
High
CUSTOM
COOK BUTTON
For food to cook in the microwave oven, the
microwaves must be able to penetrate the food
without being reflected or absorbed by the dish,
It is important to choose the correct cookware,
therefore, look for cookware that is marked
microwave-safe,
The following table lists various types of
cookware and indicates if and how they should
be used in a microwave oven,
The Custom Cook button lets you store a customized
set of cooking instructions, and recall this setting later
from memory to begin cooking quickly.
[_
!
Only one set of instructions can be stored at a time.
1. Press the Custom Cook button. The display shows
7OUCt 7S7XR7 OR h-N77-7?
NFYV 77,AXi-.
2,
Use the number buttons to enter the cooking time.
The display will show the set time.
3, Press the Power level button and use the number
buttons to enter the power level. The display will show
the selected power level. You can set the power level
from 0 to 9.
4, Press the Enter/Start button again.
5. To retrieve a Custom Cook setting, press the Custom
Cook button, then press the Enter/Start button.
You can only recall one stored Custom Cook setting
at a time.
MICROWAVE-SAFE
UTENSILS
If you are not sure whether an item is microwave-safe or
not, you can perform the following simple test:
1, Place 1 cup of water (in a glass-measuring cup) inside
your oven next to the item to be tested.
2, Press the Add 30 Sec, button twice to heat them
both for one minute at high power.
After one minute, the water should be warm and the item
you are testing should be cool. If the dish is warm, then
it is absorbing microwave energy and is not microwavesafe.
You can check the power level anytime while
cooking by pressing the Power Level button.
Aluminum
WARM & HOLD
You can keep cooked food warm in your microwave oven
for up to 99 minutes 99 seconds.
1. Press Warm Hold button.
2. Enter the cooking time.
3. Press Enter/Start button.
Warm
& Hold operates for up to 99 minutes 99
seconds.
[_
ood that is cooked covered
covered during Warm & Hold.
should also be
[_
astry items (pies, turnovers, etc.) should be
uncovered during Warm & Hold.
_
omplete meals kept warm on a dinner plate can
be covered during Warm & Hold.
Below are the amounts of food we recommend you apply
the Warm and Hold function to by Food Type.
SMH1816
XAA 03942A
EN.indd
16
foil
a
Can be used in small quantities
to protect areas against
overcooking. Arcing can occur
if the foil is too close to the oven
wall or you use too much foil.
Browning
plate
Do not preheat for more than
eight minutes.
Ceramic,
porcelain,
and
stoneware
Porcelain, pottery, glazed
earthenware and bone china are
usually suitable, unless decorated
with a metal trim.
Disposable
polyester
cardboard
Some frozen foods are packaged
in these materials.
Fast-food
packaging
Polystyrene
cups/
containers
Can be used to warm food.
Overheating may cause the
polystyrene to melt.
Paper bags or
newspaper
May catch fire.
Recycled
paper or metal
trims
May cause arcing.
2011-06-10
5:33:26
Glassware
Oven-to-table
ware
Can be used, unless decorated
with a metal trim.
Fine
glassware
Can be used to warm foods or
liquids. Delicate glass may break
or crack if heated suddenly.
Glass jars
Regular glass is too thin to be
used in a microwave, and can
shatter.
Metal
Dishes,
Utensils
May cause arcing or fire.
Freezer bag
twist ties
May cause arcing or fire.
Paper
Plates, cups,
napkins and
kitchen paper
For short cooking times and
warming. Also to absorb excess
moisture.
Recycled
paper
Do not use recycled paper towels,
which may contain metal and may
catch fire or cause arcing.
Plastic
Containers
,/
Can be used if heat-resistant
thermoplastic. Some plastics
may warp or discolor at high
temperatures. Do not use
Melamine plastic.
Cling film
,/
Can be used to retain moisture.
Avoid wrapping the food too
tightly. Take care when removing
the film as hot steam will escape.
Freezer bags
Only if boilable or oven-proof.
Should not be airtight. Pierce with
a fork if necessary.
Wax
Can be used to retain moisture
and prevent spattering.
or
grease-proof
paper
Microwave energy actually penetrates food,
attracted and absorbed by timewater, fat and
sugar in the food, Timemicrowaves cause the
m6]ecules in the food to move rapidly, The rapid
movement of these molecules creates friction
and time resulting heat cooks timefood,
GENERAL
MICROWAVE
TIPS
Dense foods, such as potatoes, take longer to heat
than lighter foods. Foods with a delicate texture should
be heated at a low power level to prevent them from
becoming tough.
Foods with a non-porous skin such as potatoes or hot
dogs, should be pierced to prevent bursting.
Putting heating oil or fat in the microwave is not
recommended. Fat and oil can suddenly boil over and
cause severe burns.
Some ingredients heat faster than others. For example,
the jelly in a jelly doughnut will be hotter than the dough.
Keep this in mind to avoid burns.
The altitude and the type of cookware you are using
can affect the cooking time. When trying a new recipe,
use the minimum cooking time and check the food
occasionally to prevent overeooking.
Home canning in the microwave oven is not
recommended because not all harmful bacteria may be
destroyed by the microwave heating process.
Although microwaves do not heat the cookware, the heat
from the food is often transferred to the cookware. Always
use pot holders when removing food from the microwave
and instruct children to do the same.
Making candy in the microwave is not recommended as
candy can be heated to very high temperatures. Keep this
in mind to avoid injury.
Cooking
techniques
If the oven is set to cook for more than 25 minutes, it
will automatically adjust to 70 percent power after 25
minutes to avoid overcooking.
Stirring
Thermometer
Use only those marked
"Microwave-safe" and follow the
directions. Check the temperature
in several places. You can use
conventional thermometers once
the food has been removed from
the oven.
Open the microwave door and stir foods such as
casseroles and vegetables occasionally while cooking
to distribute heat evenly. Food at the outside of the dish
absorbs more energy and heats more quickly, so stir
from the outside towards the center. The oven will turn off
when you open the door to stir your food.
Straw,
wicker, and
wood
Use only for short-term heating,
as these materials can be
flammable.
Arrangement
Recommended to use
z&
Arrange unevenly shaped foods, such as chicken pieces
or chops, with the thicker, meatier parts toward the
outside of the turntable where they can receive more
microwave energy. To prevent overcooking, place thin or
delicate parts towards the center of the turntable.
Use with Caution
Unsafe to use / Do not use
Shielding
Shield food with narrow strips of aluminum foil to prevent
overcooking. Areas that need shielding include poultry
wing-tips, the ends of poultry legs, and corners of square
baking dishes. Use only small amounts of aluminum foil.
Larger amounts can damage your oven.
cookng gude
SMH1816
XAA 03942A
EN.indd
17
17
2011-06-10
5:33:27
Turning
Turn foods over midway through the cooking cycle
to expose all parts to the microwave energy. This is
especially important with large items such as roasts.
Beef
Standing
Foods cooked in the microwave build up internal heat
and continue to cook for a few minutes after the oven
stops. Let foods stand to complete the cooking process,
especially foods such as roasts and whole vegetables.
Roasts need this time to complete cooking in the center
without overcooking the outer areas. All liquids, such as
soup or hot chocolate should be shaken or stirred when
cooking is complete. Let liquids stand a moment before
serving. When heating baby food, stir well and test the
temperature before serving.
Adding
moisture
Microwave energy is attracted to water molecules. Food
that is uneven in moisture content should be covered or
allowed to stand so that the heat disperses evenly. Add a
small amount of water to dry food to help it cook.
Pork
Poultry
Rare
135 °F
145 °F
Medium
150 °F
160 °F
Well Done
160 °F
170 °F
Medium
150 °F
160 °F
Well Done
160 °F
170 °F
Dark meat
170 °F
180 °F
Light meat
160 °F
170 °F
COOKING
POULTRY
Place the poultry on a microwave-safe roasting rack in a
microwave-safe dish and cover with wax paper to prevent
spattering. Use aluminum foil to shield the bone tips, thin
pieces of meat, or areas that may start to overcook.
Check the temperature in several places before letting the
poultry stand the recommended time.
Venting
After covering a dish with plastic wrap, vent the plastic
wrap by turning back one corner to let excess steam
escape.
COOKING
MEAT
Place the meat fat side down on a microwave-safe
roasting rack in a microwave-safe dish. Use narrow strips
of aluminum foil to shield any bone tips or thin pieces of
meat. Check the temperature in several places before
letting the meat stand the recommended time.
The following temperatures are the removal temperatures.
The temperature of the food will rise during standing time.
Roast beef Cooking Time:
3-9 min. /lb. for
(boneless)
Up to 4 Ibs. 145 °F - Rare
10-15 min./lb, for
160 °F - Medium
12-17 min./lb, for
170 °F - Well Done
Power Level:
High (10) for first
5 minutes, then
Medium (5).
Pork
Cooking Time:
(boneless
13-17 min. /lb. at
or bone-in) 170 °F Well Done
Up to 4 Ibs.
Power Level:
High (10) for first
5 minutes, then
Medium (5).
Place the roast fatside down on the
roasting rack and
cover with wax paper.
Turn over halfway
through the cooking
srocess. Let stand for
10 to 15 minutes.
Whole
chicken
Up to 4
Ibs.
Cooking Time:
7-11 min. /lb.
180 °F dark
meat
17O °F light
meat
Power Level:
Medium High
(7).
Chicken
pieces
Up to 2
Ibs.
Cooking Time:
7-10 min./lb.
180 °F dark
meat
17O °F light
meat
Power Level:
Medium High
(7).
Place the chicken breastside down on the roasting
rack. Cover with wax paper.
Turn over half way through
cooking process. Cook until
the juices run clear and the
meat near the bone is no
longer pink. Let stand for
5-10 minutes.
Place the chicken bone-side
down on the dish, with the
thickest portions towards
the outside of the dish.
Cover with wax paper. Turn
over halfway through the
cooking process. Cook until
the juices run clear and the
meat near the bone is no
longer pink. Let stand for
5-10 minutes.
Place the roast fatside down on the
roasting rack and
cover with wax paper.
Turn over halfway
through cooking
srocess. Let stand for
10 to 15 minutes.
The following temperatures are the removal temperatures.
The temperature of the food will rise during standing time.
Expect a 10 °F rise in temperature during the standing
time.
18 cooknggude
SMH1816
XAA 03942A
EN.indd
18
2011-06-10
5:33:27
COOKING
SEAFOOD
Place the fish on a microwave-safe roasting rack in a
microwave-safe dish. Use a tight cover to steam the fish.
A lighter cover of wax paper or paper towel will decrease
steaming. Cook the fish until it flakes easily with a fork. Do
not over cook fish. Check it after the minimum cooking
time.
Tuna steaks
and salmon
steaks
Up to 1.5
Ibs.
Fillets
Up to 1.5
Ibs.
Cooking
Time:
6-10 min./lb.
Power Level:
Medium-High
(7).
Cooking
Time:
4-8 min. /lb.
Power Level:
Medium-High
(7).
Shrimp
Up to 1.5
Ibs.
Cooking
Time:
4-6 min. /lb.
Power Level:
Medium-High
(7).
Arrange the steaks on
a roasting rack with the
meaty portions towards
the outside of the rack.
Cover with wax paper.
Turn them over halfway
through the cooking
)rocess. Cook until the
fish flakes easily with a
fork. Let stand for 3-5
minutes.
Arrange the fillets in a
baking dish, tucking any
thin pieces under. Cover
with wax paper. If the
fillets are thicker than 1/2
in., turn them over halfway
through the cooking
)rocess. Cook until the
fish flakes easily with a
fork. Let stand for 2-3
minutes.
Arrange the shrimp in
a baking dish without
overlapping or layering
them. Cover with wax
paper. Cook until firm
and opaque, stirring 2 or
3 times. Let stand for 5
minutes.
the tips toward the center.
When cooking cut vegetables, always cover the dish with
a lid or vented microwavable plastic wrap.
Whole, unpeeled vegetables such as potatoes, squash,
eggplant, etc., should have their skins pierced in several
spots before cooking to prevent them from bursting.
For a more even cooking result, stir or rearrange whole
vegetables halfway through the cook time.
Generally, the denser the food, the longer the standing
time. (The standing time refers to the time necessary for
dense, large foods and vegetables to finish cooking after
they come out of the oven.) A baked potato can stand on
the counter for five minutes before cooking is completed,
while a dish of peas can be served immediately.
RECIPES
Beef and barley stew
11_ Ibs. beef stew cubes, cut into l_-inch pieces
1_2cup chopped onion
2 Tbs. all-purpose flour
1 Tbs. Worcestershire sauce
1 can (13.75-14.5 oz.) beef broth
2 medium carrots, cut into l_-inch slices (about 1 cup)
1_ cup barley
1 bay leaf
1Atsp. pepper
1 pkg. (9-10 oz.) frozen peas, thawed
1. In a 2-quart casserole, combine the beef, onion, flour,
and Worcestershire sauce and mix well. Cover with
lid. Cook at High for 6 to 8 minutes until the beef is no
longer pink, stirring once.
2. Stir in beef broth, carrots, barley, bay leaves, and
pepper. Cover with lid. Cook at Medium for 1 to 11_
hours until carrots and beef are tender, stirring 2 to 3
times.
3. Stir in peas. Cover with lid. Cook at Medium for 10
minutes. Let stand for 10 minutes. Remove bay leaves
before serving.
Makes 6 servings.
Broccoli
COOKING
EGGS
You can use your microwave oven to cook eggs. Cook
them until they are just set as they become tough if they
are overcooked.
A
.......
Never cook eggs in their shells and never warm
up hard-boiled eggs in their shells. Eggs cooked
or warmed up in their shells can explode. Always
pierce whole eggs to keep them from bursting.
COOKING
VEGETABLES
Vegetables should be washed prior to cooking. Usually,
no extra water is needed. When cooking dense
vegetables such as potatoes, carrots and green beans,
add about 1Acup water.
Small vegetables (sliced carrots, peas, lima beans, etc.)
will cook faster than larger ones.
Whole vegetables, such as potatoes, acorn squash or
corn on the cob, should be arranged in a circle on the
turntable before cooking. They will cook more evenly if
turned over halfway through the cooking process.
Always place vegetables such as asparagus and broccoli
with the stems pointing towards the edge of the dish and
and cheese
casserole
1Acup butter or margarine
1Acup chopped onion
11/2Tbs. flour
1_ tsp. salt
1Atsp. dry mustard
1/8 tsp. pepper
11_ cups milk
1Acup chopped red pepper
8 oz. (2 cups) cheddar cheese, shredded
1 pkg. (9-10 oz.) frozen chopped broccoli, thawed
4 cups cooked spiral shaped pasta (8 oz. dry)
1. In a 2-quart casserole, cook butter and onion at High
for 1 to 2 minutes until the onion is soft, stirring once.
2. Add flour, salt, mustard, and pepper; mix well. Cook
at High for 30 to 60 seconds until mixture boils. Stir in
milk until smooth.
3. Stir in red pepper. Cook at High for 2 to 3 minutes
until mixture boils and thickens slightly, stirring twice.
Stir in cheese until melted.
4. Add broccoli and pasta. Mix well. Cover with lid. Cook
at High for 4 to 6 minutes until heated through, stirring
once. Stir before serving.
Makes 6 servings.
cookng gude
SMH1816
XAA 03942A
EN.indd
19
19
2011-06-10
5:33:27
Warm potato
salad
2 Ibs. small red potatoes, cut into l_-inch pieces
4 slices bacon (uncooked), cut into l_-inch pieces
1Acup chopped onion
2 tsp. sugar
1 tsp. salt
1 tsp. flour
1_ tsp. celery seed
1/8 tsp. pepper
21_ Tbs. apple cider vinegar
1. In a 2-quart casserole, combine the potatoes and
1Acup water. Cover with lid. Cook at High until the
potatoes are tender (7-10 minutes); stir twice. Drain
and set aside to cool slightly.
2. In a medium bowl, cook the bacon at High until crisp
(21/2-31/2
minutes); stir once. Place the bacon on a
paper towel. Reserve 1 Tbs. drippings.
3. Combine the drippings and onion. Cover with plastic
wrap; turn a corner back to vent steam. Cook at High
until tender (11_2-21_minutes); stir once.
4. Stir in sugar, salt, flour, celery seed, and pepper.
Cook at High until mixture boils (30-40 seconds). Stir
in vinegar and 1/2cup water. Cook at High until liquid
boils and thickens slightly (1-2 minutes); stir once.
Add bacon to dressing. Pour dressing over potatoes.
Stir well.
Makes 6 servings.
Keeping your microwave oven clean improves
its performance, wards off unnecessary repairs,
and lengthens its life,
CLEANING
THE EXTERIOR
It's best to clean spills on the outside of your microwave
oven as they occur. Use a soft cloth and warm, soapy
water. Rinse and dry.
Do not get water into the vents. Never use abrasive
....... products or chemical solvents such as ammonia or
alcohol as they can damage the appearance of your
microwave.
Cleaning
under
your microwave
oven
Regularly clean grease and dust from the bottom of your
microwave using a solution of warm water and detergent.
Black bean soup
Cleaning
1 cup chopped onion
1 clove garlic, minced
2 cans (15 oz. each) black beans, drained
1 can (14-16 oz.) stewed tomatoes, chopped
1 can (13.75-14.5 oz.) chicken broth
1 can (7-8.5 oz.) corn
1 can (4 oz.) chopped green chilies
1-2 tsp. ground cumin
1. Place the onion and garlic in a 3-quart casserole.
Cover with lid. Cook at High for 2 to 4 minutes until
tender.
2. Add one can of beans, and mash the beans with a
fork. Add remaining ingredients and mix well.
3. Cook uncovered at High for 10 minutes; stir. Reduce
power to Medium and cook for 5 minutes. Stir before
serving.
Wipe with a damp cloth and dry thoroughly. Do not
use cleaning sprays, large amounts of soap and water,
abrasives or sharp objects on the panel as it is easily
damaged.
Makes about 2 quarts.
Cleaning
the control
panel
the door and door seals
Always ensure that the door seals are clean and that the
door closes properly. Take particular care when cleaning
the door seals to ensure that no particles accumulate and
prevent the door from closing correctly. Wash the glass
door with very mild soap and water. Be sure to use a soft
cloth to avoid scratching.
If a thin film of water accumulates on the inside or outside
of the oven door, wipe it off with a soft cloth. A thin water
film can accumulate when you operate the oven at high
humidity and in no way indicates microwave leakage.
CLEANING
THE INTERIOR
Ensure that the microwave oven has cooled down
....... before cleaning it to avoid injury.
Remove the glass tray from the oven when cleaning
....... the oven or tray. To prevent the tray from breaking,
handle it with care and do not put it in water
immediately after cooking. Wash the tray carefully in
warm sudsy water or in the dishwasher.
Clean the interior surfaces (oven cavity) of your microwave
oven periodically to remove any splashes or stains. To
remove hardened food articles and remove smells, place
2 cups of water (add lemon juice for extra freshness) into
a four-cup measuring glass. Run the microwave at High
power for 5 minutes or until the water boils. Let water
stand in the oven for one or two minutes.
20 c ean ng and maintain n9 your m crowave oven
SMH1816
XAA 03942A
EN.indd
20
2011-06-10
5:33:27
÷
CLEANING THE TURNTABLE
ROLLER RINGS
AND
6. Remove the cover by pushing the hook and pulling up
the lever.
7.
8.
9.
10.
11.
Clean the roller rings periodically and wash the turntable
as required. You can wash the turntable safely in your
dishwasher.
STORING AND REPAIRING
M ICROWAVE OVEN
YOUR
Remove
Replace
Replace
Replace
Turn the
the bulb by turning it gently.
the bulb with a 40 watt appliance bulb.
the bulb holder.
the vent grille and the 2 screws.
power back on.
If you need to store your microwave oven for a short or
extended period of time, choose a dust-free, dry location.
Dust and dampness may adversely affect the ability of the
microwave parts.
WARNING
• Do not repair, replace or service any part of your
microwave oven yourself. Allow only a qualified
service technician to perform repairs. If the oven
is faulty and needs servicing, or you are in doubt
about its condition, unplug the oven from the
power outlet and contact your nearest service
center.
Do not use the oven if it is damaged, in
particular, if the door or door seals are damaged.
Door damage includes a broken hinge, a worn
out seal, or distorted/bent casing.
Do not remove the oven from its casing.
CLEANING
This microwave oven is for home use only and is
not intended for commercial use.
REPLACING
LIGHT
THE GREASE FILTER
Your microwave oven has two metal reusable grease
filters. The grease filters should be removed and cleaned
at least once a month, or as required.
THE COOKTOP/NIGHT
/_
To avoid risk of personal injury or property damage,
.......
_
do not operate the oven hood without the filters in
place.
When replacing the cooktop/night light, make sure that
you are wearing gloves to avoid injury from the heat of the
bulb.
1.
To remove the filter, slide it to the left (or right) using
the tab.
2.
Soak the grease filter in hot water and a mild
detergent. Rinse well and shake to dry. Brushing the
filter lightly can remove embedded dirt.
1. Unplug the oven or turn off the power at the main
power supply.
2. Remove the screw from the light cover and lower the
cover.
3. Replace bulb with 40 watt incandescent bulb.
4. Replace the light cover and mounting screw.
5 Turn the power back on at the main power supply.
ADo
not use ammonia or put the grease filter in the
....... microwave oven. The aluminum will darken.
REPLACING
THE OVEN LIGHT
When replacing the oven light, make sure that you are
wearing gloves to avoid injury from the heat of the bulb.
1. Unplug the oven or turn off the power at the main
power supply.
2. Open the door.
3. Remove the vent cover mounting screws (2 middle
3. To return the filter to its position, slide it into the frame
slot on the left (or right), then push it upwards and to
the right (or left) to lock it.
screws).
4. Slide the vent grille to the left, then pull it straight out.
5. Remove the charcoal filter, if present.
cleaning and maintaining your m crowave oven 21
SMH 1816_XAA_O3942A_EN.indd
21
4_
2011-06-10
5:33:36
÷
REPLACING
THE CHARCOAL
FILTER
If your oven is vented to the inside, the charcoal filter
should be replaced every 6 to 12 months and more often
if necessary. The charcoal filter cannot be cleaned. To
order a new charcoal filter, contact the Parts Department
at 1-800-627-4368 or your Samsung dealer. You can also
order online at www.samsungparts.com
1. Unplug the oven or turn off the power at the main
power supply.
2. Open the door.
3. Remove the vent grille mounting screws (2 middle
screws).
4. Slide the vent grille to the left, then pull it straight out.
5. Push the hook and remove the old filter.
Check these solutions
with your microwave:
The display
and/or the oven
is not working.
Make sure the plug is properly
connected to a grounded outlet.
If the wall outlet is controlled by a wall
switch, make sure the wall switch is
turned on.
Remove the plug from the outlet, wait
ten seconds, and plug it in again.
Reset the circuit breaker or replace
any blown fuses.
Plug a different appliance into the
outlet. If the other appliance doesn't
work, call a qualified electrician to
repair the wall outlet.
Plug the oven into a different outlet.
The display
is working,
but the power
won't come on.
Make sure the door is closed securely.
Check if any packaging material or
anything else is stuck in the door seal.
Check if the door is damaged.
Touch Cancel twice and enter all the
cooking instructions again.
Is the power
going off before
the set time has
elapsed?
If there was a power outage, the time
indicator will display: 88:88.
If no power outage occurred,
remove the plug from the outlet, wait
ten seconds, and plug it in again.
Reset the clock and any cooking
instructions.
Reset the circuit breaker or replace
any blown fuses.
Cooks food too
slowly.
Make sure the oven has its own 20
amp circuit line. Operating another
appliance on the same circuit can
cause a voltage drop. If necessary,
move the oven to its own circuit.
Has sparks or
arcing.
Remove any metallic utensils,
cookware, or metal ties. If using foil,
use only narrow strips and allow at
least one inch between the foil and the
interior oven walls.
The turntable
makes noise
or becomes
stuck.
Clean the turntable, roller ring and
oven floor.
Make sure the turntable and roller ring
are positioned correctly.
Causes TV
or radio
interference.
This is similar to interference caused
by other small appliances, such as
hair dryers. Move your microwave
(or appliance) away from appliances,
such as your TV or radio.
The angle
6o Slide a new charcoal filter into place. The filter should
rest at the angle shown.
7. Replace the vent grille and 2 screws and close the
door. Turn the power back on and set the clock.
The angle
SMH 1816_XAA_03942A_EN.indd
22
4_
if you have a problem
2011-06-10
5:33:57
elect, at our option, to provide for transportation of our choice
to and from a SAMSUNG authorized service center. Otherwise,
transportation to and from the SAMSUNG authorized service
center is the responsibility of the purchaser.
Specifications
Timer : 99
minutes, 99
Controls
: 10
power levels,
seconds
including
Power Source '
120 VAC, 60 Hz
Power Output
1100 Watts
Power
Consumption
1700 Watts
Net/Shipping
Weight
ST : 51.8/61.2
Ibs
B / W ' 50.4/59.7
Ibs
Outside
Dimensions
29 7/s"(W) X 16
Oven Cavity
Dimensions
20 WId'(W)
Shipping
Dimensions
33 s/s"(W) X 19 74d'(m) X 20 '_&d'(U)
Oven Cavity '
1.8 cu ft
:
15/1_"(H
)
defrost
:
X 17 5/ld'(U)
X 10 W16"(H) X 14 9/16"(D)
This limited warranty covers manufacturing defects in materials
and workmanship encountered in normal, noncommercial use of
this product and shall not apply to the following, including, but
not limited to: damage which occurs in shipment; delivery and
installation; applications and uses for which this product was not
intended; altered product or serial numbers; cosmetic damage
or exterior finish; accidents, abuse, neglect, fire, water, lightning
or other acts of nature; use of products, equipment, systems,
utilities, services, parts, supplies, accessories, applications,
installations, repairs, external wiring or connectors not supplied
or authorized by SAMSUNG which damage this product or result
in service problems; incorrect electrical line voltage, fluctuations
and surges; customer adjustments and failure to follow
operating instructions, cleaning, maintenance and environmental
instructions that are covered and prescribed in the instruction
book; problems caused by pest infestations, and overheating or
overcooking by user; glass tray or turntable; reduced magnetron
power output related to normal aging. SAMSUNG does not
warrant uninterrupted or error-free operation of the product.
THERE ARE NO EXPRESS WARRANTIES OTHER THAN
\
THOSE LISTED AND DESCRIBED ABOVE, AND NO
WARRANTIES WHFHER EXPRESS OR IMPLIED, INCLUDING,
BUT NOT LIMITED TO, ANY IMPLIED WARRANTIES OF
MERCHANTABILITY OR FITNESS FOR A PARTICULAR
SAMSUNG OVER-THE-RANGE
M ICROWAVE OVEN
PURPOSE, SHALL APPLY AFTER THE EXPRESS WARRANTY
PERIODS STATED ABOVE, AND NO OTHER EXPRESS
WARRANTY OR GUARANTY GIVEN BY ANY PERSON, FIRM
OR CORPORATION WITH RESPECT TO THIS PRODUCT
SHALL BE BINDING ON SAMSUNG. SAMSUNG SHALL
Limited
warranty
to original
(OTR)
purchaser
This SAMSUNG brand product, as supplied and distributed by
Samsung Electronics America, Inc. (SAMSUNG) and delivered
new, in the original carton to the original consumer purchaser,
is warranted by SAMSUNG against manufacturing defects in
materials and workmanship for a limited warranty period of:
ONE (1) YEAR PARTS AND LABOR, TEN (10) YEARS
PARTS WARRANTY FOR MAGNETRON
This limited warranty begins on the original date of purchase,
and is valid only on products purchased and used in the United
States. To receive warranty service, the purchaser must contact
SAMSUNG for problem determination and service procedures.
Warranty service can only be performed by a SAMSUNG
authorized service center. The original dated bill of sale must be
presented upon request as proof of purchase to SAMSUNG or
SAMSUNG's authorized service center.
SAMSUNG will repair or replace this product, at our option and
at no charge as stipulated herein, with new or reconditioned
parts or products if found to be defective during the limited
warranty period specified above. All replaced parts and products
become the property of SAMSUNG and must be returned to
SAMSUNG. Replacement parts and products assume the
remaining original warranty, or ninety (90) days, whichever is
longer.
In-home service will be provided during the warranty labor
period subject to availability within the contiguous United States.
In-home service is not available in all areas. To receive in-home
service, the product must be unobstructed and accessible to
service personnel. If during in-home service repair can not be
completed, it may be necessary to remove, repair and return
the product. If in-home service is unavailable, SAMSUNG may
NOT BE LIABLE FOR LOSS OF REVENUE OR PROFITS,
FAILURE TO REALIZE SAVINGS OR OTHER BENEFITS, OR
ANY OTHER SPECIAL, INCIDENTAL OR CONSEQUENTIAL
DAMAGES CAUSED BY THE USE, MISUSE OR INABILITY
TO USE THIS PRODUCT, REGARDLESS OF THE LEGAL
THEORY ON WHICH THE CLAIM IS BASED, AND EVEN IF
SAMSUNG HAS BEEN ADVISED OF THE POSSIBILITY OF
SUCH DAMAGES. NOR SHALL RECOVERY OF ANY KIND
AGAINST SAMSUNG BE GREATER IN AMOUNT THAN THE
PURCHASE PRICE OF THE PRODUCT SOLD BY SAMSUNG
AND CAUSING THE ALLEGED DAMAGE. WITHOUT LIMITING
THE FOREGOING, PURCHASER ASSUMES ALL RISK AND
LIABILITY FOR LOSS, DAMAGE OR INJURY TO PURCHASER
AND PURCHASER'S PROPERTY AND TO OTHERS AND THEIR
PROPERTY ARISING OUT OF THE USE, MISUSE OR INABILITY
TO USE THIS PRODUCT SOLD BY SAMSUNG NOT CAUSED
DIRECTLY BY THE NEGLIGENCE OF SAMSUNG. THIS LIMITED
WARRANTY SHALL NOT EXTEND TO ANYONE OTHER
THAN THE ORIGINAL PURCHASER OF THIS PRODUCT,
IS NONTRANSFERABLE AND STATES YOUR EXCLUSIVE
REMEDY.
Some states do not allow limitations on how long an implied
warranty lasts, or the exclusion or limitation of incidental or
consequential damages, so the above limitations or exclusions
may not apply to you. This warranty gives you specific legal
rights, and you may also have other rights which vary from state
to state.
To obtain warranty service, please contact SAMSUNG at:
1-800-SAMSUNG
samsung.com
(726-7864)
or www.
warranty 23
SMH1816
XAA 03942A
EN.indd
23
2011-06-10
5:33:68
Scan the QR code* or visit
www.samsung.com/spsn
to view our helpful
How-to Videos and Live Shows
*Requires reader to be installed
Scan this with
your
on your sma_tphone
smartphone
QUESTIONS OR COMMENTS
CANADA
1-800-SAMSUNG
MEXICO
01-800-SAMSUNG
U.S.A
1-800-SAMSUNG
(726-7864)
(726-7864)
www.samsung.com
(726-7864)
Code No. DE68-03942A
SMH1816
XAA 03942A
EN.indd
24
2011-06-10
5:33:58
iiiiii_i_}
i_i_
_!_i_/i!_iiiiii_
_i_i
i_i!_i
i_
_I}_ _!i:_ilJ _
_!_ _:
manual del usuario
100%
\
Recycled
Paper
DaDel 100 oYoreclcladS:,
las posibilidades
ESPANOL
Gracias oor naoer escogido este uroducto
Samsung. Por favor, registre su Droductoen
www.samsung.com/register
1-800-SAMSUNG(726-7864)
8MH1816
XAA 03942A
Mes.indd
1
2011-06-10
5:34:22
SiMBOLOS
YPRECAUCIONES
DE
SEGURIDAD
IMPORTANTES
Significado de iconos y simbolos en este
manual del usuario:
Felicitaciones pot haber adquirido su nuevo homo
de mioroondas Samsung. Este manua oontiene
informacbn importante aoeroa de la instalaobn,
el usov el ouidado de su electrodom6stioo. Lea
detenidamente el manual y podrS,ad aproveohar
todas las ventajas y las funoiones del Homo de
mioroondas.
LOQUENECESITA
SABER
SOBRE
LASINSTRUCClONES
DE
SEGURIDAD
Peligros o procedimientos
inseguros que pueden
ocasionar graves
lesiones en las
ADVERTENClA
POSlBLE
EXPOSICION
A ENERGiA
PRECAUClON
lesiones personales
cuando utilice el homo de
PRECAUClON
microondas,
instrucciones
siga estas
basicas de
seguridad.
NO intentar.
NO desarmar.
[_
NO tocar.
Seguir las instrucciones fielmente.
Co No haga funcionar el homo siesta, daflado. Es de especial
importancia que la puerta del homo cierre correctamente y que
no haya daflos en:
Desenchufe el cable de alimentaci6n
del tomacorriente.
1. la puerta (doblada),
2. las bisagras y los pestillos (rotos o sueltos),
&
o dafios
Para reducir el riesgo
de incendio, explosi6n,
descarga electrica o
No intente hacer funcionar este homo con la puerta abierta
dado que el funcionamiento con la puerta abierta puede
dar como resultado una exposicion nociva a energia de
microondas. Es importante no alterar ni modificar las trabas de
seguridad.
Bo No coloque ningL]n objeto entre la parte delantera del horno
y la puerta ni deje que se acumule suciedad o residuos de
limpiadores en la superficie de sellado.
la muerte.
en ias personas
en la propiedad.
DEMICROONDAS
EXCESIVA
A.
e, incluso,
provocar
Peligros o procedimientos
inseguros que pueden
ocasionar lesiones leves
Las advertencias y las instrucciones de seguridad importantes
de este manual no cubren todos los problemas y situaciones que
podrian ocurrir. Es su responsabilidad usar el sentido coraL]n, ser
precavido y cuidadoso al instalar, mantener y manejar su homo de
microondas.
PRECAUCIONES
PARAEVITAR
LA
personas
AsegOrese de que el aparato tenga
conexi6n a tierra para evitar una
Las juntas de la puerta y la superficie de sellado.
Do $61o personal del servicio tecnico adecuadamente calificado
debe ajustar o reparar este homo. No intente ajustar o reparar
este homo usted mismo.
descarga
electrica.
Comunfquese con el Centro de Servicio
Tecnico para obtener ayuda.
[_)
Nota
Estos simbolos de advertencia est_.n aqui
para evitar flue usted u otras personas sufran
lesiones. Sigalos explicitamente. Una vez que
haya leido esta secci6n, cons6rvela en un[ugar
seguro para consultas futuras.
CONSERVE
ESTASINSTRUCCIONES
2 informaci6n sobre seguridad
SMH1816
XAA 03942A
Mes.indd
2
2011-06-10
5:34:23
INSTRUCCIONES
DESEGURIDAD
IMPORTANTES
AI utilizar cualquier electrodom_stico,
se deben
precauciones
de seguridad bb.sicas, a saber:
17. Para reducir el riesgo de incendio en el interior del homo.
ao No cocine los alimentos en exceso. Preste atenci6n al
electrodomestico cuando coloque en su interior papel,
plastico u otros materiales combustibles para facilitar la
cocci6n.
seguir
bo Retire las ataduras de alambre de las bolsas de papel o
plastico antes de colocar las bolsas en el homo.
/t',, ADVERTENCIA
co Si los materiales en el interior del horno se prenden fuego,
mantenga la puerta cerrada, apague el homo y desconecte
el cable de alimentaci6n o corte la alimentaci6n en el panel
del disyuntor o fusible. Si abre la puerta, el fuego puede
expandirse.
ADVERTENCIA
Para reducir el riesgo de quemaduras, descargas electricas,
incendio, lesiones personales o exposici6n a energia de
microondas excesiva:
1.
Lea todas las instrucciones de seguridad antes de usar este
electrodomestico.
2.
Lea y siga las "Precauciones para evitar la posible exposici6n a
energia de microondas excesiva" especificadas en esta pagina.
Este electrodom&stico debe conectarse a tierra. Conectelo s61o
a los tomacorrientes adecuadamente conectados a tierra. Es
&
importante que consulte "lnstrucciones de conexi6n a tierra" en
la pagina 4 de este manual.
4.
Instale o coloque este electrodomestico solo de acuerdo con
las instrucciones de instalaci6n proporcionadas.
5.
Algunos productos tales como los huevos enteros y los
recipientes sellados (por ejemplo, frascos de vidrio cerrados)
pueden explotar si se los calienta rapidamente. Nunca los
caliente en un homo de microondas.
6.
7.
8.
9.
do No utilice el interior para almacenar alimentos u objetos. No
deje productos de papel, utensilios de cocina ni alimentos
en el interior cuando no utiliza el homo.
18. Los liquidos tales como el agua, la leche, el cafe o el te pueden
recalentarse mas alia del punto de ebullici6n sin que parezca
que estan hirviendo. No siempre se veran las burbujas o el
hervor cuando se retira el recipiente del homo de microondas.
ESTO PUEDE HACER QUE LOS L[QUIDOS MUY CALIENTES
SE DERRAMEN REPENTINAMENTE CUANDO SE MUEVE
EL RECIPIENTE O SE COLOCA UNA CUCHARA U OTRO
UTENSILIO EN EL L[QUIDO. Para reducir el riesgo de lesiones:
a. No recaliente el liquido.
bo Revuelva el liquido antes y durante la etapa de
calentamiento.
Utilice este electrodomestico Linicamente para el uso que fue
destinado como se describe en el manual. No utilice vapores ni
productos quimicos corrosivos en el interior o en el exterior de
este electrodomestico. Este tipo de homo esta especificamente
diseF_adopara calentar, cocinar o secar alimentos. No esta
diseF_adopara uso industrial o de laboratorio.
AI igual que con cualquier electrodom&stico, se requiere de
supervisi6n cuando es utilizado por ni_os.
No haga funcionar este electrodomestico si tiene un cable o
enchufe daF_ado,si no funciona correctamente o si fue daF_ado
o se cay6.
Este electrodomestico debe ser reparado s61o por personal
tecnico calificado. Comuniquese con la oficina del servicio
tecnico autorizado mas cercana para que examinen, reparen o
ajusten el equipo.
10. No tape ni bloquee ninguna de las aberturas del
electrodomestico.
co No utilice recipientes con lados rectos y cuellos estrechos.
do Despues de calentar, deje reposar el recipiente en el homo
de microondas durante un tiempo breve antes de sacarlo.
eo Sea muy cuidadoso cuando inserte una cuchara u otro
utensilio en el recipiente.
PRECAUCION
1,
Limpie las campanas de ventilaci6n con frecuencia: no se debe
acumular grasa en la campana del filtro.
2.
Cuando cocine alimentos con fuego debajo de la campana,
encienda el ventilador.
&
Tenga cuidado al limpiar el filtro de la campana de ventilaci6n.
Los agentes de limpieza corrosivos tales como los limpiadores
de homo a base de lejia pueden daF_arel filtro.
11. No altere ni haga ajustes ni reparaciones en la puerta.
12. No almacene este electrodom&stico al aire libre. No utilice este
producto cerca del agua, por ejemplo, cerca del fregadero de
la cocina, en un s6tano hLimedo, cerca de una piscina o en
lugares similares.
18. No sumerja el cable ni el enchufe en agua.
14. Mantenga el cable alejado de superficies calientes. (incluso la
parte posterior del homo).
15. No permita que el cable cuelgue del borde de una mesa o
mesada.
16. Cuando limpie las superficies de la puerta y del homo que se
ensamblan al cerrar la puerta, utilice s61ojabones o detergentes
suaves, no abrasivos, aplicados con una esponja o paF_osuave.
DesenchLifelo antes de limpiarlo.
CONSERVE
ESTASINSTRUCCIONES
informaci6n sobre seguridad 3
SMH1816
XAA 03942A
Mes.indd
3
2011-06-10
5:34:23
INSTRUCClONES
DECONEXION
A
TERRA
Este electrodomestico debe conectarse a tierra. En caso de
cortocircuito, la conexbn a tierra reduce el riesgo de descarga
el@trica ya que ofrece un cable de escape para la corriente
el@trica. Este electrodomestico esta equipado con un cable que
incluye un cable y un enchufe de conexi6n a tierra. El enchufe debe
conectarse a un tomacorriente que este correctamente instalado y
conectado a tierra.
Asegurese de instalar su homo en un lugar con espacio
suficiente.
®
Retire todas las sustancias extranas como polvo o agua
de los terminales y puntos de contacto del enchufe con un
pano seco regularmente.
• Desenchufe la alimentaci6n y limpie el enchufe con un
paso seco.
,, No hacerlo puede provocar descarga el@trica o incendio.
Enchufe el cable de alimentaciOn en un tomacorriente de 3
clavijas conectado a tierra adecuadamente. Su homo debe
set el unico electrodomestico conectado en este circuito.
,it,,,ADVERTENCIA
,, Compartir un tomacorriente de pared con otros
electrodomesticos utilizando un enchufe mLiltiple o
prolongar el cable de alimentaci6n puede provocar
descargas el@tricas o incendios.
,, No utilice un transformador el@trico. Esto puede provocar
descarga el&ctrica o incendio.
_, AsegOrese de que el voltaje, la frecuencia y la corriente
provistas coincidan con las especificaciones del producto.
No hacerlo puede provocar descarga el@trica o incendio.
ADVERTENCIA
El uso inadecuado del enchufe de conexi6n a tierra puede conducir
a un riesgo de descarga el@trica.
• EnchLifelo a un tomacorriente de 3 clavijas conectado a tierra.
No retire el tercer pin (a tierra). No utilice un adaptador ni altere
de otro modo el enchufe con conexi6n a tierra.
• Consulte a un electricista o t@nico calificado si no entiende las
instrucciones de conexbn a tierra o si no esta seguro de si el
electrodomestico esta bien conectado a tierra.
• No recomendamos utilizar un cable prolongador con este
electrodomestico. Si el cable de alimentaci6n es demasiado
corto, Ilame a un electricista calificado o a un t@nico autorizado
para que instale un tomacorriente cerca del electrodomestico.
No obstante, si es necesario utilizar un cable prolongador, lea la
secci6n "Uso de cables prolongadores" que se describe abajo y
siga Io que alli se indic&
Usode los cablesprolongadores
Se suministra un cable de alimentaci6n corto para reducir el riesgo
de enredarse o tropezar con un cable mas largo y caerse. Los
juegos de cables mas largos o cables prolongadores se encuentran
disponibles y puede utilizarlos con cuidado. Si utiliza un cable largo
o un cable prolongador:
1.
La especificaci6n el&ctrica marcada del juego de cables o cable
prolongador debe ser como minimo igual a la especificacbn
el@trica del electrodomestico.
2.
El cable prolongador debe ser un cable de 3 hilos de conexi6n
a tierra y se Io debe enchufar en un tomacorriente de 3 ranuras.
3.
El cable mas largo debe disponerse de manera tal que no
quede colgando de la mesada o mesa en donde los niSos
pueden tirar de 61o tropezarse con 61accidentalmente. Si
utiliza un cable prolongador, la luz interior puede parpadear
y la velocidad del ventilador puede variar cuando el homo de
microondas esta encendido. Los tiempos de cocci6n tambien
pueden ser mas largos.
Mantenga todos los materiales de embalaje fuera del
alcance de los ninos. Podrian utilizarlos para jugar.
Este electrodomestico debe conectarse a tierra
@correctamente.
Leay siga las "lnstrucciones de conexi6n a
tierra" especificadasal comienzo de esta seccbn. No Ileve
la conexbn a tierra a unatuberia de gas, ni a unatuberia
pla.sticade agua ni a una lineade telefono.
,, Estopuede provocardescargael@trica,incendio,
explosi6no problemascon elproducto.
,, Nuncaenchufeelcable de alimentaci6na un
tomacorrienteque no tenga conexi6natierradirectay
asegLiresede que laconexi6neste de acuerdo con los
c6digoslocalesy nacionales.
No corte ni retirela tercera clavija (a tierra)del cable de
alimentacbn bajo ningunacircunstancia.
Conecte el homo a un circuito de 20 A. Si conecta el
homo a un circuito de 15 A, aseguresede que el disyuntor
funcione.
No instale este electrodomestico en un lugar humedo,
@engrasado
o cubierto de polvo, ni en un lugar expuesto a
la luz solar directa o al agua (gotas de Iluvia).
,, Estopuede provocardescargael@tricao incendio.
Enchufela alimentaciOnaltomacorriente de la pared
con firmeza. No utilice un enchufe danado, un cable de
alimentacbn danado ni un tomacorriente de pared flojo.
,, Estopuede provocardescargael@tricao incendio.
ADVERTENCIAS
FUNDAMENTALES PARA
No Io coloque sobre un fregadero.
LA INSTALAClON
No retuerzani ate el cable de alimentacbn.
La instalaciOnde este electrodomestico debe estar a cargo
de un t@nico o una companfa de servicio calificados.
• Si el homo no es instaladopor un t@nico calificado,
puedenproducirsedescargasel@tricas,incendios,
explosiones,problemascon el productoo lesiones.
Desembaleel homo, quite todo el materialde embalaje y
examine el homo para determinarsi hay danos tales como
abolladurasen el interioro exterior del electrodomestico,
pestillos de la puerta robs, rajadurasen la puerta o una
puerta que no este correctamente alineada.Si hay algun
dano, no ponga el homo en funcionamiento y notifiquede
inmediato al distribuidor.
No hale ni doble excesivamenteel cable de alimentacbn.
No enganche el cable de alimentacbn de un objeto
meta.lico,ni coloque un objeto pesado sobre el cable de
alimentacbn, ni introduzca el cable de alimentacbn entre
objetos ni Io empuje dentro del espacio que hay detra.sdel
electrodomestico.
,, Estopuede provocardescargael@tricao incendio.
No tire del cable de alimentacbn al desenchufar el homo.
,, Desenchufe el homo tirando Linicamente del enchufe.
,, No hacerlo puede provocar descarga el@trica o incendio.
CONSERVE
ESTAS
INSTRUCCIONES
4 informaci6n sobre seguridad
SMH1816
XAA 03942A
Mes.indd
4
2011-06-10
5:34:23
Cuando se dane el enchufe o el cable de alimentaciOn,
comun[quese con el centro de servicio tecnico ma.s
cercano para solicitar un repuesto o una reparaciOn.
A',, PRECAUCIONES PARA LA
P°EcAuc'°N
INSTALACI6
N
_
oloquefa.cilmente.
el homo de manera tal que se pueda acceder al
enchufe
• Nohacerlopuedeprovocar descargaelectricao incendio
debido a fugas electricas.
Desenchufe
cuando
no se utilice
pot perbdos
prolongadosel
o homo
durante
unatormenta
electrica.
• Nohacerlopuedeprovocar descargaelectricao incendio.
ADVERTENCIAS
AOVERTENC"
FUNDAMENTALESPARA
EL USO
Si el homo se inunda,comun[quese con el centro de
servicio tecnico ma.scercano: No hacerlo puede provocar
descarga electrica o incendio.
Lea y siga las "Precaucionespara evitar la posible
exposiciOna energ[ade microondas excesiva"
especificadas al comienzo de esta secciOn.
Si el microondas genera un ruido extrano, olor a quemado
o humo, desenchofelo de inmediato y comun[quese con el
centro de servicio tecnico ma.scercano.
• Nohacerlopuedeprovocar descargaelectricao incendio.
En caso de producirse una fuga de gas (comogas
propano, gas LP, etc.), ventile el ambiente de inmediato.
No toque el microondas, ni el cable de alimentaciOn,ni el
enchufe.
• Noutiliceun ventilador.
• Unachispa podriaprovocarunaexplosi6no un incendio.
Procure que la puerta ni ningunaotra parte entre en
contacto con el cuerpo mientras cocina o cuando acaba
de cocinar.
• Nohacerlopuedeprovocar quemaduras.
En caso de un incendio provocado pot grasa en las
unidades de supefficie debajo del homo, extinga la charola
en llamas sobre la supefficie cubriendola pot completo con
una tapa, una bandeja para hornear o una bandeja plana.
Nunca descuide las unidades de superficiedebajo
de su homo en ambientes con altas temperaturas. El
sobrecalentamiento puede ocasionar humo y derrames de
grasa que pueden incendiarsey expandirse si el ventilador
se encuentra encendido. Paraminimizarel funcionamiento
automa.ticodel ventilador, utilicerecipientes de tamano
adecuado y programe altas temperaturas sobre las
unidades de supefficie solo cuando sea necesario.
Si los materialesen el interior del homo se prendieran
fuego, mantenga la puerta cerrada, apague el homo
y desconecte el cable de alimentaciOno corte la
alimentaciOnen el panel del disyuntor o fusible. Si abre la
puerta, elfuego puede expandirse.
• Siempre respete las Precauciones de seguridad cuando
utilice su horno. Nunca intente reparar el homo: contiene
voltaje peligroso en el interior. Si se debe reparar el homo,
comuniquese con un centro de servicio tecnico autorizado
cercano.
No intente reparar, desarmar ni modificar el
electrodomestico.
• Dado que una corriente de alta tension ingresa en el chasis
del producto durante su funcionamiento, abrir el producto
puede provocar descargas electricas o incendios.
• Podria estar expuesto a ondas electromagneticas.
• Cuando sea necesario reparar el homo, comuniquese con
el centro de servicio tecnico mas cercano.
Si alguna sustancia extrana, por ejemplo, agua, ingresaen
el homo, desenchufeloy comun[quese con el centro de
servicio tecnico ma.scercano.
• Nohacerlopuedeprovocar descargaelectricao incendio.
toque el enchufe de alimentaciOncon las manos
@ No
homedas.
• Estopuedeprovocardescargaelectrica.
No desenchufe la alimentaciOnpara apagar el
electrodomestico cuando este este en funcionamiento.
• Volvera enchufarla alimentaci6naltomacorrientede la
pared puedeprovocarunachispay generarunadescarga
electricao un incendio.
Mantenga todos los materiales de embalajefuera del
alcance de los ninos. Los materiales de embalaje pueden
set peligrosos para los ninos.
,, Si un ni_o se coloca unabolsa en la cabeza,puede
asfixiarse.
No deje que los ninos ni ninguna persona con
capacidades fisicas, sensorialeso mentales reducidas
utilice el electrodomestico sin supervision.
AsegLkesede que el electrodomestico este fuera del
alcance de los ninos.
,, Nohacerlopuedeprovocar unadescargaelectrica,
quemaduraso lesiones.
No toque el interiordel electrodomestico inmediatamente
despues de cocinar. El interior del electrodomestico estara.
caliente.
,, Elcalor del interiordel homo puedeprovocarquemaduras.
No utilicepapel de aluminio (excepto en los casos
particulates especificados en este manual), objetos
meta.licos(talescomo recipientes, tenedores, etc.)
ni recipientes con bordes dorados o plateados en el
microondas.
,, Estosobjetospuedenprovocarchispas o un incendio.
No utiliceni coloque objetos ni aerosoles inflamablescerca
del homo.
,, Elcalor del microondaspuedehacer quelos aerosoles
inflamablesexploteno ardan.
,, Nohacerlopuedeprovocar descargaelectricao lesiones.
No altere ni haga ajustes ni reparacionesen la puerta. Bajo
ninguna circunstancia debe quitar el gabinete exterior.
No almacene ni utiliceel homo al airelibre.
CONSERVE
ESTAS
INSTRUCCIONES
informaci6n
SMH1816
XAA 03942A
Mes.indd
5
sobre seguridad 5
2011-06-10
5:34:23
PRECAUCIONESPARAEL
PRECAUCION
®
USO
Si la superficie del microondas esta.rajada, apague el
electrodomestico.
• Nohacerlopuedeprovocardescargaelectrica.
La vajillay los envases pueden calentarse. Manipuleloscon
cuidado.
Los alimentos calientesy el vapor pueden provocar
quemaduras. Retirecuidadosamente las tapas de los
envases, dirigiendo elvapor lejosde lasmanos y la cara.
Retirelastapas de los alimentos para bebe antes de
calentarlos. Despuesde calentar losalimentos para
beb& revuelvabien para distribuirel calor en forma
pareja. Siempre pruebe los alimentos para corroborar la
temperatura antes de alimentar al beb& Los fiascos de
vidrio o la superficiede losalimentos pueden parecer ma.s
frbs que el interiorde los alimentos, los cuales pueden
estar tan calientescomo para quemar la boca del nino.
Aseguresede que todos los utensiliosde cocina que se
utilicen en el microondas sean los adecuados para este fin.
Cuando utilice utensiliosde cocina aptos para microondas,
cumpla estrictamente las recomendaciones del fabricante.
No se pare sobre el microondas ni coloque objetos
@(tales
como ropa, velas o cigarrillos encendidos,
platos, qu[micos, objetos meta.licos,etc.) sobre el
electrodomestico.
• Articulostalescomo paros puedenquedarenganchados
en lapuerta.
• Esto puedeprovocardescargael@trica,incendio,
problemascon el productoo lesiones.
No ponga en funcionamientoel electrodomestico con las
manos humedas.
• Esto puedeprovocardescargael@trica.
No rode materialesvola.tilescomo insecticidasen la
superficie del electrodomestico.
• Ademasde ser nocivospara loshumanos,tambien
puedenprovocarunadescargael@trica,un incendioo
problemascon el producto.
No coloque el electrodomestico sobre un objeto fra.gil
como un fregadero o un objeto de vidrio.
• Hacerlopuedeprovocarda_os alfregaderoo al objetode
vidrio.
No cocine sin la charola de vidrio en su lugar, sobre el piso
del homo. Los alimentos no se cocinara.ncorrectamente
sin la charola.
No descongele bebidas congeladas en botellasde cuello
@angosto.
Los envases pueden romperse.
No rayeel vidrio de lapuerta del homo con un objeto
puntiagudo.
• Estopuede provocarque elvidrio se dare o se rompa.
No almacene nada directamente encima del
electrodomestico cuando esta.en funcionamiento.
No utilice recipientessellados. Qu[teles lossellos y las
tapas antes de utilizarlos. Los recipientes sellados pueden
explotar debido a la acumulacbn de presiOnincluso
despues de que el homo se ha apagado.
/k INSTRUCCIONES
FUNDAMENTALESPARA
LA LIMPIEZA
ADVERTENCIA
No rode agua directamente sobre el electrodomestico
para limpiarlo.
No utilice benceno, diluyente ni alcohol para limpiarel
electrodomestico.
,, Estopuede provocardecoloraci6n,deformaci6n,daRos,
descargael@tricao incendio.
Antes de limpiaro realizarel mantenimiento,desenchufe
el electrodomestico del tomacorriente de la pared y quite
los restos de comida de la puerta y del compartimiento de
coccbn.
,, No hacerlo puede provocar descarga el@trica o incendio.
Tenga cuidado de no lastimarse cuando limpia el
electrodomestico (exterior/interior)
,, Puede lastimarse con los bordes puntiagudos del
electrodomestico.
No limpie el electrodomestico con un limpiador a vapor.
,, Estopuede provocarcorrosi6n.
Mantenga limpia la parte internadel homo. Las part[culas
de alimentos o los aceitessalpicados que se adhieren a
las paredes o al piso pueden causar daRos en la pintura y
reducir laeficiencia del homo.
No acerque el rostro ni el cuerpo al electrodomestico
mientras esta.cocinando o al abrir la puerta
inmediatamente despues de la coccbn.
• AsegOresede que losniRosno se acerquendemasiadoal
electrodomestico.
• Nohacerlopuedeprovocarquemadurasen los niRos.
No coloque alimentos niobjetos pesados sobre la puerta
del homo cuando la abra.
• Los alimentoso el objeto podriancaersey provocar
quemaduraso lesiones.
No enfr[eabruptamente la puerta, el interiordel
electrodomestico ni el plato vertiendo agua sobre estas
partes durante o despues de la coccbn.
• Esto puedeprovocarda_osen el electrodomestico.El
vapor o elrocio de agua puedenprovocarquemaduraso
lesiones.
No intente precalentar el homo ni hacerlofuncionar cuando
esta.vacb.
CONSERVE
ESTAS
INSTRUCCIONES
6
SMH1816
informaci6n sobre seguridad
XAA 03942A
Mes.indd
6
2011-06-10
5:34:23
nt ndo
INSTALACION DE SU HORNO DE MICROONDAS
8
8
8
9
10
10
10
10
Control de las piezas
InformaciOn sobre garantia y
servicio tecnico
InstalaciOn de su homo de
microondas
Verificar el panel de control
Conectar el homo pot primera
vez
Configurar la hora
Seguro para ninos
Mis configuraciones
GUIA DE RECIPIENTES
16
10
10
10
11
11
11
11
11
12
12
13
13
14
14
15
15
16
16
BotOn Kitchen Timer
(Temporizador de la cocina)
BotOn Add 30 sec. (Agregar 30
seg.)
Botones de ventilaciOn
(4 velocidadesy encender/apagar)
BotOn Vent delay off (Retardo de
ventilaciOn apagado)
Boton Light Hi/Lo/Off (Luz alta/
baja/apagada)
BOTON DE AJUSTE DEL
TEMPORIZADOR
BotOn Turntable On/Off (Activar/
Desactivar plato giratorio)
Estante metalico
Eco mode (Modo Eco)
Botones de Sensor Cooking
(CocciOn con sensor)
BotOn Sensor Reheat
(Recalentamiento con sensor)
BotOn Auto Defrost
(Descongelamiento automatico)
BotOn 1 pound Defrost
(Descongelamiento 1 libra)
BotOn Soften/Melt (Ablandar/
derretir)
BotOn Kids Meals (Comidas para
ninos)
BotOn Snacks (Botanas)
Tiempos de cocciOn y niveles de
potencia del microondas
BotOn Custom Cook
(CocciOn personalizada)
Warm & Hold
(Calentar y mantener caliente)
DE COCINA
Recipientes y utensilios aptos
para microondas
GUJADE COCClON
17
18
18
19
19
19
19
USO DELHORNO DE MICROONDAS
10
Y UTENSILIOS
Sugerencias generales para
cocinar en microondas
Cocinar came
Cocinar came de ave
Cocinar mariscos
Cocinar huevos
Cocinar verduras
Recetas
LIMPIEZA Y MANTENIMIENTO
MICROONDAS
)
.......\,J
20
20
21
21
21
21
21
22
DE SU HORNO DE
Limpieza del exterior
Limpieza del interior
Limpieza del anillo y el plato
giratorio
Almacenamiento y reparaciOn de
su homo de microondas
Reemplazo de la luz de la
cubierta/luz de noche
Reemplazo de la luz del homo
Limpieza de los filtros de grasa
Reemplazo del filtro de carbon
GUJA DE SOLUCION DE PROBLEMAS
APi_NDICE
GARANTJA
contenido _7
SMH1816
XAA 03942A
Mes.indd
7
2011-06-10
5:34:24
de
homode
INFORMACION SOBRE GARANTIA Y
SERVICIO TI_CNICO
AsegOrese de seguir estas instrucciones atentamente
para que su nuevo homo de mioroondas funoione de
manera adeouada
CONTROL DE LAS PLEAS
Desembale su horno de microondas con cuidado y asegOrese de
haber recibido todas las piezas que se indican a continuaci6n. Si
su homo de microondas ha side daRado durante el envio, o si no
ha recibido todas las piezas, comuniquese con el Servicio al Cliente
de Samsung; (Consulte la "INFORMACION SOBRE GARANT[A Y
SERVlCIO TECNICO" en la pagina 8).
Para ayudarnos a brindarle un mejor servicio, complete la tarjeta de
registro adjunta y enviela per correo a la brevedad. Si no recibi6 la
tarjeta de registro, puede comunicarse con Samsung Electronics,
Inc., al 1-800-SAMSUNG (726-7864) o registrarse en linea en
www.samsung.com/global/register.
Cuando se comunique con Samsung, indique el modelo especifico
y el nOmero de serie que, por Io general, se encuentra en la parte
posterior o inferior del producto, Registre los nLimeros en los
espacios provistos a continuaci6n, junto con la demas informaci6n
solicitada, Conserve esta informaci6n en un hgar seguro come
un registro permanente de su compra para ayudarlo en la
identificaci6n, en caso de robo o perdida. Tambien conserve una
copia de su recibo como prueba de compra, en case de que sea
necesario usar el servicio de garantia,
NOMERO DE MODELO
NOMERO DE SERIE
FECHADE COMPRA
ADQUIRIDO EN
El servicio de garantia solo puede ser prestado por un Centro de
Servicio Tecnico Autorizado de Samsung. Si requiere un servicio
tecnico de garantia, proporcione la informaci6n antes detallada con
una copia de su recibo al Centro de Servicio Tecnico Autorizado de
Samsung.
Para recibir asistencia del servicio tecnico y averiguar la ubicaci6n
de los centros de servicio tecnico mas cercanos, Ilame al
1-800- SAMSUNG (726-7864),
Homo de microondas
Charola de vidrio
Filtro de carb6n
INSTALACIONDE SU HORNO DE
MICROONDAS
(SMH1816)
Anillo guia
gJratorio
Adaptador
del
extractor
Manuales
PlantJllas
(Del Usuario y de
Instalaci6n)
(Superior y de
pared)
1.
Abra la puerta del homo tirando de la manija en el lado derecho
de la puerta.
2.
Limpie el interior del homo con un pare hOmedo.
3.
Instale el anillo premontado en la muesca del centro del homo
de microondas.
4.
Coloque la charola de vidrio en el centro del anillo giratorio
premontado para que quede bien sujeta.
Filtros de grasa
(2ea)
Equipo de
herramientas
(Tornillos y
m_nsulas}
Tarjeta
de registro
8 instalaciOnde su homo de microondas
SMH1816
XAA 03942A
Mes.indd
8
2011-06-10
5:34:24
÷
VERIFICAR EL PANEL DE CONTROL
Pantalla I
Consulte la _p4gina 12
Consulte la
pAgina 15
Consulte la i|
pfgina 14
Consulte la
pagina 14
Consulte la
p4gina 16
Consulte la I
|
pfigina 13
Consulte la
p4gina 10
Cookin9 P esets
Consulte la I
p4gina 15
I,
J
1
£J
4
5
7
8
Power Lever]
0
3
Consulte la
p4gina 16
9
@
Stop/Char
Sec,
Enter/Start
Consulte la
pAgina 10
Consulte la I
p4gina 11
Ligh'_
Set Timer
Hi/Lo/Off
•
]
@Hold3 sec
Consulte la
p4gina 10
instalaci6n de su homo de microondas 9
SMH 1816_XAA_03942A_Mes,indd
9
÷
2011-06-10
5:34:25
CONECTAR EL HORNO POR PRIMERA VEZ
La primera vez que enchufe el cable de alimentaci6n en un
tomacorriente, la pantalla se encendera despues de cuatro
segundos con el siguiente mensaje: H_F/_C PFL-_LSCLOCK
AN/J 2Yi' DfsiFOF YW_Y
fPOR,_f/OR OPP/fsY_CROCK fYf_tOJ) Y
CONh-/dILU_F
LA /-/Off,ix 7-JFiD//i)
Esto tambien sucederb, despues de una interrupci6n en el
suministro de energfa
CONFIGURAR LA HORA
Su homo de microondas cuenta con un reloj incorporado.
Configure el reloj al instalar su homo de microondas por primera vez
y despues de una interrupci6n de energfa electrica. La hora aparece
siempre que el horno de microondas no este en uso.
1. Presione el bot6n Clock (Reloj).
2. En la pantalla se vera F,\' fEL?DfsiE OF i J/_Y _';',
\ '_ FfE_,'ELA
HOFY, DFi D,Yi).
&
Use los botones num@icos para ingresar la hora del dfa.
Debe presionar al menos tres botones para ajustar el reloj.
Por ejemplo, si son las 5.00, presione 5, 0, 0. En la pantalla
aparecera: ._0(.
4. Presione el bot6n Enter/Start
(Ingresar/Inicio) nuevamente.
uso do hornodo
Cocinar nunca ha sido mD,s sencillo que con su nuevo
homo de microondas Samsung,
La siguiente secci6n describe todo Io que debe saber
acerca del uso de su homo de microondas,
BOTON KITCHEN TIMER
(TEMPORIZADOR DE LA COCINA)
Este microondas le permite usar su homo de microondas como
temporizador. Utilice el temporizador de la cocina para programar
hasta 99 minutos, 99 segundos.
1. Presione el bot6n Kitchen Timer (Temporizador de la
cocina).
5. En la pantalla apareceraAf'X fOUCfii f_;'/fOUCH2 ,LbFf,i_
AL'X.Pf:_-<.:_'IO!qE
i ' f _F?M f _"X.Pi_ WOI\I_
I- 2).
2. Use los botones numericos para programar la cantidad de
tiempo que quiere que el temporizador corra.
6. Utilice los botones num&ricos para seleccionar AM/PM.
3. Presione el bot6n Enter/Start
7. Presione el bot6n Enter/Start (Ingresar/Inicio) nuevamente.
8. Apareceran dos puntos, indicando que la hora esta
configurada.
4. La pantalla cuenta regresivamente y emite seSales sonoras
cuando el tiempo ha Ilegado a su fin.
Para consultar la hora mientras cocina, presione el bot6n
Clock (Reloj).
SEGURO PARA NINOS
La funcbn de Seguro para niRos le permite bloquear los
botones para que el homo de microondas no pueda funcionar
accidentalmente. El homo puede bloquearse en cualquier
momento.
Activaci6n/Desactivaci6n
Si desea activar o desactivar la funci6n de seguro para niRos,
presione el bot6n Hold 3 sec (Mantener 3 seg.) durante 3
segundos.
La pantalla mostrara CHILD LOCK ON ',;<,q_-CUF_O
f_iFf/i IW,',_'OS
AC//'//iDO) cuando el homo se encuentre bloqueado y luego
volvera a mostrar la hora.
MIS CONFIGURACIONES
i
Seleccbn de unidad de
peso
2
Control de sonido
3
Control del reloj
4
Pantalla
5. Para cancelar la configuraci6n del temporizador:
Presione una vez el bot6n Stop/Clear (Detener/Eliminar).
BOTONADD 30 SEC. (AGREGAR 30 SEG.)
Este control simplificado le ahorra tiempo, permitiendole iniciar
rapidamente la cocci6n al 100% de potencia.
1. Presione el bot6n Add 30 sec. (Agregar 30 segundos) por
cada 30 segundos que desee cocinar los alimentos.
Por ejemplo, presi6nelo dos veces para programar un
minuto de cocci6n y luego presione el bot6n Enter/Start
(Ingresar/Inicio) para comenzar la cocci6n.
2. Agregue 30 segundos a un programa de cocci6n ya iniciado
al presionar el bot6n Add 30 sec. (Agregar 30 seg.) por
cada 30 segundos adicionales que desee agregar.
BOTONES DE VENTILACION
Su nuevo homo de microondas puede personalizarse segcin sus
gustos. Para personalizar:
1. Presione el bot6n My Settings (Mis configuraciones).
2. Presione el boton numerico que corresponda a la funci6n que
desea personalizar.
& Presione el ncimero que corresponda a la opci6n que desee.
Las funciones, las opciones y los botones nume'ricos
correspondientes se enumeran en la tabla siguiente.
1
(Ingresar/Inicio).
1 lb.
2 kg.
1 Sonido activado
2 Sonido desactivado
1 12HR
2 24 HR
1 Velocidad lenta
2 Velocidad normal
3 Velocidad rapida
1 ACTIVADA
2 DESACTIVADO
5
SeRal de finalizacbn
6
Modo demostraci6n
1 ACTIVADA
2 DESACTIVADO
7
Hora de verano
1 ACTIVADA
2 DESACTIVADO
(4 VELOCIDADES Y ENCENDER/APAGAR)
La ventilacbn elimina los vapores de la superficie de cocciOn.
Puede seleccionar la configuraci6n de ventilaci6n manualmente.
1. Presione el botOn Vent 4 Speed (Ventilaci6n 2 velocidades)
para configurar la velocidad del ventilador,
2. Presione el botOn Vent On/Off (Encender/Apagar la
ventilaciOn) para encender el ventilador.
3. Presione el bot6n Vent On/Off (Encender/Apagar la
ventilaci6n) para apagar el ventilador.
BOTONVENT DELAY OFF (RETARDODE
VENTILACION APAGADO)
Presioneel botOn Delay Off (Retardoapagado) una vez para
apagar elventilador despues de algunos minutos, dependiendo
de cuantas veces se presione el bot6n.
1
2
3
4
5
3
s
_o
3o
10_ instalaciOn de su homo de microondas
SMH1816
XAA 03942A
Mes.indd
10
2011-06-10
5:34:25
BOTON LIGHT HI/LO/OFF (LUZ ALTA/BAJA/
APAGADA)
i
:ilii
Ti ¸i
T Ti
El bot6n Light (Luz) le permite seleccionar un ajuste de luz para su
homo de microondas.
1
2
3
Alto
Bajo
Desactivado
BOTON DE AJUSTE DEL TEMPORIZADOR
Puede programar el microondas para que la luz se encienda y se
apague autom_tticamente en una hora predeterminada. La luz se
enciende a la misma hora todos los dias hasta que se reinicia la
configuraci6n.
Resultados
disparejos
El estante le ofrece la opci6n de recalentar mas de un
plato al mismo tiempo.
!i
i
1o Presione el bot6n Set Timer {Ajustar temporizador).
2o Use los botones numericos para programar la luz a una hora
determinada.
3o Presione el bot6n Enter/Start
(Ingresar/Inieio).
i
4o Use los botones numericos para seleccionar AM o PM.
5o Presione el bot6n Enter/Start
(Ingresar/Inieio).
6o Use los botones numericos para programar la hora de
apagado.
7o Presione el bot6n Enter/Start
(Ingresar/Inieio).
8o Use los botones numericos para seleccionar AM o PM.
9. Presione el bot6n Enter/Start
(Ingresar/Inieio).
Presione el botOn Set Timer (Ajustar temporizador)
botOn "0" para cancelar el temporizador.
y el
BOTON TURNTABLE ON/OFF (ACTIVAR/
DESACTIVARPLATO GIRATORIO)
Para obtener mejores resultados de cocci6n, deje el plato giratorio
activado. No obstante, puede desactivarse para cocinar grandes
platos.
Presione el bot6n Turntable On/Off (Activar/Desactivar plato
giratorio) para activar o desactivar el plato giratorio.
Recalentar alimentos
Para recalentar alimentos en 2 niveles 0 para recalentar alimentos
en el nivel inferior:
• Multiplique el tiempo de recalentado por 11/2.
,, Cambie de lugar a la mitad del proceso de recalentado.
[
Es posible que el plato giratoriose caliente demasiado
PREOAUC_O,
para tocarlo. Utilice guantes protectores para tocar el plato
giratorio durante la cocci6n y despues de ella.
ESTANTE MET ,LICO
Utilice el estante metalico para cocinar mas de un plato al mismo
tiempo.
/k
CAUTION
• No utilice un recipiente dorador apto para microondas
sobre el estante. El estante podria recalentarse.
• No utilice el horno con el estante sobre el piso del
microondas. Podria da_ar el homo de microondas.
• Use guantes protectores para tomar el estante, ya que
puede estar caliente.
• No utilice el estante metalico para preparar palomitas.
Los alimentos se cocinan mejor sobre el plato giratorio.
Mejores
ECO MODE (MODO ECO)
Eco mode (Modo Eco) reduce el uso de potencia en el estado de
espera.
Cuando presiona una vez el bot6n EOO MODE (MODO ECO), la
pantalla se apaga y se conecta el modo que minimiza el uso de la
potencia.
Para cancelar ECO MODE (MODO ECO), presione el bot6n ECO
MODE (MODO ECO) nuevamente o presione cualquier otro bot6n.
resultados
uso del homo de microondas 11
SMH1816
XAA 03942A
Mes.indd
11
2011-06-10
5:34:26
BOTONES DE SENSOR COOKING (COCCI6N CON SENSOR)
Los botones Sensor Cooking (Cocci6n con sensor) comprenden configuraciones que se emplean frecuentemente, permitiendole
seleccionarlas r_tpiday c6modamente. Si los alimentos no se cocinan bien o se recalientan cuando usa la funci6n de cocci6n automatica,
complete el proceso de cocci6n seleccionando un nivel de potencia y tiempo de cocci6n.
Z_
No utilice los botones de Sensor Cooking (Cocci6n con sensor) de manera continua. El homo debe enfriarse durante 5 minutos
PRECAUCI6N
entre cada uso o los alimentos se cocinar_tn de m_ts.
Recipientes y tapas para la cocci6n con sensor
Para obtener buenos resultados de cocci6n al usar estas funciones, siga las instrucciones para seleccionar los recipientes y las tapas
adecuadas en la secci6n Recipientes y utensilios de cocina, de la pagina 16.
/'_
Siempre utilice recipientes aptos para microondas y cubralos con una tapa oun envoltorio de plb.stico. Cuando utilice un
pREC%_--"OUO_
Nenvoltorio de plb.stico, destape un extremo para liberar el vapor.
Z_
Llene los recipientes al menos por la mitad.
PRECAUCI6N
[_
os alimentos que deben revolverse o rotarse deben revolverse o darse vuelta al final del ciclo de Cocci6n con sensor, cuando
haya empezado la cuenta regresiva en la pantalla.
(_
o utilice la funci6n Cocci6n con sensor automb.tico de manera continua. Espere 5 minutos antes de seleccionar otra
operaci6n de cocci6n con sensor.
(_
ara evitar malos resultados, no use el Sensor automb.tico cuando la temperatura
baja.
ambiente sea demasiado alta o demasiado
Tabla de cocci6n con sensor
3.0-3.5 oz,
1 paquete
Palomitas
Bebidas
8 oz,
Pechuga de
Cocinar
Use s61o una bolsa de palomitas para microondas por vez. Tenga cuidado tanto al retirar la
bolsa del homo como al abrirla, Deje que el homo se enfrie per al menos 5 minutos antes
de volver a usarlo.
Utilice una taza o un jarro para medir y no Io cubra. Coloque la bebida en el homo.
Despues de calentar, revuelva bien, Deje que el homo se enfrie por al menos 5 minutos
antes de volver a usarlo.
Coloque las pechugas de polio sobre un plato apto para microondas y cLibralo con un
polio
8-16 oz.
5env°ltori°minutes.de
plastico. Cocine a una temperatura interna de 170 °F, Deje reposar durante
Desayuno
congelado
4-8 oz,
Siga las instrucciones del paquete para cubrir y dejar reposar. Use este bot6n para
emparedados congelados, entradas de desayuno, crepas, wafles, etc, Deje que el homo
se enfrie por al menos 5 minutos antes de volver a usarlo,
Comida
congelada
8-14 oz.
Retire los alimentos de su envoltorio y siga las instrucciones de la caja para cubrir y
reposar. Deje que el homo se enfrie per al menos 5 minutos antes de volver a usarlo,
Verduras
frescas
1-4 tazas
Coloque las verduras frescas en un recipiente de ceramica, vidrio o pl_tstico para
Verduras
microondas y agregue 2 a 4 cucharadas de agua. CLibralo con una tapa o un envoltorio
de plastico ventilado mientras Io cocina y revuelvalo antes de dejarlo reposar, Deje que el
homo se enfrie per al menos 5 minutes antes de volver a usarlo,
Coloque las verduras congeladas en un recipiente de cer_tmica, vidrio o pl_tstico para
Verduras
congeladas
1-4 porciones
Papas
1-6 patatas,
Pizza
1-3 porciones
microondas
y agregue
2-4 cucharadas
de agua.
CObralo
con reposar
una tapadurante
oun envoltorio
de
plastico
ventilado
para cocinarlo
y revuelvalo
antes
de dejarlo
3-5 minutos.
Deje que el homo se enfrie por al menos 5 minutes antes de volver a usarlo.
Pinche cada papa varias veces con un tenedor. Col6quelas en el plato giratorio al estilo de
los rayos de una rued& Despues de cocinar las papas, dejelas reposar de 3-5 minutos.
Deje que el homo se enfrie por al menos 5 minutes antes de volver a usarlo.
Coloque entre 1-3 porciones de pizza en un plato apto para microondas, con los bordes
gruesos de cada porci6n hacia el borde del plato. No permita que las porciones se
superpongan, No las cubra, Deje que el homo se enfrie por al menos 5 minutos antes de
volver a usarlo.
BOTONSENSOR REHEAT(RECALENTAMIENTOCON SENSOR)
Con su nuevomicroondas,es mas sencillocalentarsobrantesy alimentosprecocidos.AIsentir realmentelahumedadquese liberaa medida
que secalientanlosalimentos,eltiempo de cocci6n del homo se ajustade maneraautomaticasegLinel tipo y lacantidadde alimentos
precocidos.
[_
odos losalimentos ya deben estar precocidos. Los platos de alimentosy las cazuelasdeben almacenarsea temperatura de
nevera.
Presionelos botones Sensor Reheat (Recalentamientocon sensor)y Enter/Start (Ingresar/Inicio)para comenzar a recalentar
su comida precocida. La pantalla mostrarb.R[7/[TV :!-


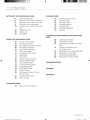
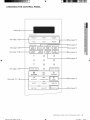
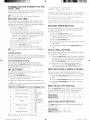
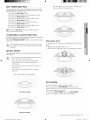
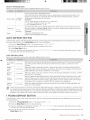
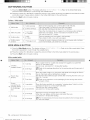

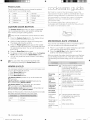
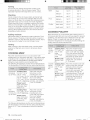
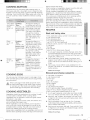
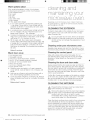
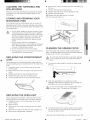
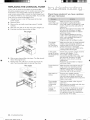
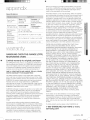
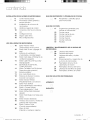
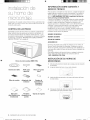
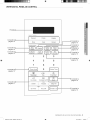
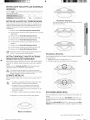

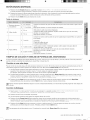


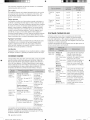
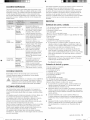
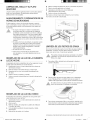

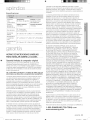


![[es] Instrucciones de uso . . . . . . . . . . . . . . . . . . 2](http://vs1.manualzilla.com/store/data/006061507_1-ca9b9960dfff7bd40da5691c4a3c1ec7-150x150.png)