1
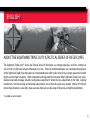
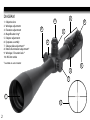
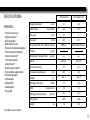
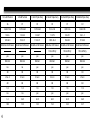
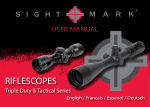
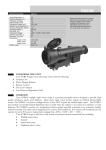
USER MANUAL
RIFLESCOPES
Triple Duty & Tactical Series
English / Francais / Español / Deutsch
ABOUT SIGHTMARK®
Sightmark offers a wide range of products that include red dot scopes, reflex sights,
rangefinders, riflescopes, laser sights, night vision and award-winning flashlights and
boresights. Sightmark products are inspired by military and law enforcement applications.
All products are designed to be the most effective weapon accessories possible.
Sightmark - MAKE YOUR MARK
www.sightmark.com
ENGLISH
ABOUT THE SIGHTMARK TRIPLE DUTY & TACTICAL SERIES OF RIFLESCOPES
The Sightmark Triple Duty™ Series and Tactical Series of riflescopes use cutting edge glass and lens coatings to
ensure that it is the most accurate riflescope in its class. Precision multicoated optics are a distinguishing feature
of the Sightmark Triple Duty riflescope line; multicoated lenses offer a clear view for easy target acquisition in both
bright and low light situations. Both waterproof and fog proof, the nitrogen filled Sightmark Triple Duty Series
features oversized windage, elevation and parallax adjustment* knobs for easy adjustment in the field. Locking
mechanisms* on the windage and elevation adjustments ensure that the scope stays zeroed. Internal lit* Mil-Dot
reticles help shooters successfully make accurate shots over a wide range of distances and lighting conditions.
*available on select models
1
DIAGRAM
1. Objective lens
2. Windage adjustment
3. Elevation adjustment
4. Magnification ring*
5. Diopter adjustment
6. Eyepiece assembly
7. Side parallax adjustment*
8. Reticle illumination adjustment*
9. Windage / Elevation lock *
10. Mil-Dot reticle
6
9
9
3
2
*available on select models
4
7
1
10
2
8
5
SPECIFICATIONS
FEATURES:
•
•
•
•
•
•
•
•
•
•
•
•
•
•
•
Precision accuracy
Locking turrets*
Mil-Dot reticle
Wide field of view
Precision multicoated optics
Phase corrected coating
Internal lit reticle*
1/8” locking MOA
adjustments*
Parallax adjustment*
Front diopter adjustment
Nitrogen purged
Lightweight
Waterproof
Shockproof
Fog proof
Eyepiece diameter
(mm)
4x32 Tactical
6x42 Triple Duty
32
34
6.37
(m @ 100m)
8.38
Exit pupil
(mm)
8.1
7
Eye relief
(mm)
99.3
92.7
AR Blue
Wide Band AR Green
Field of view
Phase corrected, anti-reflective coating
Parallax
(yards)
Waterproof / nitrogen filled
(yes/no)
Reticle
Illuminated reticle
no
yes
Mil-Dot
Mil-Dot
no
yes
One piece tube diameter
(mm)
25.4
30
Diopter
(+/-)
2 to -3
2 to -3
Windage / Elevation
MOA
Windage / Elevation lock
(MOA)
15
60
(one click, in)
1/4
1/4
(yes/no)
no
yes
Focal plane
Length
(in)
2nd
2nd
7.8
12.9
*available on select models
3
1.5-5x30 Tactical
3-9x40 Tactical
3-9x42 Triple Duty
4-16x44 Triple Duty
8.5-25x50 Triple Duty
10-40x56 Triple Duty
36
37
39
39
37
39
26.69-7.86
13.99-4.64
13.99-4.64
9.61-2.44
4.89-1.66
3.84-0.98
18.8-6
13.3-4.4
14-4.67
11-2.75
5.8-2.0
5.6-1.4
123-86.3
115.5-91
115.5-91
120.1-88.4
98.6-88
97.5-85
Wide Band AR Green
Wide Band AR Green
Wide Band AR Green
Wide Band AR Green
Wide Band AR Green
Wide Band AR Green
12 to infinity
10 to infinity
10 to infinity
yes
yes
yes
yes
yes
yes
Mil-Dot
Mil-Dot
Mil-Dot
Mil-Dot
Mil-Dot
Mil-Dot
no
no
yes
yes
yes
yes
30
30
30
30
30
30
2 to -3
2 to -3
2 to -3
2 to -3
2 to -3
2 to -3
4
60
60
60
60
60
60
1/4
1/4
1/4
1/4
1/8
1/8
no
no
yes
yes
yes
yes
1st
2nd
2nd
2nd
2nd
2nd
10.3
13.3
13.3
15.2
16.3
16.7
INSTALLATION
It is recommended to have the riflescope mounted by a professional gunsmith. However, if attempting to mount
the riflescope without professional assistance, please read and strictly adhere to the following directions.
1. All riflescopes come with basic rings for immediate mounting.
2. Unload the weapon. Remove the bolt/firing pin to ensure the weapon is incapable of firing.
3. Install the lower portions of the rings onto a Weaver base. Tighten the screws to between 45 - 65 inch pounds
of torque.
4. Place the riflescope in the rings and install the top portion of the rings loosely so that the riflescope can move
freely.
5. Establish the correct eye relief by moving the weapon into the shooting position. While in the shooting position,
move the riflescope so that very little black can be seen while looking through the riflescope.
6. Once eye relief is established, check the crosshair alignment by pointing the riflescope at an object that is level
and align the crosshair.
7. Once the alignment is checked, tighten the rings evenly. Take care not to over tighten the screws as this could
bend the scope. [base attatchment screws & ring top screws - 15 inch/lbs; ring cross bolt nut - 68 inch/lbs]
8. Check alignment and position, then boresight the riflescope.
BORESIGHTING
Using a Sightmark laser boresight is the most accurate and convenient way to sight in a riflescope.
When mounting the riflescope on a bolt action rifle, remove the bolt. When mounting to a semi automatic rifle,
disassemble the rifle until there is a straight line of sight through the bore, or use several mirrors for the same
effect.
5
Now use a target at least 50 feet away when sighting in the riflescope. Look through the bore of the weapon and
locate the target. Sight in the target through the bore and then adjust the riflescope. If the riflescope is significantly
off target, take the rifle and riflescope to a certified gunsmith to check for correct mounting and alignment.
After boresighting the weapon it will need to be fine tuned to compensate for bullet drop and other variables.
Please take the time to fine tune the weapon to ensure it is accurate.
RE-ZEROING WINDAGE AND ELEVATION KNOBS
Once the riflescope has been sighted in, it is time to reset the windage and elevation knobs back to zero. Please
refer to the directions below based on the type of turrets on the riflescope.
Riflescopes with locking turrets:
Use a 1.5mm metric hex wrench to loosen the three set screws located along the scalloped edge of the elevation
turret. Next, lock down the locking thumb screw on top of the knob. Then rotate the knob and set the MOA hash
marks back to zero. Once the knob is zeroed, retighten the three set screws making sure not to over-torque and
strip them. After all three set screws are sufficiently tightened, the mechanism will re-engage. Repeat these steps
for the windage turret.
Riflescopes without locking turrets:
Use a 1.5mm metric hex wrench to loosen the three set screws located along the scalloped edge of the elevation
knob. Next, rotate the knob to set the MOA hash marks back to zero. Once the knob is zeroed, re-tighten the three
set screws making sure not to over-torque and strip them. After all three set screws are sufficiently tightened the
mechanism will re-engage. Repeat these steps for the windage turret.
6
ZEROING PROBLEMS
Sightmark’s Triple Duty scope line comes with locking turrets that do not need tools for adjustment. These locking
turrets are designed to make adjustments on the fly. It is possible for a weapon’s mounting system to not be level
with the bore, which makes it nearly impossible to adjust zero. In this case, it is recommended that adjustable rings
or a shim be used in order to raise the rear of the scope effectively, leveling it to the bore of the weapon to attain
zero.
MAGNIFICATION
Some Sightmark riflescopes come equipped with variable magnification options. Simply turn the dial to the setting
desired. Note: The higher the magnification, the smaller the field of view becomes.
PARALLAX ADJUSTMENT
Sightmark’s higher magnification riflescopes do come equipped with a parallax adjustment knob. Parallax is the
change of angular position of two stationary points relative to each other as seen by an observer. In other words,
it’s how the image lines up in the riflescope and how the eye perceives it. Be sure to adjust the parallax knob to
the correct shooting range. It is very important to keep this in mind when zeroing the rifle. If this is not taken into
consideration at the time of sighting in the riflescope, accuracy will diminish.
DIOPTER ADJUSTMENT
The diopter is the measurement of the eye’s curvature. People’s eyes are all curved differently. Sightmark
riflescopes have a diopter adjustment that helps attain the perfect shot. Once parallax* has been adjusted, rotate
7
the diopter adjustment ring for the clearest view. This adjustment should stay the same unless the riflescope’s
operator changes.
*available on select models
MIL-DOTS
All Sightmark riflescopes come with a Mil-Dot reticle.
Mil stands for millradian. A millradian is 1/6283.2th of a
circle, or 3.438 MOA. The millradian represents 1 unit at
1000 yards. To simplify, a target that is one yard tall at
1000 yards would measure 1 millradian.
1.3
0.2
0.8
1.3
8
0.9
1.8
Sightmark’s Mil-Dot reticle is the NATO standard MilDot, which differs from the ¾ USMC reticle. In order to
accurately range using the Mil-Dot system, the target
size must be known. For example, a full size deer is
approximately six feet long. Transfer the feet into yards
(3’ = 1yd), so the deer is 2 yards long. Now measure the
deer in the crosshairs; it is 4 mils long. Then divide the
size of the deer by the Mils. 2/4=0.5 then multiply 0.5
by the constant of 1000. This equals 500. So the deer is
roughly 500 yards away. Finally, adjust the riflescope’s
elevation for accuracy.
ILLUMINATED RETICLE
Some riflescope models are equipped with an illuminated reticle. When using the illuminated reticle, use the
lowest brightness setting possible. This will make ranging targets much more effective.
CHANGING BATTERIES
1. Make sure the firearm is unloaded and pointed in a safe direction.
2. While holding the illuminated reticle battery housing, unscrew the top portion of the cap.
3. Remove the CRV2032 3volt battery and replace it while noting the polarity. Be sure the polarities of the battery
match with the positioning displayed on the diagram located in the battery housing.
4. Replace the top portion of the cap.
MAINTENANCE
Proper maintenance of the riflescope is recommended to ensure longevity. It is recommended that when the
riflescope becomes dirty that it is wiped down with a dry or slightly damp cloth. Blow dirt and debris off all optics
and then clean lenses with a lens cleaning cloth. No further maintenance is required.
WARNING
All Sightmark riflescopes are nitrogen purged and o-ring sealed unless otherwise noted. Do NOT disassemble
the riflescope for any reason as this will void the warranty and could be hazardous. Any internal work should be
handled by the manufacturer. Any tampering with the purge screw will void the warranty.
9
TROUBLESHOOTING
Never ship back a riflescope without getting proper authorization beforehand. Doing so could result in losing the
riflescope due to a multitude of reasons, i.e. sending it to the wrong address and other problems associated with
unexpected packages.
1. Make sure the parallax, if equipped, was set at the correct range.
2. Check the mount. Make sure the riflescope is mounted securely to the rifle. Try, with bare hands only, to gently
twist the scope in the rings or see if anything moves when it is jiggled. If there is any movement, retighten the
mounting system according to the mounting instructions but do not over tighten as this could cause a misalignment
of the internal optical parts.
3. Make sure the action of the firearm is properly bedded in the stock, and that all receiver screws are tight and have
been tightened in the sequence recommended by the manufacturer. A loosely fitted stock can cause changes to
the point of impact.
4. When test firing a rifle to check the point of impact relative to windage and elevation adjustments, be sure to fire
from a solid bench with sandbags supporting the forearm and buttstock.
5. Be sure to use factory-loaded ammunition of the same bullet type, weight, and, preferably, lot number when
sighting in the riflescope. If one type of ammunition does not shoot well, try another brand or bullet weight.
6. Be certain that both the barrel and chamber are clean. Heavy factory grease or copper fouling on older rifles can
diminish the accuracy of the firearm.
SIGHTMARK WARRANTY
Please visit www.sightmark.com for warranty details and information.
10
www.sightmark.com