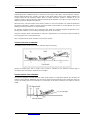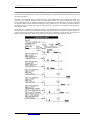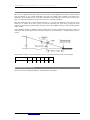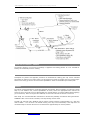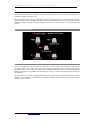
1
‘737 Captain’ FLIGHT MANUAL Part IV – Flight Crew Training Manual
DO NOT USE FOR FLIGHT
FLIGHT MANUAL
PART IV – Flight Crew Training Manual
Captain Sim is not affiliated with any entity mentioned or pictured in this document.
All trademarks are the property of their respective owners.
© 2012 Captain Sim www.captainsim.com
1
‘737 Captain’ FLIGHT MANUAL Part IV – Flight Crew Training Manual
DO NOT USE FOR FLIGHT
2
ABOUT THIS MANUAL
VERSION: 05 MAY, 2012
WARNING: THIS MANUAL IS DESIGNED FOR MICROSOFT® FSX USE ONLY. DO NOT USE FOR FLIGHT.
The ‘737 Captain’ FLIGHT MANUAL is organized into three Parts:
Each Part is provided as a separate Acrobat® PDF document:
Click START > Programs > Captain Sim > 737 Captain >
•
Part I – User’s Manual
o The User’s Manual describes the ‘737 Captain’ Sim product as a software title.
•
Part II – Aircraft Systems
•
Part III – Normal Procedures
•
Part IV – Flight Crew Training Manual - this document.
Adobe Acrobat® Reader Required
FOR GENERAL INFORMATION ON THE ‘737 CAPTAIN’ PRODUCT PLEASE USE WWW.CAPTAINSIM.COM .
THIS MANUAL PROVIDES ADDITIONAL INFORMATION ONLY, WHICH IS NOT AVAILABLE ON THE WEB SITE.
© 2012 Captain Sim www.captainsim.com
‘737 Captain’ FLIGHT MANUAL Part IV – Flight Crew Training Manual
DO NOT USE FOR FLIGHT
737 Captain FLIGHT MANUAL
PART IV - CONTENTS
5
GENERAL INFORMATION
5
5
5
7
8
8
9
OPERATIONAL PHILOSOPHY
QUALIFICATION REQUIREMENTS (CHECKRIDE)
FLAP USAGE
COMMAND SPEED
REFERENCE BUGS
RECOMMENDED RUDDER TRIM TECHNIQUE
AUTOPILOT PROCEDURES
11
GROUND OPERATIONS
11
11
11
12
PREFACE
TAKEOFF BRIEFING
PUSH BACK
TAXI
20
TAKEOFF AND INITIAL CLIMB
20
21
25
26
26
26
27
30
PREFACE
TAKEOFF
CROSSWIND TAKEOFF
IMPROVED CLIMB PERFORMANCE TAKEOFF
LOW VISIBILITY TAKEOFF
ADVERSE RUNWAY CONDITIONS
REJECTED TAKEOFF DECISION
INITIAL CLIMB - ALL ENGINES
33
CLIMB, CRUISE, DESCENT AND HOLDING
33
33
34
36
38
PREFACE
CLIMB
CRUISE
DESCENT
HOLDING
40
APPROACH AND MISSED APPROACH
40
40
43
45
50
54
57
59
60
61
PREFACE
APPROACH
MISSED APPROACH POINTS (MAP)
ILS APPROACH
NON - ILS INSTRUMENT APPROACHES
CIRCLING APPROACH
VISUAL TRAFFIC PATTERN
TOUCH AND GO LANDINGS
STOP AND GO LANDINGS
GO-AROUND AND MISSED APPROACH - ALL APPROACHES
62
LANDING
62
62
63
65
67
71
76
78
PREFACE
LANDING CONFIGURATIONS AND SPEEDS
VISUAL APPROACH SLOPE INDICATOR (VASI/T - VASI)
PRECISION APPROACH PATH INDICATOR (PAPI)
FLARE AND TOUCHDOWN
AFTER TOUCHDOWN AND LANDING ROLL
CROSSWIND LANDINGS
OVERWEIGHT LANDING
© 2012 Captain Sim www.captainsim.com
3
‘737 Captain’ FLIGHT MANUAL Part IV – Flight Crew Training Manual
DO NOT USE FOR FLIGHT
79
MANEUVERS
79
79
80
81
82
83
86
88
88
90
PREFACE
ACCELERATION TO AND DECELERATION FROM VMO
ENGINE OUT FAMILIARIZATION
HIGH ALTITUDE MANEUVERING, "G" BUFFET
RAPID DESCENT
STALL RECOVERY
STEEP TURNS
TERRAIN AVOIDANCE
UPSET RECOVERY
WINDSHEAR
92
CUSTOMER CARE
92
SPECIAL THANKS TO
© 2012 Captain Sim www.captainsim.com
4
‘737 Captain’ FLIGHT MANUAL Part IV – Flight Crew Training Manual
DO NOT USE FOR FLIGHT
5
GENERAL INFORMATION
OPERATIONAL PHILOSOPHY
The normal procedures are designed for use by trained flight crewmembers. The procedure sequence follows
a definitive panel scan pattern. Each crewmember is assigned a flight deck area to initiate action in
accordance with Normal and Supplementary Procedures. Non-normal procedural actions and actions outside
the crewmembers' area of responsibility are initiated at the direction of the captain.
QUALIFICATION REQUIREMENTS (CHECKRIDE)
Following satisfactory completion of transition training and when recommended by an authorized instructor,
each pilot must satisfactorily demonstrate the ability to perform maneuvers and procedures prescribed in
FAA or other applicable governing regulations. Throughout the prescribed maneuvers, command ability and
good judgment commensurate with a high level of safety must be demonstrated. In determining whether
such judgment has been shown, the evaluator considers adherence to approved procedures, actions based
on the analysis of situations, and care and prudence in selecting the course of action.
FLAP USAGE
For takeoffs, when conditions permit, consider using larger flap settings to provide additional aft body
clearance and shorter takeoff distance. Refer to the Typical Takeoff Tail Clearance table, chapter 3, to
determine aft body clearance for different takeoff flap settings.
For normal landings, use flaps 30. When required, use flaps 40 to minimize landing speed and landing
distance.
FLAP - SPEED SCHEDULE/MANEUVERING SPEEDS
The flap maneuvering speed schedule provides the recommended maneuvering speed for various flap
settings. When recommended maneuvering speeds are followed, the schedule provides adequate margin to
stick shaker for an inadvertent 15° overshoot beyond the normal 30° angle of bank.
The schedule provides speeds that are close to minimum drag and in climb are close to maximum angle of
climb speed. In level flight it provides relatively constant pitch attitudes and requires little change in thrust
at different flap settings.
© 2012 Captain Sim www.captainsim.com
‘737 Captain’ FLIGHT MANUAL Part IV – Flight Crew Training Manual
DO NOT USE FOR FLIGHT
6
FLAP MANEUVERING SPEED SCHEDULE
The flap maneuvering speed schedule is based on a fixed speed for each flap setting for a range of gross
weights and provides adequate maneuver margin to stick shaker at all weights. Maneuvering speeds are
shown for airplanes with rudder pressure reducer (RPR) active. If RPR is not active, refer to the DDPG for
maneuvering speeds.
Flap Position
At & Below 117,000 LB
(53,070 KG)
Above 117,000 LB
(53,070 KG
Flaps UP
210knots
220 knots
Flaps 1
190 knots
200 knots
Flaps 5
170 knots
180 knots
Flaps 10
160 knots
170 knots
Flaps 15
150 knots
160 knots
Flaps 25
140 knots
150 knots
Flaps 30
VREF 30
Flaps 40
VREF 40
During flap retraction/extension, selecting the next flap setting should be initiated when reaching the
maneuver speed for the existing flap position. The airplane should be accelerating when flaps are retracting
to the next position. Adequate maneuver margin is retained at a speed 20 knots below the recommended
speed for all bank angles up to 30°. During flap extension, selection of the flaps to the next position should
be made prior to decelerating below the recommended flap speed for the current flap setting.
FLAP OPERATION
ACCELERATION HEIGHT - ALL ENGINES
The altitude selected for acceleration and flap retraction may be specified for each airport. Safety,
obstruction clearance, airplane performance or noise abatement requirements are usually the determining
factors. Some operators have adopted a standard climb profile for all of their operations based on the airport
which requires the greatest height for level off to clear a close-in obstacle with an engine failure.
The minimum altitude for flap retraction is 400 feet. Boeing recommends 1000 feet for the standard flap
retraction altitude used in training.
ACCELERATION HEIGHT - ENGINE OUT
Acceleration height for a takeoff with an engine failure after V1 is based on accelerating to the recommended
flaps up speed while retracting flaps and selecting maximum continuous thrust limits within five minutes
after initiating takeoff. Some combinations of high gross weight, takeoff flap selection and airport elevation
may require initiating flap retraction as low as 400 feet after takeoff with an engine failure.
At typical training weights, adequate performance exists to climb to 1000 feet before beginning flap
retraction. Therefore, during training, 1000 feet is used as the acceleration height for engine failure after V1.
© 2012 Captain Sim www.captainsim.com
‘737 Captain’ FLIGHT MANUAL Part IV – Flight Crew Training Manual
DO NOT USE FOR FLIGHT
7
COMMAND SPEED
For airplanes equipped with the SP-77 autopilot, command speed may be set by the pilot using the airspeed
cursor control.
TAKEOFF
Command speed remains set at V2 until changed by the pilot for acceleration and flap retraction. Manually
select flaps up maneuver speed at flap retraction altitude.
CLIMB, CRUISE AND DESCENT
Command speed is set to the appropriate speed. The white airspeed bugs (if installed) are positioned to the
appropriate airspeeds for approach and landing.
APPROACH
Command speed is set to the maneuvering speed for the selected flap position.
LANDING
For airplanes without an autothrottle the recommended method for approach speed correction is to add one
half of the reported steady headwind component plus the full gust increment above the steady wind to the
reference speed. One half of the reported steady headwind component can be estimated by using 50% for a
direct headwind, 35% for a 45° crosswind, zero for a direct crosswind and interpolation in between.
When making adjustments for wind additives, the maximum command speed should not exceed VREF + 20
knots. This technique provides sufficient low speed maneuver margin. The following table shows examples of
wind additives with a runway heading of 360°.
Reported Winds
Wind Additive
Approach Speed
360 at 16
8
VREF + 8 knots
Calm
0
VREF + 5 knots
360 at 20 Gust 30
10 + 10
VREF + 20 knots*
060 at 24
6
VREF + 6 knots
090 at 15
0
VREF + 5 knots
090 at 15 Gust 25
0 + 10
VREF + 10 knots
* If VREF + 20 exceeds landing flap placard speed minus 5 knots, use landing flap placard speed minus 5
knots.
For airplanes without an autothrottle the minimum command speed setting is VREF + 5 knots. The gust
correction should be maintained to touchdown while the steady headwind correction should be bled off as
the airplane approaches touchdown.
Note: Do not apply wind corrections for tailwinds. Set command speed at VREF + 5 knots (autothrottle
engaged or disconnected).
© 2012 Captain Sim www.captainsim.com
‘737 Captain’ FLIGHT MANUAL Part IV – Flight Crew Training Manual
DO NOT USE FOR FLIGHT
8
REFERENCE BUGS
The following figure shows the positioning of the reference bugs on the airspeed indicator for takeoff and
approach.
BUG SETTING (MASI)
TAKEOFF
White movable airspeed bugs are set at V1, VR, takeoff flap maneuvering speed (V2 + 15), and flaps up
maneuvering speed. Command speed is set to V2. V2 is the minimum takeoff safety speed and provides at
least 30° bank capability (15° + 15° overshoot) for all takeoff flaps. V2 + 15 is recommended maneuvering
speed for all takeoff flaps and the initial flap retraction speed for takeoffs with flaps greater than 1. V2 + 15
provides 45° bank capability (30° + 15° overshoot) for all takeoff flaps.
APPROACH - LANDING
Position two white airspeed bugs at VREF for landing flaps and single white airspeed bug at VREF + 15 speed
and the flaps up maneuvering speed.
RECOMMENDED RUDDER TRIM TECHNIQUE
This section describes two techniques for properly trimming the rudder. It is assumed that the airplane is
properly rigged and in normal cruise. The primary technique uses rudder trim only to level the control wheel
and is an acceptable and effective method for trimming the airplane. It is approximately equal to a minimum
drag condition. This technique is usable for normal as well as many non-normal conditions. For some nonnormal conditions, such as engine failure, this technique is the preferred method and provides near
minimum drag.
The alternate technique may provide a more accurate trim condition when the roll is caused by a roll
imbalance. In addition, this technique outlines the steps to be taken if the primary trim technique results in
an unacceptable bank angle or excessive rudder trim. The alternate technique uses both rudder and aileron
trim to neutralize a rolling condition using the bank pointer as reference.
Note: Large trim requirements should be documented for maintenance. Refer to the maintenance manual for
guidance.
© 2012 Captain Sim www.captainsim.com
‘737 Captain’ FLIGHT MANUAL Part IV – Flight Crew Training Manual
DO NOT USE FOR FLIGHT
9
DRAG FACTORS DUE TO TRIM TECHNIQUE
If the control wheel is displaced to the point of spoiler deflection a significant increase in aerodynamic drag
results. Additionally, any rigging deviation that results in early spoiler actuation causes a significant increase
in drag per unit of trim. These conditions result in increased fuel consumption. Small out of trim conditions
affect fuel flow by less than 1%, if no spoilers are deflected.
Note: Aileron trim may be required for significant fuel imbalance, airplane damage, or flight control system
malfunctions.
PRIMARY RUDDER TRIM TECHNIQUE
It is recommended that the autopilot remain engaged while accomplishing the primary rudder trim technique
(using rudder trim only). After completing this technique, if the autopilot is disconnected, the airplane should
maintain a constant heading.
The following steps define the primary rudder trim technique:
•
set symmetrical thrust
•
balance fuel if required
•
ensure the autopilot is engaged in HDG SEL and stabilized for at least 30 seconds
•
trim the rudder in the direction corresponding to the down (low) side of the control wheel until the
control wheel indicates level. The indices on top of the control wheel should be used to ensure a
level wheel condition. The airplane is properly trimmed when the control wheel is level, (zero
index). As speed, gross weight, or altitude change, trim requirements may also change. In a
proper trim condition, there may be a slight forward slip (slight bank angle indicated on the bank
pointer) and a slight deflection of the slip/skid indicator, which is acceptable.
AUTOPILOT PROCEDURES
Crewmembers must coordinate their actions so that the airplane is operated safely and efficiently.
Autopilot engagement should only be attempted when the airplane is in trim, F/D commands (if the F/D is
on) are essentially satisfied and the airplane flight path is under control. The autopilot is not certified or
designed to correct a significant out of trim condition or to recover the airplane from an abnormal flight
condition and/or unusual attitude.
CONTROL WHEEL STEERING
After autopilot engagement, the airplane may be maneuvered using the control wheel steering (CWS) pitch
mode, roll mode, or both using the control wheel and column. Manual inputs by the pilot using CWS are the
same as those required for manual flight. Climbs and descents may be made using CWS pitch while the roll
mode is in HDG SEL or VOR/LOC. Autopilot system feel control is designed to simulate control input
resistance similar to manual flight. Refer to the FCOM for a more detailed description of CWS operation.
MANUAL FLIGHT
The PM should make autopilot mode selections at the request of the PF. However, autopilot engagement
requires relaxing forces on the control column and is normally done by the PF. On airplanes where the PM
has access to set the applicable indicator, heading and altitude changes from ATC clearances and speed
selections associated with flap position changes may be made without specific directions. However, these
selections should be announced, such as, "HEADING 170 SET". The PF must be aware such changes are
being made. This enhances overall safety by requiring that both pilots are aware of all selections, while still
allowing one pilot to concentrate on flight path control.
For airplanes equipped with the SP-77 autopilot, ensure the proper approach progress display modes (if
applicable) are annunciated for the desired maneuver. If the flight director commands are not to be followed,
the flight director should be turned off.
© 2012 Captain Sim www.captainsim.com
‘737 Captain’ FLIGHT MANUAL Part IV – Flight Crew Training Manual
DO NOT USE FOR FLIGHT
10
AUTOMATIC FLIGHT
When the autopilot is in use, the PF should make the autopilot mode selections. The PM may select new
altitudes if crew duties permit.
Using automatic systems allows the pilot to devote additional time to monitoring the airplane's flight path.
Automatic systems give excellent results in the vast majority of situations. Both pilots must monitor
approach progress display mode annunciations (SP-77) and the current flight plan. Deviations from expected
performance are normally due to an incomplete understanding of their operations by the flight crew.
Early intervention prevents unsatisfactory airplane performance or a degraded flight path. Reducing the level
of automation as far as manual flight may be necessary to ensure proper control of the airplane is
maintained. The pilot should attempt to restore higher levels of automation only after airplane control is
assured. For example, if an immediate level-off in climb or descent is required, it may not be possible to
comply quickly enough using the AFCS. The PF should disconnect the autopilot and level off the airplane
manually at the desired altitude. After level off, set the desired altitude in the MCP, select an appropriate
pitch mode and re-engage the autopilot.
© 2012 Captain Sim www.captainsim.com
‘737 Captain’ FLIGHT MANUAL Part IV – Flight Crew Training Manual
DO NOT USE FOR FLIGHT
11
GROUND OPERATIONS
PREFACE
This chapter outlines the recommended operating practices and techniques during ground operations,
including pushback, engine start and taxi. Taxi operations during adverse weather are also addressed. The
recommended operating practices and techniques discussed in this chapter improve crew coordination,
enhance safety and provide a basis for standardization.
TAKEOFF BRIEFING
The takeoff briefing should be accomplished as soon as practical so it does not interfere with the final takeoff
preparations.
The takeoff briefing is a description of the departure flight path with emphasis on anticipated track and
altitude restrictions. It assumes normal operating procedures are used. Therefore, it is not necessary to brief
normal or standard takeoff procedures. Additional briefing items may be required when any elements of the
takeoff and/or departure are different from those routinely used. These may include:
•
adverse weather
•
adverse runway conditions
•
unique noise abatement requirements
•
dispatch using the minimum equipment list
•
special engine out departure procedures (if applicable)
•
any other situation where it is necessary to review or define crew responsibilities.
PUSH BACK
Each operator should develop specific pushback procedures and policies which are tailored for their specific
operations. The flight operations and maintenance departments need to be primary in developing these
procedures.
Pushbacks present a serious hazard to ground personnel. There have been many accidents where personnel
were run over by the airplane wheels during the pushback process.
Pushback or towing involves three phases:
•
positioning and connecting the tug and tow bar
•
moving the airplane
•
disconnecting the tow bar.
Proper training of both pilots and ground maintenance and good communication between the flight deck and
ground personnel are essential for a safe pushback operation.
Backing with Reverse Thrust
If no other means are available to move the airplane, thrust reversers may be used for backing. Wing flaps
should be retracted to provide maximum clearance and visibility for the ground crew giving hand signals.
The air conditioning should be OFF to prevent ingestion of exhaust gases.
The ramp area must be free of debris to prevent engine foreign object damage.
Back the airplane at very low speeds. The amount of reverse thrust required varies with ramp slope and
"set" of the tires. If possible, allow the airplane to roll forward slightly to unset the tires. Apply idle reverse
to begin backing, modulating as required to obtain the desired taxi speed. Avoid high reverse thrust power
levels.
Use forward thrust to stop. The amount varies with ramp slope and taxi speeds. Application of brakes while
moving backwards may cause the airplane to tip onto its tail.
© 2012 Captain Sim www.captainsim.com
‘737 Captain’ FLIGHT MANUAL Part IV – Flight Crew Training Manual
DO NOT USE FOR FLIGHT
12
TAXI
TAXI GENERAL
An airport diagram should be kept in a location readily available to both crewmembers during taxi. The
following guidelines aid in conducting safe and efficient taxi operations:
PRIOR TO TAXI
•
•
•
brief applicable items from airport diagrams and related charts
ensure both crewmembers understand the expected taxi route
write down the taxi clearance when received.
DURING TAXI
•
•
•
•
•
•
•
•
•
•
•
•
•
•
progressively follow taxi position on the airport diagram
during low visibility conditions, call out all signs to verify position
if unfamiliar with the airport consider requesting a FOLLOW ME vehicle or progressive taxi
instructions
use standard radio phraseology
read back all clearances. If any crewmember is in doubt regarding the clearance, verify taxi routing
with the written clearance or with ATC. Stop the airplane if the clearance is in doubt
when ground/obstruction clearance is in doubt, stop the airplane and obtain a wing-walker
avoid distractions during critical taxi phases; plan ahead for checklist accomplishment and company
communications
consider delaying checklist accomplishment until stopped during low visibility operations
do not allow ATC or anyone else to rush you
verify the runway is clear (both directions) and clearance is received prior to entering a runway
be constantly aware of the equipment, structures, and aircraft behind the airplane when the engines
are above idle thrust
consider using the taxi light to visually indicate movement
at night use all appropriate airplane lighting
when entering any active runway ensure the exterior lights specified in the FCOM are illuminated.
PRIOR TO LANDING
•
plan/brief the expected taxiway exit and route to parking.
AFTER LANDING
•
•
ensure taxi instructions are clearly understood, especially when crossing closely spaced parallel
runways
delay company communications until clear of all runways.
FLIGHT DECK PERSPECTIVE
There is a large area near the airplane where personnel, obstacles or guidelines on the ground cannot be
seen, particularly in the oblique view across the flight deck. Special care must be exercised in the parking
area and while taxiing. When parked, the pilot should rely on ground crew communications to a greater
extent to ensure a safe, coordinated operation.
The pilot's seat should be adjusted for optimum eye position. The rudder pedals should be adjusted so that it
is possible to apply maximum braking with full rudder deflection.
During taxiing, the pilot's heels should be on the floor, sliding the feet up on the rudder pedals only when
required to apply brakes to slow the taxi speed, or when maneuvering in close quarters on the parking ramp.
© 2012 Captain Sim www.captainsim.com
‘737 Captain’ FLIGHT MANUAL Part IV – Flight Crew Training Manual
DO NOT USE FOR FLIGHT
13
THRUST USE
Thrust use during ground operation demands sound judgment and technique. Even at relatively low thrust
the air blast effects from the engines can be destructive and cause injury. Airplane response to thrust lever
movement is slow, particularly at high gross weights. Engine noise level in the flight deck is low and not
indicative of thrust output. Idle thrust is adequate for taxiing under most conditions. A slightly higher thrust
setting is required to begin taxiing. Allow time for airplane response before increasing thrust further.
Excess thrust while taxiing may cause foreign objects to deflect into the lower aft fuselage, stabilizer, or
elevators, especially when the engines are over an unimproved surface. Run-ups and taxi operations should
only be conducted over well maintained paved surfaces and runways.
TAXI SPEED AND BRAKING
To begin taxi, release brakes, smoothly increase thrust to minimum required for the airplane to roll forward,
then reduce thrust to idle. A turn should not be started until sufficient forward speed has been attained to
carry the airplane through the turn at idle thrust.
The airplane may appear to be moving slower than it actually is due to the flight deck height above the
ground. Consequently, the tendency may be to taxi faster than desired. This is especially true during runway
turnoff after landing. The appropriate taxi speed depends on turn radius and surface condition.
Note: Some taxi speeds, usually between 10 and 20 knots, can cause an increase in airplane vibration,
especially on rough taxiways. If this occurs, a slight increase or decrease in speed reduces or eliminates the
vibration and increases passenger comfort.
Taxi speed should be closely monitored during taxi out, particularly when the active runway is some distance
from the departure gate. Normal taxi speed is approximately 20 knots, adjusted for conditions. On long
straight taxi routes, speeds up to 30 knots are acceptable, however at speeds greater than 20 knots use
caution when using the nose wheel steering wheel to avoid overcontrolling the nose wheels. When
approaching a turn, speed should be slowed to an appropriate speed for conditions. On a dry surface, use
approximately 10 knots for turn angles greater than those typically required for high speed runway turnoffs.
Note: High taxi speed combined with heavy gross weight and a long taxi distance can result in tire sidewall
overheating.
Avoid prolonged brake application to control taxi speed as this causes high brake temperatures and
increased wear of brakes. If taxi speed is too high, reduce speed with a steady brake application and then
release the brakes to allow them to cool. Braking to approximately 10 knots and subsequent release of the
brakes results in less heat build-up in the tires and brakes than when the brakes are constantly
applied.
Under normal conditions, differential braking and braking while turning should be avoided. Allow for
decreased braking effectiveness on slippery surfaces.
Avoid following other aircraft too closely. Jet blast is a major cause of foreign object damage.
During taxi, the use of reverse thrust above reverse idle is not recommended due to the possibility of foreign
object damage and engine surge. Momentary use of idle reverse thrust may be necessary on slippery
surfaces for airplane control while taxiing. Consider having the airplane towed rather than relying on
extended use of reverse thrust for airplane control.
ANTISKID INOPERATIVE
With antiskid inoperative, tire damage or blowouts can occur if moderate to heavy braking is used. With this
condition, it is recommended that taxi speed be adjusted to allow for very light braking.
© 2012 Captain Sim www.captainsim.com
‘737 Captain’ FLIGHT MANUAL Part IV – Flight Crew Training Manual
DO NOT USE FOR FLIGHT
14
NOSE WHEEL/RUDDER PEDAL STEERING
The captain's position is equipped with a nose wheel steering wheel. The nose wheel steering wheel is used
to turn the nosewheel through the full range of travel at low taxi speeds. Maintain a positive pressure on the
nose wheel steering wheel at all times during a turn to prevent the nose wheel from abruptly returning to
center. Rudder pedal steering turns the nose wheel through a limited range of travel. Straight ahead
steering and large radius turns may be accomplished with rudder pedal steering.
If nose wheel "scrubbing" occurs while turning, reduce steering angle and/or taxi speed. Avoid stopping the
airplane in a turn as excessive thrust is required to start taxiing again.
Differential thrust may be required at high weights during tight turns. This should only be used as required
to maintain the desired speed in the turn. After completing a turn, center the nose wheel and allow the
airplane to roll straight ahead. This relieves stresses in the main and nose gear structure prior to stopping.
TURNING RADIUS AND GEAR TRACKING
During all turning maneuvers, crews should be aware of their position relative to nose and main landing
gear. Pilot seat position forward of the nose wheel and main gear is depicted in the tables in this chapter.
As the following diagram illustrates, while the airplane is turning, the main gear tracks inside the nose gear.
The smaller the radius of the turn, the greater the distance that the main gear tracks inside the nose gear
and the greater the need to steer the nose gear outside of the taxi path (oversteer).
© 2012 Captain Sim www.captainsim.com
‘737 Captain’ FLIGHT MANUAL Part IV – Flight Crew Training Manual
DO NOT USE FOR FLIGHT
15
VISUAL CUES AND TECHNIQUES FOR TURNING WHILE TAXIING
The following visual cues assume the pilot's seat is adjusted for proper eye position. The following
techniques also assume a typical taxiway width. Since there are many combinations of turn angles, taxiway
widths, fillet sizes and taxiway surface conditions, pilot judgment must dictate the point of turn initiation and
the amount of nose wheel steering wheel required for each turn. Except for turns less than approximately
30°, speed should be 10 knots or less prior to turn entry. For all turns, keep in mind the main gear are
located behind the nose wheels, which causes them to track inside the nose wheels during turns. The pilot
position forward of the nose wheel and main gear is depicted in the table below.
Model
737 - 200
Pilot Seat Position (forward
of nose gear) feet (meters)
Pilot Seat Position (forward of
main gear) feet (meters)
4.8 (1.5)
42 (12.8)
TURNS LESS THAN 90 DEGREES
Steer the nose wheels far enough beyond the centerline of the turn to keep the main gear close to the
centerline.
TURNS OF 90 DEGREES OR MORE
Initiate the turn as the intersecting taxiway centerline (or intended exit point) approaches approximately the
center of the number 3 window. Initially use approximately full nose wheel steering wheel displacement.
Adjust the steering wheel input as the airplane turns to keep the nose wheels outside of the taxiway
centerline, near the outside radius of the turn. Nearing turn completion, when the main gear are clear of the
inside radius, gradually release the steering wheel input as the airplane lines up with the intersecting
taxiway centerline or intended taxi path.
TURNS OF 180 DEGREES
If the available taxi surface is narrow, coordination with ATC and ground support personnel may be required
to complete the operation safely. Reference special aerodrome operating instructions, if available. In some
cases (e.g., heavy weight, pilot uncertainty of runway and/or taxiway pavement edge locations and related
safety margins, nearby construction, vehicles, potential FOD damage, etc.), towing the airplane to the
desired location may be the safest option.
If a minimum radius 180° turn is necessary, consider using the ground crew to monitor the wheel path and
provide relevant information as the turn progresses. The ground crew should be warned of the risk
associated with jet blast and position themselves to avoid the hazard. Also ensure that obstacle clearance
requirements are met. Since more than idle thrust is required, the flight crew must be aware of buildings or
other objects in the area being swept by jet blast during the turn.
Note: Monitor the nose gear track closely, as it will leave the pavement in the turn before the main gear.
Approach the edge of the taxi surface at a shallow angle until the outboard side of the main gear wheels are
near the edge. The main gear are just inside the engine nacelles. Maneuver to keep the engine nacelles over
the prepared surfaces.
Note: Painted runway markings are slippery when wet and may cause skidding of the nose gear during the
turn.
Turning radius can be reduced by following a few specific taxi techniques. Taxi the airplane so that the main
gear tires are close to the runway edge.This provides more runway surface to make the turn. Stop the
airplane completely with the thrust at idle. Hold the nose wheel steering wheel to the maximum steering
angle, release the brakes, then add thrust on the outboard engine. Only use the engine on the outboard side
of the turn and maintain 5 to 10 knots during the turn to minimize turn radius. Light intermittent braking on
the inside main gear helps decrease turn radius. Stopping the airplane in a turn is not recommended unless
required to reduce the turn radius. As the airplane passes through 90° of turn, steer to place the main gear
approximately on the runway centerline, then gradually reduce the nose wheel steering wheel input as
required to align the airplane with the new direction of taxi. These actions result in a low speed turn and less
© 2012 Captain Sim www.captainsim.com
‘737 Captain’ FLIGHT MANUAL Part IV – Flight Crew Training Manual
DO NOT USE FOR FLIGHT
16
runway being used. Wind, slope, runway or taxiway surface conditions, and center of gravity may also affect
the turning radius.
The following diagrams show suggested airplane ground tracks for minimum radius 180° turns with various
runway turnaround configurations. These ground tracks provide the best maneuver capability while providing
the maximum runway length available for takeoff at the completion of the turn. However, this type of
maneuvering is normally not required unless operating on runways less than 148 feet (45m) in width.
TECHNIQUES WHEN USING A CIRCULAR TURNAROUND
© 2012 Captain Sim www.captainsim.com
‘737 Captain’ FLIGHT MANUAL Part IV – Flight Crew Training Manual
DO NOT USE FOR FLIGHT
TECHNIQUES WHEN USING A HAMMERHEAD TURNAROUND
© 2012 Captain Sim www.captainsim.com
17
‘737 Captain’ FLIGHT MANUAL Part IV – Flight Crew Training Manual
DO NOT USE FOR FLIGHT
18
TECHNIQUES WHEN USING A HAMMERHEAD TURNAROUND
TAXI - ADVERSE WEATHER
Taxi under adverse weather conditions requires more awareness of surface conditions.
When taxiing on a slippery or contaminated surface, particularly with strong crosswinds, use reduced
speeds. Use of differential engine thrust assists in maintaining airplane momentum through the turn. Avoid
using large nose wheel steering inputs to correct for skidding. Differential braking may be more effective
than nose wheel steering on slippery or contaminated surfaces. If speed is excessive, reduce speed prior to
initiating a turn.
Note: A slippery surface is any surface where the braking capability is less than that on a dry surface.
Therefore, a surface is considered "slippery" when it is wet or contaminated with ice, standing water, slush,
snow or any other deposit that results in reduced braking capability.
During cold weather operations, nose gear steering should be exercised in both directions during taxi. This
circulates warm hydraulic fluid through the steering cylinders and minimizes the steering lag caused by low
temperatures. If icing conditions are present, use anti-ice as required by the FCOM.
Engine exhaust may form ice on the ramp and takeoff areas of the runway, or blow snow or slush which may
freeze on airplane surfaces. If the taxi route is through slush or standing water in low temperatures, or if
precipitation is falling with temperatures below freezing, taxi with flaps up. Extended or prolonged taxi times
in heavy snow may necessitate de-icing prior to takeoff.
© 2012 Captain Sim www.captainsim.com
‘737 Captain’ FLIGHT MANUAL Part IV – Flight Crew Training Manual
DO NOT USE FOR FLIGHT
19
To reduce the possibility of flap damage after making an approach in icing conditions or landing on a runway
covered with snow or slush, do not retract the flaps to less than 15 until the flap area has been checked for
debris by maintenance.
LOW VISIBILITY
Pilots need a working knowledge of airport surface lighting, markings, and signs for low visibility taxi
operations. Understanding the functions and procedures to be used with stop bar lights, ILS critical area
markings, holding points, and low visibility taxi routes is essential to conducting safe operations. Many
airports have special procedures for low visibility operations. For example, airports operating under FAA
criteria with takeoff and landing minimums below 1200ft (350m) RVR are required to have a low visibility
taxi plan.
TAXI - ONE ENGINE
Because of additional operational procedural requirements and crew workload, taxiing out for flight with an
engine shut down is not recommended. Engines require warm up prior to applying takeoff thrust and cool
down prior to shutting down. If the engine has been shut down for several hours, it is desirable to operate at
as low a thrust setting as practical for several minutes prior to takeoff.
If taxiing in after landing with an engine shut down, the crew must be aware of systems requirements,
(hydraulics, brakes, electrical). If possible, make minimum radius turns in a direction that puts the operating
engine on the outside of the turn. In operational environments such as uphill slope, soft asphalt, high gross
weights, congested ramp areas, and wet/slippery ramps and taxiways, taxi with both engines operating.
© 2012 Captain Sim www.captainsim.com
‘737 Captain’ FLIGHT MANUAL Part IV – Flight Crew Training Manual
DO NOT USE FOR FLIGHT
20
TAKEOFF AND INITIAL CLIMB
PREFACE
This chapter outlines the recommended operating practices and techniques for takeoff and initial climb.
Engine failure during takeoff/initial climb is also addressed. The discussion portion of each illustration
highlights important information.
The flight profile illustrations represent the recommended basic configuration during the accomplishment of
the flight maneuvers, and provides a basis for standardization and crew coordination.
© 2012 Captain Sim www.captainsim.com
‘737 Captain’ FLIGHT MANUAL Part IV – Flight Crew Training Manual
DO NOT USE FOR FLIGHT
21
TAKEOFF
TAKEOFF PROFILE
TAKEOFF - GENERAL
This profile does not satisfy noise abatement guidelines established by the U.S. FAA. See the Noise
Abatement Takeoff section for procedures that satisfy this requirement.
Although flaps up speed to 3,000 feet is generally recommended for noise abatement reasons, it may not be
required except at heavy weights. At lighter weights the performance of the airplane is such that 3,000 feet
is usually reached before flap retraction is complete.
THRUST MANAGEMENT
High thrust settings from jet engine blast over unpaved surfaces or thin asphalt pavement intended only to
support occasional aircraft movements can cause structural blast damage from loose rocks, dislodged
asphalt pieces, and other foreign objects. Ensure run ups and takeoff operations are only conducted over
well maintained paved surfaces and runways.
INITIATING TAKEOFF ROLL
For airplanes equipped with the SP-77 autopilot, the flight director is normally off for takeoff. Flight director
commands may be used after flaps are retracted and climb thrust is set.
Note: If a possibility exists of a windshear being encountered on takeoff, flight directors should be turned off
for airplanes not equipped with a windshear warning system.
© 2012 Captain Sim www.captainsim.com
‘737 Captain’ FLIGHT MANUAL Part IV – Flight Crew Training Manual
DO NOT USE FOR FLIGHT
22
A rolling takeoff procedure is recommended for setting takeoff thrust. It expedites takeoff and reduces the
risk of foreign object damage or engine surge/stall due to a tailwind or crosswind. Flight test and analysis
prove that the change in takeoff roll due to the rolling takeoff procedure is negligible when compared to a
standing takeoff.
Rolling takeoffs are accomplished in two ways:
•
if cleared for takeoff prior to or while entering the runway, maintain normal taxi speed. When the
airplane is aligned with the runway centerline ensure the nose wheel steering wheel is released and
apply takeoff thrust by advancing the thrust levers to approximately 1.4 EpR (levers in vertical
position.). Allow the engines to stabilize momentarily then promptly advance the thrust levers to
takeoff thrust (autothrottle TO/GA). There is no need to stop the airplane prior to adding thrust.
•
if holding in position on the runway, ensure the nose wheel steering wheel is released, release
brakes, then apply takeoff thrust as described above.
Note: Brakes are not normally held with thrust above idle unless a static run-up in icing conditions is
required.
A standing takeoff procedure may be accomplished by holding the brakes until the engines are stabilized,
ensure the nose wheel steering wheel is released, then release the brakes and promptly advance the thrust
levers to takeoff thrust (autothrottle TO/GA).
Allowing the engines to stabilize provides uniform engine acceleration to takeoff thrust and minimizes
directional control problems. This is particularly important if crosswinds exist or the runway surface is
slippery. The exact initial setting is not as important as setting symmetrical thrust.
Note: Allowing the engines to stabilize for more than approximately 2 seconds prior to advancing thrust
levers to takeoff thrust may adversely affect takeoff distance.
If thrust is to be set manually, smoothly advance thrust levers toward takeoff thrust. Final thrust
adjustments should be made, with reference to the digital readouts, by 60 knots. After 60 knots, do not
reduce thrust except as needed to maintain engine parameters within limits (red line).
During takeoff, if an engine exceedance occurs after thrust is set and the decision is made to continue the
takeoff, do not retard the thrust lever in an attempt to control the exceedance. Retarding the thrust levers
after thrust is set invalidates takeoff performance. When the PF judges that altitude (minimum 400 feet AGL)
and airspeed are acceptable, the thrust lever should be retarded until the exceedance is within limits and the
appropriate NNC accomplished.
Use of the nose wheel steering wheel is not recommended above 30 knots. However, pilots must use caution
when using the nose wheel steering wheel above 20 knots to avoid over-controlling the nose wheels
resulting in possible loss of directional control. Limited circumstances such as inoperative rudder pedal
steering may require the use of the nose wheel steering wheel at low speeds during takeoff and landing
when the rudder is not effective. Reference the airplane DDPG for more information concerning operation
with rudder pedal steering inoperative.
Light forward pressure is held on the control column. Keep the airplane on centerline with rudder pedal
steering and rudder. The rudder becomes effective between 40 and 60 knots. Maximum nose wheel steering
effectiveness is available when above taxi speeds by using rudder pedal steering.
Regardless of which pilot is making the takeoff, the captain should keep one hand on the thrust levers until
V1 in order to respond quickly to a rejected takeoff condition. After V1, the captain's hand should be
removed from the thrust levers.
The PM should monitor engine instruments and airspeed indications during the takeoff roll and announce any
abnormalities. The PM should announce passing 80 knots and the PF should verify that his airspeed indicator
is in agreement.
A pitot system blocked by protective covers or foreign objects can result in no airspeed indication, or
airspeed indications that vary between instruments. It is important that aircrews ensure airspeed indicators
are functioning and reasonable at the 80 knot callout. If the accuracy of either primary airspeed indication is
in question, reference the standby airspeed indicator. Early recognition of a malfunction is important in
making a sound go/stop decision. Refer to the Airspeed Unreliable section in chapter 8 for an expanded
discussion of this subject.
© 2012 Captain Sim www.captainsim.com
‘737 Captain’ FLIGHT MANUAL Part IV – Flight Crew Training Manual
DO NOT USE FOR FLIGHT
23
ROTATION AND LIFTOFF - ALL ENGINES
Takeoff speeds are established based on minimum control speed, stall speed, and tail clearance margins.
Shorter bodied airplanes are normally governed by stall speed margin while longer bodied airplanes are
normally limited by tail clearance margin. When a smooth continuous rotation is initiated at VR, tail
clearance margin is assured because computed takeoff speeds depicted in the QRH or airport analysis are
adjusted to provide adequate tail clearance.
Above 80 knots, relax the forward control column pressure to the neutral position. For optimum takeoff and
initial climb performance, initiate a smooth continuous rotation at VR toward 15° of pitch attitude. The use of
stabilizer trim during rotation is not recommended.
For airplanes equipped with the SP-77 autopilot, after liftoff use indicated airspeed and attitude as the
primary pitch reference, cross checking other flight instruments as necessary.
Using the technique above, liftoff attitude is achieved in approximately 3 to 6 seconds. Rotate smoothly at
an average pitch rate of 3 degrees/second.
Note: The flight director pitch command is not used for rotation.
TYPICAL ROTATION, ALL ENGINES
The following figure shows typical rotation with both engines operating.
Retract the landing gear after a positive rate of climb is indicated on the altimeter. Retract flaps in
accordance with the technique described in this chapter.
TYPICAL TAKEOFF TAIL CLEARANCE
The following diagram and table show the effect of flap position on liftoff pitch attitude and minimum tail
clearance during takeoff. Additionally, the last column shows the pitch attitude for tail contact with wheels on
runway and landing gear struts extended. For a discussion of tail strike procedures see chapter 8 and the
FCOM.
© 2012 Captain Sim www.captainsim.com
‘737 Captain’ FLIGHT MANUAL Part IV – Flight Crew Training Manual
DO NOT USE FOR FLIGHT
Model
Flap
Liftoff Attitude
(degrees)
Minimum Tail
Clearance
inches (cm)
200
1
10.2
30 (77)
5
15
25
8.5
5.8
6.2
37(95)
47 (119)
46 (116)
24
Tail Strike
Pitch Attitude
(degrees)
15.5
EFFECT OF ROTATION SPEED AND PITCH RATE ON LIFTOFF
Takeoff and initial climb performance depend on rotating at the correct airspeed and proper rate to the
rotation target attitude. Early or rapid rotation may cause a tail strike. Late, slow, or under-rotation
increases takeoff ground roll. Any improper rotation decreases initial climb flight path.
SLOW OR UNDER ROTATION (TYPICAL)
CENTER-OF-GRAVITY (C.G.) EFFECTS
When taking off at light weight and with an aft C.G., the combination of full thrust, rapid thrust application,
and sudden brake release may tend to pitch the nose up, reducing nosewheel steering effectiveness. With
C.G. at or near the aft limit, maintain forward pressure on the control column until 80 knots to increase
nosewheel steering effectiveness. Above 80 knots, relax the forward control column pressure to the neutral
position. At light weight and aft C.G., use of reduced thrust and rolling takeoff technique is recommended
whenever possible. The rudder becomes effective between 40 and 60 knots.
© 2012 Captain Sim www.captainsim.com
‘737 Captain’ FLIGHT MANUAL Part IV – Flight Crew Training Manual
DO NOT USE FOR FLIGHT
25
CROSSWIND TAKEOFF
The crosswind guidelines shown below were derived through flight test data and engineering analysis, and
piloted simulated guidelines.
Note: Engine surge can occur with a strong crosswind component if takeoff
thrust is set prior to brake release. Therefore, the rolling takeoff procedure is strongly advised when
crosswind exceeds 20 knots.
TAKEOFF CROSSWIND GUIDELINES
Crosswind guidelines are not considered limitations. Crosswind guidelines are provided to assist operators in
establishing their own crosswind policies. Takeoff crosswind guidelines are based upon the most adverse
airplane loading (light weight and aft center of gravity) and assume an engine out RTO. On slippery
runways, crosswind guidelines are a function of runway surface condition, and assume proper pilot
technique.
Runway Condition
Crosswind - Knots1
Dry
40
Wet
25
Standing Water/Slush
Snow - No Melting
2
Ice - No Melting **
16
21
7
DIRECTIONAL CONTROL
Initial runway alignment and smooth symmetrical thrust application result in good crosswind control
capability during takeoff. Light forward pressure on the control column during the initial phase of takeoff roll
(below approximately 80 knots) increases nose wheel steering effectiveness. Any deviation from the
centerline during thrust application should be countered with immediate smooth and positive control inputs.
Smooth rudder control inputs combined with small control wheel inputs result in a normal takeoff with no
overcontrolling. Large control wheel inputs can have an adverse effect on directional control near V1(MCG)
due to the additional drag of the extended spoilers.
Note: During wet or slippery runway conditions, the PM should give special attention to ensuring the engines
have symmetrically balanced thrust indications.
ROTATION AND TAKEOFF
Maintain wings level during the takeoff roll by applying control wheel displacement into the wind. During
rotation continue to apply control wheel in the displaced position to keep the wings level during liftoff. The
airplane is in a sideslip with crossed controls at this point. A slow, smooth recovery from this sideslip is
accomplished after liftoff by slowly neutralizing the control wheel and rudder pedals.
GUSTY WIND AND STRONG CROSSWIND CONDITIONS
For takeoff in gusty or strong crosswind conditions, use of a higher thrust setting than the minimum required
is recommended. When the prevailing wind is at or near 90° to the runway, the possibility of wind shifts
resulting in gusty tailwind components during rotation or liftoff increases. During this condition, consider the
use of thrust settings close to or at maximum takeoff thrust. The use of a higher takeoff thrust setting
reduces the required runway length and minimizes the airplane exposure to gusty conditions during rotation,
liftoff, and initial climb. Avoid rotation during a gust. If a gust is experienced near VR, as indicated by
1
2
measured at 33 feet (10 m) tower height and apply for runway 148 feet (45m) or greater in width.
© 2012 Captain Sim www.captainsim.com
‘737 Captain’ FLIGHT MANUAL Part IV – Flight Crew Training Manual
DO NOT USE FOR FLIGHT
26
stagnant airspeed or rapid airspeed acceleration, momentarily delay rotation. This slight delay allows the
airplane additional time to accelerate through the gust and the resulting additional airspeed improves the tail
clearance margin. Do not rotate early or use a higher than normal rotation rate in an attempt to clear the
ground and reduce the gust effect because this reduces tail clearance margins. Limit control wheel input to
that required to keep the wings level. Use of excessive control wheel may cause spoilers to rise which has
the effect of reducing tail clearance. All of these factors provide maximum energy to accelerate through
gusts while maintaining tail clearance margins at liftoff. The airplane is in a sideslip with crossed controls at
this point. A slow, smooth recovery from this sideslip is accomplished after liftoff by slowly neutralizing the
control wheel and rudder pedals.
IMPROVED CLIMB PERFORMANCE TAKEOFF
When not field length limited, an increased climb limit weight is achieved by using the excess field length to
accelerate to higher takeoff and climb speeds. This improves the climb gradient, thereby raising the climb
limit weight. V1, VR and V2 are increased to maintain consistent performance relationships. V1, VR and V2
must be obtained from dispatch or a runway analysis.
LOW VISIBILITY TAKEOFF
Low visibility takeoff operations, below landing minima, may require a takeoff alternate. When selecting a
takeoff alternate, consideration should be given to unexpected events such as an engine failure or other
non-normal situation that could affect landing minima at the takeoff alternate. Operators, who have
authorization for engine inoperative Category II/III operations, may be authorized lower alternate minima.
With proper crew training and appropriate runway lighting, takeoffs with visibility as low as 500ft/150m RVR
may be authorized (FAA). With takeoff guidance systems and centerline lighting that meets FAA or ICAO
criteria for Category III operations, takeoffs with visibility as low as 300ft/75m RVR may be authorized.
Regulatory agencies may impose takeoff crosswind limits specifically for low visibility takeoffs.
All RVR readings must be equal to or greater than required takeoff minima. If the touchdown or rollout RVR
system is inoperative, the mid RVR may be substituted for the inoperative system. When the touchdown
zone RVR is inoperative, pilot estimation of RVR may be authorized by regulatory agencies.
ADVERSE RUNWAY CONDITIONS
Slush, standing water, or deep snow reduces the airplane takeoff performance because of increased rolling
resistance and the reduction in tire-to-ground friction.
Most operators specify weight reductions to the AFM field length and/or obstacle limited takeoff weight based
upon the depth of powdery snow, slush, wet snow or standing water and a maximum depth where the
takeoff should not be attempted.
Slush or standing water may cause damage to the airplane. The recommended maximum depth for slush,
standing water, or wet snow is 0.5 inch (12.7 mm) on the runway. For dry snow the maximum depth is 4
inches (102 mm).
A slippery runway (wet, compact snow, ice) also increases stopping distance during a rejected takeoff.
Takeoff performance and critical takeoff data are adjusted to fit the existing conditions. If there is an
element of uncertainty concerning the safety of an operation with adverse runway conditions, do not takeoff
until the element of uncertainty is removed.
Note: Check the airport analysis or the PI section of the QRH for performance degradation for takeoff with
adverse runway conditions.
During wet runway or slippery conditions, the PM must give special attention to ensuring that the thrust on
the engines advances symmetrically. Any tendency to deviate from the runway centerline must immediately
be countered with steering action and, if required, slight differential thrust.
© 2012 Captain Sim www.captainsim.com
‘737 Captain’ FLIGHT MANUAL Part IV – Flight Crew Training Manual
DO NOT USE FOR FLIGHT
27
Forward pressure on the control column during the initial portion of the takeoff roll (below approximately 80
knots) increases nose wheel steering effectiveness.
During takeoffs on icy runways, lag in rudder pedal steering and possible nose wheel skidding must be
anticipated. Keep the airplane on the centerline with rudder pedal steering and rudder. The rudder becomes
effective between 40 - 60 knots. If deviations from the centerline cannot be controlled either during the start
of the takeoff roll or until the rudder becomes effective, immediately reject the takeoff.
REJECTED TAKEOFF DECISION
The total energy that must be dissipated during an RTO is proportional to the square of the airplane velocity.
At low speeds (up to approximately 80 knots), the energy level is low. Therefore, the airplane should be
stopped if an event occurs that would be considered undesirable for continued takeoff roll or flight. Examples
include Master Caution, unusual vibrations or tire failure.
Note: Refer to the Rejected Takeoff NNM in the QRH for guidance concerning the decision to reject a takeoff
below and above 80 knots.
As the airspeed approaches V1 during a balanced field length takeoff, the effort required to stop can
approach the airplane maximum stopping capability. Therefore, the decision to stop must be made prior to
V1.
Historically, rejecting a takeoff near V1 has often resulted in the airplane stopping beyond the end of the
runway. Common causes include initiating the RTO after V1 and failure to use maximum stopping capability
(improper procedures/techniques). Effects of improper RTO execution are shown in the diagrams located in
the RTO Execution Operational Margins section, this chapter. The maximum braking effort associated with an
RTO is a more severe level of braking than most pilots experience in normal service.
Rejecting the takeoff after V1 is not recommended unless the captain judges the airplane incapable of flight.
Even if excess runway remains after V1, there is no assurance that the brakes have the capacity to stop the
airplane prior to the end of the runway.
If, during a takeoff, the crew discovers that the V speeds are not set and there are no other fault indications,
the takeoff may be continued. The lack of V speeds does not fit any of the published criteria for rejecting a
takeoff (refer to the Rejected Takeoff NNM in the QRH). In the absence of V speeds, the PM should announce
V1 and VR speeds to the PF at the appropriate times during the takeoff roll.
For airplanes equipped with the SP-77 autopilot, the V2 speed should be displayed on airspeed indicators. If
neither pilot recalls the correct rotation speed, rotate the airplane 5-10 knots prior to V2 speed.
REJECTED TAKEOFF MANEUVER
The RTO maneuver is initiated during the takeoff roll to expeditiously stop the airplane on the runway. The
PM should closely monitor essential instruments during the takeoff roll and immediately announce
abnormalities, such as "ENGINE FIRE", "ENGINE FAILURE", or any adverse condition significantly affecting
safety of flight. The decision to reject the takeoff is the responsibility of the captain, and must be made prior
to V1 speed. If the captain is the PM, he should initiate the RTO and announce the abnormality
simultaneously.
Note: If the decision is made to reject the takeoff, the flight crew should accomplish the rejected takeoff
non-normal maneuver as described in the Maneuvers chapter of the QRH.
If rejecting due to fire, in windy conditions consider positioning the aircraft so the fire is on the downwind
side. After an RTO, comply with brake cooling requirements before attempting a subsequent takeoff.
© 2012 Captain Sim www.captainsim.com
‘737 Captain’ FLIGHT MANUAL Part IV – Flight Crew Training Manual
DO NOT USE FOR FLIGHT
28
GO/STOP DECISION NEAR V1
It was determined when the aviation industry produced the Takeoff Safety Training Aid in 1992 that the
existing definition of V1 might have caused confusion because they did not make it clear that V1 is the
maximum speed at which the flight crew must take the first action to reject a takeoff. The U.S. National
Transportation Safety Board (NTSB) also noted in their 1990 study of rejected takeoff accidents, that the
late initiation of rejected takeoffs was the leading cause of runway overrun accidents. As a result, the FAA
has changed the definition of V1 in FAR Part 1 to read as follows:
•
V1 means the maximum speed in the takeoff at which the pilot must take the first action (e.g.,
apply brakes, reduce thrust, deploy speedbrakes) to stop the airplane within the accelerate-stop distance
and
•
V1 also means the minimum speed in the takeoff, following a failure of an engine at which the pilot
can continue the takeoff and achieve the required height above the takeoff surface within the takeoff
distance.
Pilots know that V1 is fundamental to making the Go/Stop decision. Under runway limited conditions, if the
reject procedure is initiated at V1, the airplane can be stopped prior to reaching the end of the runway. See
RTO Execution Operational Margins diagrams for the consequences of initiating a reject after V1 and/or using
improper procedures.
When the takeoff performance in the AFM is produced, it assumes an engine failure or event one-second
before V1. In a runway limited situation, this means the airplane reaches a height of 35 feet over the end of
the runway if the decision is to continue the takeoff.
Within reasonable limits, even if the engine failure occurs earlier than the assumed one second before V1, a
decision to continue the takeoff will mean that the airplane is lower than 35 feet at the end of the runway,
but it is still flying. For instance if the engine fails 2 seconds prior to V1 and the decision is made to go, the
airplane will reach a height of 15 to 20 feet at the end of the runway.
Although training has historically centered on engine failures as the primary reason to reject, statistics show
engine thrust loss was involved in approximately one quarter of the accidents, and wheel or tire problems
have caused almost as many accidents and incidents as have engine events. Other reasons that rejects
occurred were for configuration, indication or light, crew coordination problems, bird strikes or ATC
problems.
What's important to note here is that the majority of past RTO accidents were not engine failure events. Full
takeoff power from all engines was available. With normal takeoff power, the airplane should easily reach a
height of 150 feet over the end of the runway, and the pilot has the full length of the runway to stop the
airplane if an air turnback is required.
Making the Go/Stop decision starts long before V1. Early detection, good crew coordination and quick
reaction are the keys to a successful takeoff or stop.
© 2012 Captain Sim www.captainsim.com
‘737 Captain’ FLIGHT MANUAL Part IV – Flight Crew Training Manual
DO NOT USE FOR FLIGHT
29
RTO EXECUTION OPERATIONAL MARGINS
A successful rejected takeoff at or near V1 is dependent upon the captain making timely decisions and using
the proper procedures.
The data in the following figures, extracted from the 1992 Takeoff Safety Training Aid are provided as a
reference. The individual diagrams show the approximate effects of various configuration items and
procedural variations on the stopping performance of the airplane. These calculations are frequently based
on estimated data, and are intended for training discussion purposes only. The data are generally typical of
the airplane at heavy weights and except as noted otherwise, are based on the certified transition time for
each specific model.
Each condition is compared to the baseline condition. The estimated speed at the end of the runway and the
estimated overrun distance are indicated at the right edge of each figure. The distance estimates assume an
overrun area that can produce the same braking forces as the respective runway surface. If less than the
baseline FAA accelerate-stop distance is required, the distance is denoted as a negative number.
© 2012 Captain Sim www.captainsim.com
‘737 Captain’ FLIGHT MANUAL Part IV – Flight Crew Training Manual
DO NOT USE FOR FLIGHT
30
INITIAL CLIMB - ALL ENGINES
For airplanes equipped with the SP-77 autopilot, use indicated airspeed and attitude as the primary pitch
references crosschecking other flight instruments as needed. Adjust pitch to maintain a target airspeed of V2
+ 20 knots.
V2 + 20 is the optimum climb speed with takeoff flaps. It results in the maximum altitude gain in the
shortest distance from takeoff. Acceleration to higher speeds reduces the altitude gain. If airspeed exceeds
V2 + 20 during the initial climb, stop the acceleration but do not attempt to reduce airspeed to V2 + 20. Any
speed between V2 + 15 and V2 + 25 knots results in approximately the same takeoff profile. Crosscheck
indicated airspeed for proper initial climb speed.
Retract the landing gear after a positive rate of climb is indicated on the altimeter. Do not apply brakes after
becoming airborne. Braking is automatically applied when the landing gear lever is placed in the up position.
After gear and flaps are retracted, the PM should verify the gear and flaps indications are normal.
© 2012 Captain Sim www.captainsim.com
‘737 Captain’ FLIGHT MANUAL Part IV – Flight Crew Training Manual
DO NOT USE FOR FLIGHT
31
MINIMUM FUEL OPERATION – TAKEOFF
The minimum fuel recommended for takeoff is trip fuel plus reserves. On very short flights this fuel quantity
may not be enough to prevent forward fuel pump low pressure lights from illuminating after takeoff.
If any main tank fuel pump indicates low pressure do not turn off fuel pump switches. Avoid rapid
acceleration of the airplane, reduce nose-up body attitude and maintain minimum nose-up body angle
required for a safe climb gradient.
IMMEDIATE TURN AFTER TAKEOFF - ALL ENGINES
Obstruction clearance, noise abatement, or departure procedures may require an immediate turn after
takeoff. Initiate the turn at the appropriate altitude (normally at least 400 feet AGL) and maintain V2 + 15 to
V2 + 25 with takeoff flaps.
Note: A maximum bank angle of 30° is permitted at V2 + 15 knots with takeoff flaps.
After completing the turn, and at or above flap retraction altitude, accelerate and retract flaps while
climbing.
Note: The possibility of an engine failure along the departure track must be
considered. Special engine out procedures, if available, are preferable to a takeoff weight reduction to
ensure all obstacles are cleared.
Note: For all airplanes equipped with the HDG SEL takeoff option, leave runway heading selected until turn
initiation.
AUTOPILOT ENGAGEMENT
The autopilot is FAA certified to allow engagement at or above 1,000 feet AGL after takeoff. Other
regulations or airline operating directives may specify a different minimum altitude. The airplane should be
in trim, and the flight director commands should be satisfied prior to autopilot engagement. This prevents
unwanted changes from the desired flight path during autopilot engagement.
FLAP RETRACTION SCHEDULE
During training flights, 1,000 feet AFE is normally used as the acceleration height to initiate thrust reduction
and flap retraction. For noise abatement considerations during line operations, thrust reduction typically
occurs at approximately 1,500 feet AFE and acceleration typically occurs between 1,500 and 3,000 feet AFE,
or as specified by individual airport noise abatement procedures.
At thrust reduction altitude, select or verify that climb thrust is set. At acceleration height, set flaps up
maneuvering speed and retract flaps on the Flap Retraction Schedule.
Begin flap retraction at V2 + 15 knots, except for a flaps 1 takeoff. For a flaps 1 takeoff, begin flap retraction
when reaching the flaps 1 maneuvering speed.
With airspeed increasing, subsequent flap retractions should be initiated when airspeed reaches the fixed
maneuvering speed for the existing flap position. For flaps up maneuvering, maintain at least flaps up
maneuvering speed. With flaps up and above 3,000 feet AGL, set the desired climb speed.
© 2012 Captain Sim www.captainsim.com
‘737 Captain’ FLIGHT MANUAL Part IV – Flight Crew Training Manual
DO NOT USE FOR FLIGHT
32
TAKEOFF FLAP RETRACTION SPEED SCHEDULE
T/O
Flaps
Select
Flaps
At & Below
117,000 Lb
(53,070 Kg)
Above
117,000 Lb
(53,070 Kg)
25
15
5
1
UP
V2 + 15
150
170
190
V2 + 15
160
180
200
15
5
1
UP
V2 + 15
170
190
V2 + 15
180
200
5
1
UP
V2 + 15
190
V2 + 15
200
1
UP
190
200
Note: Limit bank angle to 15 degrees until reaching V2 + 15.
NOISE ABATEMENT TAKEOFF
Normal takeoff procedures may not satisfy noise abatement requirements at all airports. Refer to specific
local airport procedures or current FAA or ICAO noise abatement profiles to accomplish the noise abatement
takeoff.
© 2012 Captain Sim www.captainsim.com
‘737 Captain’ FLIGHT MANUAL Part IV – Flight Crew Training Manual
DO NOT USE FOR FLIGHT
33
CLIMB, CRUISE, DESCENT AND HOLDING
PREFACE
This chapter outlines recommended operating practices and techniques used during climb, cruise, descent
and holding. Loss of an engine during climb or cruise and engine inoperative cruise/driftdown is also
addressed. The recommended operating practices and techniques discussed in this chapter improve crew
coordination, enhance safety, and provide a basis for standardization.
CLIMB
CLIMB CONSTRAINTS
All hard altitude climb restrictions, including "at or below" constraints, should be set in the altitude alert
controller. The next altitude may be set when the restriction has been satisfied or further clearance has been
received. This procedure provides altitude deviation alerts and ensures compliance with altitude clearance
limits.
LOW ALTITUDE LEVEL OFF
For airplanes equipped with the SP-77 autopilot, when a low altitude climb restriction is required after
takeoff the altitude restriction should be set in the altitude alert controller (SP-77). When the airplane
approaches this altitude, the airplane levels off if ALT SEL (as installed) is selected. If ALT SEL is not
installed, manually select ALT HOLD approaching the desired altitude.
TRANSITION TO CLIMB
Maintain flaps up maneuvering speed until clear of obstacles or above minimum crossing altitudes. If there
are no altitude or airspeed restrictions, accelerate to the desired climb speed schedule. The sooner the
airplane can be accelerated to the climb speed schedule, the more time and fuel efficient the flight.
ENGINE ICING DURING CLIMB
Engine icing may form when not expected and may occur when there is no evidence of icing on the
windshield or other parts of the airplane. Once ice starts to form, accumulation can build very rapidly.
Although one bank of clouds may not cause icing, another bank, which is similar, may cause icing.
Note: The engine anti-icing system should be turned on whenever icing conditions exist or are anticipated.
Failure to follow the recommended anti-ice procedures can result in engine stall, overtemperature or engine
damage.
ECONOMY CLIMB SCHEDULE - PDCS DATA UNAVAILABLE
•
•
250 knots - Below 10,000 feet
280 knots/0.74M - Above 10,000 feet
MAXIMUM RATE CLIMB
The PDCS provides a maximum rate climb for both high climb rates and minimum time to cruise altitude.
Maximum Rate Climb Schedule - PDCS Data Unavailable
•
flaps up maneuvering speed + 50 knots until intercepting 0.70M
© 2012 Captain Sim www.captainsim.com
‘737 Captain’ FLIGHT MANUAL Part IV – Flight Crew Training Manual
DO NOT USE FOR FLIGHT
34
MAXIMUM ANGLE CLIMB
The PDCS does not provide maximum angle climb speeds, but maximum angle climb speed can be
approximated by manually entering flaps up maneuvering speed. Maximum angle climb speed is normally
used for obstacle clearance, minimum crossing altitude or to reach a specified altitude in a minimum
distance.
CRUISE
This section provides general guidance for the cruise portion of the flight for maximum passenger comfort
and economy.
MAXIMUM ALTITUDE
Maximum altitude is the highest altitude at which the airplane can be operated. It is determined by three
basic characteristics, which are unique to each airplane model. The maximum altitude is the lowest of:
•
maximum certified altitude (structural) - determined during certification and is usually set by the
pressurization load limits on the fuselage.
•
thrust limited altitude - the altitude at which sufficient thrust is available to provide a specific
minimum rate of climb. (Reference the Long Range Cruise Maximum Operating Altitude table in the PI
chapter of the QRH). Depending on the thrust rating of the engines, the thrust limited altitude may be above
or below the maneuver limited altitude capability.
•
buffet or maneuver limited altitude - the altitude at which a specific maneuver margin exists prior to
buffet onset. This altitude provides at least a 0.2g margin (33° bank) for FAA operations or a 0.3g margin
(40° bank) for CAA/JAA operations prior to buffet.
Turbulence at or near maximum altitude can momentarily increase the airplane's angle-of attack and
activate the stick shaker. Maneuvering will increase the load factor and further reduce the margin to buffet
onset and stick shaker.
OPTIMUM ALTITUDE
Optimum altitude is the cruise altitude for minimum cost when operating in the ECON mode and for
minimum fuel burn when in the LRC or pilot-selected speed modes. In ECON mode, optimum altitude
increases as either airplane weight or cost index decreases. In LRC or selected speed modes, optimum
altitude increases as either airplane weight or speed decreases. On each flight, optimum altitude continues
to increase as weight decreases during the flight.
For short trips, optimum altitude as defined above may not be achievable, since the optimum descent point
will occur prior to completing the climb to optimum altitude.
Trip altitude further constrains optimum altitude by reducing the altitude for short trips until minimum cruise
segment time is satisfied. This cruise time is a minimum of 5 minutes. For short trips, operation at the trip
altitude will result in the minimum trip fuel while also satisfying the minimum cruise time requirement.
Flight plans not constrained by short trip distance are typically based on conducting the cruise portion of the
flight within plus or minus 2000 ft. of optimum altitude. Since the optimum altitude increases as fuel is
consumed during the flight, it is necessary to climb to a higher cruise altitude every few hours to achieve the
flight plan fuel burn. This technique, referred to as Step Climb Cruise, is typically accomplished by initially
climbing 2000 ft. above optimum altitude and then cruising at that flight level until 2000 ft. below optimum.
For most flights, one or more step climbs may be required before reaching optimum descent point. It may be
especially advantageous to request an initial cruise altitude above optimum if altitude changes are difficult to
obtain on specific routes. This minimizes the possibility of being held at a low altitude/high fuel consumption
condition for most of the flight. The requested/accepted initial cruise altitude should be compared to the
thrust limited or the maneuver margin limited altitudes. A cruise thrust limited altitude is dependent upon
the cruise level temperature. If the cruise level temperature increases above the chart value for gross
weight, maximum cruise thrust will not maintain desired cruise speed.
The selected cruise altitude should normally be as close to optimum as possible. Optimum altitude is the
altitude that gives the minimum trip cost for a given trip length, cost index, and gross weight. Optimum
© 2012 Captain Sim www.captainsim.com
‘737 Captain’ FLIGHT MANUAL Part IV – Flight Crew Training Manual
DO NOT USE FOR FLIGHT
35
altitude does not account for winds. It provides approximately a 1.5 load factor (approximately 48° bank to
buffet onset) or better buffet margin. As deviation from optimum cruise altitude increases, performance
economy deteriorates.
Some loss of thrust limited maneuver margin can be expected above optimum altitude. Levels 2000 feet
above optimum altitude normally allows approximately 45° bank prior to buffet onset. The higher the
airplane flies above optimum altitude, the more the thrust margin is reduced. Before accepting an altitude
above optimum, determine that it will continue to be acceptable as the flight progresses under projected
conditions of temperature and turbulence.
On airplanes with higher thrust engines, the altitude selection is most likely limited by maneuver margin to
initial buffet. Proj ected temperature and turbulence conditions along the route of flight should be reviewed
when requesting/accepting initial cruise altitude as well as subsequent step climbs.
CRUISE SPEED DETERMINATION
ECON cruise is a variable speed schedule that is a function of gross weight, cruise altitude, cost index, and
headwind or tailwind component. It is calculated to provide minimum operating cost for the entered cost
index. Entry of zero for cost index results in maximum range cruise.
Headwinds increase the ECON cruise speed. Tailwinds decrease ECON cruise speed, but not below the zero
wind maximum range cruise airspeed.
LRC is a variable speed schedule providing fuel mileage 1% less than the maximum available. The PDCS
applies wind corrections to LRC.
STEP CLIMB
Optimum step points are a function of the route length, flight conditions, speed mode, present aircraft
altitude, STEP to altitude and the gross weight. The PDCS does not compute an optimum step point. Initiate
a cruise climb to a predetermined altitude above optimum altitude when the airplane is at a predetermined
altitude below the optimum altitude displayed on the PDCS. For example, when the airplane is 2,000 feet
below the optimum altitude displayed on the PDCS, initiate a climb to a cruise altitude 2,000 feet above the
optimum altitude. Maintain this new cruise altitude until the airplane is again 2,000 feet below the cruise
altitude displayed on the PDCS, and repeat the process.
FUEL FOR ENROUTE CLIMB
The additional fuel required for a 4,000 foot enroute climb varies from 300 to 600 pounds (depending on the
airplane gross weight). This additional fuel is offset by the savings in the descent. It is usually beneficial to
climb to a higher altitude if recommended by the flight plan, provided the wind information used is reliable.
Note: The fuel saved at higher altitude does not normally justify a step climb unless the cruise time of the
higher altitude is approximately 20 minutes or longer.
CRUISE PERFORMANCE ECONOMY
The flight plan fuel burn from departure to destination is based on certain assumed conditions. These include
takeoff gross weight, cruise altitude, route of flight, temperature, enroute winds, and cruise speed.
Actual fuel burn should be compared to the flight plan fuel burn throughout the flight.
The planned fuel burn can increase due to:
•
temperature above planned
•
a lower cruise altitude than planned
•
cruise altitude more than 2,000 feet above optimum altitude
•
speed faster than planned or appreciably slower than long range cruise speed when long range
cruise was planned
•
stronger headwind component
•
fuel imbalance
•
improperly trimmed airplane
© 2012 Captain Sim www.captainsim.com
‘737 Captain’ FLIGHT MANUAL Part IV – Flight Crew Training Manual
DO NOT USE FOR FLIGHT
•
•
•
•
•
•
36
excessive thrust lever adjustments. Cruise fuel penalties include:
ISA + 10° C: 1% increase in trip fuel
2,000 feet above/below optimum altitude: 1% to 2% increase in trip fuel
4,000 feet below optimum altitude: 3% to 5% increase in trip fuel
8,000 feet below optimum altitude: 8% to 14% increase in trip fuel
cruise speed 0.01M above LRC: 1% to 2% increase in trip fuel. For cruise within 2,000 feet of
optimum, long range cruise speed can be approximated by using 0.72M. Long range cruise also
provides best buffet margin at all cruise altitudes.
Note: If a discrepancy is discovered between actual fuel burn and flight plan fuel burn that cannot be
explained by one of the items above, a fuel leak should be considered. Accomplish the applicable non-normal
checklist.
HIGH ALTITUDE HIGH SPEED FLIGHT
The airplane exhibits excellent stability throughout the high altitude/high Mach range. Mach buffet is not
normally encountered at high Mach cruise. However, even in Mach buffet, control response is smooth and
normal. The airplane does not have a Mach tuck tendency.
With Mach trim inoperative, the airplane exhibits a slight nose down trim change when accelerating to
speeds approaching MMO, however, control force changes are light and easily managed. When the Mach trim
system is operative, the nose down trim change is nearly imperceptible except by referencing the control
column position.
As speed nears MMO, drag increases rapidly. At high weights, sufficient thrust may not be available to
accelerate to MMO in level flight at normal cruising altitudes.
DESCENT
DESCENT SPEED DETERMINATION
Use the ECON speed indicated on the Descent page of the PDCS. The pilot may manually enter another
speed if desired. If the information is not available from the PDCS, use 0.74M / 250 knots for the best
average fuel economy descent.
DESCENT CONSTRAINTS
Set all mandatory altitude restrictions and "at or above" constraints in the altitude alert controller. The next
altitude may be set when the restriction has been assured or further clearance has been received.
DESCENT PLANNING
Flight deck workload increases as the airplane descends into the terminal area. Distractions must be
minimized and administrative and nonessential duties completed before descent or postponed until after
landing. Perform essential duties early in the descent so more time is available during the critical approach
and landing phases.
Operational factors and/or terminal area requirements may not allow following the optimum descent
schedule. Terminal area requirements can be incorporated into basic flight planning but ATC, weather, icing
and other traffic may require adjustments to the planned descent schedule.
Proper descent planning is necessary to arrive at the desired altitude at the proper speed and configuration.
The distance required for the descent is approximately 3 NM/1000 feet altitude loss for no wind conditions
using ECON speed. Rate of descent is dependent upon thrust, drag, airspeed schedule and gross weight.
© 2012 Captain Sim www.captainsim.com
‘737 Captain’ FLIGHT MANUAL Part IV – Flight Crew Training Manual
DO NOT USE FOR FLIGHT
37
DESCENT RATES
Descent Rate tables provide typical rates of descent below 20,000 feet with idle thrust and speedbrakes
extended or retracted.
Rate of Descent (Typical)
Target Speed
Clean
With Speedbrake
0.74 M/ 280
2100 fpm
3900 fpm
250
1500 fpm
2600 fpm
210
1000 fpm
1700 fpm
Normally, descend with idle thrust and in clean configuration (no speed brakes). Maintain cruise altitude until
the proper distance or time out for the planned descent and then hold the selected airspeed schedule during
descent. Deviations from this schedule may result in arriving too high at destination and require circling to
descend, or arriving too low and far out requiring extra time and fuel to reach destination.
The speedbrake may be used to correct the descent profile if arriving too high or too fast. The Descent
Procedure is normally initiated before the airplane descends below the cruise altitude for arrival at
destination, and should be completed by 10,000 feet MSL. The Approach Procedure is normally started at
transition level.
Plan the descent to arrive at traffic pattern altitude at flaps up maneuvering speed approximately 12 miles
from the runway when proceeding straight-in or about 8 miles out when making an abeam approach. A good
crosscheck is to be at 10,000 feet AGL, 30 miles from the airport, at 250 knots.
Losing airspeed can be difficult and may require a level flight segment. For planning purposes, it requires
approximately 25 seconds and 2 NM to decelerate from 280 to 250 knots in level flight without speedbrakes.
It requires an additional 35 seconds and 3 NM to decelerate to flaps up maneuvering speed at average gross
weights. Using speedbrakes to aid in deceleration reduces these times and distances by approximately 50%.
Maintaining the desired descent profile and awareness of position will ensure a more efficient operation.
Maintain awareness of the destination weather and traffic conditions, and consider the requirements of a
potential diversion. Review the airport approach charts and discuss the plan for the approach, landing, and
taxi routing to
The use of speedbrakes with flaps extended should be avoided, if possible. With flaps greater than 15, the
speedbrakes should be retracted. If circumstances dictate the use of speedbrakes with flaps extended, high
sink rates during the approach should be avoided. Speedbrakes should be retracted before reaching 1,000
feet
The flaps are normally not used for increasing the descent rate. Normal descents are made in the clean
configuration to pattern or instrument approach altitude.
When descending with the autopilot engaged and the speedbrakes extended at speeds near VMO/MMO, the
airspeed may momentarily increase to above VMO/MMO if the speedbrakes are retracted quickly. To avoid
this condition, smoothly and slowly retract the speedbrakes to allow the autopilot sufficient time to adjust
the pitch attitude to maintain the airspeed within limits.
When the speedbrakes are retracted during altitude capture near VMO/MMO, a momentary overspeed
condition may occur. To avoid this condition, it may be necessary to reduce the selected speed and/or
descent rate prior to altitude capture or reduce the selected speed and delay speedbrake retraction until
after level off is complete.
© 2012 Captain Sim www.captainsim.com
‘737 Captain’ FLIGHT MANUAL Part IV – Flight Crew Training Manual
DO NOT USE FOR FLIGHT
38
FLAPS AND LANDING GEAR
Normal descents are made in the clean configuration to pattern or instrument approach altitude. If greater
descent rates are desired, extend the speedbrakes. When thrust requirements for anti-icing result in less
than normal descent rates with speedbrakes extended, or if higher than normal descent rates are required
by ATC clearance, the landing gear can be lowered to increase the rate of descent.
Extend the flaps when in the terminal area and conditions require a reduction in airspeed below flaps up
maneuvering speed. Normally select flaps 5 prior to the approach fix going outbound, or just before entering
downwind on a visual approach.
Note: Avoid using the landing gear for increased drag. This minimizes passenger discomfort and increases
gear door life.
SPEED RESTRICTIONS
Speed restrictions below specific altitudes/flight levels and in the vicinity of airports are common. At high
gross weights, minimum maneuvering speed may exceed these limits. Consider extending the flaps to attain
a lower maneuvering speed or obtain clearance for a higher airspeed from ATC.
Other speeds may be assigned by ATC. Pilots complying with speed adjustments are expected to maintain
the speed within plus or minus 10 knots.
HOLDING
Start reducing to holding airspeed 3 minutes before arrival time at the holding fix so that the airplane
crosses the fix, initially, at or below the maximum holding airspeed.
If the PDCS holding speed is greater than the ICAO or FAA maximum holding speed, holding may be
conducted at flaps 1, using flaps 1 maneuvering speed. Flaps 1 uses approximately 10 percent more fuel
than flaps up. Holding speeds in the PDCS provide minimum fuel burn; but are never lower than flaps up
maneuvering speed.
If holding speed is not available from the PDCS, refer to the PI section of the QRH. Recommended holding
speeds can be approximated by using the following guidance until more accurate speeds are obtained from
the QRH:
•
•
flaps up maneuvering speed approximates minimum fuel burn speed and may be used at low
altitudes
above FL250, use VREF 40 + 100 knots to provide adequate buffet margin.
ICAO HOLDING AIRSPEEDS (MAXIMUM)
Altitude
Speed
Through 14,000 feet
230 knots
Above 14,000 to 20,000 feet MSL
240 knots
Above 20,000 to 34,000 feet MSL
265 knots
Above 34,000 feet MSL
0.83M
© 2012 Captain Sim www.captainsim.com
‘737 Captain’ FLIGHT MANUAL Part IV – Flight Crew Training Manual
DO NOT USE FOR FLIGHT
39
FAA HOLDING AIRSPEEDS (MAXIMUM)
Altitude
Through 6,000 feet MSL
Speed
200 knots
6,001 feet MSL through 230 knots
14,000 feet MSL
(210 knots Washington D. C. & New York
FIRs)
14,001 feet MSL and 265 knots
above
Maintain clean configuration if holding in icing conditions or in turbulence.
The initial outbound leg should be flown for 1 minute or 1 1/2 minutes as required by altitude. Timing for
subsequent outbound legs should be adjusted as necessary to achieve proper inbound leg timing.
In extreme wind conditions or at high holding speeds, the defined holding pattern protected airspace may be
exceeded. Advise ATC if an increase in airspeed is necessary due to turbulence, if unable to accomplish any
part of the holding procedure, or if unable to comply with speeds listed in the tables above.
© 2012 Captain Sim www.captainsim.com
‘737 Captain’ FLIGHT MANUAL Part IV – Flight Crew Training Manual
DO NOT USE FOR FLIGHT
40
APPROACH AND MISSED APPROACH
PREFACE
This chapter outlines recommended operating practices and techniques for ILS, non-ILS, circling and visual
approaches, and the Go-Around and Missed Approach maneuver. Flight profile illustrations represent the
recommended basic configuration for normal and non-normal flight maneuvers and provide a basis for
standardization and crew coordination.
The maneuvers are normally accomplished as illustrated. However, due to conflicting traffic at training
airports, air traffic separation requirements, and radar vectors, modifications may be necessary. Conditions
beyond the control of the flight crew may preclude following an illustrated maneuver exactly. The maneuver
profiles are not intended to replace good judgment and logic.
APPROACH
INSTRUMENT APPROACHES
All safe instrument approaches have certain basic factors in common. These include good descent planning,
careful review of the approach procedure, accurate flying, and good crew coordination. Thorough planning is
the key to a safe, unhurried, professional approach.
Complete the approach preparations before arrival in the terminal area. Set decision altitude/height DA(H) or
minimum descent altitude/height MDA(H). Crosscheck radio and pressure altimeters whenever practical. Do
not completely abandon enroute navigation procedures even though air traffic is providing radar vectors to
the initial or final approach fix. Check ADF/VOR bearing pointer switches set to the proper position. Verify
ILS, VOR and ADF are tuned and identified if required for the approach.
Check that the marker beacon is selected on the audio panel. The course and glide slope signals are reliable
only when their warning flags are not displayed, localizer and glide slope pointers are in view, and the ILS
identifier is received. Confirm the published approach inbound course is set or displayed.
Do not use radio navigation aid facilities that are out of service even though flight deck indications appear
normal. Radio navigation aids that are out of service may have erroneous transmissions that are not
detected by airplane receivers and no flight deck warning is provided to the crew.
APPROACH BRIEFING
Prior to the start of an instrument approach, the pilot flying should brief the other pilot as to intentions in
conducting the approach. Both pilots should review the approach procedure. All pertinent approach
information, including minimums and missed approach procedures, should be reviewed and alternate
courses of action considered.
As a guide, the approach briefing should include at least the following:
•
weather and NOTAMS at destination and alternate
•
type of approach and the validity of the charts to be used
•
navigation and communication frequencies to be used
•
minimum safe sector altitudes for that airport
•
approach procedure including courses and heading
•
vertical profile including all minimum altitudes, crossing altitudes and approach minimums
•
determination of the Missed Approach Point (MAP) and the missed approach procedure
•
other related crew actions such as tuning of radios, setting of course information, or other special
requirements
•
taxi routing to parking
•
any appropriate information related to a non-normal procedure
© 2012 Captain Sim www.captainsim.com
‘737 Captain’ FLIGHT MANUAL Part IV – Flight Crew Training Manual
DO NOT USE FOR FLIGHT
41
APPROACH CATEGORY
FAA Category
Speed
C
121 knots or more but less than 141 knots
D
141 knots or more but less than 166 knots
Speed - based upon a speed of VREF in the landing configuration
at maximum certificated landing weight.
ICAO
Range of Range
of Range
of Max
Speeds Max Speeds for
Categor Speeds at Speeds for Speeds for for
Visual Missed Approach
y
Threshold Initial Ap- Final
Ap- Maneuvering
InterFinal
proach
proach
(Circling)
mediate
C
121/140
160/240
115/160
180
160
240
D
141/165
185/250
130/185
205
185
265
Speeds at threshold - based upon a speed of VREF in the landing configuration
at maximum certified landing weight.
The designated approach category for an aircraft type is defined by landing reference speed (VREF) at
maximum certified landing weight under both USA TERPS and ICAO PANS OPS.
• The 737 is classified as a Category "C" airplane for straight in approaches.
For circling approaches, the anticipated circling speed at the actual weight is used to determine the required
approach minimums. This is because circling approach minimums for both USA TERPS and ICAO PANS OPS
are based on obstruction clearance for approach maneuvering within a defined region of airspace. The region
of airspace is determined as a function of actual aircraft speed. This region gets larger with increasing speed,
which may result in higher approach minimums depending upon the terrain characteristics surrounding the
airport. Similarly, approach minimums may decrease as speed is reduced for the same reason. However, the
use of lower circling approach minimums based on actual approach speeds does not change the designated
approach category of the airplane. Circling approach minimums are normally published as a function of
maximum aircraft speeds for circling in lieu of aircraft approach categories on Jeppesen Approach Charts.
APPROACH CLEARANCE
When cleared for an approach and on a published segment of that approach, the pilot is authorized to
descend to the minimum altitude for that segment. When cleared for an approach and not on a published
segment of the approach, maintain assigned altitude until crossing the initial approach fix or established on a
published segment of that approach. If established in a holding pattern at the final approach fix, the pilot is
authorized to descend to the procedure turn altitude when cleared for the approach.
When conducting an instrument approach from the holding pattern, continue on the same pattern as
holding, extend flaps to five on the outbound track parallel to final approach course. Turn inbound on the
procedure turn heading. This type of approach is also referred to as a race track approach.
PROCEDURE TURN
On most approaches the procedure turn must be completed within specified limits, such as within 10 NM of
the procedure turn fix or beacon. Airplane configuration and ground speed outbound must be considered. If
the procedure turn fix is crossed at an excessively high ground speed, the procedure turn protected airspace
may be exceeded. Adjust time outbound for airspeed, wind effects, and location of the procedure turn fix.
The procedure turn should be monitored using all navigation aids available to assure the airplane remains
within protected airspace. The published procedure turn altitudes are normally minimum altitudes.
© 2012 Captain Sim www.captainsim.com
‘737 Captain’ FLIGHT MANUAL Part IV – Flight Crew Training Manual
DO NOT USE FOR FLIGHT
42
STABILIZED APPROACH REQUIREMENTS
Maintaining a stable speed, descent rate, and vertical/lateral flight path in landing configuration is commonly
referred to as the stabilized approach concept.
Any significant deviation from planned flight path, airspeed, or descent rate should be announced. The
decision to execute a go-around is no indication of poor performance.
Note: Do not attempt to land from an unstable approach. Recommended Elements of a Stabilized Approach
The following recommendations are consistent with criteria developed by the Flight Safety Foundation.
All approaches should be stabilized by 1,000 feet above airport elevation in instrument meteorological
conditions (IMC) and by 500 feet above airport elevation in visual meteorological conditions (VMC). An
approach is considered stabilized when all of the following criteria are met:
•
the aircraft is on the correct flight path
•
only small changes in heading/pitch are required to maintain the correct flight path
•
the aircraft speed is not more than VREF + 20 knots indicated airspeed and not less than
VREF
•
the aircraft is in the correct landing configuration
•
sink rate is no greater than 1,000 fpm; if an approach requires a sink rate greater than
1,000 fpm, a special briefing should be conducted
•
power setting is appropriate for the aircraft configuration
•
all briefings and checklists have been conducted.
•
Specific types of approaches are stabilized if they also fulfill the following:
•
ILS approaches should be flown within one dot of the glide slope and localizer, or within the
expanded localizer scale (as installed)
•
during a circling approach, wings should be level on final when the aircraft reaches 300 feet
above airport elevation.
Unique approach procedures or abnormal conditions requiring a deviation from the above elements of a
stabilized approach require a special briefing.
Note: An approach that becomes unstabilized below 1,000 feet above airport elevation in IMC or below 500
feet above airport elevation in VMC requires an immediate go-around.
These conditions should be maintained throughout the rest of the approach for it to be considered a
stabilized approach. If the above criteria cannot be established and maintained at and below 500 feet AFE,
initiate a go-around.
At 100 feet HAT for all visual approaches, the aircraft should be positioned so the flight deck is within, and
tracking so as to remain within, the lateral confines of the runway extended.
As the aircraft crosses the runway threshold it should be:
•
stabilized on target airspeed to within + 10 knots until arresting descent rate at flare
•
on a stabilized flight path using normal maneuvering
•
positioned to make a normal landing in the touchdown zone (i.e., first 3,000 feet or first
third of the runway, whichever is less).
Initiate a go-around if the above criteria cannot be maintained.
MANEUVERING (INCLUDING RUNWAY CHANGES AND CIRCLING)
When maneuvering below 500 feet, be cautious of the following:
•
descent rate change to acquire glide path
•
lateral displacement from the runway centerline
•
tailwind/crosswind components
•
runway length available.
© 2012 Captain Sim www.captainsim.com
‘737 Captain’ FLIGHT MANUAL Part IV – Flight Crew Training Manual
DO NOT USE FOR FLIGHT
43
MANDATORY MISSED APPROACH
On all instrument approaches, where suitable visual reference has not been established and maintained,
execute an immediate missed approach when:
•
a navigation radio or flight instrument failure occurs which affects the ability to safely
complete the approach
•
the navigation instruments show significant disagreement
•
on ILS final approach and either the localizer or glide slope indicator shows full deflection
•
on a radar approach and radio communication is lost.
LANDING MINIMA
Most regulatory agencies require visibility for landing minima. Ceilings are not required. There are limits on
how far an aircraft can descend without visual contact with the runway environment when making an
approach. Descent limits are based on a decision altitude/height DA(H) for approaches using a glide slope;
or a MDA(H) for approaches that do not use vertical guidance, or where a DA(H) is not authorized for use.
Approach charts use the abbreviation DA(H) or MDA(H). DA(H) applies to Category I, II, and certain
Category III operations. A decision altitude "DA" or minimum descent altitude "MDA" is referenced to MSL
and the parenthetical height "(H)" is referenced to Touchdown Zone Elevation (TDZE) or threshold elevation.
Example: A DA(H) of 1,440' (200') is a DA of 1,440' with a corresponding height above the touchdown zone
of 200'.
When RVR is reported for the landing runway, it typically is used in lieu of the reported meteorological
visibility.
RADIO ALTIMETER (RA)
A radio altimeter is normally used to determine DH when a DA(H) is specified for Category II or Category III
approaches. Procedures at airports with irregular terrain use a barometric DH and/or a marker beacon to
determine the missed approach point. The radio altimeter may also be used to cross check the primary
altimeter over known terrain in the terminal area. However, unless specifically authorized, the radio
altimeter is not used for determining MDA(H) on instrument approaches. It should also not be used for
approaches where use of the radio altimeter is not authorized (RA NOT AUTHORIZED). However, if the radio
altimeter is used as a safety backup, it should be discussed in the approach briefing.
MISSED APPROACH POINTS (MAP)
A missed approach point is a point where a missed approach must be initiated if suitable visual references
are not available to make a safe landing or the airplane is not in a position to make a safe landing.
Determination of a MAP
For approaches such as an ILS, the DA(H) in conjunction with the glide slope is used to determine the MAP.
For non-ILS or G/S out approaches, the MAP may be determined by timing, DME or the middle marker.
TIMING DURING APPROACHES
Some regulatory agencies may still require the use of timing for approaches. The timing table, when
included, shows the distance from the final approach fix to the MAP.
© 2012 Captain Sim www.captainsim.com
‘737 Captain’ FLIGHT MANUAL Part IV – Flight Crew Training Manual
DO NOT USE FOR FLIGHT
44
INSTRUMENT LANDING SYSTEM (ILS)
Arrival at the MAP is determined by reference to an altimeter. DA is determined by reference to the
barometric altimeter, while DH is determined by reference to the radio altimeter.
LOCALIZER
The MAP for a localizer approach is not the same as for the corresponding ILS approach. Normally the
depiction on the approach chart indicates the ILS and not the localizer procedure. For most localizer
approaches, the published MAP is the threshold of the runway. The common method of determining the MAP
is by timing from the final approach fix, though other methods may be used such as DME or the middle
marker.
OTHER NON-ILS APPROACHES
The MAP for all other non-ILS approaches is depicted on the approach chart. If the procedure has a final
approach fix, the MAP may be short of the runway threshold, at the runway threshold, or located over a
radio facility on the field. For on airport facilities (VOR or NDB) which do not have a final approach fix, the
facility itself is the MAP and in most cases is beyond the runway threshold. Do not assume the airplane will
always be in a position to make a normal landing when reaching the MDA(H) prior to reaching the MAP.
When the MAP is at or beyond the runway threshold, the airplane must reach MDA(H) prior to arrival at the
MAP if a normal final approach is to be made.
PRECISION APPROACH RADAR (PAR)
The MAP for a PAR is the geographic point where the glide path intersects the DA(H). Arrival at the MAP is
determined by the pilot using the altimeter or as observed by the radar controller, whichever occurs first.
AIRPORT SURVEILLANCE RADAR (ASR)
The radar controller is required to discontinue approach guidance when the airplane is at the MAP or one
mile from the runway, whichever is greater. Perform the missed approach when instructed by the controller.
© 2012 Captain Sim www.captainsim.com
‘737 Captain’ FLIGHT MANUAL Part IV – Flight Crew Training Manual
DO NOT USE FOR FLIGHT
45
ILS APPROACH
ILS APPROACH PROFILE
ILS APPROACH - GENERAL
The ILS approach illustrated assumes all preparations for the approach such as review of approach
procedure and setting of minima and radios are complete. It focuses on crew actions and avionic systems
information. It also includes unique considerations during low weather minima operations. The pattern may
be modified to suit local traffic and air traffic requirements.
DECISION ALTITUDE/HEIGHT - DA(H)
A Decision Altitude/Height is a specified altitude or height in a precision approach where a missed approach
must be initiated if the required visual reference to continue the approach has not been established. The
"Altitude" value is typically measured by a barometric altimeter and is the determining factor for minima for
Category I approaches. The "Height" value specified in parenthesis, typically a RA height above the
touchdown zone (HAT), is advisory. The RA may not reflect actual height above terrain.
For most Category II and Category III approaches, the Decision Height is the controlling minima and the
altitude value specified is advisory. A Decision Height is usually based on a specified radio altitude above the
terrain on the final approach or touchdown zone.
PROCEDURE TURN AND INITIAL APPROACH
Cross the procedure turn fix at flaps 5 maneuvering airspeed.
© 2012 Captain Sim www.captainsim.com
‘737 Captain’ FLIGHT MANUAL Part IV – Flight Crew Training Manual
DO NOT USE FOR FLIGHT
46
APPROACH AND FINAL APPROACH
Avoid the tendency for both pilots to be "heads-down" during the approach.
Note: Prior to commencing the approach, applicable HSI/NAV switches (as installed) must be set so that the
HSI for the pilot flying indicates ILS navigation signals.
The approach procedure may be flown using HDG SEL or VOR/LOC for lateral tracking and CWS Pitch for
altitude changes.
When maneuvering to intercept the localizer, decelerate and extend flaps to 5. Attempt to be at flaps 5 and
flaps 5 maneuvering speed prior to localizer capture.
A 45 degree intercept angle is optimum. Higher intercept angles and airspeeds may cause course overshoot.
Approach mode should be selected prior to 5 degrees of course centerline, otherwise the capture feature
may not be able to capture the course correctly, resulting in undesirable overshoots.
Prior to selecting AUTO APP, the captain's radio must be tuned to the primary approach facility. The
remaining NAV radio may be used for determination of intersections and continued enroute navigation when
necessary. Both should be tuned to the primary approach facility as soon as conditions permit.
AUTO APP mode should not be selected until:
•
the ILS is tuned and identified
•
the airplane is on an inbound intercept heading
•
both localizer and glide slope pointers appear on the attitude display in the proper position
•
clearance for the approach has been received.
The glide slope may be captured before the localizer. To avoid unwanted glide slope capture, LOC mode may
be selected initially, followed by the APP mode.
Localizer capture occurs at approximately 2/5 dot for VOR and 2 dots for LOC. During LOC capture, bank
limit is 32°. At capture the F/D and A/P annunciate VOR/LOC captured and G/S armed.
Note: Early capture of false localizer or glide slope signals is possible if AUTO APP is selected prematurely.
Deselect AUTO APP mode and select Heading Select mode if this occurs.
When on intercept heading, select the AUTO APP mode and observe the VOR/LOC and G/S arm
annunciations on the approach progress display. AUTO APP mode should not be selected until both the
localizer and glide slope pointers appear on the ADI and you have received clearance for the approach.
The pilots should monitor the quality of the approach, including speedbrake deployment and autobrake (as
installed) application.
After LOC capture, select a heading to match the approach course or missed approach heading. For normal
localizer intercept angles, very little overshoot occurs. Bank angles up to 32° may be commanded during the
capture maneuver. For large intercept angles some overshoot can be expected.
When the glide slope pointer begins to move (glide slope alive), extend the landing gear, select flaps 15, and
decrease the speed to flaps 15 speed.
At glide slope capture, observe the approach progress display for correct modes. At this time, select landing
flaps and VREF + wind correction (minimum VREF + 5), and complete the Landing checklist. The pilot
monitoring should continue standard callouts during final approach and the pilot flying should acknowledge
callouts.
When established on the glide slope, set the missed approach altitude in the altitude alert window. Extension
of landing flaps at speeds in excess of flaps 15 speed may cause flap load relief activation (as installed) and
large thrust changes.
Check for correct crossing altitude and begin timing, if required, when crossing the final approach fix (FAF or
OM).
There have been incidents where airplanes have captured false glide slope signals and maintained
continuous on glide slope indications as a result of an ILS ground
transmitter erroneously left in the test mode. False glide slope signals can be detected by crosschecking the
final approach fix crossing altitude and verifying a normal pitch attitude and descent rate is indicated on final
approach after glide slope capture. Further, if a glide slope anomaly is suspected, an abnormal altitude
range-distance relationship may exist. This can be identified by crosschecking distance to the runway with
© 2012 Captain Sim www.captainsim.com
‘737 Captain’ FLIGHT MANUAL Part IV – Flight Crew Training Manual
DO NOT USE FOR FLIGHT
47
altitude. The altitude should be approximately 300 feet HAT per NM of distance to the runway for a 3° glide
slope.
If a false glide slope capture is suspected, perform a missed approach if visual conditions cannot be
maintained.
The autobrakes (as installed) should remain engaged until a safe stop is assured and adequate visibility
exists to control the airplane using visual references.
DELAYED FLAP APPROACH (NOISE ABATEMENT)
If the approach is not being conducted in adverse conditions that would make it difficult to achieve a
stabilized approach, the final flap selection may be delayed to conserve fuel or to accommodate speed
requests by air traffic.
Intercept the glide slope with gear down and flaps 15 at flaps 15 speed. The thrust required to descend on
the glide slope may be near idle. Approaching 1,000 feet AFE, select landing flaps, allow the speed to bleed
off to the final approach speed, then adjust thrust to maintain it. Complete the Landing checklist.
DECISION ALTITUDE/HEIGHT - DA(H)
The pilot monitoring should expand the instrument scan to include outside visual cues when approaching
DA(H). Do not continue the approach below DA(H) unless the airplane is in a position from which a normal
approach to the runway of intended landing can be made and suitable visual reference can be maintained.
Upon arrival at DA(H), or any time thereafter, any of the above requirements are not met, immediately
execute the missed approach procedure. When visual contact with the runway is established, maintain the
glide path to the flare. Do not descend below the glide path.
RAW DATA - (NO FLIGHT DIRECTOR)
Raw data approaches are normally used during training to improve the instrument scanflow. If a raw data
approach is required during normal operations, refer to the DDG or airline equivalent for the possibility of
increased landing minima.
ILS navigation signals are displayed on the ADI. Set the NAV switches so that ILS navigation signals are
displayed on the HSI. Course deviation displays on the HSI indicate 2 dot deviation from the ILS center
beam.
Use the HSI as the primary navigation instrument during a raw data ILS approach. Maneuvering the airplane
to place the symbolic airplane on the center of the HSI will center the course deviation bar. The course
deviation bar represents the ILS localizer after the front course is selected.
During initial course intercept, crosscheck the magnetic bearing information on the RMI or RDMI (as
installed). As the course deviation bar starts to center, turn the airplane to keep the nose of the symbolic
airplane pointed at the top of the course deviation bar. This technique will provide a smooth intercept and
rollout on course. In a crosswind it will be necessary to adjust the heading into the wind. The drift angle
pointer (as installed) on the HSI may be used to maintain the localizer.
Large bank angles will rarely be required while tracking inbound on the localizer. Use 5 to 10 degrees of
bank angle.
When the glide slope pointer begins to move (glide slope alive), lower the landing gear, extend flaps 15 and
decelerate to flaps 15 speed. This may be done in steps, pausing at intermediate settings so that large trim
changes are not required at once. Intercepting the glide slope, extend landing flaps and establish the final
approach speed. When established on the glide slope, preset the missed approach altitude in the altitude
window of the MCP. On final approach maintain VREF + 5 knots or an appropriate correction for headwind
component. Check altitude and time crossing the FAF. To stabilize on the final approach speed as early as
possible, it is necessary to exercise good speed control during the glide slope intercept phase of the
approach. The rate of descent will vary with the glide slope angle and groundspeed. Expeditious and smooth
corrections should be made based on the ILS course and glide slope indications. Apply corrections at
approximately the same rate and amount as the flight path deviations.
© 2012 Captain Sim www.captainsim.com
‘737 Captain’ FLIGHT MANUAL Part IV – Flight Crew Training Manual
DO NOT USE FOR FLIGHT
48
The missed approach procedure is the same as a normal missed approach. Flight Director guidance appears
if GA (SP-77) is selected. Refer to Go-Around and Missed Approach - All Approaches, this chapter.
LOW VISIBILITY APPROACHES
A working knowledge of approach lighting systems and regulations as they apply to the required visual
references is essential to safe and successful approaches. Touchdown RVR is normally controlling for
Category I, II, and III approaches. For Category I and II approaches, mid and rollout RVR are normally
advisory. For Category III operations mid and rollout RVR may be controlling. In some countries, visibility is
used instead of RVR. Approval from the regulatory agency is required to use visibility rather than RVR.
During Category I approaches, visual reference requirements typically specify that either the approach lights
or other aids be clearly visible to continue below DA(H). During Category I and II approaches, descent below
100 ft. above touchdown zone elevation requires the red terminating bars or red side row bars (ALSF or
Calvert lighting systems, or ICAO equivalent, if installed) to be distinctly visible. If actual touchdown RVR is
at or above the RVR required for the approach, the runway environment (threshold, threshold lights and
markings, touchdown zone, touchdown lights and markings) should become clearly visible resulting in a
successful approach. After acquiring the red terminating bars or red side row bars, if the runway
environment does not become distinctly visible execute an immediate missed approach.
A review of the approach and runway lighting systems available during the approach briefing is
recommended as the pilot has only a few seconds to identify the lights required to continue the approach.
For all low visibility approaches, a review of the airport diagram, expected runway exit, runway remaining
lighting and expected taxi route during the approach briefing is recommended.
Regulatory agencies may require an additional 15% be added to the dry landing distance. Agencies may also
require wind speed limitations less than maximum allowable autoland wind speeds found in the FCOM.
Autopilot or Flight Director System Configuration
Refer to the operator's Category II/IIIa Manual for specific airplane requirements that must be operative for
Category II/IIIa operations.
Compliance with the airworthiness performance standards for the autopilot and flight director does not
constitute approval to conduct operations in lower weather minimums. The demonstrated conditions are not
considered limiting. More detailed information concerning Category II and Category III operational
requirements can be found in FAA advisory circulars.
CAT II OPERATIONS
Category II approaches may be conducted using the autopilot, or flight director only, with two engines. For
single autopilot operation, the autopilot must be disengaged no lower than the minimum altitude listed in the
AFM. Autothrottles should be disconnected when the autopilot is disengaged.
© 2012 Captain Sim www.captainsim.com
‘737 Captain’ FLIGHT MANUAL Part IV – Flight Crew Training Manual
DO NOT USE FOR FLIGHT
49
ILS APPROACH/LANDING GEOMETRY
The following diagrams use these conditions:
•
data is based on typical landing weight
•
airplane body attitudes are based on Flaps 30, VREF 30 + 5 and should be reduced by 1° for each 5
knots above this speed
•
pilot eye height measured at point when main gear crosses threshold
•
airplane ILS antenna crosses threshold at 50 feet.
Model
Glide Path Airplane
(deg) Body
Attitude
(deg)
Main
Gear
(feet)
737 200
2.5
5.4
30.9
48.9
708.5
3.0
4.9
30.9
48.5
590.1
737
- 200
Adv
2.5
4.4
31.8
48.9
727.7
3.0
3.9
31.8
48.5
606.1
© 2012 Captain Sim www.captainsim.com
Pilot
Height
(feet)
Eye
Threshold to
Main Gear
Touchdown
Point - No
Flare (feet)
‘737 Captain’ FLIGHT MANUAL Part IV – Flight Crew Training Manual
DO NOT USE FOR FLIGHT
50
NON - ILS INSTRUMENT APPROACHES
NON - ILS INSTRUMENT APPROACHES - GENERAL
Non-ILS approaches are defined as:
•
VOR approach
•
NDB approach
•
ASR approach
•
LOC, LOC-BC, LDA, SDF, IGS, TACAN, or similar approaches.
Over the past several decades there have been a number of CFIT and unstabilized approach incidents and
accidents associated with non-precision (non-ILS) approaches and landings. Many of these could have been
prevented by the use of constant angle approach methods. Traditional methods of flying non-ILS approaches
involve use of CWS pitch mode leveling off at step-down altitudes (if applicable) and at MDA(H), followed by
a transition to a visual final approach segment and landing. These traditional methods involve changing the
flight path at low altitudes and are not similar to methods for flying ILS approaches. Further, these
traditional methods often require of the crew a higher level of skill, judgment and training than the typical
ILS approach.
The following sections describe methods for flying non-ILS constant angle approaches. These methods
provide a constant angle approach, which reduces exposure to crew error and CFIT accidents. These
methods also make it much easier for the crew to achieve a stabilized approach to a landing once suitable
visual reference to the runway environment has been established.
A typical Non-ILS Instrument Approach as illustrated, assumes all preparations for the approach have been
completed. Navaids are tuned and identified; final approach course is set (VOR or Localizer); RMIs are
displaying appropriate course or bearing information; minimum descent altitude is set, and the approach
briefing is complete. The procedure illustrated focuses generally on crew actions and avionics systems
information. The flight pattern may be modified to suit local traffic and air traffic requirements.
The following discussions assume a straight-in instrument approach is being flown. For airplanes equipped
with a SP-77 autopilot system, a circling approach may be flown following an instrument approach using
CWS pitch mode provided the altitude alert controller is set in accordance with the circling approach
procedure.
© 2012 Captain Sim www.captainsim.com
‘737 Captain’ FLIGHT MANUAL Part IV – Flight Crew Training Manual
DO NOT USE FOR FLIGHT
51
USE OF THE AUTOPILOT DURING APPROACHES
Automatic flight is the preferred method of flying non-ILS approaches. Automatic flight minimizes flight crew
workload and facilitates monitoring the procedure and flight path. During non-IL S approaches, autopilot use
allows better course and vertical path tracking accuracy, reduces the probability of inadvertent deviations
below path, and is therefore recommended until suitable visual reference is established on final approach.
Manually flying non-ILS approaches in IMC conditions increases workload and does not take advantage of
the significant increase in efficiency and protection provided by the automatic systems. However, to maintain
flight crew proficiency, pilots may elect to use the flight director without the autopilot when in VMC
conditions.
Note: The autopilot should remain engaged until suitable visual reference has been established.
RAW DATA MONITORING REQUIREMENTS
Raw data monitoring is required for all instrument approaches. Non - ILS Approach - One Engine Inoperative
Maneuvering prior to and after the final approach fix with one engine inoperative is the same as for an all
engine non-ILS approach.
APPROACH PREPARATIONS
Non-ILS approaches are normally flown using the CWS pitch mode.
Non-ILS approach recommended roll modes are:
•
VOR or Localizer: VOR LOC
•
NDB or ASR: HDG SEL
Use MDA(H) for the approach minimum altitude. Set the barometric minimums at MDA + 50 feet to ensure
that, if a missed approach is initiated, descent below the MDA(H) does not occur during the missed
approach.
PROCEDURE TURN AND INITIAL APPROACH
Approaching intercept heading, select flaps 5 and select appropriate roll mode. Cross the procedure turn fix
at flaps 5 and flaps 5 maneuvering airspeed. Approaching the FAF (approximately 2 NM), select gear down
and flaps 15 and adjust speed. Set the altitude alert controller to the first intermediate altitude constraint, or
MDA + 50 feet if no altitude constraint exists.
Note: If desired altitude is not at an even 100 foot increment, set the altitude alert controller to the nearest
100 ft. increment above the altitude constraint or MDA(H).
Just before the FAF, select landing flaps, reduce to final approach speed and complete the Landing checklist.
If the charted FAF is too close to the runway to permit a stabilized approach, consider establishing final
approach pitch mode and configuring for approach and landing earlier than specified in the FCOM procedure.
© 2012 Captain Sim www.captainsim.com
‘737 Captain’ FLIGHT MANUAL Part IV – Flight Crew Training Manual
DO NOT USE FOR FLIGHT
52
FINAL APPROACH
At or after the FAF, use CWS pitch mode and descend at appropriate vertical speed to arrive at the MDA(H)
at a distance from the runway (VDP) to allow a normal landing profile. Establish an appropriate vertical
speed considering the recommended vertical speeds that are published on the approach chart, if available.
These recommended vertical speeds vary with the airplane's ground speed on final approach. If no
recommended vertical speeds are available, set approximately 700 to 800 fpm.
A technique that may be used to achieve a constant angle path that arrives at MDA(H) at or near the VDP is
to use 300 feet per mile for a 3° path. Determine the desired HAA which corresponds to the distance in NM
from the runway end using the following table. The PM can then call out recommended altitudes as the
distance to the runway changes (Example: 900 feet - 3 NM, 600 feet - 2NM, etc.). The descent rate should
be adjusted in small increments for significant deviations from the nominal path. There should be no level
flight segment at minimums.
Distance Remaining to the Runway (NM)
10
HAT (ft.)
9
8
7
3000 2700 2400 2100
6
5
4
3
1800 1500 1200 900
2
1
600
300
Be prepared to land or go-around from the MDA(H) at the VDP. Note that a normal landing cannot be
completed from the published missed approach point on many instrument approaches.
For airplanes equipped with the SP-77 autopilot, approximately 300 feet above the MDA(H), select the
missed approach altitude. Leaving the MDA(H), disengage the autopilot and turn both F/Ds OFF. Complete
the landing.
MINIMUM DESCENT ALTITUDE/HEIGHT (MDA(H))
The pilot monitoring should expand the instrument scan to include outside visual cues when approaching
MDA(H). Do not continue the approach below MDA(H) unless the airplane is in a position from which a
normal approach to the runway of intended landing can be made and suitable visual reference can be
maintained. Upon arrival at MDA(H) or any time thereafter, if any of the above requirements are not met,
immediately execute the missed approach procedure.
When suitable visual reference is established, maintain the descent path to the flare. Do not descend below
the visual glide path.
© 2012 Captain Sim www.captainsim.com
‘737 Captain’ FLIGHT MANUAL Part IV – Flight Crew Training Manual
DO NOT USE FOR FLIGHT
53
VISUAL DESCENT POINT
For a non-IL S approach, the VDP is defined as the position on final approach from which a normal descent
from the MDA(H) to the runway touchdown point may be initiated when suitable visual reference is
established. If the airplane arrives at the VDP, a stabilized visual segment is much easier to achieve since
little or no flight path adjustment is required to continue to a normal touchdown.
VDPs are indicated on some non-ILS approach charts by a "V" symbol. The distance to the runway is shown
below the "V" symbol. If no VDP is given, the crew can determine the point where to begin the visual
descent by determining the height above the airport (HAA) of the MDA(H) and use 300 feet per NM distance
to the runway.
In the following example, an MDA(H) of 550 feet MSL with a 100 feet touchdown zone elevation results in a
HAA of 450 feet. At 300 feet per NM, the point to begin the visual descent is 1 XA NM distance from the
runway.
Most VDPs are between 1 and 2 NM from the runway. The following table provides more examples.
HAA (feet)
300
400
450
500
600
700
VDP Distance, NM
1.0
1.3
1.5
1.7
2.0
2.3
MISSED APPROACH - NON-ILS
Refer to Go-Around and Missed Approach - All Approaches, this chapter.
© 2012 Captain Sim www.captainsim.com
‘737 Captain’ FLIGHT MANUAL Part IV – Flight Crew Training Manual
DO NOT USE FOR FLIGHT
54
CIRCLING APPROACH
CIRCLING APPROACH - GENERAL
The circling approach should be flown with landing gear down, flaps 15, and at flaps 15 maneuvering speed.
Use the weather minima associated with the anticipated circling speed. Maintain MDA(H) using ALT HOLD
mode and use HDG SEL or CWS roll mode for the maneuvering portion of the circling approach. If circling
from an ILS approach, fly the ILS in VOR/LOC and CWS.
Note: If the MDA does not end in "00", set the altitude alert controller to the nearest 100 feet above the
MDA and circle at MCP altitude.
Use of the Auto Approach mode for descent to a circling approach is not recommended for several reasons:
•
the autopilot does not level off at the altitude set in the altitude alert controller
•
exiting the Auto Approach mode requires initiating a go-around or disconnecting the autopilot and
turning off the flight directors.
When in altitude hold at MDA and prior to commencing the circling maneuver, set the missed approach
altitude.
Before turning base or when initiating the turn to base leg, select landing flaps and and begin decelerating to
the approach speed plus wind correction. To avoid overshooting final approach course, adjust the turn to
final to initially aim at the inside edge of the runway threshold. Timely speed reduction also reduces turning
radius to the runway. Complete the landing checklist. Do not descend below MDA until intercepting the visual
profile to the landing runway.
For airplanes equipped with the SP-77 autopilot, leaving the MDA(H), disengage the autopilot and turn both
F/Ds OFF.
After intercepting the visual profile, cycle both F/D to OFF, and select the PNF F/D to ON. This eliminates
unwanted commands and allows F/D guidance in the event of a go-around. Complete the landing.
© 2012 Captain Sim www.captainsim.com
‘737 Captain’ FLIGHT MANUAL Part IV – Flight Crew Training Manual
DO NOT USE FOR FLIGHT
55
OBSTRUCTION CLEARANCE
Obstruction clearance areas during the circling approach are depicted in the following figure. Distances are
determined by aircraft approach category. Adjust airplane heading and timing so that the airplane ground
track does not exceed the obstruction clearance distance from the runway at any time during the circling
approach.
Radius (r), defining size of areas,
varies with airplane category.
Aircraft
Category
FAA
Obstruction ICAO
Obstruction
Clearance Radius (r) Clearance Radius (r)
C
1.7 NM
4.2 NM
D
2.3 NM
5.28 NM
© 2012 Captain Sim www.captainsim.com
‘737 Captain’ FLIGHT MANUAL Part IV – Flight Crew Training Manual
DO NOT USE FOR FLIGHT
56
MISSED APPROACH – CIRCLING
If a missed approach is required at any time while circling, make a climbing turn in the shortest direction
toward the landing runway. This may result in a turn greater than 180° to intercept the missed approach
course. Continue the turn until established on an intercept heading to the missed approach course
corresponding to the instrument approach procedure just flown. Maintain the missed approach flap setting
until close-in maneuvering is completed.
VISUAL REFERENCE
Different patterns may be required to become established on the prescribed missed approach course. This
depends on airplane position at the time the missed approach is started. The following figure illustrates the
maneuvering that may be required. This ensures the airplane remains within the circling and missed
approach obstruction clearance areas.
In the event that a missed approach must be accomplished from below the MDA(H), consideration should be
given to selecting a flight path which assures safe obstacle clearance until reaching an appropriate altitude
on the specified missed approach path.
Refer to Missed Approach/Go-Around - All Approaches, this chapter.
© 2012 Captain Sim www.captainsim.com
‘737 Captain’ FLIGHT MANUAL Part IV – Flight Crew Training Manual
DO NOT USE FOR FLIGHT
57
VISUAL TRAFFIC PATTERN
VISUAL APPROACH - GENERAL
The recommended landing approach path is approximately 2 1/2° to 3°. Once the final approach is
established, the airplane configuration remains fixed and only small adjustments to the glide path, approach
speed, and trim are necessary. This results in the same approach profile under all conditions.
THRUST
Engine thrust and elevators are the primary means to control attitude and rate of descent. Adjust thrust
slowly using small increments. Sudden large thrust changes make airplane control more difficult and are
indicative of an unstable approach. No large changes should be necessary except when performing a goaround. Large thrust changes are not required when extending landing gear or flaps on downwind and base
leg. A thrust increase may be required when stabilizing on speed on final approach.
DOWNWIND AND BASE LEG
Fly at an altitude of 1500 feet above the runway elevation and enter downwind with flaps 5 at flaps 5
maneuvering speed. Maintain a track parallel to the landing runway approximately 2 NM abeam.
Prior to turning base leg, extend the landing gear, select flaps 15, arm the speedbrake, and slow to flaps 15
maneuvering speed or approach speed plus wind correction if landing at flaps 15. If the approach pattern
must be extended, delay lowering gear and selecting flaps 15 until approaching the normal visual approach
profile. Turning base leg, adjust thrust as required while descending at approximately 600-700 fpm.
Extend landing flaps prior to turning final. Allow the speed to decrease to the proper final approach speed
and trim the airplane. Complete the Landing checklist. When established in the landing configuration,
maneuvering to final approach may be accomplished at final approach speed (VREF + wind correction).
© 2012 Captain Sim www.captainsim.com
‘737 Captain’ FLIGHT MANUAL Part IV – Flight Crew Training Manual
DO NOT USE FOR FLIGHT
58
FINAL APPROACH
Roll out of the turn to final on the extended runway centerline and maintain the appropriate approach speed.
An altitude of approximately 300 feet above airport elevation for each mile from the runway provides a
normal approach profile. Attempt to keep thrust changes small to avoid large trim changes. With the
airplane in trim
and at target airspeed, pitch attitude should be approximately the normal approach body attitude. At speeds
above approach speed, pitch attitude is less. At speeds below approach speed, pitch attitude is higher.
Slower speed reduces aft body clearance at touchdown. Stabilize the airplane on the selected approach
airspeed with an approximate rate of descent between 700 and 900 feet per minute on the desired glide
path, in trim. Stabilize on the profile by 500 feet above touchdown.
Note: Descent rates greater than 1,000 fpm should be avoided.
With one engine inoperative, the rudder trim may be centered before landing. This allows most of the rudder
pedal pressure to be removed when the thrust of the operating engine is retarded to idle at touchdown.
Full rudder authority and rudder pedal steering capability are not affected by rudder trim. If touchdown
occurs with the rudder still trimmed for the approach, be prepared for the higher rudder pedal forces
required to track the centerline on rollout.
© 2012 Captain Sim www.captainsim.com
‘737 Captain’ FLIGHT MANUAL Part IV – Flight Crew Training Manual
DO NOT USE FOR FLIGHT
59
TOUCH AND GO LANDINGS
TOUCH AND GO LANDING – GENERAL
The primary objective of touch and go landings is approach and landing practice. It is not intended for
landing roll and takeoff procedure training.
APPROACH
Accomplish the pattern and approach procedures as illustrated.The landing gear may remain extended
throughout the maneuver for brake cooling, but be prepared to retract the landing gear if an actual engine
failure occurs during go-around. Do not arm the speedbrakes. Select the autobrakes (as installed) OFF.
LANDING
The trainee should accomplish a normal final approach and landing. After touchdown, the instructor selects
flaps 15, sets stabilizer trim, ensures speedbrakes are down, and at the appropriate time instructs the
trainee to move the thrust levers to approximately the vertical position (so engines stabilize before applying
go-around thrust). When the engines are stabilized, the instructor instructs the trainee to set thrust.
Note: Flaps 15 is recommended after touchdown to minimize the possibility of a tailstrike during the takeoff.
WARNING: After reverse thrust is initiated, a full stop landing must be made.
At VREF, the instructor calls "ROTATE" and the trainee rotates smoothly to approximately 15 ° pitch and
climb at VREF + 15 to 25 knots. The takeoff warning horn may sound momentarily if the flaps have not
retracted to flaps 15 and the thrust levers are advanced to approximately the vertical position.
© 2012 Captain Sim www.captainsim.com
‘737 Captain’ FLIGHT MANUAL Part IV – Flight Crew Training Manual
DO NOT USE FOR FLIGHT
60
STOP AND GO LANDINGS
The objective of stop and go landings is to include landing roll, braking, and takeoff procedure practice in the
training profile.
Note: At high altitude airports, or on extremely hot days, stop and go landings are not recommended.
After performing
is available (FAR
the following:
•
•
•
•
•
a normal full-stop landing, a straight ahead takeoff may be performed if adequate runway
field length must be available). After stopping, and before initiating the takeoff, accomplish
set takeoff flaps
trim the stabilizer for takeoff
place speedbrake lever in the down detent
check the rudder trim
set airspeed bugs for the flap setting to be used. Perform a normal takeoff.
Do not make repeated full stop landings without allowing time for brake cooling. Brake heating is cumulative
and brake energy limits may be exceeded. Flat tires may result.
Note: Flying the pattern with the gear extended assists in brake cooling.
© 2012 Captain Sim www.captainsim.com
‘737 Captain’ FLIGHT MANUAL Part IV – Flight Crew Training Manual
DO NOT USE FOR FLIGHT
61
GO-AROUND AND MISSED APPROACH - ALL APPROACHES
GO-AROUND AND MISSED APPROACH - ALL ENGINES OPERATING
The go-around and missed approach is generally performed in the same manner whether an instrument or
visual approach was flown. The go-around and missed approach is flown using the Go-Around and Missed
Approach procedure described in the FCOM. The discussion in this section supplements those procedures.
For airplanes equipped with the SP-77 autopilot, if a missed approach is required fly manually or use CWS.
When initiating the missed approach, press either GA switch, call for flaps 15, set go-around thrust, and
rotate smoothly towards 15° pitch attitude. Then follow flight director commands and retract the landing
gear after a positive rate of climb is indicated on the altimeter. Readjust pitch as necessary for the
continuation of the go-around.
Note: For airplanes equipped with the SP-77 autopilot, following a non-ILS approach, flight director
commands are available only when GA is manually selected on the flight director mode selector.
At typical landing weights, actual thrust required for a normal go-around is usually considerably less than
maximum go-around thrust. This provides a thrust margin for windshear or other situations requiring
maximum thrust.
For airplanes equipped with the SP-77 autopilot, the GA pitch mode commands a fixed go-around attitude of
14°. The GA roll mode commands wings level. Above 400 feet AGL, select a roll mode as appropriate.
The minimum altitude for flap retraction during a normal takeoff is not normally applicable to a missed
approach procedure. However, obstacles in the missed approach flight path must be taken into
consideration. During training, use 1,000 feet AGL to initiate flap retraction, as during the takeoff procedure.
If initial maneuvering is required during the missed approach, accomplish the missed approach procedure
through gear up before initiating the turn. Delay further flap retraction until initial maneuvering is complete
and a safe altitude and appropriate speed are attained.
© 2012 Captain Sim www.captainsim.com
‘737 Captain’ FLIGHT MANUAL Part IV – Flight Crew Training Manual
DO NOT USE FOR FLIGHT
62
LANDING
PREFACE
This chapter outlines recommended operating practices and techniques for landing, rejected landings and
landing roll. Techniques are provided to help the pilot effectively utilize approach lighting, control the
airplane during crosswind landings and maintain directional control after landing. Additionally, information on
factors affecting landing distance and landing geometry is provided.
LANDING CONFIGURATIONS AND SPEEDS
Flaps 15, 30 (for noise abatement) and 40 are normal landing flap positions. Flaps 15 is normally limited to
airports where approach climb performance is a factor. Runway length and condition must be taken into
account when selecting a landing flap position.
MANEUVER MARGIN
Flight profiles should be flown at, or slightly above, the recommended maneuvering speed for the existing
flap configuration. These speeds approximate maximum fuel economy and allow full maneuvering capability
(30° bank with a 15° overshoot).
Full maneuver margin exists for all normal landing procedures whenever speed is at or above the maneuver
speed for the current flap setting. Full maneuver margin exists with flaps 15 at VREF 30 + 5 or VREF 40 + 5
during a go-around at go-around thrust.
Airspeeds recommended for non-normal flight profiles are intended to restore near normal maneuvering
margins and/or aerodynamic control response.
The configuration changes are based on maintaining full maneuvering and/or maximum performance unless
specified differently in individual procedures. It is necessary to apply wind correction to the VREF speeds.
See the Command Speed section in chapter 1 for an explanation of wind corrections.
NON-NORMAL LANDING CONFIGURATIONS AND SPEEDS
The Non-Normal Configuration Landing Distance table in the Performance Inflight chapter of the QRH shows
speeds and landing distances for various non-normal landing configurations and runway conditions. The
target speed for the approach is the appropriate approach VREF plus the wind and gust additives.
NON-NORMAL LANDING DISTANCE
Because of higher approach speeds associated with the non-normal landing condition the actual landing
distance is increased. The flight crew should review the non-normal configuration landing distance
information in the Performance Inflight section of the QRH.
© 2012 Captain Sim www.captainsim.com
‘737 Captain’ FLIGHT MANUAL Part IV – Flight Crew Training Manual
DO NOT USE FOR FLIGHT
63
VISUAL APPROACH SLOPE INDICATOR (VASI/T - VASI)
The VASI is a system
All VASI systems are
point 1,000 or 1,800
selecting a visual aim
of lights arranged to provide visual descent guidance information during the approach.
visual projections of the approach path normally aligned to intersect the runway at a
feet beyond the threshold. Flying the VASI glide slope to touchdown is the same as
point on the runway adjacent to the VASI installation.
When using a two-bar VASI, the difference between the eye reference path and the gear path results in a
normal approach and threshold height. It provides useful information in alerting the crew to low profile
situations.
Some airports have three-bar VASI which provides two visual glide paths. The additional light bar is located
upwind from a standard two-bar installation. When the airplane is on the glide path, the pilot sees the one
white bar and two red bars. Three-bar VASI may be safely used with respect to threshold height, but may
result in landing further down the runway.
For a T-VASI, flying the approach with one additional white fly down light visible provides additional wheel
clearance.
THREE BAR VASI/T – VASI
VASI LANDING GEOMETRY
Two-bar VASI installations provide one visual glide path which is normally set at 3°. Three-bar VASI
installations provide two visual glide paths. The lower glide path is provided by the near and middle bars and
is normally set at 3° while the upper glide path, provided by the middle and far bars, is normally 1/4° higher
(3.25°). This higher glide path is intended for use only by high cockpit (long wheelbase) airplanes to provide
a sufficient threshold crossing height.
© 2012 Captain Sim www.captainsim.com
‘737 Captain’ FLIGHT MANUAL Part IV – Flight Crew Training Manual
DO NOT USE FOR FLIGHT
64
TWO BAR/THREE BAR VASI LANDING GEOMETRY
The following diagrams use these conditions:
•
data is based upon typical landing weight
•
airplane body attitudes are based on Flaps 30 and Flaps 40, VREF (for the flap setting used) + 5
and should be reduced by 1° for each 5 knots above this speed.
•
eye height is calculated at the moment the main gear is over the threshold.
Flaps 40
737
Model
AIM Point at 1,000 Feet
Visual Glide Airplane Body
Path
Attitude
(degrees)
(degrees)
Threshold Height
Main Gear
Touchdown
Pilot Eye Main
Gear Point - no flare
Height (feet) Height (feet)
(feet)
-200
3.0
4.9
50.4
34.6
660
-200
Adv
3.0
3.9
50.4
35.3
673
Flaps 40
737
Model
AIM Point at 1,000 Feet
Visual Glide Airplane Body
Path
Attitude
(degrees)
(degrees)
Threshold Height
Main Gear
Touchdown
Pilot Eye Main
Gear Point - no flare
Height (feet) Height (feet)
(feet)
-200
3.0
2.3
50.4
36.3
693
-200
Adv
3.0
1.7
50.4
36.7
700
© 2012 Captain Sim www.captainsim.com
‘737 Captain’ FLIGHT MANUAL Part IV – Flight Crew Training Manual
DO NOT USE FOR FLIGHT
65
PRECISION APPROACH PATH INDICATOR (PAPI)
The PAPI uses lights which are normally on the left side of the runway. They are similar to the VASI, but are
installed in a single row of light units.
When the airplane is on a normal 3° glide path, the pilot sees two white lights on the left and two red lights
on the right. The PAPI may be safely used with respect to threshold height, but may result in landing further
down the runway. The PAPI is normally aligned to intersect the runway 1,000 to 1,500 feet down the
runway.
PAPI LANDING GEOMETRY
LANDING GEOMETRY VISUAL AIM POINT
During visual approaches many techniques and methods are used to ensure main landing gear touchdown at
the desired point on the runway. One of the most common methods used is to aim at the desired gear
touchdown point on the runway, then adjust the final approach glide path until the selected point appears
stationary in relation to the airplane (the point does not move up or down in the pilot's field of view during
the approach).
Visual aim points versus gear touchdown point differences increase as glide path angle decreases as in a flat
approach. For a particular visual approach, the difference between gear path and eye level path must be
accounted for by the pilot.
© 2012 Captain Sim www.captainsim.com
‘737 Captain’ FLIGHT MANUAL Part IV – Flight Crew Training Manual
DO NOT USE FOR FLIGHT
66
LANDING RUNWAY MARKINGS (TYPICAL)
The following runway markings are for runways served by a precision approach.
THRESHOLD HEIGHT
Threshold height is a function of glide path angle and landing gear touchdown target. Threshold height for
main gear and pilot eye level is shown in the Two Bar/Three Bar VASI Landing Geometry tables on a
previous page. Special attention must be given to establishing a final approach that assures safe threshold
clearance and gear touchdown at least 1,000 feet down the runway. The radio altimeter should be used to
assist the pilot in judging terrain clearance, threshold height and flare initiation height
© 2012 Captain Sim www.captainsim.com
‘737 Captain’ FLIGHT MANUAL Part IV – Flight Crew Training Manual
DO NOT USE FOR FLIGHT
67
FLARE AND TOUCHDOWN
The techniques discussed here are applicable to all landings including one engine inoperative landings,
crosswind landings and landings on slippery runways. Unless an unexpected or sudden event occurs, such as
windshear or collision avoidance situation, it is not appropriate to use sudden, violent or abrupt control
inputs during landing. Begin with a stabilized approach on speed, in trim and on glide path.
When the threshold passes under the airplane nose and out of sight, shift the visual sighting point to
approximately 3/4 the runway length. Shifting the visual sighting point assists in controlling the pitch
attitude during the flare. Maintaining a constant airspeed and descent rate assists in determining the flare
point. Initiate the flare when the main gear is approximately 15 feet above the runway by increasing pitch
attitude approximately 2° - 3°. This slows the rate of descent.
After the flare is initiated, smoothly retard the thrust levers to idle, and make small pitch attitude
adjustments to maintain the desired descent rate to the runway. Ideally, main gear touchdown should occur
simultaneously with thrust levers reaching idle. A smooth power reduction to idle also assists in controlling
the natural nose-down pitch change associated with thrust reduction. Hold sufficient back pressure on the
control column to keep the pitch attitude constant. A touchdown attitude as depicted in the figure below is
normal with an airspeed of approximately VREF plus any gust correction.
Note: Do not trim during flare or after touchdown.Trimming in the flare increases the possibility of a
tailstrike.
LANDING FLARE PROFILE
The following diagram uses these conditions:
•
3° approach glide path
•
flare distance is approximately 1,000 to 2,000 feet beyond the threshold
•
typical landing flare times range from 4 to 8 seconds and are a function of the approach speed
•
airplane body attitudes are based upon typical landing weights, flaps 30, VREF 30 + 5 (approach)
and VREF 30 + 0 (landing), and should be reduced by 1° for each 5 knots above this speed.
Typically, the pitch attitude increases slightly during the actual landing, but avoid over-rotating. Do not
increase the pitch attitude after touchdown; this could lead to a tail strike.
Shifting the visual sighting point down the runway assists in controlling the pitch attitude during the flare. A
smooth power reduction to idle also assists in controlling the natural nose down pitch change associated with
thrust reduction. Hold sufficient back pressure on the control column to keep the pitch attitude constant.
Avoid rapid control column movements during the flare. Do not use pitch trim during flare or after
touchdown. Such actions are likely to cause the pitch attitude to increase at touchdown and increase the
potential for a tailstrike. Do not allow the airplane to float; fly the airplane onto the runway. Do not attempt
to extend the flare by increasing pitch attitude in an attempt to achieve a perfectly smooth touchdown. Do
not attempt to hold the nose wheel off the runway.
© 2012 Captain Sim www.captainsim.com
‘737 Captain’ FLIGHT MANUAL Part IV – Flight Crew Training Manual
DO NOT USE FOR FLIGHT
68
BOUNCED LANDING RECOVERY
If the airplane should bounce, hold or re-establish a normal landing attitude and add thrust as necessary to
control the rate of descent. Thrust need not be added for a shallow bounce or skip. When a high, hard
bounce occurs, initiate a go-around. Apply go-around thrust and use normal go-around procedures. Do not
retract the landing gear until a positive rate of climb is established because a second touchdown may occur
during the go-around.
Bounced landings can occur because higher than idle power is maintained through initial touchdown,
disabling the automatic speedbrake deployment even when the speedbrakes are armed. During the resultant
bounce, if the thrust levers are then retarded to idle, automatic speedbrake deployment can occur resulting
in a loss of lift and nose up pitching moment which can result in a tail strike or hard landing on a subsequent
touchdown.
GO-AROUND AFTER TOUCHDOWN
If a go-around is initiated prior to touchdown and touchdown occurs, continue with normal go-around
procedures. The F/D go-around mode will continue to provide go-around guidance commands throughout the
maneuver.
If a go-around is initiated after touchdown but prior to thrust reverser selection, auto speedbrakes retract
and autobrakes disarm as thrust levers are advanced. The F/D go-around mode will not be available until
go-around is selected after becoming airborne.
Once reverse thrust is initiated following touchdown, a full stop landing must be made. Factors dictating this
are:
•
five seconds are required for a reverser to transition to the forward thrust position
•
a possibility exists that a reverser may not stow in the forward thrust position.
© 2012 Captain Sim www.captainsim.com
‘737 Captain’ FLIGHT MANUAL Part IV – Flight Crew Training Manual
DO NOT USE FOR FLIGHT
NORMAL TOUCHDOWN ATTITUDE
If flare control and thrust are excessive near touchdown, the airplane tends to float in ground effect.
With proper airspeed control and thrust management, touchdown occurs at no less than VREF - 5.
© 2012 Captain Sim www.captainsim.com
69
‘737 Captain’ FLIGHT MANUAL Part IV – Flight Crew Training Manual
DO NOT USE FOR FLIGHT
70
PITCH AND ROLL LIMIT CONDITIONS
The Ground Contact Angles - Normal Landing figure illustrates body roll angle/pitch angles at which the
airplane structure contacts the runway. Prolonged flare increases the body pitch attitude 2° to 3°. When
prolonged flare is coupled with a misjudged height above the runway aft body contact is possible.
Fly the airplane onto the runway at the desired touchdown point and at the desired airspeed. Do not hold it
off and risk the possibility of a tailstrike.
Note: A smooth touchdown is not the criterion for a safe landing.
GROUND CONTACT ANGLES - NORMAL LANDING
Conditions
•
Pitch about gear centerline
•
Slats fully extended
1.
•
Aileron full down
2.
Roll about outer tire centerline
3.
Stabilizer full nose up
4.
Elevator full down
5.
Struts compressed
6.
Flaps 40
© 2012 Captain Sim www.captainsim.com
‘737 Captain’ FLIGHT MANUAL Part IV – Flight Crew Training Manual
DO NOT USE FOR FLIGHT
71
AFTER TOUCHDOWN AND LANDING ROLL
Avoid touching down with thrust above idle since this may establish an airplane nose up pitch tendency and
increases landing roll.
After main gear touchdown, initiate the landing roll procedure. If the speedbrakes do not extend
automatically move the speedbrake lever to the UP position without delay. Fly the nosewheel onto the
runway smoothly by relaxing aft control column pressure. Control column movement forward of neutral
should not be required. Do not attempt to hold the nosewheel off the runway. Holding the nose up after
touchdown for aerodynamic braking is not an effective braking technique.
To avoid the risk of possible airplane structural damage, do not make large nose down control column
movements prior to nose wheel touchdown.
To avoid the risk of tailstrike, do not allow the pitch attitude to increase after touchdown. However, applying
excessive nose down elevator during landing can result in substantial forward fuselage damage. Do not use
full down elevator. Use an appropriate autobrake setting or manually apply wheel brakes smoothly with
steadily increasing pedal pressure as required for runway condition and runway length available. Maintain
deceleration rate with constant or increasing brake pressure as required until stopped or desired taxi speed
is reached.
SPEEDBRAKES
The speedbrake system is controlled with the SPEEDBRAKE lever (which is moved UP and DOWN). The
speedbrake system consists of individual spoiler panels which the pilot can extend and retract by moving the
SPEEDBRAKE lever.
The speedbrakes can be fully raised after touchdown while the nose wheel is lowered to the runway, with no
adverse pitch effects. The speedbrakes spoil the lift from the wings, which places the airplane weight on the
main landing gear, providing excellent brake effectiveness.
Unless speedbrakes are raised after touchdown, braking effectiveness may be reduced initially as much as
60%, since very little weight is on the wheels and brake application may cause rapid anti-skid modulation.
Normally, speedbrakes are armed to extend automatically. Both pilots should monitor speedbrake extension
after touchdown. In the event auto extension fails, the speedbrake should be manually extended
immediately.
Pilot awareness of the position of the speedbrake lever during the landing phase is important in the
prevention of over-run. The position of the speedbrakes should be announced during the landing phase by
the PM. This improves the crew's situational awareness of the position of the spoilers during landing and
builds good habit patterns which can prevent failure to observe a malfunctioned or disarmed spoiler system.
DIRECTIONAL CONTROL AND BRAKING AFTER TOUCHDOWN
If the nose wheel is not promptly lowered to the runway, braking and steering capability are significantly
degraded and no drag benefit is gained. Rudder control is effective to approximately 60 knots. Rudder pedal
steering is sufficient for maintaining directional control during the rollout. Do not use the nose wheel steering
wheel until reaching taxi speed. In a crosswind, displace the control wheel into the wind to maintain wings
level which aids directional control. Perform the landing roll procedure immediately after touchdown. Any
delay markedly increases the stopping distance.
Stopping distance varies with wind conditions and any deviation from recommended approach speeds.
FACTORS AFFECTING LANDING DISTANCE
Advisory information for normal and non-normal configuration landing distances is contained in the PI
section of the QRH. Actual stopping distances for a maximum effort stop are approximately 60% of the dry
runway field length requirement. Factors that affect stopping distance include: height and speed over the
threshold, glide slope angle, landing flare, lowering the nose to the runway, use of reverse thrust,
speedbrakes, wheel brakes and surface conditions of the runway.
© 2012 Captain Sim www.captainsim.com
‘737 Captain’ FLIGHT MANUAL Part IV – Flight Crew Training Manual
DO NOT USE FOR FLIGHT
72
Note: Reverse thrust and speedbrake drag are most effective during the high speed portion of the landing.
Deploy the speedbrake lever and activate reverse thrust with as little time delay as possible.
Note: Speedbrakes fully deployed, in conjunction with maximum reverse thrust and maximum manual antiskid braking provides the minimum stopping distance.
Floating above the runway before touchdown must be avoided because it uses a large portion of the
available runway. The airplane should be landed as near the normal touchdown point as possible.
Deceleration rate on the runway is approximately three times greater than in the air.
Height of the airplane over the runway threshold also has a significant effect on total landing distance. For
example, on a 3° glide path, passing over the runway threshold at 100 feet altitude rather than 50 feet could
increase the total landing distance by approximately 950 feet. This is due to the length of runway used up
before the airplane actually touches down.
Glide path angle also affects total landing distance. As the approach path becomes flatter, even while
maintaining proper height over the end of the runway, total landing distance is increased.
© 2012 Captain Sim www.captainsim.com
‘737 Captain’ FLIGHT MANUAL Part IV – Flight Crew Training Manual
DO NOT USE FOR FLIGHT
73
WHEEL BRAKES
Braking force is proportional to the force of the tires on the runway and the coefficient of friction between
the tires and the runway. The contact area normally changes little during the braking cycle. The
perpendicular force comes from airplane weight and any downward aerodynamic force such as speedbrakes.
The coefficient of friction depends on the tire condition and runway surface, e.g., concrete, asphalt, dry, wet
or icy.
AUTOMATIC BRAKES (AS INSTALLED)
Boeing recommends that whenever runway limited, using higher than normal approach speeds, landing on
slippery runways or landing in a crosswind, the autobrake system be used.
For normal operation of the autobrake system select a deceleration setting. Settings include:
•
MAX: Used when minimum stopping distance is required. Deceleration rate is less than that
produced by full manual braking
•
MED (2 or 3, as installed): Should be used for wet or slippery runways or when landing rollout
distance is limited
•
MIN (1, as installed): These settings provide a moderate deceleration effect suitable for all routine
operations.
Flight crew/airline experience with airplane characteristics relative to the various runway conditions routinely
encountered provide initial guidance as to the desirable level of deceleration selected.
Immediate initiation of reverse thrust at main gear touchdown and full reverse thrust allow the autobrake
system to reduce brake pressure to the minimum level. Since the autobrake system senses deceleration and
modulates brake pressure accordingly, the proper application of reverse thrust results in reduced braking for
a large portion of the landing roll.
The importance of establishing the desired reverse thrust level as soon as possible after touchdown cannot
be overemphasized. This minimizes brake temperatures and tire and brake wear and reduces stopping
distance on very slippery runways.
The use of minimum reverse thrust almost doubles the brake energy requirements and can result in brake
temperatures much higher than normal.
After touchdown, crewmembers should be alert for autobrake disengagement annunciations. The PM should
notify the PF anytime the autobrakes disengage.
If stopping distance is not assured with autobrakes engaged, the PF should immediately apply manual
braking sufficient to assure deceleration to a safe taxi speed within the remaining runway.
A table in the PI section of the QRH shows the relative stopping capabilities of the available autobrake
selections.
TRANSITION TO MANUAL BRAKING
The speed at which the transition from autobrakes to manual braking is made depends upon airplane
deceleration rate, runway conditions and stopping requirements. When transitioning to manual braking, keep
the speedbrakes deployed and use reverse thrust as required until taxi speed. This is especially important
when nearing the end of the runway where rubber deposits affect stopping ability.
•
•
•
•
When transitioning from the autobrake system to manual braking, the PF should notify the PM.
Techniques for release of autobrakes can affect passenger comfort and stopping distance. These
techniques are:
stow the speed brake handle. When stopping distance within the remaining runway is assured, this
method provides a smooth transition to manual braking, is effective before or after thrust reversers
are stowed, and is less dependent on manual braking technique
smoothly apply brake pedal force as in a normal stop, until the autobrake system disarms.
Following disarming of the autobrakes, smoothly release brake pedal pressure. Disarming the
autobrakes before coming out of reverse thrust provides a smooth transition to manual braking
manually position the autobrake selector off (normally done by the PM at the direction of the PF).
© 2012 Captain Sim www.captainsim.com
‘737 Captain’ FLIGHT MANUAL Part IV – Flight Crew Training Manual
DO NOT USE FOR FLIGHT
74
MANUAL BRAKING
The following technique for manual braking provides optimum braking for all runway conditions:
The pilot's seat and rudder pedals should be adjusted so that it is possible to apply maximum braking with
full rudder deflection.
Immediately after main gear touchdown, smoothly apply a constant brake pedal pressure for the desired
braking. For short or slippery runways, use full brake pedal pressure.
•
•
•
do not attempt to modulate, pump or improve the braking by any other special techniques
do not release the brake pedal pressure until the airplane speed has been reduced to a safe taxi
speed
the antiskid system stops the airplane for all runway conditions in a shorter distance than is
possible with either antiskid off or brake pedal modulation.
The antiskid system adapts pilot applied brake pressure to runway conditions by sensing an impending skid
condition and adjusting the brake pressure to each individual wheel for maximum braking effort. When
brakes are applied on a slippery runway, several skid cycles occur before the antiskid system establishes the
right amount of brake pressure for the most effective braking.
If the pilot modulates the brake pedals, the antiskid system is forced to readjust the brake pressure to
establish optimum braking. During this readjustment time, braking efficiency is lost.
Low available braking coefficient of friction on extremely slippery runways at high speeds may be interpreted
as a total antiskid failure. Pumping the brakes or turning off the antiskid degrades braking effectiveness.
Maintain steadily increasing brake pressure, allowing the antiskid system to function at its optimum.
Although immediate braking is desired, manual braking techniques normally involve a four to five second
delay between main gear touchdown and brake pedal application even when actual conditions reflect the
need for a more rapid initiation of braking. This delayed braking can result in the loss of 800 to 1,000 feet of
runway. Directional control requirements for crosswind conditions and low visibility may further increase the
delays. Distractions arising from a malfunctioning reverser system can also result in delayed manual braking
application.
BRAKE COOLING
A series of taxi-back or stop and go landings without additional in-flight brake cooling can cause excessive
brake temperatures. The energy absorbed by the brakes from each landing is cumulative.
Extending the gear a few minutes early in the approach normally provides sufficient cooling for a landing.
Total in-flight cooling time can be determined from the Performance Inflight section of the QRH.
Note: Brake energy data provided in the QRH should be used to identify potential overheat situations.
To minimize brake temperature build-up:
•
•
•
For airplanes without operative brake temperature monitoring systems:
If the last ground time plus present flight time is less than 90 minutes, extend the landing gear 5
minutes early or 7 minutes prior to landing
For airplanes with operating brake temperature monitoring systems: Extend the landing gear
approximately one minute early for each unit of brake temperature above normal.
Close adherence to recommended landing roll procedures ensures minimum brake temperature build up.
REVERSE THRUST OPERATION
Awareness of the position of the forward and reverse thrust levers must be maintained during the landing
phase. Improper seat position as well as long sleeved apparel may cause inadvertent advancement of the
forward thrust levers, preventing movement of the reverse thrust levers.
The position of the hand should be comfortable, permit easy access to the autothrottle disconnect switch,
and allow control of all thrust levers, forward and reverse, through full range of motion.
Note: Reverse thrust always reduces the "brake only" stopping distance, brake and tire wear. Reverse thrust
is most effective at high speeds.
© 2012 Captain Sim www.captainsim.com
‘737 Captain’ FLIGHT MANUAL Part IV – Flight Crew Training Manual
DO NOT USE FOR FLIGHT
75
After touchdown, with the thrust levers at idle, rapidly raise the reverse thrust levers up and aft to the
interlock position, then to the number 2 reverse thrust detent. Conditions permitting, limit reverse thrust to
the number 2 detent. The PM should monitor engine operating limits and call out any engine operational
limits being approached or exceeded, any thrust reverser failure, or any other abnormalities.
Maintain reverse thrust as required, up to maximum, until the airspeed approaches 60 knots. At this point
start reducing the reverse thrust so that the reverse thrust levers are moving down at a rate commensurate
with the deceleration rate of the airplane. The thrust levers should be positioned to reverse idle by taxi
speed, then to full down after the engines have decelerated to idle. The PM should call out 60 knots to assist
the PF in scheduling the reverse thrust. The PM should also call out any inadvertent selection of forward
thrust as reverse thrust is cancelled. If an engine surges during reverse thrust operation, quickly select
reverse idle on all engines.
REVERSE THRUST OPERATIONS
© 2012 Captain Sim www.captainsim.com
‘737 Captain’ FLIGHT MANUAL Part IV – Flight Crew Training Manual
DO NOT USE FOR FLIGHT
76
REVERSE THRUST AND CROSSWIND (ALL ENGINES)
This figure shows a directional control problem during a landing rollout on a slippery runway with a
crosswind. As the airplane starts to weathervane into the wind, the reverse thrust side force component
adds to the crosswind component and drifts the airplane to the downwind side of the runway. Main gear tire
cornering forces available to counteract this drift are at a minimum when the antiskid system is operating at
maximum braking effectiveness for the existing conditions.
To correct back to the centerline, reduce reverse thrust to reverse idle and release the brakes. This
minimizes the reverse thrust side force component without the requirement to go through a full reverser
actuation cycle, and improve tire cornering forces for realignment with the runway centerline. Use rudder
pedal steering and differential braking as required, to prevent over correcting past the runway centerline.
When re-established near the runway centerline, apply maximum braking and symmetrical reverse thrust to
stop the airplane.
CROSSWIND LANDINGS
The crosswind guidelines shown below were derived through flight test data, engineering analysis and piloted
simulation evaluations. These crosswind guidelines are based on steady wind (no gust) conditions and
include all engines operating and engine inoperative. Gust effects were evaluated and tend to increase pilot
workload without significantly affecting the recommended guidelines.
© 2012 Captain Sim www.captainsim.com
‘737 Captain’ FLIGHT MANUAL Part IV – Flight Crew Training Manual
DO NOT USE FOR FLIGHT
77
LANDING CROSSWIND GUIDELINES
Crosswind guidelines are not considered limitations. Crosswind guidelines are provided to assist operators in
establishing their own crosswind policies.
On slippery runways, crosswind guidelines are a function of runway surface condition, airplane loading, and
assume proper pilot technique.
Runway Condition
Dry
Wet
Standing Water/Slush
Snow - No Melting 3
Ice - No Melting **
Crosswind - Knots *
40 ***
40 ***
20
35 ***
17
Note: Reduce crosswind guidelines by 5 knots on wet or contaminated runways whenever asymmetric
reverse thrust is used.
* Winds measured at 33 feet (10 m) tower height and apply for runways 148 feet (45m) or greater in width.
** Landing on untreated ice or snow should only be attempted when no melting is present.
*** Sideslip only (zero crab) landings are not recommended with crosswinds in excess of 13 knots at flaps
15, 16 knots at flaps 30, or 18 knots at flaps 40. This recommendation ensures adequate ground clearance
and is based on maintaining adequate control margin.
CROSSWIND LANDING TECHNIQUES
Three methods of performing crosswind landings are presented. They are the touchdown in a crab, the decrab technique (with removal of crab in flare), and the sideslip technique. Whenever a crab is maintained
during a crosswind approach, offset the flight deck on the upwind side of centerline so that the main gear
touches down in the center of the runway.
As rudder is applied, the upwind wing sweeps forward developing roll. Hold wings level with simultaneous
application of aileron control into the wind. The touchdown is made with cross controls and both gear
touching down simultaneously. Throughout the touchdown phase upwind aileron application is utilized to
keep the wings level.
TOUCHDOWN IN CRAB
The airplane can land using crab only (zero side slip) up to the landing crosswind guideline speeds. (See the
landing crosswind guidelines table, this chapter).
On dry runways, upon touchdown the airplane tracks toward the upwind edge of the runway while decrabbing to align with the runway. Immediate upwind aileron is needed to ensure the wings remain level
while rudder is needed to track the runway centerline. The greater the amount of crab at touchdown, the
larger the lateral deviation from the point of touchdown. For this reason, touchdown in a crab only condition
is not recommended when landing on a dry runway in strong crosswinds.
On very slippery runways, landing the
touchdown, permits rapid operation
simultaneously, and may reduce pilot
touchdown. However, proper rudder
directional control is maintained.
airplane using crab only reduces drift toward the downwind side at
of spoilers and autobrakes because all main gears touchdown
workload since the aircraft does not have to be de-crabbed before
and upwind aileron must be applied after touchdown to ensure
SIDESLIP (WING LOW)
The sideslip crosswind technique aligns the aircraft with the extended runway centerline so that main gear
touchdown occurs on the runway centerline.
3
© 2012 Captain Sim www.captainsim.com
‘737 Captain’ FLIGHT MANUAL Part IV – Flight Crew Training Manual
DO NOT USE FOR FLIGHT
78
The initial phase of the approach to landing is flown using the crab method to correct for drift. Prior to the
flare the airplane centerline is aligned on or parallel to the runway centerline. Downwind rudder is used to
align the longitudinal axis to the desired track as aileron is used to lower the wing into the wind to prevent
drift. A steady sideslip is established with opposite rudder and low wing into the wind to hold the desired
course.
Touchdown is accomplished with the upwind wheels touching just before the downwind wheels.
Overcontrolling the roll axis must be avoided because overbanking could cause the engine nacelle or
outboard wing flap to contact the runway. (See Ground Clearance Angles - Normal Landing charts, this
chapter.)
Properly coordinated, this maneuver results in nearly fixed rudder and aileron control positions during the
final phase of the approach, touchdown, and beginning of the landing roll. However, since turbulence is often
associated with crosswinds, it is often difficult to maintain the cross control coordination through the final
phase of the approach to touchdown.
If the crew elects to fly the sideslip to touchdown, it may be necessary to add a crab during strong
crosswinds. (See the landing crosswind guidelines table, this chapter). Main gear touchdown is made with
the upwind wing low and crab angle applied. As the upwind gear touches first, a slight increase in downwind
rudder is applied to align the airplane with the runway centerline. At touchdown, increased application of
upwind aileron should be applied to maintain wings level.
OVERWEIGHT LANDING
Overweight landings may be safely accomplished by using normal landing procedures and techniques. There
are no adverse handling characteristics associated with overweight landings. Landing distance is normally
less than takeoff distance for flaps 30 or 40 landings at all gross weights. However, wet or slippery runway
field length requirements should be verified from the landing distance charts in the Performance Inflight
chapter of the Operations Manual. Brake energy limits will not be exceeded for flaps 30 or 40 landings at all
gross weights.
Note: Use of flaps 30 rather than flaps 40 is recommended to provide increased margin to flap placard
speed.
If stopping distance is a concern, reduce the landing weight as much as possible. At the captain's discretion,
reduce weight by holding at low altitude with a high drag configuration (gear down) to achieve maximum
fuel burn-off.
Analysis has determined that, when landing at high gross weights at speeds associated with non-normal
procedures requiring flaps set at 15 or less, maximum effort stops may exceed the brake energy limits. The
gross weights where this condition can occur are well above maximum landing weights. For these nonnormal landings, maximize use of the available runway for stopping.
Observe flap placard speeds during flap extension and on final approach. In the holding and approach
patterns, maneuvers should be flown at the normal maneuver speeds. During flap extension, airspeed can
be reduced by as much as 20 knots below normal maneuver speeds before extending to the next flap
position. These lower speeds result in larger margins to the flap placards, while still providing normal bank
angle maneuvering capability, but do not allow for a 15° overshoot margin in all cases.
Use the longest available runway, and consider wind and slope effects. Where possible avoid landing in
tailwinds, on runways with negative slope, or on runways with less than normal braking conditions. Do not
carry excess airspeed on final. This is especially important when landing during an engine inoperative or
other non-normal condition. At weights above the maximum landing weight, the final approach maximum
wind correction may be limited by the flap placards and load relief system.
Fly a normal profile. Ensure that a higher than normal rate of descent does not develop. Do not hold the
airplane off waiting for a smooth landing. Fly the airplane onto the runway at the normal touchdown point. If
a long landing is likely to occur, go-around. After touchdown, immediately apply maximum reverse thrust
using all of the available runway for stopping to minimize brake temperatures. Do not attempt to make an
early runway turnoff.
Autobrake stopping distance guidance is contained in the Performance Inflight section of the QRH. If
adequate stopping distance is available based upon approach speed, runway conditions, and runway length,
the recommended autobrake setting should be used.
© 2012 Captain Sim www.captainsim.com
‘737 Captain’ FLIGHT MANUAL Part IV – Flight Crew Training Manual
DO NOT USE FOR FLIGHT
79
MANEUVERS
PREFACE
This chapter provides a quick reference summary of operating procedures and training maneuvers. The
discussion portion of each illustration highlights important information. The flight profile illustrations
represent the Boeing recommended basic configuration during the accomplishment of the flight maneuvers,
and provides a basis for standardization and crew coordination.
The procedures recommended are based on minimizing crew workload, crew coordination and operational
safety and provide a basis for standardization.
ACCELERATION TO AND DECELERATION FROM VMO
Acceleration to and deceleration from VMO demonstrates performance capabilities and response to speed,
thrust, and configuration changes throughout the medium altitude speed range of the airplane. This
maneuver is performed in the full flight simulator and is for demonstration purposes only. It is normally
performed at 10,000 to 15,000 feet, simulating slowdown to 250 knots due to speed restrictions.
VMO is a structural limitation and is the maximum operating indicated airspeed. It is a constant airspeed
from sea level to the altitude where VMO and MMO coincide. MMO is the structural limitation above this
altitude. Sufficient thrust is available to exceed VMO in level flight at lower altitudes. Failure to reduce to
cruise thrust in level flight can result in excessive airspeed.
Begin the maneuver at existing cruise speed with the autothrottle connected and the autopilot disconnected.
Set command speed to VMO. As speed increases observe:
•
nose down trim required to keep airplane in trim and maintain level flight
•
handling qualities during acceleration
•
autothrottle protection at VMO.
At a stabilized speed just below VMO execute turns at high speed while maintaining altitude. Next, accelerate
above VMO by disconnecting the autothrottle and increasing thrust.
When the overspeed warning occurs reduce thrust levers to idle, set command speed to 250 knots, and
decelerate to command speed. Since the airplane is aerodynamically clean, any residual thrust results in a
longer deceleration time. As airspeed decreases observe that nose up trim is required to keep airplane in
trim and maintain level flight. During deceleration note the distance traveled from the time the overspeed
warning stops until reaching 250 knots.
Once stabilized at 250 knots, set command speed to flaps up maneuvering speed and decelerate to
command speed, again noting the distance traveled during deceleration. Observe the handling qualities of
the airplane during deceleration.
This maneuver may be repeated using speedbrakes to compare deceleration times and distances.
© 2012 Captain Sim www.captainsim.com
‘737 Captain’ FLIGHT MANUAL Part IV – Flight Crew Training Manual
DO NOT USE FOR FLIGHT
80
ENGINE OUT FAMILIARIZATION
The exercises shown in the following table are performed to develop proficiency in handling the airplane with
an engine inoperative and gain familiarization with rudder control requirements.
Condition One
Condition Two
Airspeed
flaps up maneuvering speed
V2
Landing Gear
Up
Down
Flaps
Up
15
Thrust
As Required
MCT
When In Trim
- Retard one thrust lever to idle
Controls - Apply to maintain heading, wings level
Rudder - Apply to center control wheel
Airspeed - Maintain with thrust (Condition One) Pitch (Condition
Two)
Trim - As required to relieve control forces
Engine out controllability is excellent during takeoff roll and after lift-off. Minimum control speeds in the air
(VMCAs) are below VR and VREF.
RUDDER AND LATERAL CONTROL
This familiarization is performed to develop proficiency in handling the airplane with an engine inoperative. It
also helps to gain insight into rudder control requirements.
Under instrument conditions the instrument scan is centered around the attitude indicator. Roll is usually the
first indication of an asymmetric condition. Roll control (ailerons) should be used to hold the wings level or
maintain the desired bank angle. Stop the yaw by smoothly applying rudder at the same rate that thrust
changes. When the rudder input is correct, very little control wheel displacement is necessary. Refine the
rudder input as required and trim the rudder so the control wheel remains approximately level.
When the rudder is trimmed to level the control wheel, the airplane maintains heading. A small amount of
bank toward the operating engine may be noticeable on the bank indicator. The slip/skid indicator is
displaced slightly toward the operating engine.
If the airplane is trimmed with too much control wheel displacement, full lateral control is not available and
spoilers on one wing may be raised, increasing drag.
Make turns at a constant airspeed and hold the rudder displacement constant. Do not attempt to coordinate
rudder and lateral control in turns. Rudder pedal inputs produce roll due to yaw and induce the pilot to
counter rudder oscillations with opposite control wheel.
The following figure shows correct and incorrect use of the rudder.
If an engine failure occurs with the autopilot engaged, manually position the rudder to approximately center
the control wheel and add thrust. Trim the rudder to relieve rudder pedal pressure.
© 2012 Captain Sim www.captainsim.com
‘737 Captain’ FLIGHT MANUAL Part IV – Flight Crew Training Manual
DO NOT USE FOR FLIGHT
81
THRUST AND AIRSPEED
If not thrust limited, apply additional thrust, if required, to control the airspeed. The total two engine fuel
flow existing at the time of engine failure may be used initially to establish a thrust setting at low altitude. If
performance limited (high altitude), adjust airplane attitude to maintain airspeed while setting maximum
continuous thrust.
HIGH ALTITUDE MANEUVERING, "G" BUFFET
Airplane buffet reached as a result of aircraft maneuvering is commonly referred to as "g" buffet. During
turbulent flight conditions, it is possible to experience high altitude "g" buffet at speeds less than MMO. In
training, buffet is induced to demonstrate the airplane's response to control inputs during flight in buffet.
Establish an airspeed of 0.80M. Induce "g" buffet by smoothly increasing the bank angle until the buffet is
noticeable. Increase the rate of descent while increasing the bank angle to maintain airspeed. Do not exceed
45° of bank. If buffet does not occur by 45° of bank, increase control column back pressure until buffet
occurs. When buffet is felt, relax back pressure and smoothly roll out to straight and level. Notice that the
controls are fully effective at all times.
© 2012 Captain Sim www.captainsim.com
‘737 Captain’ FLIGHT MANUAL Part IV – Flight Crew Training Manual
DO NOT USE FOR FLIGHT
82
RAPID DESCENT
This maneuver is designed to bring the airplane down smoothly to a safe altitude, in the minimum time, with
the least possible passenger discomfort.
Note: Use of the autopilot in CWS pitch mode is recommended on airplanes equipped with the (SP-77)
autopilot.
If the descent is performed because of a rapid loss of cabin pressure, crewmembers should place oxygen
masks on and establish communication at the first indication of a loss of cabin pressurization. Verify cabin
pressure is uncontrollable, and if so begin descent. If structural damage exists or is suspected, limit airspeed
to current IAS or less. Avoid high maneuvering loads.
Perform the procedure deliberately and methodically. Do not be distracted from flying the airplane. If icing
conditions are entered, use engine anti-ice and thrust as required.
Note: Rapid descent is made with the landing gear up.
The PM checks the lowest safe altitude, notifies ATC, and obtains an altimeter setting (QNH). Both pilots
should verify that all recall items have been accomplished and call out any items not completed. The PM calls
out 2,000 feet and 1,000 feet above the level off altitude.
Level off at the lowest safe altitude or 14,000 feet (10,000 feet for airplanes with chemical oxygen
generators installed), whichever is higher. Lowest safe altitude is the Minimum Enroute Altitude (MEA),
Minimum Off Route Altitude (MORA), or any other altitude based on terrain clearance, navigation aid
reception, or other appropriate criteria.
If severe turbulent air is encountered or expected, reduce to turbulent air penetration speed.
© 2012 Captain Sim www.captainsim.com
‘737 Captain’ FLIGHT MANUAL Part IV – Flight Crew Training Manual
DO NOT USE FOR FLIGHT
83
MANUAL ENTRY AND LEVEL OFF
The entry may be accomplished on heading or a turn may be made to clear the airway or controlled track.
However, since extending the speedbrakes initially reduces the maneuver margin, it is recommended that
turns not be initiated until the airplane is established in the descent.
To manually fly the maneuver, disconnect the autothrottles and retard thrust levers to idle. Smoothly extend
the speedbrakes, disconnect the autopilot and smoothly lower the nose to initial descent attitude
(approximately 10 degrees nose down).
About 10 knots before reaching target speed, slowly raise the pitch attitude to maintain target speed. Keep
the airplane in trim at all times. If MMO/VMO is inadvertently exceeded, change pitch smoothly to decrease
speed.
Approaching level off altitude, smoothly adjust pitch attitude to reduce rate of descent. The speedbrake lever
should be returned to the down detent when approaching the desired level off altitude. After reaching level
flight add thrust to maintain long range cruise or 300 knots.
AFTER LEVEL OFF
Recheck the pressurization system and evaluate the situation. Do not remove the crew oxygen masks if
cabin altitude remains above 10,000 feet. Determine the new course of action based on weather, oxygen,
fuel remaining, medical condition of crew and passengers, and available airports. Obtain a new ATC
clearance
.
STALL RECOVERY
The objective of the approach to stall recovery maneuver is to familiarize the pilot with the stall warning and
correct recovery techniques. Recovery from a fully developed stall is discussed later in this section.
© 2012 Captain Sim www.captainsim.com
‘737 Captain’ FLIGHT MANUAL Part IV – Flight Crew Training Manual
DO NOT USE FOR FLIGHT
84
APPROACH TO STALL RECOVERY
The following discussion and maneuvers are for an approach to a stall as opposed to a fully developed stall.
An approach to a stall is a controlled flight maneuver; a stall is an out-of-control, but recoverable, condition.
COMMAND SPEED
As the airplane is decelerated to the desired initial condition for the approach to stall, set command speed to
the maneuver speed for each selected flap setting. For the approach to stall in the landing configuration, set
command speed to VREF 30 + 5 knots.
INITIAL BUFFET-STALL WARNING-STALL BUFFET
Approach to stalls are entered with thrust set appropriate for an airspeed decrease of 1 knot per second.
During the initial stages of a stall, local airflow separation results in initial buffet giving natural warning of an
approach to stall. A stall warning is considered to be any warning readily identifiable by the pilot, either
artificial (stick shaker) or initial buffet. Recovery from an approach to stall is initiated at the earliest
recognizable stall warning, initial buffet or stick shaker.
LATERAL AND DIRECTIONAL CONTROL
Lateral control is maintained with ailerons. Rudder control should not be used because it causes yaw and the
resultant roll is undesirable.
© 2012 Captain Sim www.captainsim.com
‘737 Captain’ FLIGHT MANUAL Part IV – Flight Crew Training Manual
DO NOT USE FOR FLIGHT
85
EFFECT OF FLAPS
Flaps are used to increase low speed performance capability. The leading edge devices ensure that the
inboard wing stalls prior to the outboard wing. This causes the nose of the airplane to pitch down at the
onset of the stall.
EFFECT OF SPEEDBRAKES
For any airspeed, the angle of attack is higher with speedbrakes up. This increases initial buffet speed and
stick shaker speed but has a lesser effect on actual stall speed.
ENTRY
To save time, thrust levers may be closed to allow a more rapid deceleration. Target thrust for the
configuration should be set approaching selected speed.
Some thrust is used during entry to provide positive engine acceleration for the recovery. The airplane is
maintained in trim while decelerating. Level flight or a slight rate of climb is desired.
LANDING GEAR
If the entry has been made with the landing gear extended, do not retract it until after the recovery.
FLAPS
Do not retract flaps during the recovery. Retracting the flaps from the landing position, especially when near
the ground, causes an altitude loss during the recovery.
RECOVERY
Recover from approach to a stall with one of the following recommended recovery techniques.
GROUND CONTACT NOT A FACTOR
At the first indication of stall (buffet or stick shaker) smoothly apply maximum thrust, smoothly decrease the
pitch attitude to approximately 5 degrees above the horizon and level the wings. As the engines accelerate,
counteract the nose up pitch tendency with positive forward control column pressure and nose down trim.
(At altitudes above 20,000 feet, pitch attitudes of less than 5 degrees may be necessary to achieve
acceptable acceleration.)
Accelerate to maneuvering speed and stop the rate of descent. Correct back to the target altitude.
GROUND CONTACT A FACTOR
At the first indication of stall (buffet or stick-shaker) smoothly advance the thrust levers to maximum thrust
and adjust the pitch attitude as necessary to avoid the ground. Simultaneously level the wings. Control pitch
as smoothly as possible. As the engines accelerate the airplane nose pitches up. To assist in pitch control,
add more nose down trim as the thrust increases. Avoid abrupt control inputs that may induce a secondary
stall. Use intermittent stick shaker as the upper limit for pitch attitude for recovery when ground is a factor.
When ground contact is no longer a factor, continue to adjust pitch as required to maintain level flight or a
slight climb while accelerating to maneuvering speed for the existing flap position.
AUTOPILOT ENGAGED
If an approach to a stall is encountered with the autopilot engaged, apply limit thrust and allow the airplane
to return to the normal speed. At high altitude, it may be necessary to initiate a descent to regain
maneuvering speed. If autopilot response is not acceptable, it should be disengaged.
© 2012 Captain Sim www.captainsim.com
‘737 Captain’ FLIGHT MANUAL Part IV – Flight Crew Training Manual
DO NOT USE FOR FLIGHT
86
RECOVERY FROM A FULLY DEVELOPED STALL
An airplane may be stalled in any attitude (nose high, nose low, high angle of bank) or any airspeed
(turning, accelerated stall). It is not always intuitively obvious that the airplane is stalled.
An airplane stall is characterized by any one (or a combination) of the following conditions:
•
buffeting, which could be heavy
•
lack of pitch authority
•
lack of roll control
•
inability to arrest descent rate.
These conditions are usually accompanied by a continuous stall warning. A stall must not be confused with
the stall warning that alerts the pilot to an approaching stall. Recovery from an approach to a stall is not the
same as recovery from an actual stall. An approach to a stall is a controlled flight maneuver; a stall is an
out-of-control, but recoverable, condition.
Note: Anytime the airplane enters a fully developed stall, the autopilot and autothrottle should be
disconnected.
To recover from a stall, angle of attack must be reduced below the stalling angle. Nose down pitch control
must be applied and maintained until the wings are unstalled. Application of forward control column (as
much as full forward may be required) and the use of some nose-down stabilizer trim should provide
sufficient elevator control to produce a nose-down pitch rate. It may be difficult to know how much stabilizer
trim to use, and care must be taken to avoid using too much trim. Pilots should not fly the airplane using
stabilizer trim, and should stop trimming nose down when they feel the g force on the airplane lessen or the
required elevator force lessen.
Under certain conditions, on airplanes with underwing-mounted engines, it may be necessary to reduce
thrust in order to prevent the angle of attack from continuing to increase. Once the wing is unstalled, upset
recovery actions may be taken and thrust reapplied as necessary.
If normal pitch control inputs do not stop an increasing pitch rate in a nose high situation, rolling the
airplane to a bank angle that starts the nose down may be effective. Bank angles of about 45°, up to a
maximum of 60°, could be needed. Normal roll controls - up to full deflection of ailerons and spoilers - may
be used. Unloading the wing by maintaining continuous nose-down elevator pressure keeps the wing angle
of attack as low as possible, making the normal roll controls as effective as possible.
Finally, if normal pitch control then roll control is ineffective, careful rudder input in the direction of the
desired roll may be required to initiate a rolling maneuver recovery.
WARNING: Only a small amount of rudder is needed. Too much rudder applied too quickly or held too long
may result in loss of lateral and directional control.
STEEP TURNS
The objective of the steep turn maneuver is to familiarize the pilot with airplane handling characteristics and
improve the instrument cross check.
During training, 45° of bank is used. It is not intended that the pilot should bank greater than 25° to 30° for
normal, or non-normal procedures. If so equipped, the GPWS gives momentary bank angle alerts when
exceeding bank angles of 40°.
Note: Stabilizer trim is not recommended during the steep turn maneuver because of increased workload
during roll out.
© 2012 Captain Sim www.captainsim.com
‘737 Captain’ FLIGHT MANUAL Part IV – Flight Crew Training Manual
DO NOT USE FOR FLIGHT
87
ENTRY
Stabilize airspeed at 250 knots on heading and altitude. Use a normal turn entry. An increase in pitch is
required as the bank angle is increased to maintain constant altitude. An increase in thrust is required to
maintain constant airspeed.
DURING TURN
Pitch and thrust control are the same as for a normal turn; however, larger pitch adjustments are required
for a given altitude deviation. Trimming during the maneuver is not recommended. Varying the angle of
bank while turning makes pitch control more difficult. If altitude loss becomes excessive, reduce the angle of
bank as necessary to regain positive pitch control.
Smooth and positive control is required. A rapid instrument scan is required to detect deviations early
enough to be corrected by small adjustments.
ATTITUDE DIRECTOR INDICATOR (ADI)
The ADI has cyclical precession in pitch during steep turns. Although the actual airplane pitch attitude
remains constant in a perfect steep turn, the instrument indication of pitch attitude slowly varies throughout
the turn. Do not rely upon it for pitch attitude other than for small corrections based on short period
observations.
VERTICAL SPEED INDICATOR
The vertical speed indicator interprets a change of acceleration as a change to vertical speed. Rapid increase
in "g" forces as a steep turn is entered causes a transient display of approximately 200 FPM climb, even
though the airplane is maintaining altitude perfectly. A 200 FPM descent appears because of the reduction in
"g" force during a fast rollout. The VSI gives correct indications only during periods of steady "g" force.
ALTIMETER
Crosscheck the direction and rate of change, and make smooth minor adjustments to the pitch attitude for
corrections.
AIRSPEED
Airspeed changes very slowly because of small changes in thrust and drag. Anticipate thrust changes and
apply them at the first indication of change on the airspeed indicator. An increase in thrust is required as
bank angle increases.
Note: If the airspeed cursor is set to 250 knots on the airspeed indicator, the airspeed fast/slow indicator (as
installed) on the ADI indicates thrust change required.
ROLLOUT
Roll out at the same rate as used with normal turns. Normally rollout should begin 15° to 20° prior to the
desired heading. An decrease in pitch is required as the bank angle is decreased to maintain constant
altitude. An decrease in thrust is required to maintain constant airspeed.
© 2012 Captain Sim www.captainsim.com
‘737 Captain’ FLIGHT MANUAL Part IV – Flight Crew Training Manual
DO NOT USE FOR FLIGHT
88
TERRAIN AVOIDANCE
The Ground Proximity Warning System (GPWS) PULL UP Warning occurs for an unsafe closure rate with the
terrain. Immediately accomplish the Terrain Avoidance maneuver found in the non-normal maneuvers
section in the QRH.
Do not attempt to engage the autopilot and/or autothrottle until terrain clearance is assured.
UPSET RECOVERY
An upset can generally be defined as unintentionally exceeding the following conditions:
•
pitch attitude greater than 25 degrees nose up, or
•
pitch attitude greater than 10 degrees nose down, or
•
bank angle greater than 45 degrees, or
•
within above parameters but flying at airspeeds inappropriate for the conditions.
GENERAL
Though flight crews in line operation rarely, if ever, encounter an upset situation, understanding how to
apply aerodynamic fundamentals in such a situation helps them control the airplane. Several techniques are
available for recovering from an upset. In most situations, if a technique is effective, it is not recommended
that pilots use additional techniques. Several of these techniques are discussed in the example scenarios
below:
•
stall recovery
•
nose high, wings level
•
nose low, wings level
•
high bank angles
•
nose high, high bank angles
•
nose low, high bank angles
STALL RECOVERY
In all upset situations, it is necessary to recover from a stall before applying any other recovery actions. A
stall may exist at any attitude and may be recognized by continuous stick shaker activation accompanied by
one or more of the following:
•
buffeting which could be heavy at times
•
lack of pitch authority and/or roll control
•
inability to arrest descent rate.
If the airplane is stalled, recovery from the stall must be accomplished first by applying and maintaining
nose down elevator until stall recovery is complete and stick shaker activation ceases. Under certain
conditions, it may be necessary to reduce some thrust in order to prevent the angle of attack from
continuing to increase. Once stall recovery is complete, upset recovery actions may be taken and thrust
reapplied as needed.
NOSE HIGH, WINGS LEVEL
In a situation where the airplane pitch attitude is unintentionally more than 25 degrees nose high and
increasing, the airspeed is decreasing rapidly. As airspeed decreases, the pilot's ability to maneuver the
airplane also decreases. If the stabilizer trim setting is nose up, as for slow-speed flight, it partially reduces
the nose-down authority of the elevator. Further complicating this situation, as the airspeed decreases, the
pilot could intuitively make a large thrust increase. This causes an additional pitch up. At full thrust settings
and very low airspeeds, the elevator, working in opposition to the stabilizer, has limited control to reduce the
pitch attitude.
In this situation the pilot should trade altitude for airspeed, and maneuver the airplane's flight path back
toward the horizon. This is accomplished by the input of up to full nose-down elevator and the use of some
nose-down stabilizer trim. These actions should provide sufficient elevator control power to produce a nosedown pitch rate. It may be difficult to know how much stabilizer trim to use, and care must be taken to avoid
using too much trim. Pilots should not fly the airplane using stabilizer trim, and should stop trimming nose
© 2012 Captain Sim www.captainsim.com
‘737 Captain’ FLIGHT MANUAL Part IV – Flight Crew Training Manual
DO NOT USE FOR FLIGHT
89
down when they feel the g force on the airplane lessen or the required elevator force lessen. This use of
stabilizer trim may correct an out-of-trim airplane and solve a less-critical problem before the pilot must
apply further recovery measures. Because a large nose-down pitch rate results in a condition of less than 1
g, at this point the pitch rate should be controlled by modifying control inputs to maintain between 0 to 1 g.
If altitude permits, flight tests have determined that an effective way to achieve a nose-down pitch rate is to
reduce some thrust.
If normal pitch control inputs do not stop an increasing pitch rate, rolling the airplane to a bank angle that
starts the nose down should work. Bank angles of about 45 degrees, up to a maximum of 60 degrees, could
be needed. Unloading the wing by maintaining continuous nose-down elevator pressure keeps the wing
angle of attack as low as possible, making the normal roll controls as effective as possible. With airspeed as
low as stick shaker onset, normal roll controls - up to full deflection of ailerons and spoilers - may be used.
The rolling maneuver changes the pitch rate into a turning maneuver, allowing the pitch to decrease. Finally,
if normal pitch control then roll control is ineffective, careful rudder input in the direction of the desired roll
may be required to induce a rolling maneuver for recovery.
Only a small amount of rudder is needed. Too much rudder applied too quickly or held too long may result in
loss of lateral and directional control. Because of the low energy condition, pilots should exercise caution
when applying rudder.
The reduced pitch attitude allows airspeed to increase, thereby improving elevator and aileron control
effectiveness. After the pitch attitude and airspeed return to a desired range the pilot can reduce angle of
bank with normal lateral flight controls and return the airplane to normal flight.
NOSE LOW, WINGS LEVEL
In a situation where the airplane pitch attitude is unintentionally more than 10 degrees nose low and going
lower, the airspeed is increasing rapidly. A pilot would likely reduce thrust and extend the speedbrakes.
Thrust reduction causes an additional nose-down pitching moment. Speedbrake extension causes a nose-up
pitching moment, an increase in drag, and a decrease in lift for the same angle of attack. At airspeeds well
above VMO/MMO, the ability to command a nose-up pitch rate with elevator may be reduced because of the
extreme aerodynamic loads on the elevator.
Again, it is necessary to maneuver the airplane's flight path back toward the horizon. At moderate pitch
attitudes, applying nose-up elevator, reducing thrust, and extending speedbrakes, if necessary, changes the
pitch attitude to a desired range. At extremely low pitch attitudes and high airspeeds (well above
VMO/MMO), nose-up elevator and nose-up trim may be required to establish a nose-up pitch rate.
HIGH BANK ANGLES
A high bank angle is one beyond that necessary for normal flight. Though the bank angle for an upset has
been defined as unintentionally more than 45 degrees, it is possible to experience bank angles greater than
90 degrees.
Any time the airplane is not in "zero-angle-of-bank" flight, lift created by the wings is not being fully applied
against gravity, and more than 1 g is required for level flight. At bank angles greater than 67 degrees, level
flight cannot be maintained within flight manual limits for a 2.5 g load factor. In high bank angle increasing
airspeed situations, the primary objective is to maneuver the lift of the airplane to directly oppose the force
of gravity by rolling (in the shortest direction) to wings level. Applying nose-up elevator at bank angles
above 60 degrees causes no appreciable change in pitch attitude and may exceed normal structure load
limits as well as the wing angle of attack for stall. The closer the lift vector is to vertical (wings level), the
more effective the applied g is in recovering the airplane.
A smooth application of up to full lateral control should provide enough roll control power to establish a very
positive recovery roll rate. If full roll control application is not satisfactory, it may even be necessary to apply
some rudder in the direction of the desired roll.
Only a small amount of rudder is needed. Too much rudder applied too quickly or held too long may result in
loss of lateral and directional control or structural failure.
NOSE HIGH, HIGH BANK ANGLES
A nose high, high angle of bank upset requires deliberate flight control inputs. A large bank angle is helpful
in reducing excessively high pitch attitudes. The pilot must apply nose-down elevator and adjust the bank
angle to achieve the desired rate of pitch reduction while considering energy management. Once the pitch
© 2012 Captain Sim www.captainsim.com
‘737 Captain’ FLIGHT MANUAL Part IV – Flight Crew Training Manual
DO NOT USE FOR FLIGHT
90
attitude has been reduced to the desired level, it is necessary only to reduce the bank angle, ensure that
sufficient airspeed has been achieved, and return the airplane to level flight.
NOSE LOW, HIGH BANK ANGLES
The nose low, high angle of bank upset requires prompt action by the pilot as altitude is rapidly being
exchanged for airspeed. Even if the airplane is at a high enough altitude that ground impact is not an
immediate concern, airspeed can rapidly increase beyond airplane design limits. Simultaneous application of
roll and adjustment of thrust may be necessary. It may be necessary to apply nose-down elevator to limit
the amount of lift, which will be acting toward the ground if the bank angle exceeds 90 degrees. This also
reduces wing angle of attack to improve roll capability. Full aileron and spoiler input should be used if
necessary to smoothly establish a recovery roll rate toward the nearest horizon. It is important to not
increase g force or use nose-up elevator or stabilizer until approaching wings level. The pilot should also
extend the speedbrakes as necessary.
UPSET RECOVERY TECHNIQUES
It is possible to consolidate and incorporate recovery techniques into two basic scenarios, nose high and
nose low, and to acknowledge the potential for high bank angles in each scenario described above. Other
crew actions such as recognizing the upset, reducing automation, and completing the recovery are included
in these techniques. The recommended techniques provide a logical progression for recovering an airplane.
If an upset situation is recognized, immediately accomplish the Upset Recovery maneuver found in the nonnormal maneuvers section in the QRH.
WINDSHEAR
GENERAL
Improper or ineffective vertical flight path control has been one of the primary factors in many cases of flight
into terrain. Low altitude windshear encounters are especially significant because windshear can place the
crew in a situation which requires the maximum performance capability of the airplane. Windshear
encounters near the ground are the most threatening because there is very little time or altitude to respond
to and recover from an encounter.
AIRPLANE PERFORMANCE IN WINDSHEAR
Knowledge of how windshear affects airplane performance can be essential to the successful application of
the proper vertical flight path control techniques during a windshear encounter.
The wind component is mostly horizontal at altitudes below 500 feet. Horizontal windshear may improve or
degrade vertical flight path performance. Windshear that improves performance is first indicated in the flight
deck by an increasing airspeed. This type of windshear may be a precursor of a shear that decreases
airspeed and degrades vertical flight path performance.
Airspeed decreases if the tailwind increases, or headwind decreases, faster than the airplane is accelerating.
As the airspeed decreases, the airplane normally tends to pitch down to maintain or regain the in-trim
speed. The magnitude of pitch change is a function of the encountered airspeed change. If the pilot attempts
to regain lost airspeed by lowering the nose, the combination of decreasing airspeed and decreasing pitch
attitude produces a high rate of descent. Unless this is countered by the pilot, a critical flight path control
situation may develop very rapidly. As little as 5 seconds may be available to recognize and react to a
degrading vertical flight path.
In critical low altitude situations, trade airspeed for altitude, if possible. An increase in pitch attitude, even
though the airspeed may be decreasing, increases the lifting force and improves the flight path angle. Proper
pitch control, combined with maximum available thrust, utilizes the total airplane performance capability.
The crew must be aware of the normal values of airspeed, altitude, rate of climb, pitch attitude and control
column forces. Unusual control column force may be required to maintain or increase pitch attitude when
airspeed is below the in-trim speed. If significant changes in airspeed occur and unusual control forces are
required, the crew should be alerted to a possible windshear encounter and be prepared to take action.
© 2012 Captain Sim www.captainsim.com
‘737 Captain’ FLIGHT MANUAL Part IV – Flight Crew Training Manual
DO NOT USE FOR FLIGHT
91
AVOIDANCE, PRECAUTIONS AND RECOVERY
Crew actions are divided into three areas: Avoidance, Precautions and Recovery. For more information on
avoidance and precautions, see the Windshear Supplementary Procedure in Volume 1 of the FCOM. For
specific crew actions for recovery, see the non-normal maneuvers section in the QRH.
© 2012 Captain Sim www.captainsim.com
‘737 Captain’ FLIGHT MANUAL Part IV – Flight Crew Training Manual
DO NOT USE FOR FLIGHT
92
CUSTOMER CARE
FORUM
You are invited to join Captain Sim community forum
DAILY NEWS
For Captain Sim daily news please follow us at Twitter or Facebook.
VIDEO CHANNEL
For Captain Sim videos please watch our YouTube channel.
TECH SUPPORT
The '737 Captain' is one of the most advanced, complete and accurate digital replica of the Boeing 737
aircraft ever available for any game platform.
Our product is not perfect (unfortunately nothing is). But we are working on improvements. If you have
some important issue to report, please check-in to Your Profile then click Product Name > Customer Support
> and use the Trouble Ticket System. We process all tickets and consider the most significant issues for the
next service packs.
SPECIAL THANKS TO
Mark Fletcher
Dirceu Seabra
Paul Sweeney
Brendan Downie
Marko Raicevic
Peter Orosz
Wilfredo Tour
© 2012 Captain Sim www.captainsim.com