1
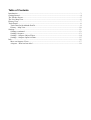
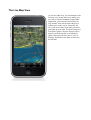
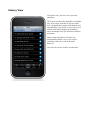
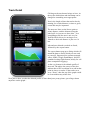
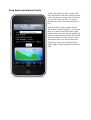
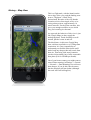
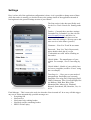
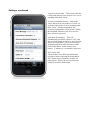
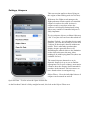
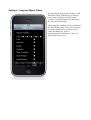
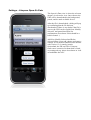
LiveTrack24Lite
User Manual
Version 1.3.5
© freethinker gmbh 2010
Table of Contents
Introduction.......................................................................................................................................... 3
Getting Started......................................................................................................................................4
The Tracker Screen...............................................................................................................................5
The Live Map View.............................................................................................................................. 6
History View.........................................................................................................................................7
Track Detail.......................................................................................................................................... 8
Track Detail with Altitude Profile....................................................................................................9
History – Map View.......................................................................................................................10
Settings............................................................................................................................................... 11
Settings, continued.........................................................................................................................12
Settings, Airspace...........................................................................................................................13
Settings – Airspace Object Filters..................................................................................................14
Settings – Airspace Open Air Data................................................................................................ 15
Info..................................................................................................................................................... 16
More on Airspace Views................................................................................................................17
Airspace – How bad can it be?...................................................................................................... 19
Introduction
Congratulations, you've taken the first step to using LiveTr ack24Lite, which is looking at this
manual.
What exactly is LiveTrack24Lite ?
Simply said, it's an iPhone application which is a tracker client. With this application, your location
is sent to the web site www.livetrack24.com where others can see your position in near time. The
web site itself was created and is being maintained by a greek paragliding pilot, Manolis
Andreadakis. You may notice on the web site a focus on things that fly, although the vehicle types
available are quite a bit more comprehensive. So let's get to it...
Getting Started
As the name implies, this is a tracker client. For full functionality, please visit
http://www.livetrack24.com and sign up for your free account. As you visit the web site, drill into a
track-in-progress to get an idea of what the site can do. Tracks can be viewed in either Google Maps
or Google Earth.
As you will discover later, the tracker used can also be set to “None”. Why this ? Two simple
words... roaming charges. Personally we use the tracker a lot for flying, and sometimes in foreign
countries. As we all know, the 3G data charges outside of your home turf can be quite steep. In
these cases, you may elect to set the tracker to “None” so that no live tracker is used. All of the
track data is stored internally in the application in a sql database, so nothing ever gets lost.
The Tracker Screen
The first view after the app launches is the main tracker screen. Going from top to bottom we have:
1. Compass Indicator – Much like the
Garmin GPSes of old, this will give your
course heading once the tracker is
activated and has a good fix (more on that
in a minute).
2. Speed and altitude – Once tracking, the
speed will first display in meters per
second until 3.6m/s is reached (e.g.
1km/h), then switch to km/h. Altitude
information is derived from the GPS.
3. Location – Displayed are decimal
latitude and longitude, along with course
and distance from start.
4. Accuracy and Coordinate Data – This is
error as reported by the Location services;
you will need to set a threshold in the
Settings for this to be useful. Although all
packets are saved internally, only once the
GPS error is less than the threshold that
you set will packets be sent to the tracker.
In this example, I have the threshold set to
50 meters, and the GPS reports a 17m
horizontal and 23m vertical accuracy. As
17m and 23m are less than 50m, the
display is green, and the data will be sent.
If the accuracy reported is more than the
threshold, the background will be red, and
the packets will not be sent. In practice, a
threshold of 100 meters should suffice for
most people.
5. Tracker Status – This is the switch which controls everything. Turn on to start tracking, turn off
to stop.
On the bottom of the view is the standard toolbar, which switches between the various views.
The Live Map View
As you are under way, you can change to the
live map view at any time to see where you
are. Just as with the standard Google Maps
application, you can pinch and scroll your
way around. Your current track shows as a
yellow trace on the screen. Generally, the
view will not recenter itself until your track
gets right up to an edge. For those interested
in airspace (pilots), airspace objects will be
drawn even if the tracker is switched off
(Show Objects needs to be set to “On” in
Settings, and items in the filter will need to
be selected).
History View
Using this view, you can review your last
adventure.
All of your saved tracks (regardless of whether
they were sent to a tracker or not) are listed
here. Originally they appear with the date and
time that they were saved. As you will see in a
minute, that can be changed to something
more meaningful once you drill down into the
track data.
Delete single and Delete All on the top
navigation bar behave as you you expect,
removing either one or all of the track
histories.
Now let's tap on one of those saved tracks...
Track Detail
Clicking on the track name brings us here. At
the top the default date and timestamp can be
changed to something more appropriate.
Next is the length of time that tracker has be
running; for certain distance (or time to goal)
events this may be important.
The next two lines are the linear (point to
point) distance, and the distance along the
path itself. As you can see here (hint – it's a
paragliding track) the start is not very far
from the finish, but we're moving at over
30km/h so the track distance is just over 16
km.
Min and max altitude recorded are listed,
followed by the export button.
The export button pops up a dialog which will
attach the data to email (which you can send
to yourself). Supported are comma separated
values, KML (Google Earth/Maps), and IGC
(standard soaring flight format, mostly for sail
plane competition logging).
At the very bottom is the altitude profile of
the track. The white dots on top of the plot
indicate that a GPS coordinate was sent at that
point in time to a tracker. If the tracker was
set to “None”, then the top of the graph would
be clean without any white dots.
Now just to show you that the altitude profile is more than just a pretty picture, put a finger down
anywhere on the graph...
Track Detail with Altitude Profile
Touching the altitude profile will show the
time and altitude of the data at that particular
point. Just drag your finger back and forth to
see how this works (So here we caught a
thermal just before 16:00 and climbed out a
bit).
If the solid line becomes dashed and the
information swatch disappears, it means that
there is no data for that point on the graph
(think land-based tracks and driving through
tunnels). Rather than interpolate the data and
make an estimate, we have chosen to show
instead that there is no data for that point.
Tapping the Map View navigation button
(upper right) will then bring us to the actual
track.
History – Map View
This is a flight track, with the launch on the
lower edge of the view, and the landing zone
next to “Weglosen” (Hoch Ybrig,
Switzerland). Because of the way that the
Location services from Apple work, we're
saving a data point at approximately 10
meter intervals. For the pilots out there, this
gives you enough resolution to see which
way you're turning in a thermal.
As expected, the behavior of this view is just
like Google Maps (as they supply the
underlying data). Touch and drag to scroll
around, pinch to zoom in and out.
The disclaimer: As this uses Google Map
data, said data is pulled over a 3G/Edge data
connection. It is your responsibility to
understand your mobile subscription tariff
model, and any charges that may result from
data use. That being said, many countries
(such as Switzerland), have fairly reasonable
data plans ($10 for 250MB per month).
Out of your home country you might want to
turn off data roaming (in Settings -> General
-> Network -> Data Roaming) to avoid extra
data charges. If you do this, then be aware
that the map data will not update (although
the track itself will still appear).
Settings
Here is where all of the application configuration is done. As it is possible to change most of these
while the tracker is running, we decided to move the settings inside of the application instead of
leaving them in the general Settings section of your iPhone.
The first section is the data specifically used
for the Live Track 24 web site. Starting at the
top:
Tracker - Currently there are three settings:
Leonardo Test, Leonardo Live (the web site
www.livetrack24.com), and None. As
mentioned before, all track data saved no
matter what this setting is. We may opt to add
more services in the future (just ask).
Username – Your Live Track 24 user name
Password – Your Live Track 24 password;
please double check this if you get
“Credentials not valid” when switching on
the tracker.
Vehicle Make – The manufacturer of your
vehicle. For example, “Ford” if traveling by
car.
Vehicle Model – Model of your vehicle; here
we have a paraglider (could be “Focus” using
the car example).
Traveling via... - Here you set your mode of
transportation. Possibilities are currently:
Paraglider, Flex wing FAI1, Rigid wing FAI5,
Glider, Paramotor, Trike, Powered Flight, Hot
Air Balloon, Walk, Run, Bike, Hike,
Mountain Bike, Motorcycle, Windsurf,
Kitesurf, Snowboard, Ski, Snowkite, Car, 4 x
4 Car
Final Message – This is sent to the web site when the client is turned off. In no way will this trigger
any sort of action automatically; possible messages are:
• Everything OK
• Need retrieve
• Need some help, nothing broken
• Need help, maybe something broken
• HELP! Serious injury
Settings, continued
Log interval (seconds) – This is how often the
client sends data up to the tracker if it is set to
anything other than “None”.
Accuracy threshold (meters) – Below this
value, data will be sent to the Live Track 24
web site if the tracker is set to anything other
than “None”. On the main display the
accuracy backgrounds will be green if within
the threshold, otherwise red. If set too low,
they will never go green.
Auto shut off (minutes) – This will
automatically switch the client to “Off” after
the specified length of time if no new location
data is received (that is, you're not moving).
In shutting off the tracker, this turns off the
GPS in the iPhone, which in turn saves
battery. 15 minutes is a reasonable value here.
IGC Export Info
The next three rows fill in the data header
section for those exporting the track data in
IGC format (most commonly used by sail
plane pilots). Those who are not pilots can
simply leave these fields blank.
Settings, Airspace
This next section applies to those flying (as
the origins of the tracking web site lies here).
With most free flight record attempts, the
flight path must remain outside of controlled
airspace in order to be valid. As there is
airspace nearly everywhere where the
software is developed (Switzerland), being
able to stay outside of controlled airspace is
fairly important.
To view airspace objects, set Show Objects to
“On”. Everyone else can leave this turned off.
Purchase Unlock – As with other devices and
software, you will only be able to see the first
5 objects in the airspace data file without an
unlock. This is what other products that
display airspace generally do as well.
Purchasing the unlock removes the limitation
on the objects drawn to the map; it has
nothing to do with buying data files (these are
available for free).
The actual airspaces themselves are in
OpenAir format (it is up to you to find the
appropriate file for your country); most major
countries have the airspace listed somewhere
out there in the internet. The best source we
have found to date is soaringweb.org.
Object Filters – Here the individual classes of
airspace can be turned on and off
Open Air Data – Used to select the Open Air data file.
As the Purchase Unlock is fairly straight forward, let's look at the Object Filters next.
Settings – Airspace Object Filters
By choosing the appropriate checkbox, each
individual “class” and category of airspace
can be made visible or not. All of these
(outside of Airstrip/Heliport) are defined in
the Open Air specification.
The settings here influence the Live Map and
the Track History Map views. You may elect
to disable certain pieces of airspace to declutter the Map View. A bit of
experimentation is called here to discover
what works best for you.
Settings – Airspace Open Air Data
The Open Air Data view is where the relevant
airspace is selected to view. Once chosen, the
URL will be downloaded in the background,
parsed, and be made available for use.
After the file is downloaded, a dialog will pop
up confirming that the file has been
downloaded. If there is any doubt if the file is
correct, the URL can be copied from “Modify
Selected” and pasted into Safari for
confirmation (let us know if this should be a
built in feature...)
Add New, Modify Selected and Delete
Selected allow you to add, change and remove
settings. A few default countries come defined
with version 1.3.0, namely Austria,
Switzerland, the UK and USA. If anyone
finds a more extensive list than what is listed
on soaringweb.org, please let us know at “info
at freethinker dot com”.
OLC Upload
From the Track Detail view, if the vehicle type
for the flight was anything that flies
(Paraglider, FAI1, etc), an additional upload
button will appear just to the right of the export
button. Tapping that will bring you to the OLC
Upload view. At the moment this only supports
Leonardo-based OLC cross country sites
(primarily as Xcontest.org does not yet have an
upload API).
Enter your username and password for the
OLC site carefully. Due to security concerns,
we can not check if this is correct or not during
the upload. Please log into the site afterwards
to insure that the upload did in fact happen.
All user info in the view is saved and will
appear on the next visit (on a per site basis).
This means your credentials will be saved for
each of the sites listed in the Picker
individually.
Info
General directions on using the application is here, as well as special thanks and a few disclaimers.
More on Airspace Views
The basic idea is simple – you should be
aware that something is there, with the least
amount of clutter. With that in mind, we is
one simple rule in effect: If there is not
sufficient space to show the airspace detail, it
is not shown. This is directly related to the
size of the airspace object, and the zoom
level.
Here we see a two pieces of airspace at Hoch
Ybrig. On the right there is a “Q” (restricted)
zone (which we know is a military test zone
as we're responsible and checked the original
map, right?), and one on the left which is
unknown. So, zoom in a little bit to get to the
detail...
After zooming the info swatch becomes
visible; shown here is a restricted zone from
ground on up. Which segues into the next
topic – data quality.
Open Air Data Quality
Most, if not all, of the Open Air data files are
generated by volunteers. As such, they may
not be exactly as precise nor up to date as we
would like. This explains why two different
files for the same country may appear quite
different. My own experience shows that one
file may tag all airspace as “CTR”, when on
the official map they are all clearly identified
as individual airspace classes (e.g A through
E). So if you're toggling the different pieces
on and off in the Object Filters and you don't
get the desired result, I can also guarantee that
the source file is to blame.
Note that the OpenAir object classification is
the first thing listed in the info swatch (here
“R” for restricted).
Airspace – How bad can it be?
Let's get oriented first... The flight track from
the two previous screen grabs can be seen in
the lower right corner, along with the two
previous pieces of airspace (look closely).
On a larger scale, Zürich Switzerland is
roughly in the middle of the screen, with the
CTR to Kloten (CTR: Zurich 4C) just above
it. I think anyone reading this should be
slowly understanding why airspace views
might be a good thing.
One popular flying site is at Uetliberg
(located next to Adliswil roughly in the center
of the map). So here we're right on the end of
an approach way to Emmen, under an airway
approach to Kloten (Zürich international),
and right next to either an airstrip or Heliport.
Gets a bit complicated, doesn't it ?